


Gas Slide-in Range
User manual
NX58K9850S* / NX58K9852S*

WARNING: If the information in this manual is not followed exactly, a fire or explosion may result causing property damage, personal injury, or death.
•DO NOT store or use gasoline or other flammable vapors and liquids in the vicinity of this or any other appliance.
•WHAT TO DO IF YOU SMELL GAS:
-DO NOT try to light any appliance.
-DO NOT touch any electrical switch.
-DO NOT use any phone in your building.
-Immediately call your gas supplier from a neighbor’s phone. Follow the gas supplier’s instructions.
-If you cannot reach your gas supplier, call the fire department.
•Installation and service must be performed by a qualified installer, service agency, or the gas supplier.
ANTI-TIP DEVICE

 WARNING
ALL RANGES CAN TIP, RESULTING IN PERSONAL INJURY. TIPPING RANGES CAN CAUSE BURNS FROM SPILLS,
PERSONAL INJURY, AND/OR DEATH.
INSTALL AND CHECK THE ANTI-TIP BRACKET USING THE INSTRUCTIONS AND TEMPLATE SUPPLIED WITH THE BRACKET.
•To prevent accidental tipping of the range, attach an approved anti-tip device to the floor. (See Installing the Anti-Tip Device in the Installation Instructions.) Check for proper installation by carefully tipping the range forward. The anti-tip device should engage and prevent the range from tipping over.
•If the range is pulled out away from the wall for any reason, make sure the anti-tip device is reengaged after the range has been pushed back into place.
•Follow the installation instructions found in the Installation Manual. Failure to follow these instructions can result in death, serious personal injury, and/or property damage.
•To prevent the range from tipping, do not step/sit/lean on the door or drawer.
•If the range is pulled out away from the wall for service or cleaning, make sure the anti-tip device is reengaged after the range has been pushed back into place. See “Installing the Anti-Tip Device” in the installation instructions.
2 English

Regulatory Notice
1. FCC Notice
 CAUTION
FCC CAUTION: Any changes or modifications not expressly approved by the party responsible for compliance could void the user’s authority to operate the equipment.
This device complies with Part 15 of FCC Rules. Operation is Subject to following two conditions:
1)This device may not cause harmful interference, and
2)This device must accept any interference received including interference that cause undesired operation.
For products available in the US/Canadian markets, only channels 1~11 are available. You cannot select any other channels.
FCC STATEMENT:
This equipment has been tested and found to comply within the limits for a Class B digital device, pursuant to part 15 of the FCC Rules. These limits are designed to provide reasonable protection against harmful interference in a residential installation.
This equipment generates, uses, and can radiate radio frequency energy and, if not installed and used in accordance with the instructions, may cause harmful interference to radio
communications. However, there is no guarantee that interference will not occur in a particular installation. If this equipment does cause harmful interference to radio or television reception, which can be determined by turning the equipment off and on, the user is encouraged to try to correct the interference by one or more of the following measures:
•Reorienting or relocating the receiving antenna
•Increasing the separation between the equipment and receiver
•Connecting the equipment to an outlet that is on a different circuit than the radio or TV
•Consulting the dealer or an experienced radio/TV technician for help.
English 3

Regulatory Notice
FCC RADIATION EXPOSURE STATEMENT:
This equipment complies with FCC radiation exposure limits set forth for an uncontrolled environment. This equipment should be installed and operated so there is at least 8 inches (20 cm) between the radiator and your body. This device and its antenna(s) must not be co-located or operated in conjunction with any other antenna or transmitter.
2. IC Notice
The term “IC” before the radio certification number only signifies that Industry Canada technical specifications were met. Operation is subject to the following two conditions: (1) this device may not cause interference, and (2) this device must accept any interference, including interference that may cause undesired operation of the device.
This Class B digital apparatus complies with Canadian ICES-003. For products available in the US/Canadian markets, only channels 1~11 are available. You cannot select any other channels.
IC RADIATION EXPOSURE STATEMENT:
This equipment complies with IC RSS-102 radiation exposure limits set forth for an uncontrolled environment. This equipment should be installed and operated so there is at least 8 inches (20 cm) between the radiator and your body. This device and its antenna(s) must not be co-located or operated in conjunction with any other antenna or transmitter.
4 English

General safety instructions
This unit has been tested and found to comply with the limits for a class B digital device, pursuant to Part 18 of the FCC rules. These
limits are designed to provide reasonable protection against harmful interference in a residential installation. This unit generates, uses and can radiate radio frequency energy and, if not installed and used in accordance with the instructions, may cause harmful interference to radio communications.
However, there is no guarantee that interference will not occur in a particular installation. If this unit does cause harmful interference to radio or television reception, which can be determined by turning the unit off and on, the user is encouraged to try to correct the interference by one or more of the following measures:
•Reorienting or relocating the receiving antennae.
•Increasing the distance between the unit and receiver.
•Connecting the equipment to an outlet that is on a different circuit than the radio or TV.
Key features
Bigger is better
With a capacity of 5.8 cubic feet, this Samsung gas oven range offers more space than many other leading brands in the United States and Canadian markets. The enhanced capacity means a better cooking experience.
A cooktop with 5 burners
Power burners, simmer burners, as well as a center oval burner provide flexible cooktop heat for a variety of cookware. The center oval burner delivers heat evenly over a large area, and provides the optimum temperatures for griddle cooking.
Enhanced convenience with easy maintenance
The Samsung gas oven range combines all the benefits of 3 separate home appliances - a gas range, a gas oven, and a storage drawer - to maximize customer convenience with its careful, stylish design.
English 5

Contents
Contents
Important safety information
Overview
Layout
What’s included
Control panel
Before you start
Display mode
Clock
Kitchen timer
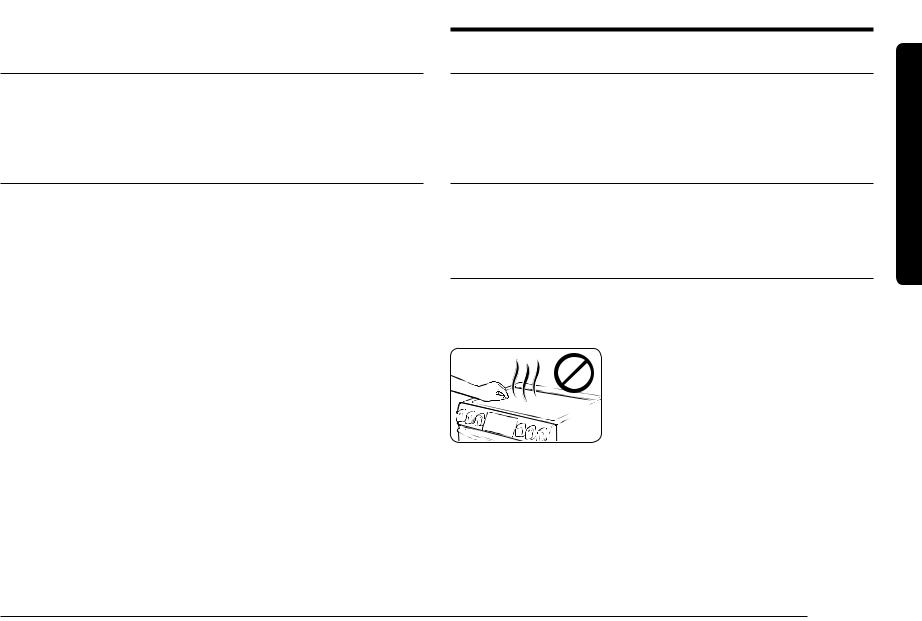
Oven vent/cooling vent
Cooktop
Ignition
Cookware
Wok grate
Griddle
Dual Door™
How to use the upper door
How to use the full door
Gas oven
Single mode
Twin mode
Cooking mode
Broiling
Recipe guide
Temperature setting guides
Using the oven racks
Cooking options
Special features
Changing option settings
6 English
7
14
14
14
15
16
16
16
17
17
17
18
19
19
20
21
21
21
22
22
22
24
26
28
29
30
32
35
38
Non-Cooking functions |
38 |
Smart control |
40 |
Maintenance |
41 |
|
|
Cleaning |
41 |
Replacing the oven light |
47 |
Removing and re-installing the oven door |
48 |
Troubleshooting |
49 |
|
|
Checkpoints |
49 |
Information codes |
55 |
Warranty |
55 |
|
|
Open Source Announcement |
57 |
Important safety information
Read all instructions before using this appliance
•All electrical and gas equipment with moving parts can be dangerous. Please read the important safety instructions for this appliance in this manual. The instructions must be followed to minimize the risk of injury, death, or property damage.
•Save this manual. Please Do Not Discard.
Symbols used in this manual
 WARNING
Hazards or unsafe practices that may result in severe personal injury or death.
 CAUTION
Hazards or unsafe practices that may result in electric shock, personal injury, or property damage.
 NOTE
NOTE
Useful tips and instructions.
These warning icons and symbols are here to prevent injury to you and others. Please follow them explicitly. After reading this section, keep it in a safe place for future reference.
State of California Proposition 65 warning (US only)
WARNING : This product contains chemicals known to the State of California to cause cancer and birth defects or other reproductive harm.
Gas appliances can cause low-level exposure to Proposition 65 listed substances, including but not limited to, benzene, carbon monoxide, formaldehyde and soot, substances resulting from the incomplete combustion of natural gas or LP fuels.
Commonwealth of Massachusetts
•This product must be installed by a licensed plumber or gas fitter qualified or licensed by the State of Massachusetts. When using ball-type gas shut-off valves, you must use the T-handle type. Multiple flexible gas lines must not be connected in series.
General safety
 WARNING
To reduce the risk of fire, electric shock, personal injuries, and/or death, observe the following precautions.
•Do not touch any part of the range, including but not limited to, oven burners, surface burners, or interior surfaces during or immediately after
cooking.
• Know the location of the gas shut-off valve and how to shut it off.
•Make sure the anti-tip device is properly installed on the range. See the installation instructions for more information.
•Do not let children near the range. Do not let children go into the range or onto the range. Do not let children play with the range or any part(s) of the range. Do not leave children unattended in an area where the range is in use. For children’s safety, we recommend utilizing the control/door lockout feature.
•Remove all packaging materials from the range before operating to prevent ignition of these materials. Keep all packaging materials out of children’s reach. Properly dispose the packaging materials after the range is unpacked.
English 7
information safety Important

information safety Important
Important safety information
•Do not store any object of interest to children on the cooktop or backguard of the range. Children climbing on the range to reach items could be killed or seriously injured.
•Do not operate the range if the range or any part of the range is damaged, malfunctioning, or missing parts.
•Do not use the range as a space heater. Use the range for cooking only.
•Do not use oven cleaners or oven liners in or around any part of the oven.
•Use only dry pot holders. Pot holders with moisture in them can release steam and cause burns if they come in contact with hot surfaces. Keep pot holders away from open flames when lifting cookware. Never use a towel or bulky cloth in place of a pot holder.
•Do not use the range to heat unopened food containers.
•Do not strike the oven glass.
•When disposing of the range, cut off the power cord and remove the door to prevent children and animals from getting trapped.
•Unplug or disconnect power before servicing.
•Make sure all meat and poultry is cooked thoroughly. Meat should always be cooked to an internal temperature of 160 °F (71 °C). Poultry should always be cooked to an internal temperature of 180 °F (82 °C).
•Do not make any attempt to operate the electric ignition oven during an electrical power failure.
•Keep the appliance area clear and free of combustible materials, gasoline, and other flammable vapors and liquids.
•Teach children not to touch or play with the controls or any part of the range. We recommend you utilize the control / door lockout feature to reduce the risk of misuse by children.
Fire safety
 WARNING
To reduce the risk of fire, electric shock, personal injuries, and/or death, observe the following precautions.
• Do not store, place, or use flammable or combustible materials such as paper, plastic, pot holders, linens, curtains, gasoline or other flammable vapors or liquids near the range.
• Do not wear loose fitting or hanging garments while using the range.
•To avoid grease buildup, regularly clean the vents.
•Do not let pot holders or other flammable materials touch a heating element. Do not use a towel or other bulky cloths in place of a pot holder.
•Do not use water on a grease fire. To put out a grease fire, turn off the heat source and smother the fire with a tight-fitting lid or use a multipurpose dry chemical or foam-type fire extinguisher.
•If a grease fire should occur in the oven, turn off the oven by pressing the OFF/ CLEAR pad. Keep the oven door closed until the fire goes out. If necessary, use a multipurpose dry chemical or foam-type fire extinguisher.
•Do not heat unopened food containers. The buildup of pressure may cause the containers to burst and result in injury.
•NEVER use this appliance as a space heater to heat or warm the room. Doing so may result in carbon monoxide poisoning and overheating of the oven. Do not use the oven for storage. Paper and other flammable items stored in the oven can ignite.
•Do not leave items such as paper, cooking utensils or food in the oven when not in use. Items stored in an oven can ignite.
•Do not put any combustible material or items around the range.
8 English

Gas safety
 WARNING
To reduce the risk of fire, electric shock, personal injuries, and/or death, observe the following precautions.
If you smell gas:
•Close the valve and do not use the range.
•Do not light a match, candle, or cigarette.
•Do not turn on any gas or electric appliances.
• Do not touch any electrical switches or plug a power cord into an outlet.
• Do not use any phone in your building.
• Evacuate the room, building, or area of all occupants.
• Immediately call your gas supplier from a neighbor’s phone. Follow the gas supplier’s instructions.
•If you cannot reach your gas supplier, call the fire department.
Checking for gas leaks
•Leak testing of the appliance must be conducted according to the manufacturer’s instructions. Do not use a flame to check for gas leaks. Use a brush to spread a soapy water mixture around the area you are checking. If there is a gas leak, you will see small bubbles in the soapy water mixture at the leak point.
Electrical and grounding safety
 WARNING
To reduce the risk of fire, electric shock, personal injuries, and/or death, observe the following precautions.
•Plug the range into a grounded 3-prong outlet.
•Do not remove the ground prong.
•Do not use an adapter or an extension cord.
• Do not use a damaged power plug, power cord, or loose power outlet.
•Do not modify the power plug, power cord, or power outlet in any way.
•Do not put a fuse in a neutral or ground circuit.
•Use a dedicated 120-volt, 60-Hz, 20-amp, AC electrical circuit with a time-delay fuse or circuit breaker for this range. Do not plug more than one appliance into this circuit.
•Do not connect the ground wire to plastic plumbing lines, gas lines, or hot water pipes.
•This range must be Earth grounded. In the event of a malfunction or breakdown, grounding will reduce the risk of electrical shock by providing a path for the electric current. This range is equipped with a cord having a grounding plug. The plug must be firmly plugged into an outlet that is properly installed and grounded in accordance with the local codes and ordinances. If you are unsure
whether your electrical outlet is properly grounded, have it checked by a licensed electrician.
•The range is supplied with a 3-pronged grounded plug. This cord must be plugged into a mating, grounded 3-prong outlet that meets all local codes and ordinances. If codes permit the use of a separate ground wire, we recommend that a qualified electrician determine the proper path for this ground wire.
•Electrical service to the range must conform to local codes. Barring local codes, it should meet the latest ANSI/NFPA No. 70 – Latest Revision (for the U.S.) or the Canadian Electrical Code CSA C22.1 – Latest Revisions.
•It is the personal responsibility of the range owner to provide the correct electrical service for this range.
information safety Important
English 9

information safety Important
Important safety information
Installation safety
 WARNING
To reduce the risk of fire, electric shock, personal injuries, and/or death, observe the following precautions.
• Have your range installed and properly grounded by a qualified installer, in accordance with the installation instructions. Any adjustment and service should be performed only by qualified gas range installers or service technicians.
•Do not attempt to service, modify, or replace your range or any part of your range unless it is specifically recommended in this manual. All other service should be referred to a qualified technician.
•Always use new flexible connectors when installing a gas appliance. Do not use old flexible connectors.
•Make sure the anti-tip device is properly installed on the range. See the installation instructions for more information.
•Due to the size and weight of the range, have two or more people move the range.
•Remove all tape and packaging materials.
•Remove all accessories from the cooktop, oven, and/or lower drawer. Grates and griddles are heavy. Use caution when handling them.
•Make sure no parts came loose during shipping. Do not install in an area exposed to dripping water or outside weather conditions.
•Make sure your range is correctly installed and adjusted by a qualified service technician or installer for the type of gas (natural or LP) you will use. For your range to utilize LP gas, the installer must replace the 5 surface burner orifices and 2 oven orifices with the provided LP orifice set, and reverse the GPR adapter. These adjustments must be made by a qualified service technician in accordance with the manufacturer’s instructions and all codes and requirements of the authority having jurisdiction. The qualified agency performing this work assumes the gas conversion responsibility.
10 English
•Installation of this range must conform with local codes or, in the absence of local codes, with the National Fuel Gas Code, ANSI Z223.1/NFPA.54, latest edition. In Canada, installation must conform with the current Natural Gas Installation Code, CAN/CGA-B149.1, or the current Propane Installation Code, CAN/CGA-B149.2, and with local codes where applicable. This range has been design-certified by ETL according to ANSI Z21.1, latest edition, and Canadian Gas Association according to CAN/CGA-1.1, latest edition.
Location safety
 WARNING
To reduce the risk of fire, electric shock, personal injuries, and/or death, observe the following precautions.
• This range is for indoor, household use only. Do not install the range in areas exposed to the weather and/or water.
• Do not install the range in a place which is exposed to a strong draft.
• Select a level, well-constructed floor that can support the range’s weight. Synthetic flooring, such as linoleum, must withstand 180 °F (82 °C) temperatures without shrinking, warping, or discoloring. Do not install the range directly over interior kitchen carpeting unless a sheet of ¼ inch plywood or a similar insulator is placed between the range and carpeting.
•Select a location where a grounded, 3-prong outlet is easily accessible.
•If the range is located near a window, do not hang long curtains or paper blinds on that window.
•For the range to ventilate properly, make sure the range’s vents are not blocked, and that there is enough clearance at the top, back, sides, and underneath the range. The vents allow the necessary exhaust for the range to operate properly with correct combustion.
•Make sure the wall coverings around the range can withstand heat up to 200 °F (93 °C) generated by the range.
•Cabinet storage above the surface of the range should be avoided. If cabinet storage above the range is necessary, allow a minimum clearance of 40 inches (102 cm) between the cooking surface and the bottom of the cabinets or install a range hood that projects horizontally a minimum of 5 inches (12.7 cm) beyond the bottom of the cabinets.
•Locate the range out of kitchen traffic paths and drafty locations to prevent poor air circulation.
•If the range is located near a window, NEVER hang long curtains or paper blinds on that window. They could blow over the surface burners and ignite, causing a fire hazard.
Cooktop safety
 WARNING
To reduce the risk of fire, electric shock, personal injuries, and/or death, observe the following precautions.
• Make sure all burners are off when you are not using the range.
• Do not use aluminium foil to line the grates or any part of the cooktop. This can cause carbon monoxide poisoning. Aluminum foil linings may also trap heat, causing a fire hazard. Do not leave burners unattended on medium or high heat settings.
•Before igniting the burners, make sure all burner caps are properly in place and all burners are level.
•Always use the LITE position when igniting the burners and make sure the burners have ignited. If ignition fails, turn the knob to OFF and wait until the gas has dissipated.
•When you set a burner to simmer, do not turn the knob quickly. Make sure the flame stays on.
•Do not place any objects other than cookware on the cooktop.
•This cooktop is designed for use with a wok or wok ring attachment.
•To flame food, you must have a ventilation hood. When you flame food, the hood must be on.
•Before removing or changing cookware, turn off the burners.
•Remove food and cookware immediately after cooking.
•Before removing any parts of the burner for cleaning, make sure the range is off and completely cool.
•After cleaning the burner spreader, make sure it is completely dry before reassembling.
•Make sure the spark mark on the dual burner spreader is placed beside the electrode when it is assembled.
•To avoid carbon monoxide poisoning, do not pour water into the cooktop well while cleaning.
•Select cookware that is designed for range top cooking. Use cookware that is large enough to cover the burner grates. Adjust the burner flames so that the flames do not extend beyond the bottom of the cookware.
•To avoid cookware discoloration, deformity, and/or carbon monoxide poisoning, do not use cookware that is substantially larger than the grate.
•Make sure cookware handles are turned to the side or rear of the cooktop, but not over other surface burners.
•Stand away from the range while frying.
•Always heat frying oils slowly, and watch as they heat. If you are frying foods at high heat, carefully watch during the cooking process. If you are going to use a combination of fats or oils when frying, mix them together before heating.
•Use a deep-fryer thermometer whenever possible. This prevents overheating the fryer beyond the smoking point.
•Use a minimum amount of oil when shallow pan-frying or deep-frying. Avoid cooking unthawed food or food with excessive amounts of ice.
information safety Important
English 11
information safety Important
Important safety information
•Before moving cookware full of fats or oils, make sure it has completely cooled.
•To prevent delayed eruptive boiling, always allow heated liquids to stand at least
20seconds after you have turned off the burner so that the temperature in the liquid can stabilize. In the event of scalding, follow these first aid instructions:
1.Immerse the scalded area in cool or lukewarm water for at least 10 minutes.
2.Do not apply any creams, oils, or lotions.
3.Cover with a clean, dry cloth.
• Place pots in the center of the grate. Do not place a pot larger than 9” in diameter on the rear burners. If you place an oversized pot in the wrong position, it might disrupt necessary air circulation and make the flame on the burner sputter and burn inefficiently.
•Do not wear loose or hanging garments when using the range. They could ignite and burn you if they touch a surface burner.
•Never leave plastic items on the cooktop. Hot air from the vent can melt or ignite plastic items or cause a build up of dangerous pressure in closed plastic containers.
•Do not place portable appliances, or any other object other than cookware on the cooktop. Damage or fire could occur if the cooktop is hot.
•Always make sure foods being fried are thawed and dry. Moisture of any kind can cause hot fat to bubble up and over the sides of the pan.
•Always make sure the controls are OFF and the grates are cool before you remove them to prevent any possibility of being burned.
•Do not put any combustible material or items around the range.
•Take care that your hands do not touch the burners when they are on. Turn off the burners when you change a pan or pot.
•To warm liquid such as sauces, stir it while warming.
Oven safety
 WARNING
To reduce the risk of fire, electric shock, personal injuries, and/or death, observe the following precautions.
• Do not use the oven for non-cooking purposes such as drying clothes or storage. Use the oven for cooking only.
• Make sure the inner portion of the split ovenrack is in the proper position within the outer rack.
•Make sure the oven racks are placed on the same level on each side.
•Do not damage, move, or clean the door gasket.
•Do not spray water on the oven glass while the oven is on or just after you have turned it off.
•Do not use aluminium foil or foil liners anywhere in the oven. Do not use aluminium foil or similar material to cover any holes or passages in the oven bottom or to cover an oven rack. This can cause carbon monoxide poisoning. Aluminum foil linings may also trap heat, causing a fire hazard.
•Stand away from the oven when opening the oven door.
•Keep the oven free from grease buildup.
•When repositioning the oven racks, make sure the oven is completely cool.
•Only use cookware that is recommended for use in gas ovens.
•To avoid damaging the burner control knobs, always bake and/or broil with the oven door closed.
•Do not broil meat too close to the burner flame. Trim excess fat from meat before cooking.
•When using cooking or roasting bags in the oven, follow the manufacturer’s directions.
•NEVER cover any slots, holes, or passages in the oven bottom or cover an entire rack with material such as aluminum foil. Doing so blocks air flow through the oven and may cause carbon monoxide poisoning. Aluminum foil linings may also trap heat, causing a fire hazard.
12 English

Storage drawer safety
 WARNING
To reduce the risk of fire, electric shock, personal injuries, and/or death, observe the following precautions.
• Do not use the drawer for non-cooking purposes such as drying clothes or storage. Use the drawer for cooking purposes only.
• Do not touch the interior drawer surface or heating element. These surfaces may be hot and could burn you.
•To avoid steam burns, use caution when opening the drawer.
•Do not use aluminium foil to line the drawer.
•Do not put the drawer in the oven. Do not put the drawer in the oven during a self-cleaning cycle.
•Do not leave containers of fat drippings in or near the drawer.
Self-cleaning oven safety
 WARNING
To reduce the risk of fire, electric shock, personal injuries, and/or death, observe the following precautions.
• The self-cleaning feature operates the oven at temperatures high enough to burn away food soils in the oven. The range is extremely hot during a self-cleaning cycle. Do not touch any surfaces of the range during a self-cleaning cycle.
•Keep children away from the oven during a selfcleaning cycle.
•Before starting a self-cleaning cycle, remove all racks, cookware, and utensils from the oven. Only porcelain-coated oven racks may be left in the oven.
•Before starting a self-cleaning cycle, wipe grease and food soils from the oven.
•Do not put the lower drawer into the oven cavity when you run a self-cleaning cycle.
•When opening the door after a self-cleaning cycle, stand away from the oven.
•If the self-cleaning cycle malfunctions, turn off the oven, disconnect the power supply, and contact a qualified service technician.
information safety Important
English 13
Overview
Overview
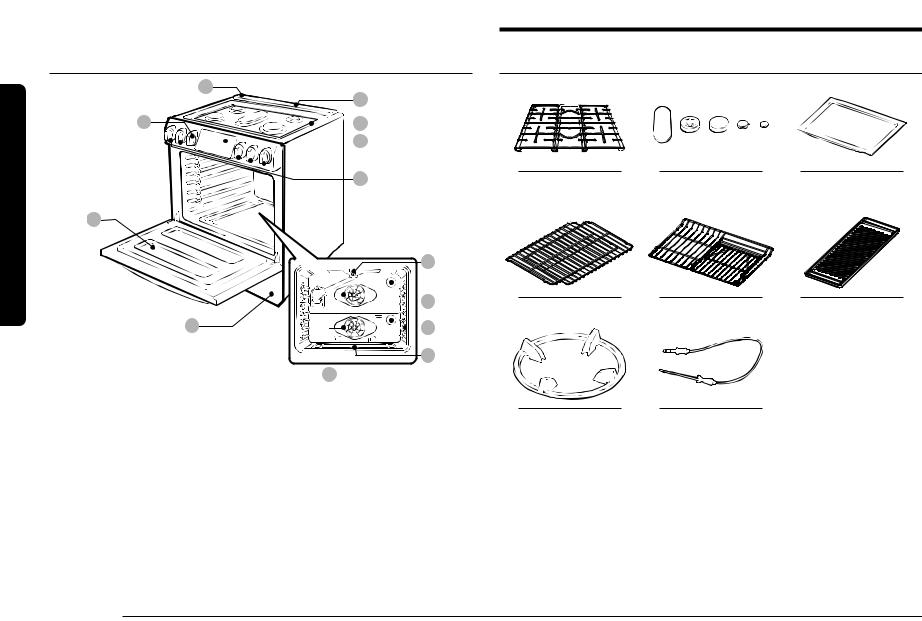
Layout
|
06 |
|
|
|
|
|
|
|
|
|
|
|
|
|
|
|
|
|
|
|
|
|
|
|
|
|
|
|
|
|
|
|
05 |
|
|
|
|
||
|
03 |
|
|
|
|
|
|
|
|
|
|
|
|
|
04 |
|
|
|
|
|
|
|
|
|
|
|
|
|
|
|
|
|
|
|
|
|
|||
|
|
|
|
|
|
|
|
|
|
|
|
|
|
01 |
|
|
|
|
|
|
|
|
|
|
|
|
|
|
|
|
|
|
|
|
|
|
|
||
|
|
|
|
|
|
|
|
|
|
|
|
|
02 |
|
|
|
|
||
|
|
|
|
|
|
|
|
|
|
|
|
|
|
|
|
|
|||
|
07 |
|
|
|
|
|
|
|
|
|
|
|
|
|
|
|
|
|
|
|
|
|
|
|
|
|
|
|
|
|
|
|
|
|
|
09 |
|||
|
08 |
|
|
|
|
|
|
|
|
|
|
|
|
|
|
|
|
10 |
|
|
|
|
|
|
|
|
|
|
|
|
|
|
|
|
|
|
|||
|
|
|
|
|
|
|
|
|
|
|
|
|
|
|
|
|
|||
|
|
|
|
|
|
|
|
|
|
|
|
|
|
|
|
||||
|
|
|
|
|
|
|
|
|
|
|
|
|
|
|
|
|
11 |
||
|
|
|
|
|
|
|
|
|
|
|
|
|
|
|
|
|
|||
|
|
|
|
|
|
|
|
|
|
|
|
|
|
|
|||||
|
|
|
|
|
|
|
|
|
|
|
|
|
|
|
|
12 |
|||
|
|
|
|
|
|
|
|
|
|
|
|
||||||||
|
|
|
13 |
|
|
|
|
|
|
|
|||||||||
|
|
|
|
|
|||||||||||||||
01 |
Touch display |
02 Surface burner |
03 |
Oven lights Knob |
|||||||||||||||
|
|
|
|
knobs (5 pcs) |
|
|
|
(1 pc) |
|||||||||||
04 |
Surface burners |
05 Oven vents |
06 |
Cooling vent |
|||||||||||||||
07 |
Removable dual oven door |
08 Storage drawer |
09 |
Broil oven burner |
|||||||||||||||
10 |
Oven light (2 locations) |
11 Oven rack system |
12 |
Bake oven burner |
|||||||||||||||
13Convection fan /
Upper convection heater
 NOTE
NOTE
If you need a part marked with an asterisk (*), you can buy it from the Samsung Contact Center (1-800-726-7864).
14 English
What’s included
Surface burner |
Surface burners and |
Smart divider (1) * |
grates (3) * |
caps (5) * |
|
Flat rack (2) * |
Split rack (1) * |
Griddle (1) * |
|
|
|
|
|
|
|
|
|
Wok grate (1) * |
Temp probe (1) * |
 NOTE
NOTE
If you need an accessory marked with an asterisk (*), you can buy it from the Samsung Contact Center (1-800-726-7864).
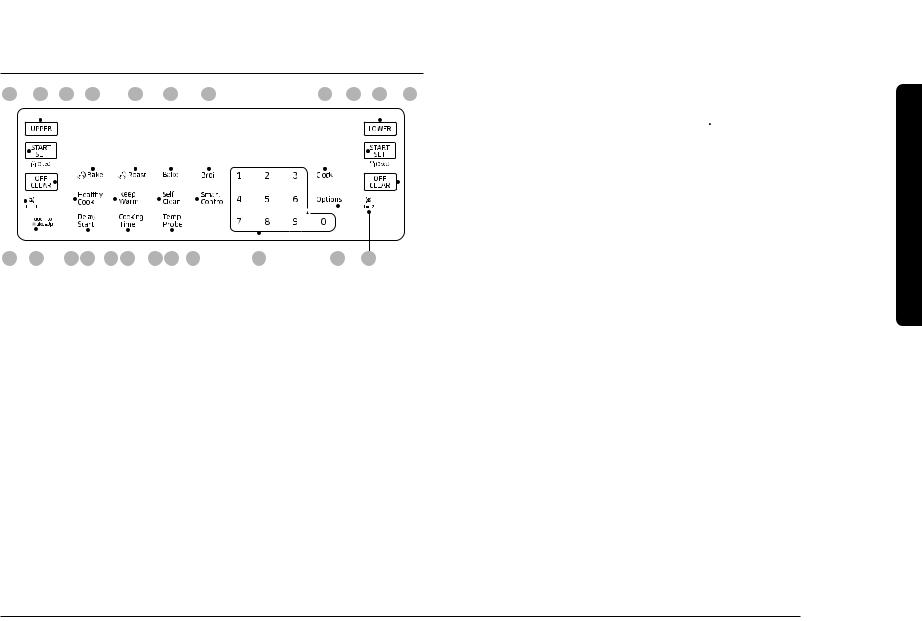
Control panel
01 |
|
02 |
03 |
|
04 |
05 |
06 |
07 |
08 |
|
09 |
10 |
11 |
|||||||||||||||||
|
|
|
|
|
|
|
|
|
|
|
|
|
|
|
|
|
|
|
|
|
|
|
|
|
|
|
|
|
|
|
|
|
|
|
|
|
|
|
|
|
|
|
|
|
|
|
|
|
|
|
|
|
|
|
|
|
|
|
|
|
|
|
|
|
|
|
|
|
|
|
|
|
|
|
|
|
|
|
|
|
|
|
|
|
|
|
|
|
|
|
|
|
|
|
|
|
|
|
|
|
|
|
|
|
|
|
|
|
|
|
|
|
|
|
|
|
|
|
|
|
|
|
|
|
|
|
|
|
|
|
|
|
|
|
|
|
|
|
|
|
|
|
|
|
|
|
|
|
|
|
|
|
|
|
|
|
|
|
|
|
|
|
|
|
|
|
|
|
|
|
|
|
|
|
|
|
|
|
|
|
|
|
|
|
|
|
|
|
|
|
|
|
|
|
|
|
|
|
|
|
|
|
|
|
|
|
|
|
|
|
|
|
|
|
|
|
|
|
|
|
|
|
|
|
|
|
|
|
|
|
|
|
|
|
|
|
|
|
|
|
|
|
|
|
|
|
|
|
|
|
|
|
|
|
|
|
|
|
|
|
|
|
|
|
|
|
|
|
|
|
|
|
|
|
|
|
|
|
|
|
|
|
|
|
|
|
|
|
|
|
|
|
|
|
|
|
|
|
|
|
|
|
|
|
|
|
|
|
|
|
|
|
|
|
|
|
|
|
|
|
|
|
|
|
|
|
|
|
|
|
|
|
|
|
|
|
|
|
|
|
12 |
13 |
14 15 |
16 17 |
18 19 |
20 |
|
21 |
22 |
23 |
01 |
START/SET: Start a function or set |
07 |
Broil: Broil food using the upper |
||||||
|
the time. |
|
|
|
|
|
oven burner only. |
|
|
02 |
UPPER: Select the upper cooking |
|
08 |
Clock: Set the clock time. |
|||||
|
cavity. |
|
|
|
|
09 |
START/SET(Lock): Start a function |
||
03 |
OFF/CLEAR: Cancel the current |
|
|
or set the time. Lock the control |
|||||
|
operation but not the timer. |
|
|
panel and the door to prevent |
|||||
04 |
Convection Bake: Activate |
|
|
accidents. |
|
|
|||
|
convection baking for large |
|
10 |
LOWER: Select the lower cooking |
|||||
|
amounts of food on multiple racks. |
|
cavity. |
|
|
||||
05 |
Convection Roast: Activate |
|
11 |
OFF/CLEAR: Cancel the current |
|||||
|
convection roasting for large cuts |
|
operation but not the timer. |
||||||
|
of meat. |
|
|
|
|
12 |
Timer1: Activate or deactivate the |
||
06 |
Bake: Bake food evenly using the |
|
timer (upper). |
|
|
||||
|
lower oven burner. |
|
|
|
|
|
|
||
13Touch to Wake-Up: Activate the control panel display.
14Healthy Cook: Bring up the Healthy Cook recipes that are specially designed for different food types.
15Delay Start: Set the oven to start at a certain time.
16Keep Warm: Keep cooked food warm at lower temperatures between 150 °F and 200 °F (66 °C and 93 °C).
17Cooking Time: Set the cooking time.
18Self Clean: Burn off food residues in the oven at very high temperatures.
19Temp Probe: Activate the temperature probe mode.
20Smart Control: Activates the Easyconnection.
• : When you use the Easy connection, this icon appears in the display.
• : When the oven is connected to Wifi, this icon appears in the display.
21Numbers: Use to set the time, temperature, or preset.
22Options: Display the 9 user options available.
23Timer2: Activate or deactivate the timer.(Lower)
Overview
English 15

start you Before
Before you start
You should know about the following features and components before you use your range for the first time.
Display mode
Sleep
After 2 minutes of inactivity (or 1 minute when the oven is in standby mode), the control panel enters Sleep mode. In Sleep mode, the control panel is inactive, displaying only the time, until it is reactivated by the user.
Wake-Up
To activate the control panel, press Touch to Wake-Up. User preferences are available in this mode including the timer, oven light, and/or control lock.
 1
1
Clock
You must set the clock correctly to ensure the automatic features work properly. This product supports two time formats: 12-hour (default) and 24-hour.
To set the clock time
|
4 |
Press the Clock pad. |
1 |
1. |
|
2 |
To select AM/PM, press the Clock pad |
|
|
2. |
|
|
|
again. |
3 |
3. |
Enter the current time using the number |
|
pad.
4.Press the START/SET pad to confirm the settings.
To change the time format (12hr/24hr)
1
 NOTE
NOTE
3
2
1
1.Press the Options pad, and then 4 on the number pad.
2.Press 1 for the 12-hour format or 2 for the 24-hour format.
3.Press the START/SET pad.
You can set/change the clock or the kitchen timer before you start a cooking mode or while most cooking modes are operating. However, you cannot set or change the time if a time based function is operating (Time Bake, for example) or the Sabbath option is enabled.
16 English

Kitchen timer
The kitchen timer gives you an extra timer you can use to time cooking tasks such as boiling eggs. It does not, however, start or stop any cooking operation. You can set the timer from 1 minute to 9 hours and 59 minutes.
|
|
1. |
Press the Timer1 or Timer2 pad. |
|
3 |
2. |
Enter a desired time using the number |
|
|
||
|
|
|
pad. |
|
|
3. |
When done, press the START/SET or |
2 |
|
1 |
Timer pad. |
4.To cancel the Timer settings, press the Timer pad again.
5.When the set time elapses, the oven beeps and displays the “End” message. Press the Timer pad to delete the message.
Oven vent/cooling vent
The cooling vents are located at the back
Cooling vent |
of the oven range. Proper air circulation |
|
|
|
prevents combustion problems and ensures |
|
good performance. |
|
• Do not block the vent or its surroundings. |
|
• Use caution when placing items near |
|
the vent. Hot steam can cause them to |
|
overheat or melt. |
Cooktop
STEP 1
Put all ingredients into a cooking container (pan, pot, etc).
STEP 2
Place the container on a surface burner.
STEP 3
Ignite the surface burner.
An LED on the control knob illuminates when you turn the control knob.
Cooktop
English 17

Cooktop
Cooktop
Gas burners
LR RR
C
LF
 RF
RF
Each burner has a corresponding knob that lets you to set the flame level from LO to HI. In addition, each burner knob has a Lite setting. Turning a knob to Lite ignites the corresponding burner. The burner indicators are located above each knob and show which burner the knob controls.
Each burner is designed for specific cooking purposes. See the table below.
Position |
Purpose |
Food type |
Characteristics |
|
|
|
|
Right Front (RF) |
Power heating |
Boiling food |
Maximum output |
22,000 BTU |
|
|
|
|
|
|
|
Right Rear (RR) |
Low simmering |
Chocolate, |
Delicate food that |
5,000 BTU |
|
casseroles, sauces |
requires low heat |
|
|
|
for a long time |
|
|
|
|
Center (C) |
Grilling/Griddling |
Pancakes, |
General-purpose |
9,500 BTU |
|
hamburgers, |
cooking |
|
|
fried eggs, hot |
|
|
|
sandwiches |
|
|
|
|
|
Left Front (LF) |
Quick heating |
General |
General-purpose |
15,000 BTU |
|
|
cooking |
|
|
|
|
Left Rear (LR) |
General heating/ |
General food, |
General-purpose |
9,500 BTU |
Low simmering |
casseroles, tomato |
cooking |
|
|
sauce* |
|
|
|
|
|
* Tomato sauce needs to be stirred while it is simmering.
18 English
Ignition
 CAUTION
The knob LED indicates if a burner knob has been turned on.
It does not indicate if the burner flame is on.
Check for an actual flame, whether the knob LED is on or off.
|
Make sure all surface burners are properly |
|
|
installed. To light a burner: |
|
2 |
1. Push in the control knob, and then turn |
|
it to the Lite position. The knob LED is |
||
|
||
|
on and you will hear a “clicking” sound |
|
1 |
indicating the electronic ignition system |
|
is working properly. |
||
|
2.After the surface burner lights, turn the control knob to shift it out of the Lite position and turn off the electronic ignition system.
3.Turn the control knob to adjust the flame level.
Manual ignition
If there is a power failure, you can ignite the burner manually. Use caution when doing this.
1.Hold a long gas grill lighter to the surface burner you want to light.
2.Push in the control knob for that burner, and then turn it to the Lite position. Turn on the grill lighter to ignite the burner.
3.After the burner is lit, turn the control knob to adjust the flame level.
Flame level
The flames on the burners should always stay under the cookware, and should not extend beyond the cookware bottom at any time.
 WARNING
•Flames larger than the cookware bottom may result in a fire or physical injury.
•When you set a burner to simmer, do not turn the burner knob quickly. Watch the flame to make sure it stays on.

•After turning on a surface burner, make sure that the burner has ignited even if the knob LED is on. Adjust the level of the flame by turning the burner knob.
•Always turn off the surface burner controls before removing cookware. All surface burner controls should be turned OFF when you are not cooking.
•Always turn the burners off before you go to sleep or go out.
•If you smell gas, turn off the gas to the range and call a qualified service technician. NEVER use an open flame to locate a leak.
•If the LED on the control knob doesn't go on when the surface burner has ignited, call a qualified service technician.
•If the knob LED illuminates, but the surface burner does not ignite, turn off the control knob immediately.
Cookware
Requirements
•Flat bottom and straight sides
•Tight-fitting lid
•Well-balanced with the handle weighing less than the main portion of the pot or pan.
Material characteristics
•Aluminum: An excellent heat conductor. Some types of food may cause the aluminum to darken. However, anodized aluminum cookware resists staining and pitting.
•Copper: An excellent heat conductor but discolors easily.
•Stainless steel: A slow heat conductor with uneven cooking performance but is durable, easy to clean, and resists staining.
•Cast-Iron: A poor conductor but retains heat very well.
•Enamelware: Heating characteristics depend on the base material.
•Glass: A slow heat conductor. Use only glass cookware that is specified for range top cooking or oven use.
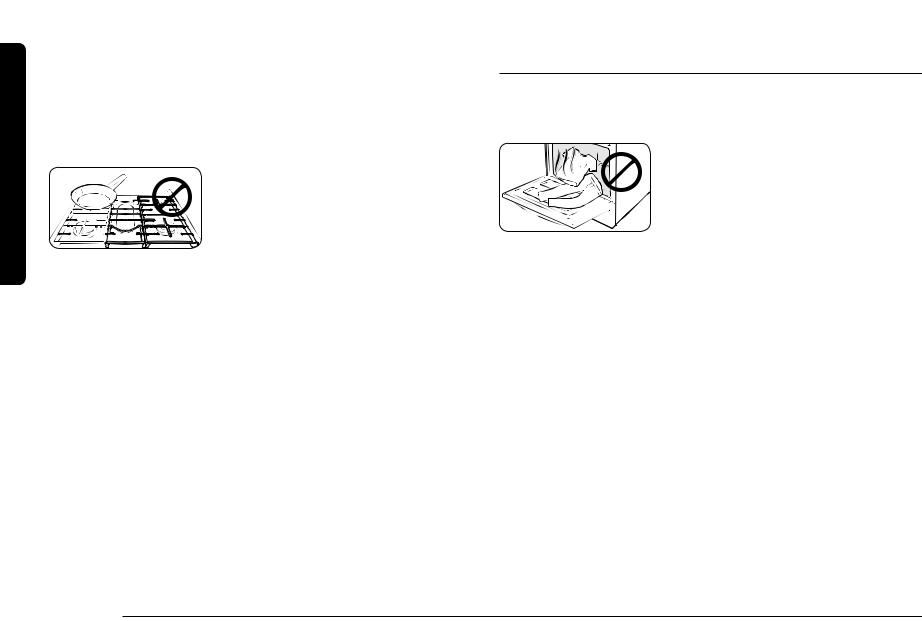
Size limitations
 CAUTION
• Do not place a small pan or pot with a bottom diameter of about 6 inches or less on the center grate. This cookware may tip over. Use the rear burners for this smallsized cookware.
*: 6 inches or less
•Always make sure cookware handles are turned to the side or rear of the cooktop and not over other surface burners. This will minimize the chance of burns, spillovers, and the ignition of flammable materials that can be caused if pots or pans are bumped accidently.
•When using glass cookware, make sure it is designed for range top cooking.
•Never leave plastic items on the cooktop. Hot air from the vent can melt or ignite plastic items or cause a building up of dangerous pressure in closed plastic containers.
•Make sure you hold the handle of a wok or a small one-handled pot while cooking.
Wok grate
Woks are often used for stir frying, pan frying, deep frying, and poaching. The provided wok grate supports 12” to 14” woks.
1. Turn off all burners, and wait until the grates completely cool down.
2. Place the wok grate on either side grate.
3. Put a wok on the wok grate. Make sure
the wok settles on the wok grate.
4. Turn on the burner, and adjust the flame level as appropriate.
Cooktop
English 19
Cooktop
Cooktop
 CAUTION
• Do not remove the wok grate until the cooktop grates, surfaces, and wok grate completely cool down.
• When you use the wok with the cooktop or when the oven is on, the wok grate on the cooktop may become very hot. Use oven gloves when placing or removing the wok grate.
• Do not use pans with a flat bottom or woks with a diameter less than the wok ring diameter. The pan or wok may tip over.
•Do not use an oversized pan. The burner flames may spread out, causing damage nearby.
•Do not use the wok grate and the griddle at the same time.
•This cooktop is not designed to flame foods or cook with a wok or wok ring attachment. If foods are flamed, they should only be flamed under a ventilation hood that is on.
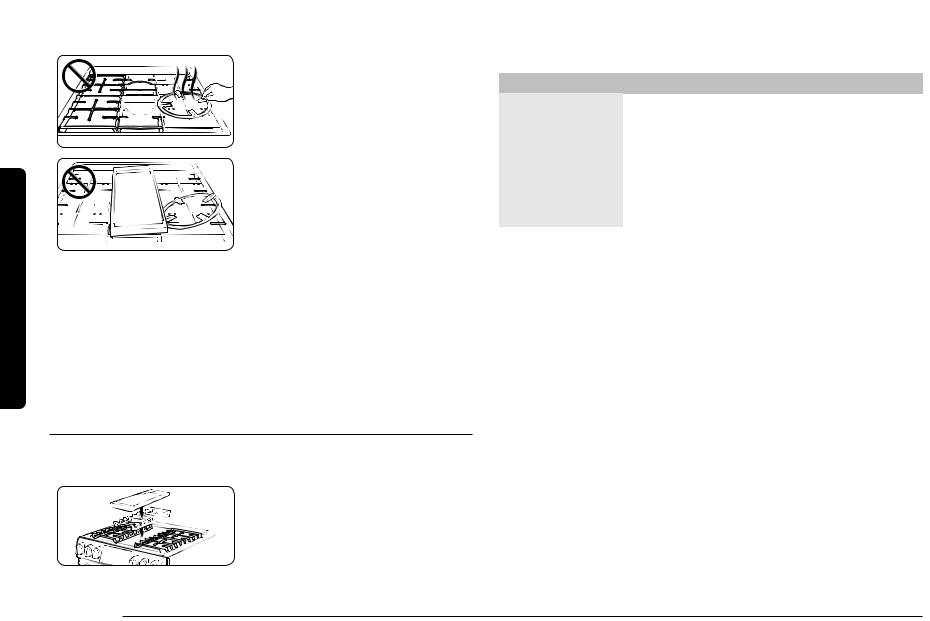
Griddle
The removable coated griddle provides an extra cooking surface. This is useful especially when cooking meat, pancakes, or other foods requiring a large cooking area.
The griddle can be used only with the center burner on the center grate. Use caution when putting the griddle on the center grate.
In most cases, you should preheat the griddle before cooking. See the table below.
Type of Food |
Preheating Time |
Preheat setting |
Cook setting |
|
|
|
|
|
|
Pancakes |
5-10 min. |
HI |
MED-HI |
|
|
|
|
|
|
Hamburgers |
5-10 min. |
HI |
HI |
|
|
|
|
|
|
Fried Eggs |
5-10 min. |
HI |
MED-LO |
|
|
|
|
|
|
Bacon |
5-10 min. |
HI |
HI |
|
|
|
|
|
|
Breakfast Sausages |
5-10 min. |
HI |
HI |
|
|
|
|
|
|
Grilled Cheese |
4-8 min. |
HI |
HI |
|
Sandwich |
||||
|
|
|
||
|
|
|
|
 CAUTION
•Do not remove the griddle until the cooktop grates, surfaces, and griddle itself cool down.
•If you leave the griddle on the cooktop, it may become very hot when you use the cooktop or oven. Use oven gloves when placing or removing the griddle.
•Do not overheat the griddle. This can damage the coating of the griddle.
•Do not use metal utensils that can damage the griddle surface.
•Do not use the griddle for other purposes, for example, as a cutting board or a storage shelf.
•Do not cook excessively greasy foods. The grease may spill over.
•The griddle is quite heavy because it is made of cast iron. Use both hands when placing or removing the griddle.
 NOTES
NOTES
•You may need to adjust heat settings for the griddle over time.
•The griddle may discolor over time as it becomes seasoned with use.
•Do not let rust remain on the griddle. If rust appears on the griddle, remove it as soon as possible.
20 English
Dual Door™
This oven has a unique Dual Door™ that is hinged in the middle. If you have |
How to use the full door |
|
inserted the Smart Divider and divided the oven in two (so it is in Twin Mode), |
|
|
1. Hold the lever-less area of the handle, |
||
you only need to open the top half to access the upper cavity. When you’re using |
||
and then pull. |
||
the Flex Duo™ capability, you can access the top oven space much more easily and |
||
|
||
with greater energy efficiency. |
|
How to use the upper door
|
1. Hold the handle and the lever. Press the |
Push! |
lever to release the door latch, and then |
pull the handle. |
2. This will open only the upper door as shown.
2. This will open the whole door as shown.
 CAUTION
• When opening the whole door, make sure to grasp the handle by the lever-less portion.
If you press the lever halfway through opening the whole door, the upper door may open, causing physical injury.
 NOTES
NOTES
•Do not put heavy objects on, or apply excessive force, to the upper door.
•Do not let children play with or on the upper door.
Door™ Dual
English 21

oven Gas
Gas oven
Single mode
STEP 1
Put all ingredients in a heat-safe container.
STEP 2
Select a cooking mode, and then start preheating.
STEP 3
Place the container on a rack.
STEP 4
Close the door and start cooking.
 NOTES
NOTES
•The cooling fan automatically runs for a certain amount of time after cooking is complete.
•There can be slight popping sound during oven cooking. This sound may occur during the normal oven burner cycling, when the oven burner flame is extinguished.
Twin mode
STEP 1
Put all ingredients in a heat-safe container.
STEP 2
Insert the Smart Divider into the 4th rack position and push in until the range beeps.
 CAUTION
When the Smart Divider is properly inserted, the “-” icon appears.
STEP 3
Select a cooking mode, and then start preheating.
22 English

STEP 4
Arrange food containers on the racks.
STEP 5
Close the door and start cooking.
 NOTES
NOTES
•To use Twin mode operation, insert the Smart Divider.
•The cooling fan automatically runs for a certain amount of time after cooking is complete.
•When you are not using the Smart Divider, store it at room temperature.
•Handle the Smart Divider with both hands.
•Use oven gloves when inserting or removing the Smart Divider.
•Please note that the time for the upper and lower ovens to preheat is different.
•Do not put food containers directly on the Smart Divider for cooking purposes.
 CAUTION
Range displays “-dc-”
•Check the Smart Divider to see if it is installed correctly.
•Do not insert/remove the Smart Divider during cooking.
oven Gas
English 23

oven Gas
Gas oven
Cooking mode
• Make sure to close the door before you start cooking.
• If you leave the door open for 20-30 seconds while the oven is in convection baking/ roasting, baking, or broiling modes, the oven burner shuts off. To restart the burner, close the door.
Baking and roasting (Single mode)
3
1
4
2
1.Press the  Bake,
Bake,  Roast, or Bake pad.
2.If necessary, use the number pad to change the default temperature (350 °F). You can set the oven to any temperature from 175 °F to 550 °F.
3.Press the START/SET pad.
•The oven preheats until it reaches the temperature you set.
•It beeps six times when the temperature reaches you set.
•When preheating is complete, place the food in the oven, and then close the door.
4.When cooking is complete, press the OFF/CLEAR pad, and then take out the food.
 NOTE
NOTE
To change the temperature during cooking, repeat steps 1 through 3 above.
Baking and Roasting (Twin mode upper)
 2
2
 5
5
 3
3
6
4
1.Insert the Smart Divider into the cavity.
2.Press the UPPER pad
3.Press the  Bake or
  Roast pad.
4.If necessary, use the number pad to change the default temperature (350 °F). You can set the oven to any temperature from 175 °F to 480 °F.
5.Press the START/SET pad.
•The oven preheats until it reaches the temperature you set.
•It beeps six times when the temperature reaches you set.
•When preheating is complete, place the food in the upper oven, and then close the door.
6.When cooking is complete, press the OFF/CLEAR pad.
24 English

Baking (Twin mode lower)
2
3 |
3 |
5 |
|
6
4
1.Insert the Smart Divider into the cavity.
2.Press the LOWER pad.
3.Press the  Bake or Bake pad.
4.If necessary, use the number pad to change the default temperature (350 °F). You can set the oven to any temperature from 175 °F to 480 °F.
5.Press the START/SET pad.
•The oven preheats until it reaches the temperature you set.
•It beeps six times when the temperature reaches you set.
•When preheating is complete, place the food in the lower oven, and then close the door.
6.When cooking is complete, press the OFF/CLEAR pad.
 NOTE
NOTE
Your oven has different temperature setting ranges when you use the upper oven and lower oven simultaneously. See "Temperature setting guides" on page 29 for details.
Convection cooking
The convection fan at the back of the oven circulates hot air evenly throughout the oven cavities so that food is evenly cooked and browned in less time than with regular heat.
|
|
|
|
|
|
|
|
|
|
|
|
|
|
|
07 |
|
|
|
|
|
|
|
|
|
|
|
|
|
|
|
C |
|
|
|
|
|
|
|
|
|
|
|
|
|
|
|
|
|
|
|
|
|
|
|
|
|
|
||||||
|
|
|
|
|
|
|
|
|
|
|
|
|
|
|
|
|
|
|
|
|
|
|
|
|
|
|
|||||
|
|
|
|
|
|
|
|
|
|
|
|
|
06 |
|
|
|
|
|
|
|
|
|
|
|
|
|
|
|
B |
||
|
|
|
|
|
|
|
|
|
|
|
|
|
|
|
|
|
|
|
|
|
|
|
|
|
|
|
|||||
|
|
|
|
|
|
|
|
|
|
|
|
|
05 |
|
|
|
|
|
|
|
|
|
|
|
|
|
|
|
A |
||
|
|
|
|
|
|
|
|
|
|
|
|
|
|
|
|
|
|
|
|
|
|||||||||||
|
|
|
|
|
|
|
|
|
|
|
|
04 |
|
|
|
|
|
|
|
|
|
|
|
|
|
|
04 |
||||
|
|
|
|
|
|
|
|
|
|
|
|
|
|
|
|
|
|
|
|
|
|
|
|
|
|
|
|
||||
|
|
|
|
|
|
|
|
|
|
|
|
03 |
|
|
|
|
|
|
|
|
|
|
|
|
|
|
03 |
||||
|
|
|
|
|
|
|
|
|
|
|
|
|
|
|
|
|
|||||||||||||||
|
|
|
02 |
|
|
|
|
02 |
|||||||||||||||||||||||
|
|
|
|
|
|||||||||||||||||||||||||||
01 |
01 |
 NOTE
NOTE
When using convection cooking, always pre-heat the oven for the best results.
Convection baking |
• Ideal for foods being cooked using multiple racks. |
•Good for large quantities of food.
•Provides the best performance for cookies, biscuits, brownies, cupcakes, cream puffs, sweet rolls, angel food cake, and bread.
•Cookies bake best when cooked on flat cookie sheets.
•When convection baking using a single rack, place the rack in rack position 3 or 4. (In Twin mode, position A or 1)
•When convection baking using two racks, place the racks in positions 2 and 5 (Cakes, Cookies). When convection baking using three racks, place the racks in position 2, 4 and 6.
•The oven automatically adjusts the temperature for convection baking.
oven Gas
English 25
oven Gas
Gas oven
Convection roasting • Good for larger, tender cuts of meat, uncovered.
•For best performance, place a broiler pan and grid under the meat or poultry. The pan catches grease spills and the grid prevents grease spatters.
•Heated air circulates over, under, and around the food. Meat and poultry are browned on all sides as if they were cooked on a rotisserie.
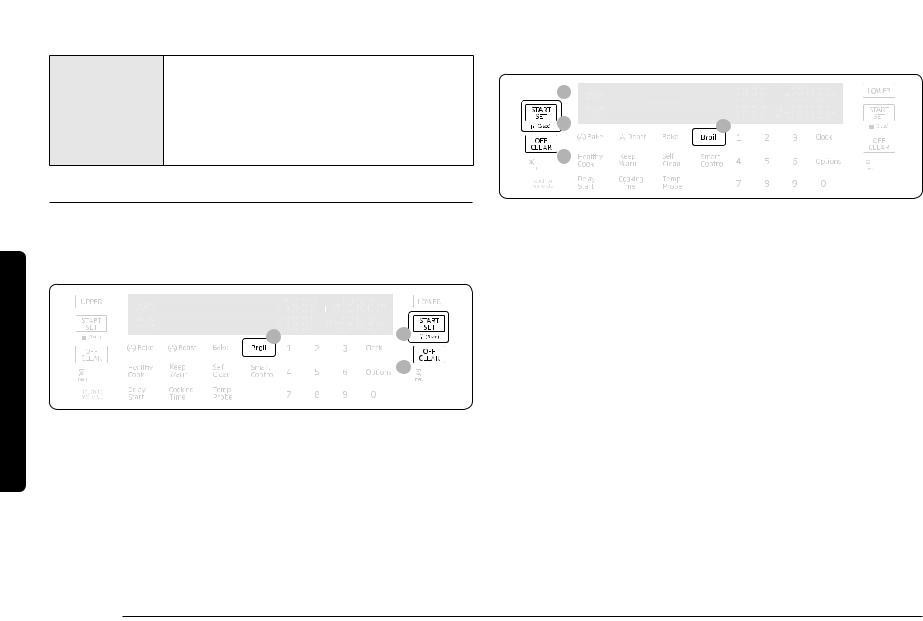
Broiling
Broiling uses the oven broil burner at the top of the oven to cook and brown food. Meat or fish must be put on a broiling grid in a broiling pan. Preheating for 5 minutes before broiling is recommended.
Broiling (Single mode)
2 |
3 |
|
7
1.Put food on a broiling grid in a broiling pan.
2.Press the Broil pad once for high temperature broiling or twice for low.
3.Press the START/SET pad to start the broiler.
4.Let the oven pre-heat for 5 minutes.
5.Place the pan on the desired rack, and then close the oven door.
6.When one side of the food is browned, turn it over, close the oven door, and start cooking the other side.
7.When cooking is complete, press the OFF/CLEAR pad.
 NOTE
NOTE
Make sure to close the door before you start cooking.
Broiling (Twin mode)
 3
3
5 |
4 |
|
 9
9
1.Insert the Smart Divider into the cavity.
2.Put food on a broiling grid in a broiling pan.
3.Press the UPPER pad.
4.Press the Broil pad once for high temperature broiling or twice for low.
5.Press the START/SET pad to start the broiler.
6.Let the oven pre-heat for 5 minutes.
7.Place the pan on the desired rack in the upper oven, and then close the oven door.
8.When one side of the food is browned, turn it over, close the oven door, and start cooking the other side.
9.When cooking is complete, press the OFF/CLEAR pad.
 NOTES
NOTES
•Use the low temperature setting for poultry or thick cuts of meat to prevent overbroiling.
•In general, to prevent overbroiling, press the Broil pad to switch from High to Low.
•Use caution when you open the oven door to turn over the food. The air escaping from the oven will be very hot.
•Your oven has different temperature setting ranges when you use the upper oven and lower oven simultaneously. See "Temperature setting guides" on page 29 for details.
26 English

Temperature probe (Single Mode Only)
The temperature probe lets you cook roasts and poultry to the exact internal temperature you want, taking the guess work out of determining whether a piece of meat is done or not.
You can use the temperature probe with the oven set to Bake, Convection Bake, or Convection Roast. When you use the temperature probe, the internal temperature is shown on the display when it reaches 100 °F.
1. Push the temperature probe into the
meat so that the tip of the probe reaches
the center of the meat.
• When you insert the temperature
probe, make sure it does not contact bone, fat, or gristle.
• For bone-in meats, insert the probe into
the center of the lowest and thickest
portion of the piece.
• For whole poultry (turkey, large chickens, etc.), insert the probe into the
thickest part of the inner thigh, parallel
to the leg.
• If you activate Keep Warm after
cooking is complete using the
temperature probe, the meat’s internal
temperature will exceed your initial
settings.
• If you remove the temperature probe while cooking is in process, the oven shuts off in 60 seconds.
• The temperature probe may not function properly if inserted into frozen food. (The temperature probe icon doesn’t appear.)
2. Insert the temperature probe plug into the socket on the top side wall of the oven.
3. Select the cooking operation ( Bake,
Bake,
 Roast, or Bake) and the temperature. 4. Press the Temp Probe pad, and then set the internal temperature between 100 °F
to 200 °F using the number pad.
6
3
4 |
4 |
|
5.Set an option (Cooking Time, Delay Start, or Keep Warm) if necessary.
6.Press the START/SET pad. When the food reaches the set internal temperature, the oven automatically shuts off, and then beeps.
 NOTES
NOTES
Temperature probe operation will shut off either :
•When cooking time is over.
•When the temperature reaches the temperature you set.
oven Gas
English 27

oven Gas
Gas oven
Temperature table
Type of Food |
Internal temperature (°F) |
|
|
|
|
|
Rare |
140-150 |
|
|
|
Beef / Lamb |
Medium |
160-170 |
|
|
|
|
Well done |
170-180 |
|
|
|
Pork |
|
170-180 |
|
|
|
Poultry |
|
165-185 |
|
|
|
 CAUTION
•To protect the temperature probe, be careful not to insert the probe so that it comes out of the meat. Make sure that the probe is inserted around the center of the meat.
•Do not store the probe in the oven.
•Do not leave the probe inside the oven during the Self-Cleaning or Broiling cycle. This will cause permanent damage to the probe.
•To avoid damage to the probe, defrost food in advance.
•Do not use tongs when inserting or removing the probe. Tongs can damage the probe.
•Use the temperature probe only for the applicable cooking operations.
 NOTE
NOTE
If you have covered the meat with aluminum foil and you let it stand covered for 10 minutes after cooking is complete, the internal temperature increases by 5-10 °F degrees.
Recipe guide
Broiling guide
For detailed instructions, see page 26.
 NOTES
NOTES
•This is for reference only.
•Preheating for 5 minutes before broiling is recommended.
•The size, weight, thickness, starting temperature, and your doneness preference will affect broiling times.
•This guide is based on meats at refrigerator temperature.
Food |
Doneness |
Size |
Thickness |
Broil |
Rack position |
Cooking time |
|||
setting |
Single |
Upper |
1st side |
2nd side |
|||||
|
|
|
|
|
|
|
|
|
|
|
Medium |
9 patties |
1" |
HI |
6 |
B |
5:00- |
4:00- |
|
Hamburgers |
5:30 |
4:30 |
|||||||
|
|
|
|
|
|
||||
|
Medium |
9 patties |
¾" |
HI |
6 |
B |
5:00 |
4:00 |
|
|
|
|
|
|
|
|
|
|
|
|
Medium |
- |
1" |
HI |
6 |
B |
7:00- |
6:00- |
|
|
6:00 |
5:00 |
|||||||
Beef steak |
|
|
|
|
|
|
|||
|
|
|
|
|
|
|
|
||
Medium |
- |
1½" |
HI |
6 |
B |
9:00- |
6:00- |
||
|
|||||||||
|
10:00 |
7:00 |
|||||||
|
|
|
|
|
|
|
|||
|
|
|
|
|
|
|
|
|
|
Chicken |
Well done |
2-2½ lbs. |
¾"-1" |
HI |
5 |
A |
15:00- |
13:00- |
|
pieces |
17:00 |
15:00 |
|||||||
|
|
|
|
|
|
||||
|
|
|
|
|
|
|
|
|
|
Chicken |
Well done |
2-3 pcs |
- |
HI |
5 |
A |
15:00- |
12:00- |
|
breasts |
18:00 |
15:00 |
|||||||
|
|
|
|
|
|
||||
|
|
|
|
|
|
|
|
|
|
Pork chops |
Well done |
1 lb. |
½" |
HI |
5 |
A |
9:00- |
6:00- |
|
11:00 |
9:00 |
||||||||
|
|
|
|
|
|
|
|||
|
|
|
|
|
|
|
|
|
|
|
Medium |
10 oz. |
1" |
HI |
4 |
A |
8:00- |
5:00- |
|
|
12:00 |
8:00 |
|||||||
Lamb chops |
|
|
|
|
|
|
|||
|
|
|
|
|
|
|
|
||
Well done |
1 lb. |
1½" |
HI |
4 |
A |
10:00- |
7:00- |
||
|
|||||||||
|
15:00 |
11:00 |
|||||||
|
|
|
|
|
|
|
|||
|
|
|
|
|
|
|
|
|
|
28 English

 CAUTION
Make sure to close the door after turning over the food.
Temperature setting guides
Twin Mode Temperature setting ranges
Your oven has different temperature setting ranges when you use the upper oven and lower oven simultaneously. The range for each oven changes, depending on the function and temperature setting of the other oven. See the tables below and on the next page for details.
Upper Oven |
|
|
Lower Oven |
|
|
|||
Available Setting Function and Temp. |
||||||||
|
|
|||||||
|
|
|
|
|
|
|
|
|
Mode |
Set Temp. |
|
Bake |
|
Bake |
|||
|
|
|
|
|
|
|||
Min |
|
Max |
Min |
|
Max |
|||
|
|
|
|
|||||
|
|
|
|
|
|
|
|
|
Broil |
HI |
400 °F |
|
480 °F |
400 °F |
|
480 °F |
|
|
|
|
|
|
|
|
||
LO |
325 °F |
|
480 °F |
325 °F |
|
480 °F |
||
|
|
|
||||||
|
|
|
|
|
|
|
|
|
|
480 °F |
400 °F |
|
480 °F |
400 °F |
|
480 °F |
|
|
|
|
|
|
|
|
|
|
|
450 °F |
350 °F |
|
480 °F |
350 °F |
|
480 °F |
|
Bake |
|
|
|
|
|
|
|
|
300 °F |
250 °F |
|
375 °F |
250 °F |
|
375 °F |
||
Roast |
|
|
||||||
|
|
|
|
|
|
|
||
250 °F |
225 °F |
|
300 °F |
225 °F |
|
300 °F |
||
|
|
|
||||||
|
|
|
|
|
|
|
|
|
|
175 °F |
175 °F |
|
200 °F |
175 °F |
|
200 °F |
|
|
|
|
|
|
|
|
|
|
(O - Available, X - Not available)
|
Lower Oven |
|
|
|
Upper Oven |
|
|||
|
Available Setting Function and Temp. |
||||||||
|
|
|
|||||||
|
|
|
|
|
|
|
|
|
|
Mode |
|
Set Temp. |
|
Broil |
|
Bake and |
Roast |
||
|
|
|
|
|
|
|
|
||
|
LO |
|
HI |
|
Min |
|
Max |
||
|
|
|
|
|
|
||||
|
|
|
|
|
|
|
|
|
|
|
|
480 °F |
O |
|
O |
|
400 °F |
|
480 °F |
|
|
|
|
|
|
|
|
|
|
|
|
450 °F |
O |
|
O |
|
350 °F |
|
480 °F |
|
|
|
|
|
|
|
|
|
|
Bake |
|
350 °F |
O |
|
X |
|
275 °F |
|
450 °F |
|
|
|
|
|
|
|
|
|
|
|
325 °F |
O |
|
X |
|
275 °F |
|
400 °F |
|
|
|
|
|
|
|||||
|
|
|
|
|
|
|
|
|
|
|
|
250 °F |
X |
|
X |
|
225 °F |
|
300 °F |
|
|
|
|
|
|
|
|
|
|
|
|
175 °F |
X |
|
X |
|
175 °F |
|
200 °F |
|
|
|
|
|
|
|
|
|
|
|
|
480 °F |
O |
|
O |
|
400 °F |
|
480 °F |
|
|
|
|
|
|
|
|
|
|
|
|
450 °F |
O |
|
O |
|
350 °F |
|
480 °F |
|
|
|
|
|
|
|
|
|
|
Bake |
|
350 °F |
O |
|
X |
|
275 °F |
|
450 °F |
|
|
|
|
|
|
|
|
|
|
|
325 °F |
O |
|
X |
|
275 °F |
|
400 °F |
|
|
|
|
|
|
|||||
|
|
|
|
|
|
|
|
|
|
|
|
250 °F |
X |
|
X |
|
225 °F |
|
300 °F |
|
|
|
|
|
|
|
|
|
|
|
|
175 °F |
X |
|
X |
|
175 °F |
|
200 °F |
|
|
|
|
|
|
|
|
|
|
oven Gas
English 29

Gas oven
Temperature Limitations by Mode
Feature |
Single Mode |
Twin Mode |
|||
|
|
|
|
||
Min |
Max |
Min |
Max |
||
|
|||||
|
|
|
|
|
|
Bake |
175 °F (80 °C) |
550 °F (285 °C) |
175 °F (80 °C) |
480 °F (250 °C) |
|
|
|
|
|
|
|
Broil |
LO |
HI |
LO |
HI |
|
|
|
|
|
|
|
Bake |
175 °F (80 °C) |
550 °F (285 °C) |
175 °F (80 °C) |
480 °F (250 °C) |
|
|
|
|
|
|
|
Roast |
175 °F (80 °C) |
550 °F (285 °C) |
175 °F (80 °C) |
480 °F (250 °C) |
|
|
|
|
|
|
|
Self Clean |
2 hours |
5 hours |
|
- |
|
|
|
|
|
|
|
Storage Drawer |
- |
- |
|
- |
|
|
|
|
|
|
|
Keep Warm |
- |
3 hours |
|
- |
|
|
|
|
|
|
|
For  Bake or
  Roast, use Auto Conversion to set the minimum temperature to 200 °F (95 °C) if necessary. See “Auto Conversion” on page 39 for details.
oven Gas
30 English
Using the oven racks
Single Mode - One Oven Cavity
Your oven range comes with 3 racks and 7 rack positions. The rack positions are delineated by rack guides which support the racks. Each rack guide has a stop that prevents the rack from loosening during the oven's operation. Each rack has stoppers that need to be placed correctly on the rack guides. The stoppers prevent the racks from accidently coming out of the oven completely when you pull the racks out.
|
Type of food |
Rack position |
|
|
|
|
|
07 |
Broiling hamburgers |
6 |
|
06 |
|
|
|
Broiling meats or small |
|
||
05 |
5-4 |
||
04 |
cuts of poultry, fish |
||
|
|||
|
|
||
03 |
|
|
|
Bundt cakes, Pound |
|
||
02 |
4 or 3 |
||
01 |
cakes, Frozen pies, |
||
|
|
||
|
casseroles |
|
|
|
|
|
|
|
Fresh Pizza, Angel |
|
|
|
food cakes, Small |
2 |
|
|
roasts |
|
|
|
|
|
|
|
Turkey, Large roasts, |
1 |
|
|
Hams |
||
|
|
||
|
|
|
 CAUTION
•Do not cover an oven rack with aluminum foil. This will hamper heat circulation, resulting in poor baking.
•Do not place aluminum foil on the oven bottom. The aluminum can melt and damage the oven.
•Arrange the oven racks only when the oven is cool.
•When placing an oven rack in the top-most rack position (position 7), make sure the rack is situated stably on the embossed stop.
 NOTE
NOTE
This table is for reference only.
 Loading...