


QUICK START
Introduction
Thank you for purchasing the Roland XP-80 Music Workstation. The XP-80 effectively combines a synthesizer sound source and sequencer whose performance and functions are on a par with the Roland XP-50, along with extended functions for easier operation and a wide scope of music production. From live performance to desk top music applications, the XP-80 delivers all the power to produce great music.
Using the XP-80 manuals
To be able to enjoy the full music-making potential of the XP-80, become completely familiar with its functionality and have trouble-free use, please take some time to read this Quick Start and the Owner’s Manual.
Quick Start
This manual explains how you can quickly and easily begin enjoying the XP-80. To take complete advantage of the many advanced functions of the XP-80, first read the Quick Start manual, then the Owner’s Manual.
Owner’s Manual
Be sure to read Chapter 1 which explains XP-80 basic concepts and operation. The remaining chapters can be read for more information as necessary, referring to the contents or indices.
Contents |
|
Names and functions of buttons and |
|
controls .............................................. |
2 |
Connect your XP-80 .......................... |
6 |
Turn the power on ............................. |
7 |
Play a demo song.............................. |
8 |
Play sounds ..................................... |
10 |
Reset to default factory settings................................. |
10 |
Select and play Patches............................................. |
10 |
Play percussion sounds from the keyboard ............... |
11 |
Try out performance functions ................................... |
12 |
Play arpeggios (Arpeggiator) ..................................... |
14 |
Try out the demo disk ..................... |
15 |
Listen to the demo songs ........................................... |
15 |
Play back a pattern by pressing specific keys (RPS).16 |
|
Combine Patterns for playback .................................. |
16 |
Add rhythmic ‘feel’ to the songs ................................. |
18 |
Try out some user groove templates.......................... |
18 |
Playing songs in sequence (Chain Play).................... |
20 |
Record a song ................................. |
21 |
Select a Performance................................................. |
21 |
Clear internal memory................................................ |
22 |
Record the drums using realtime recording ............... |
22 |
View the recorded data .............................................. |
25 |
Record the bass using step recording........................ |
25 |
Record the melody using realtime recording.............. |
27 |
Create an appropriate Performance |
|
for the song ..................................... |
29 |
Select a different Patch for the melody ...................... |
29 |
Assign a new name to the Performance .................... |
29 |
Store the Performance ............................................... |
30 |
Copyright 1996 ROLAND CORPORATION
All rights reserved. No part of this publication may be reproduced in any form without the written permission of ROLAND CORPORATION.
Save your new song........................ |
31 |
Format a disk ............................................................. |
31 |
Save your song to disk............................................... |
32 |
DanceKit........................................... |
33 |
Profiles of composers..................... |
36 |
1
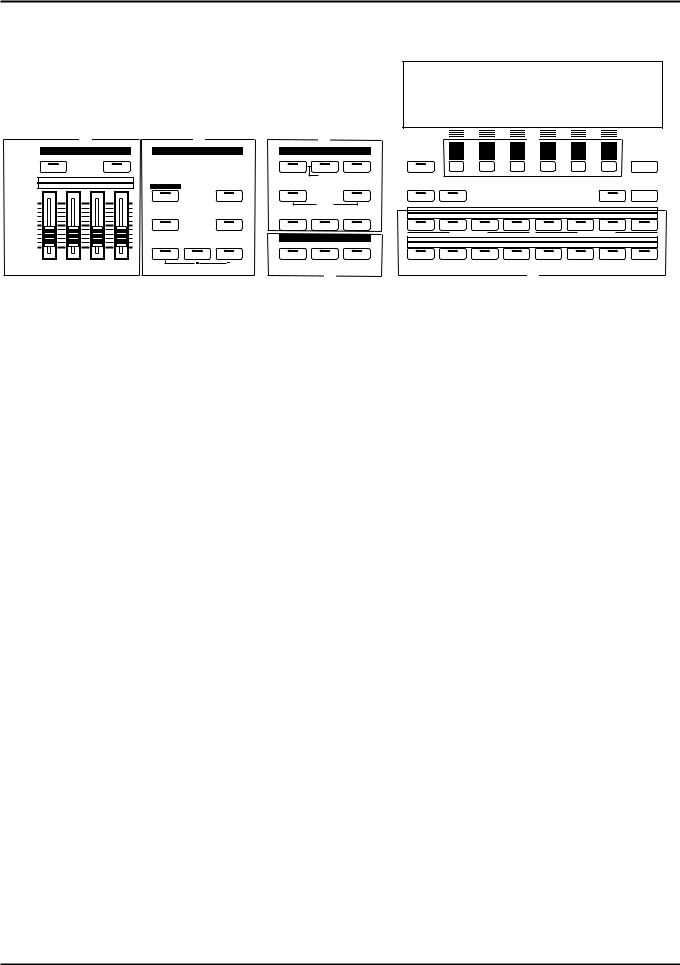
Names and functions of buttons and controls
Front panel
|
|
|
|
|
|
|
|
|
|
K |
|
|
|
|
A |
B |
|
C |
|
F |
|
|
|
E |
|
|
F |
SOUND PALETTE |
KEY EFFECTS |
|
MODE |
|
|
|
|
|
|
|
|||
|
|
|
F1 |
F2 |
F3 |
F4 |
F5 |
F6 |
|
||||
FILTERl/ ENV |
LEVEL |
|
PERFORM |
PATCH |
RHYTHM |
LOCAL / TX / RX |
EXIT |
||||||
|
|
|
|
|
|
|
|||||||
FILTER/ENVl |
CUTOFF |
RESO. |
ATTACK |
DECAY |
|
|
|
GM |
PART |
|
|
|
|
|
|
|
|
|
PANIC |
|
|
|
|
|
|
|
|
|
|
|
|
|
|
|
|||||
LEVEL |
1 |
2 |
3 |
4 |
RPS |
|
ARPEGGIO |
SEQUENCER |
|
CHAIN PLAY |
|
SOUND LIST |
a/b/c/d |
|
|
|
|
LOCATE |
UNDO/REDOl |
|
|
|
|
|
|
|
|
|
DEMO |
|
|
TEMPO/BEAT |
PATTERN |
|
|
|
|
|
|
|
|
|
|
|
|
|
|
|
|
|
BANK |
1 |
2 |
3 |
4 |
5 |
6 |
7 |
8 |
|
|
|
|
|
PORTAMENTO |
|
SOLO |
SYSTEM |
UTILITY |
DISK |
TRACK/PART |
1 |
2 |
3 |
4 |
5 |
6 |
7 |
8 |
|
|
|
|
|
|
|
|
|
EFFECTS |
|
|
|
TONE SWITCH |
|
|
TONE SELECT |
|
||
|
|
|
|
|
|
- OCT |
+ OCT |
|
|
NUMBER |
1 |
2 |
3 |
4 |
5 |
6 |
7 |
8 |
|
|
|
|
|
|
TRANSPOSE |
EFX |
CHORUS |
REVERB |
TRACK/PART |
9 |
10 |
11 |
12 |
13 |
14 |
15 |
16 |
||
D |
G |
A. SOUND PALETTE section
Use the four sliders to modify sounds in real time.
[FILTER/ENV]
Press this button ON when modifying filter and/or envelope settings in real time using the four sliders.
[LEVEL]
Press this button ON when adjusting volume balance in real time using the four sliders.
B. KEY EFFECTS section
The buttons in this section allow you to assign various functions to the keys of the XP-80’s keyboard.
[RPS]
Switches RPS on/off.
[ARPEGGIO]
Switches Arpeggiator on/off.
[PORTAMENTO]
Switches Portamento on/off.
C. MODE section
The buttons in this section select modes. The button indicator of the selected mode will light.
D. EFFECTS section
The buttons in this section turn their respective internal effects (EFX, Chorus and Reverb) on/off.
[EFX]
Switches the multiple effects unit (EFX) on/off.
[CHORUS]
Switches Chorus on/off.
[REVERB]
Switches Reverb on/off.
E. [F1]–[F6] (Function buttons)
Each of these buttons corresponds to a function indicated at the display bottom. The functions of these buttons change depending on the selected mode or the current display.
[SOLO]
Specifies playing a single note at a time.
[TRANSPOSE]
Specifies transposing the keyboard in semitone steps.
[+OCT], [-OCT]
These buttons adjust the pitch of the keyboard in octave steps.
Pressing either of these buttons while holding down [TRANSPOSE] allows you to set the desired amount of transposition.
F.
[LOCAL/TX/RX]
This button opens the LOCAL/TX/RX window for switching Local, Transmit and Receive switches on/off.
[EXIT]/[PANIC]
The function of this button changes depending on whether you hold down [SHIFT] or not.
EXIT: Press this button to return to the Play display of a mode, or when you want to cancel the current operation.
PANIC: If notes stick or do not sound, hold down [SHIFT] and press this.
2

L
|
VALUE |
|
|
|
|
|
|
|
|
H |
|
|
|
|
J |
|
|
DEC |
|
INC |
7 |
STU |
8 |
VWX |
9 |
Y Z! |
|
|
|
|
3 |
|
|
|
|
|
|
|
4 |
JKL |
5 |
MNO |
6 |
PQ R |
|
SEQUENCER |
|
E |
|
F |
3 |
G |
|
|
|
1 |
|
2 |
3 |
|
||
REC |
BEAT |
LOOP |
ABC |
DEF |
GHI |
|||
|
|
|
B |
|
C |
|
D |
3 |
|
|
|
|
|
|
|
|
|
BWD |
STOP/PLAYl |
FWD |
|
SHIFT |
0 |
SPACE |
|
ENTER |
|
I |
|
|
|
A |
+l - |
DIGIT HOLD |
|
I
[SOUND LIST] / [TEMPO/BEAT]
The function of this button changes depending on the selected mode.
SOUND LIST: Opens the Sound List window when a sound source mode display is up.
TEMPO/BEAT: Press this button for selecting a tempo track or beat track when a Sequencer mode display is up. If you have temporarily modified the tempo and wish to play back the song with its initial tempo, press it while holding down [SHIFT].
[a/b/c/d] / [PATTERN]
The function of this button changes depending on the mode on display.
a/b/c/d: Select a subgroup (a/b/c/d) when selecting a Patch/Performance/Rhythm Set using the Bank/Number method.
PATTERN: Select a Pattern when a Sequencer mode display is up.
[LOCATE]
This button opens the Locate window to specify and move the locate position.
[UNDO/REDO]
Press this button to restore a modified value to its previous (pre-modified) state, or when cancelling recording or a currently executing operation. Pressing this button again will restart the recording/operation.
G.
BANK [1]–[8], NUMBER [1]–[8] / TRACK / PART [1]–[16]
The functions of these buttons change depending on the display which is showing.
Play display of a sound source mode: Selects a Patch/Performance/Rhythm Set with the Bank /Number method. Use BANK [1]–[8] buttons to select a bank and NUMBER [1]–[8] buttons to select a number.
Performance edit display: Use TRACK/PART [1]–[16] buttons to select the Part to be modified.
Patch edit display: TRACK/PART [1]–[4] buttons (TONE SWITCH) are used to switch a Tone on/off. Use TRACK/PART [5]–[8] buttons (TONE SELECT) to select the Tone to be modified.
Rhythm Set edit display: Use TRACK/PART [5]–[8] buttons (TONE SELECT) to select the note of the keyboard to be modified.
Sequencer mode: Use TRACK/PART [1]–[16] buttons to select a phrase track or Part. During song playback/recording, these buttons can be used to switch between the Play and Mute of a phrase track.
H.
[l], [r], [u], [d] (Cursor buttons)
Move the cursor (black box) with these.
[INC], [DEC]
Use these buttons to modify values. If you keep on holding down one button and pressing the other, the value change accelerates. If you press one of these buttons while holding down [SHIFT], the value will change in bigger increments.
I. SEQUENCER section
The buttons in this section are used for playback and recording of the XP-80’s sequencer.
[REC]
Press this to begin recording.
BEAT indicator
This blinks in sync with the tempo and beat of the song.
[LOOP]
Press this to turn Loop Play and Loop Recording on/off.
[BWD]
Press this to “rewind” a song. Pressing this button while holding down [SHIFT] moves you right back to the beginning of the song. If you hold down this button as you press [FWD], the song will “rewind” faster.
[STOP/PLAY]
Press this button to start or stop playback of the song.
3

[FWD]
Use this button to fast-forward the song. Pressing this button while holding down [SHIFT] moves you to the end of the song. If you hold down this button as you press [BWD], the song will fast-forward faster.
J.
[0]–[9] (Numeric keys)
Use these to set a value. They can be used to enter numeric values as well as alphabetical characters and notes.
[SHIFT]
This is used in combination with other buttons. Some buttons on the front panel include grey-printed characters. They indicate the button’s function when [SHIFT] is held down.
[ENTER] / [DIGIT HOLD]
The function of this button changes depending on whether [SHIFT] is being held down or not.
ENTER: Use this button to finalize a value.
DIGIT HOLD: Press this button while holding down [SHIFT] to turn the Digit Hold function on/off. With the Digit Hold on, the 100’s place and 10’s place will be fixed and only the 1’s place will change. This means that you can select Patches simply by pressing the numeric key for the 1’s place, without having to press [ENTER].
K.
Display
Shows various information for the currently selected function or operation.
L.
VALUE dial
This dial is used to modify values. If you hold down [SHIFT] as you turn the VALUE dial, the value will change in greater increments.
Side panel
VOLUME |
C 1 |
C2 |
VOLUME slider
This slider adjusts the overall output level from the rear panel OUTPUT and PHONES jacks.
C1 slider, C2 slider
Various parameters or functions can be assigned to these sliders, so you can control the sound source section as you play.
Pitch bend / modulation lever
This allows you to control pitch bend or apply vibrato. Depending on the settings, other specified parameters can also be controlled.
Floppy disk drive
3.5” 2DD/2HD floppy disks can be used. Press the eject switch located at the lower right of the disk drive to remove a disk.
4
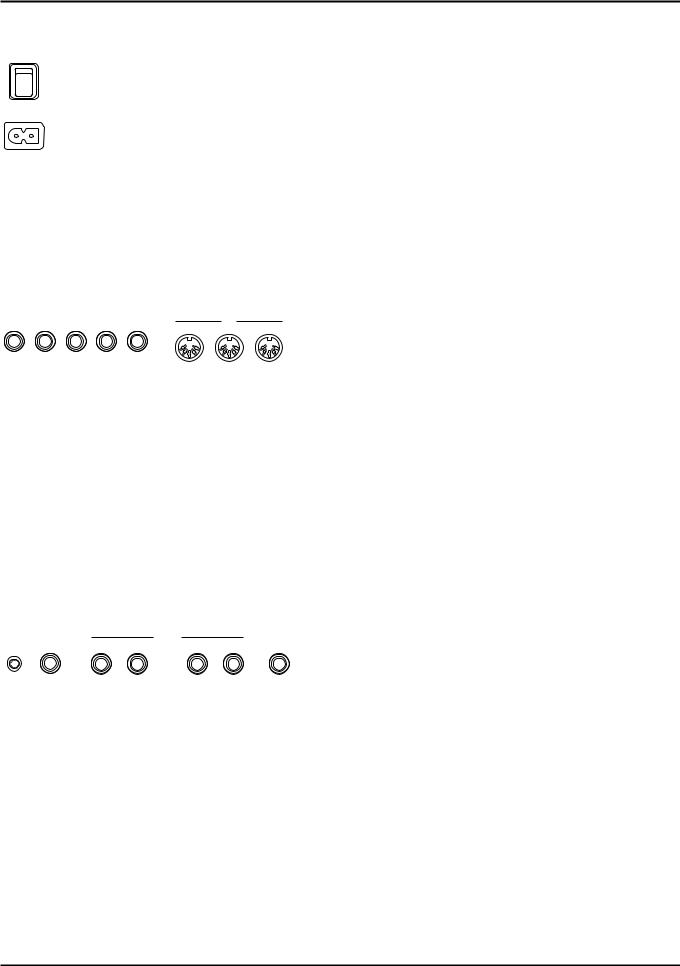
Rear panel
POWER
AC
Power switch
Press to turn the power on/off.
AC inlet
Connect the AC power cable (included) to this inlet.
With units rated for 117V operation, the AC cable is already connected to the unit.
|
CONTROL PEDAL |
|
HOLD |
|
MIDI |
|
|
4 |
3 |
2 |
1 |
THRU |
OUT |
IN |
|
OUTPUT MIX R jack, OUTPUT MIX L jack
These jacks output the audio signal to the connected mixer/amplifier system in stereo. For mono output, use the L jack.
PHONES jack
An optional set of headphones can be connected to this jack. Make sure that your headphones have an impedance of 8–150 ohms.
CONTROL PEDAL 1–4 jacks
You can connect optional expression pedals to these jacks. By assigning a desired function to a pedal, you can use it to select or modify sound or perform various other control. You can also connect optional pedal switches to sustain sound.
HOLD jack
An optional pedal switch can be connected to this jack for use as a hold pedal.
MIDI connectors
These connectors can be connected to other MIDI devices to receive and transmit MIDI messages.
|
CLICK OUT |
|
|
DIRECT |
OUTPUT |
MIX |
|
|
|
|
|
|
PHONES |
||||
LEVEL |
OUTPUT |
R |
L |
R |
L |
|||
CLICK OUT LEVEL knob
Adjusts the level of the click sound to be output to external devices.
CLICK OUT OUTPUT jack
Connect a cable to this jack when sending clicks to external devices.
OUTPUT DIRECT R jack, OUTPUT DIRECT L jack
These jacks output only the direct sound (no effects applied) or EFX’d sound in stereo.
5

Connect your XP-80
The XP-80 does not contain an amp or speakers. In order to hear sound, you will need to connect it to a keyboard amp, audio system, or headphones. Refer to the following diagram and connect the XP-80 to the external equipment you are using.
POWER
|
CONTROL PEDAL |
1 |
HOLD |
|
MIDI |
|
OUTPUT |
|
|
|
4 |
3 |
2 |
THRU |
OUT |
IN |
|
MIX |
PHONES |
||
|
|
|
|
|
|
|
|
R |
L |
|
AC
Power outlet
External MIDI device
Sterero headphones
Pedal Switch
Expression pedal or pedal switch
|
|
|
|
|
|
|
|
|
|
|
|
|
|
|
|
|
|
|
|
Stereo set, etc. |
Speaker with built-in amp, |
||||||||
|
|
|
|
|
keyboard amp, etc. |
||||
<Procedure>
Before you make connections, make sure that power is turned off for all devices.
If the power is on when you make connections, you may damage your speakers.
Connect supplied AC power cable to the XP-80, and plug the other end into an AC power outlet.
On 117V models the AC cable is permanently attached to the unit.
Connect audio cables and MIDI cables as shown in the diagram. If you are using headphones, plug them into the PHONES jack. Connect pedal switches or expression pedals as necessary.
In order to take full advantage of the XP-80’s performance, we recommend using a stereo amp/speaker system, If you are using a mono system, make you connections to the MIX OUTPUT jack L.
CONTROL PEDAL 1–4 jacks can also accommodate pedal switches.
6
Turn the power on
Once the connections have been completed (p.6), turn on power to your various devices in the order specified. By turning on devices in the wrong order, you risk causing malfunction and/or damage to speakers and other devices.
<Procedure>
Before you turn the power on, check to make sure that: All external devices are correctly connected to the XP-80.
The volume controls of the XP-80 and the amp/mixer system are turned down all the way. No disk is in the floppy disk drive.
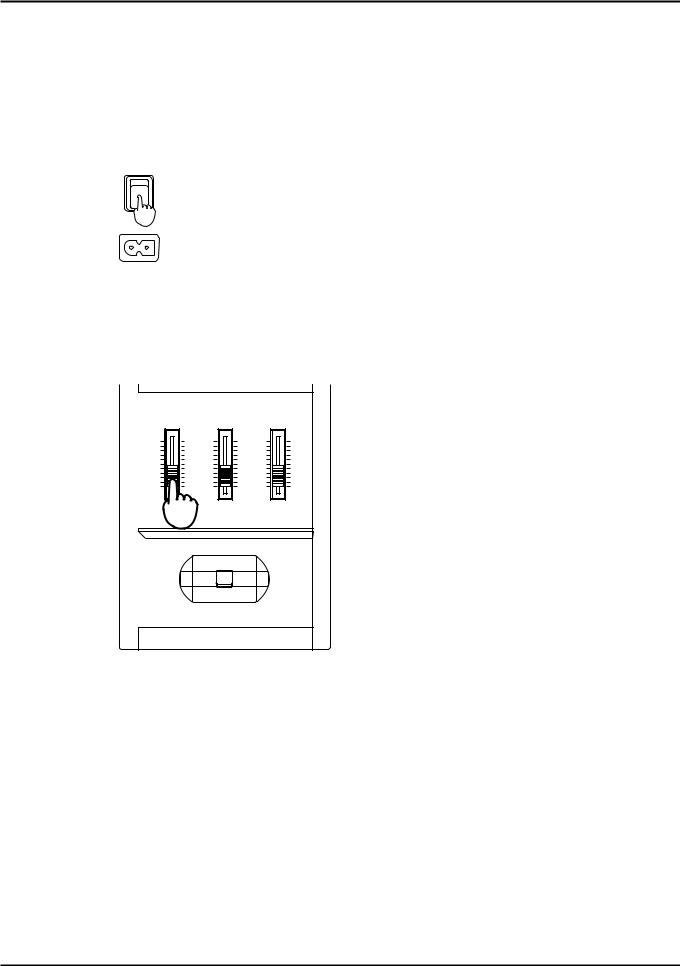
Turn on the power switch located on the rear panel of the XP-80.
POWER
This unit is equipped with a protection circuit. A brief interval (a few seconds) after power up is required before the unit will operate normally.
Turn the power on of your amp or audio system.
Play the XP-80 and gradually raise the volume controls of the XP-80, your amp or mixer to an appropriate volume level.
VOLUME |
C 1 |
C2 |
Be careful not to raise the VOLUME slider of the XP-80 too much. Excessive volume may damage your amp/speaker system or could cause hearing problems.
To turn power off
<Procedure>
Before you turn power off, check to make sure that:
The volume controls of the XP-80 and the amp/mixer system are turned down all the way. No disk is in the floppy disk drive.
Important data has been saved to a disk (p.32).
Turn off your amp/mixer system.
Turn off the XP-80 power.
7
Play a demo song
The XP-80 contains a demo song and you use ‘demo play’ to play it. It’s the easiest introduction to the XP-80’s exceptional sounds and effects.
If you play a demo song, the current song existing in internal memory will be lost. To keep the song in the internal memory, save the song to disk (p.32) before executing demo play.
Demo song |
Composer |
The AXE |
Alex Wurman Copyright © 1996 Sonart Productions BMI |
Warning: All rights reserved. Unauthorized use of the demo song for concerts, broadcasting, or any other purposes than personal enjoyment, as well as storage to disk form a violation of applicable laws.
Refer to page 36 for the profile of the composer.
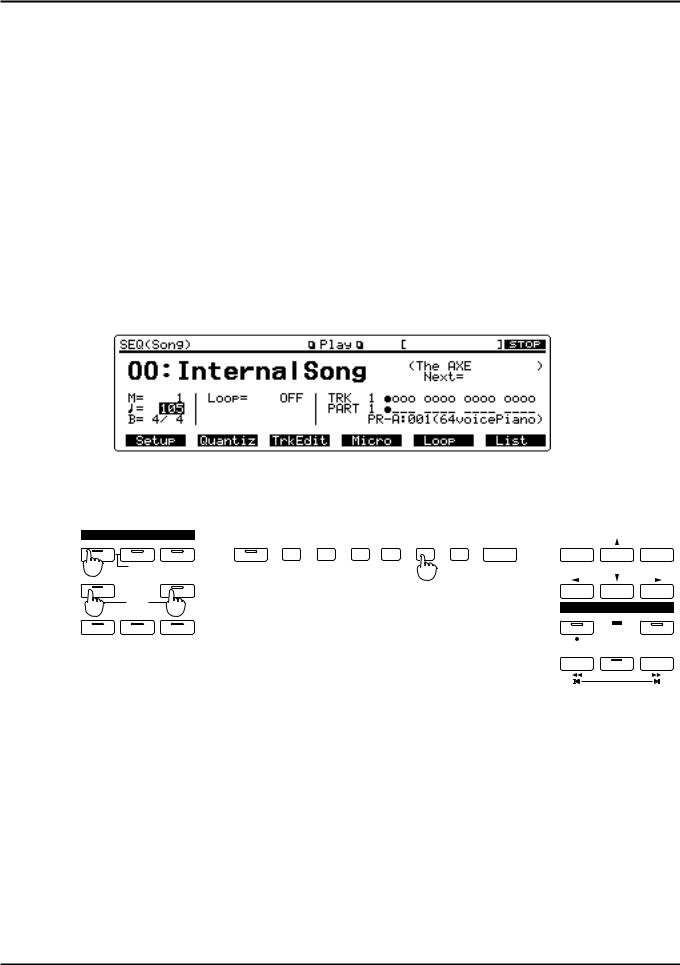
<Procedure>
Hold down [SEQUENCER] and press [CHAINPLAY].
The confirmation message “DEMO PLAY OK?” will appear.
Press [F5] (OK) to start demo song playback.
If you wish to cancel playback, press [F6] (Cancel). Playback will stop automatically when the song ends. To interrupt playback, press [STOP/PLAY] again.
You can control the volume level or effects parameters of each Part during playback. To modify the values, press [PERFORM] and follow the procedure below.
|
MODE |
|
|
F1 |
F2 |
F3 |
F4 |
F5 |
F6 |
|
|
|
|
PERFORM |
PATCH |
RHYTHM |
LOCAL / TX / RX |
EXIT |
DEC |
|
INC |
||||||
|
|
|
|
|
|
|
|||||||
3 |
PART |
|
|
|
|
|
|
2 |
|
PANIC |
|
|
|
|
|
|
|
|
|
|
|
|
|
|
|
|
|
SEQUENCER |
|
CHAIN PLAY |
|
|
|
|
|
|
|
|
|
|
|
1 |
DEMO |
1 |
|
|
|
|
|
|
|
|
|
SEQUENCER |
|
|
|
|
|
|
|
|
|
|
|
|
|||
|
UTILITY |
|
|
|
|
|
|
|
|
|
REC |
BEAT |
LOOP |
|
|
|
|
|
|
|
|
|
|
|
BWD |
l |
FWD |
|
|
|
|
|
|
|
|
|
|
|
STOP/PLAY |
 I
I 
8

To modify the volume level of each Part
Press [F6] (Info), then [F4] (Volume) to call up the Part Information display for Volume. Press [l], [r], [u] or [d] to move the cursor (black box) to the Part whose volume level you want to modify and set the desired volume level.
To change panning
Press [F6] (Info), then [F5] (Pan) to call up the Part Information display for Pan. Press [l], [r], [u] or [d] to move the cursor (black box) to the Part whose panning you want to change and set the desired panning value.
To modify effects settings
Press [F5] (Effects) to call up the General display, then select the Part whose effects settings you want to modify by pressing TRACK/PART [1]–[16]. Next press [l], [r], [u] or [d] to move the cursor (black box) to the parameter you want to modify and specify the value.
You can also modify other parameters. For details regarding each parameter, refer to “Functions of Performance parameters” (p.65) in the Owner's Manual.
9
Play sounds
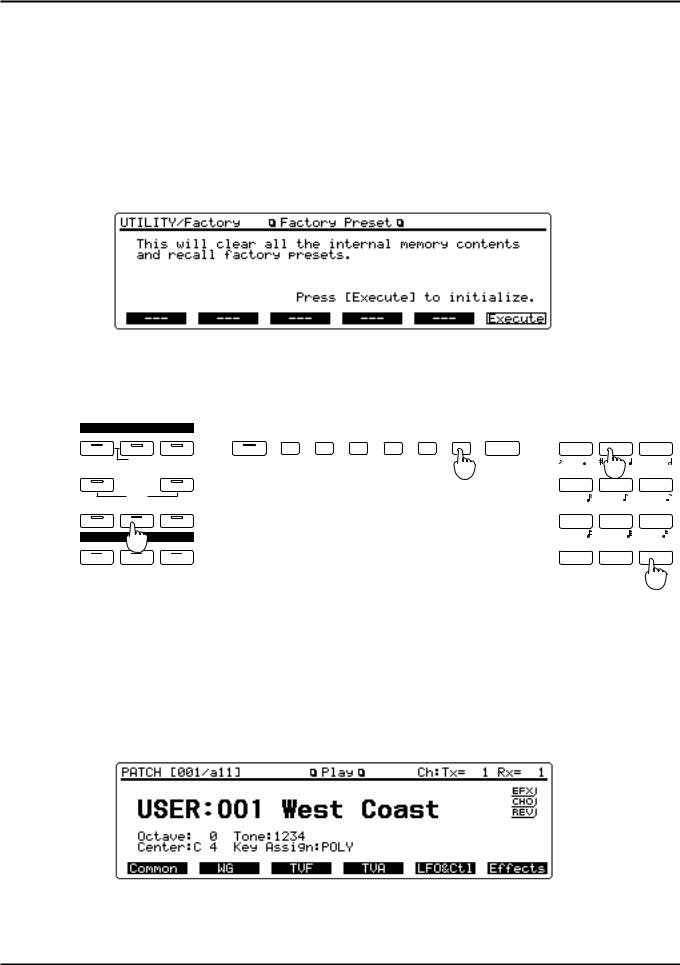
Reset to default factory settings
Before using XP-80 for the first time, reset it to its default factory settings using Factory Preset. Different settings may result in unexpected effects.
Factory Preset operation resets all data in the internal memory and user memory to factory presets. Save any important data to a disk before executing this operation (p.168) in the XP-80 Owner’s Manual.
<Procedure>
Press [UTILITY].
Press the numeric key [8], then [ENTER].
The Factory Preset display (UTILITY/Factory) will appear.
Press [F6] (Execute).
If “Write Protect ON” message is displayed, press [DEC] to turn the setting OFF. After pressing [EXIT] to clear the message, press [F6] (Execute) again to reset to the factory preset settings.
|
MODE |
|
|
F1 |
F2 |
F3 |
F4 |
F5 |
F6 |
|
7 |
|
8 |
|
9 |
|
|
PERFORM |
PATCH |
RHYTHM |
LOCAL / TX / RX |
EXIT |
STU |
VWX |
Y Z! |
||||||||||
|
|
|
|
|
|
||||||||||||
GM |
PART |
|
|
|
|
|
|
|
3 |
PANIC |
|
|
|
2 |
|
|
|
SEQUENCER |
|
CHAIN PLAY |
|
|
|
|
|
|
|
4 |
JKL |
|
6 |
PQ R |
|||
|
|
|
|
|
|
|
|
|
|
|
|||||||
|
DEMO |
|
|
|
|
|
|
|
|
|
E |
|
F |
|
G |
|
|
SYSTEM |
UTILITY |
DISK |
|
|
|
|
|
|
|
|
1 |
ABC |
2 |
DEF |
3 |
GHI |
|
|
|
|
|
|
|
|
|
|
|
|
B |
|
C |
|
D |
|
|
EFX |
1 |
REVERB |
|
|
|
|
|
|
|
|
|
SHIFT |
0 |
SPACE |
|
ENTER |
|
|
|
|
|
|
|
|
|
|
|
|
A +l -
2
Select and play Patches
The XP-80 contains a large number of sounds ready for you to play. The sounds that you select and play on the XP-80 are generally called ‘Patches.’ Here’s how to select and play Patches.
<Procedure>
Press [PATCH].
The Play display (PATCH) will appear.
Patch group |
Patch number |
Patch name |
||||||
|
|
|
|
|
|
|
|
|
10
Play the keyboard and listen to the sound.
To select a different Patch, turn the VALUE dial or press [INC]/[DEC].
MODE
PERFORM |
PATCH |
RHYTHM |
|
|
GM |
|
|
|
|
SEQUENCER |
1 |
CHAIN PLAY |
|
|
|
|
|
||
|
DEMO |
|
|
3 |
SYSTEM |
UTILITY |
DISK |
DEC |
INC |
|
|
|||
|
EFFECTS |
|
|
|
EFX |
CHORUS |
REVERB |
|
|
Play percussion sounds from the keyboard
The XP-80’s Rhythm Sets contain a wide variety of percussion sounds and special effects. Here’s how to select a Rhythm Set and play percussion sounds.
<Procedure>
Press [RHYTHM].
The Play display (RHYTHM) will appear.
Rhythm set group Rhythm set number Rhythm set name
Note name |
Wave name |
Press different keys to play different percussion instruments.
The display will indicate the last-pressed key (note name) and the percussion instrument (wave name) assigned to that key.
The percussion instrument played by each key will depend on the selected Rhythm Set. For details, refer to “Factory preset settings” (p.206) in the Owner’s Manual.
To select another Rhythm Set, turn the VALUE dial or press [INC]/[DEC].
MODE
PERFORM |
PATCH |
RHYTHM |
|
|
GM |
PART |
|
|
|
SEQUENCER |
|
1 |
|
|
|
|
|
|
|
|
DEMO |
|
|
3 |
SYSTEM |
UTILITY |
DISK |
DEC |
INC |
|
|
|||
|
EFFECTS |
|
|
|
EFX |
CHORUS |
REVERB |
|
|
11
 Loading...