


 Loading...
Thank you very much for purchasing this product.
•To ensure correct and safe usage with a full understanding of this product's performance, please be sure to read through this manual completely and store it in a safe location.
•Unauthorized copying or transferal, in whole or in part, of this manual is prohibited.
•The specifications of this product and the contents of this operation manual are subject to change without notice.
•This manual and the product have been prepared and tested as much as possible. If you find any misprints or errors, please inform Roland DG Corporation.
•Roland DG Corporation assumes no responsibility for any direct or indirect loss or damage that may occur through use of this product, regardless of any failure to perform on the part of this product.
•Roland DG Corporation assumes no responsibility for any direct or indirect loss or damage that may occur with respect to any article made using this product.
FA01574/R1-190830
http://www.rolanddg.com/
Copyright 2019 © Roland DG Corporation

Contents |
|
|
Chapter 1 Basic Handling Methods ................................................................................................ |
6 |
|
1. |
Basic Information ................................................................................................................................................... |
7 |
|
Part Names and Functions............................................................................................................................................................. |
8 |
|
Printer Unit........................................................................................................................................................................... |
8 |
|
Head refresher ................................................................................................................................................................... |
12 |
|
Operation Panel.................................................................................................................................................................. |
13 |
|
Display Screen .................................................................................................................................................................... |
14 |
|
Statuses Indicated by Status Light Color............................................................................................................................. |
15 |
|
Object to Be Printed On............................................................................................................................................................... |
16 |
|
Conditions for Settable Objects to Be Printed On .............................................................................................................. |
16 |
|
Printable Area..................................................................................................................................................................... |
17 |
|
Features of Inks ........................................................................................................................................................................... |
18 |
|
Features of ECO-UV Inks..................................................................................................................................................... |
18 |
|
Features of Primer.............................................................................................................................................................. |
18 |
|
Menu List..................................................................................................................................................................................... |
19 |
|
Main Menu......................................................................................................................................................................... |
19 |
|
Function Menu ................................................................................................................................................................... |
22 |
|
Language and Unit Menu ................................................................................................................................................... |
23 |
2. |
Basic Operations................................................................................................................................................... |
24 |
|
Power Supply Operations ............................................................................................................................................................ |
25 |
|
Turning the Power On ........................................................................................................................................................ |
25 |
|
Turning the Power Off ........................................................................................................................................................ |
26 |
|
Precautions When Operating the Power Supply ................................................................................................................ |
27 |
|
Sleep Mode (Power-saving Feature)................................................................................................................................... |
28 |
|
Checks before Operations ........................................................................................................................................................... |
29 |
|
LAN (Local Area Network) Settings..................................................................................................................................... |
29 |
|
Preparing the Cleaning Liquid for Head Refreshing............................................................................................................ |
30 |
|
Preventing Sedimentation in Inks....................................................................................................................................... |
32 |
Chapter 2 Output Method ............................................................................................................ |
33 |
|
1. |
Printing Operations .............................................................................................................................................. |
34 |
|
Printing method........................................................................................................................................................................... |
35 |
|
Checking the Daily Workflow ............................................................................................................................................. |
35 |
|
Three Checks before Printing ............................................................................................................................................. |
36 |
|
Step1: Preparing for the Start of Daily Operations............................................................................................................. |
39 |
|
Step 2: Start Printing .......................................................................................................................................................... |
51 |
|
Step 3: Head Refreshing after Daily Operations ................................................................................................................. |
58 |
|
Pausing and Canceling Printing.................................................................................................................................................... |
63 |
|
Pausing and Resuming Printing .......................................................................................................................................... |
63 |
|
Canceling Printing............................................................................................................................................................... |
63 |
Chapter 3 Optimizing Quality and Efficiency.................................................................................. |
64 |
|
1. Optimizing the Setup Method.............................................................................................................................. |
65 |
|
|
Suction Function Setting.............................................................................................................................................................. |
66 |
|
Setting the Suction Function .............................................................................................................................................. |
66 |
|
Adjusting the Height.................................................................................................................................................................... |
67 |
|
Setting the Height of the Object to Be Printed On Manually ............................................................................................. |
67 |
|
Adjusting the Distance between the Object to Be Printed On and the Print Heads .......................................................... |
69 |
|
Enabling Automatic Height Adjustment during Printing .................................................................................................... |
70 |
|
Determining the Maximum Value (Threshold) for Automatic Height Adjustment............................................................. |
71 |
|
Notes When the Print Surface Is Uneven ........................................................................................................................... |
72 |
|
Changing the Z-axis (Height) Origin.................................................................................................................................... |
73 |
1

Contents |
|
|
|
Print Area Settings ....................................................................................................................................................................... |
74 |
|
Fixing the Base Position of the Print Area .......................................................................................................................... |
74 |
|
Setting the Print Area Using the Center of the Print Area as the Base Position ................................................................. |
75 |
|
Changing Just the Base (Home) Position ............................................................................................................................ |
81 |
2. Optimizing the Printing Quality ............................................................................................................................ |
83 |
|
|
Using the Correction Functions ................................................................................................................................................... |
84 |
|
Bidirectional Adjustment.................................................................................................................................................... |
84 |
|
Correcting for Misalignment in Bidirectional Printing (Simple).......................................................................................... |
84 |
|
Correcting for Misalignment in Bidirectional Printing More Precisely (Detailed) .............................................................. |
86 |
|
Preventing Ink Discharge Defects ................................................................................................................................................ |
88 |
|
Preventing Soiling of the Object to Be Printed On and Dot Drop-out ................................................................................ |
88 |
|
Reducing Ink Mist (Ink Spatter) .......................................................................................................................................... |
89 |
|
Preventing Primer Dot Drop-out ........................................................................................................................................ |
90 |
|
Improving Ink Adhesion............................................................................................................................................................... |
91 |
|
Additional UV Lamp Illumination after Printing ................................................................................................................. |
91 |
3. |
Optimizing Work Efficiency................................................................................................................................... |
92 |
|
Using the Preset Function............................................................................................................................................................ |
93 |
|
Saving the Current Settings in Presets................................................................................................................................ |
93 |
|
Load a Preset and Print ...................................................................................................................................................... |
95 |
|
Making Fine Adjustments and Printing a Preset ................................................................................................................ |
96 |
|
Checking Current Preset Name .......................................................................................................................................... |
97 |
|
Reducing Print Time..................................................................................................................................................................... |
98 |
|
Omitting the Setting of the Print Area................................................................................................................................ |
98 |
|
Continuously Printing Multiple Sets of Data ...................................................................................................................... |
99 |
|
Minimizing Print Head Movement ................................................................................................................................... |
100 |
|
Setting the Smallest Possible Print Area........................................................................................................................... |
101 |
|
Reducing Paper Used during Printing Tests ............................................................................................................................... |
102 |
|
Performing Printing Tests Arranged Horizontally ............................................................................................................. |
102 |
|
Optimizing Head Refreshing Work When Using Jigs.................................................................................................................. |
103 |
|
Setting the Installation Height of the Head Refresher...................................................................................................... |
103 |
4. |
Optimizing Operation Management................................................................................................................... |
106 |
|
Managing the Operations Appropriately and Efficiently ........................................................................................................... |
107 |
|
Setting the Date and Time................................................................................................................................................ |
107 |
|
Setting the Start Timer ..................................................................................................................................................... |
108 |
|
Sounding a Buzzer to Notify the User of the End of Printing ........................................................................................... |
110 |
|
Determining What Happens When Ink Runs Out............................................................................................................. |
111 |
|
Notifying the User of Ink Exceeding Its Shelf Life ............................................................................................................. |
112 |
|
Checking the Ink Shelf Life................................................................................................................................................ |
113 |
|
Setting the Activation Interval for Sleep Mode (Power-saving Feature)........................................................................... |
114 |
|
Deactivating the Sleep Mode (Power-saving Feature) ..................................................................................................... |
115 |
|
Managing the Basic Settings of the Printer ............................................................................................................................... |
116 |
|
Setting the Menu Language and Units of Measurement ................................................................................................. |
116 |
|
Viewing System Information ............................................................................................................................................ |
117 |
|
Turning Off the Status Light.............................................................................................................................................. |
118 |
|
Returning All Settings to Factory Defaults ........................................................................................................................ |
119 |
Chapter 4 Maintenance .............................................................................................................. |
120 |
|
1. |
Introduction........................................................................................................................................................ |
121 |
|
Important Notes on Handling and Use ...................................................................................................................................... |
122 |
|
Printer .............................................................................................................................................................................. |
122 |
|
Ink Cartridges ................................................................................................................................................................... |
123 |
|
Basic Maintenance Knowledge.................................................................................................................................................. |
124 |
|
Types and Timing of Maintenance ................................................................................................................................... |
124 |
|
Automatic Maintenance Feature and Notes .................................................................................................................... |
126 |
2

|
|
Contents |
|
Alarm Feature................................................................................................................................................................... |
127 |
|
Measures When the Printer Is Not in Use for a Prolonged Period ................................................................................... |
128 |
2. |
Regular Maintenance ......................................................................................................................................... |
129 |
|
Cleaning the Machine................................................................................................................................................................ |
130 |
|
Cleaning the Machine on a Daily Basis............................................................................................................................. |
130 |
|
Replacing Ink Cartridges ............................................................................................................................................................ |
133 |
|
Checking for Remaining Ink.............................................................................................................................................. |
133 |
|
How to Replace the Ink Cartridge..................................................................................................................................... |
134 |
|
Disposing of Discharged Fluid.................................................................................................................................................... |
135 |
|
Precautions for Disposing of Discharged Fluid ................................................................................................................. |
135 |
|
If the Discharged Fluid Disposal Message Appears .......................................................................................................... |
136 |
|
If the Drain Bottle Exceeds Its Capacity Limit ................................................................................................................... |
138 |
|
If the Contents of the Drain Bottle Are Not Visible .......................................................................................................... |
140 |
|
Maintenance That Must Be Performed Daily ............................................................................................................................ |
141 |
|
Maintenance of Ink Cartridges ......................................................................................................................................... |
141 |
|
Printing Tests and Normal Cleaning.................................................................................................................................. |
142 |
|
Head Refreshing Method ................................................................................................................................................. |
152 |
|
When Normal Cleaning Is Not Effective..................................................................................................................................... |
157 |
|
Medium Cleaning Method ............................................................................................................................................... |
157 |
|
Powerful Cleaning Method............................................................................................................................................... |
159 |
|
Manual Cleaning........................................................................................................................................................................ |
163 |
|
When Manual Cleaning Is Necessary ............................................................................................................................... |
163 |
|
Manual Cleaning Method................................................................................................................................................. |
164 |
|
Cleaning That Must Be Performed Once a Month or More....................................................................................................... |
173 |
|
When UV-LED Device Cleaning Is Necessary .................................................................................................................... |
173 |
|
How to Clean the UV-LED Devices.................................................................................................................................... |
174 |
3. |
Advanced Maintenance...................................................................................................................................... |
177 |
|
Restoring the White Ink Concentration ..................................................................................................................................... |
178 |
|
Circulating the Ink to Clear Precipitation.......................................................................................................................... |
178 |
|
Handling Severe Dot Drop-out .................................................................................................................................................. |
180 |
|
Handling Severe Dot Drop-out with White Ink................................................................................................................. |
180 |
|
Cleaning All Print Heads ................................................................................................................................................... |
184 |
|
Partially Restricting the Print Heads Used for Printing..................................................................................................... |
187 |
|
Emergency Measure) Cleaning the Print Head Surface.................................................................................................... |
197 |
4. Replacing Consumable Parts and Products ........................................................................................................ |
198 |
|
|
How to Replace Consumable Parts............................................................................................................................................ |
199 |
|
Replacing the Wipers and Wiper Cleaner......................................................................................................................... |
199 |
|
Replacing the Filter........................................................................................................................................................... |
204 |
|
Replacing the Cleaning Pad Unit ...................................................................................................................................... |
207 |
|
Inquiries for Consumable Parts and Products ........................................................................................................................... |
208 |
|
Items That You Can Purchase and Replace by Yourself .................................................................................................... |
208 |
|
Items That Require Inquiries before Replacement........................................................................................................... |
208 |
Chapter 5 Troubleshooting Methods........................................................................................... |
209 |
|
1. |
Print Quality Problems ....................................................................................................................................... |
210 |
|
Printed Results Are Coarse or Contain Horizontal Stripes ......................................................................................................... |
211 |
|
Do the print heads cause dot drop-out? .......................................................................................................................... |
211 |
|
Are the software RIP settings appropriate?...................................................................................................................... |
211 |
|
Is the printer installed in a level and stable location? ...................................................................................................... |
211 |
|
Is the printer installed in a location that is not exposed to direct sunlight? .................................................................... |
211 |
|
Is the object to be printed on loaded and set up correctly? ............................................................................................ |
211 |
|
The Object to be Printed on Becomes Soiled When Printed ..................................................................................................... |
212 |
|
Are the print heads dirty? ................................................................................................................................................ |
212 |
|
Is the humidity of the room too low?............................................................................................................................... |
212 |
3

Contents |
|
Colors Are Unstable or Uneven ................................................................................................................................................. |
213 |
Did you shake the ink cartridges before installing them? ................................................................................................ |
213 |
Has the printer been used continuously for a long time? ................................................................................................ |
213 |
Was printing paused partway through? ........................................................................................................................... |
213 |
Is the printer installed in a level and stable location? ...................................................................................................... |
213 |
Is the printer set to pause during printing for cleaning?.................................................................................................. |
213 |
Is the printer being used in a location subject to severe changes in the operating environment?.................................. |
213 |
Are the settings for the [PRESET] menu item appropriate? ............................................................................................. |
213 |
2. Machine Problems.............................................................................................................................................. |
214 |
The Print Heads Do Not Move................................................................................................................................................... |
215 |
What to Do First ............................................................................................................................................................... |
215 |
If the Heads Still Do Not Move ......................................................................................................................................... |
215 |
The Printer Unit Does Not Run .................................................................................................................................................. |
216 |
Is the power switched on? ............................................................................................................................................... |
216 |
Is [SETUP] lit? ................................................................................................................................................................... |
216 |
Are any covers open? ....................................................................................................................................................... |
216 |
Is the top menu displayed? .............................................................................................................................................. |
216 |
Is [PAUSE] lit? ................................................................................................................................................................... |
216 |
Has the ink run out? ......................................................................................................................................................... |
216 |
Is a message displayed on the screen?............................................................................................................................. |
217 |
Are the cables connected? ............................................................................................................................................... |
217 |
Is the status LED for the LAN cable connector lit in green?.............................................................................................. |
217 |
Are the LAN settings correct?........................................................................................................................................... |
217 |
Did the software RIP end abnormally?............................................................................................................................. |
217 |
Is the temperature of the room too low?......................................................................................................................... |
217 |
The Flat Table Does Not Move................................................................................................................................................... |
218 |
Is something stuck in one of the movable components inside of the machine? ............................................................. |
218 |
Are any covers open? ....................................................................................................................................................... |
218 |
The Head Gap Sensor Does Not Detect the Object to Be Printed on ........................................................................................ |
219 |
Is something covering the head gap sensor or has it attracted dust?.............................................................................. |
219 |
It Is Not Possible to Check the Amount of Discharged Fluid in the Drain Bottle ....................................................................... |
220 |
Is ink splattered around the inside of the drain bottle? ................................................................................................... |
220 |
3. Messages on the Operation Panel...................................................................................................................... |
221 |
Messages ................................................................................................................................................................................... |
222 |
1 ■ 2 ■ 3 ■ 4 ■ 5 ■ 6 ■ 7 ■ ............................................................................................................................................... |
222 |
PRESS THE POWER KEY TO CLEAN.................................................................................................................................... |
222 |
CIRCULATING INK ............................................................................................................................................................. |
222 |
SHAKE WHITE INK CARTRIDGE ......................................................................................................................................... |
222 |
FINISHED PRINT................................................................................................................................................................ |
222 |
SET/REMOVE CARTRIDGE................................................................................................................................................. |
222 |
CLOSE XXX COVER DRY-UP MAY DAMAGE THE HEAD ...................................................................................................... |
222 |
CLOSE XXX COVER ............................................................................................................................................................ |
222 |
SET/REMOVE CL-LIQUID ................................................................................................................................................... |
223 |
READJUST TABLE HEIGHT ................................................................................................................................................. |
223 |
DO HEAD REFRESH ........................................................................................................................................................... |
223 |
INSTALL DRAIN BOTTLE..................................................................................................................................................... |
223 |
EMPTY DRAIN BOTTLE...................................................................................................................................................... |
223 |
SETUP MEDIA ................................................................................................................................................................... |
223 |
TIME FOR FILTER REPLACE................................................................................................................................................ |
223 |
TIME FOR WIPER REPLACE ............................................................................................................................................... |
223 |
TIME FOR MAINTENANCE ................................................................................................................................................ |
224 |
CANCEL FOR 19 LOW TEMPERATURE ........................................................................................................................... |
224 |
Error Messages .......................................................................................................................................................................... |
225 |
AREA TOO SMALL CONTINUE? ......................................................................................................................................... |
225 |
PRINT AREA TOO SMALL................................................................................................................................................... |
225 |
CANCELED FOR TABLE HEIGHT ......................................................................................................................................... |
225 |
CHECK TABLE HEIGHT ....................................................................................................................................................... |
225 |
4

|
|
Contents |
|
CHECK HEIGHT OF HEAD REFRESHER ............................................................................................................................... |
225 |
|
ADJUST FAILED ................................................................................................................................................................. |
225 |
|
TEMPERATURE IS TOO HIGH **°C .................................................................................................................................... |
226 |
|
TEMPERATURE IS TOO LOW **°C ..................................................................................................................................... |
226 |
|
DATA ERROR CANCELING.................................................................................................................................................. |
226 |
|
INK SHELF LIFE EXPIRE 1234567 ....................................................................................................................................... |
226 |
|
WRONG CARTRIDGE......................................................................................................................................................... |
227 |
|
WRONG HEAD IS INSTALLED............................................................................................................................................. |
227 |
|
AVOIDING DRY-UP TURN POWER OFF.............................................................................................................................. |
227 |
|
MOTOR ERROR TURN POWER OFF................................................................................................................................... |
227 |
|
CANCELED FOR MOTOR PROTECTION .............................................................................................................................. |
227 |
|
CLEAR EXTERNAL DEVICE ERROR...................................................................................................................................... |
227 |
|
SERVICE CALL ****........................................................................................................................................................... |
227 |
Chapter 6 Appendix.................................................................................................................... |
228 |
|
1. How to Connect External Devices ...................................................................................................................... |
229 |
|
|
Connecting and Removing External Devices.............................................................................................................................. |
230 |
|
Connecting an Alarm Lamp .............................................................................................................................................. |
230 |
|
Removing the Alarm Lamp ............................................................................................................................................... |
232 |
|
Using Expansion Terminal B to Connect an External Device ............................................................................................ |
233 |
|
Disconnecting an External Device (Expansion Terminal B)............................................................................................... |
234 |
2. Operations When Moving the Unit .................................................................................................................... |
235 |
|
|
Moving the Unit......................................................................................................................................................................... |
236 |
|
Step 1 Cleaning All Print Heads .................................................................................................................................... |
236 |
|
Step 2: Securing the Print Heads and the Flat Table Using Retainers............................................................................... |
239 |
|
Step 3: Securing the Print-head Carriage in Place Using the Retainer.............................................................................. |
240 |
|
Step 4: Reinstalling the Machine...................................................................................................................................... |
242 |
3. |
Main Specifications ............................................................................................................................................ |
243 |
|
Dimensional Drawings ............................................................................................................................................................... |
244 |
|
When using a jig: Hole positions for the head refresher.................................................................................................. |
245 |
|
Locations of the Power Rating and Serial Number Label........................................................................................................... |
246 |
|
Specifications and Diagrams for the External Expansion Terminal ............................................................................................ |
247 |
|
External Controller Connector.......................................................................................................................................... |
247 |
|
Connector for an External Deodorizer.............................................................................................................................. |
248 |
|
Alarm Lamp Connector .................................................................................................................................................... |
248 |
4. |
MEMO ................................................................................................................................................................ |
250 |
5
Chapter 1 Basic Handling
Methods
6

1. Basic Information |
|
Part Names and Functions ..................................................................................................................... |
8 |
Printer Unit ................................................................................................................................... |
8 |
Head refresher............................................................................................................................ |
12 |
Operation Panel.......................................................................................................................... |
13 |
Display Screen............................................................................................................................. |
14 |
Statuses Indicated by Status Light Color..................................................................................... |
15 |
Object to Be Printed On ....................................................................................................................... |
16 |
Conditions for Settable Objects to Be Printed On....................................................................... |
16 |
Printable Area ............................................................................................................................. |
17 |
Features of Inks.................................................................................................................................... |
18 |
Features of ECO-UV Inks ............................................................................................................. |
18 |
Features of Primer ...................................................................................................................... |
18 |
Menu List ............................................................................................................................................. |
19 |
Main Menu ................................................................................................................................. |
19 |
Function Menu ........................................................................................................................... |
22 |
Language and Unit Menu ........................................................................................................... |
23 |
1. Basic Information |
7 |

Part Names and Functions
Printer Unit
 Front
Front
No. |
Name |
Function overview |
|
Handle |
Hold this handle to open and close the font cover gently. |
|
|
|
|
Front cover |
Keep this cover closed except when necessary, such as when loading the object to be |
|
|
printed on. |
|
|
|
|
Status light |
When lit, the color of the light indicates the status of the machine. |
|
|
|
|
Operation panel |
The panel containing the buttons used to operate the machine. |
|
|
|
|
Panel cover |
Remove this when performing actions such as replacing the wipers and discarding the dis- |
|
|
charged fluid. |
|
|
|
|
Print-head carriage |
The print heads are inside this carriage. |
|
|
|
|
Carriage fan |
Spins while printing. |
|
|
|
|
UV-LED device |
Shines the UV light used to cure the ink. |
|
|
|
|
Drain bottle |
Discharged fluid is stored in this bottle. |
|
|
|
|
Head gap sensor |
Detects the height of the object to be printed on. |
|
|
|
|
Flat table |
Table on which the object to be printed on is loaded. |
|
|
|
|
Extension plate |
Suppresses UV light reflections. |
|
|
|
|
Maintenance cover |
Remove this when performing actions such as cleaning the print heads. |
|
|
|
81. Basic Information

|
|
|
|
Part Names and Functions |
|
|
|
|
|
|
|
|
|
|
|
|
|
|
No. |
|
Name |
Function overview |
|
|
|
UV screen |
|
Changes the UV light reflection direction to prevent the UV light from reflecting onto the |
|
|
|
|
|
print heads. |
|
|
|
|
|
|
|
|
|
Reflected light suppression plate |
Suppresses UV light reflections. |
|
|
|
|
|
|
|
|
|
CAUTION |
Excluding the top of the flat table, do not place your hands on or touch the inside of the |
|
||
|
|
|
product. |
|
|
|
|
|
Doing so may cause burns. |
|
|
|
CAUTION |
Do not place any object on top of the extension plate or press on it with force. |
|
||
|
|
|
Doing so may cause damage. |
|
|
|
CAUTION |
Do not place any object in front of or behind the flat table. |
|
||
|
|
|
The flat table moves horizontally and vertically. If there is any object between the flat table and the ma- |
|
|
|
|
|
chine, it can be caught and cause the machine to malfunction. |
|
|
|
CAUTION |
If anything drops toward the back of the flat table, switch off all power switches before |
|
||
|
|
|
looking for the dropped object. |
|
|
Otherwise sudden movement of the machine may cause injury.
IMPORTANT
Do not place anything near the reflected light suppression plate. Doing so will eliminate the reflected light suppression effect.
1. Basic Information |
9 |
Part Names and Functions
 Rear
Rear
|
|
|
|
|
|
|
|
|
|
|
|
|
|
|
|
|
|
|
|
|
|
|
|
|
|
|
|
|
|
|
|
|
|
|
|
|
|
|
|
|
|
|
|
|
|
|
|
|
|
|
|
|
|
|
|
|
|
|
|
|
|
|
|
|
|
|
|
|
|
|
|
|
|
|
|
|
|
|
|
|
|
|
|
|
|
|
|
|
|
|
|
|
|
|
|
|
|
|
|
|
|
|
|
|
|
|
|
|
|
|
|
|
|
|
|
|
|
|
|
|
|
|
|
|
|
|
|
|
|
|
|
|
|
|
|
|
|
|
|
|
|
|
|
|
|
|
|
|
|
|
|
|
|
|
|
|
|
|
|
|
|
|
|
|
|
|
|
|
|
|
|
|
|
|
|
|
|
|
|
|
|
|
|
|
|
|
|
|
|
|
|
|
|
|
|
|
|
|
|
|
|
|
|
|
|
|
|
|
|
|
|
|
|
|
|
|
|
|
|
|
|
|
|
|
|
|
|
|
|
|
|
|
|
|
|
|
|
|
|
|
|
|
|
|
|
|
|
|
|
|
|
|
|
|
|
|
|
|
|
|
|
|
|
|
|
|
|
|
|
|
|
|
|
|
|
|
|
|
|
|
|
|
|
|
|
|
|
|
|
|
|
|
|
|
|
|
|
|
|
|
|
|
|
|
|
|
|
|
|
|
|
|
|
|
|
|
|
|
|
|
|
|
|
|
|
|
|
|
|
|
|
|
|
|
|
|
|
|
|
|
|
|
|
|
|
|
|
|
|
|
|
|
|
|
|
|
|
|
|
|
|
|
|
|
|
|
|
|
|
|
|
|
|
|
|
|
|
|
|
No. |
|
|
Name |
|
|
|
|
Function overview |
|||||||||||
|
Main power switch |
Switch the main power on/off. |
|||||||||||||||||
|
|
|
|
|
|
|
|
|
|
|
|
|
|
|
|
|
|
||
|
Power cable port |
Use this to connect the power cable. |
|||||||||||||||||
|
|
|
|
|
|
|
|
|
|
|
|
|
|
|
|
|
|
||
|
Status LED |
This lights up green when the connection to the network is normal. |
|||||||||||||||||
|
|
|
|
|
|
|
|
|
|
|
|
|
|
|
|
|
|
||
|
Activity LED |
This flashes yellow while data is being received from the network. |
|||||||||||||||||
|
|
|
|
|
|
|
|
|
|
|
|
|
|
|
|
|
|
||
|
LAN cable connector |
Use this to connect the LAN cable. |
|||||||||||||||||
|
|
|
|
|
|
|
|
|
|
|
|
|
|
|
|
|
|
||
|
Expansion terminal A |
This terminal can be used to connect the machine to an external deodorizer (the deodor- |
|||||||||||||||||
|
|
|
|
|
|
|
|
|
|
izer is sold separately). |
|||||||||
|
|
|
|
|
|
|
|
|
|
|
|
|
|
|
|
|
|
||
|
Expansion terminal B |
This terminal can be used to connect the machine to an external output device used by |
|||||||||||||||||
|
|
|
|
|
|
|
|
|
|
the user. |
|||||||||
|
|
|
|
|
|
|
|
|
|
|
|
|
|
|
|
|
|
|
|
10 1. Basic Information

Part Names and Functions
 Side
Side
No. |
Name |
Function overview |
|
Cartridge slots |
The location where ink cartridges are installed. |
|
|
|
|
Alarm lamp location |
Attach an alarm lamp (sold separately) to the machine here. When a lamp is installed, the |
|
|
connecting parts are contained within the cover. |
|
|
|
|
Alarm lamp connector |
Use this to connect an alarm lamp to the machine. When a lamp is installed, the connect- |
|
|
ing parts are contained within the cover. |
|
|
|
1. Basic Information 11
Part Names and Functions
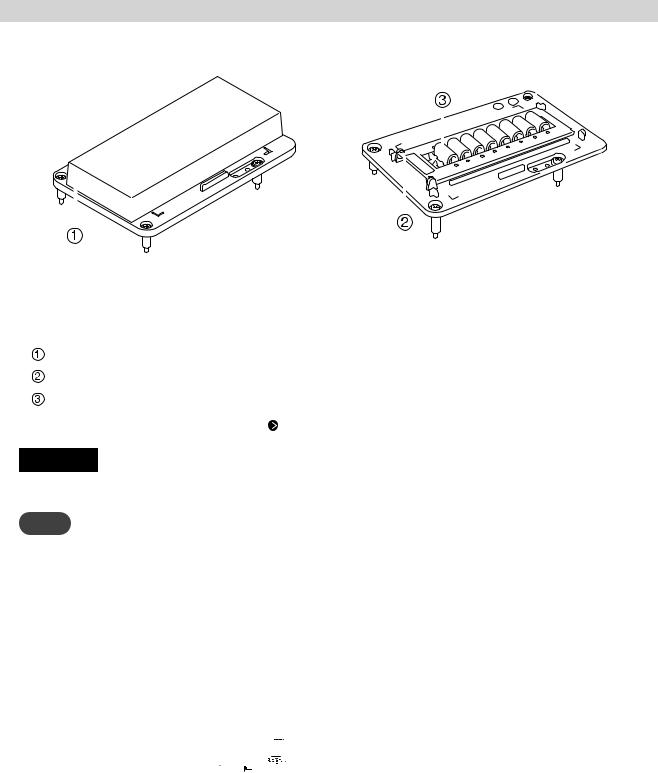
Head refresher
|
|
|
|
|
|
|
|
|
|
|
|
|
|
|
|
|
|
|
|
|
|
|
|
|
|
|
|
|
|
|
|
|
|
|
|
|
|
|
|
|
|
|
|
|
|
|
|
|
|
|
|
|
|
|
|
|
|
|
|
|
|
|
|
|
|
|
|
|
|
|
|
|
|
|
|
|
|
|
|
|
|
|
|
|
|
|
|
|
|
|
|
|
|
|
|
|
|
|
|
|
|
|
|
|
|
|
|
|
|
|
|
|
|
|
|
|
|
|
|
|
|
|
|
|
|
|
|
|
|
|
|
|
|
|
|
|
|
|
|
|
|
|
|
|
|
|
|
|
|
|
|
|
|
|
|
|
|
|
|
|
|
|
|
|
|
|
|
|
|
|
|
|
|
|
|
|
|
|
|
|
|
|
|
|
|
|
|
|
|
|
|
|
|
|
|
|
|
|
|
|
|
|
|
|
|
|
|
|
|
|
|
|
|
|
|
|
|
|
|
|
|
|
|
|
|
|
|
|
|
|
|
|
|
|
|
|
|
|
|
|
|
|
|
|
|
|
|
|
|
|
|
|
|
|
|
|
|
|
|
|
|
|
|
|
|
|
|
|
|
|
|
|
|
|
|
|
|
|
|
|
|
|
|
|
|
|
|
|
|
|
|
|
|
|
|
|
|
|
|
|
|
|
|
|
|
|
|
|
|
|
|
|
|
|
|
|
|
|
|
|
|
|
|
|
|
|
|
|
|
|
|
|
|
|
|
|
|
|
|
|
|
|
|
|
|
|
|
|
|
|
|
|
|
|
|
|
|
|
|
|
|
|
|
|
|
|
|
|
|
|
|
|
|
|
|
|
|
|
|
|
|
|
|
|
|
|
|
|
Cover closed |
|
|
|
|
|
|
|
|
|
|
|
|
Cover open |
|||||
|
|
|
|
|
|
|
|
|
|
|
|
|
|
|
|
|
|
|
|
|
|
|
|
|
|
|
|
|
|
|
|
|
|
|
|
|
|
|
|
|
|
|
|
|
|
|
|
No. |
|
|
|
Name |
|
|
|
|
|
|
|
|
Function overview |
||||||||||
|
Cover |
Keep the cover closed when the machine is not in use. |
|||||||||||||||||||||
|
|
|
|
|
|
|
|
|
|
|
|
|
|
|
|
|
|
|
|
|
|
|
|
|
Sheet retaining cover |
This cover keeps the head cleaning sheet, used for head refreshing, in place. |
|||||||||||||||||||||
|
|
|
|
|
|
|
|
|
|
|
|
|
|
|
|
|
|
|
|
|
|
|
|
|
Cleaning pad |
A total of eight cleaning pads are provided. These consumables should be replaced about |
|||||||||||||||||||||
|
|
|
|
|
|
|
every six months. |
||||||||||||||||
|
|
|
|
|
|
|
|
|
|
|
P. 207 Replacing the Cleaning Pad Unit |
||||||||||||
|
|
|
|
|
|
|
|
|
|
|
|
|
|
|
|
|
|
|
|
|
|
|
|
IMPORTANT
Continue using the same head refresher with a single machine. Using one head refresher with multiple machines may lead to print head malfunctions.
MEMO
When the head refresher is not in use, it can be put in the space on the left side of the machine. Do not place anything here other than the head refresher, head cleaning sheet, and bottle for head refreshing.
12 1. Basic Information
Part Names and Functions
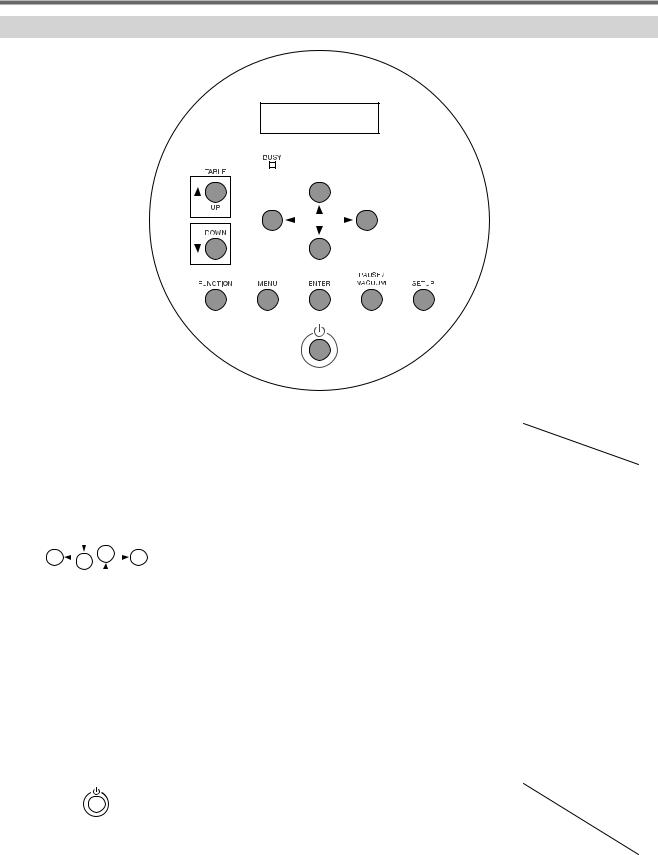
Operation Panel
Part |
Name |
Details |
Notation in this manual |
|
|
|
Display screen |
This displays various setting menus and |
|
|
W: 80mm L: 70mm |
|
||
|
H:100.0mm |
|
other information. |
|
|
|
|
|
|
|
|
|
|
|
BUSY |
BUSY light |
This lamp lights up during printing and |
[BUSY] |
|
|
|
|
other such operations. |
|
|
|
|
|
|
UP |
TABLE UP key |
The flat table goes up. |
[UP] |
|
|
|
|
|
|
DOWN |
TABLE DOWN key |
The flat table goes down. |
[DOWN] |
|
|
|
|
|
|
|
|
Cursor keys |
Use these keys to select settings for menu |
[ ][▼][▲][ ] |
|
|
|
items, to move the object to be printed |
|
|
|
|
on, and for other similar operations. |
|
|
|
|
|
|
FUNCTION |
FUNCTION key |
You press this when entering the setting |
[FUNCTION] |
|
|
|
|
menu for cleaning of the print heads, |
|
|
|
|
printing tests, and so on. |
|
|
|
|
|
|
MENU |
MENU key |
Press this to enter the menus for various |
[MENU] |
|
|
|
|
settings. |
|
|
|
|
|
|
ENTER |
ENTER key |
Use this for such tasks as enabling setting |
[ENTER] |
|
|
|
|
values. |
|
|
|
|
|
|
PAUSE/VACUUM |
PAUSE/VACUUM key |
Pauses printing. It lights when operation is |
[PAUSE/VACUUM] |
|
|
|
|
paused. |
|
|
|
|
This key is also used to turn the vacuum |
|
|
|
|
function on or off. |
|
|
|
|
|
|
SETUP |
SETUP key |
Displays the setup screen. |
[SETUP] |
|
|
|
|
|
|
|
|
Sub power switch |
This switches the printer on and off. (To |
|
|
|
|
switch the printer off, hold down the |
|
|
|
|
switch for one second or longer). The light |
|
|
|
|
flashes slowly when the machine is in |
|
|
|
|
sleep mode. |
|
|
|
|
|
|
1. Basic Information 13
Part Names and Functions
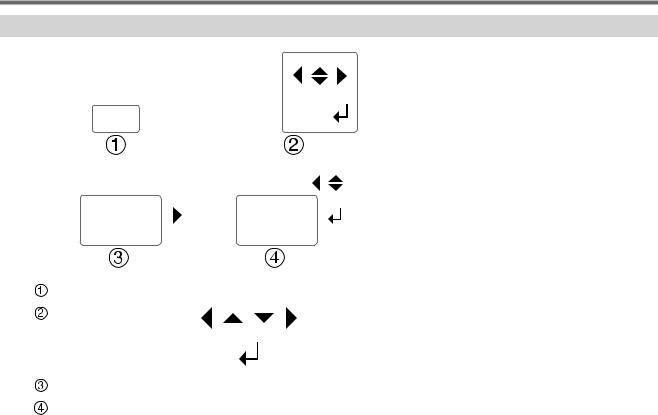
Display Screen
NORMAL CL. |
|
|
|
||
|
AB |
|
|
|
|
|
|
|
|
|
|
|
|
|
|
|
|
PRINT-END BEEP |
|
||||
|
ON |
OFF |
|
||
|
|
|
|
|
|
|
|
|
|
|
|
|
Cursor |
|
Displays the setting to be changed. You can move it with the cursor keys. |
||
|
|
|
|
|
|
|
Direction mark |
|
|
You can select settings and switch screens by pressing the cursor keys |
|
|
|
|
|
indicating directions. |
|
|
|
|
|
|
|
|
ENTER mark |
|
|
Press [ENTER] to set the selected setting or execute the processing. |
|
|
|
|
|
|
|
|
Present value |
|
The present value (before change) is displayed. |
||
|
|
|
|
||
|
Setting value |
|
Select the setting you want to set (after change). |
||
|
|
|
|
|
|
14 1. Basic Information

Part Names and Functions
Statuses Indicated by Status Light Color
The status light colors indicate the following statuses.
LED |
Status |
Off |
Setup has not been completed. Alternatively, an error that can be recovered from has occurred. |
|
The error details are shown on the display screen of the operation panel. |
|
|
Green |
Printing |
|
|
Yellow |
Setup is complete and printing can start. When flashing, printing is paused. |
|
|
Red |
An error that is preventing the machine from continuing operating, such as a motor error or an abnormal temperature |
|
inside the machine, has occurred. |
|
The error details are shown on the display screen of the operation panel. |
|
|
RELATED LINKS
P. 221 "Messages on the Operation Panel"
1. Basic Information 15
Object to Be Printed On
Conditions for Settable Objects to Be Printed On
The conditions for objects to be printed on that can be set in the machine are shown below.
Maximum size |
Width |
800 mm (31.5 in.) |
|
|
|
|
Length |
360 mm (14.2 in.) |
|
|
|
|
Thickness |
Height 100 mm |
|
|
|
Maximum weight |
8 kg (17.6 lb.) |
|
|
|
|
IMPORTANT
•Do not use objects to print on that are charged with static electricity.
•This printer cannot print on all materials. When selecting the object to be printed on, be sure to carry out testing in advance to make sure that satisfactory print quality can be obtained.
•There is a limit to the variation in the unevenness on the print surface.
 P. 72 Notes When the Print Surface Is Uneven
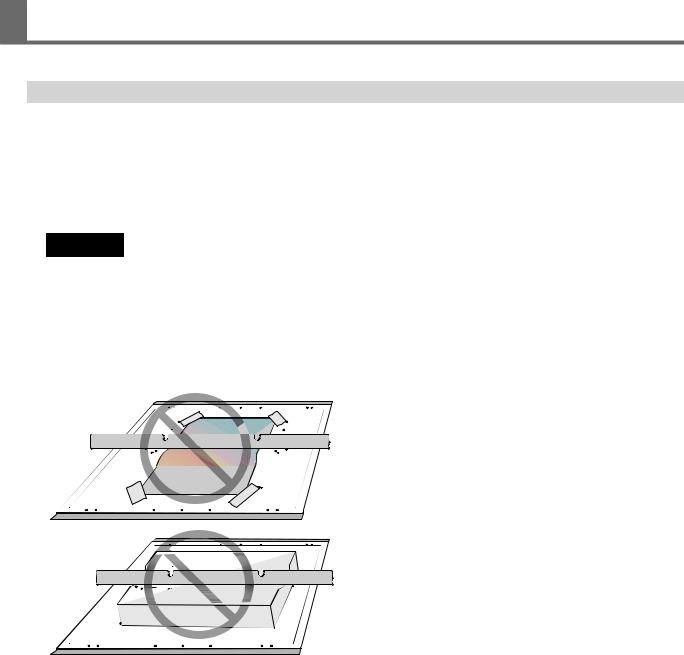
•Depending on the type of object to print on and the installation method, the height may not be set correctly. The machine may malfunction if printing is performed when an incorrect installation method is used or if printing is performed on an inappropriate material. Do not use objects to print on that match the status or material shown below.
|
|
|
Objects that easily become |
If the object to be printed on is not firmly |
|
|
|
loose |
held in place, the head gap sensor cannot |
|
|
|
|
detect the height correctly. Be sure to se- |
|
|
|
|
cure the object to be printed on firmly in |
|
|
|
|
place. If you are not able to use the suction |
|
|
|
|
function to hold the object to be printed on |
|
|
|
|
in place and it becomes loose, you can use a |
|
|
|
|
substance such as commercially available |
|
|
|
|
adhesive tape to hold the object to be print- |
|
|
|
|
ed on in place. |
|
|
|
|
|
|
|
|
Objects made from soft |
If the object to be printed on is made from |
|
|
|
material |
soft material, the pressure it applies on the |
|
|
|
|
head gap sensor is too weak. This prevents |
|
|
|
|
its height from being detected correctly. |
|
|
|
|
|
|
|
|
|
|
16 1. Basic Information
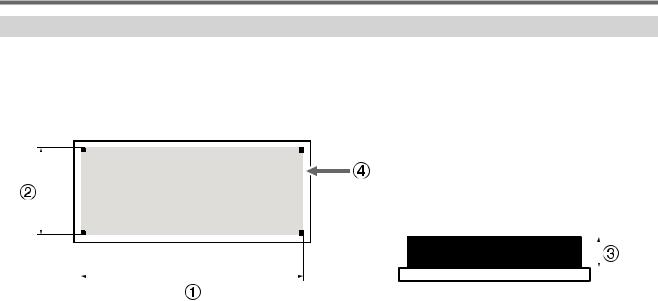
Object to Be Printed On
Printable Area
Maximum printable area: ( ) 770 mm (30.3 in.) × (
 ) 330 mm (13.0 in.) × (
 ) 100 mm (3.9 in.) [W × L × D]
•The maximum printable area is inside the square holes ( ) on the four corners of the flat table (including these holes).
•The maximum size of the object to be printed on and the maximum printable area are different.
1. Basic Information 17

Features of Inks
Features of ECO-UV Inks
This printer uses ECO-UV inks. ECO-UV inks are fixed to the object to be printed on instantly by ultraviolet light. This makes it possible to perform printing on objects that are difficult to print on using conventional inks. ECO-UV inks are available in a lineup of six colors (cyan, magenta, yellow, black, white, and gloss).
Features of Primer
The primer is a colorless and transparent coating agent used as an ink base. By using primer as a base, you can print on glass or other materials on which UV ink cannot be applied.
• The primer may not be fully efficient on some materials. Be sure to perform test printing to check the effect.
18 1. Basic Information
Menu List
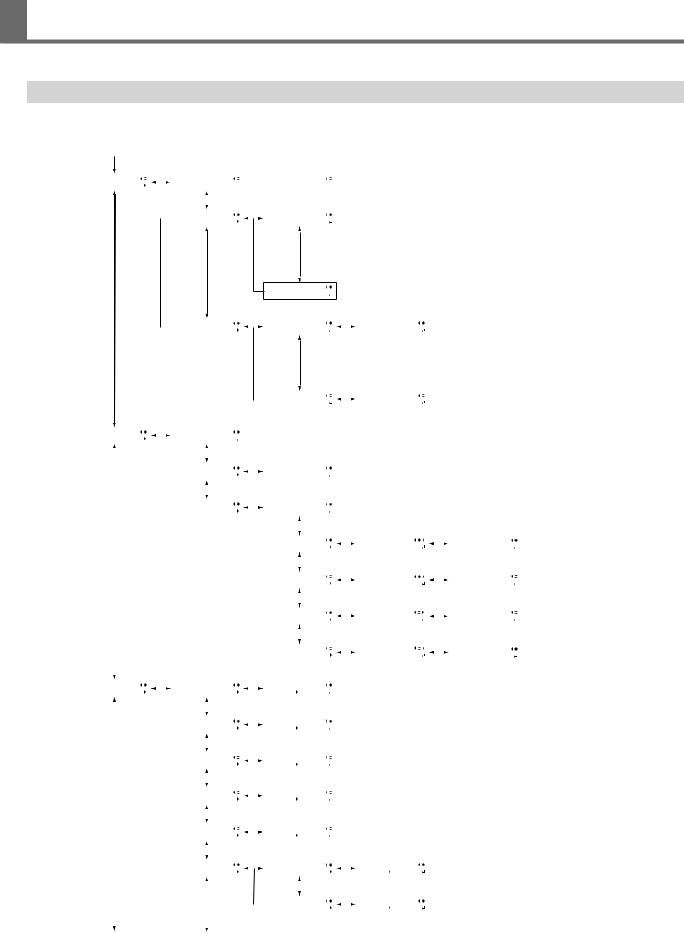
Main Menu
Press [MENU].
MENU |
|
|
|
|
PRESET |
|
|
|
PRESET |
|
PRESET |
|
|
|
|
NAME1 |
|
|
|
|
|
|
|
|
|
|
|
|
|
|
|
|
|
|
|
|
|
|
|
|
|
|
|
|
|
|
|
|
|
|
|
|
|
|
|
|
|
|
|
PRESET |
|
|
|
LOAD |
|
|
|
|
|
|
LOAD |
|
|
|
NAME1 |
|
LOAD
NAME40
|
PRESET |
|
|
|
SAVE |
|
|
|
5'6 0#/' |
|
SAVE |
|
|
|
NAME1 |
|
|
|
|
|
|
|
|
|
|
|
|
|
|
|
SAVE |
|
|
|
5'6 0#/' |
|
|
|
|
|
|
|
|
|
|
|
|
|
|
|
|
|
NAME40 |
|
|
|
|
|
|
|
|
|
|
|
|
|
|
|
|
|
|
|
|
|
|
|
|
|
|
|
|
|
|
|
|
MENU |
|
|
|
|
ADJUST BI-DIR |
|
|
|
|
|
|
|
|
|
|
|
|
|
|
||
#&,756 $+ &+4 |
|
|
|
|
|
|
|
|
|
|
|
|
|
|
|
|
|
|
|
||
|
|
|
|
|
|
|
|
|
|
|
|
|
|
|
|
|
|
|
|
|
|
|
|
|
|
|
|
|
|
|
|
|
|
|
|
|
|
|
|
|
|
|
|
|
|
|
|
|
|
|
|
|
|
|
|
|
|
|
|
|
|
|
|
|
|
|
|
|
|
|
|
#&,756 $+ &+4 |
|
|
|
5+/2.' 5'66+0) |
|
|
|
|
|
|
|
|
|
||
|
|
|
|
|
|
5+/2.' 5'66+0) |
|
|
|
|
|
|
|
|
|
|
|
|
|
||
|
|
|
|
|
|
|
|
|
|
|
|
|
|
|
|
|
|
|
|
|
|
|
|
|
|
|
|
|
|
|
|
|
|
|
|
|
|
|
|
|
|
|
|
|
|
|
|
|
|
|
|
|
|
|
|
|
|
|
|
|
|
|
|
|
|
|
|
|
|
|
|
#&,756 $+ &+4 |
|
|
|
&'6#+. 5'66+0) |
|
|
|
|
|
|
|
|
|
||
|
|
|
|
|
|
&'6#+. 5'66+0) |
|
|
|
6'56 24+06 |
|
|
|
|
|
|
|
|
|
||
|
|
|
|
|
|
|
|
|
|
|
|
|
|
|
|
|
|
|
|
|
|
|
|
|
|
|
|
|
|
|
|
|
|
|
|
|
|
|
|
|
|
|
|
|
|
|
|
|
|
|
|
|
|
|
&'6#+. 5'66+0) |
|
|
H1 |
H2 |
H3 |
|
|
|
H4 |
|
|
|
|
|
|
|
|
|
|
|
|
5'66+0) 01 |
|
|
0 |
0 |
0 |
|
|
|
0 |
|
|
|
|
|
|
|
|
|
|
|
|
|
|
|
|
|
|
|
|
|
|
|
|
|
|
|
|
|
|
|
|
|
|
|
|
|
|
|
|
|
|
|
|
|
|
|
|
|
|
|
|
|
|
|
|
|
|
|
|
|
|
|
|
|
|
|
|
|
|
|
|
|
|
|
|
|
|
&'6#+. 5'66+0) |
|
|
H1 |
H2 |
H3 |
|
|
|
H4 |
|
|
|
|
|
|
|
|
|
|
|
|
5'66+0) 01 |
|
|
0 |
0 |
0 |
|
|
|
0 |
|
|
|
|
|
|
|
|
|
|
|
|
|
|
|
|
|
|
|
|
|
|
|
|
|
|
|
|
|
|
|
|
|
|
|
|
|
|
|
|
|
|
|
|
|
|
|
|
|
|
|
|
|
|
|
|
|
|
|
|
|
|
|
|
|
|
|
|
|
|
|
|
|
|
|
|
|
|
&'6#+. 5'66+0) |
|
|
H1 |
H2 |
H3 |
|
|
|
H4 |
|
|
|
|
|
|
|
|
|
|
|
|
5'66+0) 01 |
|
|
0 |
0 |
0 |
|
|
|
0 |
|
|
|
|
|
|
|
|
|
|
|
|
|
|
|
|
|
|
|
|
|
|
|
|
|
|
|
|
|
|
|
|
|
|
|
|
|
|
|
|
|
|
|
|
|
|
|
|
|
|
|
|
|
|
|
|
|
|
|
|
|
|
|
|
|
|
|
|
|
|
|
|
|
|
|
|
|
|
&'6#+. 5'66+0) |
|
|
H1 |
H2 |
H3 |
|
|
|
H4 |
|
|
|
|
|
|
|
|
|
|
|
|
5'66+0) 01 |
|
|
0 |
0 |
0 |
|
|
|
0 |
|
|
|
|
|
|
|
|
|
|
|
|
|
|
|
|
|
|
|
|
|
|
|
|
|
|
|
|
|
|
|
|
|
|
|
|
|
|
|
|
|
|
|
|
|
MENU |
|
|
|
|
SUB MENU |
|
|
|
5'6 #6 5'672 |
|
|
|
|
|
|
|
|
|
|||
SUB MENU |
|
|
|
|
SET AT SETUP |
|
|
|
'0#$.' &+5#$.' |
|
|
|
|
|
|
|
|
|
|||
|
|
|
|
|
|
|
|
|
|
|
|
|
|
|
|
|
|
|
|
|
|
|
|
|
|
|
|
|
|
|
|
|
|
|
|
|
|
|
|
|
|
|
|
|
|
|
|
|
|
|
|
|
|
|
|
|
|
|
|
|
|
|
|
|
|
|
|
|
|
|
|
SUB MENU |
|
|
|
SET Z AXIS |
|
|
|
|
|
|
|
|
|
||
|
|
|
|
|
|
SET Z AXIS |
|
|
|
HGT |
THK |
|
|
|
|
|
|
|
|
|
|
|
|
|
|
|
|
|
|
|
|
|
|
|
|
|
|
|
|
|
|
|
|
|
|
|
|
|
|
|
|
|
|
|
|
|
|
|
|
|
|
|
|
|
|
|
|
|
|
|
|
|
|
|
|
|
|
|
|
|
|
|
|
|
|
|
|
|
|
|
|
|
|
57$ /'07 |
|
|
|
|
5'6 $#5' 215 |
|
|
|
|
|
|
|
|
|
|
|
|
|
|
|
|
5'6 $#5' 215 |
|
|
|
.19'4 4 %'06'4 |
|
|
|
|
|
|
|
|
|
||
|
|
|
|
|
|
|
|
|
|
|
|
|
|
|
|
|
|
|
|
|
|
|
|
|
|
|
|
|
|
|
|
|
|
|
|
|
|
|
|
|
|
|
|
|
|
|
|
|
|
57$ /'07 |
|
|
|
|
#761 &190 |
|
|
|
|
|
|
|
|
|
|
|
|
|
|
|
|
#761 &190 |
|
|
|
OO OO |
|
|
|
|
|
|
|
|
|
||
|
|
|
|
|
|
|
|
|
|
|
|
|
|
|
|
|
|
||||
|
|
|
|
|
|
|
|
|
|
|
|
|
|
|
|
|
|
|
|
|
|
|
|
|
|
|
|
|
|
|
|
|
|
|
|
|
|
|
|
|
|
|
|
|
|
|
|
|
|
|
|
|
|
|
|
|
|
|
|
|
|
|
|
|
|
|
|
|
|
|
|
57$ /'07 |
|
|
|
|
(7.. 9+&6* 5 |
|
|
|
|
|
|
|
|
|
|
|
|
|
|
|
|
(7.. 9+&6* 5 |
|
|
|
(7.. 1(( |
|
|
|
|
|
|
|
|
|
||
|
|
|
|
|
|
|
|
|
|
|
|
|
|
|
|
|
|
||||
|
|
|
|
|
|
|
|
|
|
|
|
|
|
|
|
|
|
|
|
|
|
|
|
|
|
|
|
|
|
|
|
|
|
|
|
|
|
|
|
|
|
|
|
|
|
|
|
|
|
|
|
|
|
|
|
|
|
|
|
|
|
|
|
|
|
|
|
|
|
|
|
57$ /'07 |
|
|
|
|
%.'#4#0%' /1&' |
|
|
SETTING |
|
|
|
|
|
||
|
|
|
|
|
|
%.'#4#0%' /1&' |
|
|
|
SETTING |
|
|
|
%#0%'. 4' #&, |
|
|
|
|
|||
|
|
|
|
|
|
|
|
|
|
|
|
|
|
|
|
||||||
|
|
|
|
|
|
|
|
|
|
|
|
|
|
|
|
|
|
|
|
|
|
|
|
|
|
|
|
|
|
|
|
|
|
|
|
|
|
|
|
|
|
|
|
|
|
|
|
|
|
|
|
|
|
|
|
|
|
|
|
|
|
|
|
|
|
|
|
|
|
|
|
|
|
|
|
|
%.'#4#0%' /1&' |
|
|
THRESHOLD |
|
|
|
|
|||
|
|
|
|
|
|
|
|
|
|
|
6*4'5*1.& |
|
|
10.0mm |
10.0mm |
|
|
|
|
||
|
|
|
|
|
|
|
|
|
|
|
|
|
|
|
|
|
|
|
|
|
|
|
|
|
|
|
|
|
|
|
|
|
|
|
|
|
|
|
|
|
|
|
|
1. Basic Information 19
Menu List
57$ /'07
246 %106+07'
57$ /'07 /+56 %#6%*'4
SUB MENU
PERIODIC CL.
57$ /'07 24+/'4 %.
57$ /'07 56#675 .+)*6
57$ /'07
24+06 '0& $''2
57$ /'07 ':6 2146 $
57$ /'07  (#%614; &'(#7.6
246 %106+07'  '0#$.' &+5#$.'
/+56 %#6%*'4 1(( .19
PERIODIC CL.
010' OKP
24+/'4 %.  OKP OKP
56#675 .+)*6
10 1((
24+06 '0& $''2
10 1((
':6 2146 $  '0#$.' &+5#$.'
|
SUB MENU |
|
|
|
|
SLEEP |
|
|
|
INTERVAL |
|
|
|
|
|
||
|
SLEEP |
|
|
|
|
INTERVAL |
|
|
|
15min |
15min |
|
|
|
|
||
|
|
|
|
|
|
|
|
|
|
|
|
|
|
|
|
|
|
|
|
|
|
|
|
|
|
|
|
|
|
|
|
|
|
|
|
|
|
|
|
|
|
|
|
|
|
|
|
|
|
|
|
|
|
|
|
|
|
|
|
|
SLEEP |
|
|
|
SETTING |
|
|
|
|
|
|
|
|
|
|
|
|
|
SETTING |
|
|
|
'0#$.' &+5#$.' |
|
|
|
|
||
|
|
|
|
|
|
|
|
|
|
|
|
|
|
|
|
|
|
|
|
|
|
|
|
|
|
|
|
|
|
|
|
|
|
|
|
|
57$ /'07 |
|
|
|
|
|
+0- %10614. |
|
|
|
'/26; /1&' |
|
|
|
|
||
|
+0- %10641. |
|
|
|
|
'/26; /1&' |
|
|
|
5612 %106 |
|
|
|
|
|||
|
|
|
|
|
|
|
|
|
|
|
|
|
|
|
|
|
|
|
|
|
|
|
|
|
|
|
|
|
|
|
|
|
|
|
|
|
|
|
|
|
|
|
|
|
|
|
|
|
|
|
|
|
|
|
|
|
|
|
|
|
+0- %10641. |
|
|
|
EMPTY |
|
|
|
|
|
|
|
|
|
|
|
|
|
27/2 72 |
|
|
|
|
&4#+0 $166.' |
|
|
|
|
|
|
|
|
|
|
|
|
|
|
|
|
|
|
|
|
|
|
|
|
|
|
|
|
|
|
|
|
|
|
|
|
|
|
|
|
|
|
|
|
|
|
|
|
|
|
|
|
|
|
|
|
|
|
|
|
|
|
|
|
|
|
+0- %10641. |
|
|
|
%.'#0+0) .+37+& |
|
|
|
EMPTY |
||
|
|
|
|
|
|
|
*'#& 9#5* |
|
|
|
+5 4'37+4'& |
|
|
|
&4#+0 $166.' |
||
|
|
|
|
|
|
|
|
|
|
|
|
|
|
|
|
|
|
|
|
|
|
|
|
|
|
|
|
|
|
|
|
|
|
|
|
|
|
|
|
|
|
|
|
|
|
|
|
|
|
|
|
|
|
|
|
|
|
|
|
|
+0- %10641. |
|
|
|
%+4%7.#6' +0- |
|
|
|
|
||
|
|
|
|
|
|
|
%+4%7.#6' +0- |
|
|
|
CIR-DISCHARGE |
|
|
|
|
||
|
|
|
|
|
|
|
|
|
|
|
|
|
|
|
|
|
|
|
|
|
|
|
|
|
|
|
|
|
|
|
|
|
|
|
|
|
SUB MENU |
|
|
|
|
MAINTENANCE |
|
|
|
|
|
|
|
|
|
||
|
MAINTENANCE |
|
|
|
|
CLEANING |
|
|
|
|
|
|
|
|
|
||
|
|
|
|
|
|
|
|
|
|
|
|
|
|
|
|
|
|
|
|
|
|
|
|
|
|
|
|
|
|
|
|
|
|
|
|
|
|
|
|
|
|
|
|
|
|
|
|
|
|
|
|
|
|
|
|
|
|
|
|
|
MAINTENANCE |
|
|
|
|
|
|
|
|
|
|
|
|
|
|
|
|
|
4'2.#%' 9+2'4 |
|
|
|
|
|
|
|
|
|
|
|
|
|
|
|
|
|
|
|
|
|
|
|
|
|
|
|
|
|
|
|
|
|
|
|
|
|
|
|
|
|
|
|
|
|
|
|
|
|
|
|
|
|
|
|
|
|
|
|
|
|
|
|
|
|
|
|
|
|
|
|
MAINTENANCE |
|
|
|
|
|
|
|
|
|
|
|
|
|
|
|
|
|
4'2.#%' (+.6'4 |
|
|
|
|
|
|
|
|
|
|
|
|
|
|
|
|
|
|
|
|
|
|
|
|
|
|
|
|
|
|
|
|
|
|
|
|
|
|
|
|
|
|
|
|
|
|
|
|
|
|
|
|
|
MAINTENANCE |
|
|
|
|
|
|
|
|
|
|
|
|
|
|
|
|
|
&4#+0 $166.' |
|
|
|
|
|
|
|
|
|
|
|
|
|
|
|
|
|
|
|
|
|
|
|
|
|
|
|
|
57$ /'07  6'56 24+06 215
6'56 24+06 215 5%#0 (''&
|
|
|
|
|
57$ /'07 |
|
|
|
4'(4'5*'4 #&, |
|
|
|
5'6 *'#& |
|
|
|
|
|
4'(4'5*'4 #&, |
|
|
|
&'(#7.6 #&,756 |
|
|
|
4'(4'5*'4C |
|
|
|
|
|
|
|
|
|
|
|
|
|
|
MENU |
|
|
|
|
5;56'/ +0(1 |
|
|
|
MODEL |
|
|
|
|
5;56'/ +0(1 |
|
|
|
|
/1&'. |
|
|
|
XX-XXX |
|
|
|
|
20 1. Basic Information
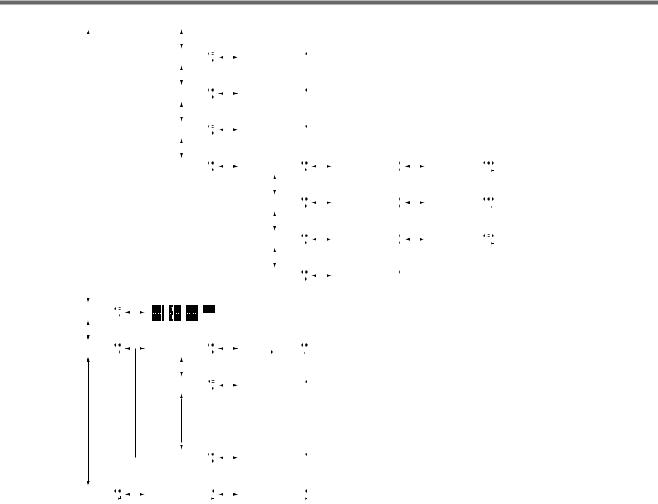
Menu List
|
|
|
|
|
|
|
|
|
|
|
|
|
|
|
|
|
|
|
|
|
|
|
|
|
|
|
|
|
|
|
|
|
|
|
|
|
|
|
|
|
|
|
|
|
|
|
5;56'/ +0(1 |
|
|
|
|
5'4+#. 01 |
|
|
|
|
|
|
|
|||
|
|
|
|
|
5'4+#. 01 |
|
|
|
|
XXXXXXX |
|
|
|
|
|
|
|
|||
|
|
|
|
|
|
|
|
|
|
|
|
|
|
|
|
|
|
|
|
|
|
|
|
|
|
|
|
|
|
|
|
|
|
|
|
|
|
|
|
|
|
|
|
|
|
|
|
|
|
|
|
|
|
|
|
|
|
|
|
|
|
|
|
|
|
|
|
5;56'/ +0(1 |
|
|
|
|
INK |
|
|
|
|
|
|
|
|||
|
|
|
|
|
+0- |
|
|
|
|
|
|
XXXX XXXX XXXX |
|
|
|
|
|
|
|
|
|
|
|
|
|
|
|
|
|
|
|
|
|
|
|
|
|
|
|
|
|
|
|
|
|
|
|
|
|
|
|
|
|
|
|
|
|
|
|
|
|
|
|
|
|
|
|
|
|
|
|
|
|
|
|
|
|
|
|
|
|
|
|
|
|
|
|
|
5;56'/ +0(1 |
|
|
|
|
FIRMWARE |
|
|
|
|
|
|
|
|||
|
|
|
|
|
(+4/9#4' |
|
|
|
|
|
Ver. X.XX |
|
|
|
|
|
|
|
||
|
|
|
|
|
|
|
|
|
|
|
|
|
|
|
|
|
|
|
|
|
|
|
|
|
|
|
|
|
|
|
|
|
|
|
|
|
|
|
|
|
|
|
|
|
|
|
|
|
|
|
|
|
|
|
|
|
|
|
|
|
|
|
|
|
|
|
|
5;56'/ +0(1 |
|
|
|
|
NETWORK |
|
|
IP ADDRESS |
|
|
|
IP ADDRESS |
|||
|
|
|
|
|
0'6914- |
|
|
|
|
|
IP ADDRESS |
|
|
XXX.XXX.XXX.XXX |
|
|
|
XXX.XXX.XXX.XXX |
||
|
|
|
|
|
|
|
|
|
|
|
|
|
|
|
|
|
|
|
|
|
|
|
|
|
|
|
|
|
|
|
|
|
|
|
|
|
|
|
|
|
|
|
|
|
|
|
|
|
|
|
|
|
|
|
|
|
|
|
|
|
|
|
|
|
|
|
|
|
|
|
|
|
|
|
NETWORK |
|
|
SUBNET MASK |
|
|
|
SUBNET MASK |
|
|
|
|
|
|
|
|
|
|
|
|
|
SUBNET MASK |
|
|
XXX.XXX.XXX.XXX |
|
|
|
XXX.XXX.XXX.XXX |
|
|
|
|
|
|
|
|
|
|
|
|
|
|
|
|
|
|
|
|
|
|
|
|
|
|
|
|
|
|
|
|
|
|
|
|
|
|
|
|
|
|
|
|
|
|
|
|
|
|
|
|
|
|
|
|
|
|
|
|
|
|
|
|
|
|
|
|
|
|
|
|
|
|
|
|
NETWORK |
|
|
)#6'9#; #&&4 |
|
|
|
)#6'9#; #&&4 |
|
|
|
|
|
|
|
|
|
|
|
|
|
)#6'9#; #&&4 |
|
|
XXX.XXX.XXX.XXX |
|
|
|
XXX.XXX.XXX.XXX |
|
|
|
|
|
|
|
|
|
|
|
|
|
|
|
|
|
|
|
|
|
|
|
|
|
|
|
|
|
|
|
|
|
|
|
|
|
|
|
|
|
|
|
|
|
|
|
|
|
|
|
|
|
|
|
|
|
|
|
|
|
|
|
|
|
|
|
|
|
|
|
|
|
|
|
|
NETWORK |
|
|
MAC ADDRESS |
|
|
|
|
|
|
|
|
|
|
|
|
|
|
|
|
|
MAC ADDRESS |
|
|
XXXXXXXXXXXX |
|
|
|
|
|
|
|
|
|
|
|
|
|
|
|
|
|
|
|
|
|
|
|
|
|
|
|
|
|
|
|
|
|
|
|
|
|
|
|
|
|
|
|
|
|
|
|
MENU |
|
|
|
1 |
2 |
3 4 |
|
|
|
|
|
|
|
|
|
|
|
|
|
|
+0- 4'/#+0+0) |
|
|
|
5 |
6 |
7 |
|
|
|
|
|
|
|
|
|
|
|
|
|
|
|
|
|
|
|
|
|
|
|
|
|
|
|
|
|
|
|
|
|
|
|
|
|
|
|
|
|
|
|
|
|
|
|
|
|
|
|
|
|
|
|
|
|
|
|
|
|
|
|
|
|
|
|
|
|
|
|
|
|
|
|
|
|
MENU |
|
|
|
+0- 5*'.( .+(' |
|
|
|
|
SETTING |
|
|
|
|
|
|
|
||||
+0- 5*'.( .+(' |
|
|
|
5'66+0) |
|
|
|
|
|
'0#$.' &+5#$.' |
|
|
|
|
|
|
|
|||
|
|
|
|
|
|
|
|
|
|
|
|
|
|
|
|
|
|
|
|
|
|
|
|
|
|
|
|
|
|
|
|
|
|
|
|
|
|
|
|
|
|
|
|
|
|
|
|
|
|
|
|
|
|
|
|
|
|
|
|
|
|
|
|
|
|
|
|
+0- 5*'.( .+(' |
|
|
|
|
5.16 |
|
|
|
|
|
|
|
|
||
|
|
|
|
|
5.16 |
|
|
|
|
|
:: :: :: |
|
|
|
|
|
|
|
||
|
|
|
|
|
+0- 5*'.( .+(' |
|
|
|
5.16 |
|
|
|
|
|
5.16 |
|
|
|
:: :: :: |
|
|
|
|
|
|
|
|
|
|
MENU |
|
|
|
|
%.'#0+0) .+37+& |
|
|
|
EMPTY |
+0- 4'0'9#. |
|
|
|
|
+5 4'37+4'& |
|
|
|
&4#+0 $166.' |
1. Basic Information 21
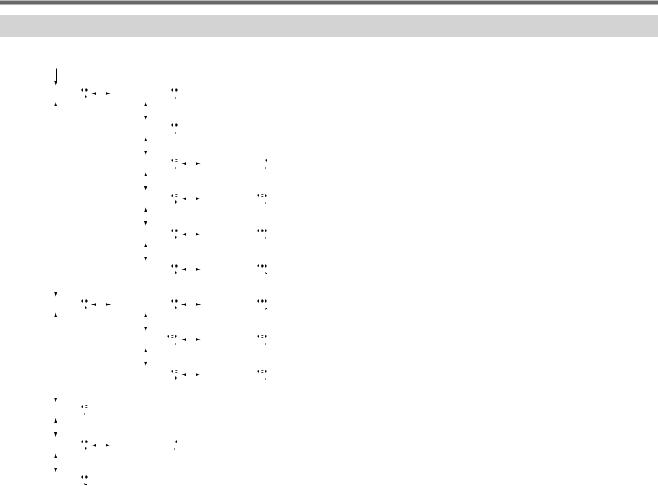
Menu List
Function Menu
Press [FUNCTION].
FUNCTION |
|
|
|
|
CLEANING |
|
|
|
|
||
CLEANING |
|
|
|
|
6'56 24+06 |
|
|
|
|
||
|
|
|
|
|
|
(*1) |
|
|
|
|
|
|
|
|
|
|
|
|
|
|
|
|
|
|
|
|
|
|
|
|
|
|
|
|
|
|
|
|
|
|
|
CLEANING |
|
|
|
|
|
|
|
|
|
|
|
6'56 24+06 |
|
|
|
|
|
|
|
|
|
|
|
(*1) |
|
|
|
|
|
|
|
|
|
|
|
|
|
|
|
|
|
|
|
|
|
|
|
|
|
|
|
|
|
|
|
|
|
|
|
CLEANING |
|
|
|
5'6 *'#& |
|
|
|
|
|
|
|
*'#& 4'(4'5* |
|
|
|
4'(4'5*'4 |
|
|
|
|
|
|
|
|
|
|
|
|
|
|
|
|
|
|
|
|
|
|
|
|
|
|
|
|
|
|
|
|
|
|
|
|
|
|
|
|
|
|
|
CLEANING |
|
|
|
NORMAL CL. |
|
|
|
|
|
|
|
NORMAL CL. |
|
|
|
AB |
|
|
|
|
|
|
|
|
|
|
|
|
|
|
|
|
|
|
|
|
|
|
|
|
|
|
|
|
|
|
|
|
|
|
|
|
|
|
|
|
|
|
|
CLEANING |
|
|
|
MEDIUM CL. |
|
|
|
|
|
|
|
MEDIUM CL. |
|
|
|
AB |
|
|
|
|
|
|
|
|
|
|
|
|
|
|
|
|
|
|
|
|
|
|
|
|
|
|
|
|
|
|
|
|
|
|
|
|
|
|
|
|
|
|
|
CLEANING |
|
|
|
POWERFULL CL. |
|
|
|
|
|
|
|
POWERFUL CL. |
|
|
|
AB |
|
|
|
|
|
|
|
|
|
|
|
|
|
FUNCTION |
|
|
|
|
6+/'4 |
|
|
|
5'6 |
||
TIMER |
|
|
|
|
5'6 |
|
|
|
|
||
|
|
|
|
|
|
|
|
|
|
|
|
|
|
|
|
|
|
|
|
|
|
|
|
|
|
|
|
|
|
|
|
|
|
|
|
|
|
|
|
|
|
TIMER |
|
|
|
DATE |
|
|
|
|
|
|
|
DATE |
|
|
|
2020/12/25 |
|
|
|
|
|
|
|
|
|
|
|
|
|
|
|
|
|
|
|
|
|
|
|
|
|
|
|
|
|
|
|
|
|
|
|
|
|
|
|
|
|
|
|
TIMER |
|
|
|
TIME |
|
|
|
|
|
|
|
6+/' |
|
|
|
09:23:59 |
|
|
|
|
|
|
|
|
|
|
|
|
|
|
|
|
|
|
|
|
|
|
|
|
|
FUNCTION |
|
|
|
|
|
|
|
|
|
|
|
%*#0)' 14+)+0 |
|
|
|
|
|
|
|
|
|
|
|
(*1) |
|
|
|
|
|
|
|
|
|
|
|
|
|
|
|
|
|
|
|
|
|
|
|
|
|
|
|
|
|
|
|
|
|
|
|
FUNCTION |
|
|
|
|
24+06 #4'# |
|
|
|
|
||
24+06 #4'# |
|
|
|
|
24'8+'9 |
|
|
|
|
|
|
(*1) |
|
|
|
|
|
(*1) |
|
|
|
|
|
|
|
|
|
|
|
|
|
|
|
||
|
|
|
|
|
|
|
|
|
|
|
|
FUNCTION |
|
|
|
|
|
|
|
|
|
|
|
UV SCANNING |
|
|
|
|
|
|
|
|
|
|
|
(*1) |
|
|
|
|
|
|
|
|
|
|
|
(*1) Not displayed if the setup of the object to be printed on is not completed (when [SETUP] is off or flashing).
22 1. Basic Information

Menu List
Language and Unit Menu
Hold down [MENU] and switch on the sub power.
MENU LANGUAGE
ENGLISH
.'0)6* 70+6
OO +0%*
6'/2 70+6
% (
1. Basic Information 23

2. Basic Operations |
|
Power Supply Operations..................................................................................................................... |
25 |
Turning the Power On................................................................................................................. |
25 |
Turning the Power Off................................................................................................................. |
26 |
Precautions When Operating the Power Supply ........................................................................ |
27 |
Sleep Mode (Power-saving Feature)........................................................................................... |
28 |
Checks before Operations.................................................................................................................... |
29 |
LAN (Local Area Network) Settings ............................................................................................. |
29 |
Preparing the Cleaning Liquid for Head Refreshing .................................................................... |
30 |
Preventing Sedimentation in Inks ............................................................................................... |
32 |
24 2. Basic Operations
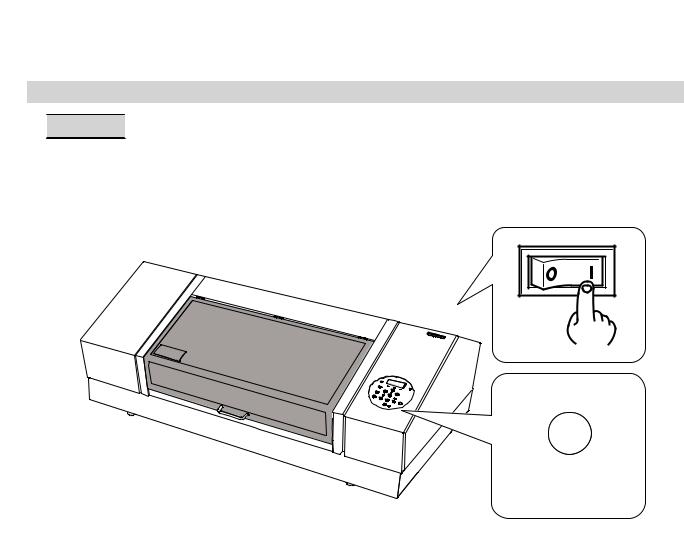
Power Supply Operations
Turning the Power On

 Procedure

1. Close the front cover.
2. Turn on the main power switch.
3. Press the sub power button.
1
2
3
IMPORTANT
Be sure to hold the handle of the front cover and keep holding it until the cover is completely opened or closed. If you do not open and close the front cover gently, it may break or you may be injured.
2. Basic Operations 25
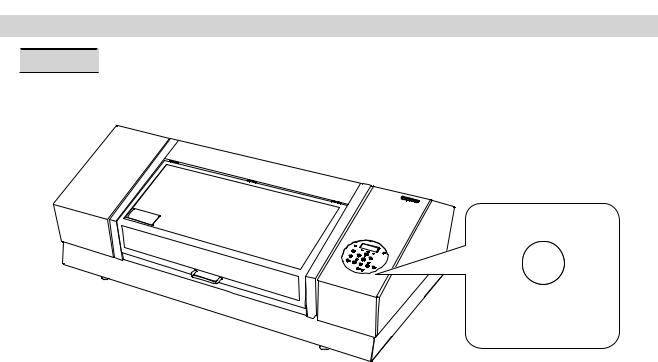
Power Supply Operations
Turning the Power Off

 Procedure

1. Switch off the sub power whenever printing is finished.
The sub power switches off automatically. Turn off the sub power after printing is complete.
26 2. Basic Operations

Power Supply Operations
Precautions When Operating the Power Supply
IMPORTANT
Always keep the main power switched on.
Never switch off the main power. Leaving the main power enables automatic maintenance to be carried out periodically. If the automatic maintenance is not carried out, it may result in the breakdown of this machine, such as the breakdown of the print heads.
IMPORTANT
Never switch off the main power or unplug the power cord suddenly while operation is in progress.
Switching off the main power or unplugging the power cord suddenly while operation is in progress may damage the print heads. Be sure to first switch off the sub power. If the main power is accidentally switched off, immediately turn the main power and sub power back on.
2. Basic Operations 27

Power Supply Operations
Sleep Mode (Power-saving Feature)
This machine is provided with a power-saving feature that switches to a low-power "sleep mode" when a fixed interval passes with no operation. The factory default for the time after which the machine switches to sleep mode is 30 minutes. When the machine is in the sleep mode, the sub power switch flashes slowly. Using the operation panel or performing operations such as sending print data from the computer restores the machine to its normal mode.
This sleep mode setting can be changed. However, we recommend setting the activation time for sleep mode to 30 minutes or less to reduce power consumption and prevent problems such as overheating.
 P. 114 Setting the Activation Interval for Sleep Mode (Power-saving Feature)
28 2. Basic Operations
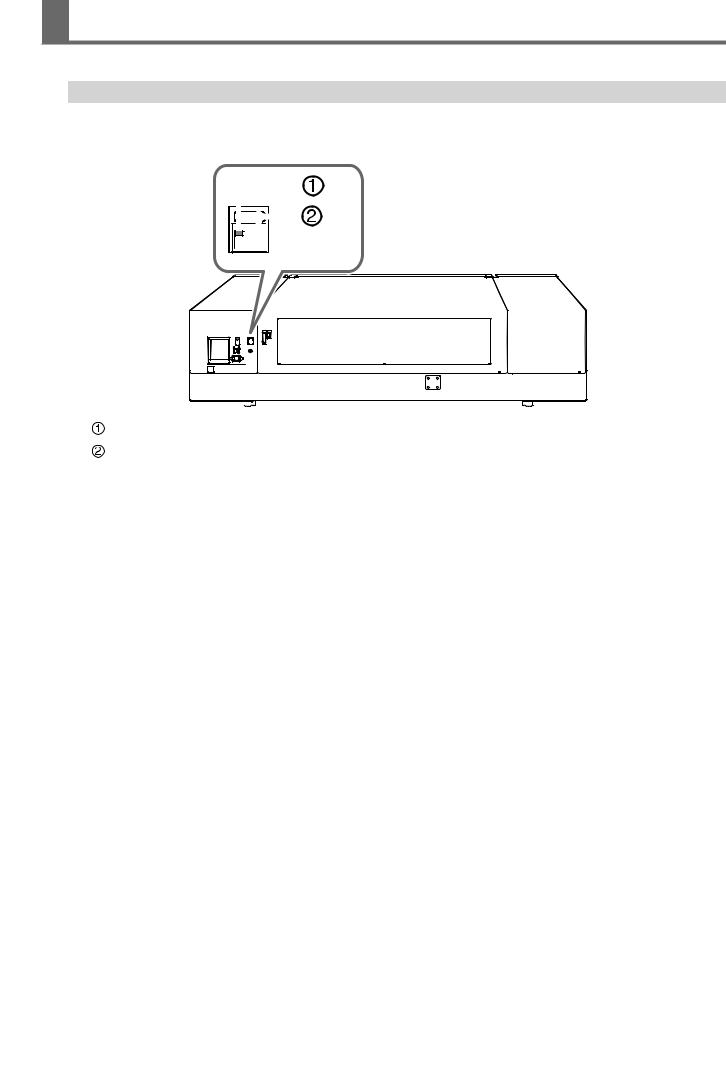
Checks before Operations
LAN (Local Area Network) Settings
Check that you can perform communication through the LAN interface.
The LAN is enabled if the status LED ( ) on the LAN connector located on the back of the printer is lit in green.
|
|
|
|
|
|
|
|
|
|
|
|
|
|
|
|
|
|
|
|
|
|
|
|
|
|
|
|
|
|
|
|
|
|
|
|
|
|
|
|
|
|
|
|
|
|
|
|
|
|
|
|
|
|
|
|
|
|
|
|
|
|
|
|
|
|
|
|
|
|
|
|
|
|
|
|
|
|
|
|
|
|
|
|
|
|
|
|
|
|
|
|
|
|
|
|
|
|
|
|
|
|
|
|
|
|
|
|
|
|
|
|
|
|
|
|
|
|
|
|
|
|
|
|
|
|
|
|
|
|
|
|
|
|
|
|
|
|
|
|
|
|
|
|
|
|
|
|
|
|
|
|
|
|
|
|
|
|
|
|
|
|
|
|
|
|
|
|
|
|
|
|
|
|
|
|
|
|
|
|
|
|
|
|
|
|
|
|
|
|
|
|
|
|
|
|
|
|
|
|
|
|
|
|
|
|
|
|
|
|
|
|
|
|
|
|
|
|
|
|
|
|
|
|
|
|
|
|
|
|
|
|
|
|
|
|
|
|
|
|
|
|
|
|
|
|
|
|
|
|
|
|
|
|
|
|
|
|
|
|
|
|
|
|
|
|
|
|
|
|
|
|
|
|
|
|
|
|
|
|
|
|
|
|
|
|
|
|
|
|
|
|
|
|
|
|
|
|
|
|
|
|
|
|
|
|
|
|
|
|
|
|
|
|
|
|
|
|
|
|
|
Status LED |
This indicates the status of the communication function. When it lights in green, communication is possible. |
|||||||||||||||||
|
|
|
|
|
|
|
|
|
|
|
|
|
|
|
|
|
|
|
|
|
Activity LED |
This flashes yellow while data is being received from the network. |
|||||||||||||||||
|
|
|
|
|
|
|
|
|
|
|
|
|
|
|
|
|
|
|
|
2. Basic Operations 29
Loading...