


r
Owner’s Manual
We’d like to take a moment to thank you for purchasing the Roland KR-3 Digital Intelligent Piano.
In order to enjoy reliable performance for many years to come, please take the time to read this manual in its entirety.
Main features
Three instruments in one
The KR-3 can be used as piano, organ, or “keyboard” (i.e. a synthesizer with automatic accompaniment) – all at the touch of a button.
270 Tones (sounds) and 136 Styles built-in
Support for a wide range of musical genres. Additional “Acoustic” Styles are provided on the included Style disk.
Piano Tones that rely on stereo sampling
The technology used ensures that your KR-3 provides some of the finest concert grand piano sounds available on electronic musical instruments.
64-voice polyphony
Up to 64 voices can be played simultaneously. (In most instances your KR-3 is 64-voice polyphonic.)
Simple yet versatile Composer
Simple recording.
Playback of commercial music data. A comprehensive Composer menu:
•16-track Sequencer
•Chord Sequencer
•Song Edit
•Style Composer
•Style Converter
GM (General MIDI) and GS compatible
•General MIDI System m
The General MIDI System is a set of recommendations which seeks to standardize the MIDI support features of sound generating devices. Sound generating devices and musical data (disks) carrying the General MIDI logo conform to the General MIDI specifications. This means that whenever you play back music data marked with the General MIDI logo, the musical response will be identical when played on any device which also carries the General MIDI logo.
•GS Format g
Roland developed the GS Format to standardize the response of sound generators when MIDI is used for the production of music. By using a GS Format sound generating device, you can be assured that you will always obtain a faithful, high-quality rendition of any commercially available music data that carries the GS Format logo.
The KR-3’s tone generator fully supports both the General MIDI system and the GS Format—so you can use music data that is designed for either standard.
Reads and writes SMF Music Data
The KR-3 is capable of playing Standard MIDI Files, such as “SMF Music Data” (720 KB/1.44 MB format 3.5 inch floppy disks).
Copyright © 2002 ROLAND EUROPE spa.
All rights reserved. No part of this publication may be reproduced in any form without the written permission of ROLAND EUROPE spa.
1

Contents
1. Important notes. . . . . . . . . . . . . . . . . . . . . . . . 5 2. Panel descriptions . . . . . . . . . . . . . . . . . . . . . . 6
3. Before using the KR-3 . . . . . . . . . . . . . . . . . . . 9
3.1 Setting up the music rest . . . . . . . . . . . . . . . . . . . . . . . . . 9 3.2 Connecting the power cable . . . . . . . . . . . . . . . . . . . . . . 9 3.3 Turning the instrument on and off. . . . . . . . . . . . . . . . . 9 3.4 Using headphones . . . . . . . . . . . . . . . . . . . . . . . . . . . . . . 9 3.5 Connecting external amplifiers and other devices. . . . . 9
4. Basic operation and display . . . . . . . . . . . . . 11
5. Overview of the KR-3 . . . . . . . . . . . . . . . . . . 12
5.1 Introduction of the main functions — [DEMO] . . . . . . 12 5.2 Performance functions. . . . . . . . . . . . . . . . . . . . . . . . . . 13 5.3 Playing back songs on disk . . . . . . . . . . . . . . . . . . . . . . 16 5.4 Pitch Bend and Transpose . . . . . . . . . . . . . . . . . . . . . . . 17
6. Tones and related functions. . . . . . . . . . . . . 18
6.1 Selecting Tones. . . . . . . . . . . . . . . . . . . . . . . . . . . . . . . . 18
Drum sounds and sound effects — [DRUMS/SFX] . . . . . . 18 Adding effects to Tones. . . . . . . . . . . . . . . . . . . . . . . . . . . . . . 19 Octave Shift: changing the pitch by octaves . . . . . . . . . . . . . 19
6.2 Keyboard modes. . . . . . . . . . . . . . . . . . . . . . . . . . . . . . . 20
7. Playing with accompaniment (Arranger) . . 22
7.1 What is an Arranger?. . . . . . . . . . . . . . . . . . . . . . . . . . . 22 7.2 Selecting Music Styles. . . . . . . . . . . . . . . . . . . . . . . . . . . 23 7.3 Starting and stopping Styles . . . . . . . . . . . . . . . . . . . . . 24 7.4 Style tempo. . . . . . . . . . . . . . . . . . . . . . . . . . . . . . . . . . . 25 7.5 Accompaniment and melody volume balance. . . . . . . 25 7.6 Switching Style arrangements (divisions) . . . . . . . . . . . 26 7.7 Easy fingering – Chord Intelligence . . . . . . . . . . . . . . . 27 7.8 Melody Intelligence . . . . . . . . . . . . . . . . . . . . . . . . . . . . 28
8. Recording and Playback . . . . . . . . . . . . . . . . 29
8.1 Recording . . . . . . . . . . . . . . . . . . . . . . . . . . . . . . . . . . . . 29 8.2 Playing back a Composer song . . . . . . . . . . . . . . . . . . . 31 8.3 Track Mute: Muting specific tracks . . . . . . . . . . . . . . . . 31 8.4 Playing back songs without tempo changes . . . . . . . . 31 8.5 Erasing the Composer song . . . . . . . . . . . . . . . . . . . . . . 31 8.6 Saving a song to disk . . . . . . . . . . . . . . . . . . . . . . . . . . . 32
9. Composer Menu. . . . . . . . . . . . . . . . . . . . . . . 32
9.1 16-track Sequencer. . . . . . . . . . . . . . . . . . . . . . . . . . . . . 32 9.2 Chord Sequencer . . . . . . . . . . . . . . . . . . . . . . . . . . . . . . 33 9.3 Recording Mode. . . . . . . . . . . . . . . . . . . . . . . . . . . . . . . 34 9.4 Formatting disks. . . . . . . . . . . . . . . . . . . . . . . . . . . . . . . 34 9.5 Style Composer. . . . . . . . . . . . . . . . . . . . . . . . . . . . . . . . 35 9.6 Style Converter . . . . . . . . . . . . . . . . . . . . . . . . . . . . . . . . 36 9.7 Saving User Styles. . . . . . . . . . . . . . . . . . . . . . . . . . . . . . 37 9.8 Song Edit. . . . . . . . . . . . . . . . . . . . . . . . . . . . . . . . . . . . . 37
10.Function Menu . . . . . . . . . . . . . . . . . . . . . . . .40
10.1 Piano screen functions. . . . . . . . . . . . . . . . . . . . . . . . . . .40 10.2 Organ screen functions . . . . . . . . . . . . . . . . . . . . . . . . . .42 10.3 Basic screen functions . . . . . . . . . . . . . . . . . . . . . . . . . . .42
11.Music Assistant, Pad buttons, pedals . . . . . .43
11.1 Music Assistant : registering panel settings . . . . . . . . . .43 11.2 Performance Pad buttons: additional or frequently used functions44
11.3 Pedal functions. . . . . . . . . . . . . . . . . . . . . . . . . . . . . . . . .45
12.Utility Menu . . . . . . . . . . . . . . . . . . . . . . . . . .46
12.1 Operating procedure. . . . . . . . . . . . . . . . . . . . . . . . . . . .46 12.2 Utility functions . . . . . . . . . . . . . . . . . . . . . . . . . . . . . . . .46
Master Tune . . . . . . . . . . . . . . . . . . . . . . . . . . . . . . . . . . . . . . . 46 Key Touch/Key Transpose. . . . . . . . . . . . . . . . . . . . . . . . . . . . 46 Metronome Volume and Beat. . . . . . . . . . . . . . . . . . . . . . . . . 47 Selecting a different Reverb and/or Chorus effect. . . . . . . . . 47 Expansion Tone . . . . . . . . . . . . . . . . . . . . . . . . . . . . . . . . . . . . 47 Lyric: switching off the display of lyrics . . . . . . . . . . . . . . . . . 47 Pitch Bend Range . . . . . . . . . . . . . . . . . . . . . . . . . . . . . . . . . . . 47 Program Change (and Bank Select) . . . . . . . . . . . . . . . . . . . . 48 MIDI: TX MIDI Ch./Local Control . . . . . . . . . . . . . . . . . . . . 48 Music Assistant Arranger Update . . . . . . . . . . . . . . . . . . . . . . 49 Memory Backup . . . . . . . . . . . . . . . . . . . . . . . . . . . . . . . . . . . . 49 Factory Preset (initialization) . . . . . . . . . . . . . . . . . . . . . . . . . 49 Link to 16TRK Sequencer . . . . . . . . . . . . . . . . . . . . . . . . . . . . 49
13.Connecting MIDI instruments . . . . . . . . . . . .50
14.Appendix. . . . . . . . . . . . . . . . . . . . . . . . . . . . .51
14.1 DSP effects . . . . . . . . . . . . . . . . . . . . . . . . . . . . . . . . . . . .51 14.2 Specifications . . . . . . . . . . . . . . . . . . . . . . . . . . . . . . . . . .51
Tones, Drum Sets, Music Styles. . . . . . . . . . .52
2

KR-3–
Using the unit safely
Used for instructions intended to alert the user to the risk of death or severe injury should the unit be used improperly.
Used for instructions intended to alert the user to the risk of injury or material damage should the unit be used improperly.
* Material damage refers to damage or other adverse effects caused with respect to the home and all its furnishings, as well to domestic animals or pets.
The symbol alerts the user to important instructions or warnings.The specific meaning of the symbol is determined by the design contained within the triangle. In the case of the symbol at left, it is used for general cautions, warnings, or alerts to danger.
The  symbol alerts the user to items that must never be carried out (are forbidden). The specific thing that must not be done is indicated by the design contained within the circle. In the case of the symbol at left, it means that the unit must never be disassembled.
The ● symbol alerts the user to things that must be carried out. The specific thing that must be done is indicated by the design contained within the circle. In the case of the symbol at left, it means that the powercord plug must be unplugged from the outlet.
001
•Before using this unit, make sure to read the instructions below, and the Owner’s Manual.
......................................................................................................
002a
• Do not open or perform any internal modifications on the unit.
009
•Do not excessively twist or bend the power cord, nor place heavy objects on it. Doing so can damage the cord, producing severed elements and
short circuits. Damaged cords are fire and shock hazards!
......................................................................................................
010
......................................................................................................
003
•Do not attempt to repair the unit, or replace parts within it (except when this manual provides specific instructions directing you to do so). Refer all servicing to your retailer, the nearest Roland Ser-
vice Center, or an authorized Roland distributor, as listed on the “Information” page.
......................................................................................................
004
• Never use or store the unit in places that are:
• Subject to temperature extremes (e.g., direct sunlight in an enclosed vehicle, near a heating duct, on top of heat-generating equipment); or are
•Damp (e.g., baths, washrooms, on wet floors); or are
•Humid; or are
•Exposed to rain; or are
•Dusty; or are
•Subject to high levels of vibration.
......................................................................................................
007
• Make sure you always have the unit placed so it is level and sure to remain stable. Never place it on stands that could wobble, or on inclined surfaces.
......................................................................................................
008a
•The unit should be connected to a power supply only of the type described in the operating instructions, or as marked on the unit.
......................................................................................................
•This unit, either alone or in combination with an amplifier and headphones or speakers, may be capable of producing sound levels that could cause permanent hearing loss. Do not operate for a long period of time at a high volume level, or at a level that is uncomfortable. If you experience any hearing loss or ringing in the ears, you
should immediately stop using the unit, and consult an audiologist.
......................................................................................................
011
•Do not allow any objects (e.g., flammable material, coins, pins); or liquids of any kind (water, soft drinks, etc.) to penetrate the unit.
......................................................................................................
013
•In households with small children, an adult should provide supervision until the child is capable of following all the rules essential for the safe operation of the unit.
......................................................................................................
014
• Protect the unit from strong impact.
(Do not drop it!)
......................................................................................................
3
KR-3 Owner’s Manual—Contents
015
•Do not force the unit’s power-supply cord to share an outlet with an unreasonable number of other devices. Be especially careful when using extension cords—the total power used by all devices you have connected to the extension cord’s outlet must never exceed the power rating
(watts/amperes) for the extension cord. Excessive loads can cause the insulation on the cord to heat up and eventually melt through.
......................................................................................................
016
•Before using the unit in a foreign country, consult with your retailer, the nearest Roland Service Center, or an authorized Roland distributor, as
listed on the “Information” page.
......................................................................................................
101a
•The unit should be located so that its location or position does not interfere with its proper venti-
lation.
......................................................................................................
102b
• Always grasp the plug on the power-supply cord
when plugging into, or unplugging from, an outlet or this unit.
......................................................................................................
104
•Try to prevent cords and cables from becoming entangled. Also, all cords and cables should be
placed so they are out of the reach of children.
......................................................................................................
106
•Never climb on top of, nor place heavy objects on the unit.
......................................................................................................
107b
• Never handle the power cord or its plugs with wet
hands when plugging into, or unplugging from, an outlet or this unit.
......................................................................................................
108d: Selection
•Before moving the instrument take note of the precautions listed below. At least two persons are required to safely lift and move the unit. It should be handled carefully, all the while keeping it level. Make sure to have a firm grip, to protect yourself from injury and the instrument from damage.
•Check to make sure the knob bolts securing the unit to the stand have not become loose. Fasten them again securely whenever you notice any loosening.
•Disconnect the power cord.
•Disconnect all cords coming from external devices.
•Raise the adjusters on the stand.
•Close the lid.
•Remove the music stand.
......................................................................................................
109a
• Before cleaning the unit, turn off the power and unplug the power cord from the outlet.
......................................................................................................
110a
• Whenever you suspect the possibility of lightning
in your area, pull the plug on the power cord out of the outlet.
......................................................................................................
116
• Be careful when opening/closing the lid so you do
not get your fingers pinched. Adult supervision is recommended whenever small children use the
unit.
......................................................................................................
118
•Should you remove the screws fastening the stand, make sure to put them in a safe place out of children's reach, so there is no chance of them
being swallowed accidentally.
......................................................................................................
4

1. Important notes
In addition to the items listed under “IMPORTANT SAFETY INSTRUCTIONS” and “USING THE UNIT SAFELY”, please read and observe the following:
Power supply
•Before connecting the KR-3 to other devices, turn off the power to all units. This will help prevent malfunctions and/or damage .
•Do not use the KR-3 on the same power circuit with any device that will generate line noise; an electric motor or variable lighting system for example.
Placement
•This instrument may interfere with radio and television reception. Do not use this instrument in the vicinity of such receivers.
•Do not place the instrument near devices that produce a strong magnetic field (e.g., loudspeakers).
•Install the instrument on a solid, level surface.
•Do not move the instrument or subject it to vibration while the disk drive is operating.
•Do not expose the KR-3 to direct sunlight, place it near devices that radiate heat, leave it inside an enclosed vehicle, or otherwise subject it to temperature extremes. Excessive heat can deform or discolor the unit.
Maintenance
•For everyday cleaning wipe the instrument with a soft, dry cloth or one that has been slightly dampened with water. To remove stubborn dirt, use a mild, non-abrasive detergent. Afterwards, be sure to wipe the instrument thoroughly with a soft, dry cloth.
•Never use benzene, thinners, alcohol or solvents of any kind, to avoid the possibility of discoloration and/or deformation.
Repairs and data backup
•Please be aware that data contained in the KR-3’s memory may be lost when the instrument is sent for repairs. Important data should always be backed up on a floppy disk, or written down on paper (if possible). During repairs, due care is taken to avoid the loss of data. However, in certain cases (such as when circuitry related to memory itself is out of order), we regret that it may not be possible to restore the data, and Roland assumes no liability concerning such loss of data.
Additional precautions
•Please be aware that the contents of memory can be irretrievably lost as a result of a malfunction, or the improper operation of the instrument. To protect yourself against the risk of losing important data, we recommend that you periodically save a backup copy of important data to a high-quality floppy disk. Bear in mind, however, that it may be impossible to restore the contents of data that was stored on a floppy disk. Roland Corporation assumes no liability concerning such loss of data.
•Use a reasonable amount of care when operating the instrument’s buttons, sliders other controls. Rough handling can lead to malfunctions.
•Never strike or apply strong pressure to the display.
•When connecting/disconnecting all cables, grasp the connector itself—never pull on the cable. This way you will avoid causing shorts, or damage to the cable wires.
•A small amount of heat will radiate from the instrument during normal operation.
•To avoid disturbing your neighbors, try to keep the instrument’s volume at a reasonable level. At times, it may be preferable to use headphones.
•When you need to transport the KR-3, package it in the box (including padding) that it came in or use a hard or soft case.
Before using floppy disks
Floppy disk drive
•Avoid using the KR-3 immediately after it has been moved to a location with a significantly higher or lower level of humidity. Rapid changes in the environment can cause condensation to form inside the drive, which will adversely affect the operation of the drive and/or damage floppy disks. When the instrument has been moved, switch it on and wait at least one hour before using the disk drive.
•To insert a disk, push it gently but firmly into the drive— it will click into place. To remove a disk, press the EJECT button.
•Never attempt to remove a floppy disk from the drive while the drive is operating (the indicator is brightly lit); damage could result to both the disk and the drive.
•Remove any disk from the drive before powering up or down.
•To prevent damage to the disk drive’s heads, always try to hold the floppy disk in a level position (not tilted in any direction) while inserting it into the drive.
Handling floppy disks
•Floppy disks contain a plastic disk with a thin magnetic coating. Microscopic precision is required to enable storage of large amounts of data on such a small surface area. To preserve their integrity, please observe the following when handling floppy disks:
•Never touch the magnetic medium inside the disk.
•Do not use or store floppy disks in dirty or dusty areas.
•Do not subject floppy disks to temperature extremes (e.g., direct sunlight in an enclosed vehicle). Recommended temperature range: 10 to 50° C (50 to 122° F).
•Do not expose floppy disks to strong magnetic fields, such as those generated by loudspeakers.
5
KR-3 Owner’s Manual—Panel descriptions
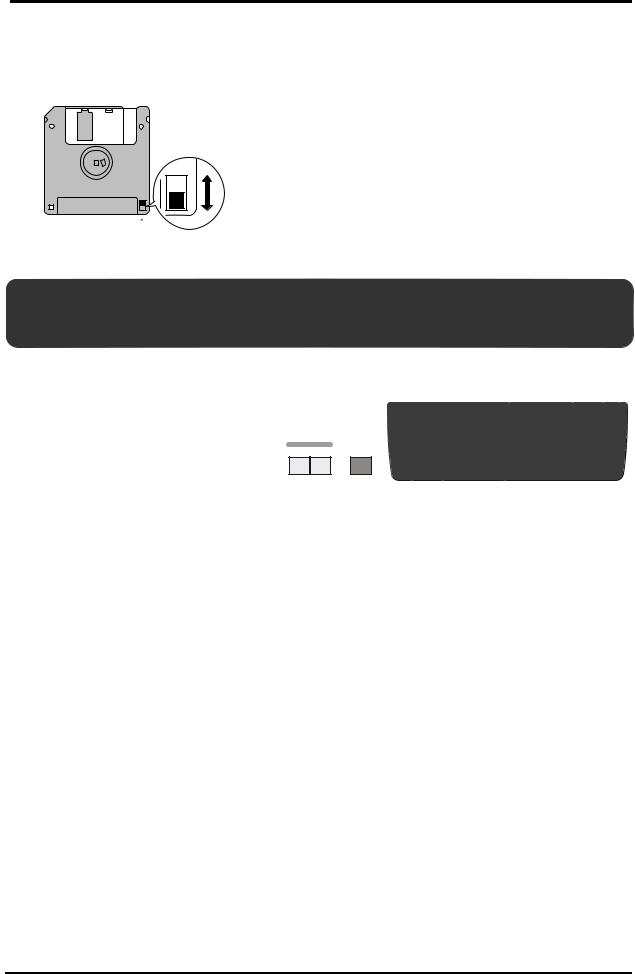
•Floppy disks have a “WRITE PROTECT” tab which can protect the disk from accidental erasure. It is recommended that the tab be kept in the PROTECT position, and moved to the WRITE position only when you wish to write new data onto the disk.
Rear side of the disk
WRITE
(you can save new data to disk)
Write protect tab 
PROTECT
(prevents writing to disk)
•Disks containing important performance data for this unit should always be locked (have their write protect tab slid to the “Protect” position) before you insert them into the drive of another instrument (except the PR-300, or a product of the HP-G, MT, KR, or Atelier families), or into a computer’s drive. Otherwise, when performing any disk operations (such as checking the contents of the disk, or loading data), you risk rendering the disk unreadable by the KR-3’s disk drive.
•The identification label should be firmly affixed to the disk. If the label comes loose while the disk is in the drive, it may be difficult to remove the disk.
•Put the disk back into its case for storage.
2.Panel descriptions
2.1Front panel
CD
A |
B |
E |
G H I J K L M N
AUTILITY button
Press this button to access the KR-3’s Utility functions (see “Utility Menu” on page 46).
BDEMO button
This button provides access to an on-screen Help function with explanations of the KR-3’s functions, games allowing you to identify sounds and chords, etc. It also allows you to listen to the internal demo songs.
CPart Balance ACCOMP and KEYBOARD buttons
Use the [ACCOMP] button to set the volume of each individual accompaniment part. The [KEYBOARD] button provides access to a display page where you can set the volume of the part(s) played via the keyboard.
DMUSIC STYLE buttons
Use these buttons to select Music Style groups. Refer to “Internal Music Styles & Disk Styles” at the end of this manual.
ETempo indicators
These indicators flash in the rhythm of the selected Music Style, sequence, or Song to indicate the tempo and time signature. Depending on the time signature, not all indicators may be used, or the last indicator may flash several times (e.g. for 6/8).
FSONG button
Press this button to load songs you recorded using the KR-3’s Song Composer and saved to floppy disk.
F
Q
O P R
GVOLUME knob
Adjusts the instrument’s overall volume.
HBRILLIANCE knob
Allows you to make the overall sound brighter or darker.
IPERFORMANCE PAD buttons
Various functions can be assigned to these buttons (see “Performance Pad buttons: additional or frequently used functions” on page 44).
JTO VARIATION & TO ORIGINAL buttons
These buttons have two functions: you can use them to select the accompaniment pattern for a Music Style or to switch from the accompaniment pattern to a FillIn during a performance.
KSYNC button
Allows you to start a Music Style by playing on the keyboard.
LSTART/STOP button
Used to start or stop a Style performance.
MINTRO/ENDING button
Press this button when you want to start a Style performance with an introduction, or to stop Music Style playback with a musical ending.
6

KR-3 – Front panel
NTEMPO buttons |
PEXIT button |
Use these buttons to adjust the tempo of the selected Music Style or of the song you are playing back.
Press this button to return to the previous display page or the Master page.
OMUSIC ASSISTANT button |
QDisplay and related buttons |
Press this button if you wish to store the panel settings or recall the settings for a given song.
The display shows all the information you need in a given situation. The soft keys next to the display (whose function varies according to the selected display page) allow you to select one of the available menu options.
S T U V W
Q
R X Y Z
RHOLD button
In most cases, the selected display page will disappear after a few seconds. Press this button to “lock” the currently selected display page. Press it again to release the Hold function, or [EXIT] to leave it right away.
S  LCD contrast knob
Use this knob to change the contrast whenever the display is difficult to read.
TTONE buttons
XONE TOUCH PROGRAM buttons
These buttons allow you to instantly recall the appropriate settings for the music you want to play.
YWhole, Lower, Upper buttons
Use these buttons to select whether you want to play one sound (Tone) on the entire keyboard (“Whole”), or one sound for the left hand and another one for the right hand.
ZMELODY INTELLIGENCE button
Used to select a Tone Group (see “Selecting Tones” on page 18).
USAVE button
Press this button to save the Song in the KR-3’s internal memory to disk.
VCOMPOSER section
Use these buttons to control the on-board sequencer (called Composer).
WTRANSPOSE [b]/[#] buttons
Change the key of the music being played.
Press this button to add a harmony to the melody you play.
aPOWER switch (left side)
Press this button to switch the KR-3 on and off.
bDisk drive (right side)
Used for playing back material recorded on floppy disks, or saving and loading songs or settings to/from disk.
cPHONES jacks (left, below the keyboard)
This is where you can connect two pairs of headphones (preferably Roland RH-25 or RH-50). Connecting a pair of headphones to one of the PHONES jacks turns off the built-in speakers.
7
KR-3 Owner’s Manual—Panel descriptions
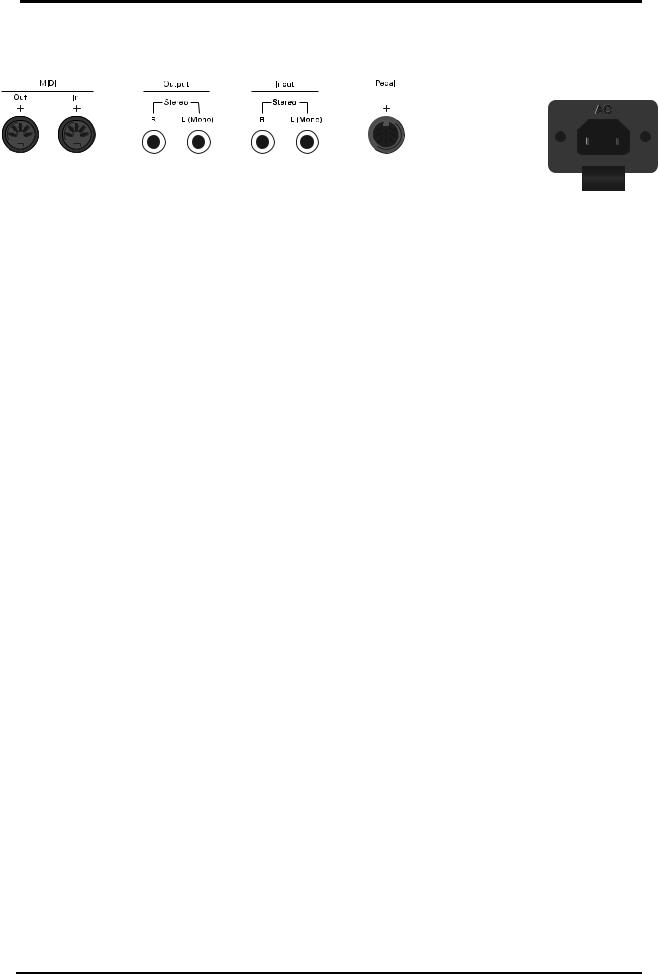
2.2 Connections
A B C D E
AMIDI connectors (Out, In)
Use these connectors to exchange MIDI data with external MIDI devices.
BOUTPUT R/L (MONO) sockets
To connect the KR-3 to an external amplifier or mixing console, or to record your music with a tape recorder, connect these jacks to the external device (see “Sending audio to external equipment” on
page 9).
CINPUT R/L (MONO) sockets
This is where you can connect the audio outputs of another MIDI instrument, a CD or cassette player, etc. The signals of that audio source will be amplified and mixed with the KR-3’s own audio signals.
DPEDAL socket
This is where you can connect the pedal cable of the stand.
EAC IN
The supplied power cord connects here.
8

3. Before using the KR-3
3.1 Setting up the music rest
The music rest sets up easily with two sections folding to the inside. To put the stand away, hold it firmly with your hands, undo the fittings, and slowly collapse the rest.
3.2Connecting the power cable
1.Set the [POWER] switch on the front panel (left side) to the OFF position.
2.After plugging the power cable included with your instrument into the AC IN jack, plug the other end into a wall socket.
Note: If you are not going to use the instrument for some time, unplug the power cord from the socket.
3.3Turning the instrument on and off
1.Before turning the instrument on, lower the volume with the [VOLUME] knob on the front panel.
2. Press the [POWER] switch to the left of the keyboard.
|
|
|
|
|
|
|
The power is on when the switch is pressed. |
|
|
|
|
|
|
||
|
|
|
|
|
|
|
The power is ON when the switch is pressed. |
|
ON |
|
|
|
OFF |
|
TheThepowerpoweris offis OFFwhenwhenthe theswitchswitchis pressedis pressed. again. |
A few seconds after turning the power on you will be able to hear the notes you play on the keyboard.
Note: In order to protect its circuits, the instrument requires a few moments after powering up before it is ready for operation.
3.4 Using headphones
You can connect one or two pairs of stereo headphones (preferably Roland RH-25, RH-50) that carry the same signal as the one sent to the OUTPUT R, L/ MONO jacks. Connecting a pair of headphones to one of the PHONES jack turns off the built-in speakers. There are two jacks, so that two pairs of headphones can be connected.
LEFT side (below the keyboard) |
Two pairs of headphones can be con- |
LEFT SIDE (below |
Two pairs of headphones |
the keyboard) |
nected. |
can be connected. |
The volume of the headphones can be adjusted using the main [VOLUME] knob.
Note: Please use stereo headphones, preferably the Roland RH-50, RH-25.
Note: Listening at excessive volume levels for extended periods may result in impaired hearing – please take appropriate caution.
3.5 Connecting external amplifiers and other devices
If the KR-3’s amplification system doesn’t deliver enough power for your application, you can take advantage of its OUTPUT jacks.
Sending audio to external equipment
Before connecting the KR-3 to another piece of equipment, turn off the power to both devices.
If you wish to amplify the KR-3 through an external system, or record your music using a tape recorder, connect the KR-3’s OUTPUT jacks to the AUX IN, LINE IN, or CH IN jacks of the external (keyboard) amplifier, mixer, or tape deck.
To the AUX IN/LINE IN jacks of the external amplifier/ mixer, etc.
Note: If you are connecting the KR-3 to a device with a monaural input, be sure to use the L/MONO jack.
Note: For cassette decks or HiFi amplifiers, you need audio leads with mono jacks at one end and (usually) RCA/cinch jacks at the other.
9
KR-3 Owner’s Manual—Before using the KR-3
After connecting the KR-3 to the amplifier, etc., be sure to switch on the KR-3 and the external device(s) in the following sequence:
1.First turn on the power to the KR-3.
2.Then turn on the power to the mixing console, amp, etc. (in that order).
Receiving audio signals from external sources
You can connect the audio outputs of an external MIDI instrument, CD or cassette player, etc., to the INPUT jacks. That has the advantage that such signals can be amplified by the KR-3 and are therefore also present in the headphones (if connected).
To connect an external signal source, follow the instructions above but be sure to connect the LINE OUT, etc., jacks of the external source to the KR-3’s INPUT jacks.
From the LINE OUT, etc., jacks of the external instrument, CD player, etc.
10
4. Basic operation and display
The KR-3 features a large-sized screen that keeps you informed about the status of your instrument and allows you to access functions for which there is (usually) no button or slider.
Typographic conventions used in this owner’s manual
This Owner’s Manual uses the following typographic conventions to indicate panel buttons and items appearing on the display.
[ ]— This indicates a button or slider on the panel. Example: the TONE [PIANO] button.
< >— This indicates an item appearing on the display. To choose such an item, press the corresponding soft button (located below or next to the item).
Example: the <Layer> button (see below).
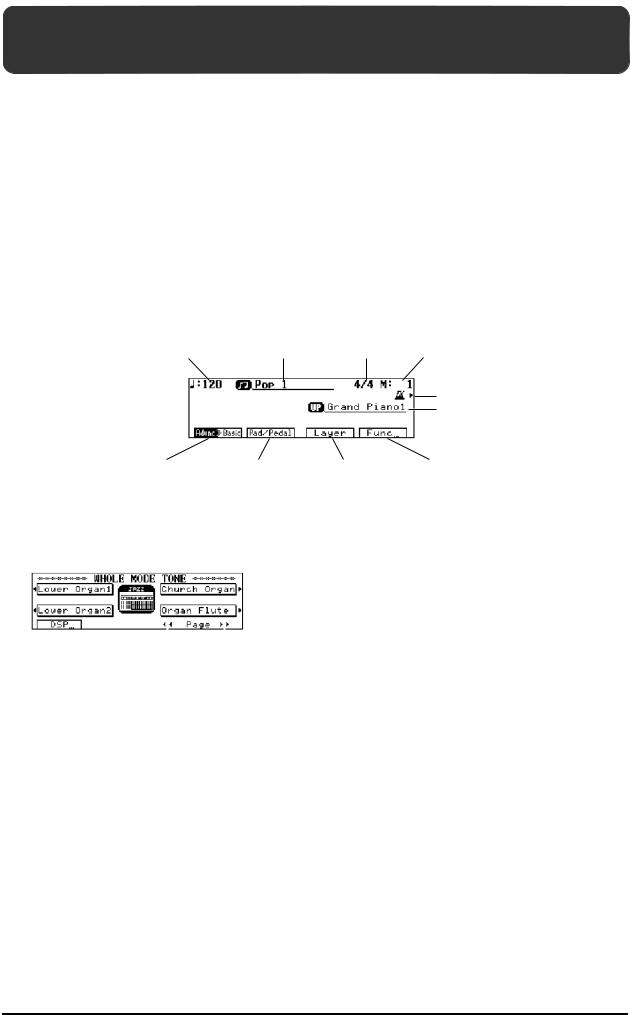
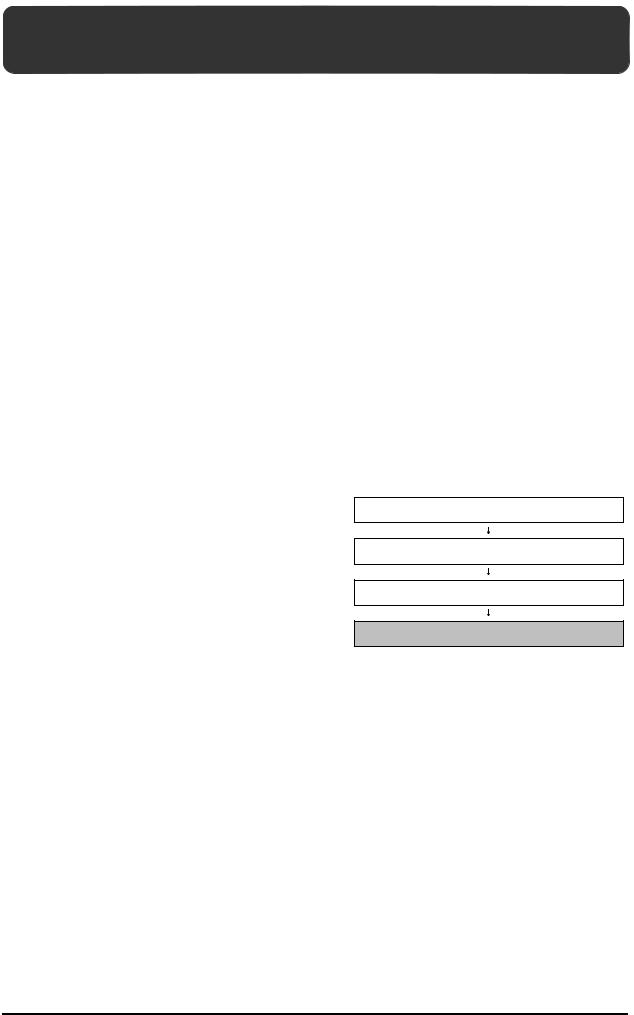
The Basic/Home screen
Here is the display page (called Basic screen) that will be displayed every time you press the One Touch Program [ARRANGER] button.
Tempo |
Chosen Style |
Time signature Current measure |
Metronome On/Off Tone Name (Upper or Whole)
Selection of another |
Registering performance |
Two Tones can |
Access the Function menu |
Style level |
functions to the [PAD] |
be played together |
|
|
buttons and pedals |
|
|
Note: If you can hardly read what is being displayed, use the CONTRAST knob to change the display contrast.
Navigating through the display pages
|
|
|
|
|
|
|
|
Go to the previous page |
Go to the next page |
||
Changing screen pages— <√√PAGE> and <PAGE®®>
Some screens may comprise multiple display pages. By pressing <PAGE®®> you will go to the next page. Press <√√PAGE> to return to the previous display page.
Retaining a screen— the [HOLD] button
Some screens are only displayed for a few seconds, after which you will be returned to the previous screen, or to the Basic screen. If you do not want the screen to change, you can “lock” the current screen on the display by pressing the [HOLD] button.
Returning to the previous screen, or to the Basic screen— [EXIT] button
By pressing the [EXIT] button, you will be returned to the previous screen, or to the Basic screen.
11
5. Overview of the KR-3
5.1 Introduction of the main functions — [DEMO]
Let’s take a look at the most striking features of your KR-3. Just follow the instructions or items that appear on the display.
1. Press the [DEMO] button.
A “Demo” screen appears on the display. The Demo screen is made up of three pages.
2.Press <▲> and <▼> to the right of the display to select another page.
The screen changes, allowing you to view the introduction to other functions.
3.Press a button below the display to choose an item.
A screen showing the functions and controls of the selected item appears.
4.Press the [DEMO] button to leave the Demo screen.
Tone and Style demo — <Sound>/<Style>
To give you a better idea of the KR-3’s Tones (sounds) and Music Styles (accompaniments) and their quality, the KR-3 comes with a Sound and Style Demo function. Here is how to use them.
1.On the Demo screen, press <Sound> for a demonstration of the Tones, or <Style> for an explanation and demonstration of the Music Styles.
2.Press <Demo> at the bottom right of the display.
3.Use the buttons to the left and right of the display to choose the instrument you want to hear, or press <Next> to audition the next Music Style.
A demo song using the selected Tone or Music Style is played. The number of demo songs varies according to the Tone you select. When the first song ends, the next one starts to play.
4.You can start playback of the second demo by pressing the same button (or <Next>) again.
The performance stops automatically when all songs have been played.
5.Press <Exit> or <To Menu> to stop playback.
Note: All rights reserved. Unauthorized use of the demo songs for purposes other than private enjoyment is a violation of applicable laws.
Note: The performance data of the demo songs are not transmitted to the MIDI OUT connector.
Choosing the display language
The Basic menu and part of the Demo menu can be displayed in other languages.
1.On the Demo screen, press <Language>.
2.Use the buttons to the left and right of the display to choose the language.
Note: This setting reverts to the original language when the power is switched off. If you prefer the KR-3 to select another language, see “Memory Backup” on page 49.
Using <Game>
The <Game> option lets you play a noteor chordguessing game.
1.On the Demo screen, press <Game>.
2.Use the buttons at the bottom of the display to select a game.
From left to right, the games displayed are “Guess the Note”, “Guess the Chord”, and “Chord Practice.”
Guess the Note— Listen to the sound that’s played, and guess what note it is.
Guess the Chord— Listen to the chord that’s played, and guess what notes are used to make it up.
Chord Practice— Look at the chord and try to play it.
Here’s how the game progresses:
3. Use the buttons below the display to choose either “Beginner” or “Advanced”.
The question appears on the display.
The display waits a few seconds and then gives you a first hint (center of the screen).
After a few more seconds, the second hint appears in the center of the screen.
Try to answer before time runs out. The faster you give the correct answer, the better your score.
12

KR-3 – Performance functions
5.2 Performance functions
Brilliance knob
Use the [Brilliance] knob to make the overall sound brighter or darker.
One Touch Program: Selecting the “instrument type”
By pressing the One Touch Program [PIANO], [ORGAN], or [ARRANGER] buttons, you will access suitable settings (registrations) for the kind of music you wish to play. To play a piano piece, for instance, press the [PIANO] button. Press [ORGAN] to transform your KR-3 into an organ. To play a song using the automatic accompaniment, press [ARRANGER].
Piano music — One Touch Program [PIANO]
The settings assigned to this button are loaded every time you turn the power on.
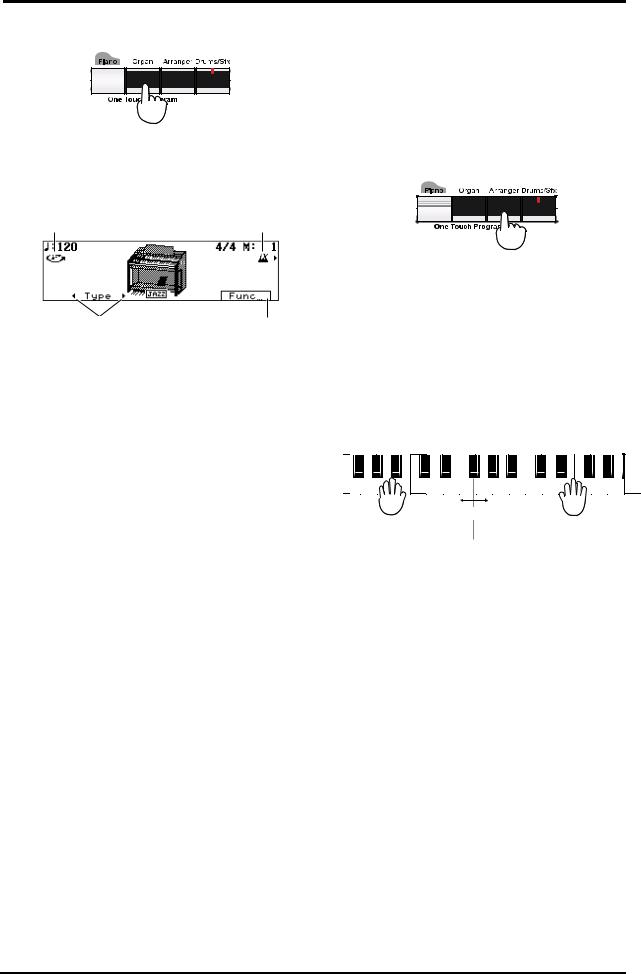
1. Press the One Touch Program [PIANO] button.
A picture of a piano will be displayed to signal that you can play a piano sound on the entire keyboard. The Tone that is selected is called “Grand Piano 1”.
Metronome
Opening and |
Function |
closing the lid |
■ Adjusting the piano tone
With the KR-3, you can simulate changes in tone of a grand piano that come about when the piano’s lid is opened or closed.
2. Press the One Touch Program [PIANO] button, and the Piano screen will appear.
Pressing <▲Open> and <▼Close> adjusts the amount of the “opening” of the piano lid.
Each time you press the <▲Open> button, the lid of the piano shown on the screen will open more, creating a brighter tone.
Each time you press the <▼Close> button, the lid of the piano shown on the screen will close more, creating a mellower tone.
■ Using the metronome
The KR-3 features a metronome function. Use the metronome whenever you want to practice at a given tempo. By pressing the button to the right of the metronome icon, you can turn the metronome on and off.
When desired, adjust the tempo with the TEMPO [+] and [–] buttons. Pressing the [+] and [–] buttons simultaneously will return the keyboard to the default (preset) tempo.
Note: You can change the metronome’s volume and time signature. Please refer to “Metronome volume and beat” on page 40.
Note: The metronome always uses the same time signature (beat) and tempo as the currently selected Style.
■ Using the pedals
The KR-3 features a PEDAL jack where you should connect the pedals that are built into the stand. Each time you switch on the KR-3, or whenever you press the One Touch Program [PIANO] button, the functions of these pedals are as follows:
|
|
|
Soft Pedal |
Damper Pedal |
|
(other functions |
|
|
can be assigned |
|
|
to this pedal) |
|
|
Soft (left)— Pressing the Soft pedal yields a softer tone.
Damper (right)— Press the Damper pedal to sustain all notes being played.
Note: The function of the left (Soft) pedal differs in Arranger and Split modes. See also “Pedal functions” on page 45.
■ The Function menu — <Func...>
This feature is used to make various useful settings for piano performances. For more detailed information, please refer to “Function Menu” on page 40.
Please note that your KR-3 comes with a variety of Tones (not just piano sounds). See “Selecting Tones” on page 18 for how to select them.
13
KR-3 Owner’s Manual—Overview of the KR-3
Organ music — One Touch Program [ORGAN]
Press the One Touch Program [ORGAN] button.
A picture of an organ will appear on the screen, with the keyboard being split at F#3 into Lower (left hand) and Upper (right hand) parts.
Switching the |
Metronome |
Rotary Speed |
ON/OFF |
Selecting another organ Type |
Function |
The Tones currently assigned to the left (Lower) and right (Upper) halves of the keyboard are called “Lower Organ 1” and “Jazz Organ 1”. These Tones make up the Jazz Organ type. See below for how to choose another organ Type.
■ Adjusting the Rotary Effect
The Jazz Organ has a rotary effect added to it. This simulates the effect obtained with those famous rotary speakers that are indispensable for a true organ sound.
To change the rotation speed, press of the soft button assigned to this function. Each press toggles the rotation speed between S (Slow) and F (Fast).
■ Selecting an organ Type
Use <√Type> and <Type®> to make your selection. The selected organ Type is memorized until power is turned off. In other words, if you select another One Touch Program mode and then press [ORGAN] again, the KR-3 will use the last organ Type you selected.
Note: When the power is switched off, the KR-3 reverts to “Jazz Organ”.
■ The Function menu —<Func...>
This feature is used to make settings for the various functions related to organ performances. For more detailed information, please refer to “Function Menu” on page 40.
Accompaniment — One Touch Program [ARRANGER]
The KR-3 comes with an “Arranger” function that provides an automatic, yet interactive, accompaniment you can use as backing for your melodies and solos. 111 accompaniments (called Music Styles) covering all popular musical genres are built-in. Other Styles can be loaded from the supplied floppy disk, while you can also create your own Styles.
The Arranger is interactive: it always adapts the key of the accompaniments to the chords you play (see “What is an Arranger?” on page 22).
■ Simple explanation of how to use the Arranger
Here’s what you need to do to be able to use the KR-3’s Arranger:
1. Press the One Touch Program [ARRANGER] button.
The keyboard is now split at F#3 into a Lower (left half of the keyboard) and an Upper section (right half).
|
F#3 |
LeftLefthand:hand: |
RigRight hand:nd: |
accompanimentaccompaniment |
melodymelody |
2.Select a Music Style (see “Selecting Music Styles” on page 23).
3.Play a chord in the Lower section to start the accompaniment.
Style playback starts with an introduction. Wait until the Intro is finished before you start playing the melody in the Upper section. If the accompaniment is too fast, you can slow it down with the TEMPO [–] button.
The KR-3 has a number of features that make playing with the Arranger even easier:
•For major chords, you only need to press the key of the root note (see “Easy fingering – Chord Intelligence” on page 27).
•You can release the keys in the Lower section after playing the desired chord. The Arranger will go on playing in that key until you play another chord.
4. At the end of your song, press the [INTRO/ ENDING] button.
How about trying using the Arranger in a real-life situation? We’ve prepared a little piece you probably know. Here’s what to do to play it:
14
KR-3 – Performance functions
Example: “When The Saints Go Marching In”
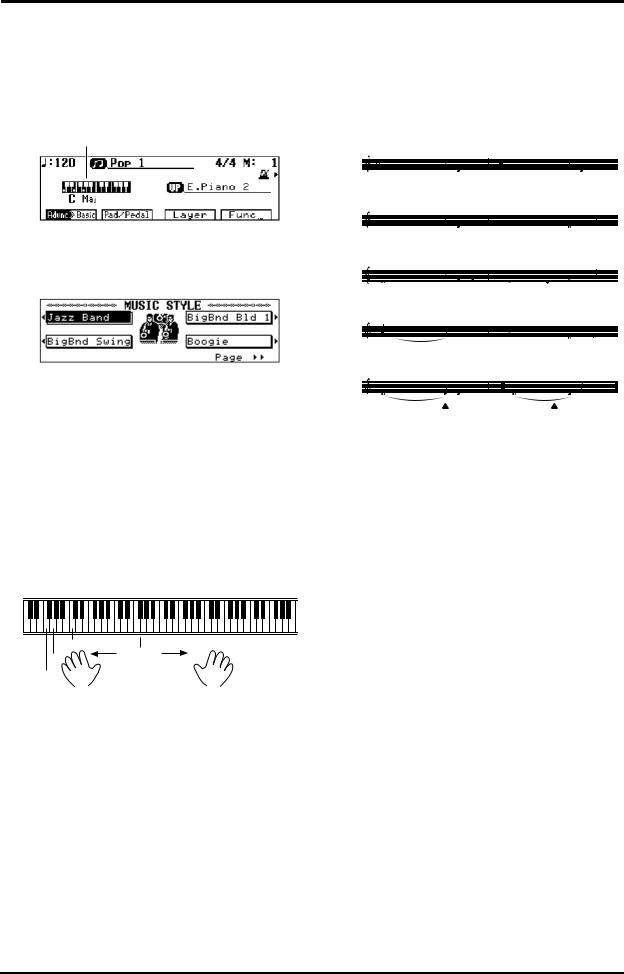
1. Press the One Touch Program [ARRANGER] button.
The Basic screen will be displayed. The names of the chords you play in the Lower section appear on the display:
Graphic chord display
2.Press the Music Style [Big Band/Swing] button.
3.From the list of Music Styles shown on the display, select <Jazz Band>.
(The Style “Jazz Band” has now been selected.) After a few seconds, the display returns to the Basic screen.
4. Start the accompaniment by pressing the C key (see the score for the chords to play).
As explained above, this is the easy way of playing chords: by pressing the C, you actually play a C major chord.
The Arranger will start with an eight-measure Intro. Wait until the Intro is finished before playing the melody.
Here are the “chords” you need for “The Saints”:
|
C |
F 3 |
|
G |
|
F |
Left |
Right |
Remember that you can slow down the tempo by pressing the TEMPO [–] button. If you think the accompaniment is too slow, press TEMPO [+] instead.
Pressing the [+] and [–] buttons simultaneously will return the Arranger to the default tempo of the Jazz Band Style.
5. At the end of the song, press the [INTRO/ENDING] button.
If you want to play the song again, press the [SYNC] button and play the first chord (C).
Note: There are various ways to start and stop a Style (see “Starting and stopping Styles” on page 24).
Once you feel you master the basic version of “The Saints”, try adding some variation here and there. Where “To Variation” is indicated in the music, press the [TO VARIATION] button. Of course, there is a lot more you can do with the KR-3’s Arranger.
When The Saints Go Marching In
American Traditional
|
|
|
|
|
C |
8 |
|
|
|
|
|
|
|
|
|
|
|
|
|
|
|
|
|
|
|
|
|
|
|
|
|
|
|
|
|
|
|
|
|
|
|
|
|
|
|
|
|
|
|
|
|
|
|
|
|
|
|
|
|
|
|
|
|
|
|
|
|
|
|
|
|
|
|
|
|
|
|
|
|
|
|
|
|
|
|
|
|
|
|
|
|
|
Right |
|
( Eight-measure Intro ) |
|
|
|
|
|
|
|
|
|
|
|
|
|
|
|
|
||||||||||||
|
|
|
|
|
|
|
|
|
|
|
C |
E |
F |
|
|
|
G |
|
|
|
|
|
|
C |
E F |
|||||
Left |
|
|
|
C chord |
|
|
|
|
|
|
|
|
|
|
|
|
|
|
|
|
||||||||||
Right |
|
|
|
|
|
|
|
|
|
|
|
|
|
|
|
|
|
|
|
|
|
|
|
|
|
|
|
|||
|
G |
|
|
|
|
|
|
|
|
C |
E |
F |
|
G |
E |
|
|
|
C |
E |
||||||||||
Left |
|
|
|
|
|
|
|
|
|
|
|
|
|
|
|
|
|
|
|
|
|
|
|
|
|
|
|
|
|
|
|
|
G |
|
|
|
|
|
|
|
|
|
|
|
|
|
C |
|
|
|
|
|
|
|
|
|
|||||
Right |
|
|
|
|
|
|
|
|
|
|
|
|
|
|
|
|
|
|
|
|
|
|
|
|
|
|||||
D |
|
|
|
|
|
|
|
E |
E |
D |
C |
|
C |
|
|
E |
G |
|||||||||||||
Left |
G chord |
|
|
|
|
|
|
|
|
|
|
C chord |
|
|
|
|
|
|
|
|
|
|||||||||
|
|
|
F |
|
|
|
|
|
|
|
|
|
|
|
|
|
C |
|
|
|
|
G |
|
|||||||
Right |
|
|
|
|
|
|
|
|
|
|
|
|
|
|
|
|
|
|
|
|
|
|
||||||||
G |
|
F |
|
|
|
|
|
|
|
|
E |
F |
|
G |
E |
|
|
|
C |
D |
||||||||||
Left |
F chord |
|
|
|
|
|
|
|
|
|
|
C chord |
|
|
|
G chord |
|
|||||||||||||
|
|
|
|
|
|
|
|
|
|
|
|
|
|
|
|
|
|
|
|
|
|
|
|
|
||||||
|
|
1. C |
|
|
|
|
|
|
|
|
|
|
|
|
2. C |
|
|
|
|
|
|
|
|
|
||||||
Right |
|
|
|
|
|
|
|
|
|
|
|
|
|
|
|
|
|
|
|
|
|
|||||||||
|
|
|
|
|
|
|
|
|
|
|
|
|
|
|
|
|
|
|
|
|
|
|
|
|
|
|
|
|
||
|
C |
|
|
|
|
|
|
|
C |
E |
F |
|
|
|
C |
|
|
|
|
|
|
|
|
|
||||||
Left |
C chord |
|
|
|
|
|
|
|
|
|
|
|
C chord |
|
|
|
|
|
|
|
|
|||||||||
|
|
|
|
|
|
|
|
|
|
|
|
|
|
|
|
|
|
|
||||||||||||
|
|
|
|
|
|
|
|
|
|
|
To Variation |
|
|
|
|
|
|
|
|
Intro/Ending |
|
|||||||||
15
KR-3 Owner’s Manual—Overview of the KR-3
5.3 Playing back songs on disk
The KR-3 is fitted with a floppy disk drive. Among other things, it allows you to listen to commercially available music data (Standard MIDI Files) or to play back songs you created and saved onto disk. Here is how to listen to such music data:
Note: Before using disks, please carefully read “Before using floppy disks” on page 5.
1.Insert the music data disk into the floppy disk drive.
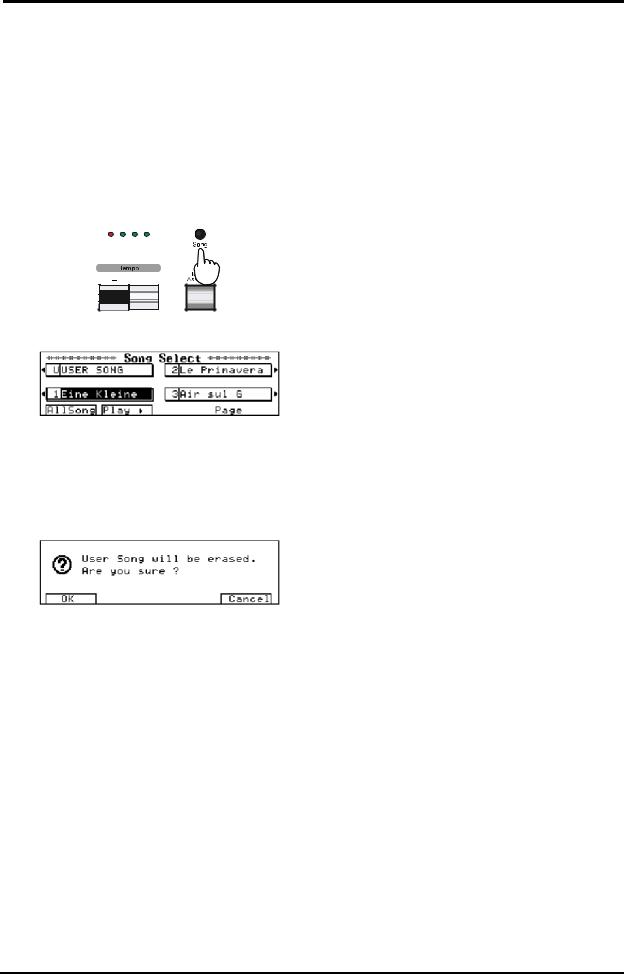
2.Press the [SONG] button.
The “Song Select” function will be displayed.
Every song you play back from disk is automatically copied to the KR-3’s internal Composer memory. (The advantage of that is that you can remove the music data disk after listening to the song once.) If the KR-3’s memory already contains a song, the following message appears:
If you don’t want to lose the song in the KR-3’s internal memory, press <CANCEL> and see “Saving a song to disk” on page 32. Otherwise, press <OK>.
Selecting and playing back Songs
3.Use the buttons next to the display to select the song you want to listen to.
If not all songs of the disk fit on one page, use <√√PAGE> and <PAGE®®> to jump to the desired Song Select page.
4.Press <Play®> or the [PLAY] button.
The performance will begin. After several seconds, the display returns to previous screen.
Note: For songs that do not begin on the downbeat of the first measure, “PU” (Pickup) will be displayed when the song begins. After that, measure numbers will be displayed.
5. Playback stops automatically at the end of the song.
You can stop playback any time by pressing <STOP■> or the [STOP] button.
If you press the [RESET] button, playback stops and the song is rewound to the beginning of the first measure.
Listening to all songs one after another
6. Press <All Song>.
The entire group of songs will begin playing in order. The set will repeat if you do not stop the performance.
7. To stop playback, press <STOP■> or the [STOP] button.
If you press the [RESET] button, playback stops and the song is rewound to the beginning of the first measure.
Rewinding and fast forwarding
By pressing the [FWD] and [BWD] buttons, you can advance to later measures or return to previous ones. Doing so allows you to start playback from the desired measure.
Each press of one of the buttons moves you ahead or back one measure at a time, and when you hold the button down, the movement is continuous.
Note: Depending on the size of the song data, rewinding and fast forwarding may take some time.
Note: It is also possible to mute one of the song parts and play it yourself. See “Track Mute: Muting specific tracks” on page 31.
Note: The KR-3 provides a function for practising difficult passages. Such passages can be marked and repeated over and over. See “Marker function: repeatedly playing back the same section” on page 41.
16
KR-3 – Pitch Bend and Transpose
5.4 Pitch Bend and Transpose
The KR-3’s left pedal (Soft) can be used to bend the notes you play. To do so, you must assign it the Pitch Bend function (see “Pedal functions” on page 45 for details) and specify whether you want to bend the notes upward (“Bend Up”) or downward (“Bend Down”). Furthermore, you must set the “Pitch Bend Range” (see page 47), i.e. the interval (or number of semitones) by which the notes will be shifted when you press the Soft pedal.
If you are playing a C and want to shift it to D by pressing the pedal, set Pitch Bend Range to “2” (two semitones, i.e. one whole tone) and select “Bend Up” as Pedal Assign function. To bend to the G below the C you are playing, set the Range value to “5” and Pedal Assign to “Bend Down” (select “7” and “Bend Up” to shift to the G above the C).
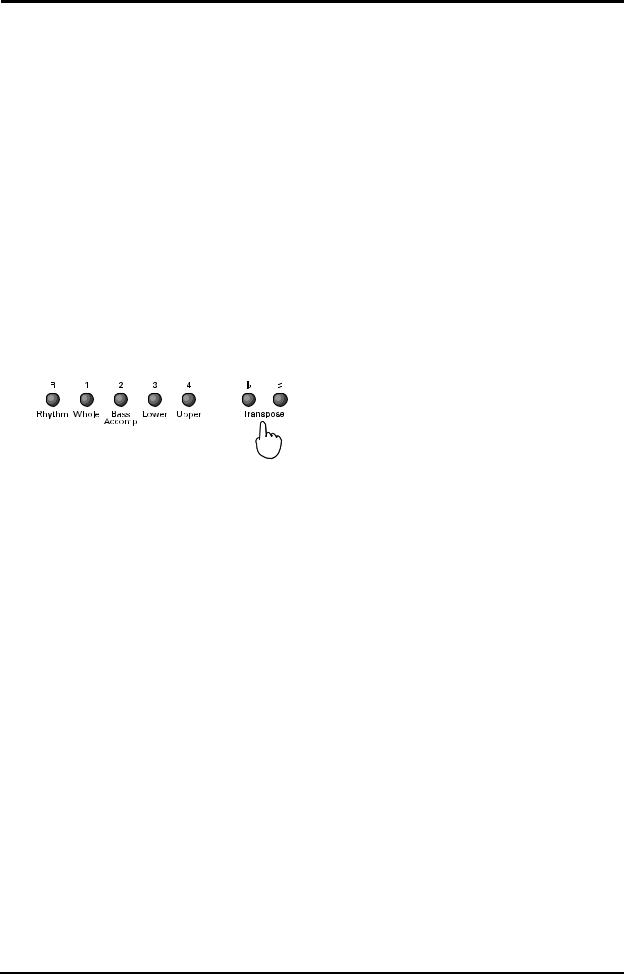
If you find the key of a song difficult to sing in, select a different one with the TRANSPOSE [b]/[#] buttons.
Each time you press the [b] button, the key will be lowered a semitone; each time you press the [#] button, the key will be raised a semitone. Pressing the [b]/ [#] buttons simultaneously will return the song to the original key.
Note: The transposition interval can also be set via the display. See “Key Touch/Key Transpose” on page 46.
17
6. Tones and related functions
6.1 Selecting Tones
The KR-3 comes with a host of instrument sounds (called Tones). These Tones are divided into eight categories, called Groups.
Selecting “normal” Tones
1. Press the TONE button of the Group that contains the Tone you need.
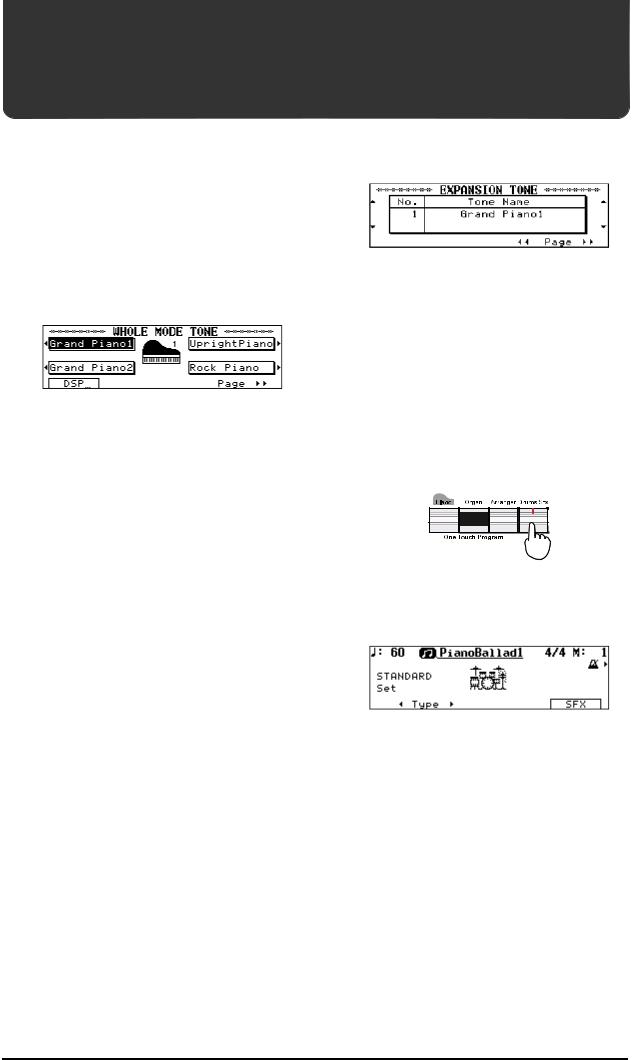
The button’s indicator will go on, and a Tone select screen (e.g. Whole Mode Tone) will be displayed.
Each Tone Group contains a varying number of Tones.
2. Select a Tone by pressing the buttons to the side of the display screen.
The name of the Tone selected will be highlighted on the display. Play a few notes on the keyboard to confirm that the Tone is what you had in mind.
The Tone Select screen is composed of multiple pages. Use <√√PAGE> and <PAGE®®> to turn to another page.
Note: If you want to try out several Tones from a Tone Group, pressing the [HOLD] button will lock the Tone Select screen and keep it from vanishing after a few seconds of inaction.
Note: See “Normal Tones” at the end of this manual for the number and kinds of Tones each Group contains.
You may wonder why we use “Normal Tones” rather than just “Tones”. That is because the above procedure does not provide access to all Tones the KR-3 contains. See “Selecting Expansion Tones” for more details about how to access all Tones.
Note: See also “Selecting Tones for the Upper and Lower parts” on page 20 for how to assign Tones in Split mode.
Selecting Expansion Tones
Expansion Tones can only be assigned to the Upper part (Whole Keyboard, Split, and Arranger modes).
Caution— Expansion Tones are only temporarily selected and cannot be written to a Music Assistant memory (see page 43). Whenever you select another mode (for example, if you change from Whole mode to Split mode), the Upper part returns to last “normal” Tone you selected.
1. Press [UTILITY] and use <√√PAGE> or <PAGE®®> to select the following display page.
2. Use the buttons to the left and right of the display to select a Tone.
See “Expansion Tones” at the end of this manual for a list of the available Tones.
Note: You can use Expansion Tones for recording the melody with the KR-3’s Composer (see page 32).
Drum sounds and sound effects — [DRUMS/SFX]
Instead of playing melodies, you can also “drum” on the KR-3’s keyboard, or play sound effects, such as trains noises, helicopter sounds, etc.
Press the [DRUMS/SFX] button (indicator lights).
The display switches to the “Drum Screen”. Every key is now assigned to a different drum or percussion sound. Play a few notes and listen – and watch the display.
Note: See “Drum Sets” at the end of this manual for details about the assignments of drum sounds and sound effects to the keyboard.
Press the [DRUMS/SFX] button once more (or the [EXIT] button), to return to the previous screen.
Toggling between drum sounds and sound effects
1.If necessary, press [DRUMS/SFX] again (indicator must light).
2.Press <SFX>.
The display will switch to the “SFX Screen”. Play a few notes on the keyboard. This time, you will hear sound effects rather than drum sounds. Again, the display will show you pictures of the sounds being played.
3. Press <Drums>.
The display jumps to the Drum Screen. With each press of the button you will toggle between drums sounds and effects.
18
KR-3 – Pitch Bend and Transpose
Selecting Drum Set Types
Press <√Type> or <Type®>.
Each time you press one of these buttons, the drum set type will change, and the names of the drum sounds appearing on the display will change.
Note: There is one SFX set.
Adding effects to Tones
Reverberation (REV)
Reverb is a digital effect that gives the impression that you are playing in a concert hall.
1. Press the [UTILITY] button.
2. Usethe <▲> and <▼> buttons to the left of the display to modify the Reverb balance.
Setting the value to “100” gives you maximum Reverb, while selecting “0” removes all Reverb from the sound. The REV parameter actually increases or decreases the Reverb Depth for the sound that is assigned to the keyboard, i.e. the part volume for the signal that is fed to the Reverb effect. Setting a high Reverb value means that you effectively increase the effect volume for the keyboard part. It works much the same way as a cathedral: the louder you sing, the more Reverb you hear. In the case of the cathedral, singing louder means that you increase the effect send level, i.e. the level of the signal (your voice) that will be processed by the acoustic environment. The overall volume of the effect (cathedral) itself, however, does not change.
That, in turn, is a good thing because other parts (the Arranger and Composer parts) are also processed by the same Reverb effect. If REV were assigned to the volume of the effect itself, selecting the Min value would also strip the accompaniment of Reverb.
Note: The KR-3 contains several Reverb programs (called Types), so that you can always use the Reverb type that best suits your needs. See “Reverb Types” on page 47.
Note: You cannot adjust the Reverb Depth of the Arranger parts or the sounds played back by the Composer function.
Adding other effects — DSP effect
DSP is short for Digital Signal Processor. Of course, the Reverb effect is also digital, but we preferred not to use “multi-effect” here because that term may be misleading. What it boils down to, however, is that the DSP effect contains a variety of effects programs, one of which you can select for the song you are about to play. See “DSP effects” on page 51 for a list of all DSP effects the KR-3 contains.
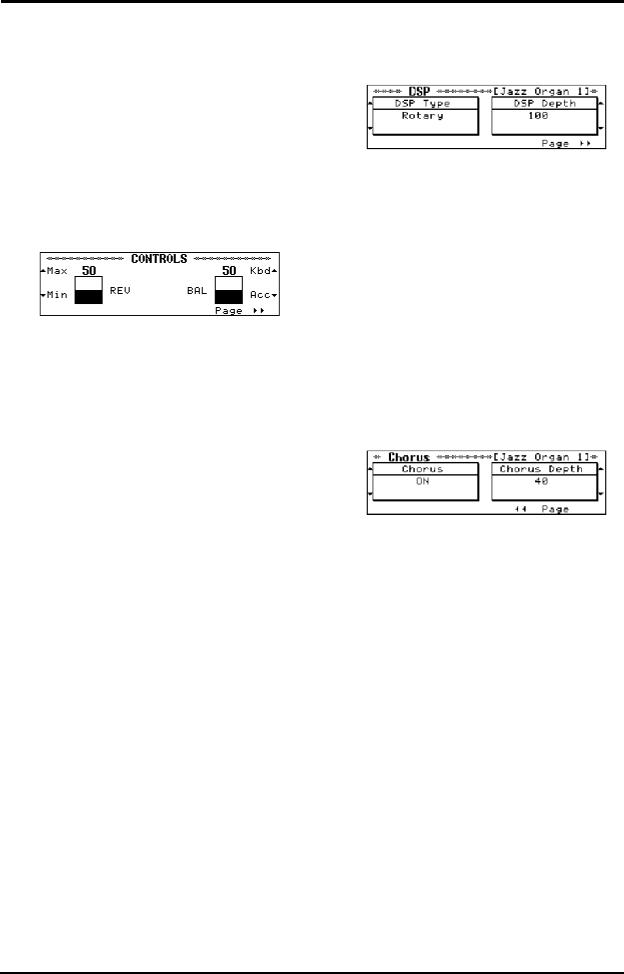
1. Select <DSP…> on the Tone Select screen.
The display now jumps to a screen similar to the following:
2. Use the buttons to the left of the display to select the Type (kind of effect), and set its Depth with the buttons to the right of the display.
Select “OFF” from the Type screen if you don’t need a DSP effect.
Note: Only one DSP effect can be used at a time.
Note: When you select Upper, Lower, or Whole and choose the Rotary Effect, you can switch the rotation speed with the button at the upper left of the display.
Chorus effect
Your KR-3 also contains a Chorus effect. Chorus is an effect that creates a more spacious, “fatter” sound.
1. After pressing <DSP…> on the Tone Select screen, press <PAGE®®>.
The display now jumps to a page similar to the following:
2. Turn the Chorus on and off with the buttons to the left of the display, and select the Chorus Depth with the buttons to the right of the display.
After several seconds, the display returns to the previous screen.
Note: The KR-3 contains several Chorus programs (called Types), so that you can always use the Chorus type that best suits your needs. See “Chorus Types” on page 47.
Octave Shift: changing the pitch by octaves
Octave Shift is a function that changes the pitch of a sound in octave steps. Octave Shift can be set independently for the Lower and Upper parts.
To give you an idea of the flexibility of this system, here is an example: suppose you assign the same Tone (E.Piano 1) to both the Upper and Lower keyboard section. Though you are using the same sound, it is assigned to two parts you can shift individually. Thus, by setting Octave Shift to “+1” for the Lower part, while leaving it at “0” for the Upper part, you create an overlap of the octaves immediately to the left (Lower) and right (Upper) of the split point. You could use this feature for playing intricate parts.
19
 Loading...