


JUNO-Gi
Quick Guide
Read this guide when you’re ready to start using the JUNO-Gi.
The JUNO-Gi combines an excellent live performance synthesizer with a digital recorder for creating songs.
This guide is divided into two parts, which respectively explain the basics of using the JUNO-Gi for “live performance”
and for “creating songs.”
Let’s get started!
Contents
The Basics of the JUNO-Gi . . . . . . . . . . . . . . . . . . . . . . . . . . . . . . . . . . . . . . . . . . . . . . . . . . . . . . . . . . . . . . . . . . . 3
Save Your Settings After Editing! . . . . . . . . . . . . . . . . . . . . . . . . . . . . . . . . . . . . . . . . . . . . . . . . . . . . . . . . . . . . . . . . . . . . . . . . . . . . . . . . . . . . . . .4
Synthesizer (Using the JUNO-Gi Live) 5
Basic Performance . . . . . . . . . . . . . . . . . . . . . . . . . . . . . . . . . . . . . . . . . . . . . . . . . . . . . . . . . . . . . . . . . . . . . . . . . . 6
Selecting Live Sets . . . . . . . . . . . . . . . . . . . . . . . . . . . . . . . . . . . . . . . . . . . . . . . . . . . . . . . . . . . . . . . . . . . . . . . . . . . . . . . . . . . . . . . . . . . . . . . . . . . .6
Registering Frequently Used Live Sets As Favorites . . . . . . . . . . . . . . . . . . . . . . . . . . . . . . . . . . . . . . . . . . . . . . . . . . . . . . . . . . . . . . . . . . . . .7
Selecting Tones . . . . . . . . . . . . . . . . . . . . . . . . . . . . . . . . . . . . . . . . . . . . . . . . . . . . . . . . . . . . . . . . . . . . . . . . . . . . . . . . . . . . . . . . . . . . . . . . . . . . . . .8
Dividing the Keyboard to Play Dierent Tones (Split) . . . . . . . . . . . . . . . . . . . . . . . . . . . . . . . . . . . . . . . . . . . . . . . . . . . . . . . . . . . . . . . . . . . .9
Performance Settings . . . . . . . . . . . . . . . . . . . . . . . . . . . . . . . . . . . . . . . . . . . . . . . . . . . . . . . . . . . . . . . . . . . . . . 10
Raising/Lowering the Keyboard in Octave Steps . . . . . . . . . . . . . . . . . . . . . . . . . . . . . . . . . . . . . . . . . . . . . . . . . . . . . . . . . . . . . . . . . . . . . . 10
Raising/Lowering the Keyboard in Semitone Steps . . . . . . . . . . . . . . . . . . . . . . . . . . . . . . . . . . . . . . . . . . . . . . . . . . . . . . . . . . . . . . . . . . . 10
Using the Pitch Bend Lever . . . . . . . . . . . . . . . . . . . . . . . . . . . . . . . . . . . . . . . . . . . . . . . . . . . . . . . . . . . . . . . . . . . . . . . . . . . . . . . . . . . . . . . . . . 10
Using the D Beam Controller . . . . . . . . . . . . . . . . . . . . . . . . . . . . . . . . . . . . . . . . . . . . . . . . . . . . . . . . . . . . . . . . . . . . . . . . . . . . . . . . . . . . . . . . . 11
Using the Knobs to Modify the Sound . . . . . . . . . . . . . . . . . . . . . . . . . . . . . . . . . . . . . . . . . . . . . . . . . . . . . . . . . . . . . . . . . . . . . . . . . . . . . . . . 11
Advanced Performance . . . . . . . . . . . . . . . . . . . . . . . . . . . . . . . . . . . . . . . . . . . . . . . . . . . . . . . . . . . . . . . . . . . . 12
Playing Arpeggios . . . . . . . . . . . . . . . . . . . . . . . . . . . . . . . . . . . . . . . . . . . . . . . . . . . . . . . . . . . . . . . . . . . . . . . . . . . . . . . . . . . . . . . . . . . . . . . . . . . 12
Playing Chords (Chord Memory) . . . . . . . . . . . . . . . . . . . . . . . . . . . . . . . . . . . . . . . . . . . . . . . . . . . . . . . . . . . . . . . . . . . . . . . . . . . . . . . . . . . . . 12
Recorder (Creating a Song) 13
Listening to the Demo Song . . . . . . . . . . . . . . . . . . . . . . . . . . . . . . . . . . . . . . . . . . . . . . . . . . . . . . . . . . . . . . . . 14
Access the RECORDER Screen . . . . . . . . . . . . . . . . . . . . . . . . . . . . . . . . . . . . . . . . . . . . . . . . . . . . . . . . . . . . . . . . . . . . . . . . . . . . . . . . . . . . . . . . 14
Creating a New Song . . . . . . . . . . . . . . . . . . . . . . . . . . . . . . . . . . . . . . . . . . . . . . . . . . . . . . . . . . . . . . . . . . . . . . . 15
Playing Rhythm Patterns . . . . . . . . . . . . . . . . . . . . . . . . . . . . . . . . . . . . . . . . . . . . . . . . . . . . . . . . . . . . . . . . . . . 16
Turning the Rhythm Pattern On . . . . . . . . . . . . . . . . . . . . . . . . . . . . . . . . . . . . . . . . . . . . . . . . . . . . . . . . . . . . . . . . . . . . . . . . . . . . . . . . . . . . . . 16
Selecting a Rhythm Pattern . . . . . . . . . . . . . . . . . . . . . . . . . . . . . . . . . . . . . . . . . . . . . . . . . . . . . . . . . . . . . . . . . . . . . . . . . . . . . . . . . . . . . . . . . . 16
Setting the Recorder Tempo . . . . . . . . . . . . . . . . . . . . . . . . . . . . . . . . . . . . . . . . . . . . . . . . . . . . . . . . . . . . . . . . . . . . . . . . . . . . . . . . . . . . . . . . . 17
Recording Your Synthesizer Performance . . . . . . . . . . . . . . . . . . . . . . . . . . . . . . . . . . . . . . . . . . . . . . . . . . . 18
Selecting a Piano Sound . . . . . . . . . . . . . . . . . . . . . . . . . . . . . . . . . . . . . . . . . . . . . . . . . . . . . . . . . . . . . . . . . . . . . . . . . . . . . . . . . . . . . . . . . . . . . 18
Selecting the Recording Source . . . . . . . . . . . . . . . . . . . . . . . . . . . . . . . . . . . . . . . . . . . . . . . . . . . . . . . . . . . . . . . . . . . . . . . . . . . . . . . . . . . . . . 18
Recording . . . . . . . . . . . . . . . . . . . . . . . . . . . . . . . . . . . . . . . . . . . . . . . . . . . . . . . . . . . . . . . . . . . . . . . . . . . . . . . . . . . . . . . . . . . . . . . . . . . . . . . . . . . 19
Recording Your Guitar or Vocal . . . . . . . . . . . . . . . . . . . . . . . . . . . . . . . . . . . . . . . . . . . . . . . . . . . . . . . . . . . . . 20
Selecting the Input Source . . . . . . . . . . . . . . . . . . . . . . . . . . . . . . . . . . . . . . . . . . . . . . . . . . . . . . . . . . . . . . . . . . . . . . . . . . . . . . . . . . . . . . . . . . 20
Connecting the Recording Source and Adjusting the Analog Input Level . . . . . . . . . . . . . . . . . . . . . . . . . . . . . . . . . . . . . . . . . . . . . . 20
Applying an Insert Eect . . . . . . . . . . . . . . . . . . . . . . . . . . . . . . . . . . . . . . . . . . . . . . . . . . . . . . . . . . . . . . . . . . . . . . . . . . . . . . . . . . . . . . . . . . . . 21
Adjusting the Internal Input Level . . . . . . . . . . . . . . . . . . . . . . . . . . . . . . . . . . . . . . . . . . . . . . . . . . . . . . . . . . . . . . . . . . . . . . . . . . . . . . . . . . . . 21
Recording . . . . . . . . . . . . . . . . . . . . . . . . . . . . . . . . . . . . . . . . . . . . . . . . . . . . . . . . . . . . . . . . . . . . . . . . . . . . . . . . . . . . . . . . . . . . . . . . . . . . . . . . . . . 21
Adjusting Each Track’s Volume Balance and Eects . . . . . . . . . . . . . . . . . . . . . . . . . . . . . . . . . . . . . . . . . . 22
Adjusting the Track Volumes . . . . . . . . . . . . . . . . . . . . . . . . . . . . . . . . . . . . . . . . . . . . . . . . . . . . . . . . . . . . . . . . . . . . . . . . . . . . . . . . . . . . . . . . . 22
Adjusting the Pan, Reverb, and EQ . . . . . . . . . . . . . . . . . . . . . . . . . . . . . . . . . . . . . . . . . . . . . . . . . . . . . . . . . . . . . . . . . . . . . . . . . . . . . . . . . . . 22
Selecting the Reverb Type . . . . . . . . . . . . . . . . . . . . . . . . . . . . . . . . . . . . . . . . . . . . . . . . . . . . . . . . . . . . . . . . . . . . . . . . . . . . . . . . . . . . . . . . . . . 23
Mastering Your Song . . . . . . . . . . . . . . . . . . . . . . . . . . . . . . . . . . . . . . . . . . . . . . . . . . . . . . . . . . . . . . . . . . . . . . . 24
Checking the Mastered Result . . . . . . . . . . . . . . . . . . . . . . . . . . . . . . . . . . . . . . . . . . . . . . . . . . . . . . . . . . . . . . . . . . . . . . . . . . . . . . . . . . . . . . . 25
Making a CD of Your Completed Song . . . . . . . . . . . . . . . . . . . . . . . . . . . . . . . . . . . . . . . . . . . . . . . . . . . . . . . 26
USB Memory Song Player 27
Playing Song Files from USB Memory . . . . . . . . . . . . . . . . . . . . . . . . . . . . . . . . . . . . . . . . . . . . . . . . . . . . . . . 27
Before using this unit, carefully read the sections entitled: “USING THE UNIT SAFELY” (Owner’s Manual) and “IMPORTANT NOTES” (Owner’s Manual). These sections provide
important information concerning the proper operation of the unit. Additionally, in order to feel assured that you have gained a good grasp of every feature provided by your new
unit, Owner’s Manual should be read in its entirety. The manual should be saved and kept on hand as a convenient reference.
INTRO
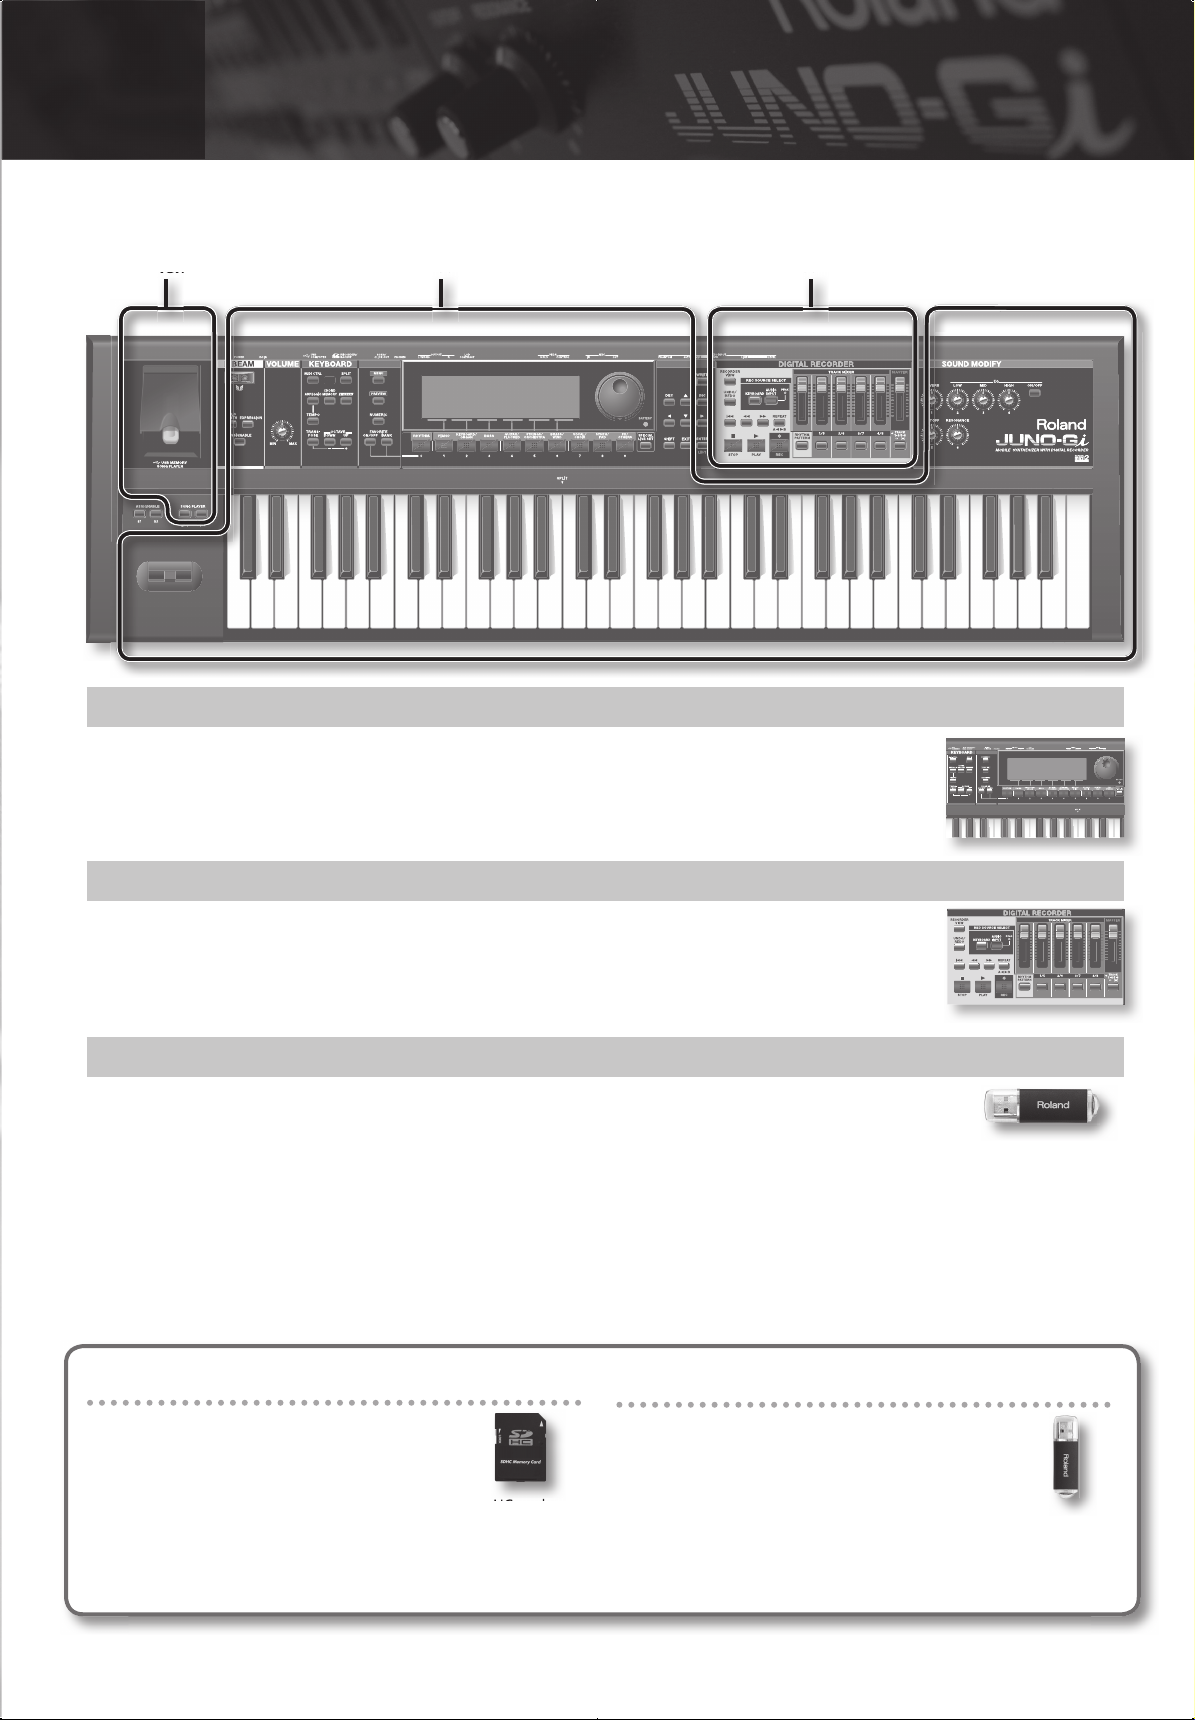
Broadly speaking, the JUNO-Gi consists of three parts: “synthesizer,” “digital recorder,” and “USB memory song player.”
The Basics of the JUNO-Gi
USB Memory Song Player
Synthesizer Digital Recorder
What’s the Synthesizer? ( p. 5)
The synthesizer lets you select sounds and play them from the keyboard.
For ease of use when playing live, the sound names are shown in large characters, and dedicated buttons make it
easy to select sounds. You can choose from more than 1,000 sounds (live sets) for any musical need.
What’s the Digital Recorder? ( p. 13)
The JUNO-GI’s digital recorder can record not only the JUNO-Gi’s own performances, but also a vocal or guitar
performance. This means that you can create full- edged recordings without needing any other equipment.
The digital recorder has eight tracks. Each of these tracks has eight “virtual tracks” (V-tracks), and you can choose one
of these to use for recording and playback. In other words, you can use 8 x 8 = 64 tracks to record your performance,
and then choose eight of these for playback.
What’s the USB Memory Song Player? ( p. 27)
This function plays back audio les (MP3, WAV, AIFF) or MIDI les (SMF) that you’ve copied from your computer to
USB memory (sold separately); simply connect your USB memory to the JUNO-Gi, and play back. (This function
operates independently of the digital recorder.)
About SD cards
SD cards store the following data.
• Data recorded by the digital recorder
• Backup data for the JUNO-Gi
If you use a commercially available high-capacity SD/SDHC card, you’ll
be able to record for longer times. The JUNO-Gi supports SDHC/SD
cards up to 32 GB in capacity.
About USB memory
USB memory is used as the playback media for the
USB memory song player. The digital recorder’s
recorded data or the JUNO-Gi’s backup data can’t be
saved on USB memory.
* You must use USB memory made by Roland.
3
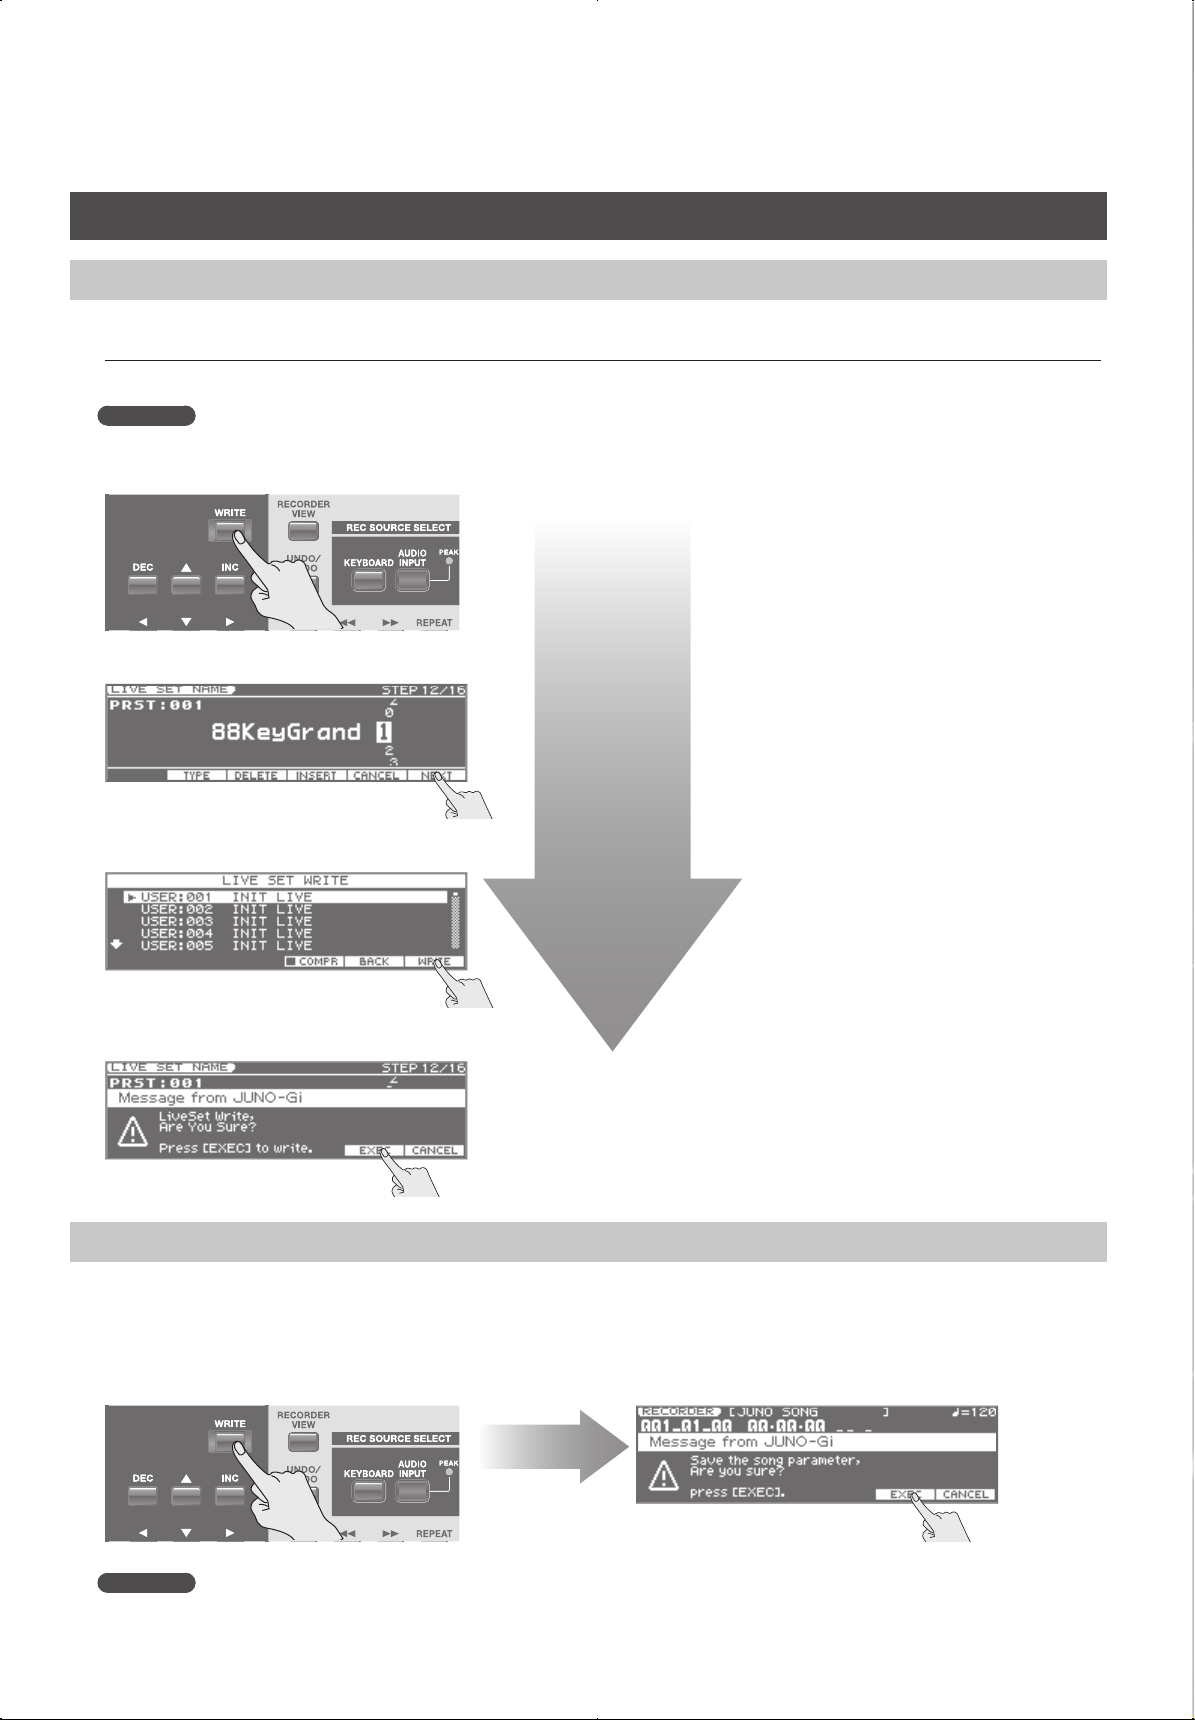
Save Your Settings After Editing!
Saving Your Sound (Live Set)
When you’ve created an original sound (live set), save it as a User Live Set so that you’ll be able to use it again later.
* Any changes you’ve made will be lost if you select a diff erent live set or turn off the power before saving the live set you created.
User live sets have the indication “USER” preceding the name; e.g., “USER 001 INITIAL LIVE SET.” Here we’ll explain how to save your own unique sound.
Reference
The illustrations below depict the overall work ow for saving. For details on saving a live set, refer to page 35 in the Owner’s Manual.
1. Press the [WRITE] button.
2. Assign a name.
3. Specify the destination of the save.
4. Carry out the save.
Saving a Song
The state of the digital recorder’s mixer, e ects, and rhythm pattern are automatically saved when you nish recording.
These settings won’t be saved if you simply operate the mixer without recording; you’ll need to save them as follows.
1. Press the [RECORDER VIEW] button to access the RECORDER screen.
2. Press the [WRITE] button.
3. Carry out the save.
Reference
For details on saving your song, refer to page 104 in the Owner’s Manual.
4
Synthesizer (Using the JUNO-Gi Live)
01
Basic Performance
Selecting Live Sets
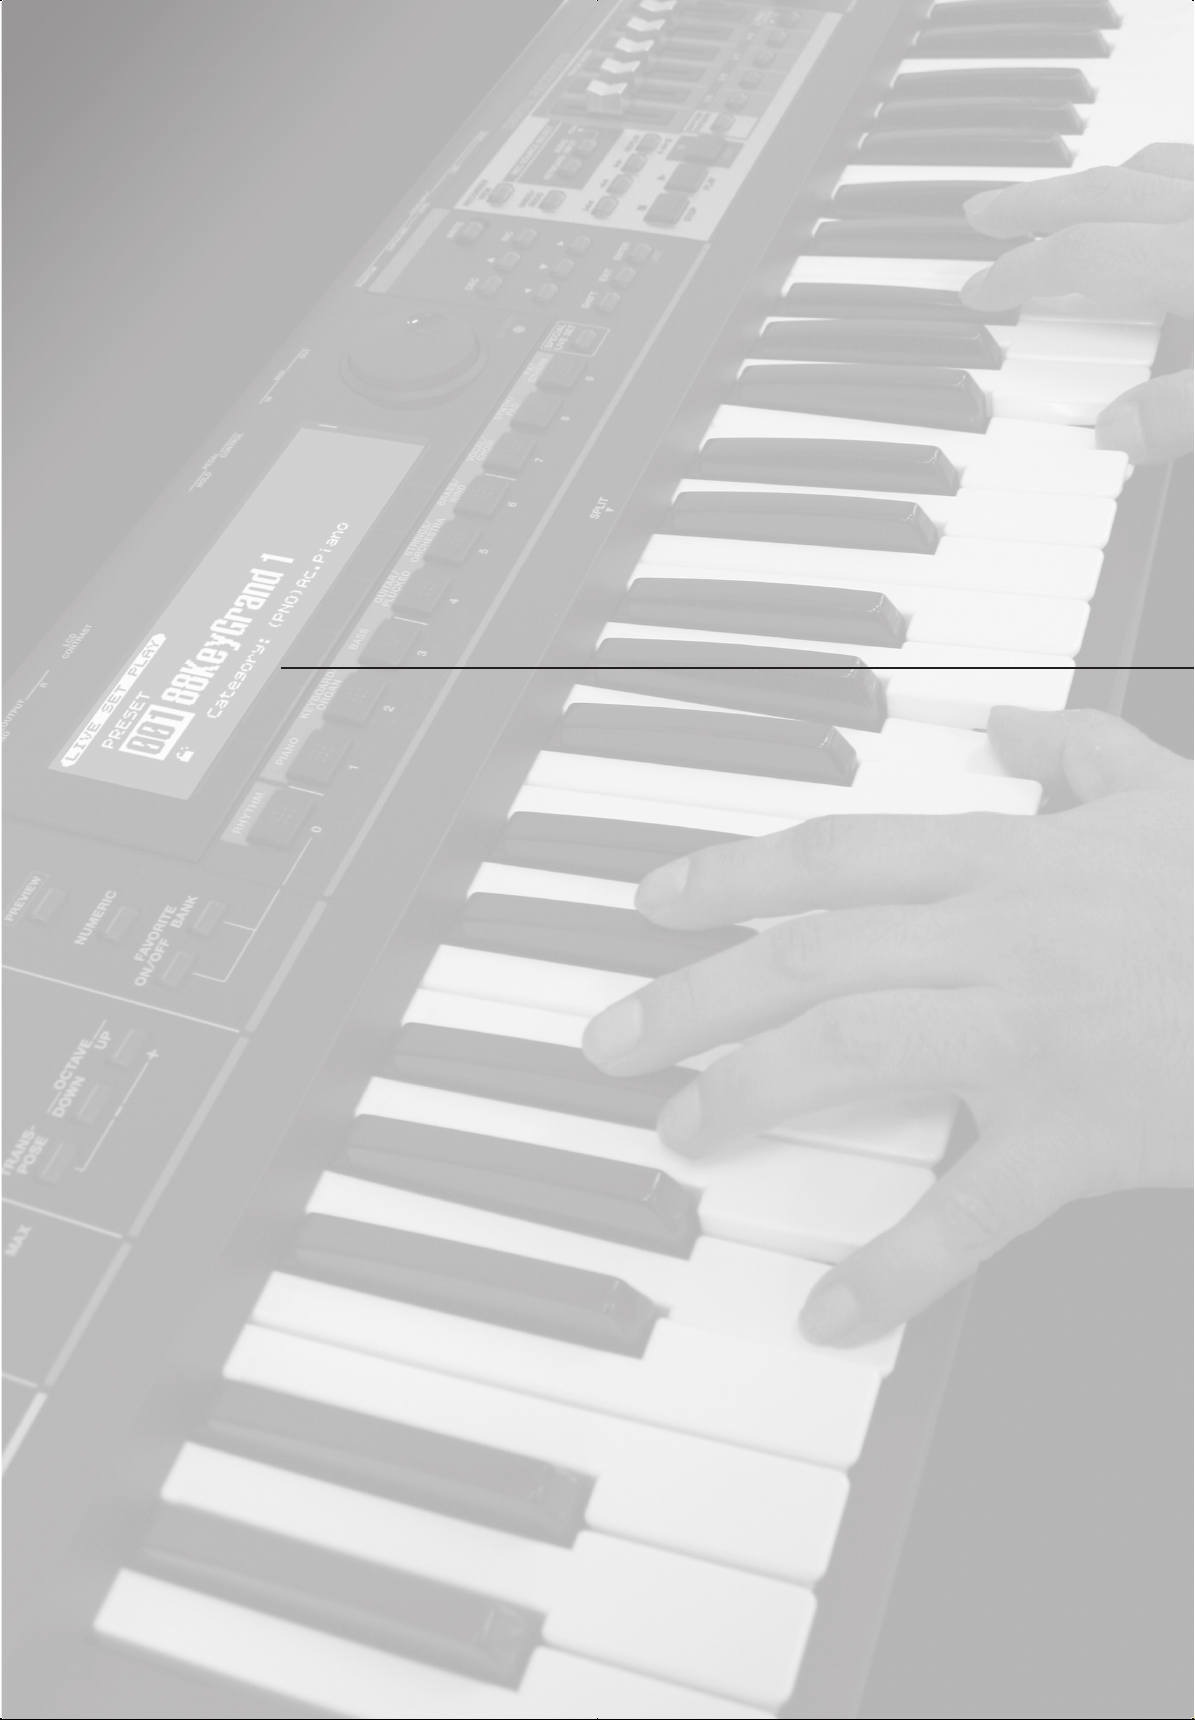
What’s a Live Set?
“Live sets” are the units of sound that you select and play on the
JUNO-Gi.
What’s a Special Live Set?
“Special live sets” are live sets with layers that take full advantage of
the JUNO-Gi’s capabilities to produce particularly rich sounds.
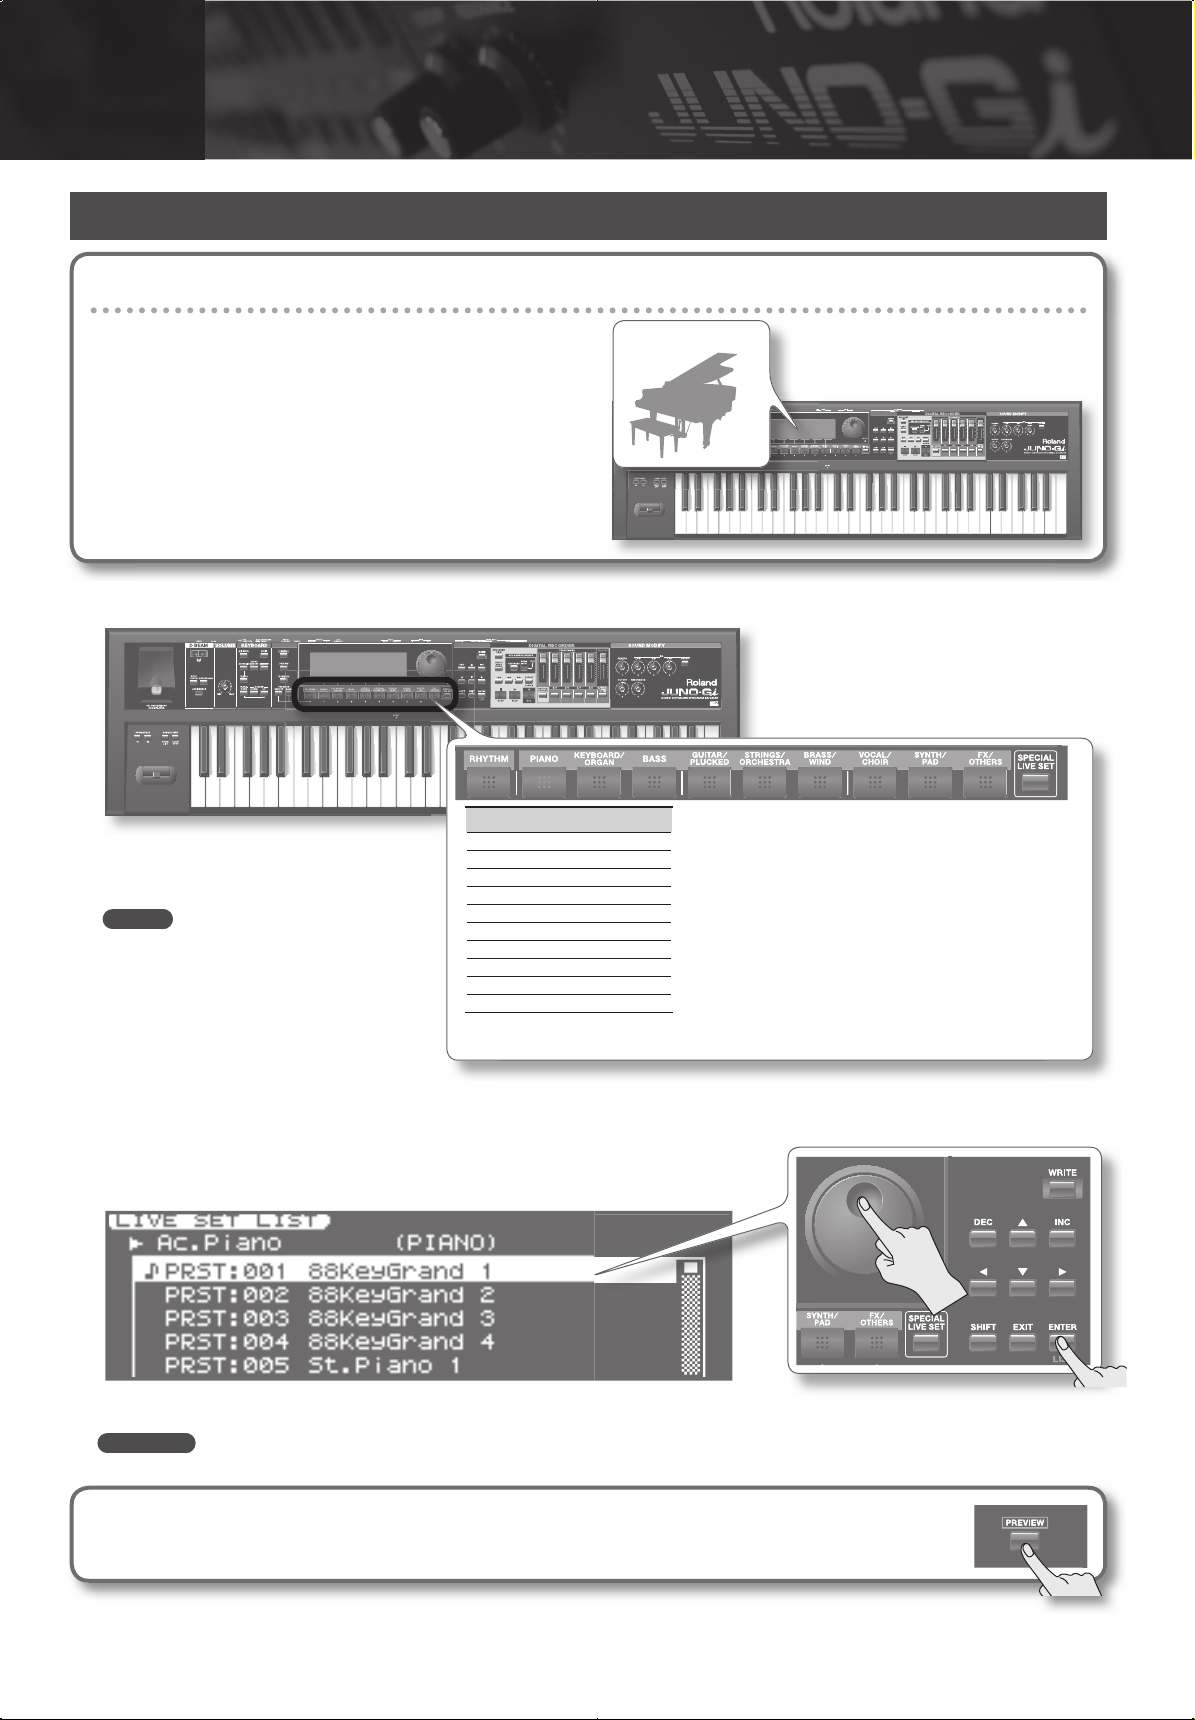
1. Press a category group button to select a category group.
Category Group
RHYTHM
PIANO
KEYBOARD/ORGAN
BASS
MEMO
By pressing such buttons as the [PIANO] or
[KEYBOARD/ORGAN] twice in succession you
can select other categories within the same
category group.
GUITAR/PLUCKED
STRINGS/ORCHESTRA
BRASS/WIND
VOCAL/CHOIR
SYNTH/PAD
FX/OTHERS
You can press the [SPECIAL LIVE SET] button to select special live sets.
Live Set
2. Press the [ENTER] (LIST) button to access the LIVE SET LIST.
3. Use the VALUE dial to select a live set, and press the [ENTER] button.
Play the keyboard, and you’ll hear the sound of the live set you selected.
Reference
For details, refer to page 22 in the Owner’s Manual.
Previewing live set
If you hold down the [PREVIEW] button, the JUNO-Gi will play a demo for the selected live set using an appropriate phrase.
6
Registering Frequently Used Live Sets As Favorites
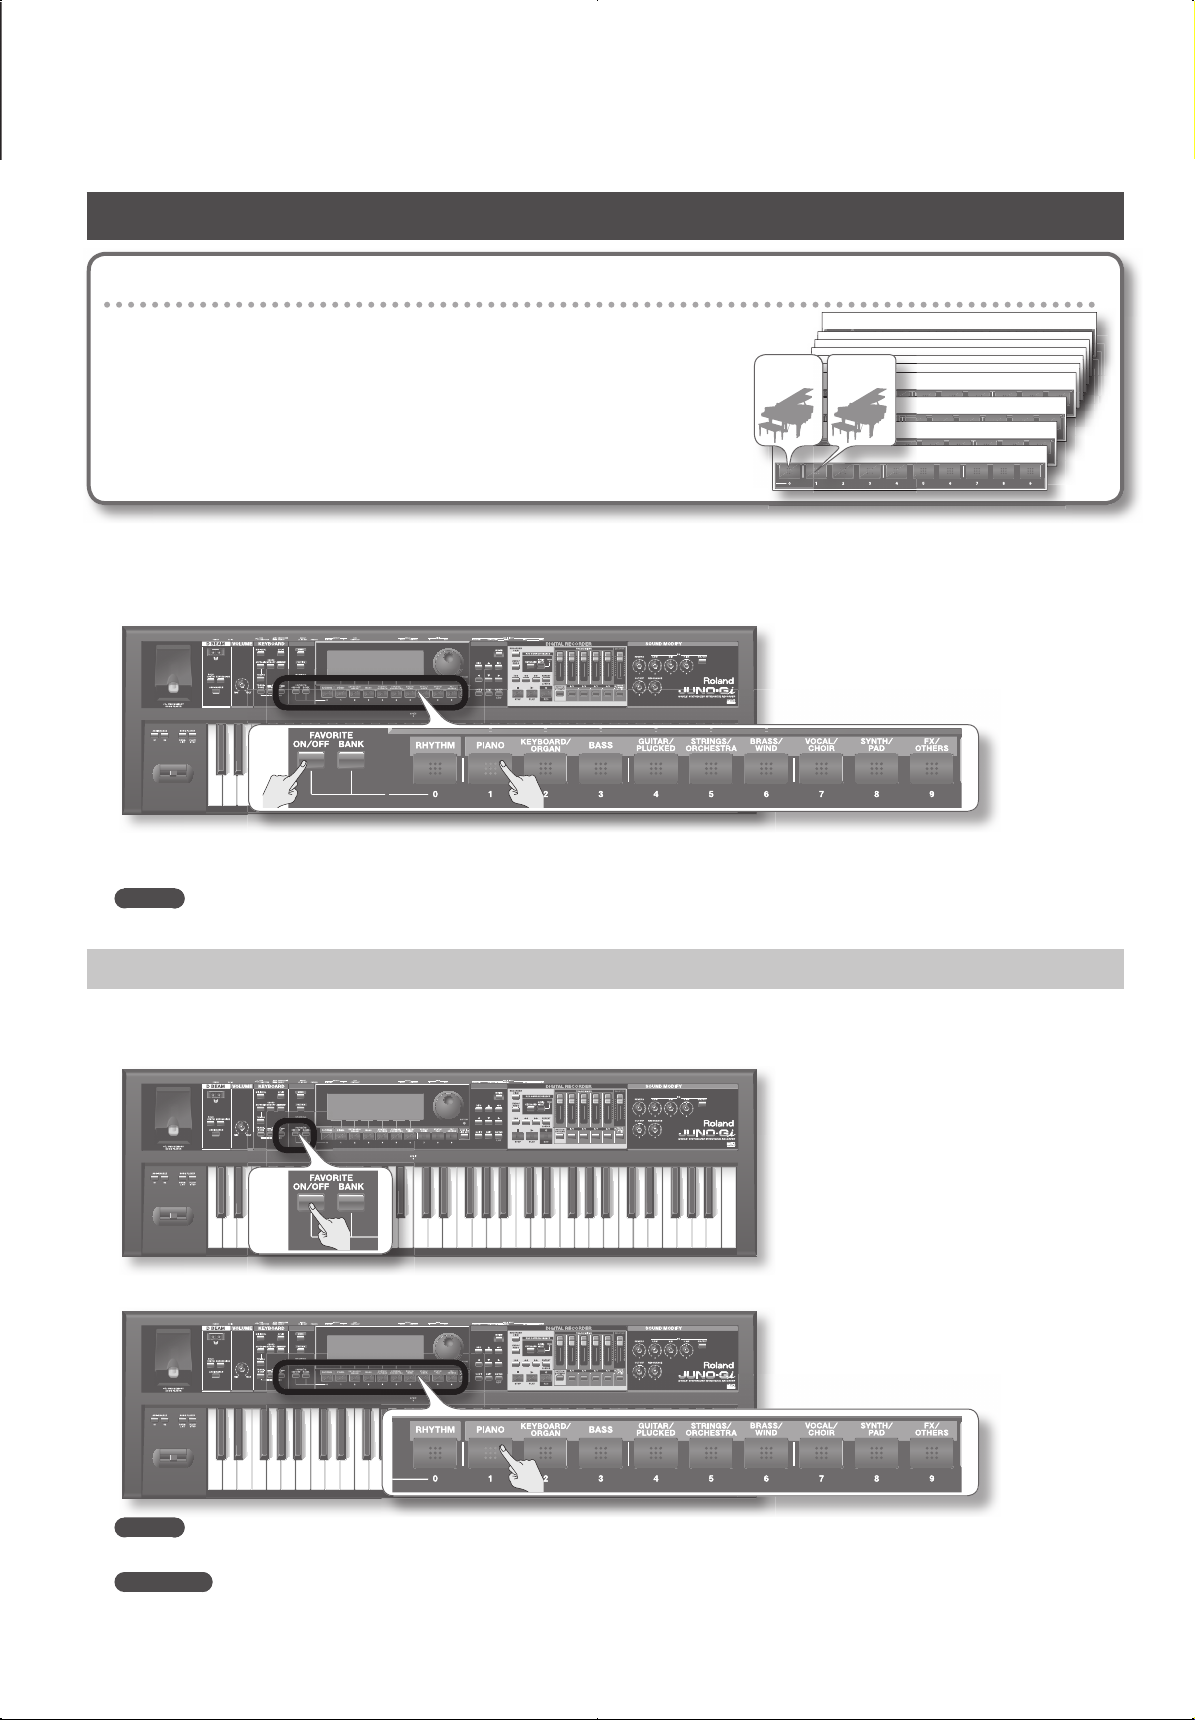
What’s a Favorite?
If you register a frequently used live set as a “favorite,” you’ll be able to select
it instantly by simply pressing one of the ten buttons located below the display.
You can register ten live sets in each bank.
You can create ten such banks.
1. Select the live set that you want to register.
2. Hold down the FAVORITE [ON/OFF] button, and press the button
([0]–[9] buttons) of the favorite number in which you want to register that live set.
Bank 10
Live Set Live Set
Bank 4
Bank 3
Bank 2
Bank 1
The live set will be registered to the favorite number you selected.
It’s convenient to register the live sets in the order in which you’ll use them within your song or performance.
MEMO
To switch banks, press the FAVORITE [BANK] button and then press the button ([0]–[9] buttons) of the bank you want to recall.
Recalling a Favorite
If you leave the FAVORITE [ON/OFF] button turned on, you can select favorites simply by pressing the [0]–[9] buttons.
1. Press the FAVORITE [ON/OFF] button so it’s lit.
2. Press the [0]–[9] buttons to select favorites.
MEMO
To switch banks, press the FAVORITE [BANK] button and then press the button ([0]–[9] buttons) of the bank that you want to recall.
Reference
For details, refer to page 24 in the Owner’s Manual.
7
Selecting Tones
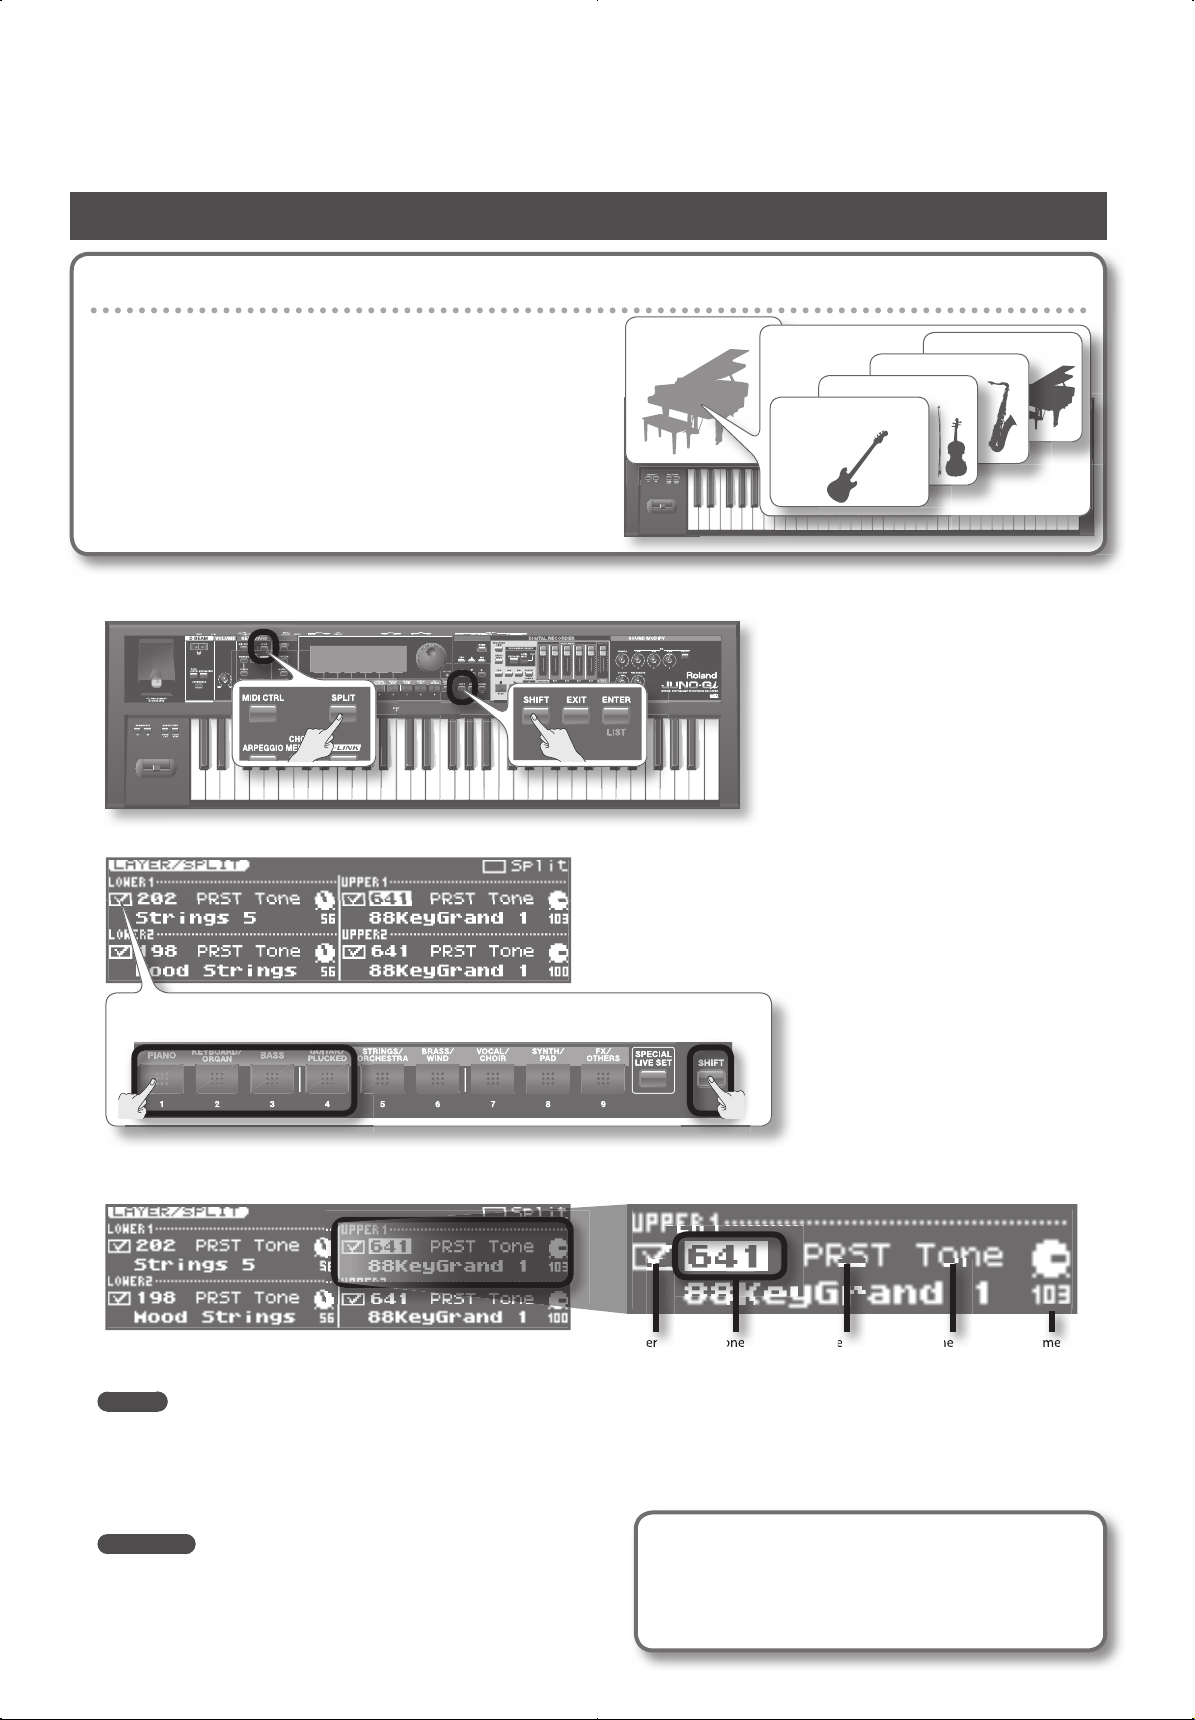
What is a Tone?
Each Live Set has four “Layers” (Upper 1, 2, Lower 1, 2), and a “Tone”
is assigned to each of these Layers.
A tone is the lowest-level unit of sound; you can’t play a tone by
itself.
1. Hold down the [SHIFT] button and press the [SPLIT] button.
The LAYER/SPLIT screen will appear.
Live Set
Layer: Upper 1
Layer: Upper 2
Layer: Lower 1
Layer: Lower 2
Tone
To switch each layer on/o , hold down the [SHIFT] button
and press the [1]–[4] buttons.
2. Use the cursor buttons to move the cursor to the Tone Number eld of the tone you want to change, and then use
the VALUE dial to select the desired tone number.
Layer
Switch
MEMO
• When you move the cursor to the tone number eld and press the [ENTER] (LIST ) button, the tone list will appear.
• In the tone list screen, you can hold down the [PREVIEW] button to audition the tone.
• In the LAYER/SPLIT screen, you can also use the VALUE dial to change the tone group, tone type or volume (LEVEL) of each tone.
Tone
Number
Tone
Group
Tone
Type
Volume
(LEVEL)
3. Press the [EXIT] button to return to the previous screen.
Reference
For details, refer to page 25 in the Owner’s Manual.
* If you’ve edited the settings, be sure to save the live set (p. 4).
Setting the Octave for Each Layer
In the LAYER/SPLIT screen, you can press the OCTAVE [DOWN]
button or [UP] button to raise or lower by an octave the key
range of the layer at the position of the cursor.
8
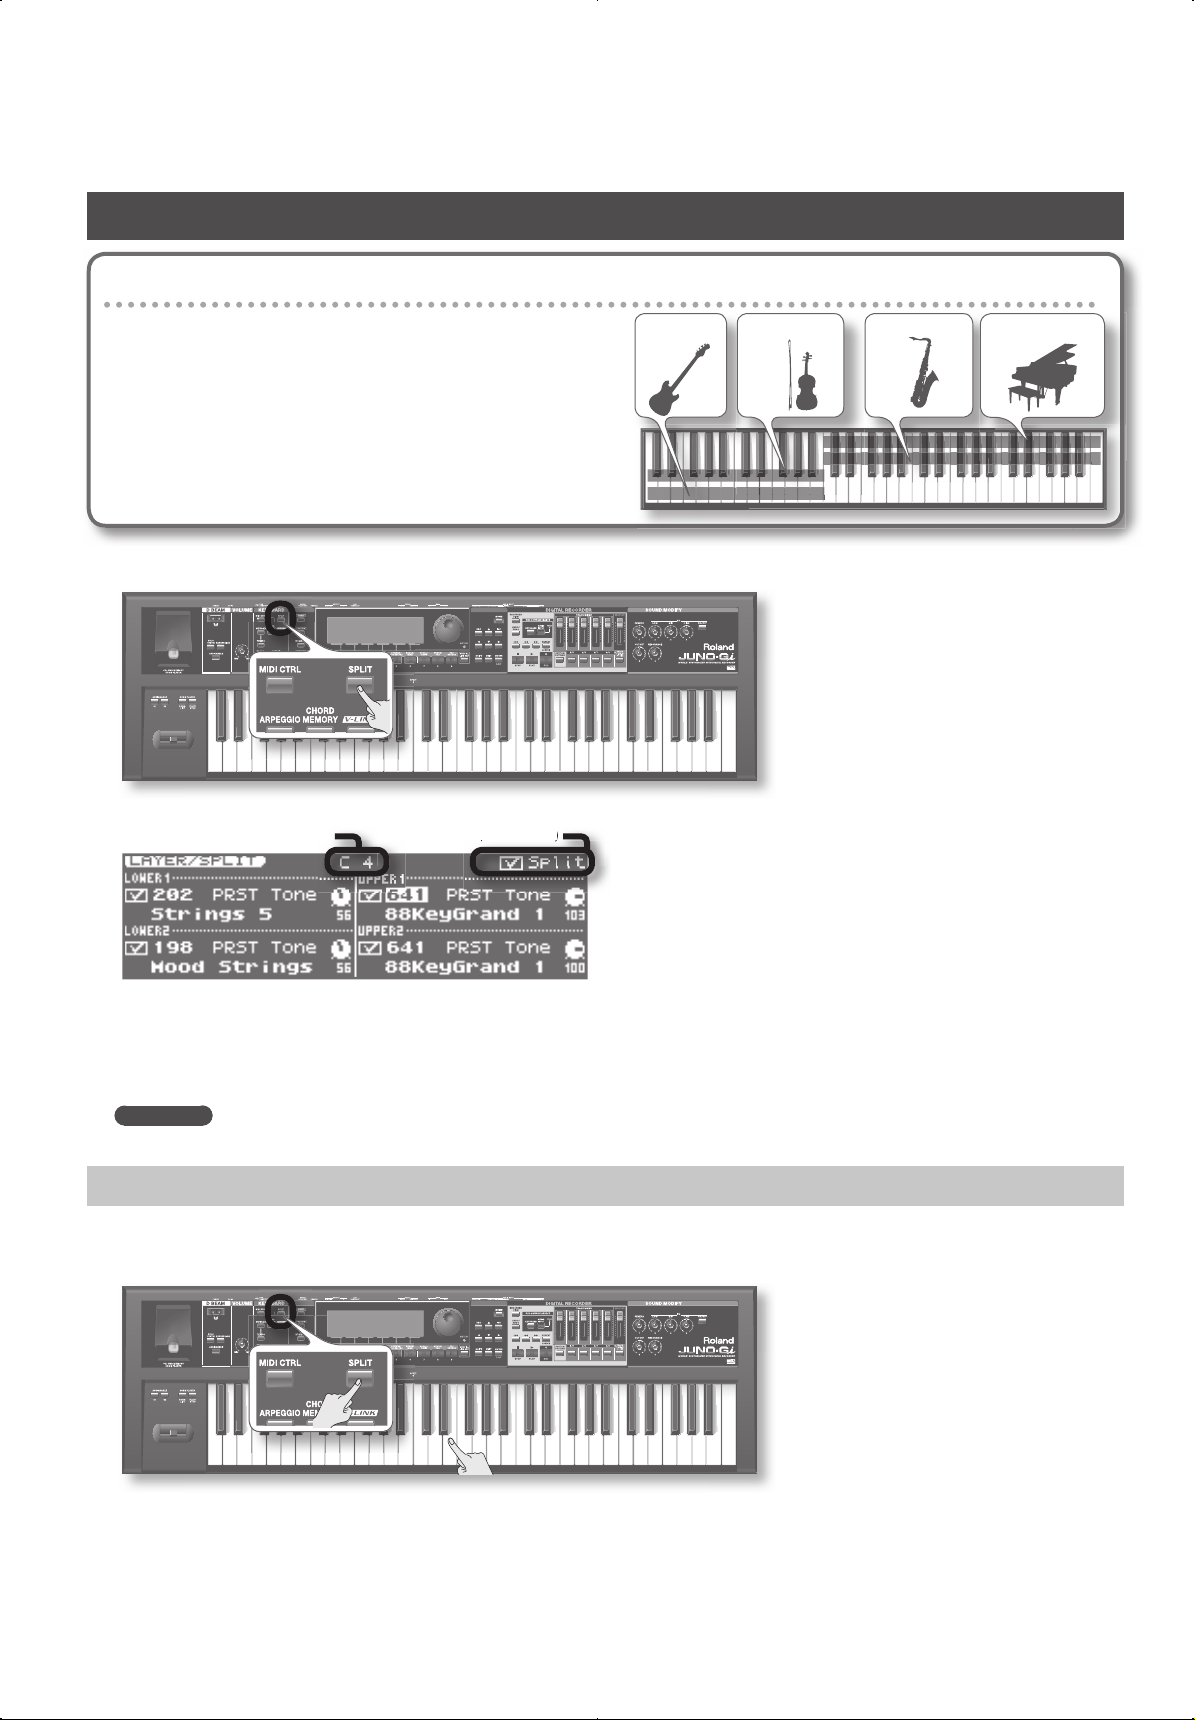
Dividing the Keyboard to Play Diff erent Tones (Split)
means on)
What is a Split?
“Split” refers to settings in which the keyboard is divided into
left-hand and right-hand zones at a certain note, allowing you to
play di erent tones in each zone. The point at which the keyboard is
divided is called the “split point.”
When you turn Split on, the Upper tone will be heard in the right
zone of the keyboard, and the Lower tone will be heard in the left
zone.
Lower 2 Lower 1 Upper 2 Upper 1
Tone Tone Tone Tone
1. Press the [SPLIT] button so it’s lit.
The LAYER/SPLIT screen will appear. The right-hand zone of the keyboard will play the Upper tone, and the left-hand zone will play the Lower tone.
Split Point
Split Switch (✔ means on)
2. To cancel Split, press the [SPLIT] button and turn o its illumination.
• If you want to close the LAYER/SPLIT screen while leaving Split on, press the [EXIT] button.
• By holding down the [SHIFT] button and pressing the [SPLIT] button, you can access the LAYER/SPLIT screen without turning the Split function on/
o .
Reference
For details, refer to page 26 in the Owner’s Manual.
Changing the Split Point
Here’s how to change the point at which the keyboard is divided (the Split Point) when Split is on.
1. Hold down the [SPLIT] button, and press the key that you want to specify as the Split Point.
The key you pressed will become the split point.
The split point key is included in the Upper zone.
2. To close the setting window, press the [EXIT] button.
* If you’ve edited the settings, be sure to save the live set (p. 4).
9
 Loading...