


Owner’s Manual (this document)
Read this first.

 PDF Manual (download from the Web)
•Sound List
This is a list of the sounds and effect parameters built into the HandSonic.
•MIDI Implementation
This is detailed information about MIDI messages.

 To obtain the PDF manual
1. Enter the following URL in your computer. http://www.roland.com/manuals/
2. Choose “HandSonic HPD-20” as the product name.
Contents
What is the HandSonic?
This section gives an overview of the HandSonic, and explains how to get started using it.
Look What You Can Do with the HandSonic. . . . . . . 5
Panel Descriptions. . . . . . . . . . . . . . . . . . . 6
Top Panel. . . . . . . . . . . |
. . . . . . . . . . |
. |
6 |
Rear Panel (Connections). . . . |
. . . . . . . . . |
. |
. 8 |
|
|
|
|
Turning the Power On/Off. . . . . |
. . . . . . . . . |
. 10 |
|
|
|
|
|
Attaching to a Stand. . . . . . . |
. . . . . . . . . |
. |
11 |
Quick Guide
Read this quick guide to get started performing with the HandSonic. It’s a friendly explanation of basic performance techniques and procedures.
HandSonic Basics. . . . . . . . . . . . . . . . . . . 12
Pads and Kits. . . . . . . . . . . . . . . . . . . . 12 Instruments and Layers. . . . . . . . . . . . . . . 12 Effects. . . . . . . . . . . . . . . . . . . . . . . 13 How the HandSonic is Structured. . . . . . . . . . 13
Performing. . . . . . . . . . . . . . . . . . . . . . 14
Pads. . . . . . . . . . . . . . . . . . . . . . . . 14 D-BEAM. . . . . . . . . . . . . . . . . . . . . . . 15 Realtime Modify Knob. . . . . . . . . . . . . . . . 15
Switching Sound Sets (Kits). . . . . . . . . . . . . . 16
Changing Sounds (Instruments). . . . . . . . . . . . 17
Adjusting Instruments (QUICK EDIT). . . . . . . . . . 18
Using the Metronome. . . . . . . . . . . . . . . . . 19
Recording Your Performance (QUICK REC). . . . . . . 20
Menu Operations. . . . . . . . . . . . . . . . . . . 22
Frequently Used Functions
This section explains functions that help you take full advantage of the HandSonic.
Sound Editing . . . . . . . . . . . . . . . . . . . . |
23 |
Assigning Sounds to Pads (Inst). . . . . . . . . . . |
23 |
Layering Sounds (Layer). . . . . . . . . . . . . . |
. 24 |
Adjusting the Sound (Edit). . . . . . . . . . . . . |
. 25 |
Using Effects to Modify the Sound (FX). . . . . . . |
. 26 |
Multi-Effects (MFX1–3) . . . . . . . . . . . . |
26 |
Ambience. . . . . . . . . . . . . . . . . . . 28 |
|
EQ. . . . . . . . . . . . . . . . . . . . . . 30 |
|
|
|
Overall Settings for a Kit. . . . . . . . . . . . . . . |
. 31 |
Adjusting the Volume of the Kit. . . . . . . . . . . |
31 |
Adjusting the Pad Sensitivity . . . . . . . . . |
31 |
Naming a Kit. . . . . . . . . . . . . . . . . . . . |
31 |
Copying a Kit. . . . . . . . . . . . . . . . . . . . |
32 |
Returning a Kit to the Factory Settings. . . . |
. 32 |
|
|
Kit Chain . . . . . . . . . . . . . . . . . . . . . . . 33 |
|
|
|
Undo. . . . . . . . . . . . . . . . . . . . . . . . |
. 33 |
User Inst. . . . . . . . . . . . . . . . . . . . . . . 34
Importing. . . . . . . . . . . . . . . . . . . . . . 34 Managing User Instruments. . . . . . . . . . . . . 35 Loop Settings. . . . . . . . . . . . . . . . . 36 Deleting. . . . . . . . . . . . . . . . . . . 37 Renaming. . . . . . . . . . . . . . . . . . . 37
Backing Up (USB Flash Drive). . . . . . . . . . . . . 38
Saving a Backup. . . . . . . . . . . . . . . . . . . 38 Loading a Backup. . . . . . . . . . . . . . . . . . 39
Connecting External Expansion Pads or Pedals. . . . . 40
Using an External Expansion Pad (TRIG IN) . . . . . . 40 Using a Footswitch (FOOT SW). . . . . . . . . . . . 42 Using a Hi-hat Control Pedal (HH CTRL) . . . . . . . 43
Connecting the HandSonic to a Computer. . . . . . . 44
2
Contents
Parameter Guide (Things You Can Do)
This section explains all of the HandSonic’s functions and settings in each screen, organized according to the menu structure. You can look up a topic according to its screen, or by what you want to accomplish.
For the procedure, refer to “Menu Operations” (p. 22).
MENU. . . . . . . . . . . . . . . . . . . . . . . . 45
INST. . . . . . . . . . . . . . . . . . . . . . . . . 46
Assign an instrument (Inst) . . . . . . . . . . 46 Adjusting the volume (Volume). . . . . . . . 46 Adjusting the pitch (Tuning). . . . . . . . . . 46 Varying the pitch (Sweep) . . . . . . . . . . . 46 Adjusting the length of the sound (Muffling). . 46 Adjusting the tonal character (Color). . . . . . 46
Adjusting the left/right position of the sound (Pan). . . . . . . . . . . . . . . . . . . . . 46
Applying effects. . . . . . . . . . . . . . . . 46
Specifying how instrument B will be sounded (Layer, Fade Point). . . . . . . . . . . . . . . 47
Specifying how the sound will be produced (Trigger Mode). . . . . . . . . . . . . . . . 47
Fixing the dynamics of the sound
(Fixed Velocity). . . . . . . . . . . . . . . . 47
Preventing sounds from being heard together (Mute Group, Mono/Poly). . . . . . . . . . . 47
KIT. . . . . . . . . . . . . . . . . . . . . . . . . . 48
PAD CTRL. . . . . . . . . . . . . . . . . . . . . . 48
Modifying the sound by pressing down on a pad. . . . . . . . . . . . . . . . . . . . . . 48
Specifying how the sound will change when
you press down on a pad. . . . . . . . . . . 48 Assigning the realtime modify knob (PITCH). . 48 Adjusting the roll speed (Roll Speed). . . . . . 49 KIT PRM. . . . . . . . . . . . . . . . . . . . . . . 49
Adjusting the volume of the entire kit
(Kit Volume). . . . . . . . . . . . . . . . . . 49
Adjusting the volume of the hi-hat control
pedal (Pedal Hi-Hat Volume). . . . . . . . . . 49
Adjusting the sensitivity of the pads
(Pad Sensitivity). . . . . . . . . . . . . . . . 49 Realtime modify knob settings. . . . . . . . . . . . . . . . 49 Renaming the kit (Kit Name). . . . . . . . . . 50 MIDI. . . . . . . . . . . . . . . . . . . . . . . . 50
Specifying the note number of each pad
(Note#) . . . . . . . . . . . . . . . . . . . . 50 Specifying the gate time of each pad (Gate). . 50
FX. . . . . . . . . . . . . . . . . . . . . . . . . . 51
MULTI-FX . . . . . . . . . . . . . . . . . . . . . . 51
Specifying the multi-effect type
(MULTI-FX Type). . . . . . . . . . . . . . . . 51 Adjusting the multi-effect (MULTI-FX Edit). . . 51
Applying the multi-effect to each pad
(MULTI-FX Assign). . . . . . . . . . . . . . . 51 AMBIENCE. . . . . . . . . . . . . . . . . . . . . 52
Specifying the type of ambience
(Ambience Type). . . . . . . . . . . . . . . 52 Adjusting the ambience (Ambience Edit). . . . 52
Applying ambience to each pad
(Ambience Send Pad). . . . . . . . . . . . . 52
Applying ambience to the sound of each multi-effect (Ambience Send MFX). . . . . . . 53
EQ. . . . . . . . . . . . . . . . . . . . . . . . . 53 Applying EQ to the kit (EQ) . . . . . . . . . . 53
USER INST. . . . . . . . . . . . . . . . . . . . . . 54
IMPORT. . . . . . . . . . . . . . . . . . . . . . . 54 Importing a user instrument (Import). . . . . 54 LIST. . . . . . . . . . . . . . . . . . . . . . . . . 54
Viewing a list of user instruments
(USER INST–LIST). . . . . . . . . . . . . . . 54 Looping a user instrument (Loop). . . . . . . 54
Viewing information about user instruments (Function). . . . . . . . . . . . . . . . . . . 54
Deleting a user instrument (Delete). . . . . . 54
Renaming the user instrument
(User Inst Name) . . . . . . . . . . . . . . . 55 UTIL . . . . . . . . . . . . . . . . . . . . . . . . 55
Reassigning the user instrument numbers (Renumber). . . . . . . . . . . . . . . . . . 55
Optimizing the user instrument area
(Memory Optimize) . . . . . . . . . . . . . . 55 Delete all user instruments (All Delete). . . . . 56
3
Contents
Parameter Guide (continued)
TOOLS. . . . . . . . . . . . . . . . . . . . . . . . 57
PAD COPY. . . . . . . . . . . . . . . . . . . . . . 57 Copying a pad (Pad Copy). . . . . . . . . . . 57
Exchanging the sounds of pads
(Pad Exchange). . . . . . . . . . . . . . . . 57 KIT COPY. . . . . . . . . . . . . . . . . . . . . . 57 Copying a kit (Kit Copy). . . . . . . . . . . . 57 Exchanging kits (Kit Exchange). . . . . . . . . 57 Returning a Kit to the Factory Settings. . . . . 57 Creating an empty kit . . . . . . . . . . . . . 57 CHAIN. . . . . . . . . . . . . . . . . . . . . . . 58 Editing a kit chain (Chain). . . . . . . . . . . 58 Specifying the order of kits (Chain Edit) . . . . 58
SYS. . . . . . . . . . . . . . . . . . . . . . . . . . 59
Metronome. . . . . . . . . . . . . . . . . . . . . 59 Specifying the metronome time signature . . . 59
Specifying the sound and volume of the metronome. . . . . . . . . . . . . . . . . . 59
USB Memory. . . . . . . . . . . . . . . . . . . . 59 Backing up to a USB flash drive (Save Backup). 59
Loading a backup from a USB flash drive
(Load Backup). . . . . . . . . . . . . . . . . 60
Deleting a backup from the USB flash drive (Delete Backup). . . . . . . . . . . . . . . . 60
Viewing information about the USB flash
drive (USB Memory Information). . . . . . . . 60
Formatting a USB flash drive
(Format USB Memory). . . . . . . . . . . . . 60
Appendix 
The appendix contains material that will help you when you have a problem or when an error occurs.
Please be sure to read the safety cautions and the guidelines for use, and use the HandSonic safely.
Pad Settings . . . . . . . . . . . . . . . . . . . . 61 Adjusting the sensitivity etc. for each pad. . . 61 Adjusting the pad’s pressure sensitivity . . . . 61
Adjusting how the sound will respond to
strike position. . . . . . . . . . . . . . . . . 62 D-BEAM Settings. . . . . . . . . . . . . . . . . . 62 Calibrating the D-BEAM . . . . . . . . . . . . 62 ExtTrig Settings. . . . . . . . . . . . . . . . . . . 62
Specifying the type of external expansion
pad. . . . . . . . . . . . . . . . . . . . . . 62 Adjusting the external expansion pad. . . . . 63
Making detailed adjustments for the external expansion pad. . . . . . . . . . . . . . . . 63
Making adjustments for the rim of an external expansion pad. . . . . . . . . . . . . . . . 63
Reducing crosstalk with an external
expansion pad. . . . . . . . . . . . . . . . 64 HHPedal Setting . . . . . . . . . . . . . . . . . . 64 Hi-hat control pedal sensitivity. . . . . . . . . . . . . . . . 64 FootSw Control . . . . . . . . . . . . . . . . . . . 64 Footswitch function assignments. . . . . . . 64 Footswitch polarity settings . . . . . . . . . . 65 Options. . . . . . . . . . . . . . . . . . . . . . . 65 Overall settings for the entire HandSonic. . . . 65 MIDI. . . . . . . . . . . . . . . . . . . . . . . . 66 MIDI-related settings. . . . . . . . . . . . . 66 Visual control settings. . . . . . . . . . . . . 66 Information. . . . . . . . . . . . . . . . . . . . . 67
Viewing version information about the HandSonic unit. . . . . . . . . . . . . . . . . . . . . . . . . . . . . . . 67
Factory Reset . . . . . . . . . . . . . . . . . . . . 67 Initializing the HandSonic . . . . . . . . . . . 67
Error Messages. . . . . . . . . . . . . . . . . . . 68 Shortcuts. . . . . . . . . . . . . . . . . . . . . . 68 Troubleshooting. . . . . . . . . . . . . . . . . . 69 Kit List. . . . . . . . . . . . . . . . . . . . . . . 70 Main Specifications. . . . . . . . . . . . . . . . . 73 USING THE UNIT SAFELY. . . . . . . . . . . . . . . 74 IMPORTANT NOTES. . . . . . . . . . . . . . . . . 75
Index. . . . . . . . . . . . . . . . . . . . . . . . . 79
Before using this unit, carefully read the sections entitled“USINGTHE UNIT SAFELY”and“IMPORTANT NOTES”(p. 74; p. 75).These sections provide important information concerning the proper operation of the unit. Additionally, in order to feel assured that you have gained a good grasp of every feature of your new unit, read the Owner’s manual in its entirety. This manual should be saved and kept on hand as a convenient reference.
Copyright © 2013 ROLAND CORPORATION
All rights reserved. No part of this publication may be reproduced in any form without the written permission of ROLAND CORPORATION.
4
What is the HandSonic?
The HandSonic is an electronic percussion instrument that can be played with the hands and fingers. The sound can be varied by the playing position, pressure or interactivity between different pads. With built-in sounds and the possibility of using your own sounds, it’s a unique instrument that will adapt to any musical style.
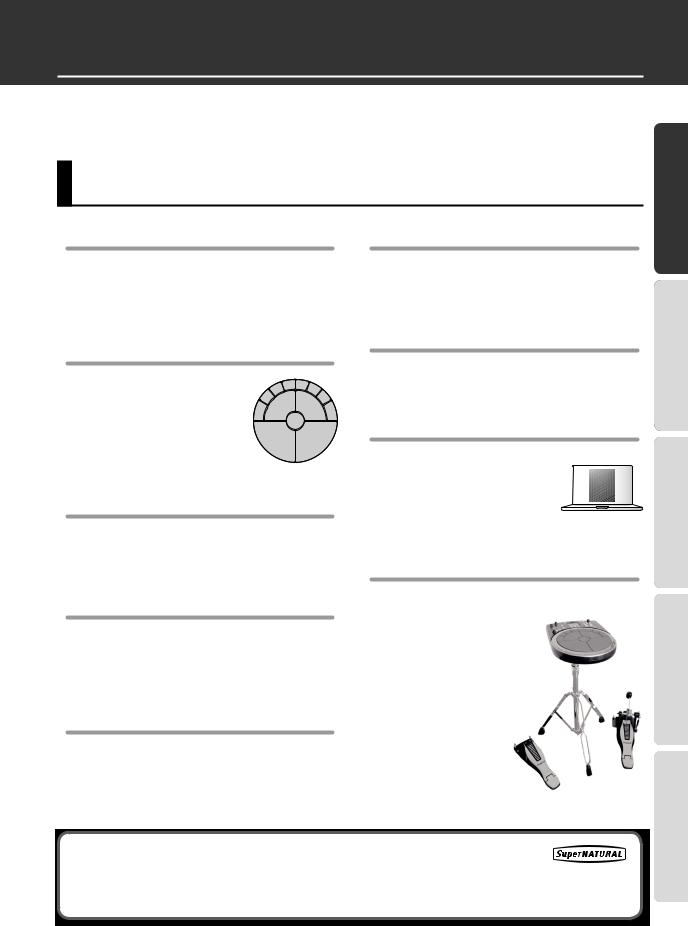
Look What You Can Do with the HandSonic
WhatHandSonic?isthe
Play with your hands and fingers
From powerful shots using your palm, to subtle grooves using your fingertips, you’ll have the full range of dynamic expressiveness offered by a percussion instrument. You can also use the D-BEAM to control the sound without touching the instrument.
Play combinations of sounds
The striking surface is divided into 13 sections, and your choice of more than 800 instrumental sounds and sound effects can be assigned to each section. You can store 200 of these sets of assignments and recall them instantly while you perform.
Edit sounds individually
You can individually make adjustments to each sound; for example, you can adjust the volume, raise or lower the pitch, shorten the decay, or brighten the tonal character.
Use effects to modify the sound
The built-in effects let you modify the sound in a variety of ways, such as distorting it or adding reverb. You can also control the effects while you perform, opening up fresh new possibilities that are not available on acoustic percussion.
Add your own sounds
Your own original sounds can be added to the sounds that are built-into the HandSonic.
Record and play back
It’s easy to record your performance. Objectively |
|
|||
listening to your playing is a great way to improve your |
|
|||
skill. You can also export your performance as an audio |
|
|||
file. |
Guide |
|||
Metronome |
||||
Quick |
||||
|
|
|
||
A metronome function is built-in. It’s a real convenience |
|
|||
for rhythm training or for warming-up before a |
UsedFunctions |
|||
performance. |
||||
|
||||
Works with your computer |
|
|||
Connect the HandSonic to your |
Frequently |
|||
computer via USB, and you’ll be |
|
|
||
able to exchange audio and MIDI |
|
|
|
|
data. Since the HandSonic doesn’t |
|
|
|
|
require sticks, it’s ideal for sound |
|
|
|
|
|
|
|
||
design or performance with your |
|
|||
computer. |
|
|||
Add expansion pads |
Guide |
|||
You can expand your |
||||
|
||||
system by adding a |
|
|||
kick pad, footswitch, or |
|
|||
hi-hat control pedal and |
Parameter |
|||
using your feet to play. |
||||
|
||||
You can also add a bar |
|
|||
pad or cymbal pad that |
|
|||
you play using sticks, |
|
|||
and play the HandSonic |
|
|||
as a percussion set. |
|
|||
The HandSonic SuperNATURAL sound engine
This percussion sound engine allows the nuances of your hand percussion (dynamics, position,
mute, etc.) to be accurately reflected in the resulting sound, giving you a sense of presence, a comfortable playing feel, and a naturally expressive tone.
Appendix
5

Panel Descriptions
Top Panel
1 |
2 |
3 |
4 |
5 |
6 |
7 |
8 |
9 |
10 |
11 |
|
|
16 |
12 |
|
17 |
13 |
|
18 |
14 |
|
19 |
|
|
|
15 |
|
|
S4 |
S5 |
|
S3 |
|
S6 |
S2 |
|
S7 |
M3 |
M4 |
20 |
|
|
|
S1 |
|
S8 |
|
M5 |
|
M1 |
M2 |
6
Panel Descriptions
Number |
Name |
Explanation |
|
Page |
|||||
|
|
|
|
|
|
|
|
|
|
1 |
|
|
|
|
|
|
|
||
[PHONES] knob |
Adjusts the volume of the headphones connected to the PHONES jack. |
|
p. 10 |
|
|
||||
|
|
|
|
|
|
|
|
|
|
2 |
|
|
|
|
|
|
|||
[VOLUME] knob |
Adjusts the volume of the OUTPUT jacks. |
|
p. 10 |
|
|||||
|
|
|
|
|
|
|
|
|
|
3 |
[KIT] button |
Displays the Kit screen (the screen you use for performance). |
|
– |
|||||
|
|
|
|
|
|
||||
|
|
|
|
|
|
||||
Hold down the [SHIFT] button and press the [KIT] button to UNDO an operation. |
|
p. 33 |
|
|
|||||
|
|
|
|
|
|
||||
|
|
|
|
|
|
|
|
|
|
|
|
|
|
|
|
|
|
||
|
|
|
|
Displays the QUICK REC screen, where you can record and play back your performance. |
|
p. 20 |
|
||
4 |
[QUICK REC] button |
|
|
|
|
|
|
||
Hold down the [SHIFT] button and press the [QUICK REC] button to turn the |
|
|
|
|
|
||||
|
p. 19 |
|
|
||||||
|
|
|
|
|
|
|
|||
|
|
|
|
metronome on/off. |
|
|
|||
|
|
|
|
|
|
|
|
|
|
|
|
|
|
|
|
|
|
|
|
5 |
Display |
Shows the number and name of the currently selected kit. |
|
– |
|||||
Menu screens are also shown here, allowing you to edit a variety of settings. |
|
||||||||
|
|
|
|
|
|
|
|
|
|
|
|
|
|
|
|
|
|
|
|
6 |
D-BEAM |
This is the D-BEAM sensor area. By positioning your hand above this sensor you can |
|
|
|
|
|
||
play sounds or modify them. |
|
p. 15 |
|
|
|||||
|
|
|
|
|
|
||||
7 |
[D-BEAM] button |
Turns the D-BEAM on/off. The button will light if this is on. |
|
|
|
|
|
||
|
|
|
|
|
|
|
|
|
|
8 |
|
|
|
|
|
|
|||
[MENU] button |
Accesses the menu screen. |
|
p. 45 |
|
|||||
|
|
|
|
|
|
|
|
|
|
9 |
Cursor buttons |
|
|
|
|
|
|
||
Move the cursor (the selected item) in the screen up, down, left, or right. |
|
p. 22 |
|
|
|
||||
[ |
] [ ] [ ] [ ] |
|
|
||||||
|
|
|
|
|
|
|
|||
|
|
|
|
|
|
|
|
|
|
10 |
|
|
|
Turn this knob to change the kit number or parameter value. |
|
|
|
|
|
|
|
|
|
p. 22 |
|
|
|
||
Value knob |
The knob has the same function as the [-][+] buttons. |
|
|
||||||
|
|
|
|
If you turn it while holding down the [SHIFT] button, the value will change in larger steps. |
|
|
|
|
|
|
|
|
|
|
|
|
|
|
|
11 |
|
|
|
|
|
|
|||
[ |
|
] button |
Turns the power of the HandSonic on/off. |
|
p. 10 |
|
|||
|
|
||||||||
|
|
||||||||
|
|
|
|
|
|
|
|
|
|
12 |
Function buttons |
The function of these buttons will change depending on the screen. The names of the |
|
|
|
|
|
||
|
p. 22 |
|
|
|
|||||
current functions are shown in the bottom of the screen. From the left, these are called |
|
|
|
|
|||||
[F1] [F2] [F3] |
|
|
|||||||
|
the [F1], [F2], and [F3] buttons. |
|
|
|
|
|
|||
|
|
|
|
|
|
|
|
|
|
|
|
|
|
|
|
|
|
|
|
13 |
|
|
|
Turns the Roll function on/off. When the function is on the button will be lit, and a roll |
|
|
|
|
|
[ROLL] button |
|
p. 14 |
|
|
|
||||
will be heard when you apply pressure to the pad. |
|
|
|||||||
|
|
|
|
|
|
|
|
|
|
|
|
|
|
|
|
|
|
|
|
|
[PITCH] button |
Choose what will be controlled by the realtime modify knob. |
|
|
|
|
|
||
14 |
[PITCH]: The pitch will be controlled. |
|
|
|
|
|
|||
[EFFECT] button |
|
p. 15 |
|
|
|
||||
|
[EFFECT]: The multi-effect will be controlled. |
|
|
||||||
|
|
|
|
|
|
|
|
|
|
|
|
|
|
|
|
|
|
|
|
15 |
Realtime Modify knob |
Turn this knob to temporarily modify the sound. |
|
|
|
|
|
||
|
|
|
|
|
|
|
|
|
|
16 |
|
|
|
|
|||||
[ENTER] button |
Confirms a selection, such as in a menu. |
|
p. 22 |
|
|||||
|
|
|
|
|
|
|
|
|
|
17 |
[EXIT] button |
Returns to the previous screen. |
|
– |
|||||
|
|
|
|
|
|
|
|
|
|
18 |
|
|
|
Modify the kit number or parameter value. This has the same function as the value knob. |
|
|
|
|
|
|
|
|
|
p. 22 |
|
|
|
||
[-] [+] buttons |
If you use the [-][+] buttons while holding down the [SHIFT] button, the value will |
|
|
||||||
|
|
|
|
change in larger steps. |
|
|
|
|
|
|
|
|
|
|
|
|
|
|
|
19 |
|
|
|
|
|||||
[SHIFT] button |
You can access a variety of functions by using this in conjunction with other buttons. |
|
p. 68 |
|
|||||
|
|
|
|
|
|
|
|
|
|
|
|
|
|
Strike these surfaces (pads) to play. By varying your striking force and pressure, you can |
|
|
|
|
|
20 |
Pads |
obtain a variety of performance expressions. |
|
p. 14 |
|
||||
|
|
|
|
These pads are referred to as M1–5 (Main) and S1–8 (Sub). |
|
|
|
|
|
|
|
|
|
|
|
|
|
|
|
WhatHandSonic?isthe
Frequently UsedFunctions QuickGuide
Parameter Guide
Display
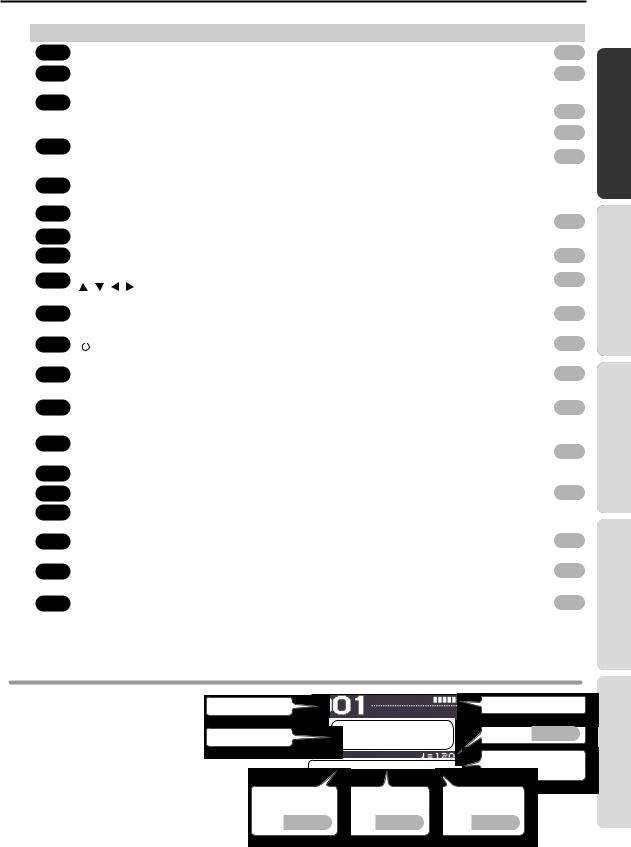
When you turn on the power, the display will show a “kit screen” like the one shown at right.
*The explanations in this manual include illustrations that depict what should typically be shown by the display. Note, however, that your unit may incorporate a newer, enhanced version of the system (e.g., includes newer sounds), so what you actually see in the display may not always match what appears in the manual.
Kit number
Kit name
Pad strike force
|
|
Tempo |
p. 19 |
|
|
Indicates the function of the |
|
|
|
|
buttons |
Kit chain on/off |
Access the Q.EDIT |
Access the TEMPO |
|
|
screen |
screen |
|
p. 33 |
p. 18 |
p. 19 |
|
Appendix
7
Panel Descriptions
Rear Panel (Connections)
USB MEMORY port |
USB COMPUTER port |
||||
Connect a USB flash drive (sold |
Use a USB cable to connect the |
||||
separately) here. You can save the |
HandSonic to your computer. You can |
||||
HandSonic’s settings on a USB flash |
use DAW software on your computer to |
||||
drive. You can also use a USB flash |
record the HandSonic’s performance as |
||||
drive to load user instruments. |
audio or as MIDI. |
||||
|
|
|
|
|
|
|
|
|
|
|
|
|
|
|
|
|
|
|
|
|
|
|
|
p. 38 |
p. 34 |
p. 44 |
MIDI connectors
Connect a sound module or other external MIDI device here. You can also control an external video device.
p. 50
DC IN jack
Place the AC adaptor so the side with the indicator (see illustration) faces upwards and the side with textual information faces downwards.
The indicator will light when you plug the AC adaptor into an AC outlet.
NOTE
To prevent the inadvertent disruption of power to your unit (should the plug be pulled out accidentally), and to avoid applying undue stress to the DC IN jack, anchor the power cord using the cord hook, as shown in the illustration.
*Never insert or remove a USB flash drives while this unit is turned on. Doing so may corrupt the unit’s data or the data on the USB flash drives.
*Carefully insert the USB flash drives all the way in—until it is firmly in place.
*Use USB flash drive sold by Roland. We cannot guarantee operation if other products are used.
8
|
|
|
|
|
|
|
|
|
|
|
|
Panel Descriptions |
||
|
|
|
|
|
|
|
|
|
|
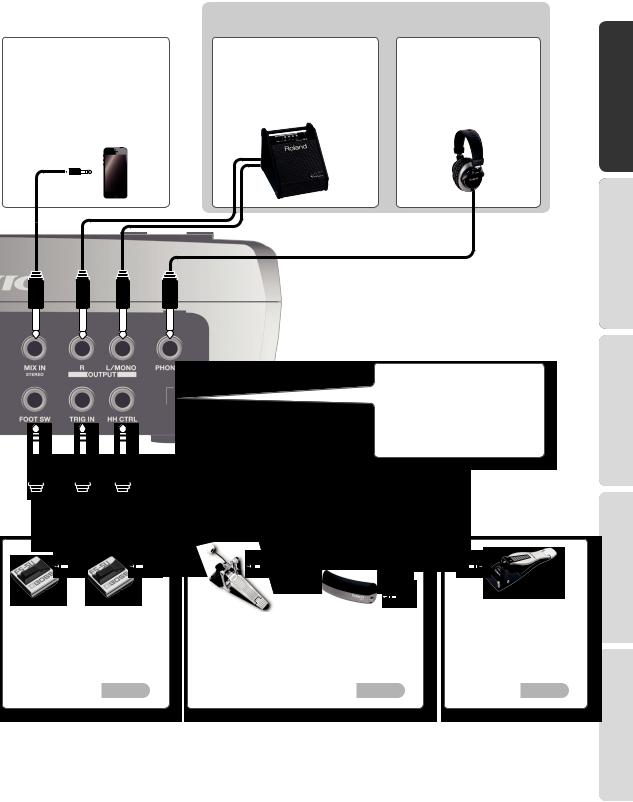
* You must make at least one of these connections in order to hear |
||||
|
|
|
|
|
|
|
|
|
|
the sound. |
|
|
|
|
|
MIX IN jack (stereo) |
|
OUTPUT jacks |
|
PHONES jack |
|
||||||||
|
By connecting a digital audio player |
|
These jacks output the sound. Connect |
|
Connect headphones |
|
||||||||
|
or other audio source here, you can |
|
them to amplified speakers etc. (sold |
|
(sold separately) here. |
|
||||||||
|
play the HandSonic while listening to |
|
separately). If you’re outputting in |
|
Even if headphones are con- |
|
||||||||
|
a song. |
|
monaural, connect only the |
|
nected, sound will still be output |
|
||||||||
|
The sound that’s input to this jack will |
|
L/MONO jack. |
|
from the OUTPUT jacks. |
|
||||||||
|
be output to the OUTPUT jacks and |
|
|
|
|
|
|
|||||||
|
the PHONES jack. |
|
|
|
|
|
|
|||||||
|
|
|
|
|
|
|
|
|
|
|
|
|
|
|
|
|
|
|
|
|
|
|
|
|
|
|
|
|
|
|
|
|
|
|
|
|
|
|
|
|
|
|
|
|
|
|
|
|
|
|
|
|
|
|
|
|
|
|
|
|
|
|
|
|
|
|
|
|
|
|
|
|
|
|
|
|
|
|
|
|
|
|
|
|
|
|
|
|
|
Security slot(  )
)
http://www.kensington.com/
FOOT SW jack
Connect a footswitch (sold separately) here. You can use your foot to control
a variety of functions.
p. 42
or
TRIG IN jack
Connect an external expansion pad (sold separately) here. You can connect a kick pad and use your foot to
play sounds, or add a bar trigger pad.
p. 40
HH CTRL jack
Connect a hi-hat control pedal (sold separately) here. You can use your foot to open/close the hi-hat sound, or to modify a sound.
WhatHandSonic?isthe
Frequently UsedFunctions QuickGuide
Parameter Guide
Appendix
*To prevent malfunction and equipment failure, always turn down the volume, and turn off all the units before making any connections.
9
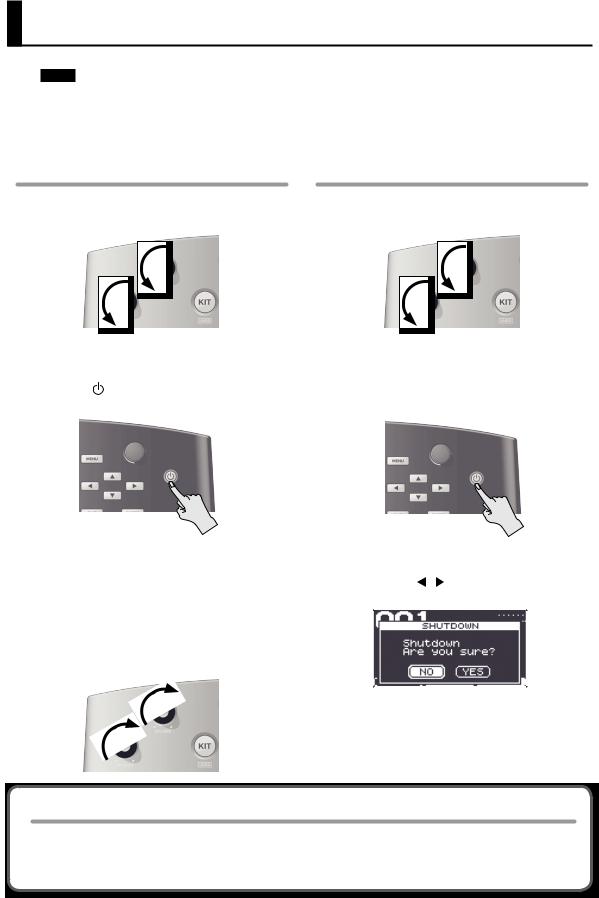
Turning the Power On/Off
NOTE
*Once everything is properly connected (p. 8), be sure to follow the procedure below to turn on their power. If you turn on equipment in the wrong order, you risk causing malfunction or equipment failure.
*Before turning the unit on/off, always be sure to turn the volume down. Even with the volume turned down, you might hear some sound when switching the unit on/off. However, this is normal and does not indicate a malfunction.
Turning the power off
1. Minimize the volume of the HandSonic and of your amplified speakers.
2.
3.
Turn off the power of your amplified speakers.
Hold down the HandSonic’s [ ] button.
The SHUTDOWN screen will appear.
* This unit is equipped with a protection circuit. A brief |
|
|
|
||||
interval (a few seconds) after turning the unit on is |
4. Use the cursor [ ] [ ] buttons to select “YES,” and |
||||||
required before it will operate normally. |
|||||||
4. Turn on the power of your amplified speakers, |
press the [ENTER] button. |
||||||
|
|
|
|||||
|
|
|
|||||
adjust the volume to an appropriate level. |
|
|
|
||||
5. Turn the [VOLUME] and [PHONES] knobs toward |
|
|
|
||||
the right to adjust the volume. |
|
|
|
||||
|
|
|
|
|
|
|
|
|
|
|
|
|
|
|
|
|
|
|
|
|
5. Verify that the screen has gone dark. |
||
|
|
|
|
|
|||
|
|
|
|
|
The HandSonic will be powered-off. |
||
|
|
|
|
|
|
|
|
The power to this unit will be turned off automatically after a predetermined amount of time has passed since it was last used for playing music, or its buttons or controls were operated (Auto Off function).
If you do not want the power to be turned off automatically, disengage the Auto Off function (p. 65). To restore power, turn the power on again.
10
Attaching to a Stand
If you want to play the HandSonic with a stand, use a pad stand (PDS-10; sold separately).
*You must use the screws on the bottom panel of the HandSonic. Using any other screws may cause malfunction.
*When turning the unit over, be careful so as to protect the buttons and knobs from damage. Also, handle the unit carefully; do not drop it.
1.Using the screws on the bottom of the HandSonic, attach the PDS-10 mounting plate.
*Do not use the screws included with the pad stand.
2. Attach the HandSonic to the pad stand.
For the details on how to assemble the pad stand and use the mounting plate, refer to the owner’s manual of the pad stand.
For easier playing, tilt the
HandSonic slightly forward.
WhatHandSonic?isthe
Frequently UsedFunctions QuickGuide
Parameter Guide
Appendix
11
Quickick GuideGuide
HandSonic Basics
This section explains the basic terms that you’ll need to know, and how the HandSonic is structured.
Pads and Kits
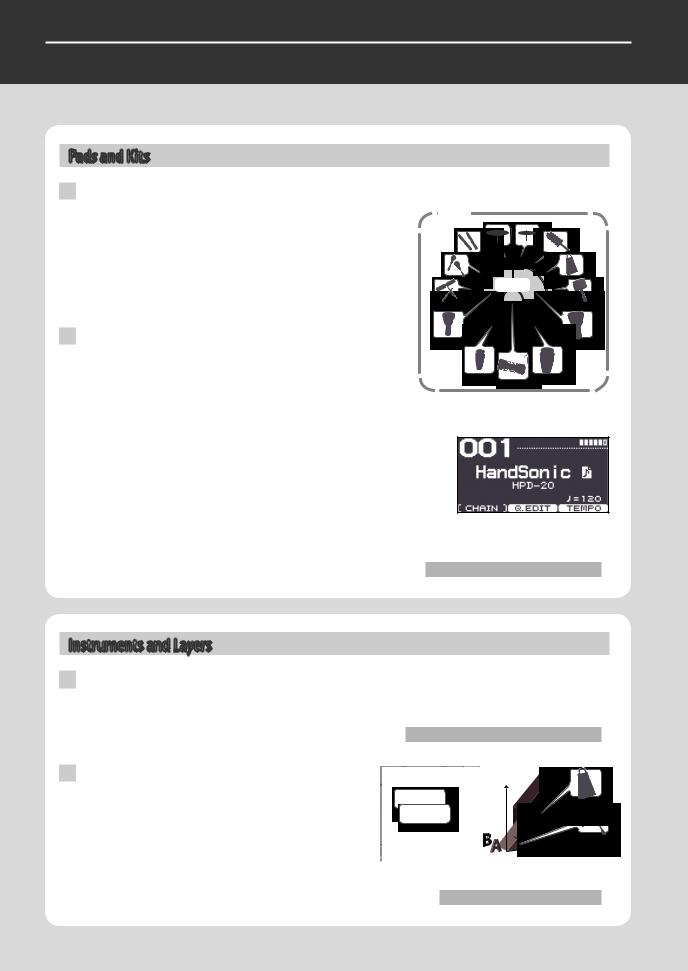
Pads
The HandSonic has 13 striking surfaces that you can strike with your |
Kit |
hands and fingers. Each of these striking surfaces is called a “pad.” |
|
You can assign a different sound to each pad. |
|
A sound can also be assigned to the D-BEAM just like a pad. |
|
This means that the HandSonic lets you play a large number of |
|
instrumental sounds simultaneously, or skillfully switch between the |
Pads |
sounds of different playing techniques. |
|
Kits
A set of sounds assigned to these pads is called a “kit.”
The HandSonic can store 200 such kits; you can switch instantly between kits.
You can edit the pitch, duration, and tonal character of the sound
assigned to each pad; these edited sounds are automatically saved in the kit, and will be applied the next time you select that kit.
The HandSonic comes with more than 100 such kits that cover a wide range of musical styles.
When you power-on the HandSonic, the number and name of the currently selected kit is shown. This is called the “kit screen.”
Kit screen
“Switching Sound Sets (Kits)” (p. 16)
Instruments and Layers
Instruments
The HandSonic provides more than 800 sounds. Each sound is called an “instrument” (abbreviated “inst”). If an instrument is assigned to a pad, you’ll be able to play it.
“Changing Sounds (Instruments)” (p. 17)
Layers
Two instruments can be assigned to each pad; these two assignments are called “layers.” The instruments (Inst A and Inst B) assigned to the two layers can sound together, or you can switch between them according to how strongly you strike the pad.
Volume
Inst B
Inst A
“Layering Sounds (Layer)” (p. 24)
12

Effects
In addition to editing the instruments, the HandSonic provides other ways for you to modify the sound. These are called “effects” (abbreviated “FX”). While editing will modify the way in which the instrument produces sound, effects can add a special effect to the sound produced by the instrument.
The HandSonic contains the following effect processors.
Multi-effects |
These provide a choice of effect types that let you distort the sound, add depth, or add cyclic |
|
|
p. 26 |
|
||
(MFX1–3) |
modulation. You can use three effect processors (MFX1–3) simultaneously. |
|
|
|
|
||
|
|
|
|
|
This adds reverberation to the sound. It lets you create the sensation of performing in a |
|
|
Ambience |
p. 28 |
|
|
concert hall or studio. |
|
||
|
|
|
|
|
|
|
|
|
This lets you boost or cut the volume in the low, mid, and high-frequency regions of the |
|
|
EQ |
p. 30 |
|
|
sound. You can use EQ to make the sound more powerful by boosting the low region, or |
|
||
|
boost the high region to make the sound brighter. |
|
|
|
|
|
|
How the HandSonic is Structured
The following illustration shows how the kits, pads, layers, and FX are structured.
Kit 200
Kit 001 |
|
|
|
|
|
|
|
|
|
Kit settings (KIT) |
|
|
|
Pads |
|
|
|
|
|
FX |
M1 |
M2 |
M3 |
M4 |
M5 |
EXT HEAD |
|
|
|
|
|
|
|
MFX 1 |
|
|
|
|
|
|
MFX 2 |
S1 |
S2 |
S3 |
S4 |
|
EXT RIM |
|
|
|
|
|
|
|
MFX 3 |
S5 |
S6 |
S7 |
S8 |
D-BEAM |
HH PEDAL |
AMBIENCE |
|
||||||
|
|
|
|
|
|
EQ |
Pad settings |
|
Inst A |
Settings for the entire HandSonic |
|
(SYSTEM) |
Inst B |
|
WhatHandSonic?isthe
Frequently UsedFunctions QuickGuide
Parameter Guide
Appendix
13

Quick Guide
Performing
Here’s how to use the HandSonic’s pads and D-BEAM for a variety of performance techniques.
Pads
Strike
Strike a pad using your palm or fingers (one to three fingers). The sound you hear will depend on the force of your strike. For the two pads closest to you (M1, M2), the tonal character will change depending on the location of your strike. The tonal change or effect will differ depending on the instrument.
Strike with your palm
Use your fingers to strike the sub-pads (S1–S8).
Use your palm or fingers to strike the main pads (M1–M5).
Press
Strike with |
|
|
|
your fingers |
|
|
|
S4 |
S5 |
|
|
S3 |
S6 |
|
|
S2 |
|
S7 |
|
M3 |
M4 |
|
|
S1 |
|
S8 |
The M5 pad can also |
M5 |
|
|
|
|
|
be struck using your |
|
|
|
|
fist. |
M1 |
M2 |
|
The M1 and M2 pads |
|
|
|
will vary the sound |
|
|
|
according to the |
|
|
|
location of the strike. |
Each of the pads can be pressed using your hand or elbow.
By pressing one pad while you strike another pad, you can shorten (mute) the sound or raise the pitch. The tonal change or effect will differ depending on the kit.
You can specify the muting or pitch change for each pad.
1 While pressing... |
2 Strike! |
Roll
Press the [ROLL] button to make it light, and press a pad; the sound will play repeatedly. The pressure you apply will affect the volume or tonal character.
To specify the speed of the roll, hold down the [SHIFT] button and press the [ROLL] button.
“Adjusting the roll speed (Roll Speed)” (p. 49)
1
2 Press!
14
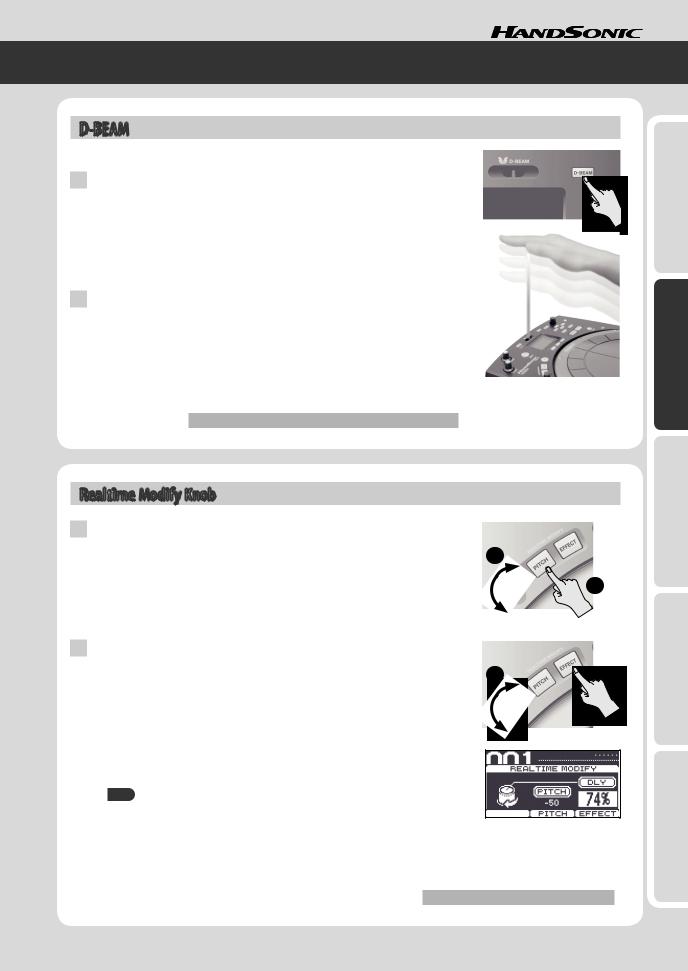
D-BEAM
To use the D-BEAM, press the [D-BEAM] button to make it light.
Playing sounds
Position the palm of your hand above the D-BEAM sensor; you’ll hear a sound. The volume will change according to the height of your hand, and will become louder as get closer to the sensor.
To play the sound again, take your hand away from the D-BEAM and then position your palm above the sensor again.
* There won’t be any sound if no instrument is assigned to the D-BEAM.
Modifying the sound
By positioning your hand above the D-BEAM sensor, you can modify the pitch or another aspect of the sound proportionately to the distance between your hand and the sensor.
While repeatedly striking a pad, move the palm of your hand up and down over the D-BEAM sensor, and listen to the change.
* For some settings, there might not be an effect.
“Modifying the sound by pressing down on a pad” (p. 48)
*The light beam in the illustration is shown for conceptual purposes.
Realtime Modify Knob
Modifying the pitch (PITCH)
Press the [PITCH] button to make it light. |
2 |
|
|
While playing, turn the realtime modify knob; the pitch will change, and the amount |
|
|
|
|
|
|
|
of change will be shown in the screen. |
|
|
1 |
Press the [PITCH] button once again to make it go dark; the sound will return to the |
|
|
|
|
|
|
|
original pitch. |
|
|
|
* You can specify for each pad whether the pitch will change. |
|
|
|
|
|
|
|
Controlling an effect (EFFECT) |
|
|
|
Press the [EFFECT] button to make it light. |
2 |
|
|
While playing, turn the realtime modify knob; a multi-effect parameter will be |
|
|
|
temporarily adjusted, and the sound will change.
The multi-effect being controlled is shown in the screen.
Press the [EFFECT] button once again to make it go dark; the change produced by the effect will return to its original state.
* There will be no effect on kits or pads for which the effect is not enabled.
HINT
•You can make the [PITCH] and [EFFECT] buttons both light. Use the [F2] and [F3] buttons to select what will be controlled by the realtime modify knob.
•You can also make the sound change when you simply press the [PITCH] or [EFFECT] buttons.
•You can change the realtime modify settings by holding down the [SHIFT] button and pressing the [PITCH] or [EFFECT] button.
“Realtime modify knob settings” (p. 49)
WhatHandSonic?isthe
Frequently UsedFunctions QuickGuide
Parameter Guide
Appendix
15
Quick Guide
Switching Sound Sets (Kits)
When you switch kits, the sounds of all pads will be switched simultaneously.
The HandSonic comes with more than 100 kits already provided; here’s how to select and play them.
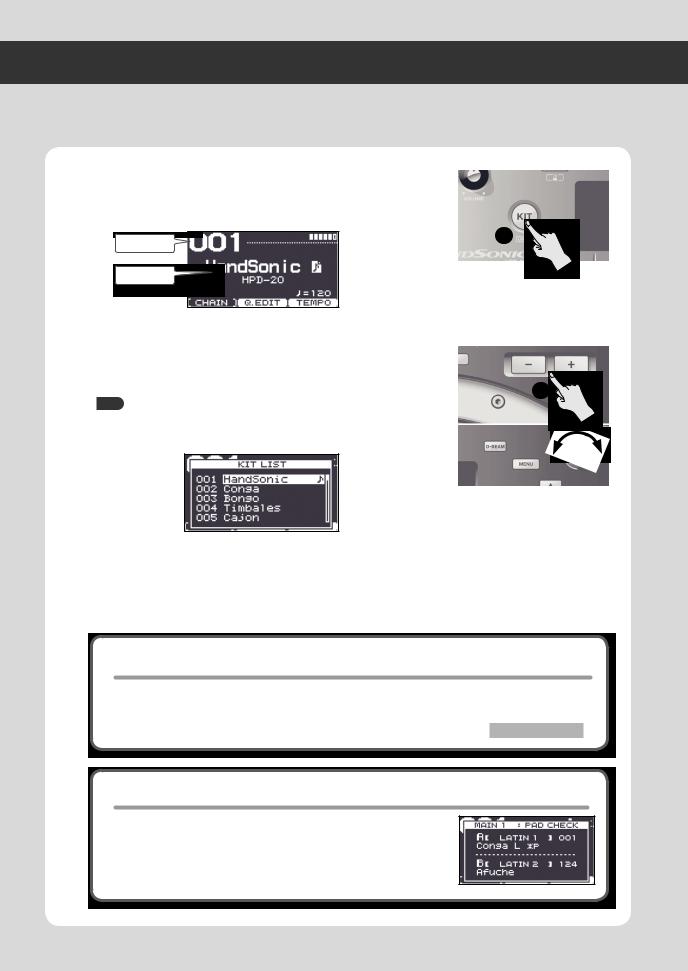
1.
2.
Press the [KIT] button to access the kit screen.
The kit screen shows the number and name of the currently selected kit.
* This screen will appear immediately after you power-on the HandSonic.
1
Kit number
Kit name
Use the [-][+] buttons or the value knob to switch kits.
The kit number and name in the screen will change, and you’ll instantly switch to
the stored content.
2
HINT
You can view a kit list by pressing the [ENTER] button, and select a kit from the list. Press the [ENTER] button to close the list.
*Use the cursor [ ] [
] [ ] buttons to switch pages.
3.Strike the pads to play them.
Now you can perform using the sounds of the newly selected kit.
 (user instrument icon)
If this icon is shown at the kit name, the kit contains user instruments. You can use user instruments to play your favorite audio phrases or your own original sounds.
For details, refer to “User Inst.”
“User Inst” (p. 34)
Checking the sounds (instruments)
In the kit screen, hold down the [SHIFT] button and strike a pad; the instrument that’s assigned to that pad will be shown in the screen.
16
Changing Sounds (Instruments)
You can individually change the instrument that is assigned to each pad of each kit. Your changes are automatically saved to the kit, and the instruments you chose will be there the next time you select that kit.
“Assigning Sounds to Pads (Inst)” (p. 23)
1.Strike the pad whose instrument you want to change.
As an example, we’ll change the instrument that’s assigned to the S1 pad.
HINT |
1 Strike |
You can also change the instrument that’s assigned to the D-BEAM or to an external expansion pad.
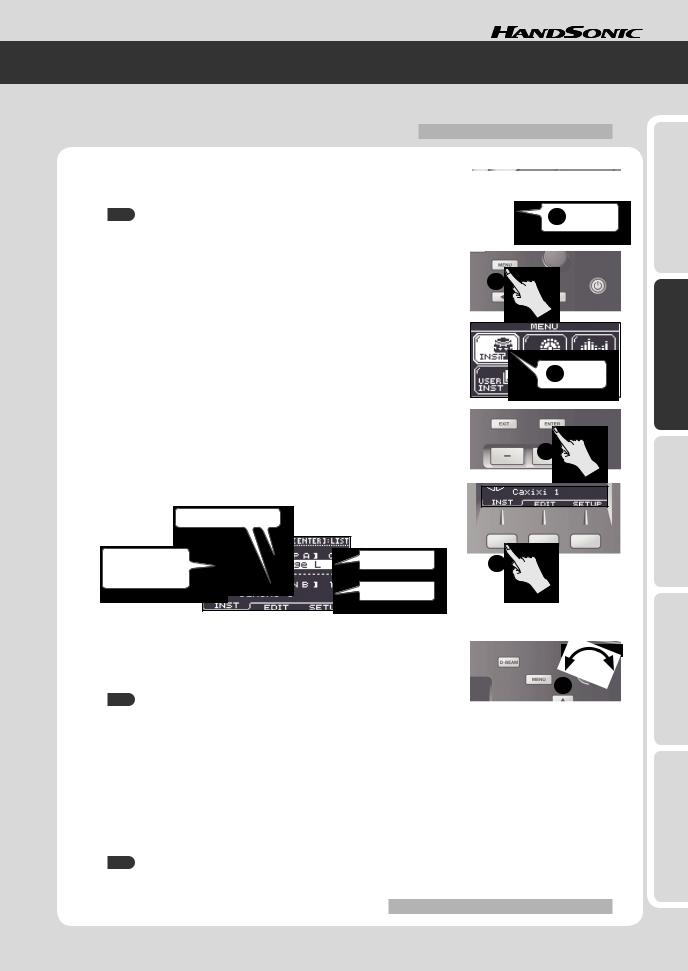
2. Press the [MENU] button. |
2 |
The menu screen will appear. |
3.Use the cursor [ ] [
] [ ] [
] [ ] [
] [ ] buttons to select “INST.”
4.Press the [ENTER] button.
You’ll enter the “INST” menu.
3 |
Select |
4
5. Press the [F1] (INST) button to select the “INST” tab.
The INST screen will appear.
|
Instrument group |
|
Pad whose |
Instrument A |
5 |
instrument you’re |
|
changing
Instrument B
6. Use the [-][+] buttons or the value knob to change the instrument.
Use the cursor [ ] [
] [ ] buttons to select instrument A or B.
You can also change the instrument group.
6
HINT
•Press the [ENTER] button to see the instrument list.
•Strike the S1 pad to audition the sound.
If you strike a different pad, you’ll be able to change the instrument for that pad.
•If you want to hear only instrument A, press the [F3] (SETUP) button and turn the “Layer” parameter “OFF” (p. 24).
7.Press the [KIT] button to return to the kit screen.
Your changes will be saved automatically.
HINT
Even if you’ve modified a kit, you can return individual kits to their factory-set kit settings.
“Returning a Kit to the Factory Settings” (p. 32)
WhatHandSonic?isthe
Frequently UsedFunctions QuickGuide
Parameter Guide
Appendix
17
Quick Guide
Adjusting Instruments (QUICK EDIT)
By using QUICK EDIT you can quickly and easily edit the pitch or decay of an instrument.
For more detailed editing, refer to “Adjusting the Sound (Edit).”
1. Strike the pad whose instrument you want to adjust.
HINT 1 Strike
You can also adjust the instrument that’s assigned to the D-BEAM or to an external expansion pad.
2.In the kit screen, press the [F2] (Q.EDIT) button.
The QUICK EDIT screen will appear.
2
3. Use the [F1] – [F3] buttons to select the parameter.
Button |
Parameter |
Explanation |
|
[F1] (VOLUME) |
Volume |
Adjusts the volume. |
|
|
|
|
|
[F2] (TUNING) |
Tuning |
Adjusts the pitch. |
|
Positive (“+”) settings raise the pitch, and negative (“-”) settings lower the pitch. |
|||
|
|
||
|
|
|
|
[F3] (MUFFLING) |
Muffling |
Adjusts the decay of the sound. |
|
Greater values reduce the decay, emphasizing the attack. |
|||
|
|
||
|
|
|
4.Use the cursor [ ] [
] [ ] buttons to select instrument “A” or “B.”
5.Use the [-][+] buttons or the value knob to adjust the value.
5
6.Strike another pad that you want to edit.
Repeat steps 3–6.
7.Press the [KIT] button to return to the kit screen.
Your changes will be saved automatically.
18
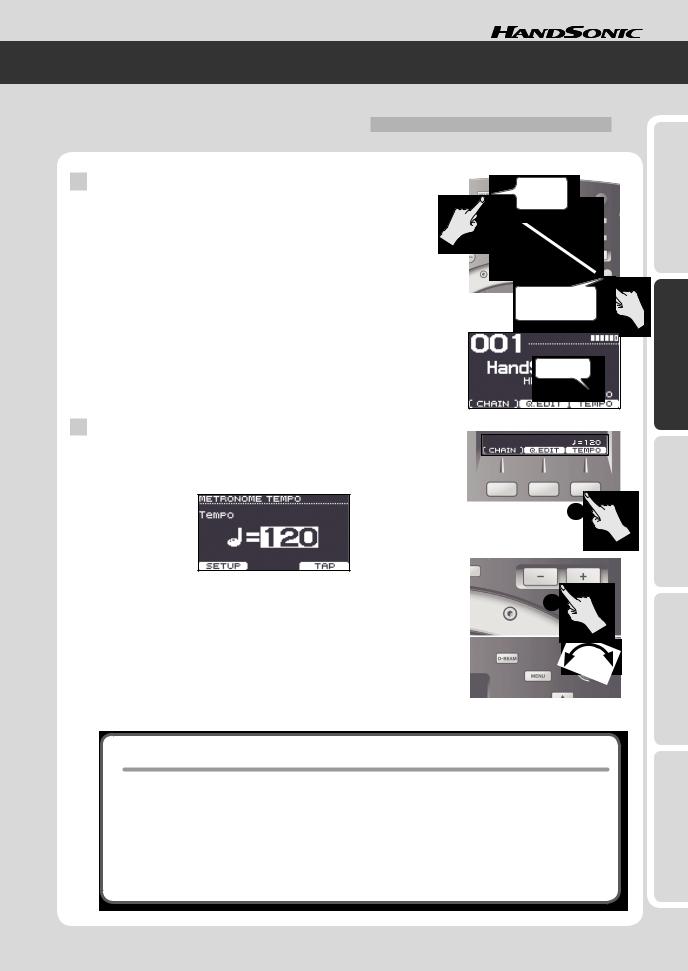
Using the Metronome
The HandSonic provides a metronome function. You can use this for rhythm training to improve your skill, or for warming up before a performance.
Starting/stopping the metronome
1. Hold down the [SHIFT] button and press the [QUICK REC] button.
The metronome will sound.
The kit screen will show the tempo.
2. Once again hold down the [SHIFT] button and press the [QUICK REC] button.
The metronome will stop.
Changing the tempo
1.In the kit screen, press the [F3] (TEMPO) button.
The TEMPO screen will appear.
1
2. Use the [-][+] buttons or the value knob to change the tempo.
The metronome tempo will be changed.
3. Press the [KIT] button to return to the kit screen.
WhatHandSonic?isthe
Frequently UsedFunctions QuickGuide
Parameter Guide
Tap tempo
You can specify the tempo by pressing a button at the desired interval. This is a convenient way to find out the tempo of a song.
1.In the kit screen, press the [F3] (TEMPO) button.
The TEMPO screen will appear.
2.Press the [F3] (TAP) button at least three times in rhythm with the song.
The tempo will be changed.
Appendix
19
Quick Guide
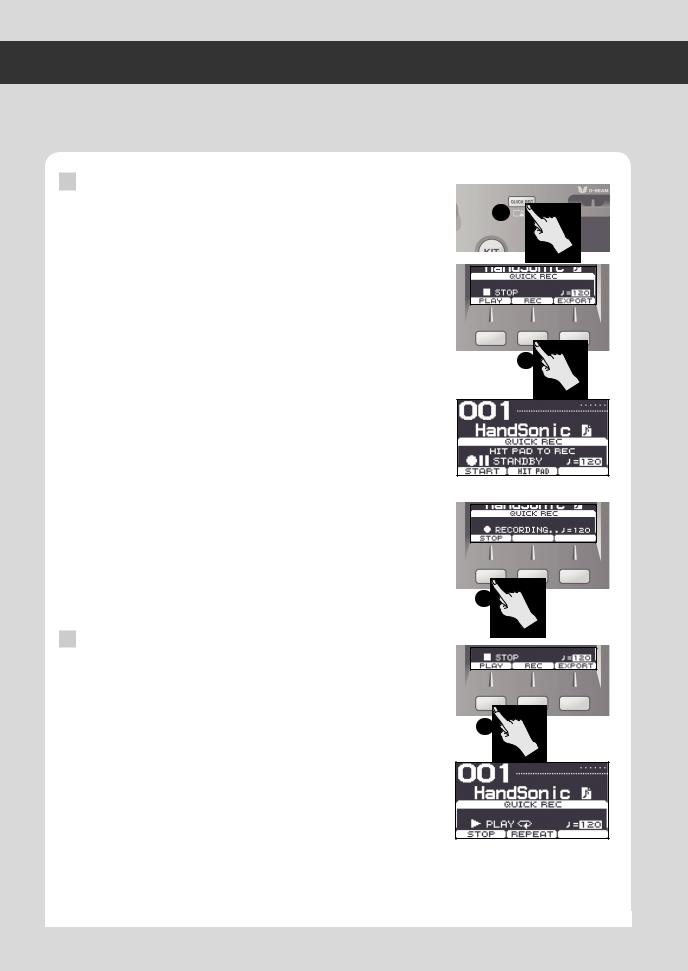
Recording Your Performance (QUICK REC)
It’s easy to record your HandSonic performance. A recorded performance can be played back, or exported to a USB flash drive as an audio file.
Listening objectively to your performance is a good way to improve your skill, and you can also use a recorded performance as material for your rhythm tracks.
Recording
1.Press the [QUICK REC] button.
The QUICK REC screen will appear.
2.Press the [F2] (REC) button.
The STANDBY screen will appear.
You can sound the metronome by holding down the [SHIFT] button and pressing the [QUICK REC] button.
Use the value knob to adjust the tempo.
3.Begin performing.
Recording will start.
*You can also start recording by pressing the [F1] (START) button.
*If the [F2] (HIT PAD) button is off, recording will not start when you begin performing.
4.Press the [F1] (STOP) button to stop recording.
Playing back
5.Press the [F1] (PLAY) button.
The recorded performance will play.
Press the [F2] (REPEAT) button to make playback repeat.
*Playback will use the sounds of the currently selected kit.
*If you sound the metronome, you can use the value knob to change the tempo.
6.Press the [F1] (STOP) button to stop playback.
Playback will stop automatically when it reaches the end of the recorded performance.
1
2
4
5
* The recorded performance will disappear when you power-off the HandSonic.
20
Exporting a recorded performance as an audio file
* Connect your USB flash drive before you continue. |
“Rear Panel (Connections)” (p. 8) |
|
1.Stop recording or playback, and then press the [F3] (EXPORT) button.
The EXPORT screen will appear.
2. Note the file name, and adjust the tempo. |
1 |
The file will be saved with the name that’s shown here.
If you sound the metronome, the tempo will be displayed, allowing you to adjust the tempo.
Use the value knob to adjust the tempo.
As necessary, use the cursor [ ] [
] [ ] buttons to select the following parameters, and use the value knob to set the values.
Parameter |
Explanation |
|
|
Post Export Time |
In some cases, the reverberant decay at the end of the exported |
audio file may be cut off. If this occurs, you can increase this |
|
|
value so that the reverberant decay will not be cut off. |
|
|
Export Gain |
While reading the output level meter, adjusts the volume of the |
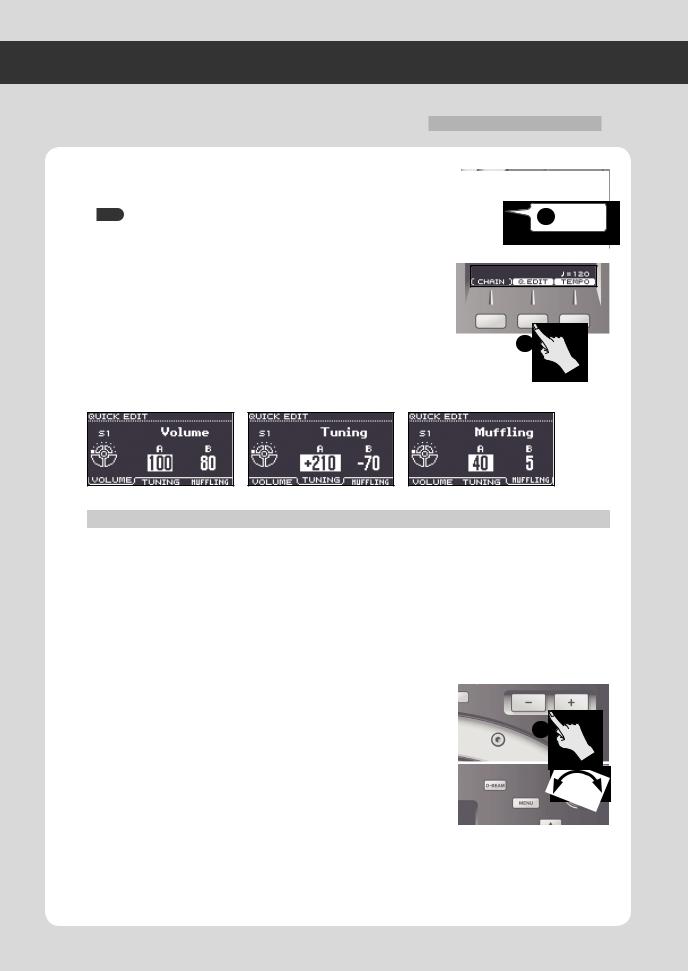
audio file. |
|
|
Positive (“+”) values will increase the volume. |
Output level for the export
Press the [F1] (PREVIEW) button to audition the performance.
3. Press the [F3] (EXECUTE) button. |
|
Exporting to the USB flash drive will begin. |
|
When export is completed, the screen will indicate “Completed!” |
|
* The audio file will be saved in the top level (root) of the USB flash drive. |
3 |
|
|
NOTE |
|
Do not strike the HandSonic’s pads during the export.
The vibration may cause unexpected errors.
4. Press the [KIT] button to return to the kit screen.
WhatHandSonic?isthe
Frequently UsedFunctions QuickGuide
Parameter Guide
Appendix
21
Quick Guide
Menu Operations
The HandSonic has numerous parameters (items that you can set) that specify how it will operate and its sounds will be produced. This section explains the procedure for the basic menu operations you’ll use when setting the parameters. The basic procedure will be the same for any of the screens.
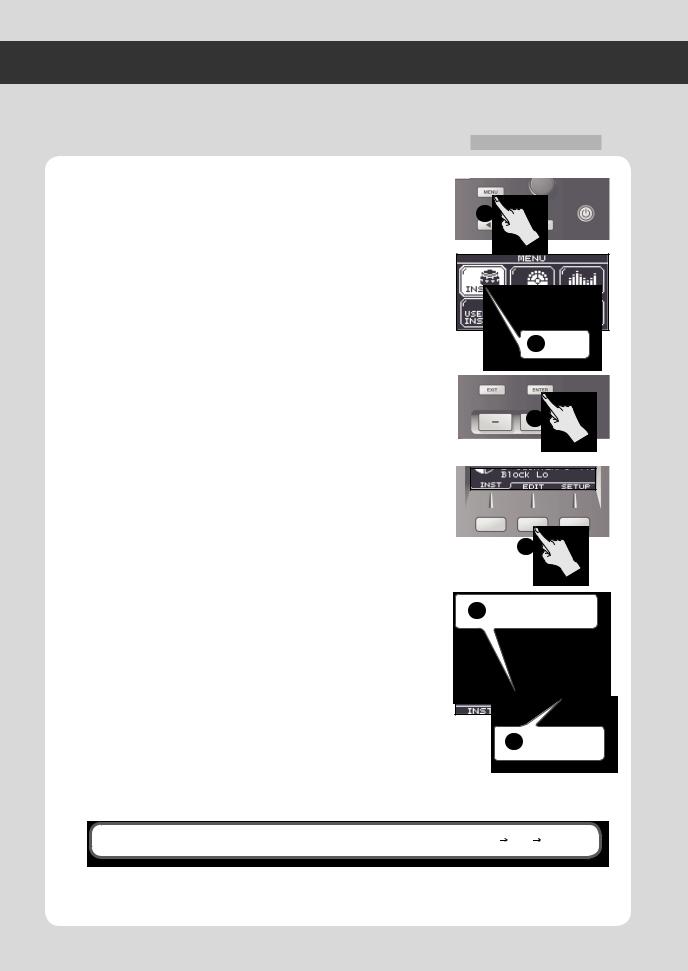
1.Press the [MENU] button.
The MENU screen will appear.
2.Use the cursor [ ] [
] [ ] [
] [ ] [
] [ ] buttons to select an item.
Example) Select the “INST.”
3.Press the [ENTER] button to confirm your selection.
The INST screen sill appear.
4.Use the [F1]–[F3] buttons to select a tab.
Example) Select the “EDIT” tab. The INST–EDIT screen will appear.
*In some cases, buttons as well as tabs may be displayed. Some screens do not have tabs.
5.Use the cursor [ ] [
] [ ] buttons to select a parameter.
Example) Select the “Muffling” parameter.
7.Use the [-][+] buttons or value knob to set the value.
Example) Set the value to “85.”
8.When you’ve finished making settings, press the [KIT] button to return to the kit screen.
The changes you’ve made will be saved automatically.
*You can return to the kit screen from any screen by pressing the [KIT] button
“Parameter Guide” (p. 45)
1
2 Select
3
4
5 Select a parameter
6 Set the value
In this manual, steps 1–4 of the above procedure will be given in the form “choose MENU INST EDIT.”
22
Frequently Used Functions
This section explains functions that help you take full advantage of the HandSonic.
For the procedure, refer to “Menu Operations” (p. 22).
Sound Editing
You can customize your very own kit by assigning your choice of instruments to the pads, or creating your own sounds. If you like, you can also copy a kit before you start editing it.
“Copying a Kit” (p. 32)
Assigning Sounds to Pads (Inst)
1.
2.
3.
Choose MENU gINST gINST.
The INST screen will appear.
Strike to select the pad that you want to change.
To select the D-BEAM or hi-hat control pedal, make it produce sound.
Use the cursor [ ] [ ] buttons to select instrument “A” or “B.”
*For more about instruments A and B, refer to “Layering Sounds (Layer)” (p. 24).
Pad whose instrument |
Instrument |
will be changed |
group |
Instrument A
Instrument B
INST screen
4. Use the value knob to change the instrument.
The instruments are organized by group; to change the group, select the instrument group in step 3. You can also assign user instruments in the same way as the built-in instruments.
|
MEMO |
|
|
|
• You can strike a pad to audition the instrument you selected. |
Audition the sound |
Changing instrument group |
||
|
By holding down the [SHIFT] button and striking a pad, you can |
|
|
|
|
play instruments A or B separately. |
|
|
|
•Press the [ENTER] button to see the instrument list.
•If layer is “OFF,” instrument B is shown as “Layer is OFF.” and will be unavailable.
5.Repeat steps 2–4.
INST LIST screen
Applying the same values to all pads (ALL)
If you hold down the [SHIFT] button and press the [ENTER] button, the value of the selected parameter will be copied to all pads. For example this is convenient when you want to assign the same instrument (A or B) to all pads, or if you want to set the “Tuning” to “0.”
Checking the instruments in the kit screen
WhatHandSonic?isthe
Frequently UsedFunctions QuickGuide
Parameter Guide
In the kit screen, hold down the [SHIFT] button and strike a pad; the instrument that’s assigned to that pad will be shown in the screen.
Sound Editing
Layering Sounds (Layer)
1.
2.
3.
You can assign two instruments (A and B) to each pad. You can make these two instruments sound together, or you can switch between them or vary their balance depending on the strength of your strike.
Choose MENU gINST gSETUP. |
|
The INST–SETUP screen will appear. |
|
Strike to select the pad that you want to change. |
|
Use the cursor [ ] [ ] buttons to select the “Layer” or “Fade Point” |
|
parameter, and use the value knob to edit the value. |
INST–SETUP screen |
Parameter |
Explanation |
|
|
|
Volume |
|
OFF |
Only instrument A will sound |
|
|
Striking |
|
|
force |
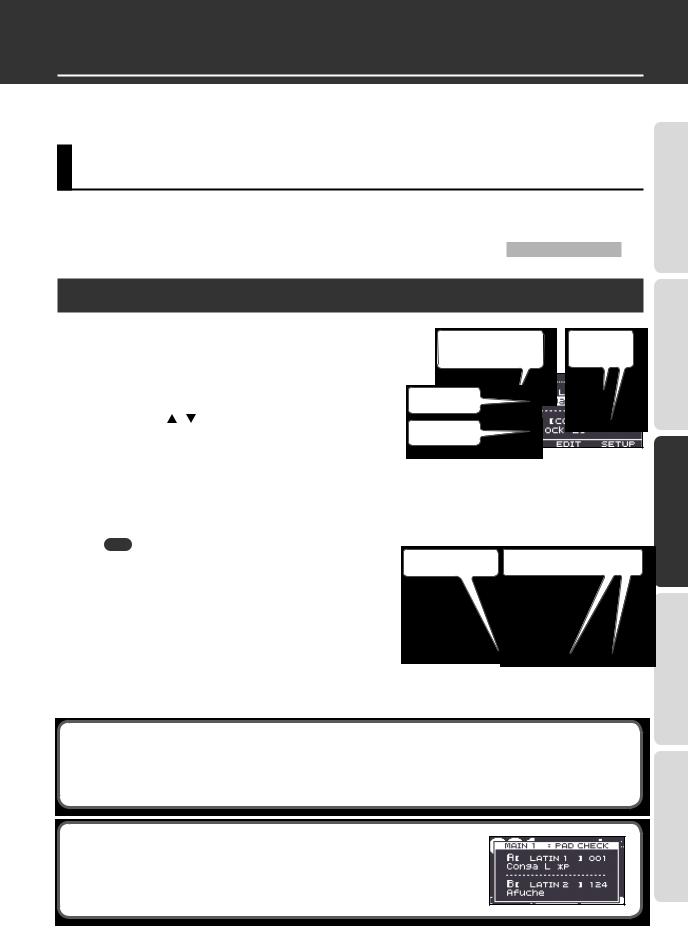
|
|
Volume |
|
MIX |
Instruments A and B will always sound together. |
|
|
Striking |
|
|
force |
|
|
Volume |
Layer |
VELO MIX |
Instrument B will be layered only for strikes stronger than “Fade Point.” |
|
|
Striking |
|
|
force |
|
|
Volume |
|
VELO FADE |
Instrument B will be layered according to the force of the strike only for strikes |
|
stronger than “Fade Point.” |
|
|
|
|
|
|
Striking |
|
|
force |
|
|
Volume |
|
VELO SW |
Switches between instrument A for strikes that are weaker than “Fade Point” and |
|
instrument B for stronger strikes. |
|
|
|
|
|
|
Striking |
|
|
force |
|
Specifies the striking force at which instrument B will begin to be heard. |
|
Fade Point |
If this is “0,” instrument B will sound for strikes of any force. |
|
If this is “127,” instrument B will sound only for the strongest strike. |
||
*This parameter is unavailable if “Layer” is “OFF” or “MIX.”
4.Press the [F1] (INST) button to access the INST screen.
5.Use the cursor [ ] [
] [ ] buttons to select instrument “A” or “B,” and use the value knob to edit the instrument.
Hints for using layers
Layer |
Fade Point |
Explanation |
|
|
|
|
|
MIX |
– |
By assigning the same sound and settings to instruments A/B, and changing “Tuning” to be approxi- |
|
mately 10–20 apart, you can create a spacious sound. |
|||
|
|
||
|
|
|
|
VELO FADE |
|
By assigning the same sound to instruments A/B and setting the maximum “Muffling” for instrument B, |
|
110–127 |
you can cause the sense of attack to be emphasized for strong strikes. Use the instrument B “Color” or |
||
|
|
“Volume” to adjust the strength of the attack. |
|
|
|
|
24
 Loading...