


 Loading...
Owner’s Manual
Congratulations on your choice of the Roland Digital Piano F-100.
201a
Before using this unit, carefully read the sections entitled: “USING THE UNIT SAFELY” and “IMPORTANT NOTES” (p. 2; p. 4). These sections provide important information concerning the proper operation of the unit. Additionally, in order to feel assured that you have gained a good grasp of every feature provided by your new unit, Owner’s manual should be read in its entirety. The manual should be saved and kept on hand as a convenient reference.
Assembling the F-100 |
page 6 |
|
|
Before You Play |
page 10 |
Listening to the Internal Songs page 13
Playing the Keyboard |
page 15 |
|
|
Contents |
page 9 |
|
|
Index |
page 39 |
|
|
202
Copyright © 2002 ROLAND CORPORATION
All rights reserved. No part of this publication may be reproduced in any form without the written permission of ROLAND CORPORATION.

For the U.K.
IMPORTANT: THE WIRES IN THIS MAINS LEAD ARE COLOURED IN ACCORDANCE WITH THE FOLLOWING CODE.
BLUE: NEUTRAL
BROWN: LIVE
As the colours of the wires in the mains lead of this apparatus may not correspond with the coloured markings identifying the terminals in your plug, proceed as follows:
The wire which is coloured BLUE must be connected to the terminal which is marked with the letter N or coloured BLACK. The wire which is coloured BROWN must be connected to the terminal which is marked with the letter L or coloured RED.
Under no circumstances must either of the above wires be connected to the earth terminal of a three pin plug.
USING THE UNIT SAFELY
Used for instructions intended to alert the user to the risk of death or severe injury should the unit be used improperly.
Used for instructions intended to alert the user to the risk of injury or material damage should the unit be used improperly.
* Material damage refers to damage or other adverse effects caused with respect to the home and all its furnishings, as well to domestic animals or pets.
The symbol alerts the user to important instructions or warnings.The specific meaning of the symbol is determined by the design contained within the triangle. In the case of the symbol at left, it is used for general cautions, warnings, or alerts to danger.
The  symbol alerts the user to items that must never be carried out (are forbidden). The specific thing that must not be done is indicated by the design contained within the circle. In the case of the symbol at left, it means that the unit must never be disassembled.
The ● symbol alerts the user to things that must be carried out. The specific thing that must be done is indicated by the design contained within the circle. In the case of the symbol at left, it means that the powercord plug must be unplugged from the outlet.
001
•Before using this unit, make sure to read the instructions below, and the Owner’s Manual.
..........................................................................................................
002c
• Do not open (or modify in any way) the unit or its AC adaptor.
..........................................................................................................
003
•Do not attempt to repair the unit, or replace parts within it (except when this manual provides specific instructions directing you to do so). Refer all servicing to your retailer, the nearest Roland Service Center, or an authorized Roland
distributor, as listed on the “Information” page.
..........................................................................................................
004
• Never use or store the unit in places that are:
• Subject to temperature extremes (e.g., direct sunlight in an enclosed vehicle, near a heating duct, on top of heat-generating equipment); or are
•Damp (e.g., baths, washrooms, on wet floors); or are
•Humid; or are
•Exposed to rain; or are
•Dusty; or are
•Subject to high levels of vibration.
..........................................................................................................
007
• Make sure you always have the unit placed so it is level and sure to remain stable. Never place it on stands that could wobble, or on inclined surfaces.
..........................................................................................................
008c
•Be sure to use only the AC adaptor supplied with the unit. Also, make sure the line voltage at the
installation matches the input voltage specified on the AC adaptor’s body. Other AC adaptors may
use a different polarity, or be designed for a different voltage, so their use could result in
damage, malfunction, or electric shock.
..........................................................................................................
008e
• Use only the attached power-supply cord.
..........................................................................................................
009
•Do not excessively twist or bend the power cord, nor place heavy objects on it. Doing so can damage the cord, producing severed elements and
short circuits. Damaged cords are fire and shock hazards!
..........................................................................................................
2
010
•This unit, either alone or in combination with an amplifier and headphones or speakers, may be capable of producing sound levels that could cause permanent hearing loss. Do not operate for a long period of time at a high volume level, or at a level that is uncomfortable. If you experience any hearing loss or ringing in the ears, you should
immediately stop using the unit, and consult an audiologist.
..........................................................................................................
011
•Do not allow any objects (e.g., flammable material, coins, pins); or liquids of any kind (water, soft drinks, etc.) to penetrate the unit.
..........................................................................................................
012b
•Immediately turn the power off, remove the AC adaptor from the outlet, and request servicing by your retailer, the nearest Roland Service Center, or an authorized Roland distributor, as listed on the “Information” page when:
•The AC adaptor, the power-supply cord, or the plug has been damaged; or
•Objects have fallen into, or liquid has been spilled onto the unit; or
•The unit has been exposed to rain (or otherwise has become wet); or
•The unit does not appear to operate normally or
exhibits a marked change in performance.
..........................................................................................................
013
•In households with small children, an adult should provide supervision until the child is capable of following all the rules essential for the
safe operation of the unit.
..........................................................................................................
014
•Protect the unit from strong impact. (Do not drop it!)
..........................................................................................................
015
•Do not force the unit’s power-supply cord to share an outlet with an unreasonable number of other devices. Be especially careful when using extension cords—the total power used by all devices you have connected to the extension cord’s outlet must never exceed the power rating (watts/amperes) for the extension cord. Excessive loads can cause the insulation on the cord to heat
up and eventually melt through.
..........................................................................................................
016
•Before using the unit in a foreign country, consult with your retailer, the nearest Roland Service Center, or an authorized Roland distributor, as
listed on the “Information” page.
..........................................................................................................
101b
•The unit and the AC adaptor should be located so their location or position does not interfere with their proper ventilation.
..........................................................................................................
102c
•Always grasp only the plug on the AC adaptor cord when plugging into, or unplugging from, an outlet or this unit.
..........................................................................................................
103b
•At regular intervals, you should unplug the AC adaptor and clean it by using a dry cloth to wipe all dust and other accumulations away from its prongs. Also, disconnect the power plug from the power outlet whenever the unit is to remain unused for an extended period of time. Any
accumulation of dust between the power plug and the power outlet can result in poor insulation and lead to fire.
..........................................................................................................
104
•Try to prevent cords and cables from becoming entangled. Also, all cords and cables should be
placed so they are out of the reach of children.
..........................................................................................................
106
•Never climb on top of, nor place heavy objects on the unit.
..........................................................................................................
107c
• Never handle the AC adaptor or its plugs with
wet hands when plugging into, or unplugging from, an outlet or this unit.
..........................................................................................................
108d: Selection
•If you need to move the instrument, take note of the precautions listed below. At least two persons are required to safely lift and move the unit. It should be handled carefully, all the while keeping it level. Make sure to have a firm grip, to protect yourself from injury and the instrument from damage.
•Check to make sure the screws securing the unit to the stand have not become loose. Fasten them again securely whenever you notice any loosening.
•Disconnect the power cord.
•Disconnect all cords coming from external devices.
•Remove the lid.
•Remove the music stand.
..........................................................................................................
109b
•Before cleaning the unit, turn off the power and unplug the AC adaptor from the outlet (p. 10).
..........................................................................................................
110b
•Whenever you suspect the possibility of lightning in your area, disconnect the AC adaptor from the outlet.
..........................................................................................................
116
• Be careful when opening/closing the lid so you do
not get your fingers pinched (p. 11). Adult supervision is recommended whenever small children
use the unit.
..........................................................................................................
118
•Should you remove the caps, screws and cord cramps, make sure to put them in a safe place out of children’s reach, so there is no chance of them being swallowed accidentally.
..........................................................................................................
3

IMPORTANT NOTES
291a
In addition to the items listed under “USING THE UNIT SAFELY” on page 2 and 3, please read and observe the following:
Power Supply
301
•Do not use this unit on the same power circuit with any device that will generate line noise (such as an electric
motor or variable lighting system).
302
•When the AC adaptor is used for extended periods, both the adaptor itself, and the area around the F-100’s DC In connector will become somewhat warm; however, this
does not indicate a malfunction.
307
•Before connecting this unit to other devices, turn off the power to all units. This will help prevent malfunctions and/or damage to speakers or other devices.
Placement
351
•Using the unit near power amplifiers (or other equipment containing large power transformers) may induce hum. To alleviate the problem, change the orientation of this unit; or move it farther away from the source of inter-
ference.
352a
•This device may interfere with radio and television reception. Do not use this device in the vicinity of such
receivers.
352b
•Noise may be produced if wireless communications devices, such as cell phones, are operated in the vicinity of this unit. Such noise could occur when receiving or initiating a call, or while conversing. Should you experience such problems, you should relocate such wireless devices so they are at a greater distance from this unit, or switch
them off.
354b
•Do not expose the unit to direct sunlight, place it near devices that radiate heat, leave it inside an enclosed vehicle, or otherwise subject it to temperature extremes. Also, do not allow lighting devices that normally are used while their light source is very close to the unit (such as a piano light), or powerful spotlights to shine upon the same area of the unit for extended periods of time.
Excessive heat can deform or discolor the unit.
355
• To avoid possible breakdown, do not use the unit in a wet area, such as an area exposed to rain or other moisture.
356
•Do not allow rubber, vinyl, or similar materials to remain on the piano for long periods of time. Such objects can
discolor or otherwise harmfully affect the finish.
357
•Do not put anything that contains water (e.g., flower vases) on the piano. Also, avoid the use of insecticides, perfumes, alcohol, nail polish, spray cans, etc., near the unit. Swiftly wipe away any liquid that spills on the unit
using a dry, soft cloth.
358
•Do not allow objects to remain on top of the keyboard. This can be the cause of malfunction, such as keys ceasing to produce sound.
359
•Do not paste stickers, decals, or the like to this instrument. Peeling these off, particularly when strong adhesives have been used, can damage the instrument’s exterior finish (the stickers provided with this instrument feature a weak adhesive).
Maintenance
401b
•To clean the unit, use a dry, soft cloth; or one that is slightly dampened. Try to wipe the entire surface using an equal amount of strength, moving the cloth along with the grain of the wood. Rubbing too hard in the same area can
damage the finish.
402
•Never use benzine, thinners, alcohol or solvents of any kind, to avoid the possibility of discoloration and/or deformation.
Additional Precautions
552
•Unfortunately, it may be impossible to restore the contents of data that was stored in the unit’s memory once it has been lost. Roland Corporation assumes no liability
concerning such loss of data.
553
•Use a reasonable amount of care when using the unit’s buttons, sliders, or other controls; and when using its jacks
and connectors. Rough handling can lead to malfunctions.
556
•When connecting / disconnecting all cables, grasp the connector itself—never pull on the cable. This way you will avoid causing shorts, or damage to the cable’s
internal elements.
557
• A small amount of heat will radiate from the unit during normal operation.
558a
•To avoid disturbing your neighbors, try to keep the unit’s volume at reasonable levels. You may prefer to use headphones, so you do not need to be concerned about
those around you (especially when it is late at night).
559a
•When you need to transport the unit, package it in the box (including padding) that it came in, if possible. Otherwise,
you will need to use equivalent packaging materials.
562
•Use a cable from Roland to make the connection. If using some other make of connection cable, please note the following precautions.
•Some connection cables contain resistors. Do not use cables that incorporate resistors for connecting to this unit. The use of such cables can cause the sound level to be extremely low, or impossible to hear. For information on cable specifications, contact the manufacturer of the cable.
4

Introduction
Congratulations on your choice of the Roland Digital Piano F-100.
In order to enjoy reliable performance of your new keyboard for many years to come, please take the time to read through this manual in its entirety.
Main Features
Refined Wood Grain, Compact Design
The simple design and light wood grain finish is at home both in the living room as well as in the children’s room.
And at a compact about 300 millimeters deep, it fits in perfectly with other furniture.
Authentic Piano Performances
High-quality concert grand piano tones, along with the Progressive Hammer Action keyboard, which gives more realistic piano touch by providing a heavier feel in the low end and a lighter feel in the upper notes, let you enjoy truly authentic piano performances. The two pedals are securely attached to the piano, ensuring that they will be stable when operated.
A variety of practice features to help you develop your musicality
In addition to a metronome, the F-100 provides functionality that is possible only for an electronic piano, making it an instrument that is ideal for piano lessons: a “rhythm function” that encourages a natural sense of rhythm, and a “two-track recorder” that lets you record and listen to your own playing.
Tones For Use in a Wide Variety of
Musical Genres
The F-100 offers twenty different onboard tones, including piano, which can be used for almost every conceivable style of music.
High-Performance Two-Box Speaker
Construction
The lateral speaker box features two independent left and right speaker boxes, providing unexpectedly superior volume and sonic quality.
The speakers can also be directed rearward if conditions require.
Includes High-Quality Reverb
The Reverb effect can duplicate the ambience of a concert hall.
Sixty Internal Piano Songs
The instrument comes with a selection of classical piano songs, which can be used for lesson, or be played for your listening enjoyment.
Keyboard Touch Can Be Set to Match
Finger Strength
You can change the keyboard touch so it better suits the finger strength of the person playing the keyboard.
Checking the Included Items
Check to see if you have all of the items that normally are supplied with the F-100.
If any items are missing, please contact the dealer where you purchased this unit.
F-100 (For installing the F-100, refer to p. 6) |
AC Adaptor (DC 9V), AC Cord |
Side Panel right |
Lid |
Side Panel left |
Music Stand |
Speaker Box |
Owner’s manual (this document) |
Pedal Board |
Tempo Setting Sheet |
Screw x 10 |
|
Cap x 10 (and additional spare caps) |
|
Cord Cramps |
|
Lid Holder |
|
5

Introduction
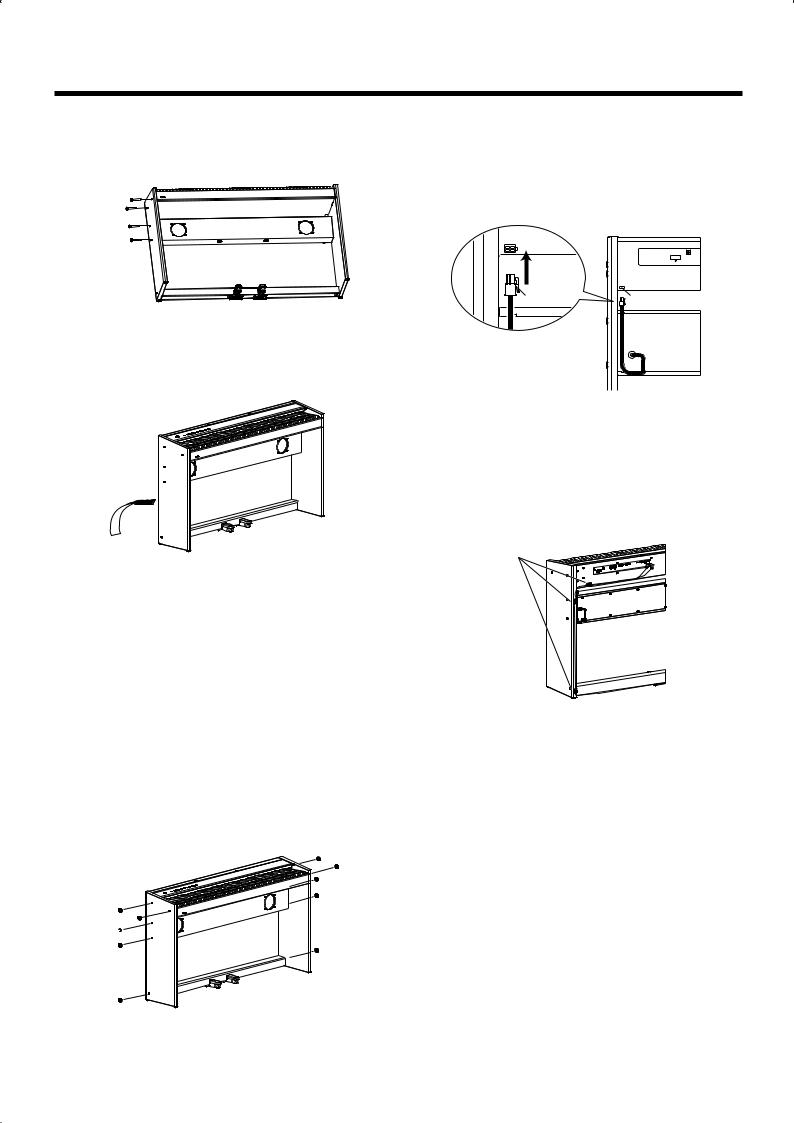
Assembling the F-100
Make sure that another person is on hand to help with the assembly and setup.
To move the piano, lift it carefully—all the while keeping it level. Be very careful, when you assemble and move the piano, to make sure that you do not drop it on your hands or feet.
Always carry out this procedure with the F-100 lying horizontally, with the rear panel facing down.
■ Check the Parts
Before you begin assembling the F-100, check that all the parts were supplied.
You will also need to have a Phillips screwdriver.
fig.st1
1F-100
2Speaker box
Speaker cable
3 Side panel right and left
Rear
(Left)
Front
Cross section
Rear
(Right)
Front
4 Pedal Board
5 Screw x 10 |
6 Cap x 10 |
(and some spare caps)
The speaker box can also be installed so that it faces toward the rear instead of toward the front. Having the speaker box face out the rear of the instrument allows the speakers to be directed toward listeners when the back of the instrument faces the audience.
fig.stsp
Normal direction |
When facing to the rear |
||
Front |
Rear |
Front |
Rear |
|
Speaker |
Speaker |
|
|
box |
box |
|
■Assembly Procedure
•At first, assemble the entire unit in a temporary fashion, without really tightening the screws.
Then, after checking the overall alignment of the boards (and gently shifting certain parts where necessary), go around and tightly fasten each of the screws.
•Be careful when assembling the F-100, so as to avoid scratching the side panels.
When securing the screws, lay the entire unit sideways with the rear side of the F-100 at the bottom.
1.Tighten the screws on one of the side panels to secure that side panel the F-100 and speaker box (four locations).
Install so that the speaker cable at the rear of the speaker box extends to the right side (the side where the F-100’s
[Power] switch is located).
fig.st02-2
|
F-100 |
|
|
|
Screws |
|
|
Side with |
Speaker box |
|
rounded |
|
Side panel |
corners |
|
facing out |
|
|
(Right) |
|
|
|
2.Align the projection of the pedal board with the hole in the side panel, and use a screw to fasten
the pedal board (one location).
fig.st02-2
Pedal Board |
Screw |
3.Align the hole in the other side panel with the projection of the pedal board, and use a screw to
fasten the pedal board (one location).
fig.st02-2
Side with rounded
corners
facing out  Side panel (Left)
Screw 


6
Introduction
4.Tighten the screws on the side panels to secure that side panel the F-100 and speaker box (four
locations).
fig.st03-2
Screws
5.Stand the instrument back up.
When lifting the instrument back up, grasp near the center of the speaker box and the F-100, and gently raise
the instrument.
fig.st03-2
If the Stand is Uneven
If after lifting the F-100 back up you find that stand is crooked, try loosening the screws and then securing them again. When retightening, start with the top screws, then work your way down. When doing this, slightly loosen the screws before firmly tightening them.
To stabilize the pedals
Temporarily loosen the screws that fasten the pedal board.
Step on the pedal, and after verifying that the pedal is in firm contact with the floor, re-tighten the screws firmly.
6. Place the caps over the heads of the screws (five on each side).
fig.st03
Caps
7.Connect the speaker cable extending from the rear of the speaker box to the F-100’s speaker connector.
Press the speaker cable completely into the connector so
that it is securely fastened.
fig.st04
F-100 Rear
Clip Portion |
Speaker Connecter |
 Speaker cable
Hold and insert the cable so that the clip portion extends into the stand and is securely connected.
8.Connect the pedal cables to the Pedal [Damper] jack and [Soft] jack.
Connect the brown plug to the Damper jack, and the black plug to the Soft jack.
9.As necessary, affix cord cramps as shown in the
diagram to fasten the pedal cable.
fig.st04
Cord Cramps
 Pedal Cord
When Moving the Instrument
Disconnect the AC cord, cables, the music stand and the lid from the F-100.
Then lift the piano while keeping it level, and move it with care, so that you do not drop it on your feet, or get your hands caught.
Check the stability of the pedal, and make adjustments as necessary.
When Disassembling
Disassemble the unit by carrying out assembly Steps 1-8 in reverse order.
When Changing the Orientation of the
Speaker Box
Be sure to completely disassemble the unit, change the
speaker box orientation, then reassemble it.
7
Introduction
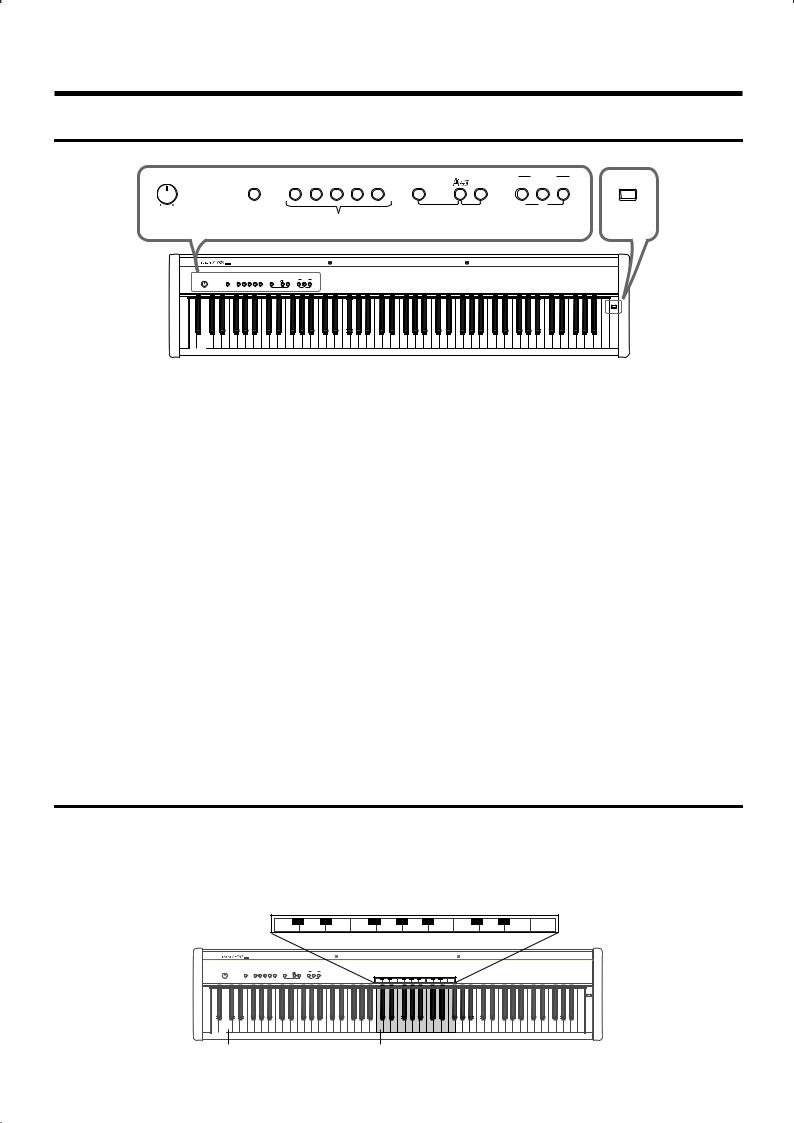
Panel Descriptions
Volume |
|
Harpsi- |
|
|
|
Recorder |
|
|
|
|
|
Reverb |
Piano E.Piano chord Organ Strings |
Variation |
Song |
Play |
Rec |
Track |
Power |
Min |
Max |
|
|
Dual Balance |
Key Touch |
1 |
2 |
|
|
|
|
|
|
|
|
||||
1 |
|
2 |
3 |
4 |
5 6 |
7 8 9 |
10 |
||
|
Volume |
Harpsi- |
Recorder |
|
|
|
|
|
|
|
Reverb |
Piano E.Piano chord Organ Strings Variation |
Demo Play Rec Track |
|
|
|
|
|
|
|
|
|
|
|
|
|
|
|
Power |
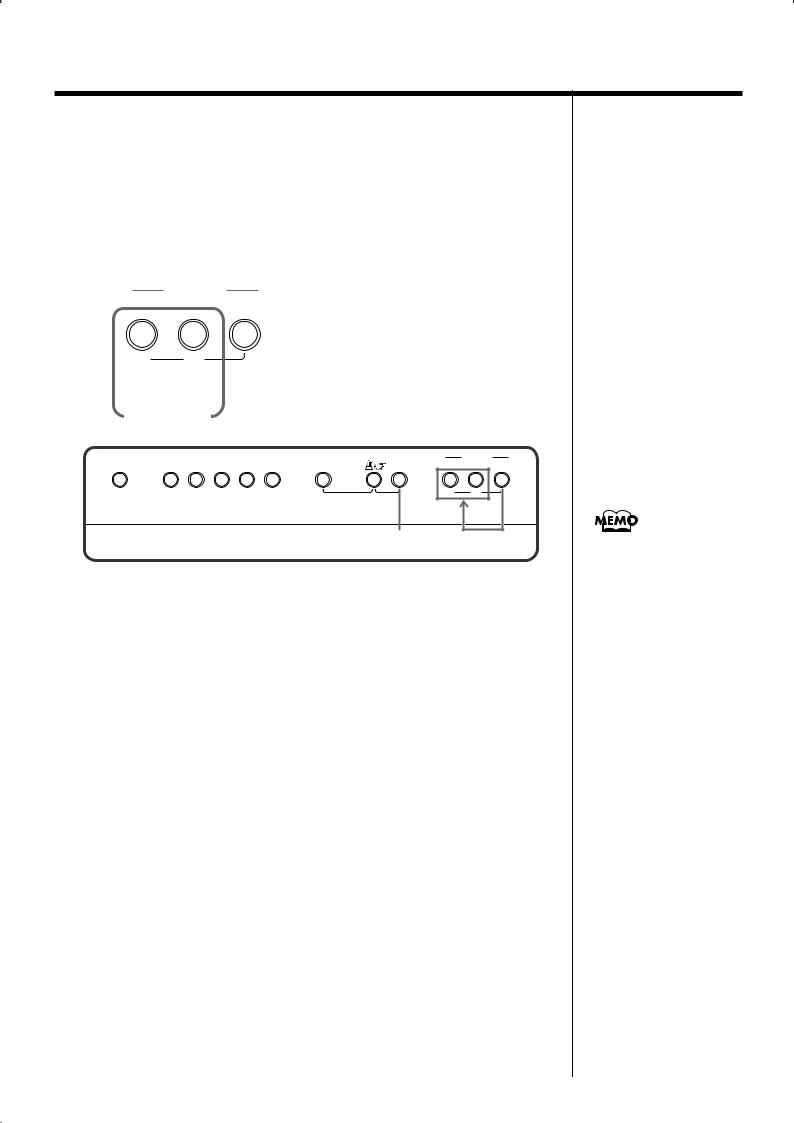
1.[Volume] Knob
Adjusts the volume (p. 12).
2.[Reverb] Button
Used to add reverberation to the sound (p. 17).
3. Tone Buttons
The following five buttons are collectively referred to as the Tone buttons. These are used to select the tone to played via the keyboard (p. 15).
[Piano] Button
[E.Piano] Button
[Harpsichord] Button
[Organ] Button
[Strings] Button
4. [Variation] Button
This is used in combination with the Tone buttons to select the instrument sounds to be played with the keyboard (p. 15).
5. [ 
 (Metronome/Rhythm)] Button
Activates the built-in metronome or rhythm (p. 17, p. 20).
6. [Song] Button
This plays the internal piano songs (p. 13).
Recorder
7. [Play]/[1] Button
Starts playback of recorded performance.
When you press the [Track] button, the [Play] button will function as the Track [1] button (p. 14).
This button and the following [2] button are collectively referred to as the “Track buttons.”
8. [Rec]/[2] Button
Records your performance (p. 21).
When you press the [Track] button, the [Rec] button will function as the Track [2] button (p. 14).
9. [Track] Button
Hold down this button while you switch playback or recording on/off for the [1] and [2] buttons (p. 14, p. 24).
10. [Power] Switch
This switch turns the unit on/off (p. 12).
Applying the Tempo Setting Sheet
If desired, you can affix the included tempo setting sheet to the instrument. Use the tempo setting sheet when setting the metronome tempo.
Position and apply the tempo setting sheet as shown in the figure.
For more details, refer to “Changing the Tempo” (p. 18).
fig.00-09
– |
2 |
+ |
4 |
5 |
6 |
7 |
– |
9 |
+ |
Enter |
1 |
3 |
8 |
0 |
|||||||
|
|
|
Tempo Setting Sheet |
|
|
|
||||
Piano |
|
|
|
|
|
|
|
|
|
|
|
|
|
– |
+ |
– |
+ |
|
|
|
|
|
|
|
1 |
2 |
3 |
4 |
5 |
6 |
7 |
8 |
9 |
0 |
Enter |
|
C1 |
C2 |
C3 |
C4 |
|
|
|
|
|
|
C5 |
|
|
C6 |
C7 |
Low C (C1) |
Position “1” at the fourth C |
|
from the bottom (C4). |
8
Contents |
|
USING THE UNIT SAFELY ............................................................. |
2 |
IMPORTANT NOTES ....................................................................... |
4 |
Introduction ............................................................... |
5 |
Main Features ..................................................................................... |
5 |
Checking the Included Items............................................................ |
5 |
Assembling the F-100 ........................................................................ |
6 |
Check the Parts............................................................................ |
6 |
Assembly Procedure................................................................... |
6 |
Panel Descriptions ............................................................................. |
8 |
Applying the Tempo Setting Sheet.................................................. |
8 |
Before You Play....................................................... |
10 |
Connecting the AC Adaptor........................................................... |
10 |
Installing the Music Stand .............................................................. |
10 |
Connecting Pedals............................................................................ |
10 |
Assembling the Lid .......................................................................... |
11 |
Installing the Lid Holders........................................................ |
11 |
Turning On the Power..................................................................... |
12 |
Turning Off the Power ............................................................. |
12 |
Adjusting the Volume ..................................................................... |
12 |
Connecting Headphones (Sold Separately).................................. |
12 |
Listening to the Internal Songs ............................. |
13 |
Playing/Stopping the Internal Songs............................................ |
13 |
Selecting a Song for Playback.................................................. |
13 |
Playing Each Hand Separately................................................ |
14 |
Playing the Keyboard ............................................. |
15 |
Selecting the Instrument Sound You Wish to Play ..................... |
15 |
Layering Two Instrument Sounds (Dual Play)............................ |
16 |
Adding Reverberation to Sounds (Reverb Effect)....................... |
17 |
Sounding the Metronome ............................................................... |
17 |
Changing the Tempo ................................................................ |
18 |
Changing the Beat..................................................................... |
19 |
Adjusting the Volume .............................................................. |
19 |
Playing Rhythm................................................................................ |
20 |
Recording Your Performance ................................ |
21 |
Recording a Performance................................................................ |
21 |
Recording Along with the Rhythm ............................................... |
22 |
Recording Along with a Song ........................................................ |
23 |
Selecting and Recording the Track for Each Hand Separately..24 |
|
Erasing Recorded Performances .................................................... |
25 |
Erasing a performance from the specified track................... |
25 |
Erasing a song............................................................................ |
25 |
Some Handy Functions ......................................... |
26 |
Changing the Keyboard’s Touch ................................................... |
26 |
Disabling Buttons (Panel Lock)...................................................... |
26 |
Transposing without Changing Your Keyboard Fingering |
|
(Key Transpose)................................................................................ |
27 |
Adjusting the Pitch of the Sound (Master Tuning) ..................... |
27 |
Lowering/ raising the Reference Pitch .................................. |
27 |
Setting the Reference Pitch to 440.0 Hz.................................. |
28 |
Setting the Reference Pitch to 442.0 Hz.................................. |
28 |
Changing the Volume Balance in Dual Play ................................ |
28 |
Changing the Depth of the Reverb ................................................ |
28 |
Checking the depth of the Reverb Effect ............................... |
28 |
Connecting to Audio Equipment .......................... |
29 |
About the Jacks................................................................................. |
29 |
Making the Connections ................................................................. |
29 |
Connecting to MIDI Devices .................................. |
30 |
About the MIDI Connectors ........................................................... |
30 |
Making the Connections ................................................................. |
30 |
Cautions when Connecting an External MIDI Device................ |
31 |
Disconnecting the F-100’s keyboard and internal sound |
|
generator (Local On/Off)......................................................... |
31 |
Switching Local On/Off........................................................... |
31 |
Receiving on all MIDI channels (Omni On/Off).................. |
31 |
Switching Omni On/Off .......................................................... |
31 |
Set the MIDI Channel ............................................................... |
32 |
Transmitting a performance you recorded ........................... |
32 |
Troubleshooting ..................................................... |
33 |
Internal Song List ................................................... |
34 |
MIDI Implementation .............................................. |
36 |
Main Specifications................................................ |
37 |
Functions Assigned to the Keyboard .................. |
38 |
Functions for Metronome/Rhythm............................................... |
38 |
Other Functions ................................................................................ |
38 |
Index........................................................................ |
39 |
Information ............................................................. |
42 |
9
Before You Play
Connecting the AC Adaptor
NOTE
To prevent malfunction and/or damage to speakers or other devices, always turn down the volume, and turn off the power on all devices before making any connections.
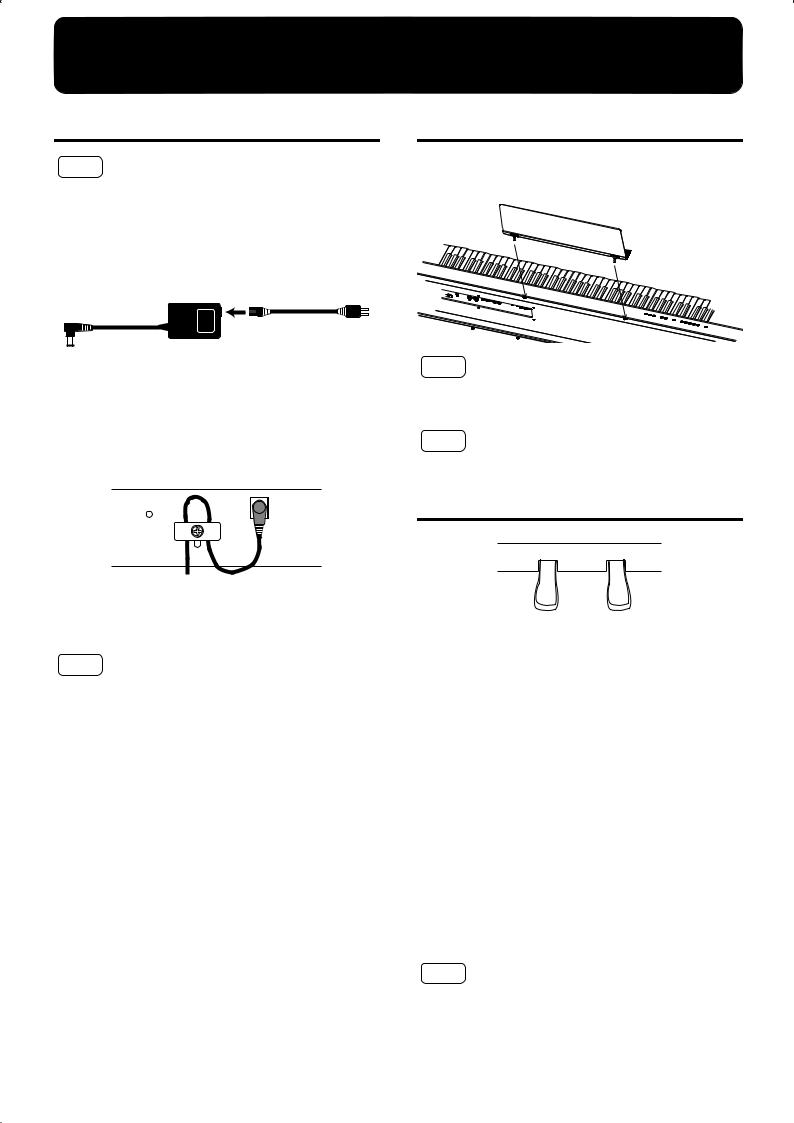
1. Connect the supplied AC adaptor and AC cord.
fig.00-02
AC cord
AC adaptor
2.Connect the AC adaptor to the DC In connector on the rear panel.
3.As shown in the diagram, loop the AC adaptor
cord around the cord hook to fasten it in place.
fig.00-01
Rear
4.Plug the AC cord into a power outlet.
As necessary, cramp the AC adaptor cord with the cord cramps (p. 7).
NOTE
To prevent the inadvertent disruption of power to your unit (should the plug be pulled out accidentally), to avoid applying undue stress to the DC In connector, anchor the power cord using the cord hook, as shown in the diagram.
Even if the cord is fastened, strong tension applied to the cord may cause it to be damaged or broken. Be careful not to pull the cord accidentally, or to apply strong pressure to it.
Installing the Music Stand
1. Assemble the music stand as shown in the diagram.
fig.00-01
NOTE
When moving the piano, be sure to remove the music stand as a safety precaution.
NOTE
Do not apply excessive force to the installed music stand.
Connecting Pedals
fig.00-03
Soft Pedal |
Damper Pedal |
Soft Pedal
This pedal is used to make the sound softer.
Playing with the soft pedal depressed produces a sound that is not as strong as when otherwise played with the equivalent strength.
This is the same function as the left pedal of an acoustic piano.
Some tones are affected less than others.
Damper Pedal
Use this pedal to sustain the sound.
While the pedal is depressed, long lingering reverberations continue to be added to the sound after you release from the keys.
This is the same function as the right pedal of an acoustic piano.
NOTE
Unplugging a pedal cord from the unit while the power is on may cause the pedal’s effect to be applied without stopping. The power of the F-100 must be turned off before inserting or removing a pedal cord.
10
Before You Play
Assembling the Lid
NOTE
You must always use both hands to open or close the lid. When opening and closing the lid, be very careful not to catch your finger in the lid.
1. Attach the included lid as shown in the diagram.
fig.00-04
|
Lid |
Projection |
Keyboard |
2.When opening the lid, grasp the lid with your hands and gently lift it upwards.
3.When closing the lid, grasp the lid with your hands and gently lower it down.
NOTE
Make sure an adult is on hand to provide assistance when young children are playing the F-100.
NOTE
When you move the piano, be sure to remove the lid to prevent accidents. Be careful not to drop the removed lid.
■ Installing the Lid Holders
Attaching the supplied lid holders provides you with a place to rest the lid whenever it's been removed.
Check the Parts
Lid Holders (left and right) |
Attachment screws (4) |
Installation Procedure
1.1.Remove the four screws from both sides of the rear panel of the F-100.
*Be careful not to lose the screws you've removed. You will need to put them back in place at the rear of the F-100 if you decide that you don't want to use the lid holders.
Remove the screws at both ends
2.Attach the lid holders to the rear panel of the F- 100 using the supplied attachment screws (four locations).
Lid Holder
Attachment
screws
Placing the Lid
Rest the lid on the lid holders gently, as shown.
Lid |
Align the ends of |
|
the lid with the |
||
|
||
|
corners of the lid holders |
Lid Holder
NOTE
Never lean against, nor apply excessive force to the lid while
it is resting on the lid holders.
11
Before You Play
Turning On the Power
NOTE
Once the connections have been completed, turn on power to your various devices in the order specified. By turning on devices in the wrong order, you risk causing malfunction and/or damage to speakers and other devices.
1. Turn the [Volume] knob completely to the left to lower the volume to the minimum level.
fig.00-04
Volume
Min Max
2.Push the [Power] switch to turn on the F-100.
After a few seconds, the unit becomes operable and playing the keyboard produces sound.
Adjust the volume to obtain the proper volume level.
fig.00-05
Power
Lower position
ON
NOTE
This unit is equipped with a protection circuit. A brief interval (a few seconds) after power up is required before the unit will operate normally.
■ Turning Off the Power
1. Turn the [Volume] knob completely to the left to lower the volume to the minimum level.
fig.00-04
Volume
Min Max
2. Push the [Power] switch to turn off the F-100.
fig.00-06
Power |
Upper position |
OFF |
Adjusting the Volume
1. Use the [Volume] knob to adjust the overall volume level.
fig.00-07
Volume
Min Max
NOTE
Raising the volume excessively may cause the sound to
distort. Enjoy the piano at an appropriate volume level.
Connecting Headphones
(Sold Separately)
The F-100 features two headphone jacks. This allows two people to listen through headphones simultaneously, making it very useful for lessons and when performing piano pieces for four hands. Additionally, this allows you to play without having to worry about bothering others around you, even at night.
fig.00-08
1.Turn the [Volume] knob to lower the volume to the minimum level.
2.Connect the headphones to either of the headphone jacks.
3.Use the [Volume] knob to adjust the overall volume level.
The sound from the built-in speakers stops. Sound will be heard only through the headphones.
Use Stereo headphones (stereo miniature phone type).
12

Listening to the Internal Songs
The F-100 comes with sixty internal songs.
Playing/Stopping the Internal Songs
fig.01-01
|
Harpsi- |
|
|
|
Recorder |
|
|
Reverb |
Variation |
Song |
Play |
Rec |
Track |
||
Piano E.Piano chord Organ Strings |
|||||||
|
|
Dual Balance |
Key Touch |
1 |
2 |
|
|
|
|
|
|
|
1, 2
1. Press the [Song] button, getting its indicator to light.
The internal songs will play back in succession. When the last song has been
played, playback will return to the first song and begin again.
2. To stop the internal song playback, press the [Song] button to make the indicator go out.
The internal song playback will stop.
■ Selecting a Song for Playback
Here’s how you can select and play a desired internal song.
1. While holding down the [Song] button, press the key that corresponds to the internal song you wish to hear.
The internal songs are assigned to the keys in sequential order, starting with the leftmost key.
fig.01-05
Variation |
Song |
Dual Balance |
Key Touch |
Volume |
Harpsi- |
|
|
|
Recorder |
|
|
|
Reverb |
Piano E.Piano chord Organ Strings |
Variation |
Song |
Play |
Rec |
Track |
Min |
Max |
|
Dual Balance |
Key Touch |
1 |
2 |
|
|
|
|
|
||||
|
|
|
|
|
|
|
|
|
|
|
Power |
2 |
5 |
7 |
10 12 |
14 |
17 |
19 |
22 24 |
26 |
53 |
55 |
58 60 |
1 3 4 6 8 9 11 13 15 16 18 20 21 23 25 27 ••• |
••• 54 56 57 59 |
The indicator of the [Song] button will light. When the last song has been played, playback will return to the first song and resume.
2. To stop the internal song playback, press the [Song] button
to make the indicator go out.
The internal song playback will stop.
For more on song list, please refer to “Internal Song List” (p. 34).
When you play back an internal song, the reverb effect (p. 17) will automatically be turned on (the button’s indicator lights).
When you press the [Song] button, the songs will play back in succession, starting with the previously selected song.
You can adjust the tempo of the song that is playing. Please refer to “Changing the Tempo” (p. 18).
NOTE
It is not possible to sound the rhythm (p. 20) while an internal song is playing.
13
Listening to the Internal Songs
■ Playing Each Hand Separately
The internal songs allow you to select the performance part that will be played back.
The left-hand performance of the internal songs is assigned to the [1] button, while the right-hand performance is assigned to the [2] button. The place where each part of the performance is held is called a “track,” and the [1] and [2] buttons are called “track buttons.”
fig.trackbuttons.e
Recorder
Play Rec Track
1 |
2 |
|
|
|
|
|
Left-hand Right-hand |
|
|
|
|
||
Part |
Part |
|
|
|
|
|
Track Buttons |
|
|
|
|
||
fig.panel3-2 |
|
|
|
|
|
|
|
Harpsi- |
|
|
|
Recorder |
|
Reverb |
Variation |
Song |
Play |
Rec Track |
||
Piano E.Piano chord Organ Strings |
||||||
|
|
Dual Balance |
Key Touch |
1 |
2 |
|
|
|
|
|
|||
1, 2, 4, 5 3
1. While holding down the [Song] button, press the key that corresponds to the internal song you wish to hear.
The song will begin playing back.
2. Press the [Song] button to stop the internal song playback.
3. While holding down the [Track] button, press the [1] or [2] button for any track not to be played back.
4. Press the [Song] button, getting its indicator to light.
The song selected in step 1 will begin playing back.
The part you selected in step 3 will not sound.
Once again hold down the [Track] button and press the button you selected in step 3, illuminating its indicator. The sound will be heard again.
In this way, you can mute the sound, or have it play by holding down the [Track] button and pressing the [1] or [2] button.
5. Press the [Song] button.
Choices you’ve made as to whether a particular performance part plays or not get cancelled as soon as another song plays.
To select a performance part of an internal song, play back the song, then make your selection.
14
Loading...