


 Loading...
Operating Instructions
For safe and correct use, be sure to read "Safety Information" before using the machine.
TABLE OF CONTENTS |
|
How to Read This Manual................................................................................................................................. |
9 |
Introduction..................................................................................................................................................... |
9 |
Legal Prohibition............................................................................................................................................. |
9 |
Disclaimer........................................................................................................................................................ |
9 |
Differences in Functions between Different Models.................................................................................. |
10 |
Note to Administrator.................................................................................................................................. |
10 |
About IP Address......................................................................................................................................... |
11 |
List of Option................................................................................................................................................ |
11 |
Model-Specific Information............................................................................................................................. |
12 |
Important Safety Instructions ...................................................................................................... |
13 |
User Information on Electrical & Electronic Equipment............................................................................. |
13 |
Environmental Advice for Users.................................................................................................................. |
13 |
Note for the Battery and/or Accumulator Symbol (For EU countries only)............................................ |
14 |
Notes to Users of Facsimile Unit................................................................................................................. |
15 |
Important Safety Instructions ....................................................................................................... |
16 |
Notes to Users in the State of California.................................................................................................... |
16 |
ENERGY STAR Program.................................................................................................................................. |
17 |
Saving Energy.............................................................................................................................................. |
17 |
1. Getting Started |
|
Guide to Components...................................................................................................................................... |
19 |
Exterior: Front View...................................................................................................................................... |
19 |
Exterior: Rear View...................................................................................................................................... |
21 |
Interior........................................................................................................................................................... |
23 |
Control Panel................................................................................................................................................ |
24 |
Installing the Machine...................................................................................................................................... |
27 |
Where to Put the Machine.......................................................................................................................... |
27 |
Installing Option............................................................................................................................................... |
30 |
Attaching Paper Feed Unit.......................................................................................................................... |
30 |
About Operation Tools.................................................................................................................................... |
33 |
Initial Setup....................................................................................................................................................... |
34 |
Initial Setup................................................................................................................................................... |
34 |
Changing Operation Modes...................................................................................................................... |
35 |
Multi-access................................................................................................................................................. |
35 |
1

Assigning a Setting to the [ID Card Copy] Key (Shortcut Function)........................................................ |
40 |
Configuring Network Settings......................................................................................................................... |
42 |
Configuring the IP Address Settings........................................................................................................... |
42 |
Sharing the Printer on a Network............................................................................................................... |
46 |
Wireless LAN Setup..................................................................................................................................... |
47 |
Restricting Machine Functions According to User......................................................................................... |
50 |
Enabling the User Restriction Settings......................................................................................................... |
50 |
When Machine Functions are Restricted........................................................................................................ |
54 |
2. Loading Paper |
|
Supported Paper.............................................................................................................................................. |
57 |
Specifications of Paper Types..................................................................................................................... |
60 |
Non-Recommended Paper Types................................................................................................................... |
67 |
Print Area.......................................................................................................................................................... |
68 |
Loading Paper.................................................................................................................................................. |
71 |
Loading Paper into Tray1 and 2................................................................................................................ |
71 |
Loading Paper into Bypass Tray................................................................................................................. |
75 |
Loading Envelopes....................................................................................................................................... |
76 |
Specifying Paper Type and Paper Size Using Control Panel................................................................... |
78 |
Placing Originals.............................................................................................................................................. |
82 |
About Originals............................................................................................................................................ |
82 |
Placing Originals.......................................................................................................................................... |
84 |
3. Printing Documents |
|
Basic Operation............................................................................................................................................... |
87 |
Canceling a Print Job................................................................................................................................... |
87 |
If a Paper Mismatch Occurs............................................................................................................................ |
89 |
Continuing Printing Using Mismatched Paper........................................................................................... |
89 |
Resetting the Print Job.................................................................................................................................. |
89 |
Printing Confidential Documents..................................................................................................................... |
90 |
Storing a Locked Print file............................................................................................................................ |
90 |
Printing a Locked Print file............................................................................................................................ |
91 |
Deleting a Locked Print file.......................................................................................................................... |
92 |
Checking which Locked Print File Jobs Have Been Canceled.................................................................. |
93 |
Direct Printing from a Digital Camera (PictBridge)........................................................................................ |
95 |
2

What Is PictBridge?...................................................................................................................................... |
95 |
PictBridge Printing........................................................................................................................................ |
95 |
What Can Be Done on this Machine......................................................................................................... |
96 |
Exiting PictBridge......................................................................................................................................... |
96 |
When PictBridge Printing Does Not Work................................................................................................. |
97 |
Using Various Print Functions........................................................................................................................... |
99 |
Print Quality Functions................................................................................................................................. |
99 |
Print Output Functions................................................................................................................................ |
100 |
4. Copying Originals |
|
Copier Mode Screen.................................................................................................................................... |
103 |
Basic Operation............................................................................................................................................. |
104 |
Canceling a Copy..................................................................................................................................... |
105 |
Making Enlarged or Reduced Copies......................................................................................................... |
107 |
Specifying Reduce/Enlarge..................................................................................................................... |
108 |
Copying Single-Sided Originals with 2-Sided and Combined Printing.................................................... |
109 |
Specifying Combined and 2-sided Copies............................................................................................. |
112 |
Copying 2-Sided Originals with 2-Sided and Combined Printing (Manual 2-Sided Copying)............ |
113 |
Manually Performing 2-Sided Copying Using the ADF......................................................................... |
114 |
Manually Performing 2-Sided Copying Using the Exposure Glass...................................................... |
114 |
Copying Both Sides of an ID Card onto One Side of Paper..................................................................... |
116 |
Copying an ID Card................................................................................................................................. |
116 |
Specifying the Scan Settings......................................................................................................................... |
118 |
Adjusting Image Density........................................................................................................................... |
118 |
Selecting the Document Type According to Original............................................................................. |
118 |
5. Scanning Originals |
|
Scanner Mode Screen.................................................................................................................................. |
121 |
Registering Scan Destinations....................................................................................................................... |
122 |
Modifying Scan Destinations.................................................................................................................... |
128 |
Deleting Scan Destinations....................................................................................................................... |
128 |
Basic Operation............................................................................................................................................. |
129 |
Scan to E-mail/FTP/Folder...................................................................................................................... |
129 |
Basic Operation for Scan to USB............................................................................................................. |
132 |
Specifying the Scan Settings......................................................................................................................... |
136 |
3

Specifying the Scanning Size According to the Size of the Original.................................................... |
136 |
Adjusting Image Density........................................................................................................................... |
137 |
Specifying Resolution................................................................................................................................ |
138 |
Scanning from a Computer........................................................................................................................... |
139 |
Basic Operation for TWAIN Scanning.................................................................................................... |
139 |
Using TWAIN Scanner............................................................................................................................. |
139 |
TWAIN Scanning...................................................................................................................................... |
139 |
Basic Operation for WIA Scanning......................................................................................................... |
141 |
6. Sending and Receiving a Fax |
|
Fax Mode Screen.......................................................................................................................................... |
143 |
Setting the Date and Time............................................................................................................................. |
145 |
Entering Characters....................................................................................................................................... |
146 |
Registering Fax Destinations......................................................................................................................... |
148 |
Registering Fax Destinations Using the Control Panel............................................................................ |
148 |
Registering Fax Destinations Using Web Image Monitor...................................................................... |
150 |
Preventing Transmission to the Wrong Destination................................................................................. |
152 |
Sending a Fax................................................................................................................................................ |
154 |
Selecting Transmission Mode................................................................................................................... |
154 |
Internet Fax Transmission.......................................................................................................................... |
155 |
Basic Operation for Sending a Fax......................................................................................................... |
155 |
Canceling a Transmission......................................................................................................................... |
157 |
Specifying the Fax Destination................................................................................................................. |
160 |
Useful Sending Functions.......................................................................................................................... |
164 |
Specifying the Scan Settings..................................................................................................................... |
167 |
Using the Fax Function from a Computer (LAN-Fax).................................................................................. |
169 |
Basic Operation for Sending Faxes from a Computer........................................................................... |
169 |
Configuring Transmission Settings............................................................................................................ |
171 |
Configuring the LAN-Fax Address Book................................................................................................. |
172 |
Editing a Fax Cover Sheet........................................................................................................................ |
174 |
Receiving a Fax.............................................................................................................................................. |
176 |
Selecting Reception Mode....................................................................................................................... |
176 |
Receiving an Internet Fax.......................................................................................................................... |
179 |
Forwarding or Storing Faxes in Memory................................................................................................ |
181 |
4

Printing Out Faxes Stored in Memory...................................................................................................... |
184 |
Receiving or Rejecting Faxes from Special Senders............................................................................... |
185 |
Lists/Reports Related to Fax......................................................................................................................... |
188 |
7. Configuring the Machine Using the Control Panel |
|
Basic Operation............................................................................................................................................. |
189 |
Menu Chart.................................................................................................................................................... |
191 |
Copier Features Settings............................................................................................................................... |
193 |
Scanner Features Settings............................................................................................................................. |
198 |
Fax Transmission Features Settings............................................................................................................... |
200 |
Fax Features Settings..................................................................................................................................... |
202 |
Address Book Settings................................................................................................................................... |
208 |
System Settings............................................................................................................................................... |
209 |
Tray Paper Settings........................................................................................................................................ |
215 |
Printing Lists/Reports..................................................................................................................................... |
218 |
Printing the Configuration Page................................................................................................................ |
218 |
Types of Lists/Reports............................................................................................................................... |
218 |
Printer Features Settings................................................................................................................................. |
220 |
Network Settings............................................................................................................................................ |
224 |
Administrator Settings.................................................................................................................................... |
228 |
8. Configuring the Machine Using Web Image Monitor |
|
Using Web Image Monitor........................................................................................................................... |
233 |
Displaying Top Page..................................................................................................................................... |
234 |
Changing the Interface Language........................................................................................................... |
235 |
Checking the System Information................................................................................................................. |
236 |
Status Tab................................................................................................................................................... |
236 |
Counter Tab............................................................................................................................................... |
237 |
Machine Information Tab......................................................................................................................... |
240 |
Configuring the System Settings................................................................................................................... |
241 |
Sound Volume Adjustment Tab................................................................................................................ |
241 |
Tray Paper Settings Tab............................................................................................................................ |
241 |
Copier Tab................................................................................................................................................. |
245 |
Fax Tab....................................................................................................................................................... |
245 |
Priority Tray Tab......................................................................................................................................... |
247 |
5

Toner Saving Tab...................................................................................................................................... |
248 |
I/O Timeout Tab....................................................................................................................................... |
248 |
Black-and-White Print Priority Tab........................................................................................................... |
249 |
Shortcut to Function Tab............................................................................................................................ |
249 |
Registering Destinations................................................................................................................................ |
250 |
Registering Fax Special Senders.................................................................................................................. |
251 |
Restricting Machine Functions According to User....................................................................................... |
252 |
Configuring the Network Settings................................................................................................................ |
253 |
Network Status Tab................................................................................................................................... |
253 |
IPv6 Configuration Tab............................................................................................................................. |
254 |
Network Application Tab......................................................................................................................... |
254 |
DNS Tab.................................................................................................................................................... |
255 |
Auto E-mail Notification Tab.................................................................................................................... |
256 |
SNMP Tab................................................................................................................................................. |
257 |
SMTP Tab................................................................................................................................................... |
258 |
POP3 Tab................................................................................................................................................... |
259 |
Internet Fax Tab......................................................................................................................................... |
259 |
Wireless Tab.............................................................................................................................................. |
260 |
Configuring the IPsec Settings....................................................................................................................... |
263 |
IPsec Global Settings Tab......................................................................................................................... |
263 |
IPsec Policy List Tab................................................................................................................................... |
263 |
Printing Lists/Reports..................................................................................................................................... |
267 |
Configuring the Administrator Settings......................................................................................................... |
268 |
Administrator Tab...................................................................................................................................... |
268 |
Reset Settings Tab...................................................................................................................................... |
268 |
Backup Setting Tab................................................................................................................................... |
269 |
Restore Setting Tab.................................................................................................................................... |
270 |
Set Date/Time Tab.................................................................................................................................... |
270 |
Energy Saver Mode Tab.......................................................................................................................... |
271 |
PCL6 Mode................................................................................................................................................ |
272 |
9. Maintaining the Machine |
|
Replacing the Print Cartridge........................................................................................................................ |
273 |
Replacing the Waste Toner Bottle................................................................................................................ |
278 |
6

Replacing a Component............................................................................................................................... |
284 |
Replacing the Intermediate Transfer Unit................................................................................................. |
284 |
Replacing the Fusing Unit and Transfer Roller........................................................................................ |
284 |
Cautions When Cleaning.............................................................................................................................. |
285 |
Cleaning the Toner Density Sensor.............................................................................................................. |
286 |
Cleaning the Friction Pad and Paper Feed Roller....................................................................................... |
288 |
Cleaning the Registration Roller and Paper Tray........................................................................................ |
291 |
Cleaning the Exposure Glass and ADF....................................................................................................... |
294 |
Cleaning the Exposure Glass................................................................................................................... |
294 |
Cleaning the ADF...................................................................................................................................... |
294 |
10. Troubleshooting |
|
Removing Paper Jams.................................................................................................................................... |
295 |
Removing Printing Jams............................................................................................................................. |
295 |
Removing Scanning Jams......................................................................................................................... |
301 |
Common Problems......................................................................................................................................... |
304 |
Paper Feed Problems..................................................................................................................................... |
306 |
Print Quality Problems................................................................................................................................... |
309 |
Checking the Condition of the Machine.................................................................................................. |
309 |
Checking the printer driver settings.......................................................................................................... |
310 |
Printer Problems............................................................................................................................................. |
312 |
When You Cannot Print Properly............................................................................................................. |
312 |
When You Cannot Print Clearly............................................................................................................... |
316 |
When Paper Is Not Fed Properly............................................................................................................. |
319 |
Other Printing Problems............................................................................................................................ |
320 |
Copier Problems............................................................................................................................................ |
321 |
When You Cannot Make Clear Copies.................................................................................................. |
321 |
When You Cannot Make Copies as Wanted......................................................................................... |
322 |
Scanner Problems.......................................................................................................................................... |
323 |
When You Cannot Browse the Network to Send a Scan File............................................................... |
323 |
When Scanning Is Not Done As Expected............................................................................................. |
323 |
Fax Problems.................................................................................................................................................. |
324 |
When You Cannot Send or Receive Fax Messages As Wanted.......................................................... |
324 |
When an Error Is Notified via a Report or E-mail................................................................................... |
327 |
7

Error Code................................................................................................................................................. |
329 |
Error and Status Messages on the Screen................................................................................................... |
334 |
11. Appendix |
|
Functions and Network Settings Available in an IPv6 Environment.......................................................... |
343 |
Available Functions................................................................................................................................... |
343 |
Transmission Using IPsec............................................................................................................................... |
345 |
Encryption and Authentication by IPsec.................................................................................................. |
345 |
Security Association.................................................................................................................................. |
346 |
Encryption Key Exchange Settings Configuration Flow......................................................................... |
347 |
Specifying Encryption Key Exchange Settings........................................................................................ |
347 |
Specifying IPsec Settings on the Computer............................................................................................. |
348 |
Enabling and Disabling IPsec Using the Control Panel.......................................................................... |
350 |
Notes About the Toner.................................................................................................................................. |
351 |
Moving and Transporting the Machine....................................................................................................... |
352 |
Disposal...................................................................................................................................................... |
352 |
Where to Inquire....................................................................................................................................... |
353 |
Consumables.................................................................................................................................................. |
354 |
Print Cartridge............................................................................................................................................ |
354 |
Waste Toner Bottle.................................................................................................................................... |
356 |
Specifications of the Machine...................................................................................................................... |
357 |
General Function Specifications.............................................................................................................. |
357 |
Printer Function Specifications.................................................................................................................. |
359 |
Copier Function Specifications................................................................................................................. |
360 |
Scanner Function Specifications............................................................................................................... |
361 |
Fax Function Specifications...................................................................................................................... |
362 |
Specifications of Options.............................................................................................................................. |
365 |
Paper Feed Unit TK1010.......................................................................................................................... |
365 |
Copyright Information about Installed Applications................................................................................... |
366 |
expat........................................................................................................................................................... |
366 |
Iperf............................................................................................................................................................ |
366 |
WPA Supplicant........................................................................................................................................ |
367 |
Trademarks..................................................................................................................................................... |
369 |
INDEX........................................................................................................................................................... |
371 |
8
How to Read This Manual
Introduction
This manual contains detailed instructions and notes on the operation and use of this machine. For your safety and benefit, read this manual carefully before using the machine. Keep this manual in a handy place for quick reference.
Legal Prohibition
Do not copy or print any item for which reproduction is prohibited by law. Copying or printing the following items is generally prohibited by local law:
bank notes, revenue stamps, bonds, stock certificates, bank drafts, checks, passports, driver's licenses.
The preceding list is meant as a guide only and is not inclusive. We assume no responsibility for its completeness or accuracy. If you have any questions concerning the legality of copying or printing certain items, consult with your legal advisor.
This machine is equipped with a function that prevents making counterfeit bank bills. Due to this function the original images similar to bank bills may not be copied properly.
Disclaimer
Contents of this manual are subject to change without prior notice. In no event will the company be liable for direct, indirect, special, incidental, or consequential damages as a result of handling or operating the machine.
To the maximum extent permitted by applicable laws, in no event will the manufacturer be liable for any damages whatsoever arising out of failures of this machine, losses of the registered data, or the use or non-use of this product and operation manuals provided with it.
Make sure that you always copy or have backups of the data registered in this machine. Documents or data might be erased due to your operational errors or malfunctions of the machine.
In no event will the manufacturer be responsible for any documents created by you using this machine or any results from the data executed by you.
For good output quality, the manufacturer recommends that you use genuine toner from the manufacturer.
The manufacturer shall not be responsible for any damage or expense that might result from the use of parts other than genuine parts from the manufacturer with your office products.
Two kinds of size notation are employed in this manual.
9

Some illustrations or explanations in this guide may differ from your product due to improvement or change in the product.
Differences in Functions between Different Models
The differences in main functions between different models are as follows:
|
SP C250SF |
SP C252SF |
|
|
|
Type |
Type 1 |
Type 2 |
|
|
|
Restrictions on available functions |
Not available |
Available |
|
|
|
User Restriction |
Not available |
Available |
|
|
|
Locked Print |
Not available |
Available |
|
|
|
Internet Fax |
Not available |
Available |
|
|
|
Paperless FAX |
Not available |
Available |
(Reception file setting, Print received file, Print forwarded file, |
|
|
Notify forward status) |
|
|
|
|
|
Notification to replace a component |
Not available |
Available |
(Fusing unit, Transfer roller, Intermediate transfer belt) |
|
|
|
|
|
Note to Administrator
Password
Certain configurations of this machine can be password-protected to prevent unauthorized modifications by others. We strongly recommend you to create your own password immediately.
The following are the operations that can be password-protected:
•Configuring the [Address Book], [Network Settings], or [Admin. Tools] menu using the control panel
You can access these menus without a password by factory default. The setting for creating a password can be found in [Admin. Tools].
•Configuring the [System Settings], [Quick Dial Destination], [Scan Destination], [Fax Speed Dial Destination], [Special Sender], [Restrict Available Functions], [Network Settings], [IPsec Settings], or [Administrator Tools] menu using Web Image Monitor
10
By default, the access to the machine via Web Image Monitor is not password-protected. The setting for configuring the password can be found in [Administrator Settings].
•For details about creating passwords, see page 228 "Administrator Settings" or page 268 "Configuring the Administrator Settings".
User Restriction
You can restrict the use of certain functions of this machine to users with proper authentication.
Using Web Image Monitor, you can select the functions you want to restrict, and register the users who can use that function upon authentication.
•For details about creating passwords and configuring the user restriction settings, see page 50 "Restricting Machine Functions According to User".
About IP Address
In this manual, "IP address" covers both IPv4 and IPv6 environments. Read the instructions that are relevant to the environment you are using.
List of Option
|
|
Option List |
Referred to as |
|
|
|
|
Paper Feed Unit TK1010 |
Paper feed unit |
||
|
|
|
|
|
|
|
|
|
|
|
|
• If Paper feed unit is attached, "Tray 2" appears on the machine's control panel.
11
Model-Specific Information
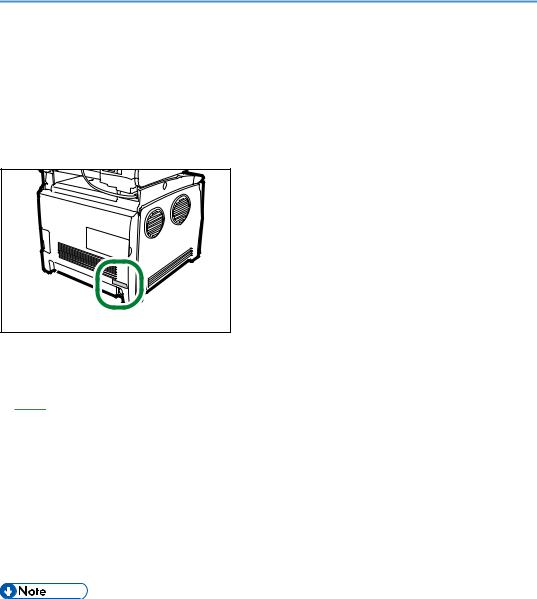
This section explains how you can identify the region your machine belongs to.
There is a label on the rear of the machine, located in the position shown below. The label contains details that identify the region your machine belongs to. Read the label.
DAC029
The following information is region-specific. Read the information under the symbol that corresponds to the region of your machine.


 (mainly Europe and Asia)
If the label contains the following, your machine is a region A model:
•CODE XXXX -27
•220-240V


 (mainly North America)
If the label contains the following, your machine is a region B model:
•CODE XXXX -17
•120-127V
•Dimensions in this manual are given in two units of measure: metric and inch. If your machine is a Region A model, refer to the metric units. If your machine is a Region B model, refer to the inch units.
12
Important Safety Instructions 


User Information on Electrical & Electronic Equipment
Users in the countries where this symbol shown in this section has been specified in national law on collection and treatment of E-waste
Our Products contain high quality components and are designed to facilitate recycling. Our products or product packaging are marked with the symbol below.
The symbol indicates that the product must not be treated as municipal waste. It must be disposed of separately via the appropriate return and collection systems available. By following these instructions you ensure that this product is treated correctly and help to reduce potential impacts on the environment and human health, which could otherwise result from inappropriate handling. Recycling of products helps to conserve natural resources and protect the environment.
For more detailed information on collection and recycling systems for this product, please contact the shop where you purchased it, your local dealer or sales/service representatives.
All Other Users
If you wish to discard this product, please contact your local authorities, the shop where you bought this product, your local dealer or sales/service representatives.
Environmental Advice for Users
Users in the EU, Switzerland and Norway
Consumables yield
Please refer to either the User’s Manual for this information or the packaging of the consumable.
Recycled paper
The machine can use recycled paper which is produced in accordance with European standard EN 12281:2002 or DIN 19309. For products using EP printing technology, the machine can print
13

on 64g/m2 paper, which contains less raw materials and represents a significant resource reduction.
Duplex printing (if applicable)
Duplex printing enables both sides of a sheet of paper to be used. This saves paper and reduces the size of printed documents so that fewer sheets are used. We recommend that this feature is enabled whenever you print.
Toner and ink cartridge return program
Toner and ink cartridge for recycling will be accepted free of charge from users in accordance with local regulations.
For details about the return program, please refer to the Web page below or consult your service person.
https://www.ricoh-return.com/
Energy efficiency
The amount of electricity a machine consumes depends as much on its specifications as it does on the way you use it. The machine is designed to allow you to reduce electricity costs by switching to Ready mode after it prints the last page. If required, it can immediately print again from this mode.
If no additional prints are required and a specified period of time passes, the device switches to an energy saving mode.
In these modes, the machine consumes less power (watts). If the machine is to print again, it needs a little longer to return from an energy saving mode than from Ready mode.
For maximum energy savings, we recommend that the default setting for power management is used.
Products that comply with the Energy Star requirement are always energy efficient.
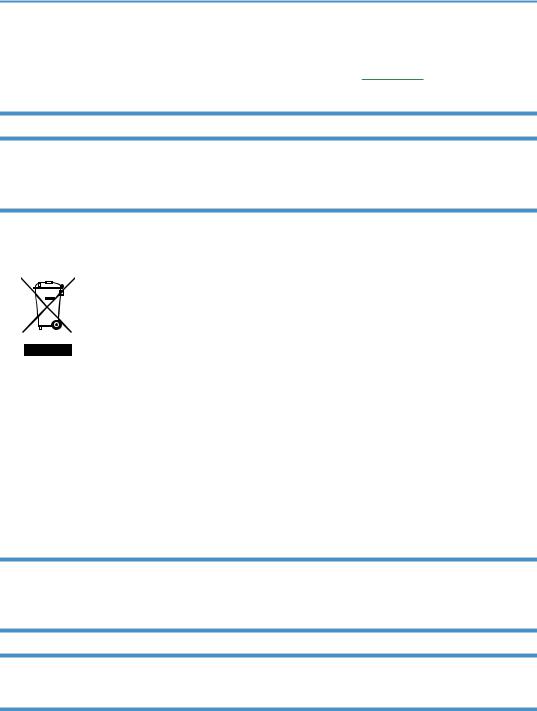
Note for the Battery and/or Accumulator Symbol (For EU countries only)
In accordance with the Battery Directive 2006/66/EC Article 20 Information for end-users Annex II, the above symbol is printed on batteries and accumulators.
This symbol means that in the European Union, used batteries and accumulators should be disposed of separately from your household waste.
In the EU, there are separate collection systems for not only used electrical and electronic products but also batteries and accumulators.
Please dispose of them correctly at your local community waste collection/recycling centre.
14

Notes to Users of Facsimile Unit
Declaration of Conformity
Notice to Users in EEA Countries
This product complies with the essential requirements and provisions of Directive 1999/5/EC of the European Parliament and of the Council of 9 March 1999 on radio equipment and telecommunications terminal equipment and the mutual recognition of their conformity.
Notice to Users Accessing Analog PSTN in EEA Countries
This product is designed to be able to access analog PSTN in all EEA countries. Local PSTN compatibility is dependent on software switch settings. Please contact your service representative if relocating this product to another country. In the event of problems, please contact your service representative in the first instance.
The CE Declaration of Conformity is available by accessing the URL: http://www.ricoh.co.jp/fax/ce_doc/ and selecting the product applicable.
15

Important Safety Instructions 


Notes to Users in the State of California
Perchlorate Material - special handling may apply. See: www.dtsc.ca.gov/hazardouswaste/ perchlorate
16

ENERGY STAR Program
ENERGY STAR® Program Requirements for Imaging Equipment
The ENERGY STAR® Program Requirements for Imaging Equipment encourage energy conservation by promoting energy efficient computers and other office equipment.
The program backs the development and dissemination of products that feature energy saving functions.
It is an open program in which manufacturers participate voluntarily.
Targeted products are computers, monitors, printers, facsimiles, copiers, scanners, and multifunction devices. Energy Star standards and logos are internationally uniform.
Saving Energy
This machine is equipped with the following Energy Saver modes: Energy Saver mode 1 and Energy Saver mode 2. If the machine has been idle for a certain period of time, the machine automatically enters Energy Saver mode.
The machine recovers from Energy Saver mode when it receives a print job, prints a received fax, or when the [Copy], [Color Start], or [B&W Start] key is pressed.
Energy Saver mode 1
The machine enters Energy Saver mode 1 if the machine has been idle for about 30 seconds. It takes less time to recover from Energy Saver mode 1 than from power-off state or Energy Saver mode 2, but power consumption is higher in Energy Saver mode 1 than in Energy Saver mode 2.
Energy Saver mode 2
The machine enters Energy Saver mode 2 after the period of time specified for this setting is passed. Power consumption is lower in Energy Saver mode 2 than in Energy Saver mode 1, but it takes longer to recover from Energy Saver mode 2 than from Energy Saver mode 1.
17

Specifications
Energy Saver mode 1 |
Power Consumption*1 |
80 W or less |
|
Default Time |
30 seconds |
|
|
|
|
Recovery Time*1 |
10 seconds or less |
Energy Saver mode 2 |
Power Consumption*1 |
(mainly Europe and Asia) |
|
|
3.8 W or less |
|
|
(mainly North America) |
|
|
3.2 W or less |
|
|
|
|
Default Time |
1 minute |
|
|
|
|
Recovery Time*1 |
30 seconds |
Duplex Function*2 |
Standard |
|
*1 Recovery time and power consumption may differ depending on the conditions and environment of the machine.
*2 Achieves ENERGY STAR energy savings; product fully qualifies when packaged with (or used with) a duplex tray and the duplex function is enabled as an option.
For details about Energy Saver modes, see page 228 "Administrator Settings".
•If the machine is in Energy Saver mode for 24 hours continuously, the machine automatically returns to normal state and performs self-maintenance.
18
1. Getting Started
Guide to Components
This section introduces the names of the various parts on the front and rear side of the machine and outlines their functions.
Exterior: Front View
7
1
9
2 
 8
8
3 |
10 |
|
11 |
||
|
||
4 |
|
5 |
|
|
12 |
6 |
13 |
|
14 |
DAC025
1.ADF (Auto document feeder) Cover
Open this cover to remove originals jammed in the ADF.
2.Output Tray for the ADF
Originals scanned with the ADF are delivered from here.
19

1.Getting Started
3.USB Flash Disk Port
Insert a USB flash disk for using the Scan to USB function or connect a digital camera using a USB cable for PictBridge printing.
4.Control Panel
Contains a screen and keys for machine control.
5.Front Cover
Open this cover to replace the waste toner bottle or remove jammed paper.
6.Bypass Tray
Load paper here sheet by sheet.
7.Input Tray for the ADF
Place stacks of originals here. They will feed in automatically. This tray can hold up to 35 sheets of plain paper.
8.Extender for the ADF Tray
Extend these when placing paper longer than A4 in the input tray for ADF.
9.Cover for the Exposure Glass
Open this cover to place originals on the exposure glass.
10.Exposure Glass
Place originals here sheet by sheet.
11.Standard Tray/Top Cover
Printed paper is delivered to this tray. Up to 150 sheets of plain paper can be stacked here. Open this to replace the print cartridges.
12.Front Cover Open Lever
To open the front cover, pull this lever on the right side of the machine.
13.Tray 1
This tray can hold up to 250 sheets of plain paper.
14.Tray 2 (option)
This tray can hold up to 500 sheets of plain paper.
20
Guide to Components
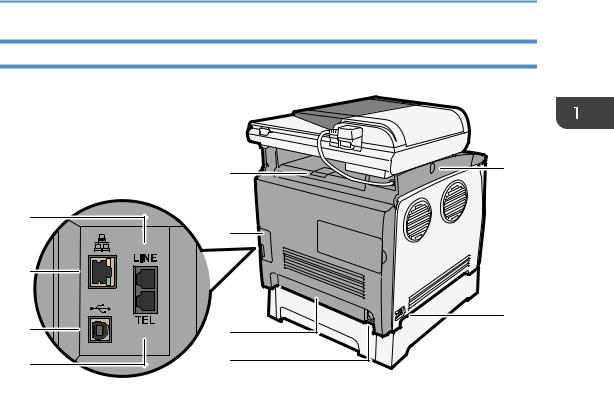
Exterior: Rear View
|
1 |
9 |
|
|
|
3 |
|
|
|
2 |
|
4 |
|
|
5 |
|
10 |
7 |
|
|
|
|
|
6 |
8 |
|
|
|
DAC026 |
1.Stop Fences
Pull up this fence to prevent paper falling off when printing a large amount of paper at a time. The fence can be adjusted at the A4/Letter or Legal size position.
2.Cable Cover
Remove this cover when connecting cables to the machine.
3.G3 (analog) Line Interface Connector
For connecting a telephone line.
4.Ethernet Port
For connecting the machine to the network using a network interface cable.
5.USB Port
For connecting the machine to a computer using a USB cable.
6.External Telephone Connector
For connecting an external telephone.
7.Rear Cover
Remove this cover when loading paper longer than A4 in Tray 1.
8.Power Socket
For connecting the power cord to the machine.
21

1.Getting Started
9.Button for Sliding the ADF
Press to slide the ADF towards the rear of the machine and hold it in that position, if paper output to the output tray is difficult to retrieve.
10.Power Switch
Use this switch to turn the power on or off.
•As shown, slide the ADF while pressing the button for sliding the ADF. Be sure to check that the ADF is closed in advance. Be careful not to trap your fingers when sliding.
DAC009 |
• Pull up the retainer as shown below to prevent A4or Letter-size printed copies from falling off.
DAC034 |
• Pull up the retainer as shown below to prevent Legal-size printed copies from falling off.
1 |
2 |
3 |
DAC035 |
22

Guide to Components
Interior
1
2
3
4
5
DAC027
1.Print Cartridges
Install the print cartridges from the machine rear, in the order of cyan (C), magenta (M), yellow (Y), and black
(K). Messages appear on the screen when print cartridges need to be replaced, or new ones need to be prepared.
2.Fusing Unit Lever
Lower both the left and right levers when you print on an envelope.
3.Fusing Unit
Fuses toner to the paper.
You might have to move this unit to check for or remove jammed paper.
4.Waste Toner Bottle
Collects toner that is wasted during printing.
5.Transfer unit
You need to remove this when you replace the waste toner bottle.
•For details about the messages that appear on the screen when consumables need to be replaced, see page 334 "Error and Status Messages on the Screen".
23
1. Getting Started
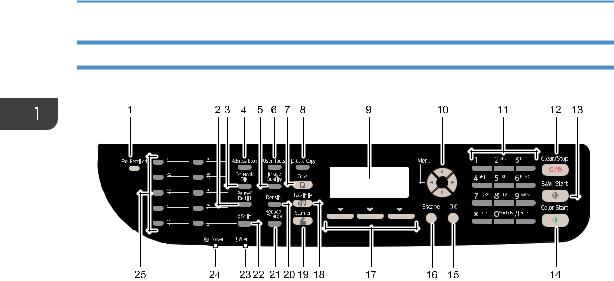
Control Panel
DAC504
1.Fax Received indicator
Lights up when received faxes that have not been printed out exist in the machine's memory. Flashes when the machine is unable to print out the faxes due to machine errors such as an empty paper tray or a paper jam.
2.[Pause/Redial] key
•Pause
Press to insert a pause in a fax number. The pause is indicated by "P".
•Redial
Press to display the last used scan or fax destination.
3.[On Hook Dial] key
Press to use on-hook dialing to check the destination's status when sending a fax.
4.[Address Book] key
Press to select a scan or fax destination from the Address Book.
5.[Image Quality] key
Press to select the image quality for the current job.
•Copier mode: select Text, Photo, or Mixed.
•Scanner mode: select the resolution.
•Fax mode: select Standard, Detail, or Photo.
6.[User Tools] key
Press to display the menu for configuring the machine's system settings.
7.[Copy] key
Press to switch to copier mode. The key stays lit while the machine is in copier mode.
8.[ID Card Copy] key
Press to enter ID card copy mode for the current job.
24

Guide to Components
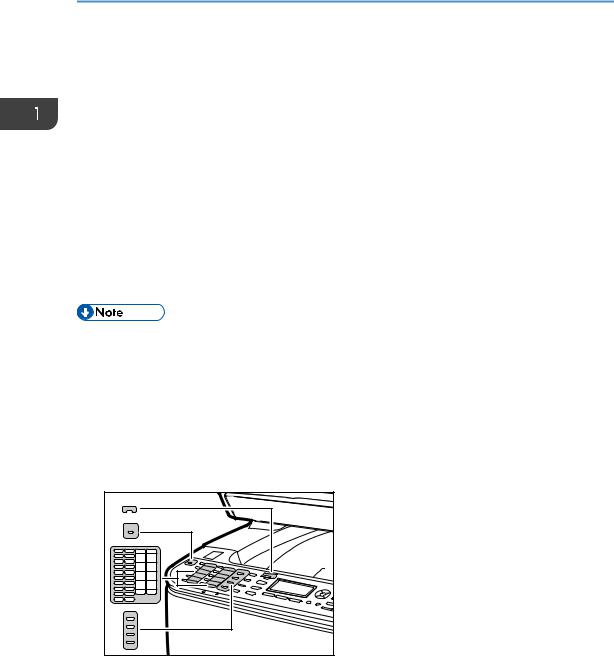
If you do not use the ID card copy mode frequently, configure [Shortcut to Function] in [Admin. Tools] to make this key available for sending faxes immediately or displaying scan file destinations. For [Shortcut to Function], see page 34 "Initial Setup".
9.Screen
Displays the current status and messages.
10.Scroll keys
Press to move the cursor in the directions indicated by each scroll key.
Pressing the [ ][
][ ] keys while the machine is in standby mode will display the menu for configuring the settings of the machine's current operation mode (copier, scanner, or fax).
11.Number keys
Use to enter numerical values when specifying settings such as fax numbers and copy quantities, or enter letters when specifying names.
12.[Clear/Stop] key
•While the machine is processing a job: press to cancel the current job.
•While configuring the machine settings: press to cancel the current setting and return to standby mode.
•While in standby mode: press to cancel temporary settings such as image density or resolution.
13.[B&W Start] key
Press to scan or copy in black and white, or start sending a fax.
14.[Color Start] key
Press to scan or copy in color.
15.[OK] key
Press to confirm settings or enter the next level of the menu tree.
16.[Escape] key
Press to cancel the last operation or exit to the previous level of the menu tree.
17.Selection keys
Press the key that corresponds to an item shown on the bottom line of the screen to select it.
18.[Facsimile] key
Press to switch to fax mode. The key stays lit while the machine is in fax mode.
19.[Scanner] key
Press to switch to scanner mode. The key stays lit while the machine is in scanner mode.
20.[Density] key
Press to adjust image density for the current job.
•Copier mode: select from 5 levels of density.
•Scanner mode: select from 5 levels of density.
•Fax mode: select from 3 levels of density.
21.[Reduce/Enlarge] key
•Copier mode: press to specify the reduction or enlargement ratio for the current job.
25
1.Getting Started
•Scanner mode: press to specify the scanning size applied to the current original.
22.[Shift] key
Press to switch between Quick Dial numbers 1 to 10 and 11 to 20 when specifying a scan or fax destination using the One Touch buttons.
23.Alert indicator
Flashes yellow when the machine will require maintenance soon (such as replacing consumables), or lights up red when a machine error occurs.
When an alert is issued, check the messages on the screen. For details about the messages that appear on the screen, page 334 "Error and Status Messages on the Screen".
24.Power indicator
Remains lit while the power is on. It is unlit when the power is off.
25.One Touch buttons
Press to select a scan or fax Quick Dial destination.
•The backlight of the screen is turned off when the machine is in Energy Saver mode.
•When the machine is processing a job, you cannot display the menu for configuring the machine. You can confirm the machine's status by checking messages on the screen. If you see messages such as "Printing...", "B&W Copying...", "Color Copying...", or "Processing...", wait until the current job is finished.
•As required, apply the stickers appropriate for your language to control panel keys and One Touch buttons. If the control panel is covered with a protective sheet, be sure to remove it before applying the stickers.
DAC028 |
• The color of the control panel varies depending on the model.
26
Installing the Machine
Installing the Machine
Where to Put the Machine
Be careful about where to place the machine, because environmental conditions greatly affect its performance.
•Do not use flammable sprays or solvents in the vicinity of this machine. Doing so could result in fire or electric shock.
•Do not place vases, plant pots, cups, toiletries, medicines, small metal objects, or containers holding water or any other liquids, on or close to this machine. Fire or electric shock could result from spillage or if such objects or substances fall inside this machine.
•Keep the machine away from humidity and dust. Otherwise a fire or an electric shock might occur.
•Do not place the machine on an unstable or tilted surface. If it topples over, an injury might occur.
•Do not place heavy objects on the machine. Doing so can cause the machine to topple over, possibly resulting in injury.
•Keep the machine in an area that is within optimum environmental conditions. Operating the machine in an environment that is outside the recommended ranges of humidity and temperature can cause an electrical fire hazard. Keep the area around the socket free of dust. Accumulated dust can become an electrical fire hazard.
•Make sure the room where you are using the machine is well ventilated and spacious. Good ventilation is especially important when the machine is used heavily.
•Do not obstruct the machine's vents. Doing so risks fire caused by overheated internal components.
•Keep the machine away from salt-bearing air and corrosive gases. Also, do not install the machine in places where chemical reactions are likely (laboratories, etc.), as doing so will cause the machine to malfunction.
27
1. Getting Started
Space Required for Installation
The recommended (or minimum) space requirements are as follows:
24 cm
(9.5 inches)
20 cm
(7.9 inches)
|
20 cm |
|
(7.9 inches) |
|
10 cm |
70 cm |
(4 inches) |
|
|
(27.6 inches) |
DAC022 |
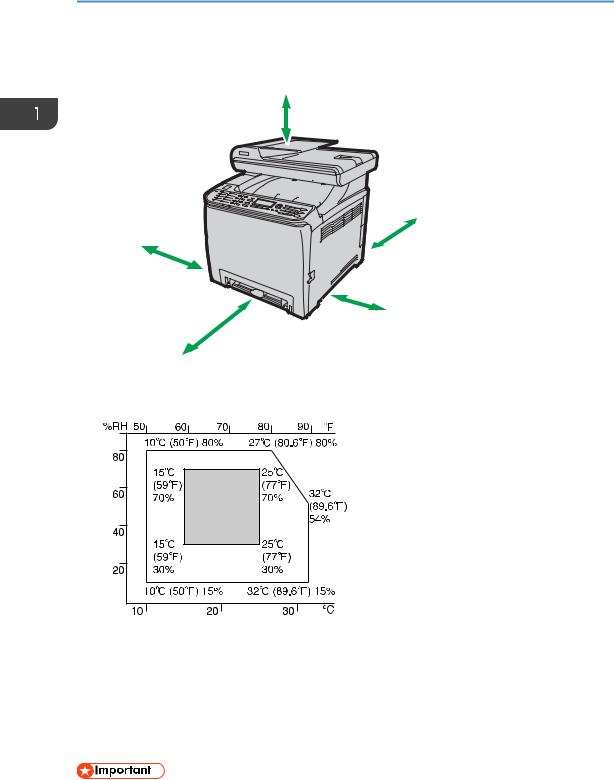
Optimum Environmental Conditions
Permissible and recommended temperature and humidity ranges are as follows:
DAC581 |
•White area: Permissible Range
•Gray area: Recommended Range
To avoid possible build-up of ozone, locate this machine in large well ventilated room that has an air turnover of more than 30m3/hr/person.
Environments to Avoid
• Areas exposed to direct sunlight or strong light
28
Loading...