


 Loading...
User Guide
What You Can Do with This Machine
Getting Started
Copy
Fax
Scan
Web Image Monitor
Adding Paper and Toner
Troubleshooting
Maintenance
Information for This Machine
For safe and correct use, be sure to read the Safety Information in Read This First before using the machine.

TABLE OF CONTENTS |
|
How to Read the Manuals................................................................................................................................. |
6 |
Symbols Used in the Manuals....................................................................................................................... |
6 |
Model-Specific Information............................................................................................................................... |
7 |
Names of Major Features.................................................................................................................................. |
8 |
1. What You Can Do with This Machine |
|
Searching by What You Want to Do................................................................................................................ |
9 |
I Want to Reduce my Costs........................................................................................................................... |
9 |
I Want to Use Scanned Files on the Computer......................................................................................... |
10 |
I Want to Register Destinations................................................................................................................... |
11 |
I Want to Operate the Machine More Effectively.................................................................................... |
12 |
What You Can Do with This Machine............................................................................................................ |
13 |
You Can Customize the [Home] Screen.................................................................................................... |
13 |
You Can Make Copies Using Various Functions...................................................................................... |
14 |
You Can Print Data Using Various Functions............................................................................................. |
15 |
You Can Send Faxes without Paper........................................................................................................... |
15 |
You Can Use the Facsimile and the Scanner in a Network Environment................................................ |
16 |
You Can Scan ID Cards and Print or Send the Scanned Images............................................................ |
17 |
You Can Prevent Information Leakage (Security Functions)..................................................................... |
17 |
You Can Monitor and Set the Machine Using a Computer..................................................................... |
18 |
You Can Use Application Site (for SP C361SFNw)................................................................................. |
18 |
2. Getting Started |
|
Guide to Names and Functions of Components............................................................................................ |
21 |
Guide to Components................................................................................................................................. |
21 |
Guide to Functions of the Machine's Options................................................................................................ |
27 |
Guide to the Names and Functions of the Machine's Control Panel........................................................... |
28 |
Adjusting the Angle of the Control Panel................................................................................................... |
29 |
Changing the Display Language.................................................................................................................... |
30 |
How to Use the [Home] Screen...................................................................................................................... |
31 |
Possible Operations on the Standard Application Screen....................................................................... |
33 |
Adding Icons to the [Home] Screen........................................................................................................... |
35 |
Guide to Applications Installed on the Machine........................................................................................... |
37 |
Standard Application Screen..................................................................................................................... |
38 |
Other Application Screen........................................................................................................................... |
45 |
1

Registering Functions in a Program................................................................................................................. |
48 |
Turning On/Off the Power.............................................................................................................................. |
50 |
Turning on the main power......................................................................................................................... |
50 |
Turning off the main power......................................................................................................................... |
50 |
Logging In the Machine................................................................................................................................... |
52 |
When the Authentication Screen is Displayed.......................................................................................... |
52 |
User Code Authentication Using the Control Panel.................................................................................. |
52 |
Logging In Using the Control Panel............................................................................................................ |
52 |
Logging Out Using the Control Panel......................................................................................................... |
53 |
Placing Originals.............................................................................................................................................. |
54 |
Placing Originals on the Exposure Glass................................................................................................... |
54 |
Placing Originals in the Auto Document Feeder....................................................................................... |
54 |
Placing Originals in the ID Card Feeder.................................................................................................... |
55 |
3. Copy |
|
Basic Copying Procedure................................................................................................................................ |
57 |
Duplex Copying............................................................................................................................................... |
59 |
Combined Copying......................................................................................................................................... |
61 |
One-Sided Combine................................................................................................................................... |
62 |
Two-Sided Combine.................................................................................................................................... |
62 |
Procedure for Combined Copying............................................................................................................. |
63 |
Copying onto Envelopes................................................................................................................................. |
64 |
Sort.................................................................................................................................................................... |
66 |
ID Card Copy................................................................................................................................................... |
67 |
Copying an ID Card Using the ID Card Feeder........................................................................................ |
67 |
Copying an ID Card Using the Exposure Glass........................................................................................ |
68 |
4. Fax |
|
Basic Transmission Procedure......................................................................................................................... |
69 |
Registering a Fax Destination...................................................................................................................... |
69 |
Deleting a Fax Destination.......................................................................................................................... |
70 |
Canceling a Transmission................................................................................................................................ |
72 |
Canceling a Transmission Before the Original Is Scanned...................................................................... |
72 |
Canceling a Transmission While the Original Is Being Scanned............................................................. |
72 |
Canceling a Transmission after the Original Is Scanned.......................................................................... |
72 |
2

Printing a Journal Manually............................................................................................................................. |
73 |
5. Print |
|
Quick Installation.............................................................................................................................................. |
75 |
Quick Installation via a Network................................................................................................................ |
75 |
Quick Installation via a USB Connection................................................................................................... |
75 |
Displaying the Printer Driver Properties.......................................................................................................... |
77 |
Standard Printing.............................................................................................................................................. |
78 |
When Using the PCL 6 Printer Driver.......................................................................................................... |
78 |
Printing on Both Sides of Sheets...................................................................................................................... |
79 |
When Using the PCL 6 Printer Driver.......................................................................................................... |
79 |
Combining Multiple Pages into Single Page.................................................................................................. |
80 |
When Using the PCL 6 Printer Driver.......................................................................................................... |
80 |
Printing on Envelopes....................................................................................................................................... |
82 |
Configuring Envelope Settings Using the Control Panel........................................................................... |
82 |
Printing on Envelopes Using the PCL 6 Printer Driver................................................................................ |
82 |
6. Scan |
|
Preparation for Sending by Scan to Folder................................................................................................... |
83 |
Creating a Shared Folder on a Computer Running Windows/Confirming a Computer's Information..... |
|
....................................................................................................................................................................... |
83 |
Registering an SMB Folder......................................................................................................................... |
85 |
Deleting an SMB Registered Folder........................................................................................................... |
87 |
Entering the Path to a Shared Network Folder Manually........................................................................ |
88 |
Basic Procedure for Sending Scanned Files to a Folder (Scan to Folder)................................................... |
90 |
Basic Procedure for Sending Scanned Files by E-mail (Scan to Email)....................................................... |
91 |
Registering an E-mail Destination............................................................................................................... |
92 |
Deleting an E-mail Destination.................................................................................................................... |
92 |
Entering an E-mail Address Manually........................................................................................................ |
93 |
Specifying the Original Type........................................................................................................................... |
94 |
Specifying the Resolution................................................................................................................................. |
95 |
Specifying the Scan Size................................................................................................................................. |
96 |
Specifying the File Type................................................................................................................................... |
98 |
7. Web Image Monitor |
|
Displaying Top Page........................................................................................................................................ |
99 |
3

8. Adding Paper and Toner |
|
Workflow for Loading Paper and Configuring Paper Sizes and Types.................................................... |
101 |
Loading Paper................................................................................................................................................ |
102 |
Precautions for Loading Paper................................................................................................................. |
102 |
Loading Paper into Paper Trays............................................................................................................... |
102 |
Loading Paper into the Bypass Tray........................................................................................................ |
108 |
Loading Orientation-fixed Paper or Two-sided Paper........................................................................... |
109 |
Loading Envelopes........................................................................................................................................ |
112 |
Loading Envelopes into the Bypass Tray................................................................................................. |
112 |
Loading Envelopes into Tray 1................................................................................................................. |
115 |
Changing the Paper Size.............................................................................................................................. |
120 |
Precautions for Changing the Paper Size................................................................................................ |
120 |
Changing Paper Size Settings.................................................................................................................. |
120 |
Printing from the Bypass Tray Using the Printer Function........................................................................ |
121 |
Supported Paper............................................................................................................................................ |
124 |
Supported Paper Sizes and Types........................................................................................................... |
124 |
Replacing the Print Cartridge........................................................................................................................ |
132 |
Sending faxes or scanned documents when toner has run out............................................................. |
135 |
Disposing of used toner............................................................................................................................ |
135 |
9. Troubleshooting |
|
When a Status Icon Is Displayed.................................................................................................................. |
137 |
When the Indicator Lamp for [Check Status] Is Lit or Flashing................................................................... |
138 |
When the Machine Makes a Beeping Sound............................................................................................. |
140 |
When You Have Problems Operating the Machine................................................................................... |
142 |
When Multiple Functions Cannot Be Executed Simultaneously............................................................ |
146 |
Messages Displayed When You Use the Copy Function........................................................................... |
147 |
Messages Displayed When You Use the Facsimile Function..................................................................... |
148 |
When the Cloud Fax Connector Function Cannot Be Used.................................................................. |
149 |
Messages Displayed When You Use the Printer Function.......................................................................... |
150 |
Messages Displayed on the Control Panel When You Use the Printer Function.................................. |
150 |
Messages Printed on the Error Logs or Reports When You Use the Printer Function........................... |
152 |
Messages Displayed When You Use the Scanner Function...................................................................... |
158 |
Messages Displayed on the Control Panel When You Use the Scanner Function.............................. |
158 |
4

Messages Displayed on the Client Computer......................................................................................... |
|
|
162 |
|
When Other Messages Appear................................................................................................................... |
|
|
|
169 |
When the ID Card Copy/Scan Cannot Be Used................................................................................... |
|
|
170 |
|
When the Address Book Is Updated....................................................................................................... |
|
|
|
171 |
When Data Cannot Be Sent Due to a Problem with the Destination..................................................... |
|
|
172 |
|
When Problems Occur While Logging In............................................................................................... |
|
|
|
172 |
When the User Lacks Privileges to Perform an Operation..................................................................... |
|
|
172 |
|
When the LDAP Server Cannot Be Used................................................................................................. |
|
|
|
173 |
10. Maintenance |
|
|
|
|
Maintaining Your Machine........................................................................................................................... |
|
|
|
175 |
How to Clean the Machine...................................................................................................................... |
|
|
|
175 |
Cleaning the Exposure Glass and Scanning Glass................................................................................ |
|
|
176 |
|
Cleaning the Auto Document Feeder....................................................................................................... |
|
|
|
177 |
Cleaning the Paper Tray, Friction Pad, and the Paper Feed Roller....................................................... |
|
|
183 |
|
Cleaning the Registration Roller............................................................................................................... |
|
|
|
186 |
Cleaning the LED Heads........................................................................................................................... |
|
|
|
187 |
Cleaning the Power Cord Plug................................................................................................................. |
|
|
|
189 |
Updating the Firmware.................................................................................................................................. |
|
|
|
191 |
11. Information for This Machine |
|
|
|
|
Information on Environmental Regulations.................................................................................................. |
|
|
|
193 |
ENERGY STAR Program........................................................................................................................... |
|
|
|
193 |
Energy Saving Functions........................................................................................................................... |
|
|
|
193 |
User Information on Electrical and Electronic Equipment |
(mainly Europe) |
...................... 195 |
||
Note for the Battery and/or Accumulator Symbol (For EU countries only) |
|
(mainly Europe) |
||
.................................................................................................................................................................... |
|
|
|
196 |
Environmental Advice for Users |
(mainly Europe)............................................................... |
|
|
196 |
Notes to users in the state of California (Notes to Users in USA) |
|
(mainly North America).... |
||
.................................................................................................................................................................... |
|
|
|
197 |
INDEX........................................................................................................................................................... |
|
|
|
199 |
5

How to Read the Manuals
Symbols Used in the Manuals
This manual uses the following symbols:
Indicates points to pay attention to when using the machine, and explanations of likely causes of paper misfeeds, damage to originals, or loss of data. Be sure to read these explanations.
Indicates supplementary explanations of the machine's functions, and instructions on resolving user errors.
This symbol is located at the end of sections. It indicates where you can find further relevant information.
[ ]
Indicates the names of keys on the machine's display or control panels. 


 (mainly Europe and Asia), (mainly Europe), or (mainly Asia)


 (mainly North America)
Differences in the functions of Region A and Region B models are indicated by two symbols. Read the information indicated by the symbol that corresponds to the region of the model you are using. For details about which symbol corresponds to the model you are using, see page 7 "Model-Specific Information".
6
Model-Specific Information
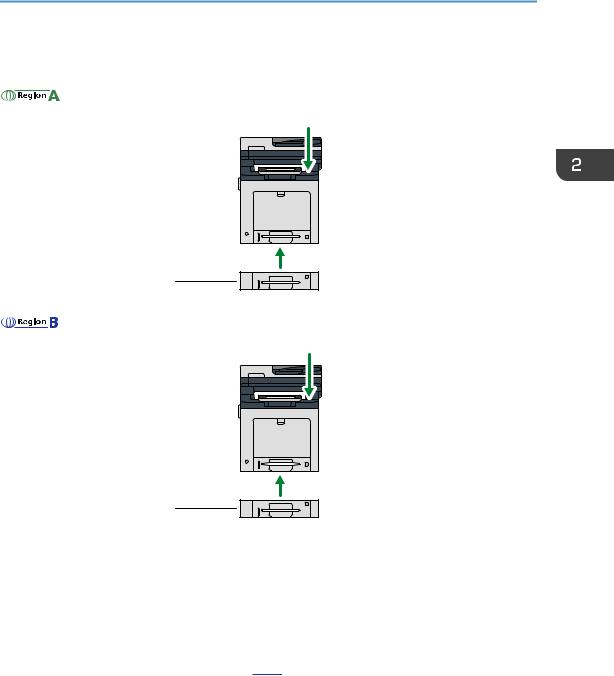
This section explains how you can identify the region your machine belongs to.
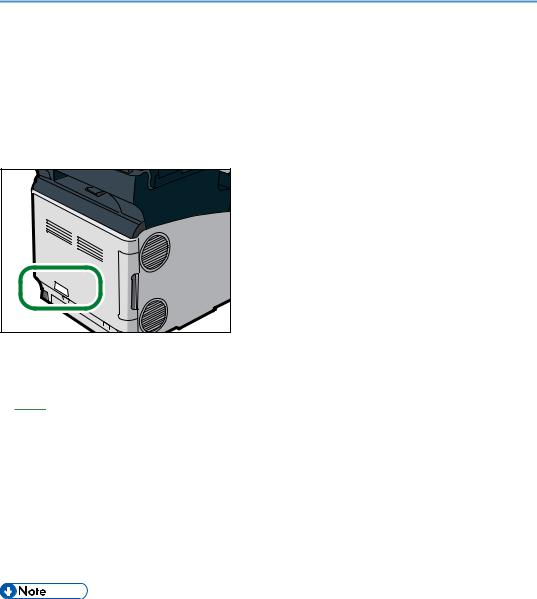
There is a label on the rear of the machine, located in the position shown below. The label contains details that identify the region your machine belongs to. Read the label.
DUP801 |
The following information is region-specific. Read the information under the symbol that corresponds to the region of your machine.


 (mainly Europe and Asia)
If the label contains the following, your machine is a region A model:
•CODE XXXX -27
•220–240 V


 (mainly North America)
If the label contains the following, your machine is a region B model:
•CODE XXXX -17
•120–127 V
•Dimensions in this manual are given in two units of measure: metric and inch. If your machine is a Region A model, refer to the metric units. If your machine is a Region B model, refer to the inch units.
7

Names of Major Features
In this manual, major features of the machine are referred to as follows:
• Auto Document Feeder  ADF
ADF
8
1. What You Can Do with This Machine
You can search for a description by what you want to do. Also, this machine's distinctive functions are explained.
Searching by What You Want to Do
You can search for a procedure by what you want to do.
You can use the fax function on SP C360SFNw/C361SFNw only.
I Want to Reduce my Costs
BRL059S
Printing multi-page documents on both sides of sheets (Duplex Copy)
 See "Duplex Copying", Copy.
Printing multi-page documents on a single sheet (Combine (Copier))
 See "Combined Copying", Copy.
Sending files from the computer without printing them (LAN-Fax)
 See "Sending Fax Documents from Computers", Fax.
Reducing electricity consumption
 See "Saving Energy", Setting Up the Machine.
 See "Timer Settings", Connecting the Machine/ System Settings.
9
1. What You Can Do with This Machine
I Want to Use Scanned Files on the Computer
BQX138S |
Sending scan files
 See "Basic Procedure for Sending Scanned Files by E-mail (Scan to Email)", Scan.
Storing scan files in a shared folder
 See "Basic Procedure for Sending Scanned Files to a Folder (Scan to Folder)", Scan.
Storing scan files on media
 See "Basic Procedure for Saving Scan Files on a Memory Storage Device", Scan.
10
Searching by What You Want to Do
I Want to Register Destinations
BRL060S
Using the control panel to register destinations in the Address Book
 See "Registering Entered Destinations to the Address Book", Fax.
 See "Registering Entered Destinations to the Address Book", Scan.
Downloading destinations registered in the machine to the LAN-Fax driver destination list
 See "Using the machine's Address Book as the LAN-Fax destination list", Fax.
11
1. What You Can Do with This Machine
I Want to Operate the Machine More Effectively
BQX139S |
Registering and using frequently-used settings (Program)
 See "Registering Functions in a Program", Convenient Functions.
Registering frequently-used settings as initial settings (Program as Defaults (Copy/Fax/ Scanner/Quick Copy/Quick Fax/Quick Scanner)
 See "Changing the Default Functions of the Initial Screen", Convenient Functions.
Registering frequently-used printing settings to the printer driver
 See "Using One Click Presets", Print.
Changing the initial settings of the printer driver to frequently-used printing settings
 See "Displaying the [Printing Preferences] Dialog Box", Print.
Adding shortcuts to frequently used programs or Web pages
 See "Adding Icons to the [Home] Screen", Convenient Functions.
Changing the order of the function and shortcut icons
 See "Changing the Order of Icons on the [Home] Screen", Convenient Functions.
12
What You Can Do with This Machine
What You Can Do with This Machine
This section describes the features of this machine.
You can use the fax function on SP C360SFNw/C361SFNw only.
You Can Customize the [Home] Screen
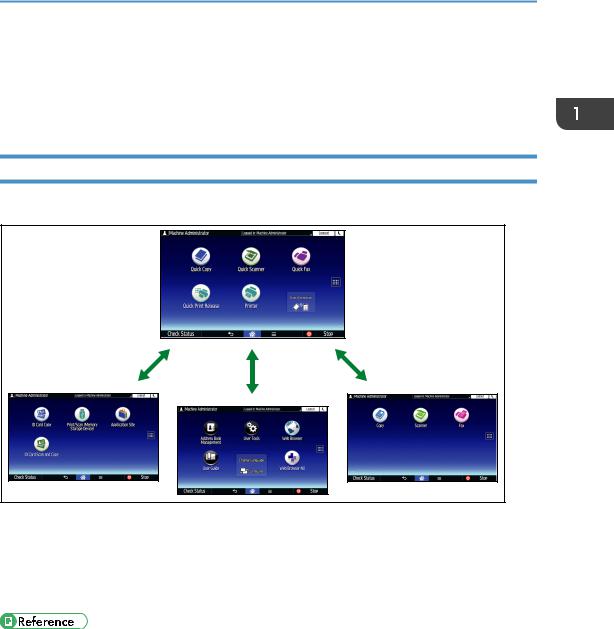
The icons of each function are displayed on the [Home] screen.
DUP860 |
•You can add shortcuts to often used programs or Web pages to the [Home] screen. The programs or Web pages can be recalled easily by pressing the shortcut icons.
•You can display only the icons of functions and shortcuts that you use.
•You can change the order of the function and shortcut icons.
•For details about the features on the [Home] screen, see page 31 "How to Use the [Home] Screen".
•For details about how to customize the [Home] screen, see "How to Customize the [Home] Screen", Convenient Functions.
13
1. What You Can Do with This Machine
You Can Make Copies Using Various Functions
DUP814 |
•You can make copies in full color. You can switch the color copy mode depending on the type of originals used and the desired finish.
 See "Copying in Color", Copy.
•You can adjust the color tones and image quality of your copies.  For details about a color adjustment, see Copy.
•You can reduce or enlarge the copy image. With the Auto Reduce/Enlarge function, the machine automatically calculates the reproduction ratio based on the sizes of the originals and the paper you have specified.
 See "Reducing or Enlarging Originals", Copy.
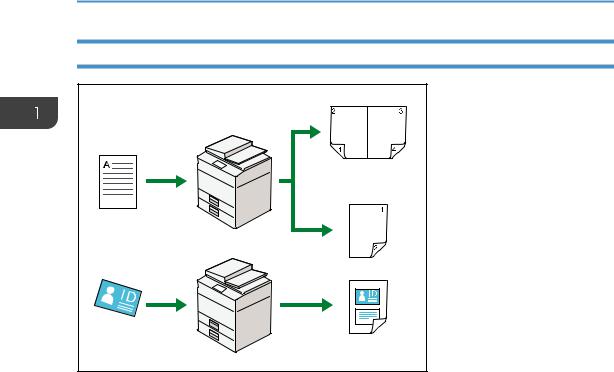
•Copier functions such as Duplex and Combine allow you to save on paper by copying multiple pages onto single sheets.
 For details about duplex copying, see "Duplex Copying", Copy.
 For details about combined copying, see "Combined Copying", Copy.
•You can copy onto various types of paper such as envelopes.  See "Copying onto Various Types of Paper", Copy.
•You can sort copies.  See "Sort", Copy.
•You can scan and copy both sides of an ID card on a single sheet of paper.  See "ID Card Copy", Copy.
14
What You Can Do with This Machine
You Can Print Data Using Various Functions
CMQ004 |
•This machine supports network and local connections.
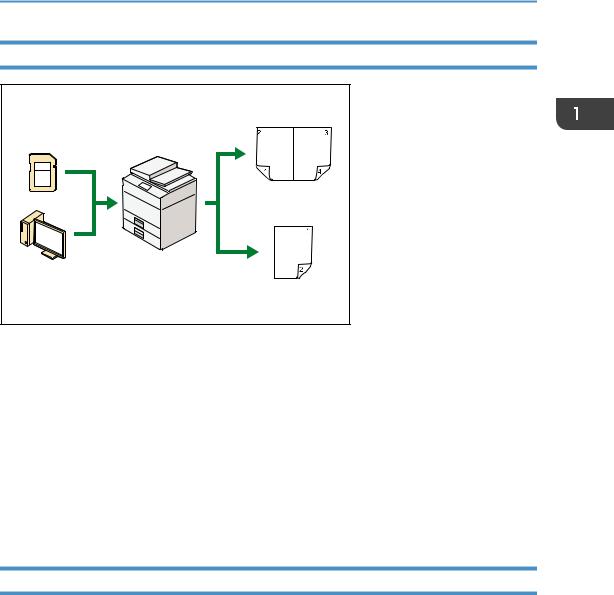
•You can store a document in the memory of the machine by printing the document using the printer driver.
 See "Storing a Locked Print File to the Machine", Print.
•You can collate printed paper.  See "Collate", Print.
•You can print files stored on a removable memory device and specify print conditions such as print quality and print size.
 See "Printing a File in a Memory Storage Device", Print.
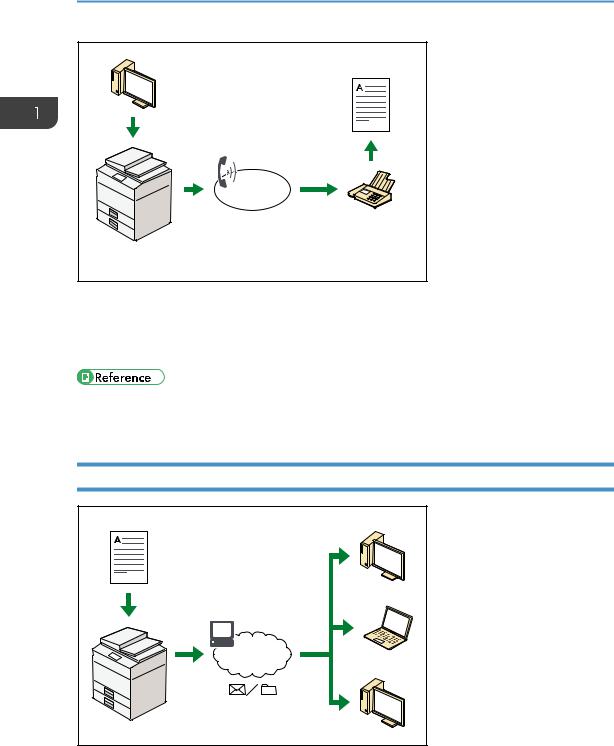
You Can Send Faxes without Paper
You can send a fax from your computer over the network (Ethernet or wireless LAN) to this machine, which then forwards the fax via its telephone connection (LAN-Fax).
15
1. What You Can Do with This Machine
DUP816
•To send a fax, print from the Windows application you are working with, select LAN-Fax as the printer, and then specify the destination.
•You can also check the sent image data.
•For details about the machine's settings, see Connecting the Machine/System Settings.
•For details about how to use the function, see Fax.
You Can Use the Facsimile and the Scanner in a Network Environment
CJQ607 |
•You can send scan files to a specified destination using e-mail (Sending scan files by e-mail).  See "Reception Functions", Fax.
16
What You Can Do with This Machine
 See "Basic Procedure for Sending Scanned Files by E-mail (Scan to Email)", Scan.
•You can send scan files directly to folders (Sending scan files by Scan to Folder).  See "Overview of Folder Transmission Function", Fax.
 See "Basic Procedure for Sending Scanned Files to a Folder (Scan to Folder)", Scan.
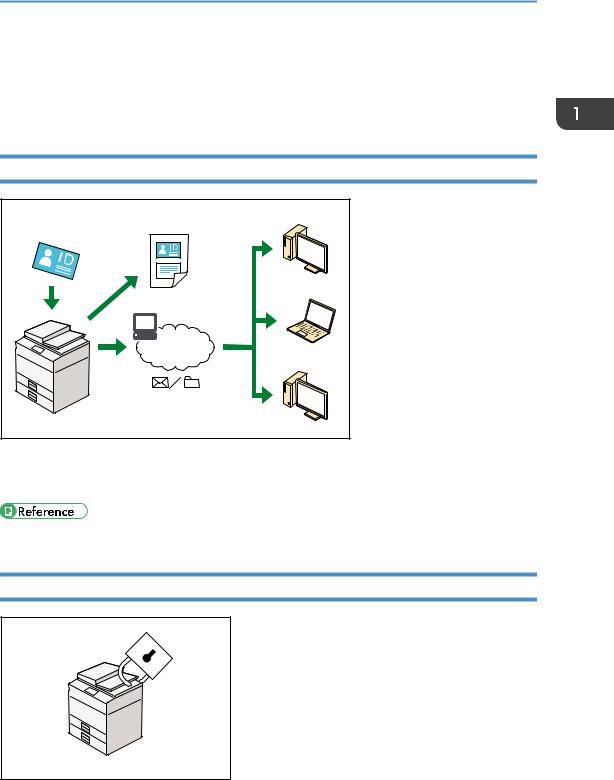
You Can Scan ID Cards and Print or Send the Scanned Images
DUP815 |
•You can scan and combine both sides of an ID card on a single sheet of paper for printing or transmission.
•See Scan for details.
You Can Prevent Information Leakage (Security Functions)
CJQ608
17
1.What You Can Do with This Machine
•You can control the use of the machine, as well as prevent machine settings from being changed without authorization.
•By setting passwords, you can prevent unauthorized access via the network.
•You can limit the usage of functions for each user.
•See Security Guide.
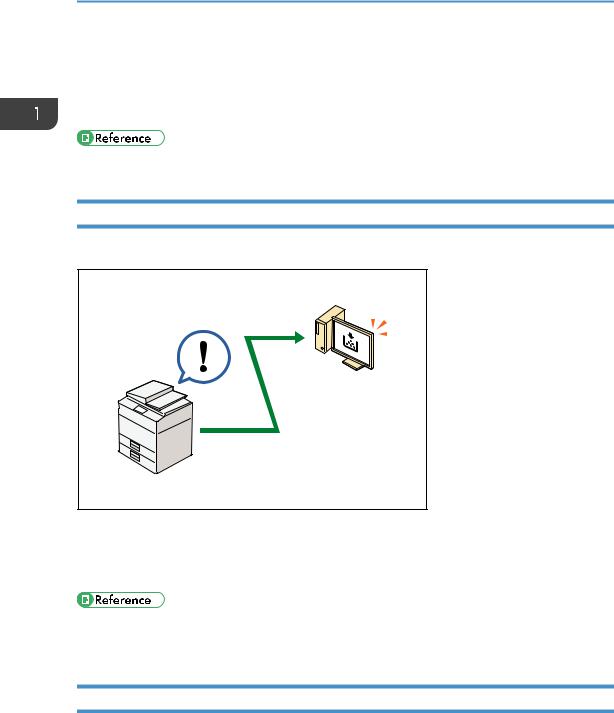
You Can Monitor and Set the Machine Using a Computer
Using Web Image Monitor, you can check the machine's status and change the settings.
CJQ609
You can check which tray is running out of paper, register information in the Address Book, specify the network settings, configure and change the system settings, manage jobs, print the job history, and configure the authentication settings.
•See "Using Web Image Monitor", Connecting the Machine/ System Settings.
•See Web Image Monitor Help.
You Can Use Application Site (for SP C361SFNw)
You can download from the Application Site useful applications that allow you to more conveniently utilize various office equipment such as copiers and printers.
18
What You Can Do with This Machine
DQU010
What You Can Do on the Application Site
•Download and install applications on devices
•Update the application that has already been installed on the device
•Uninstall an application that is no longer necessary on the device
•For details, see "How to Use the Application Site (for SP C361SFNw)", Other Applications.
19

1. What You Can Do with This Machine
20

2. Getting Started
This chapter describes preparations for using the machine, operating instructions, and character input methods.
Guide to Names and Functions of Components
Guide to Components
•Do not obstruct the machine's vents. Doing so risks fire caused by overheated internal components.
21

2. Getting Started
Exterior: Front view
7 8
25
24 |
|
|
|
|
|
1 |
2 |
3 |
4 |
5 |
6 |
22 23 |
|
|
|
|
|
|
|
|
|
|
9 |
21 |
|
|
|
|
|
20 |
|
|
|
|
|
19 |
|
|
|
|
|
|
|
|
|
|
10 |
|
|
|
|
|
11 |
18 |
|
|
|
|
12 |
|
|
|
|
|
17 |
13 |
16 |
|
15 |
|
|
14 |
DUP802
1.ADF
Lower the ADF over originals placed on the exposure glass.
If you load a stack of originals in the ADF, the ADF will automatically feed the originals one by one.
2.ADF cover
Open this cover to remove originals jammed in the ADF.
3.Input tray for the ADF
Place stacks of originals here.
4.Extender for the ADF tray
Extend this when placing paper longer than A4 in the input tray for ADF.
5.Stop fence for the ADF
Pull out this fence to prevent originals from falling off.
22

Guide to Names and Functions of Components
6.Output tray for the ADF
Originals scanned with the ADF are output here.
7.Exposure glass
Place originals face down here.
8.Cover for the exposure glass
Open this cover to place originals on the exposure glass.
9.Stop fence
Raise the rear fence to prevent A4 or letter-size prints from falling behind the machine.
After using the stop fence, be sure to return it to its original position. The fence may be damaged if it is hit with something or excessive force is applied.
10.Top cover open lever
Pull this lever upward to open the top cover.
11.Control panel
See page 28 "Guide to the Names and Functions of the Machine's Control Panel".
12.Ventilation holes
Prevent overheating.
13.Front cover open lever
Pull this lever to open the front cover.
14.Paper size dial
Use this dial to specify the paper size. To use a paper size that is not indicated on the paper size dial, set the dial to " ". If this is the case, set the paper size using the control panel.
15.Paper tray (Tray 1)
Load paper here.
16.Remaining paper indicator
Indicates the approximate amount of paper remaining in the tray.
17.Main power switch
To operate the machine, the main power switch must be on. If it is off, turn the switch on.
18.Front cover
Open this cover when replacing the waste toner bottle, etc., or removing jammed paper. Pull the right side lever to open the front cover.
19.Bypass tray
Use to copy or print on thick paper, envelopes, and label paper (adhesive labels).
20.Paper guides
When loading paper in the bypass tray, align the paper guides flush against the paper.
21.Extender for the bypass tray
Pull this extender out when loading A4 , 81/2 × 11
 or larger size paper in the bypass tray.
23
2.Getting Started
22.Top cover
Open this cover to replace the toner or black drum unit/color drum units.
23.Standard tray
Output is stacked here with the print side down.
24.ID Card Feeder cover
Open this cover to set a larger size card or paper in the ID Card Feeder.
25.ID Card Feeder
Use this to copy or scan both sides of a card such as an ID card. Load one original at a time.
Exterior: Rear view
1
2
4 3
DUP803
1.Handset slit


 (mainly North America)
Attach the handset bracket to the slit.
2.Ventilation holes
Prevent overheating.
3.Cable cover
Remove this cover to connect an Ethernet, USB cable, telephone line, or external telephone.
4.Power connector
Connect the power cord to the machine. Insert the other end into an electrical outlet.
24
Guide to Names and Functions of Components
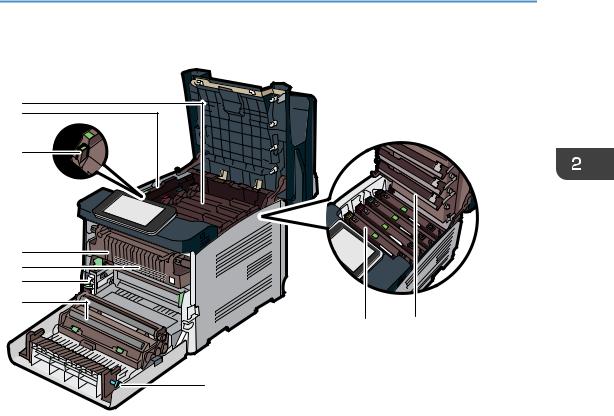
Interior: Front view
1 |
2 |
3 |
4
5
6
7
9 8
10
DUP834
1.Toner
Loads from the machine rear, in the order of black (K), cyan (C), magenta (M), and yellow (Y).
Messages appear on the screen when the toner cartridge needs to be replaced, or a new cartridge needs to be prepared. For details about the messages that appear on the screen when consumables need to be replaced, see "Replenishing and Replacing Consumables", Maintenance and Specifications.
2.Inner cover
Open this cover when replacing the black drum unit/color drum units.
3.Inner cover open lever
Pull this lever to open the inner cover.
4.Fusing unit
Messages appear on the screen when the fusing unit needs to be replaced, or a new fusing unit needs to be prepared. For details about the messages that appear on the screen when consumables need to be replaced, see "Replenishing and Replacing Consumables", Maintenance and Specifications.
5.Intermediate transfer unit
Messages appear on the screen when the intermediate transfer unit needs to be replaced, or a new intermediate transfer unit needs to be prepared.
For details about the messages that appear on the screen when consumables need to be replaced, see "Replenishing and Replacing Consumables", Maintenance and Specifications.
25

2.Getting Started
6.Waste toner bottle
Collects toner that is wasted during printing. Messages appear on the screen when the waste toner bottle needs to be replaced, or a new waste toner bottle needs to be prepared. For details about the messages that appear on the screen when consumables need to be replaced, see "Replenishing and Replacing Consumables", Maintenance and Specifications.
7.Transfer roller
If the message appears on the control panel, replace the transfer roller, which is included with the intermediate transfer unit.
For details about the messages that appear on the screen when consumables need to be replaced, see "Replenishing and Replacing Consumables", Maintenance and Specifications.
Replace the transfer roller and the intermediate transfer unit together.
8.LED heads
Clean the LED heads if black or color lines appear on prints.
9.Black drum unit / Color drum units
The drum units are installed in the order of black (K), cyan (C), magenta (M), and yellow (Y).
Messages appear on the screen when the drum unit needs to be replaced, or a new drum unit needs to be prepared.
For details about the messages that appear on the screen when consumables need to be replaced, see "Replenishing and Replacing Consumables", Maintenance and Specifications.
10.knob
If you cannot pull out jammed paper, remove it by turning the knob.
26
Guide to Functions of the Machine's Options
Guide to Functions of the Machine's Options


 2
2
1
DUP805


 2
2
3 


1
DUP804
1.Lower paper trays
You can attach one lower paper tray.
There are two types of trays, each holding up to 250 or 500 sheets of paper.
2.NFC card reader (for SP C361SFNw)
Allows you to read or write an NFC card, and communicate with a smart device equipped with the NFC card function.
3.Handset (for SP C360SFNw/C361SFNw) 


 (mainly North America)
Used as a receiver.
Allows you to use the On Hook Dial and Manual Dial functions. It also allows you to use the machine as a telephone.
27
2. Getting Started
Guide to the Names and Functions of the Machine's Control Panel
You can use the fax function on SP C360SFNw/C361SFNw only.
1

 2
2
7 |
|
7 |
|
6 |
5 |
|
|
|
4 |
3
DUP823
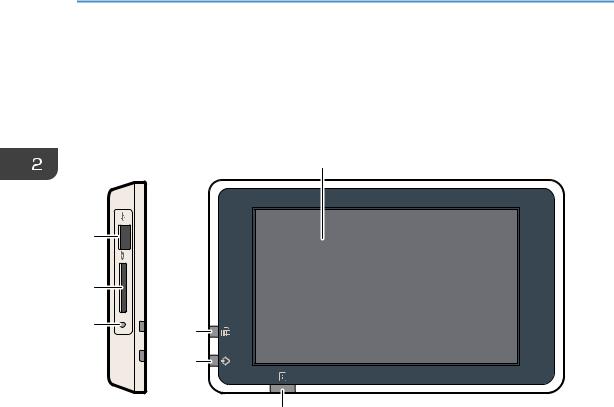
1.Display panel
This is a touch panel display that features icons, keys, shortcuts, and widgets that allow you to navigate the screens of the various functions and applications and provide you with information about operation status and other messages. See page 37 "Guide to Applications Installed on the Machine".
2.Main power indicator
The main power indicator goes on when you turn on the main power switch. When the machine is in Sleep mode, the main power indicator flashes slowly. In Fusing Unit Off mode, the main power indicator is lit.
3.Status indicator
Indicates the status of the system. Stays lit when an error occurs or the toner runs out.
4.Data In indicator (facsimile and printer mode)
Flashes when the machine is receiving print jobs or LAN-Fax documents from a computer. See Fax and Print.
5.Fax indicator (for SP C360SFNw/C361SFNw)
Indicates the status of the fax functions. Flashes during data transmission and reception. Stays lit when receiving a fax via Confidential or Substitute Reception.
6.Media access lamp
Lights up when an SD card is inserted in the media slot.
28
Loading...