


User Guide
Getting Started
Loading Paper
Troubleshooting
For information not in this manual, refer to the HTML/PDF files on the supplied
CD-ROM.
For safe and correct use, be sure to read the Safety Information in "Read This First" before using the machine.

TABLE OF CONTENTS |
|
Manuals for This Machine................................................................................................................................. |
3 |
List of Manuals.................................................................................................................................................... |
5 |
1. Getting Started |
|
Before You Start.................................................................................................................................................. |
7 |
How to Read the Manuals............................................................................................................................. |
7 |
Model-Specific Information........................................................................................................................... |
8 |
List of Options................................................................................................................................................. |
9 |
Guide to Names and Functions of Components............................................................................................ |
10 |
Guide to Components................................................................................................................................. |
10 |
Guide to the Names and Functions of the Control Panel......................................................................... |
14 |
Guide to the Names and Functions of the Control Panel Screen............................................................ |
15 |
Turning On/Off the Power.............................................................................................................................. |
17 |
Turing On the Power.................................................................................................................................... |
17 |
Turning Off the Power.................................................................................................................................. |
17 |
Saving Energy.............................................................................................................................................. |
18 |
Displaying the Printer Configuration Screens Using the Control Panel........................................................ |
20 |
Using Web Image Monitor............................................................................................................................. |
21 |
Displaying the top page.............................................................................................................................. |
22 |
2. Loading Paper |
|
Paper Loading Procedure................................................................................................................................ |
25 |
Paper Size Specifications................................................................................................................................ |
26 |
Paper Type Specifications............................................................................................................................... |
29 |
Paper Precautions............................................................................................................................................. |
31 |
Loading Paper into Paper Trays...................................................................................................................... |
33 |
When Loading Paper Larger than A4 or 81/2 × 11................................................................................ |
36 |
Loading Paper into the Bypass Tray............................................................................................................... |
38 |
Loading Orientation-Fixed Paper or Two-Sided Paper................................................................................ |
40 |
Loading Envelopes........................................................................................................................................... |
42 |
Specifications of Envelopes......................................................................................................................... |
43 |
Printing on Envelopes with Windows (PCL 6/PostScript 3)..................................................................... |
45 |
Printing on Envelopes with Windows (PCL 5e/5c)................................................................................... |
45 |
Printing on Envelopes with Mac OS X........................................................................................................ |
46 |
Paper Settings................................................................................................................................................... |
48 |
1

Specifying a Paper Size.............................................................................................................................. |
48 |
Specifying a Paper Type............................................................................................................................. |
49 |
Configuring Envelope Settings Using the Control Panel........................................................................... |
49 |
3. Troubleshooting |
|
When a Panel Tone Beeps.............................................................................................................................. |
51 |
When Checking the Indicator Lamps, Status Icons, and Messages on the Control Panel......................... |
52 |
Indicators...................................................................................................................................................... |
52 |
If USB Connection Fails................................................................................................................................... |
53 |
When Messages Are Displayed..................................................................................................................... |
54 |
Status Messages.......................................................................................................................................... |
54 |
Alert Messages............................................................................................................................................ |
54 |
When You Cannot Print................................................................................................................................... |
58 |
Other Printing Problems................................................................................................................................... |
59 |
When You Cannot Print Properly................................................................................................................ |
59 |
Paper Misfeeds Occur Frequently.............................................................................................................. |
64 |
Additional Troubleshooting......................................................................................................................... |
67 |
The Printed Image is Different from the Image on the Computer............................................................. |
71 |
When Printer Is Not Functioning Properly.................................................................................................. |
71 |
Removing Jammed Paper................................................................................................................................ |
74 |
Paper Misfeed Message (A1).................................................................................................................... |
74 |
Paper Misfeed Message (A2).................................................................................................................... |
76 |
Paper Misfeed Message (B)....................................................................................................................... |
77 |
Paper Misfeed Message (B) (C)................................................................................................................. |
80 |
Paper Misfeed Message (Y)....................................................................................................................... |
85 |
Paper Misfeed Message (Z1)..................................................................................................................... |
87 |
Paper Misfeed Message (Z2)..................................................................................................................... |
89 |
Trademarks....................................................................................................................................................... |
92 |
2

Manuals for This Machine
Read this manual carefully before using this machine.
Refer to the manuals that are relevant to what you want to do with the machine.
•The method for viewing the manual depends on the manual.
•Adobe® Acrobat® Reader®/Adobe Reader must be installed in order to view the manuals as PDF files.
•A Web browser must be installed in order to view the HTML manuals.
User Guide
Summaries are provided below for the operating instructions regarding the basic usage of this machine, frequently used functions, and troubleshooting when an error message appears.
Read This First
Before using the machine, be sure to read the "Safety Information" section of this manual. It describes the regulations and environmental conformance.
Quick Installation Guide
Describes procedures from unpacking the machine to connecting it to a computer.
Operating Instructions
Provides detailed information about the operation of the machine in HTML format. The following are the main topics of the manual:
•Getting Started
•Setting Up the Printer
•Loading Paper
•Printing
•Configuring and Managing the Printer
•Troubleshooting
•Maintenance and Specifications
Security Guide
This manual is for administrators of the machine. It explains security functions that you can use to prevent unauthorized use of the machine, data tampering, or information leakage. For enhanced security, we recommend that you first:
•Install the Device Certificate.
•Enable SSL (Secure Sockets Layer) Encryption.
•Change the password of the administrator using Web Image Monitor. For details, see "Changing an Administrator's Password", Security Guide.
3

Be sure to read this manual when configuring the enhanced security functions or user and administrator authentication.
Driver Installation Guide
Explains how to install and configure the drivers.
4

List of Manuals
|
|
Manual Name |
Printed Manual |
PDF Manual |
HTML Manual |
|
|
Provided |
Provided |
Provided |
|
|
|
|
|||
|
|
|
|
|
|
User Guide |
No |
Yes |
No |
||
|
|
|
|
|
|
Read This First |
Yes |
No |
No |
||
|
|
|
|
|
|
Quick Installation Guide |
Yes |
No |
No |
||
|
|
|
|
|
|
Operating Instructions |
No |
No |
Yes |
||
|
|
|
|
|
|
Security Guide |
No |
Yes |
No |
||
|
|
|
|
|
|
Driver Installation Guide |
No |
Yes |
No |
||
|
|
|
|
|
|
|
|
|
|
|
|
|
|
|
|
|
|
•Operating Instructions and Driver Installation Guide are available in English, German, French, Italian, Spanish, Dutch, and Russian.
5

6

1. Getting Started
This section describes the symbols used in the manuals supplied with the printer, available options, and names and functions of components.
Before You Start
How to Read the Manuals
Symbols used in the manuals
This manual uses the following symbols:
Indicates points to pay attention to when using the machine, and explanations of likely causes of paper misfeeds, damage to originals, or loss of data. Be sure to read these explanations.
Indicates supplementary explanations of the machine's functions, and instructions on resolving user errors.
This symbol is located at the end of sections. It indicates where you can find further relevant information.
[ ]
Indicates the names of keys on the machine's display or control panels.
Indicates the key sequence order you should perform using the control panel. Example:
Select [System]  Press [OK]
(Select [System], and then press the [OK] key.) 


 (mainly Europe and Asia)


 (mainly North America)
Differences in the functions of Region A and Region B models are indicated by the two symbols. Read the information indicated by the symbol that corresponds to the region of the model you are using. For details about which symbol corresponds to the model you are using, see page 8 "Model-Specific Information".
7
1. Getting Started
Disclaimer
Contents of this manual are subject to change without prior notice.
To the maximum extent permitted by applicable laws, in no event will the manufacturer be liable for any damages whatsoever arising out of failures of this machine, losses of the registered data, or the use or non-use of this product and operation manuals provided with it.
Make sure that you always copy or have backups of the data registered in this machine. Documents or data might be erased due to your operational errors or malfunctions of the machine.
In no event will the manufacturer be responsible for any documents created by you using this machine or any results from the data executed by you.
Notes
The manufacturer shall not be responsible for any damage or expense that might result from the use of parts other than genuine parts from the manufacturer with your office products.
For good output quality, the manufacturer recommends that you use genuine toner from the manufacturer.
Some illustrations in this manual might be slightly different from the machine.
About IP addresses
In this manual, "IP address" covers both IPv4 and IPv6 environments. Read the instructions that are relevant to the environment you are using.
Model-Specific Information
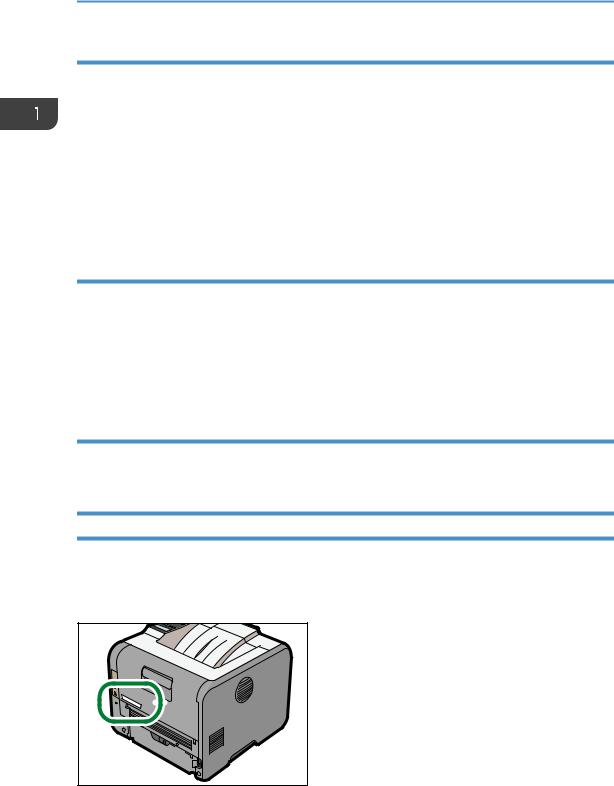
This section explains how to identify the region to which your printer belongs.
There is a label on the rear of the printer, located in the position shown below. The label contains details that identify the region to which your printer belongs. Read the label.
CZF090 |
8
Before You Start
The following information is region-specific. Read the information under the symbol that corresponds to the region of your printer.


 (mainly Europe and Asia)
If the label contains the following, your printer is a Region A model:
•CODE XXXX -27
•220–240 V


 (mainly North America)
If the label contains the following, your printer is a Region B model:
•CODE XXXX -17
•120–127 V
•Dimensions in this manual are given in two measurement units: metric and imperial. If your printer is a Region A model, refer to the metric units. If your printer is a Region B model, refer to the imperial units.
List of Options
This section provides a list of options for this printer and the names commonly used in this manual.
Option name |
Description |
|
|
Paper Feed Unit PB1060 |
250-sheet paper feed unit |
|
|
Paper Feed Unit PB1070 |
500-sheet paper feed unit |
|
|
9
1. Getting Started
Guide to Names and Functions of Components
Guide to Components
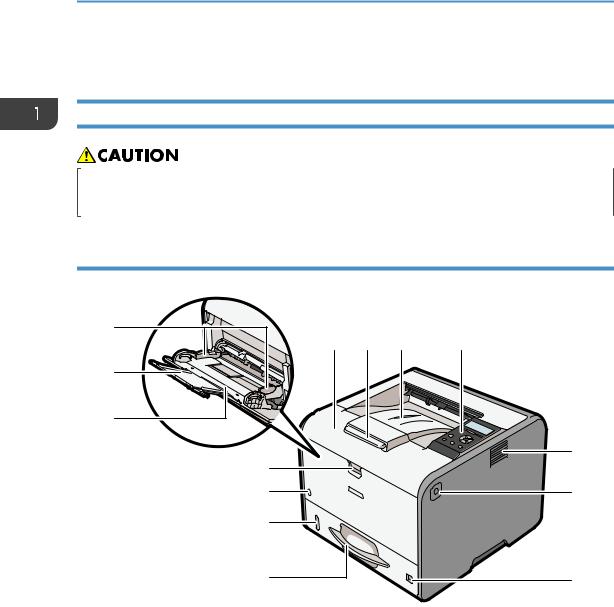
•Do not obstruct the machine's vents. Doing so risks fire caused by overheated internal components.
Exterior: Front view
14 |
13 |
12
11
10
9
8
1 |
2 |
3 |
4 |
5
6
7
CZF044
1.Front cover
Open to access the inside of the printer and remove jammed paper. Open here to replace the print cartridge and the drum unit.
2.Tray Extension
Pull this fence to prevent paper from falling off.
3.Standard tray
Output is stacked here with the print side down.
4.Control panel
For details, see page 14 "Guide to the Names and Functions of the Control Panel".
10

Guide to Names and Functions of Components
5.Ventilation holes
Prevent overheating.
6.Front cover open button
Push this button to open the front cover.
7.Paper size dial
Use this dial to specify the paper size. To use a paper size that is not indicated on the paper size dial, set the dial to " ". If this is the case, set the paper size using the control panel.
8.Tray 1
Up to 250 sheets of plain paper can be loaded.
For details about the sizes and types of paper that can be used, see page 26 "Paper Size Specifications" and page 29 "Paper Type Specifications".
9.Remaining paper indicator
Indicates the approximate amount of paper remaining in the tray.
10.Main power switch
Use this switch to turn the power on and off.
For details about how to shut down the printer, see page 17 "Turning Off the Power".
11.Bypass tray open lever
Push this lever to open the bypass tray.
12.Bypass tray
Up to 100 sheets of plain paper can be loaded.
For details about the sizes and types of paper that can be used, see page 26 "Paper Size Specifications" and page 29 "Paper Type Specifications".
13.Extender for the bypass tray
Pull this extender out when loading A4 , 81/2 × 11
 or larger size paper in the bypass tray.
14.Paper guides
When loading paper in the bypass tray, align the paper guides flush against the paper.
11
1. Getting Started
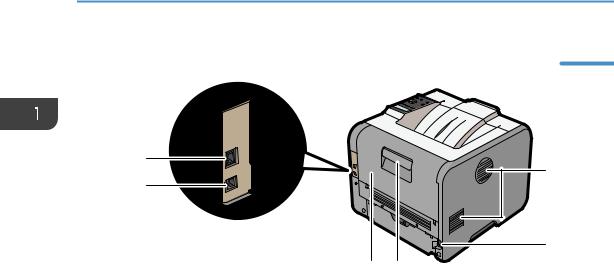
Exterior: Rear view
6
1
5
2
4 3
CZF003
1.Ventilation holes
Prevent overheating.
2.Power connector
Connect the power cord to the printer. Insert the other end into an electrical outlet.
3.Rear cover open lever
Pull this lever to open the rear cover.
4.Rear cover
Open to access the inside of the printer.
Open here to replace the fusing unit or using the envelope lever.
5.USB port B
Use a USB cable to connect the printer to a computer.
6.Ethernet port
Use a network interface cable to connect the printer to a network.
12

Guide to Names and Functions of Components
Interior: Front view
1
2
CZF002
1.Print cartridge
Messages appear on the screen when the print cartridge needs to be replaced, or a new cartridge needs to be prepared.
For details about the messages that appear on the screen when consumables need to be replaced, see "Replenishing and Replacing Consumables", Operating Instructions.
•When you set the print cartridge apart from the drum unit, pull down the lever on the right side of the print cartridge, and then pull the print cartridge out.
2.Drum unit
Messages appear on the screen when the drum unit needs to be replaced, or a new drum unit needs to be prepared.
For details about the messages that appear on the screen when consumables need to be replaced, see "Replenishing and Replacing Consumables", Operating Instructions.
Interior: Rear view
1
CZF004
13
1.Getting Started
1.Fusing unit
Messages appear on the screen when the fusing unit needs to be replaced, or a new fusing unit needs to be prepared.
For details about the messages that appear on the screen when consumables need to be replaced, see "Replenishing and Replacing Consumables", Operating Instructions.
The fusing unit is included in Maintenance Kit.
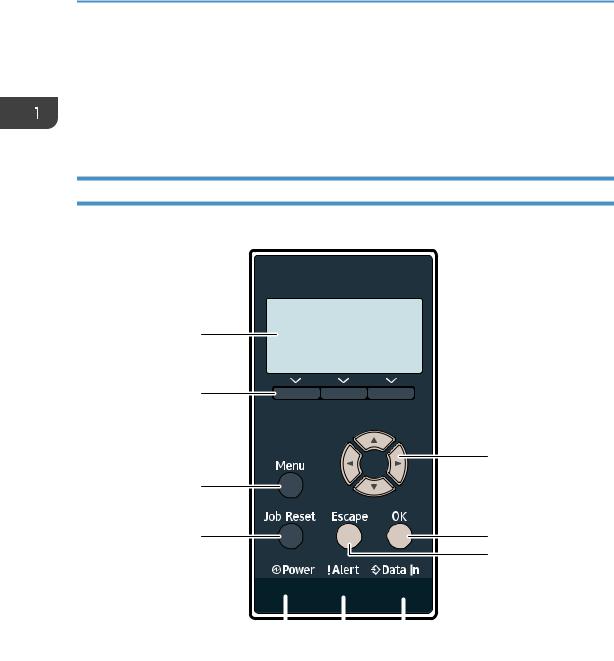
Guide to the Names and Functions of the Control Panel
This illustration shows the control panel of the printer.
1 |
|
2 |
|
|
10 |
3 |
|
4 |
9 |
|
8 |
|
|
|
|
|
|
|
|
|
|
|
|
|
|
5 |
6 |
7 |
CZF041 |
|||
1.Display
Displays current printer status and error messages.
2.Selection keys
Correspond to the function items at the bottom line on the display.
Example: When this manual instructs you to press [Supplies], press the selection key on the right below the initial screen.
14
Guide to Names and Functions of Components
3.[Menu] key
Press this key to configure and check the current printer settings.
Press to change the default settings to meet your requirements. See page 20 "Displaying the Printer Configuration Screens Using the Control Panel".
4.[Job Reset] key
Press to cancel the current print job.
5.Power indicator
Lights up when the printer is ready to receive data from a computer. Flashes when the printer is warming up or receiving data. It is unlit when the power is off.
6.Alert indicator
Lights up or flashes when a printer error occurs.
Steady red: printing is not possible, or is possible but print quality cannot be ensured.
Flashing yellow: the printer will soon require maintenance or a replacement consumable such as print cartridge.
Follow the instructions that appear on the display.
7.Data in indicator
Flashes when the printer is receiving data from a computer. The data in indicator is lit if there is data to be printed.
8.[Escape] key
Press this key to cancel an operation or return to the previous display.
9.[OK] key
Use this key to confirm settings or setting values, or move to the next menu level.
10.Scroll keys
Press these keys to move the cursor in each direction.
When the [ ] [
] [ ] [
] [ ] [
] [ ] keys appear in this manual, press the applicable key for the direction that you want to move the cursor.
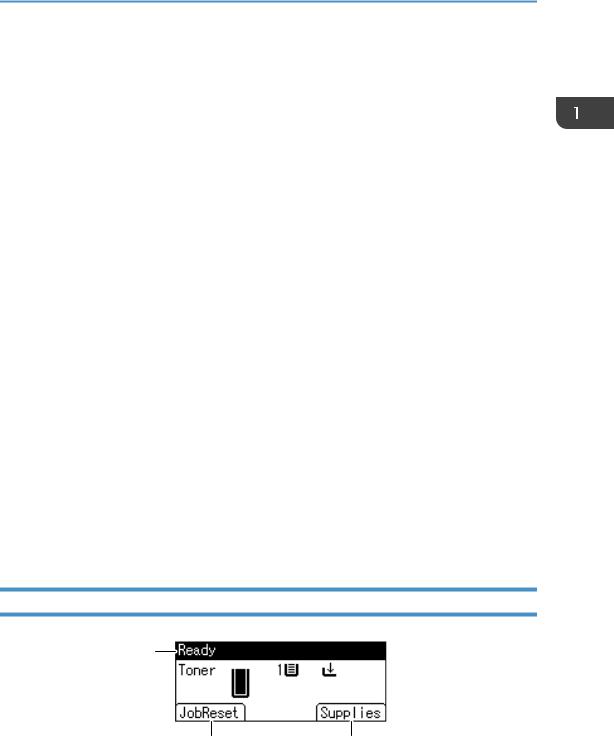
Guide to the Names and Functions of the Control Panel Screen
1
2 |
3 |
CZF903
15

1.Getting Started
1.Operational Status or Messages
Displays the printer status and messages.
2.[JobReset]
Press to cancel the current print job.
3.[Supplies]
Press to display the information about printer supplies.
16
Turning On/Off the Power
Turning On/Off the Power
This section explains how to turn on/off the printer.
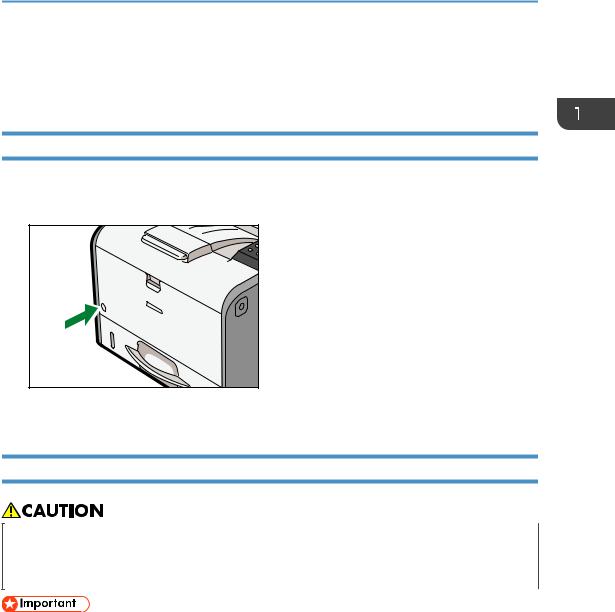
Turing On the Power
1.Make sure the power cord is firmly plugged into the wall outlet.
2.Push the main power switch.
CZF031 |
The power indicator turns on.
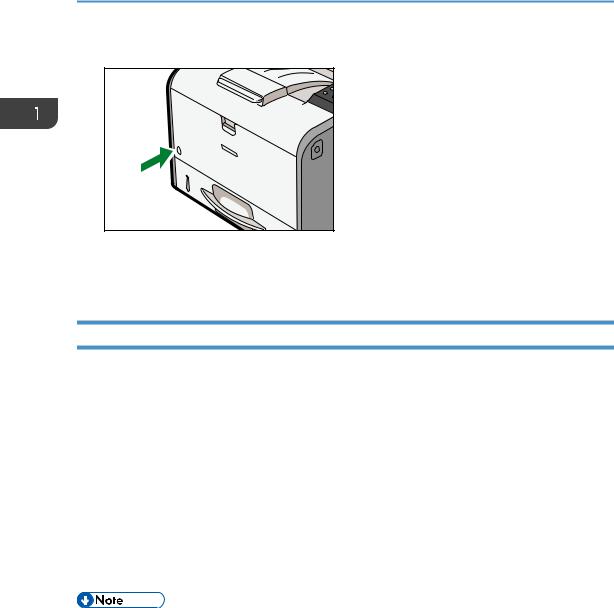
Turning Off the Power
•When disconnecting the power cord from the wall outlet, always pull the plug, not the cord. Pulling the cord can damage the power cord. Use of damaged power cords could result in fire or electric shock.
•Do not press and hold the main power switch when turning off the printer. Doing so shuts down the printer forcefully and may damage the memory, causing a malfunction of the printer.
•Before unplugging the power cord plug, turn off the power switch and make sure the power switch indicator turns off. Not doing so may result in damage to the memory, leading to a malfunction.
•Do not turn off the power while the printer is in operation.
17
1.Getting Started
1.Push the main power switch.
CZF031 |
The main power is turned off automatically when the shutdown process is complete. If the machine does not turn off within 10 minutes, contact your service representative.
Saving Energy
This printer has the following energy saving functions:
Sleep mode
The printer will automatically go into Sleep mode when a certain period of time elapses following the last operation or print.
The printer can print jobs from computers.
You can change the amount of time that the printer waits before switching to Sleep mode. For details about setting [Sleep Mode], see "Timer Settings", Operating Instructions.
To exit Sleep mode, do one of the following:
•Press one of the keys on the control panel
•Start print jobs
•The energy saving functions will not activate when:
•A warning message is displayed
•The service call message is displayed
•Paper is jammed
•The printer's covers are opened
•Toner is being replenished
•The printer settings screen is displayed
•Fixed warm-up is in progress
•Data is being processed
18
Turning On/Off the Power
•Operations are suspended during printing
•The Data In indicator is on or flashing
•The printer consumes less energy when in Sleep mode, but it takes longer to start printing.
19
1. Getting Started
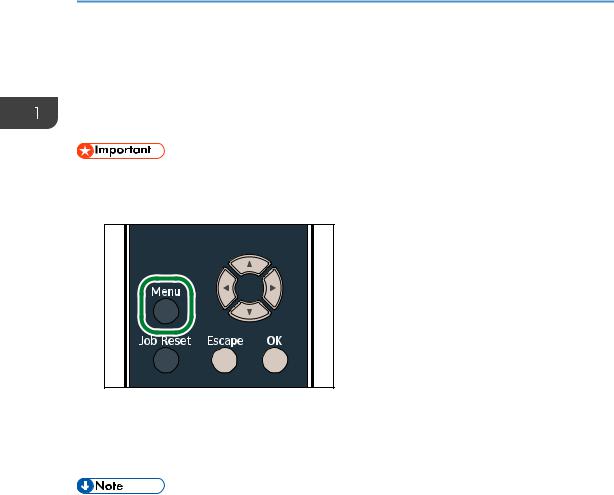
Displaying the Printer Configuration Screens
Using the Control Panel
The configuration screens allow you to change or set defaults.
• If an authentication screen appears, enter the password. For details, contact your administrator.
1. Press the [Menu] key.
CZF042
2.Select the settings you want to change.
Press the [ ] or [
 ] key to select the next or previous items.
3.Press the [OK] key.
•Any changes you make with configuration screens remain in effect even if the main power switch is turned off.
•To cancel changes made to settings and return to the initial display, press the [Escape] key.
20

Using Web Image Monitor
Using Web Image Monitor
Using Web Image Monitor, you can check the printer status and change settings.
Available operations
The following operations can be remotely performed using Web Image Monitor from a client computer.
•Displaying printer status or settings
•Configuring printer settings
•Configuring network protocol settings
Configuring the printer
To perform the operations from Web Image Monitor, TCP/IP is required. After the printer is configured to use TCP/IP, operations from Web Image Monitor become available.
Recommended Web browser
•Windows:
Internet Explorer 6.0/7.0/8.0 Firefox 2.0 or higher
•Mac OS:
Safari 3.0 or higher Firefox 2.0 or higher
Web Image Monitor supports screen reader software. We recommend JAWS 7.0 or a later version.
•Display and operation problems may occur if you do not enable JavaScript and cookies, or if you are using a non-recommended Web browser.
•If you are using a proxy server, change the Web browser settings. Contact your administrator for information about the settings.
•We recommend using Web Image Monitor in the same network.
•If the printer is firewall-protected, it cannot be accessed from computers outside the firewall.
•If the printer under DHCP is used, the IP address may be changed automatically by the DHCP server settings. Enable DDNS setting on the printer, and then connect using the printer's host name. Alternatively, set a static IP address to the DHCP server.
•If the HTTP port is disabled, a connection to the printer using the printer's URL cannot be established. SSL settings must be enabled on this printer. For details, contact your network administrator.
•If Firefox is used, fonts and colors may be different, or tables may not appear properly configured.
21

1.Getting Started
•When using a host name under Windows Server 2003/2003 R2/2008/2008 R2/2012 with IPv6 protocol, perform host name resolution using an external DNS server. The host file cannot be used.
•To use JAWS 7.0 under Web Image Monitor, you must be running Windows and Internet Explorer 6.0 or a later version.
•If you are using Internet Explorer 8.0 or higher, downloading will be slower than with other browsers. To download faster with Internet Explorer 8.0 or higher, open the browser's [Internet Options] menu and register the printer's URL as a trusted site, and then disable SmartScreen filter for trusted sites. For details about these settings, see the Internet Explorer Help files.
•You can access Web Image Monitor more quickly by registering the printer's URL as a bookmark. Note that the URL you register must be the URL of the top page, which is the page that appears before login. If you register the URL of a page that appears after login, Web Image Monitor will not open properly from the bookmark.
•When you configure settings using Web Image Monitor, do not log in from the control panel. The settings you have configured using Web Image Monitor may become invalid.
Displaying the top page
There are two modes available with Web Image Monitor: guest mode and administrator mode. Displayed items may differ depending on the printer type.
Guest mode
This mode requires no login to enter.
In the guest mode, the printer status, settings, and print job status can be viewed, but the printer settings cannot be changed.
Administrator mode
This mode requires an administrator login to enter.
In the administrator mode, you can configure various printer settings.
•When entering an IPv4 address, do not begin segments with zeros. For example: If the address is "192.168.001.010", you must enter it as "192.168.1.10".
1.Start your Web browser.
2.Enter "http://(printer's IP address or host name)/" in your Web browser's address bar.
The top page of Web Image Monitor appears.
If the printer's host name has been registered on the DNS or WINS server, you can enter it.
When setting SSL, a protocol for encrypted communication, under the environment in which server authentication is issued, enter "https://(printer's IP address or host name)/".
22
Using Web Image Monitor
3.To log in to Web Image Monitor in the administrator mode, click [Login] on the top page.
The window for entering the login user name and password appears.
4.Enter your login user name and password, and then click [Login].
For details about the login user name and password, contact your administrator.
Depending on the configuration of your Web browser, the login user name and password might be saved. If you do not want to save them, configure your Web browser's settings so that this information is not saved.
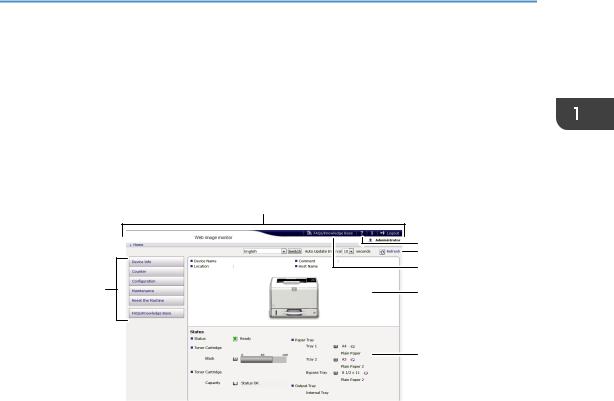
2
3
4
5
1 |
6 |
|
7
CZF906
1.Menu area
Displays the content of a selected menu item.
2.Header area
Displays the dialog box for switching to the user mode and administrator mode and the menu for each mode. Also displays the link to Help.
3.Help
Clicking the Help button ( ) in the header area displays the contents of Help.
Clicking the Help button ( ) in the work area displays the Help for the setting items in the work area. An internet connection is required to view the contents of Help.
4.Refresh
Click  at the upper right in the work area to update the printer information. Click the Web browser's [Refresh] button to refresh the entire browser screen.
5.FAQs/Knowledge Base
Click  to view the Frequently Asked Questions. An internet connection is required to view the Frequently Asked Questions.
6.Basic Information area
Displays the basic information of the printer.
7.Work area
Displays the contents of the item selected in the menu area.
23

1. Getting Started
24

2. Loading Paper
This chapter describes available trays for each paper size and type, and explains how to load paper in paper trays.
Paper Loading Procedure
To achieve the print results you expect, it is important to select an appropriate input tray according to the size, type, and weight of the paper you want to use for printing. You also need to specify the paper size and type properly using the control panel or Web Image Monitor, and/or the paper size dial on the tray.
Follow the procedure below to load paper.
1.Check the paper tray available for the size, type, and weight of the paper you want to use for printing.
For details about available paper trays for each paper size and type, see page 26 "Paper Size Specifications" and page 29 "Paper Type Specifications".
2.Change the paper size and type settings for the tray you selected.
Use the control panel of the printer or Web Image Monitor to change the paper size and type. When loading paper into Trays 1 and 2, adjust the paper size dial on the trays.
For details about changing paper settings using the control panel, see page 48 "Paper Settings".
3.Load paper into the tray.
For details about loading paper, see page 33 "Loading Paper into Paper Trays" or page 38 "Loading Paper into the Bypass Tray".
For details about loading envelopes, see page 42 "Loading Envelopes".
25

2. Loading Paper
Paper Size Specifications
The following tables show the paper sizes that can be loaded in each paper tray. The "Paper size" column shows the names of paper sizes and their dimensions in millimeters and inches. The  and
and  icons indicate the paper orientation in relation to the printer body.
The letters in the tables indicate the following:
•A: Select the paper size using the control panel.
•B: Select the paper size using the paper size dial on the tray.
•C: Set the paper size dial on the tray to " ", and select the paper size with the control panel.
• : You can print on both sides of paper.
•-: Not supported
Metric sizes
Paper size name |
Actual size |
Bypass tray |
Tray 1 |
Tray 2 |
Two-sided |
|
|
|
|
|
|
A4 |
210 × 297 mm |
A |
B |
B |
|
|
|
|
|
|
|
A5 * |
148 × 210 mm |
A |
B |
B |
- |
A5 |
148 × 210 mm |
A |
C |
C |
- |
|
|
|
|
|
|
A6 |
105 × 148 mm |
A |
B |
B |
- |
|
|
|
|
|
|
B5 |
182 × 257 mm |
A |
C |
C |
- |
|
|
|
|
|
|
B6 |
128 × 182 mm |
A |
C |
C |
- |
|
|
|
|
|
|
B6 |
128 × 182 mm |
A |
- |
- |
- |
|
|
|
|
|
|
C5 Env |
162 × 229 mm |
A |
C |
- |
- |
|
|
|
|
|
|
C6 Env |
114 × 162 mm |
A |
C |
- |
- |
|
|
|
|
|
|
DL Env |
110 × 220 mm |
A |
C |
- |
- |
|
|
|
|
|
|
16K |
195 × 267 mm |
A |
C |
C |
- |
|
|
|
|
|
|
*While a print job is performed on paper that is loaded vertically, smearing may occur near the edges of the printed paper. If this happens, set the paper horizontally and print again.
Imperial sizes
Paper size name |
Actual size |
Bypass tray |
Tray 1 |
Tray 2 |
Two-sided |
|
|
|
|
|
|
81/2 × 14 |
8.5" × 14" |
A |
B |
B |
|
26

|
|
|
|
|
|
Paper Size Specifications |
|
|
|
|
|
|
|
|
|
|
|
|
|
|
|
|
|
Paper size name |
Actual size |
Bypass tray |
Tray 1 |
Tray 2 |
|
Two-sided |
|
|
|
|
|
|
|
|
|
81/2 × 13 |
8.5" × 13" |
A |
C |
C |
|
|
|
81/2 × 11 |
8.5" × 11" |
A |
B |
B |
|
|
|
81/4 × 14 |
8.25" × 14" |
A |
C |
C |
|
|
|
81/4 × 13 |
8.25" × 13" |
A |
C |
C |
|
|
|
8 |
× 13 |
8" × 13" |
A |
C |
C |
|
|
|
|
|
|
|
|
|
|
8 |
× 101/2 |
8" × 10.5" |
A |
C |
C |
|
- |
8 |
× 10 |
8" × 10" |
A |
C |
C |
|
- |
|
|
|
|
|
|
|
|
71/4 × 101/2 |
7.25" × 10.5" |
A |
C |
C |
|
- |
|
51/2 × 81/2 * |
5.5" × 8.5" |
A |
B |
B |
|
- |
|
51/2 × 81/2 |
5.5" × 8.5" |
A |
- |
- |
|
- |
|
41/8 × 91/2 |
4.125" × 9.5" |
A |
C |
- |
|
- |
|
37/8 × 71/2 |
3.875" × 7.5" |
A |
C |
- |
|
- |
|
*While a print job is performed on paper that is loaded vertically, smearing may occur near the edges of the printed paper. If this happens, set the paper horizontally and print again. Use the bypass tray when printing on paper that is set horizontally.
Custom Size Specifications
You can also load custom size paper by specifying horizontal and vertical sizes. The following tables show the custom paper sizes that can be loaded in each tray.
Metric sizes
Tray |
Horizontal size |
Vertical size |
Horizontal size |
Vertical size |
|
(One-sided) |
(One-sided) |
(Two-sided) |
(Two-sided) |
||
|
|||||
|
|
|
|
|
|
Bypass tray |
60.0 to 216.0 |
127.0 to 900.0 |
100.0 to 216.0 |
279.0 to 356.0 |
|
mm |
mm |
mm |
mm |
||
|
|||||
|
|
|
|
|
|
Trays 1, 2 |
100.0 to 216.0 |
148.0 to 356.0 |
100.0 to 216.0 |
279.0 to 356.0 |
|
mm |
mm |
mm |
mm |
||
|
|||||
|
|
|
|
|
27

2. Loading Paper
Imperial sizes
Tray |
Horizontal size |
Vertical size |
Horizontal size |
Vertical size |
|
(One-sided) |
(One-sided) |
(Two-sided) |
(Two-sided) |
||
|
|||||
|
|
|
|
|
|
Bypass tray |
2.37 to 8.50" |
5.00 to 35.43" |
3.94 to 8.50" |
10.99 to 14.01" |
|
|
|
|
|
|
|
Trays 1, 2 |
3.94 to 8.50" |
5.83 to 14.01" |
3.94 to 8.50" |
10.99 to 14.01" |
|
|
|
|
|
|
28
 Loading...