


Digital Camera
Operating Manual
To ensure the best performance from your camera, please read the Operating Manual before using the camera.
Model:R02090

Thank you for purchasing this RICOH WG-60 Digital Camera.
Please read this manual before using the camera in order to get the most out of all the features and functions. Keep this manual safe, as it can be a valuable tool in helping you to understand all the camera’s capabilities.
Regarding copyrights
Images taken with this digital camera that are for anything other than personal enjoyment cannot be used without permission according to the rights as specified in the Copyright Act. Please take care, as there are cases where limitations are placed on taking pictures even for personal enjoyment during demonstrations, performances or of items on display. Images taken with the purpose of obtaining copyrights also cannot be used outside the scope of use of the copyright as laid out in the Copyright Act, and care should be taken here also.
Regarding trademarks
•SDXC logo is a trademark of SD-3C, LLC.
•Microsoft and Windows are registered trademarks of Microsoft Corporation in the United States of America and other countries.
•Macintosh, OS X, and macOS are trademarks of Apple Inc., registered in the U.S. and other countries.
•HDMI, the HDMI logo, and High-Definition Multimedia Interface are trademarks or registered trademarks of HDMI Licensing, LLC in the United States and/or other countries.
•FlashAir is a trademark of Toshiba Memory Corporation.
•This product supports PRINT Image Matching III. PRINT Image Matching enabled digital still cameras, printers and software help photographers to produce images more faithful to their intentions. Some functions are not available on printers that are not PRINT Image Matching III compliant. Copyright 2001 Seiko Epson Corporation. All Rights Reserved.
PRINT Image Matching is a trademark of Seiko Epson Corporation. The PRINT Image Matching logo is a trademark of Seiko Epson Corporation.
•This product is licensed under the AVC Patent Portfolio License for the personal use of a consumer or other uses in which it does not receive remuneration to (i) encode video in compliance with the AVC standard (“AVC video”) and/or (ii) decode AVC video that was encoded by a consumer engaged in a personal activity and/or was obtained from a video provider licensed to provide AVC video. No license is granted or shall be implied for any other use.
Additional information may be obtained from MPEG LA, LLC. See http://www.mpegla.com.

• All other trademarks are the property of their respective owners.
To users of this camera
•Do not use or store this camera in the vicinity of equipment that generates strong electromagnetic radiation or magnetic fields.
Strong static charges or the magnetic fields produced by equipment such as radio transmitters could interfere with the display, damage the stored data, or affect the camera’s internal circuitry and cause camera misoperation.
•The liquid crystal panel used for the display is manufactured using extremely high precision technology. Although the level of functioning pixels is 99.99% or better, you should be aware that 0.01% or fewer of the pixels may not illuminate or may illuminate when they should not. However, this has no effect on the recorded image.
•There is a possibility that the illustrations and the screen display in this manual are different from the actual ones.
•In this manual, SD Memory Cards, SDHC Memory Cards and SDXC Memory Cards are referred to as SD Memory Cards.
•In this manual, the generic term “computer(s)” refers to either a Windows PC or a Macintosh.
•In this manual, the term “battery(ies)” refers to any type of batteries used for this camera and its accessories.
Using Your Camera Safely
We have paid close attention to the safety of this camera. When using this camera, we request your special attention regarding items marked with the following symbols.
Warning |
This symbol indicates that ignoring this item could |
|
|
cause serious personal injuries. |
|
Caution |
This symbol indicates that ignoring this item could |
|
cause minor or medium personal injuries, or loss of |
||
|
||
|
property. |
1

About the Camera
 Warning
•Do not attempt to take the camera apart or modify the camera. High voltages are present within the camera, and there is a danger of electric shock if the camera is taken apart.
•If the inside of the camera should become exposed as a result of, for example, the camera being dropped, please do not under any circumstances touch such exposed portions, as there is a danger of receiving an electric shock.
•Wrapping the strap around a neck is dangerous. Take care that small children do not hang the strap around their necks.
•If any irregularities occur during use, such as smoke or a strange odor, stop use immediately, remove the battery, and contact your nearest service center. Continued use can cause a fire or electric shock.
 Caution
•Do not place your finger on the flash when it is discharging as there is a risk of burns.
•Do not discharge the flash while it is touching your clothing as there is a risk of discoloring.
•Some portions of the camera heat up during use, so please take care, as there is a risk of low temperature burns if such portions are held for long periods of time.
•Should the display be damaged, be careful of glass fragments. Also, be careful not to allow the liquid crystal to get on your skin, in your eyes, or in your mouth.
•Depending on your individual factors or physical condition, the use of the camera may cause itching, rashes or blisters. In case of any abnormality, stop using the camera and get medical attention immediately.
2

About the Power Adapter
 Warning
•Always use the power adapter exclusively developed for this camera, with the specified power and voltage. Using a power adapter not exclusive to this camera, or using the exclusive power adapter with an unspecified power or voltage can cause a fire, electric shock, or camera breakdown. The specified voltage is 100-240V AC.
•Do not disassemble or modify the product. This can cause a fire or electric shock.
•If the generation of smoke or strange odor from the product or other abnormality occurs, immediately discontinue its use and consult your nearest service center. Continued use can cause a fire or electric shock.
•If water should happen to get inside the product, consult your nearest service center. Continued use can cause a fire or electric shock.
•If you see a lightning flash or hear thunder during use of the power adapter, unplug the AC plug and discontinue use. Continued use can cause damage to the product, fire, or electric shock.
•Wipe off the AC plug if it becomes covered with dust. Accumulated dust may cause a fire.
 Caution
•Do not place or drop heavy objects on or forcefully bend the USB cable. Doing so may damage the cable. Should the cable be damaged, consult your nearest service center.
•Do not touch or short-circuit the terminal area of the USB cable while the cable is plugged in.
•Do not handle the AC plug with wet hands. This can cause an electric shock.
•Do not subject the product to strong impacts or allow it to drop onto a hard surface. This can cause a malfunction.
•Do not use the power adapter to charge a battery other than a rechargeable lithium-ion battery D-LI92. This can cause overheating, explosion, or connected device failure.
•To reduce the risk of hazards, use only a CSA/UL certified power supply cord set, cord is Type SPT-2 or heavier, minimum NO.18 AWG copper, one end with a molded-on male attachment plug cap (with a specified NEMA configuration), and the other is provided with a molded-on female connector body (with a specified IEC nonindustrial type configuration) or the equivalent.
3

About the Battery
 Warning
•Be sure to store the battery out of the reach of small children. Placing it in their mouths may cause an electric shock.
•If any leakage from the battery should come in contact with your eyes, it may cause a loss of sight. Flush your eyes with clean water and get medical attention immediately. Do not rub them.
 Caution
•Only use the specified battery with this camera. Use of other batteries may cause an explosion or fire.
•Do not disassemble the battery. Disassembling the battery may cause an explosion or leakage.
•Remove the battery from the camera immediately if it becomes hot or begins to smoke. Be careful not to burn yourself during removal.
•Keep wires, hairpins, and other metal objects away from the + and - contacts of the battery.
•Do not short the battery or dispose of the battery in fire. This can cause an explosion or fire.
•If any leakage from the battery should come in contact with skin or clothes, it may cause irritation to the skin. Wash the affected areas thoroughly with water.
•Precautions for D-LI92 Battery Usage:
BATTERY MAY EXPLODE OR FIRE IF MISTREATED.
-DO NOT DISASSEMBLE OR DISPOSE OF IN FIRE.
-DO NOT CHARGE EXCEPT SPECIFIED CHARGING CONDITION.
-DO NOT HEAT ABOVE 140°F / 60°C, OR SHORT CIRCUIT.
-DO NOT CRUSH OR MODIFY.
Keep the Camera and its Accessories out of the Reach of Small Children
 Warning
•Be sure to keep the camera and its accessories out of the reach of small children.
1.Injuries may result from the product falling or from unexpected movement.
2.Suffocation may result from wrapping the strap around the neck.
3.Small accessories such as battery or an SD Memory Card may be swallowed. Seek medical attention immediately if an accessory is accidentally swallowed.
4

Care to be Taken During Handling
Before Using Your Camera
•When the camera has not been used for a long time, confirm that it is still working properly, particularly prior to taking important pictures (such as at a wedding or when traveling). Contents of the recording cannot be guaranteed if recording, playback or transferring your data to a computer, etc. is not possible due to a malfunction of your camera or recording media (SD Memory Card), etc.
•The lens on this camera is not interchangeable. The lens is not removable.
About the Battery and Power Adapter
•To keep the battery in optimum condition, avoid storing it in a fully charged state or in high temperatures.
•If the battery is left inserted and the camera is not used for a long time, the battery will over-discharge and shorten the battery’s life.
•Charging the battery a day before use or on the day of use is recommended.
• Class II equipment: The provided power adapter is a Class II (doubleinsulated) product.
Precautions on Carrying and Using Your Camera
•Hot and humid places should be avoided. Particular care should be taken regarding vehicles, which can become very hot inside.
•Ensure that the camera is not subjected to substantial vibrations, shocks, or pressure as this may cause damage, malfunction, or a loss in waterproof performance. Place the camera on a cushion for protection when the camera is subjected to the vibrations of a motorbike, car, ship, etc. If the camera is subjected to substantial vibrations, shocks, or pressure, take your camera to your nearest service center and have it checked.
•The temperature range in which the camera can be used is -10°C to 40°C (14°F to 104°F).
•The display will become black at high temperatures but will return to normal at normal temperatures.
•The response speed of the display becomes slow at low temperatures. This is due to the properties of the liquid crystal and is not a malfunction.
•If the camera is subjected to rapid temperature changes, condensation may form on the inside and outside of the camera. Therefore put the camera in a bag or plastic bag and take it out when the difference in temperature has subsided.
5

•Avoid contact with garbage, mud, sand, dust, water, toxic gases, or salt. These could cause the camera to breakdown. Wipe the camera to dry off any rain or water drops.
•Do not press the display with excessive force. This could cause it to break or malfunction.
•Be careful not to sit down with the camera in your back pocket as this may damage the exterior of the camera or the display.
•When using a tripod with the camera, be careful not to overtighten the screw in the tripod socket on the camera.
Cleaning Your Camera
•Do not clean the camera with organic solvents such as thinner, alcohol or benzine.
•Use a lens brush to remove dust accumulated on the lens. Never use a spray blower for cleaning as it may damage the lens.
Storing Your Camera
•Avoid storing the camera where pesticides and chemicals are handled. Remove the camera from its case and store it in a well-ventilated place to prevent the camera from becoming moldy during storage.
•Avoid using or storing the camera where it may be exposed to static electricity or electrical interference.
•Avoid using or storing the camera in direct sunlight or in locations where it may be exposed to rapid changes in temperature or to condensation.
•Periodic inspections are recommended every one to two years to maintain high performance.
6

Other Precautions
•The SD Memory Card is equipped with a write-protect switch. Setting the switch to LOCK prevents new data from being recorded on the card, the stored data from being deleted, and the card from being formatted by the camera or computer.
rappears on the display when the card is write-protected.
Write-protect
switch
•Care should be taken when removing the SD Memory Card immediately after using the camera, as the card may be hot.
•Keep the battery/card cover closed and do not remove the SD Memory Card or turn the camera off while the data is being played back or saved to the card, or the camera is connected to a computer with the USB cable, as this may cause the data to be lost or the card to be damaged.
•Do not bend the SD Memory Card or subject it to violent impact. Keep it away from water and store away from high temperature.
•Do not remove the SD Memory Card during formatting as this may damage the card and render it unusable.
•The data on the SD Memory Card may be lost in the following circumstances. We do not accept any liability for data that is deleted
(1)when the SD Memory Card is mishandled by the user.
(2)when the SD Memory Card is exposed to static electricity or electrical interference.
(3)when the SD Memory Card has not been used for a long time.
(4)when the SD Memory Card is ejected or the batteries are removed while the card is being accessed.
•If it is not used for a long time, the data on the card may become unreadable. Be sure to regularly make a backup of important data on a computer.
•Be sure to format SD Memory Cards that are unused or have been used on another camera. Refer to “Formatting the Memory” (p.148).
•When using an SD Memory Card with a slow recording speed, recording may stop while recording a movie even if there is adequate space in the memory, or image capture or playback may take a long time.
•Please note that deleting data, or formatting the SD Memory Cards or the built-in memory does not completely erase the original data. Deleted files can sometimes be recovered using commercially available software. It is user’s responsibility to ensure the privacy of such data.
7
Regarding Waterproof, Dustproof, and
Shockproof Design
•This camera is provided with a waterproof/dustproof design complying with JIS waterproof grade 8 and JIS dustproof grade 6 (equivalent to IP68).
•The camera satisfies our drop test (1.6 m height onto a 5 cm thick plywood surface) complying with MIL-Standard 810F Method 516.5-Shock testing.
•The camera satisfies our test for the waterproof, dustproof, and shockproof performance, but this does not guarantee it will remain free of trouble or damages.
•Waterproof performance is not guaranteed if the camera is exposed to impact such as being dropped or hit.
Precautions Before Using the Camera in the
Water
Check the Following Before Going Near the Water
•Make sure that there are no cracks or scratches on the rubber seal of the battery/card and terminal covers.
|
|
|
|
|
|
|
|
|
|
|
|
|
|
|
|
|
|
|
|
|
|
|
|
|
|
|
|
|
|
|
|
|
|
|
|
|
|
|
|
|
|
|
|
Packing contact surface |
|
|
Waterproof packing |
|||||||
Packing contact surface  Waterproof packing
•Make sure that there are no foreign objects (dust, sand, hair, lint or liquid) on the rubber seals or the surface they contact before closing the battery/card and terminal covers. Wipe off any foreign objects with a clean lint-free cloth.
•Close the battery/card and terminal covers properly until they click. Otherwise water may get in and damage the camera.
8
Be Careful Near the Water
•Avoid opening the battery/card and terminal covers when near the waterside or with wet hands. When changing the battery or the SD Memory Card, avoid places where the camera is likely to get wet or dirty, and make sure that the camera and your hands are completely dry.
•The camera will sink if dropped in water, so be sure to attach the strap to the camera and wrap it around your wrist when using the camera in or near water.
•To enhance the waterproof performance of the camera, the front of the lens is protected by glass. The glass should be kept clean at all times, as any dirt or water on the glass will affect the quality of pictures taken.
Precautions When Using the Camera in the Water
•Do not use the camera deeper than 14 meters underwater. Do not use the camera underwater for more than 120 minutes consecutively.
•Do not open the battery/card and terminal covers underwater.
•Do not use the camera in hot water or in a hot spring.
•Do not apply excessive force to the camera, for example diving into water with it. Doing so may compromise the waterproof performance of the camera or cause the cover to open.
•Do not leave the camera on the sand at the beach, as this may cause the camera to exceed the upper limit of its operational temperature range, or cause the speaker or microphone to become blocked with sand.
•Avoid subjecting the camera to substantial vibrations, shocks, or pressure as this may cause a loss in waterproof performance. If the camera is subjected to substantial vibrations, shocks or pressure, take your camera to your nearest service center and have it checked.
•Avoid getting sunscreen or sun oil on the camera as it may cause discoloration of the surface. If any oil gets on the camera, wash it off immediately with warm water.
•Sudden and extreme changes in temperature may cause condensation to form in and on the camera. Keep the camera in a bag or case to reduce the difference in temperature.
9
Precautions After Using the Camera in the Water
•Do not open the battery/card and terminal covers if the camera is wet. Wipe off any water with a clean lint-free cloth.
•The inside surface of the covers may get wet when they are opened. Wipe off any water that is on the cover.
•Wiping off the camera while there is sand or dust on it may scratch the surface of the camera. Make sure that the battery/card and terminal covers are firmly closed before washing the camera in tap water. After washing the camera, dry it with a soft cloth.
•Wipe off any dirt or sand on the waterproof seal or the contact surface. The camera’s waterproof performance may be compromised by a loose seal, or cracks or dents on the seal or the contact surface. If there is any such damage, contact your nearest service center.
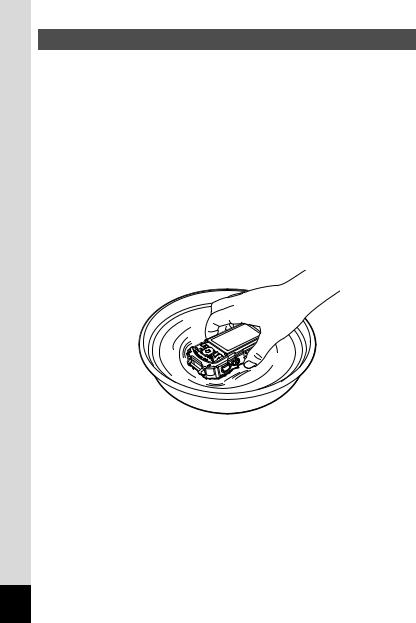
•If the camera becomes very dirty or after it has been used in the sea, make sure that it is turned off and the battery/card and terminal covers are firmly closed before rinsing it under running tap water or leaving it in a bowl of clean water for a short time (2 or 3 minutes).
•Avoid cleaning with agents such as soapy water, mild detergents, or alcohol as this may compromise the waterproof performance of the camera.
•To maintain the waterproof performance of the camera, you are recommended to change the waterproof seal once a year. Contact your nearest service center regarding changing the seal. (A charge will be made.)
•The camera’s accessories are not waterproof.
10

Contents |
|
Using Your Camera Safely...................................................................... |
1 |
Care to be Taken During Handling .......................................................... |
5 |
Regarding Waterproof, Dustproof, and Shockproof Design.................... |
8 |
Precautions Before Using the Camera in the Water................................ |
8 |
Precautions When Using the Camera in the Water................................. |
9 |
Precautions After Using the Camera in the Water................................. |
10 |
Contents ................................................................................................ |
11 |
Composition of the Operating Manual ................................................... |
17 |
Getting Started |
18 |
Checking the Contents of the Package.................................................... |
18 |
Names of Parts ........................................................................................... |
19 |
Names of Operating Parts ......................................................................... |
20 |
Display Indications .................................................................................... |
21 |
Display in AMode................................................................................ |
21 |
Display in Q Mode............................................................................... |
24 |
Guide Display ........................................................................................ |
26 |
Histogram .............................................................................................. |
27 |
Attaching the Strap .................................................................................... |
28 |
Attaching the Strap ................................................................................ |
28 |
Powering the Camera ................................................................................ |
29 |
Installing the Battery.............................................................................. |
29 |
Charging the Battery ............................................................................. |
31 |
Installing an SD Memory Card .................................................................. |
34 |
Turning the Camera On and Off................................................................ |
36 |
Starting-up in Playback Mode ............................................................... |
37 |
Initial Settings............................................................................................. |
38 |
Setting the Display Language ............................................................... |
38 |
Setting the Date and Time..................................................................... |
41 |
Common Operations |
43 |
Understanding the Button Functions....................................................... |
43 |
AMode ................................................................................................ |
43 |
Q Mode ............................................................................................... |
45 |
Switching Between AMode and Q Mode.......................................... |
47 |
Setting the Camera Functions .................................................................. |
48 |
Operating the Menus............................................................................. |
48 |
Menu List............................................................................................... |
50 |
11

Taking Pictures |
54 |
Taking Still Pictures................................................................................... |
54 |
Taking Pictures...................................................................................... |
54 |
Using the Zoom ..................................................................................... |
57 |
Setting the Shooting Mode .................................................................... |
60 |
Using the Face Detection Function ....................................................... |
63 |
Taking Pictures in Basic Mode (Green Mode)....................................... |
64 |
Taking Pictures of Your Pet (Pet Mode) ................................................ |
65 |
Taking Pictures in Digital Microscope Mode.......................................... |
65 |
Taking Pictures at a Set Interval (Interval Shot) .................................... |
66 |
Using the Self-timer ............................................................................... |
67 |
Taking a Series of Pictures (Continuous Shooting/Burst Shooting) ...... |
69 |
Taking Pictures Using a Remote Control Unit (Optional) ...................... |
70 |
Taking Pictures with Automatic Exposure Adjustment |
|
(Auto Bracketing) ............................................................................ |
71 |
Setting the Shooting Functions................................................................ |
72 |
Using the Rec. Mode Menu Items ......................................................... |
72 |
Selecting the Flash Mode ...................................................................... |
73 |
Selecting the Focus Mode..................................................................... |
75 |
Setting the Image Tone ......................................................................... |
78 |
Selecting the Number of Recorded Pixels............................................. |
79 |
Selecting the Quality Level of Still Pictures ........................................... |
80 |
Adjusting the White Balance ................................................................. |
82 |
Setting the AE Metering ........................................................................ |
84 |
Setting the Sensitivity ............................................................................ |
85 |
Setting AUTO ISO Range ..................................................................... |
86 |
Setting the Exposure (EV Compensation)............................................. |
86 |
Correcting the Brightness (D-Range Setting) ........................................ |
87 |
Setting Pixel Track SR .......................................................................... |
88 |
Switching the Face Detection Function ................................................. |
89 |
Setting the Blink Detection Function ..................................................... |
91 |
Setting the Instant Review..................................................................... |
91 |
Setting the Green Button Function ........................................................ |
92 |
Setting the Image Sharpness (Sharpness) ........................................... |
95 |
Setting the Saturation/Tone Adjustment................................................ |
95 |
Setting the Image Contrast (Contrast)................................................... |
96 |
Setting the Date Imprint Function .......................................................... |
96 |
Setting the IQ Enhancer Processing ..................................................... |
97 |
Setting the Macro Light ......................................................................... |
97 |
Underwater Shooting................................................................................. |
98 |
Underwater Shooting (Underwater Mode/Underwater Movie Mode)..... |
98 |
12

Recording Movies .................................................................................... |
100 |
Recording Movies................................................................................ |
100 |
Recording a Movie Quickly Using the Movie Button............................ |
101 |
Selecting the Number of Recorded Pixels and Frame Rate |
|
for Movies ..................................................................................... |
102 |
Setting the Movie SR (Movie Shake Reduction) Function................... |
103 |
Suppressing Wind Noises during Movie Recording |
|
(Wind Suppression) ...................................................................... |
104 |
Combining Pictures Taken at a Set Interval into a Movie |
|
(Interval Movie) ............................................................................. |
104 |
Using the High Speed Movie Function ................................................ |
107 |
Saving the Settings (Memory)................................................................. |
108 |
Playing Back and Deleting Images |
110 |
Playing Back Images ............................................................................... |
110 |
Playing Back Still Pictures................................................................... |
110 |
Playing Back a Movie .......................................................................... |
111 |
Multi-Image Display ............................................................................. |
112 |
Using the Playback Functions ............................................................. |
114 |
Slideshow ............................................................................................ |
117 |
Rotating the Image .............................................................................. |
119 |
Zoom Playback.................................................................................... |
120 |
Deleting Images........................................................................................ |
121 |
Deleting a Single Image ...................................................................... |
121 |
Deleting Selected Images ................................................................... |
122 |
Deleting All Images ............................................................................. |
123 |
Protecting Images from Deletion (Protect) .......................................... |
124 |
Connecting the Camera to an AV Device............................................... |
126 |
Connecting the Camera to an HDMI Terminal .................................... |
126 |
13

Editing and Printing |
128 |
Editing Images.......................................................................................... |
128 |
Changing the Image Size (Resize)...................................................... |
128 |
Cropping Images ................................................................................. |
129 |
Processing Images to Make Faces Look Smaller ............................... |
130 |
Using the Digital Filters ....................................................................... |
131 |
Using the HDR Filter ........................................................................... |
133 |
Using the Ink Rubbing Filter ................................................................ |
133 |
Creating a Collage Image.................................................................... |
134 |
Red-eye Edit........................................................................................ |
137 |
Overlaying Your Original Frame on Still Pictures ................................ |
138 |
Editing Movies ..................................................................................... |
142 |
Copying Images .................................................................................. |
145 |
Settings |
147 |
Camera Settings....................................................................................... |
147 |
Using the Setting Menu Items ............................................................. |
147 |
Formatting the Memory ....................................................................... |
148 |
Changing the Sound Settings.............................................................. |
149 |
Changing the Date and Time .............................................................. |
150 |
Setting the Alarm ................................................................................. |
151 |
Setting the World Time ........................................................................ |
153 |
Setting the Text Size on the Menu ...................................................... |
155 |
Changing the Display Language ......................................................... |
155 |
Changing the Naming System of the Folder........................................ |
156 |
Changing the Naming System of the File ............................................ |
158 |
Selecting the HDMI Output Format ..................................................... |
160 |
Setting up wireless LAN for FlashAir ................................................... |
160 |
Adjusting the Brightness of the Display............................................... |
161 |
Adjusting the Brightness of the Display for Outdoor Shooting............. |
161 |
Using the Power Saving Function ....................................................... |
161 |
Using the Auto Power Off Function ..................................................... |
162 |
Setting the Quick Zoom Function ........................................................ |
163 |
Setting the Guide Display.................................................................... |
163 |
Perform Pixel Mapping ........................................................................ |
163 |
Changing the Start-up Screen............................................................. |
164 |
Resetting to Default Settings (Reset) .................................................. |
165 |
Setting the Startup Shortcut ................................................................ |
166 |
Displaying the Clock Display ............................................................... |
167 |
Light up the LED Macro Lights ............................................................ |
167 |
14

Connecting to a Computer |
168 |
Connecting to a Computer ...................................................................... |
168 |
Setting the USB Connection Mode...................................................... |
168 |
Connecting the Camera and a Computer............................................ |
169 |
Disconnecting the Camera from the Computer ................................... |
170 |
System Requirements ......................................................................... |
170 |
Transferring Images Using a FlashAir Card .......................................... |
172 |
Appendix |
174 |
Functions Available for Each Shooting Mode....................................... |
174 |
Messages .................................................................................................. |
178 |
Troubleshooting ....................................................................................... |
180 |
Default Settings........................................................................................ |
182 |
List of World Time Cities ......................................................................... |
187 |
Main Specifications.................................................................................. |
188 |
Warranty Policy ........................................................................................ |
193 |
Index.......................................................................................................... |
198 |
15

In this manual, the method for operating the four-way controller is shown in illustrations, such as in the ones below.
2
2or
2
4 |
or 4 4 |
5 5or 5 |
3
3or
3
The meanings of the symbols used in this Operating Manual are explained below.
1 |
Indicates the reference page number for an explanation of the |
related operation. |
|
|
|
|
Indicates information that is useful to know. |
|
|
|
Indicates precautions to be taken when operating the camera. |
|
|
16

Composition of the Operating Manual
This Operating Manual contains the following chapters.
1 Getting Started –––––––––––––––––––––––––––––––––––––––––––––––– 1
This chapter explains what you need to do after purchasing the camera before you start taking pictures. Be sure to read it and follow the instructions.
2 Common Operations ––––––––––––––––––––––––––––––––––––––––––– 2
This chapter explains common operations such as the functions of the buttons and how to use the menus. For more details, refer to the respective chapters below.
3 Taking Pictures ––––––––––––––––––––––––––––––––––––––––––––––– 3
This chapter explains the various ways of capturing images and how to set the relevant functions.
4 Playing Back and Deleting Images –––––––––––––––––––––––––––––––– 4
This chapter explains how to view still pictures and movies on the camera or on a TV and how to delete them from the camera.
5 Editing and Printing –––––––––––––––––––––––––––––––––––––––––––– 5
This chapter explains the various ways of printing still pictures and how to edit them with the camera.
6 Settings –––––––––––––––––––––––––––––––––––––––––––––––––––––– 6
This chapter explains how to set camera-related functions.
7 Connecting to a Computer –––––––––––––––––––––––––––––––––––––– 7
This chapter explains how to connect the camera to a computer.
8 Appendix ––––––––––––––––––––––––––––––––––––––––––––––––––––– 8
This chapter provides some basic troubleshooting tips and other useful information.
17
1 GettingStarted
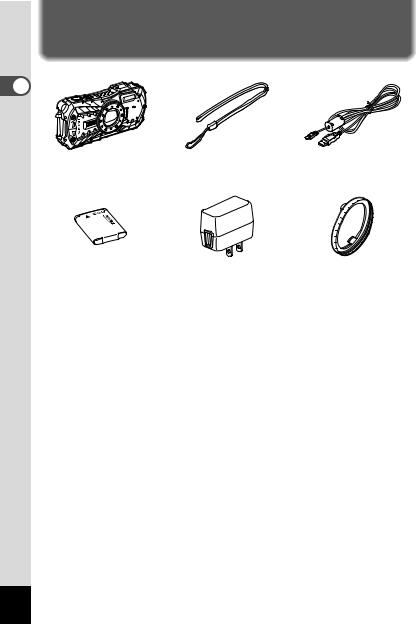
Checking the Contents of the Package |
1Getting Started |
Camera |
Strap |
USB cable |
RICOH WG-60 |
O-ST104 (*) |
I-USB157 (*) |
Rechargeable lithium-ion Power adapter D-PA164 |
Macro stand |
battery D-LI92 (*) |
O-MS1 |
Start Guide
Regarding Waterproof,
Dustproof, and Shockproof
Design
* Available as optional accessories.
18

Names of Parts
Front
Power button/Power lamp (green)
Lens
Shutter release button
Flash |
Speaker |
Microphone |
Remote control receiver |
Self-timer lamp/ |
Focus assist light |
LED Macro Lights
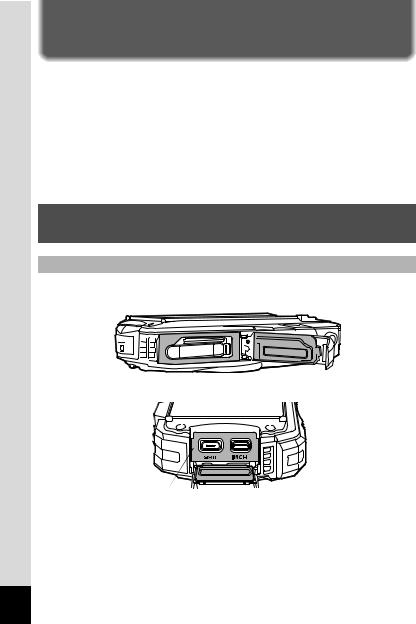
Back
|
Display |
Terminal cover |
Remote control |
|
receiver |
Terminal cover |
Tripod socket |
lock lever |
|
|
Battery/card cover |
|
lock lever |
|
Battery/card cover |
Battery lock lever
USB terminal HDMI terminal
1 GettingStarted
19
1 GettingStarted
Names of Operating Parts
Power button
Shutter release button
W/T/f/y button
Q button


 Four-way controller


 4/W button


 Movie button
Green/ibutton
3 button
Refer to “Understanding the Button Functions” (p.43 - 46) for an explanation of the function of each button.
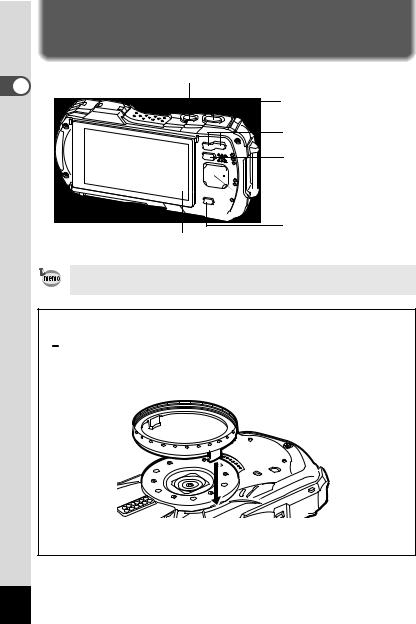
Macro stand
Attaching the supplied macro stand (O-MS1) reduces camera shake during shooting in 
 (Digital Microscope) mode (p.65). Insert two clips into the slits in upper and lower sides of the LED Macro Lights part. When attaching and detaching the macro stand, do not hold the clip part.
*When using the macro stand, the camera may not be able to focus if the objects have uneven surfaces.
20
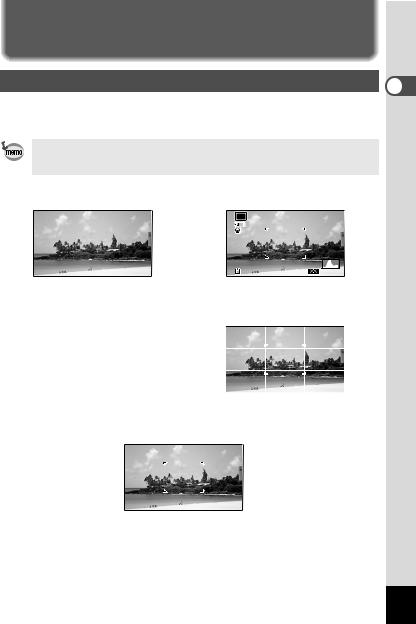
Display Indications
Display in A Mode
The display changes in the following sequence each time you press the 4 button: “Normal Display”, “Histogram + Info”, “Grid Display”, “No Info”, “LCD Off”.
• All the camera buttons function as normal even when the LCD is off. Press the shutter release button to take pictures as normal.
• The display cannot be changed in some shooting modes.
Normal Display |
Histogram + Info |
|
|
OK |
|
38 |
38 12M |
AWB ISO 200 |
OK |
|
OK |
|
|
|
LCD Off |
Grid Display |
|
OK |
OK |
|
No Info |
||
|
1 GettingStarted
21

Normal Display/ Histogram + Info/ Grid Display in Still Picture Capture Mode
1 to 18 and A1 appear when “Normal Display” is selected. B1 to B6 appear at the position of 16 when “Histogram + Info” is selected. Only A1 appears when “Grid Display” or “No Info” is selected.
1 |
|
11 |
12 |
13 |
14 |
15 |
|
||
Getting |
1 |
P |
|
|
|
|
|
|
|
2 |
|
|
|
|
|
|
|
||
Started |
3 |
|
|
|
|
|
|
|
|
4 |
DATE |
|
|
|
|
|
|
|
|
5 |
+1.0 |
|
|
|
|
|
|
A1 |
|
|
6 |
1/250 |
|
|
|
|
|
|
|
|
7 |
F3.5 |
|
|
|
|
|
|
B5 |
|
8 |
|
|
|
|
|
|
|
|
|
9 |
38 |
|
12M |
|
AWB |
|
ISO 200 |
B6 |
|
10 |
17 18 |
B1 |
B2 |
B3 |
B4 |
|
|
|
|
|
|
|
||||||
|
|
|
|
|
07/07/2018 |
14:25 |
16 |
||
1 |
Shooting mode (p.60) |
15 |
Digital zoom/Intelligent Zoom |
2 |
Battery level indicator (p.33) |
|
icon (p.57) |
3 |
Face Detection icon (p.89) |
16 |
Date and time (p.41) |
4 |
Date Imprint setting (p.96) |
17 |
World Time setting (p.153) |
5 |
EV Compensation (p.86) |
18 |
D-Range Setting (p.87) |
6 |
Shutter speed |
A1 |
Focus frame (p.54) |
7 |
Aperture |
B1 |
Recorded Pixels (p.79) |
8 |
Pixel Track SR icon (p.88) |
B2 |
Quality Level (p.80) |
9 |
Memory status (p.36) |
B3 |
White Balance (p.82) |
10 |
Remaining image storage capacity |
B4 |
AE Metering (p.84) |
11 |
Flash Mode (p.73) |
B5 |
Histogram (p.27) |
12 |
Drive Mode (p.67 - p.71) |
B6 |
Sensitivity (p.85) |
13Focus Mode (p.75)
14FlashAir communication status (p.160)
22

*6 and 7 are only displayed when the shutter release button is pressed halfway.
*For 8, Mis displayed when Pixel Track SR is set to O(On) on the [A Rec. Mode] menu. fis displayed when the shutter release button is pressed halfway if Pixel Track SR is set to P (Off) and there is a danger of camera
shake.
*For 13, when the focus mode is set to = and the Auto Macro function is activated, q appears on the display (p.75).
*14 changes depending on [FlashAir] setting in the [WSetting] menu.
*16 appears for two seconds after the camera is turned on.
*18 changes depending on [D-Range Setting] settings in the [A Rec. Mode] menu. No icon is displayed on the screen when [Highlight Correction] and [Shadow Correction] are both set to [Off].
*When the shooting mode is b(Auto Picture) and if you press the shutter release button halfway, the automatically selected shooting mode appears in A1 even when “No Info” is selected.
*If there are overexposed highlight areas in the image, they will blink red on the display, and if there are underexposed shadow areas, they will blink yellow.
*Some indications may not appear depending on the shooting mode.
1 GettingStarted
23

1 GettingStarted
Display in Q Mode
The display shows the shooting information of the image in playback mode. The display changes in the following sequence each time you press the 4 button:
The display cannot be changed by pressing the 4button while playing back or pausing a movie.
Normal Display |
Histogram + Info |
100-0038 |
OK |
1/250 F3.5
Edit |
07/07/2018 14:25 |
Edit |
 100-0038
12M 
 AWB
AWB ISO 200
OK |
OK |
Edit
No Info
24

Normal Display/ Histogram + Info in Playback Mode |
|
|
|||||
(All of the display items are displayed here for explanatory purposes.) |
|
||||||
The display shows information such as the shooting conditions. In "Normal |
|
||||||
Display", A1 to A10 are displayed. In "Histogram + Info", B1 to B8 are displayed |
|
||||||
as well. |
|
|
|
|
|
|
1 |
|
|
|
|
|
|
|
|
A1 |
|
|
|
|
100-0038 |
A6 |
Getting |
A2 |
|
|
|
|
|||
A3 |
|
|
|
|
|
A7 |
|
A4 |
|
|
|
|
|
A8 |
Started |
|
|
|
|
|
A9 |
||
|
|
|
|
|
|
||
|
|
|
|
|
|
|
|
B1 |
1/250 |
|
|
|
|
A10 |
|
B2 |
F3.5 |
|
|
|
|
|
|
A5 |
|
|
|
|
|
B3 |
|
|
Edit |
12M |
|
AWB |
ISO 200 |
B4 |
|
|
|
B5 |
B6 |
B7 |
B8 |
|
|
A1
A2
A3
A4
A5
A6
A7
A8
A9
Face Detection icon (p.89) |
A10 |
Playback mode |
B1 |
Q : Still picture (p.110) |
B2 |
K : Movie (p.111) |
B3 |
Battery level indicator (p.33) |
B4 |
Protect icon (p.124) |
B5 |
Four-way controller guide |
B6 |
File number |
B7 |
Folder number (p.156) |
B8 |
Memory status (p.36) |
|
FlashAir communication status (p.160) |
|
Volume icon Shutter speed Aperture Histogram (p.27) Sensitivity (p.85)
Recorded Pixels (p.79) Quality Level (p.80) White Balance (p.82) AE Metering (p.84)
*A1 appears only if the Face Detection function worked when the image was shot.
*In “Normal Display”, A3 disappears if no operation is performed for two seconds.
*A5 appears even when “No Info” is selected, but disappears if no operation is performed for two seconds. When no operation is performed for two seconds in “Normal Display” or “Histogram + Info”, only “Edit” disappears.
*A10 appears only when the volume is being adjusted during playback of movies (p.111).
*When “Normal Display” is selected, the shooting date and time appears for two seconds in the B4 to B8 positions.
*If there are overexposed highlight areas in the image, they will blink red on the display, and if there are underexposed shadow areas, they will blink yellow.
25

1 GettingStarted
Guide Display
A guide indicator for each available button or key operation appears as follows on the display during operation.
2Four-way controller (2)
3Four-way controller (3)
4Four-way controller (4)
5Four-way controller (5) MENU 3 button
Zoom button |
OK 4 button
SHUTTER Shutter release button
X(green), iGreen/i button  (red) Movie button
26

Histogram
A histogram shows the brightness |
|
|
|
|
|
|
|
|
|
|
|
|
|||
distribution of an image. The |
|
|
|
|
|
||
pixels |
|
|
|
|
|
||
horizontal axis represents |
|
|
|
|
|
||
brightness (dark at the left and |
|
|
|
|
|
||
of |
|
|
|
|
|
||
bright at the right) and the vertical |
|
|
|
|
|
||
Number |
|
|
|
|
|
||
axis represents the number of |
|
|
|
|
|
||
pixels. |
|
|
|
|
|
||
The shape of the histogram |
|
(Dark) |
Brightness (Bright) |
|
|||
before and after shooting tells you |
|
|
|
||||
whether the brightness and |
|
|
|
|
|
|
|
Dark portions |
Bright portions |
||||||
contrast are correct or not, and |
|||||||
|
|
|
|
|
|
||
lets you decide if you need to use EV compensation and take the picture again.
Setting the Exposure (EV Compensation) 1p.86
Understanding Brightness
If the brightness is correct, the graph peaks in the middle. If the image is underexposed, the peak is on the left side, and if it is overexposed, the peak is on the right side.
|
Dark image |
|
Correct image |
|
Bright image |
|||
|
|
|
|
|
|
|
|
|
|
|
|
|
|
|
|
|
|
When the image is underexposed, the part to the left is cut off (dark portions) and when the image is overexposed, the part to the right is cut off (bright portions). This camera has a function where overexposed areas are indicated as blinking red and underexposed areas as blinking yellow.
Understanding Contrast
The graph peaks gradually for images in which contrast is balanced. The graph peaks on both sides but sinks in the middle for images with a large difference in contrast and low amounts of mid-level brightness.
1 GettingStarted
27
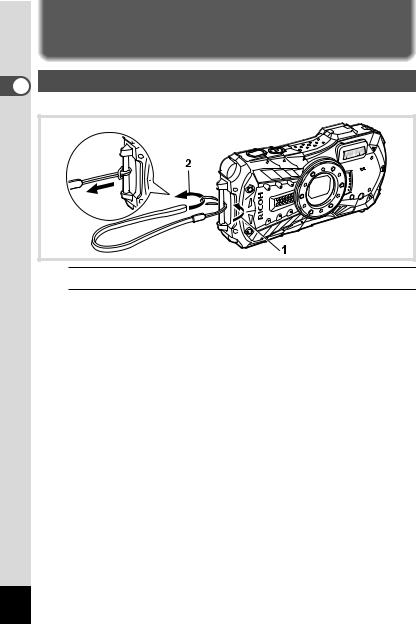
Attaching the Strap
1 |
Attaching the Strap |
Started Getting |
Attach the strap (O-ST104) supplied with the camera. |
|
1
2
Pass the narrow end of the strap through the strap lug.
Pass the other end of the strap through the loop and pull tight.
28
 Loading...