


SP C440DN

User Guide
Getting Started
Loading Paper
Troubleshooting
For safe and correct use, be sure to read the Safety Information in
Read This First before using the machine.


TABLE OF CONTENTS
Manuals for This Machine................................................................................................................................. 3
1. Getting Started
Before You Start..................................................................................................................................................5
How to Read the Manuals.............................................................................................................................5
Model-Specific Information...........................................................................................................................6
List of Options................................................................................................................................................. 7
Guide to Names and Functions of Components..............................................................................................8
Guide to Components....................................................................................................................................8
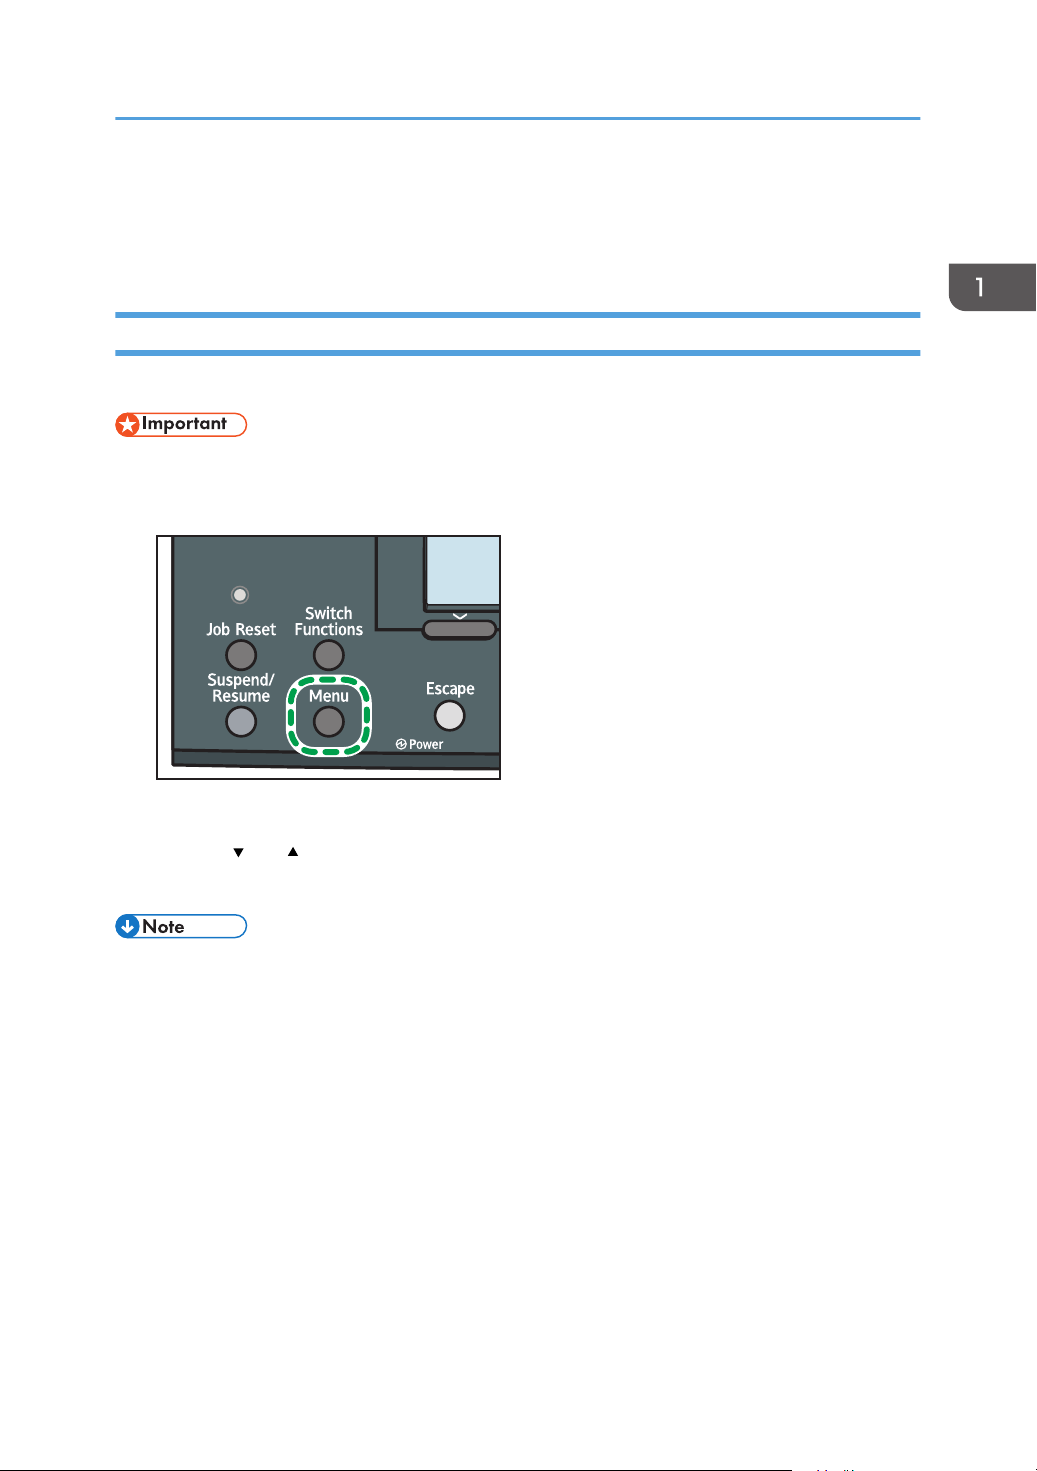
Guide to the Names and Functions of the Control Panel......................................................................... 13
Guide to the Names and Functions of the Control Panel Screen............................................................ 15
Turning On/Off the Power..............................................................................................................................17
Turing On the Power....................................................................................................................................17
Turning Off the Power..................................................................................................................................17
Saving Energy.............................................................................................................................................. 18
Displaying the Printer Configuration Screens Using the Control Panel........................................................21
Configuring Printer Settings from the [Menu] key......................................................................................21
Using Web Image Monitor............................................................................................................................. 22
Displaying the top page..............................................................................................................................23
2. Loading Paper
Paper Loading Procedure................................................................................................................................27
Paper Size Specifications................................................................................................................................ 28
Paper Type Specifications............................................................................................................................... 30
Paper Precautions.............................................................................................................................................32
Loading Paper into Paper Trays......................................................................................................................35
Loading Paper into the Bypass Tray............................................................................................................... 38
Loading Orientation-Fixed Paper or Two-Sided Paper................................................................................ 40
Loading Envelopes...........................................................................................................................................42
Specifications of Envelopes.........................................................................................................................42
Printing on Envelopes with Windows (PCL 6/PostScript 3)..................................................................... 44
Printing on Envelopes with Windows (PCL 5c)..........................................................................................44
Printing on Envelopes with Mac OS X........................................................................................................45
Paper Settings...................................................................................................................................................46
Specifying a Paper Size.............................................................................................................................. 46
1

Specifying a Paper Type............................................................................................................................. 47
Configuring Envelope Settings Using the Control Panel...........................................................................47
3. Troubleshooting
When a Panel Tone Beeps.............................................................................................................................. 49
When Checking the Indicator Lamps, Status Icons, and Messages on the Control Panel.........................50
Indicators...................................................................................................................................................... 50
If USB Connection Fails................................................................................................................................... 51
When Messages Are Displayed.....................................................................................................................52
Status Messages.......................................................................................................................................... 52
Alert Messages (Displayed on the Control Panel).................................................................................... 53
Alert Messages (Printed on Error Logs and Reports)................................................................................ 57
When You Cannot Print................................................................................................................................... 62
When the Data In Indicator Does Not Light Up or Flash..........................................................................65
Other Printing Problems................................................................................................................................... 66
When You Cannot Print Properly................................................................................................................66
Paper Misfeeds Occur Frequently..............................................................................................................72
Additional Troubleshooting.........................................................................................................................75
The Printed Image is Different from the Image on the Computer............................................................. 79
When Printer Is Not Functioning Properly..................................................................................................82
When PictBridge Printing Does Not Work.....................................................................................................84
Removing Jammed Paper................................................................................................................................ 85
Paper Misfeed Message (A).......................................................................................................................86
Paper Misfeed Message (B) (C).................................................................................................................87
Paper Misfeed Message (Y1), (Y2) or (Y3).............................................................................................. 89
Paper Misfeed Message (Z)....................................................................................................................... 91
Trademarks....................................................................................................................................................... 93
INDEX............................................................................................................................................................. 95
2

Manuals for This Machine
Read this manual carefully before using this machine.
Refer to the manuals that are relevant to what you want to do with the machine.
• The method for viewing the manual depends on the manual.
• Adobe® Acrobat® Reader®/Adobe Reader must be installed in order to view the manuals as PDF
files.
• A Web browser must be installed in order to view the HTML manuals.
User Guide
Summaries are provided below for the operating instructions regarding the basic usage of this
machine, frequently used functions, and troubleshooting when an error message appears.
Read This First
Before using the machine, be sure to read the "Safety Information" section of this manual. It
describes the regulations and environmental conformance.
Quick Installation Guide
Describes procedures from unpacking the machine to connecting it to a computer.
Operating Instructions
Provides detailed information about the operation of the machine in HTML format. The following
are the main topics of the manual:
• Getting Started
• Setting Up the Printer
• Loading Paper
• Printing
• Configuring and Managing the Printer
• Troubleshooting
• Maintenance and Specifications
VM Card Extended Feature Settings
Explains how to set up the extended features settings using the control panel or Web Image
Monitor.
Security Guide
This manual is for administrators of the machine. It explains security functions that you can use to
prevent unauthorized use of the machine, data tampering, or information leakage. For enhanced
security, we recommend that you first:
• Install the Device Certificate.
3

• Enable SSL (Secure Sockets Layer) Encryption.
• Change the user name and password of the administrator using Web Image Monitor.
For details, see "Before Using This Printer", Security Guide.
Be sure to read this manual when configuring the enhanced security functions or user and
administrator authentication.
Driver Installation Guide
Explains how to install and configure the drivers.
Other Manuals
• Appendix
• DHCP Option 204
4
1. Getting Started
This section describes the symbols used in the manuals supplied with the printer, available options, and
names and functions of components.
Before You Start
How to Read the Manuals
Symbols used in the manuals
This manual uses the following symbols:
Indicates points to pay attention to when using the machine, and explanations of likely causes of paper
misfeeds, damage to originals, or loss of data. Be sure to read these explanations.
Indicates supplementary explanations of the machine's functions, and instructions on resolving user
errors.
This symbol is located at the end of sections. It indicates where you can find further relevant information.
[ ]
Indicates the names of keys on the machine's display or control panels.
Indicates the key sequence order you should perform using the control panel.
Example:
Select [Host Interface] Press [OK]
(Select [Host Interface], and then press the [OK] key.)
(mainly Europe and Asia)
(mainly North America)
Differences in the functions of Region A and Region B models are indicated by the two symbols. Read
the information indicated by the symbol that corresponds to the region of the model you are using. For
details about which symbol corresponds to the model you are using, see page 6 "Model-Specific
Information".
5
DJF125
1. Getting Started
Disclaimer
Contents of this manual are subject to change without prior notice.
To the maximum extent permitted by applicable laws, in no event will the manufacturer be liable for any
damages whatsoever arising out of failures of this machine, losses of the registered data, or the use or
non-use of this product and operation manuals provided with it.
Make sure that you always copy or have backups of the data registered in this machine. Documents or
data might be erased due to your operational errors or malfunctions of the machine.
In no event will the manufacturer be responsible for any documents created by you using this machine or
any results from the data executed by you.
Notes
The manufacturer shall not be responsible for any damage or expense that might result from the use of
parts other than genuine parts from the manufacturer with your office products.
For good output quality, the manufacturer recommends that you use genuine toner from the
manufacturer.
Some illustrations in this manual might be slightly different from the machine.
About IP addresses
In this manual, "IP address" covers both IPv4 and IPv6 environments. Read the instructions that are
relevant to the environment you are using.
Model-Specific Information
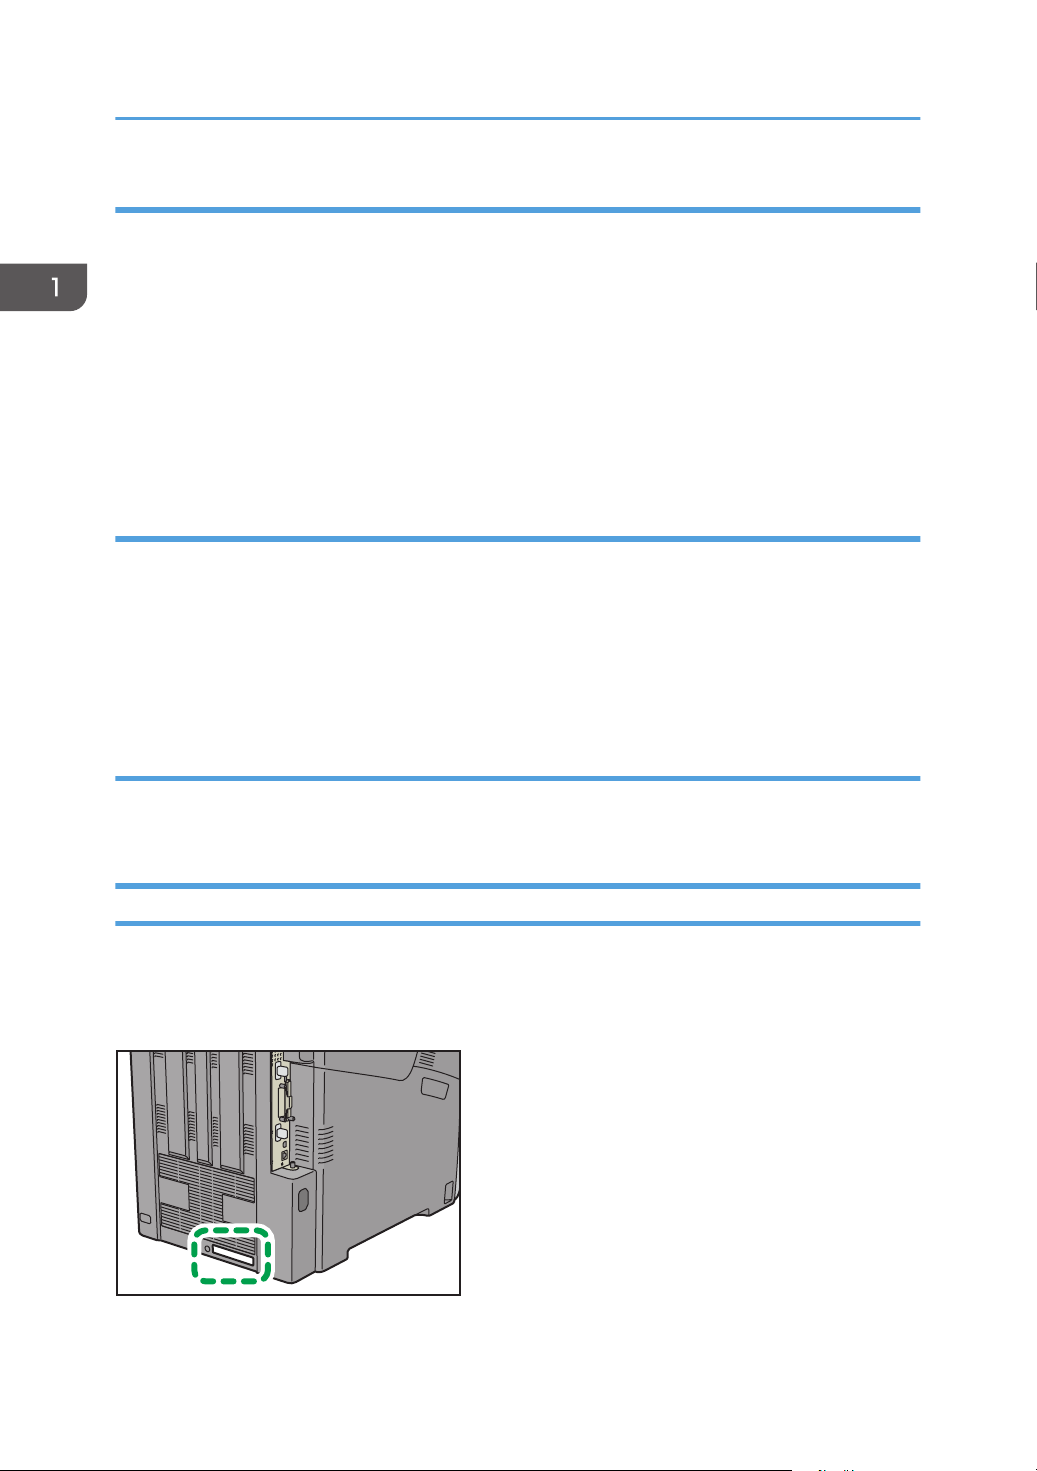
This section explains how to identify the region to which your printer belongs.
There is a label on the rear of the printer, located in the position shown below. The label contains details
that identify the region to which your printer belongs. Read the label.
6
Before You Start
The following information is region-specific. Read the information under the symbol that corresponds to
the region of your printer.
(mainly Europe and Asia)
If the label contains the following, your printer is a Region A model:
• CODE XXXX -27
• 220–240 V
(mainly North America)
If the label contains the following, your printer is a Region B model:
• CODE XXXX -17
• 120–127 V
• Dimensions in this manual are given in two measurement units: metric and imperial. If your printer is
a Region A model, refer to the metric units. If your printer is a Region B model, refer to the imperial
units.
List of Options
This section provides a list of options for this printer and the names commonly used in this manual.
Option name Description
Paper Feed Unit PB1020 550-sheet paper feed unit
Hard Disk Drive Option Type P7 Hard disk
IEEE802.11 Interface Unit Type O Wireless LAN interface board
IEEE 1284 Interface Board Type A IEEE 1284 interface board
USB Device Server Option Type M12 USB device server
XPS Direct Print Option Type P7 XPS card
Camera Direct Print Card Type P7 Camera direct print card
VM CARD Type P7 VM card
7
1
3
4
5
6
7
8
9
10
2
BYK004
1. Getting Started
Guide to Names and Functions of Components
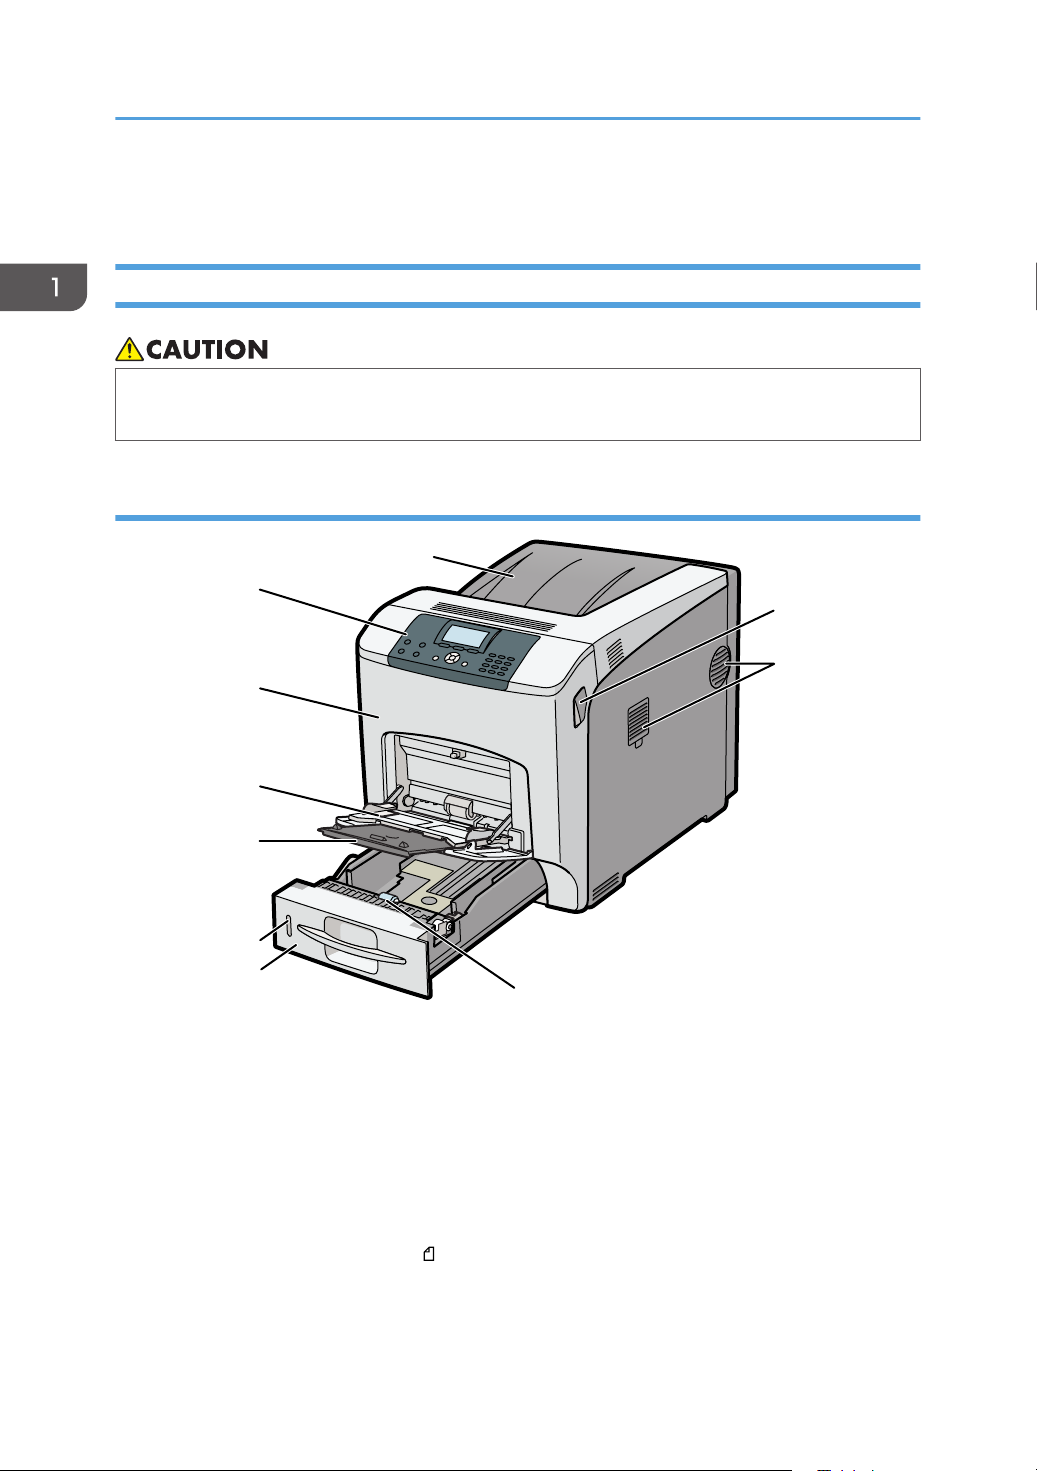
Guide to Components
• Do not obstruct the machine's vents. Doing so risks fire caused by overheated internal
components.
Exterior: Front view
8
1. Tray 1
Up to 550 sheets of plain paper can be loaded.
For details about the sizes and types of paper that can be used, see page 28 "Paper Size Specifications"
and page 30 "Paper Type Specifications".
2. Remaining paper indicator
Indicates the approximate amount of paper remaining in the tray.
3. Extender for the bypass tray
Pull this extender out when loading A5 or larger size paper in the bypass tray.
4. Bypass tray
Up to 100 sheets of plain paper can be loaded.
DJF001
1
2
3
4
5
6
7
8
9
10
11
12
Guide to Names and Functions of Components
For details about the sizes and types of paper that can be used, see page 28 "Paper Size Specifications"
and page 30 "Paper Type Specifications".
5. Front cover
Open the front cover to replace the fusing unit or transfer roller, or to remove jammed paper.
6. Control panel
For details, see page 13 "Guide to the Names and Functions of the Control Panel".
7. Standard Tray / Top Cover
Under normal operation, output is stacked on the top cover, which works as the standard output tray. Open
this cover to replace the toner.
8. Front Cover Open Levers
Pull these levers toward the front side of the printer to open the front cover.
9. Ventilation holes
The right side of the printer features two ventilation holes. To prevent overheating, heat from internal
components is released through these vents. Malfunctions and failure can result if these ventilation holes are
blocked or obstructed.
The dustproof filter needs to be replaced regularly for proper maintenance.
Replace the dustproof filter when the following message appears:
"Replcmnt Rqrd:Fusing Unit"
Replace the dustproof filter and the fusing unit together.
10. Paper Feed Roller
This ensures only one sheet of paper is fed in at a time. If multi-sheet feeds occur, clean the paper feed roller
carefully.
Exterior: Rear view
9

1. Getting Started
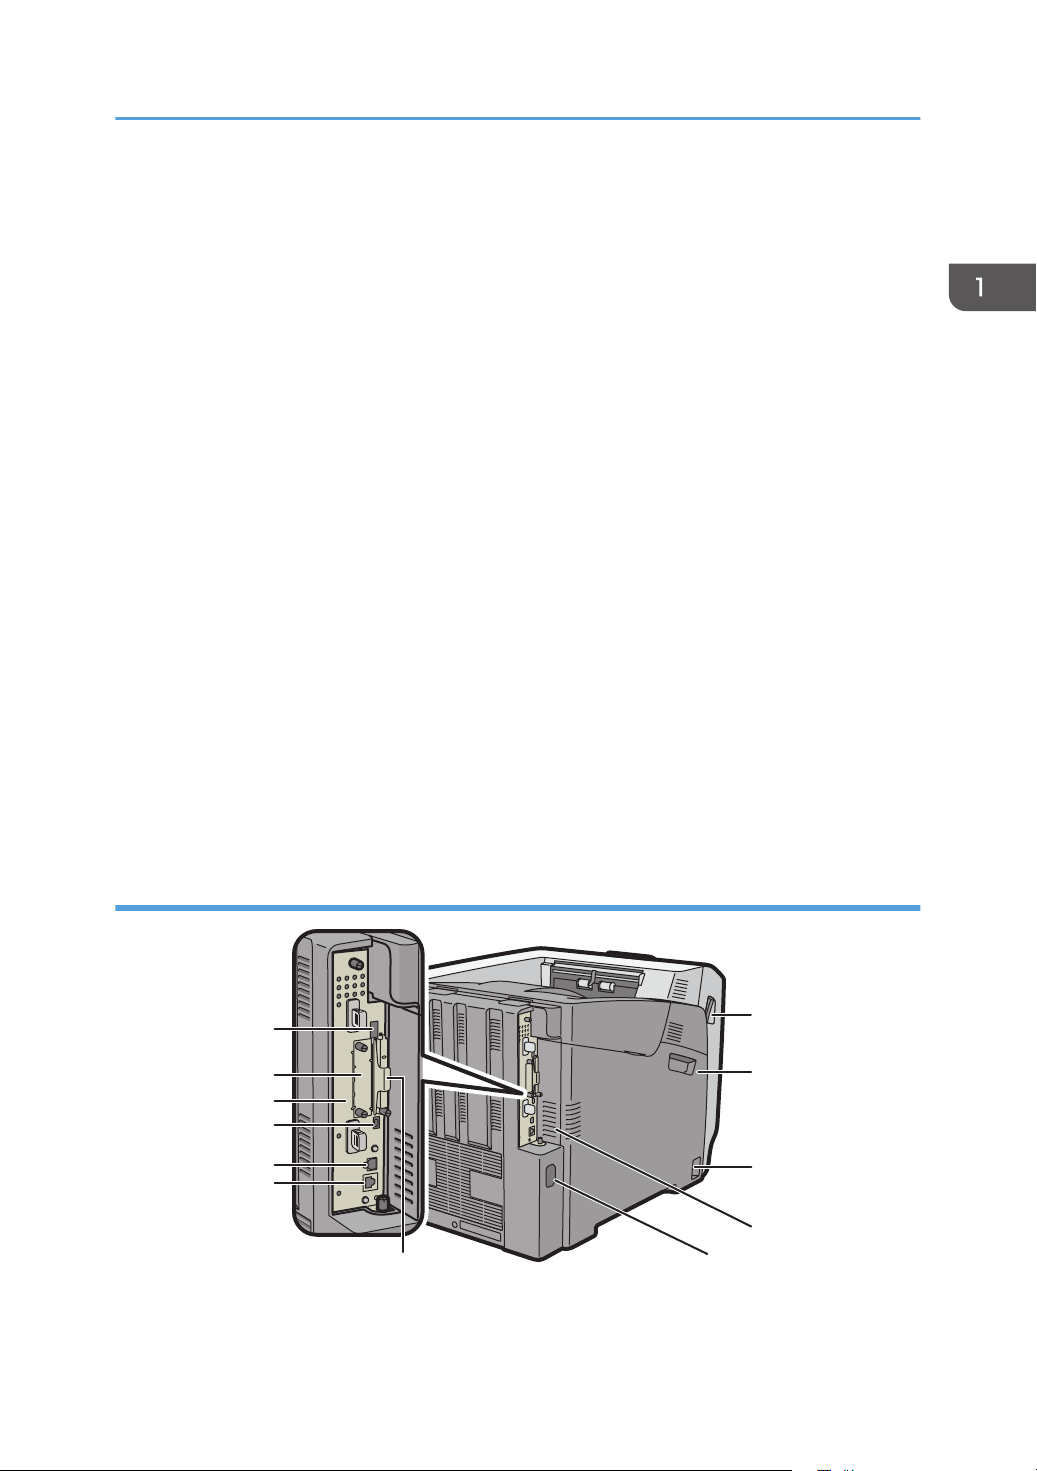
1. Ethernet port
Use a network interface cable to connect the printer to a network.
2. USB port B
Use a USB cable to connect the printer to a computer.
3. USB port H (Port for use by customer engineer)
Do not use this port.
4. Controller Board
Slide this out to install options such as the memory unit or printer hard disk. Plug cables such as a USB cable
and Ethernet cable into their connectors.
5. Optional interface board slot
Optional interface boards can be inserted.
Insert an optional wireless LAN interface board, IEEE 1284 interface board, or USB device server board.
6. USB port A
Connect external devices such as a digital camera, a card authentication device, etc.
7. Front Cover Open Levers
Pull these levers toward the front side of the printer to open the front cover.
8. Left Cover
Open this cover when replacing the drum unit, transfer unit or waste toner bottle.
9. Main power switch
Use this switch to turn the power on and off.
For details about how to shut down the printer, see page 17 "Turning Off the Power".
10. Ventilation holes
To prevent overheating, heat from internal components is released through these ventilation holes.
Malfunctions and failure can result if these ventilation holes are blocked or obstructed.
The dustproof filter needs to be replaced regularly for proper maintenance.
11. Power connector
Connect the power cord to the printer. Insert the other end into an electrical outlet.
12. Expansion card slots
Remove the cover to install SD cards.
10
Interior: Front view
1
2
3
4
5
6
7
BYK006
Guide to Names and Functions of Components
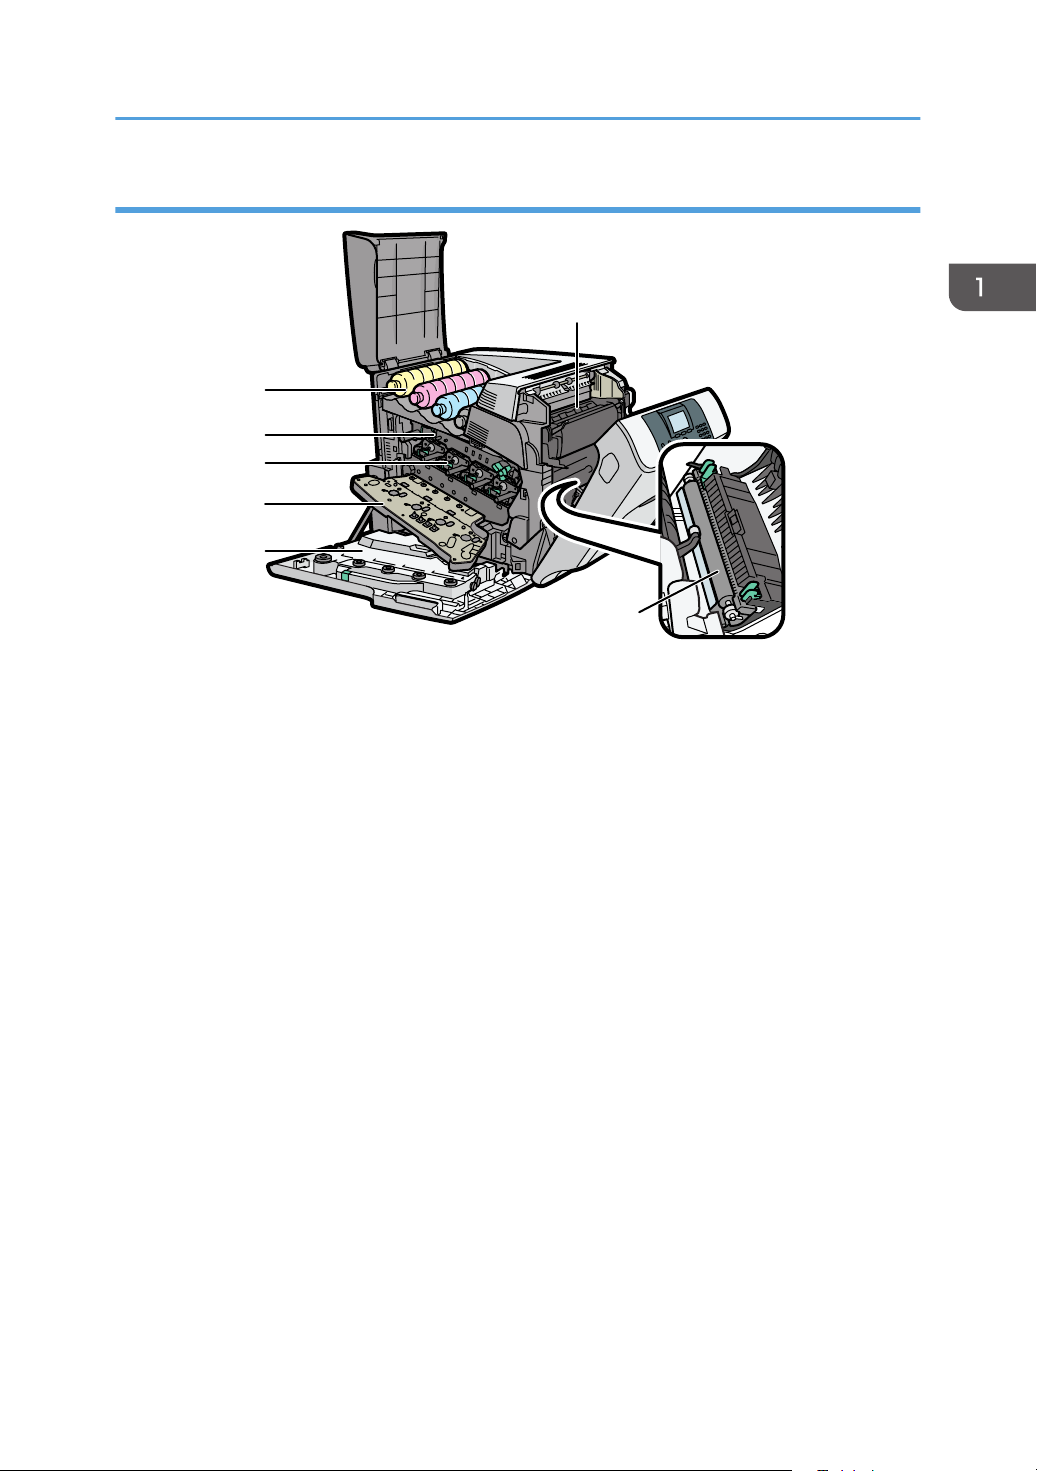
1. Waste Toner Bottle
Collects toner that is wasted during printing.
If the message which prompts you to replace it appears on the display, replace the waste toner bottle.
For details about the messages that appear on the screen when consumables need to be replaced, see
"Replacing Other Consumables", Operating Instructions.
2. Inner Cover
Open this cover when replacing the drum unit or transfer unit.
3. Drum Unit
From the left, the drum units are installed in the order of yellow (Y), magenta (M), cyan (C), and black (K).
For details about the messages that appear on the screen when consumables need to be replaced, see
"Replacing Other Consumables", Operating Instructions.
4. Transfer Unit
Replace the transfer unit and transfer roller together.
For details about the messages that appear on the screen when consumables need to be replaced, see
"Replacing Other Consumables", Operating Instructions.
5. Toner
From the left, the toner is installed in the order of yellow (Y), magenta (M), cyan (C), and black (K).
For details about the messages that appear on the screen when consumables need to be replaced, see
"Adding Toner (Print Cartridge)", Operating Instructions.
6. Fusing Unit
Replace the fusing unit and the dustproof filter together.
11
1
2
3
DJF002
1. Getting Started
For details about the messages that appear on the screen when consumables need to be replaced, see
"Replacing Other Consumables", Operating Instructions.
7. Transfer Roller
Replace the transfer roller and the transfer unit together.
For details about the messages that appear on the screen when consumables need to be replaced, see
"Replacing Other Consumables", Operating Instructions.
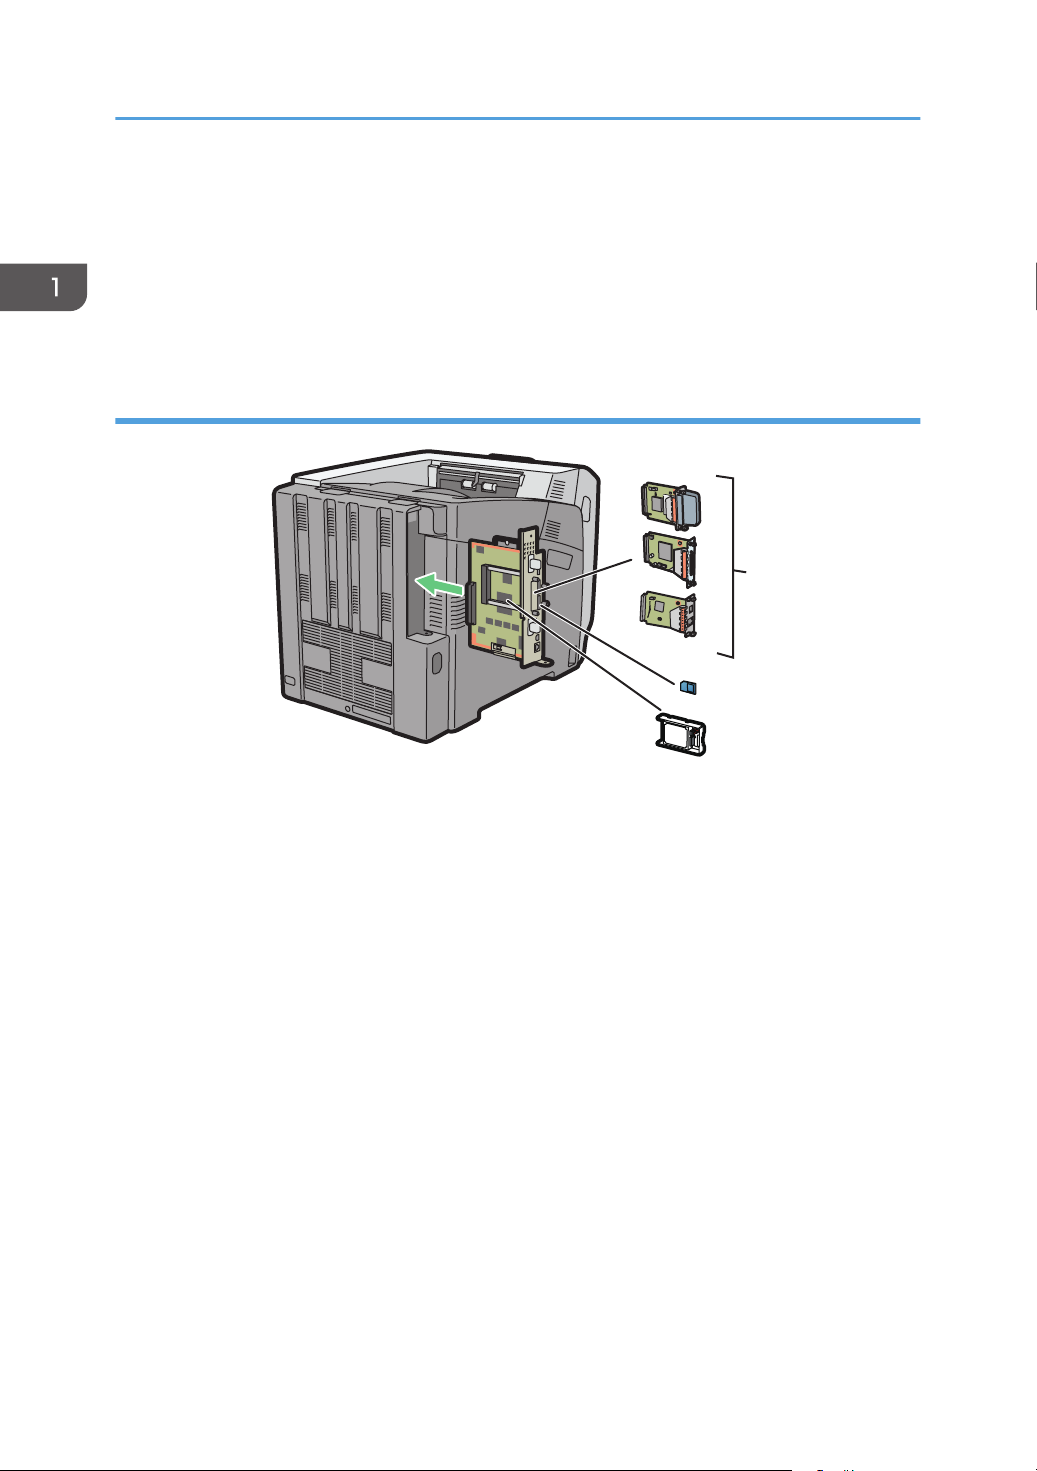
Guide to functions of the printer's internal options
12
1. Optional interface units
• Wireless LAN board
Allows you to communicate over a wireless LAN.
• IEEE 1284 interface board
Allows you to connect to an IEEE 1284 cable.
• USB device server
Allows you to add an Ethernet port to the printer and use two IP addresses at the same time.
To attach this option, see "Installing the Interface Units", Operating Instructions.
2. SD memory card options
• Camera direct print card
Allows you to directly print images taken with a PictBridge-compatible digital camera.
• VM card
With this card, you can install embedded software applications.
• XPS card
Allows you to print XPS files.
DJF101
Guide to Names and Functions of Components
To attach this option, see "Installing SD Card Options", Operating Instructions.
3. Hard disk
Allows you to store documents to be printed.
To attach this option, see "Installing the hard disk", Operating Instructions.
• If you want to use two or more SD cards that can be inserted in the same slot, contact your sales or
service representative.
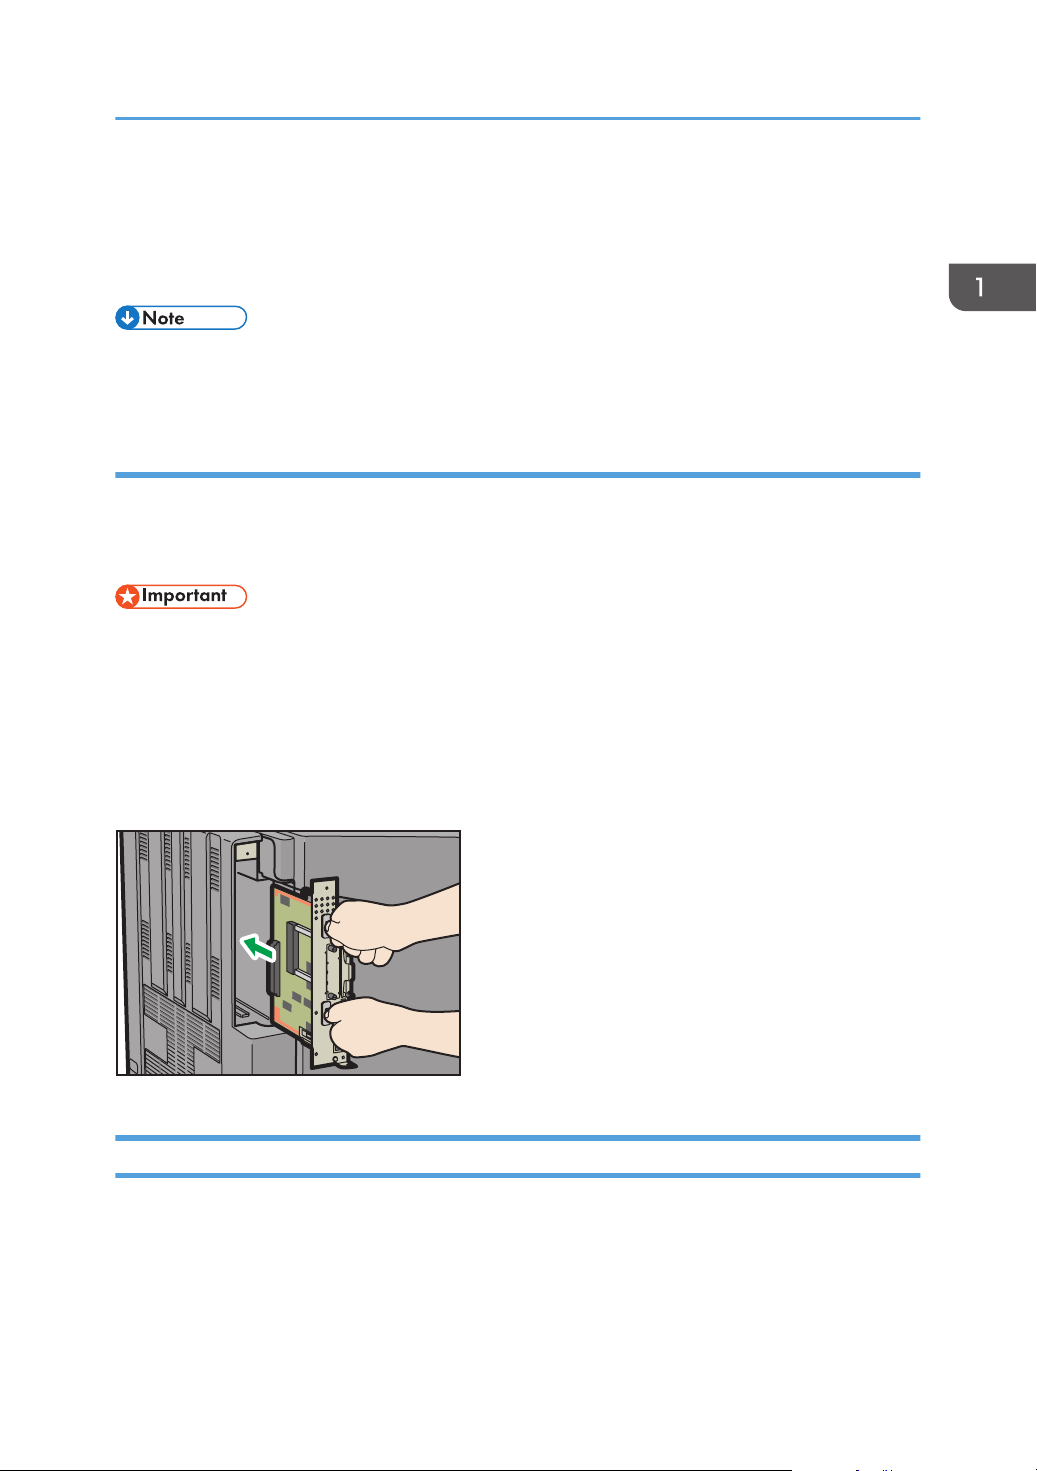
Cautions When Re-installing the Controller Board
This section describes handling the controller board when installing options.
If you slide out the controller board to install the hard disk, carefully follow the instruction below to reinstall the controller board.
• The following may occur if the controller board is not correctly installed:
• All control panel indicators are lit.
• No control panel indicators are lit.
• The "SC670" error message appears on the display.
Re-install the controller board in the printer. To do this, grip the handles on the back of the board and
push the board in until it stops.
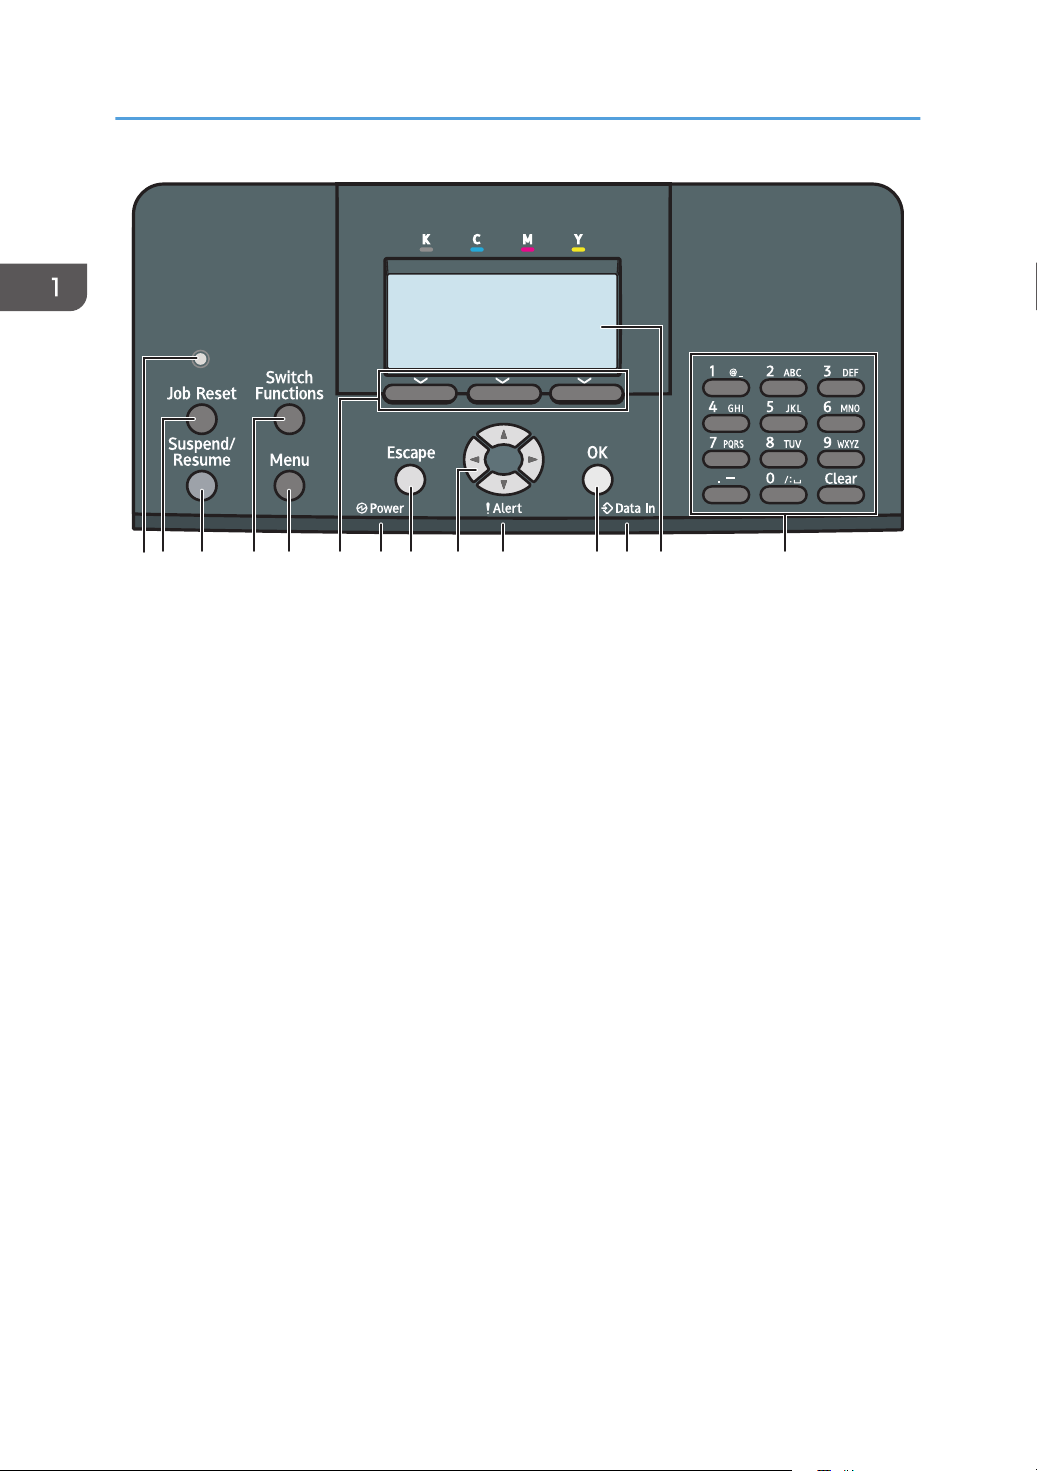
Guide to the Names and Functions of the Control Panel
This illustration shows the control panel of the printer.
13
12 3 4 5 6 7 8 9 10 11 12 13 14
DJF004
1. Getting Started
1. Light sensor
The sensor that detects the ambient light level when the ECO Night Sensor function is enabled.
2. [Job Reset] key
Press to cancel the current print job.
3. [Suspend/Resume] key
Press this to suspend the print job currently being processed. The indicator remains lit as long as the job is
suspended.
To resume the job, press this key again. The suspended job will resume automatically when the time specified
in [Auto Reset Timer] elapses (default: 60 seconds).
For details about the [Auto Reset Timer] setting, see "Timer Settings", Operating Instructions.
4. [Switch Functions] key
Press this key to switch between the operation screen of the printer function and the function screens of the
extended features currently in use.
5. [Menu] key
Press this key to configure and check the current printer settings.
Press to change the default settings to meet your requirements. See "Function Details of the Printer
Configuration Items", Operating Instructions.
6. Selection keys
Correspond to the function items at the bottom line on the display.
Example: When this manual instructs you to press [Option], press the selection key on the left below the initial
screen.
7. Power indicator
Lights up when the printer is ready to receive data from a computer. Flashes when the printer is warming up or
receiving data. It is unlit when the power is off or when the printer is in energy saver mode.
14
AQC060S
Guide to Names and Functions of Components
8. [Escape] key
Press this key to cancel an operation or return to the previous display.
9. Scroll keys
Press these keys to move the cursor in each direction.
When the [ ] [ ] [ ] [ ] keys appear in this manual, press the applicable key for the direction that you
want to move the cursor.
10. Alert indicator
Lights up or flashes when a printer error occurs.
Steady red: printing is not possible, or is possible but print quality cannot be ensured.
Flashing yellow: the printer will soon require maintenance or a replacement consumable such as print
cartridge.
Follow the instructions that appear on the display.
11. [OK] key
Use this key to confirm settings or setting values, or move to the next menu level.
12. Data in indicator
Flashes when the printer is receiving data from a computer. The data in indicator is lit if there is data to be
printed.
13. Display
Displays current printer status and error messages.
Entering energy saver mode turns off the back light. For details about energy saver mode, see page 18
"Saving Energy".
14. Number Keys
Use these to enter characters or numbers.
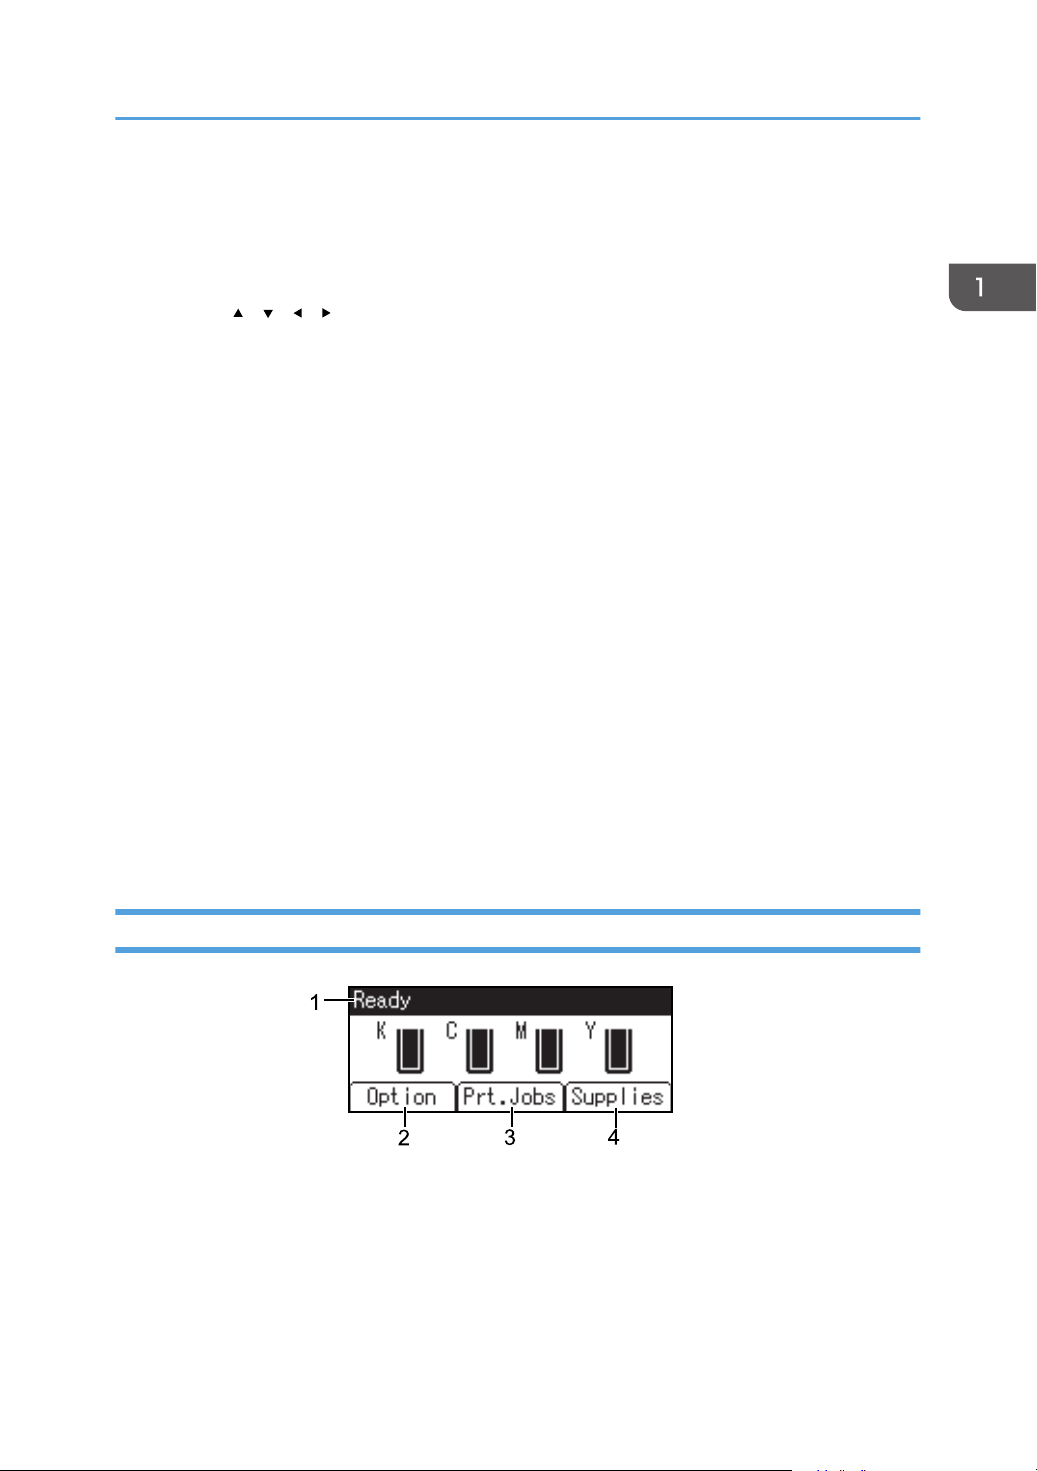
Guide to the Names and Functions of the Control Panel Screen
1. Operational Status or Messages
Displays the printer status and messages.
2. [Option]
Press to display the following items:
• Form Feed
You can output data that is unprintable due to errors such as a missing line-feed code.
15

1. Getting Started
• Error Log
If a document cannot be printed due to errors or other reasons, an error log is created. You can check
the error log using the control panel.
3. [Prt.Jobs]
Press to display print jobs sent from a computer.
[Prt.Jobs] is displayed only when the optional hard disk is installed in the printer.
4. [Supplies]
Press to display the information about printer supplies.
• By default, the remaining amount of toner is displayed. To avoid displaying the remaining amount
of toner, set [Display Supply Info] to [Off] in [General Settings] under [Maintenance].
16
Turning On/Off the Power
DJF005
This section explains how to turn on/off the printer.
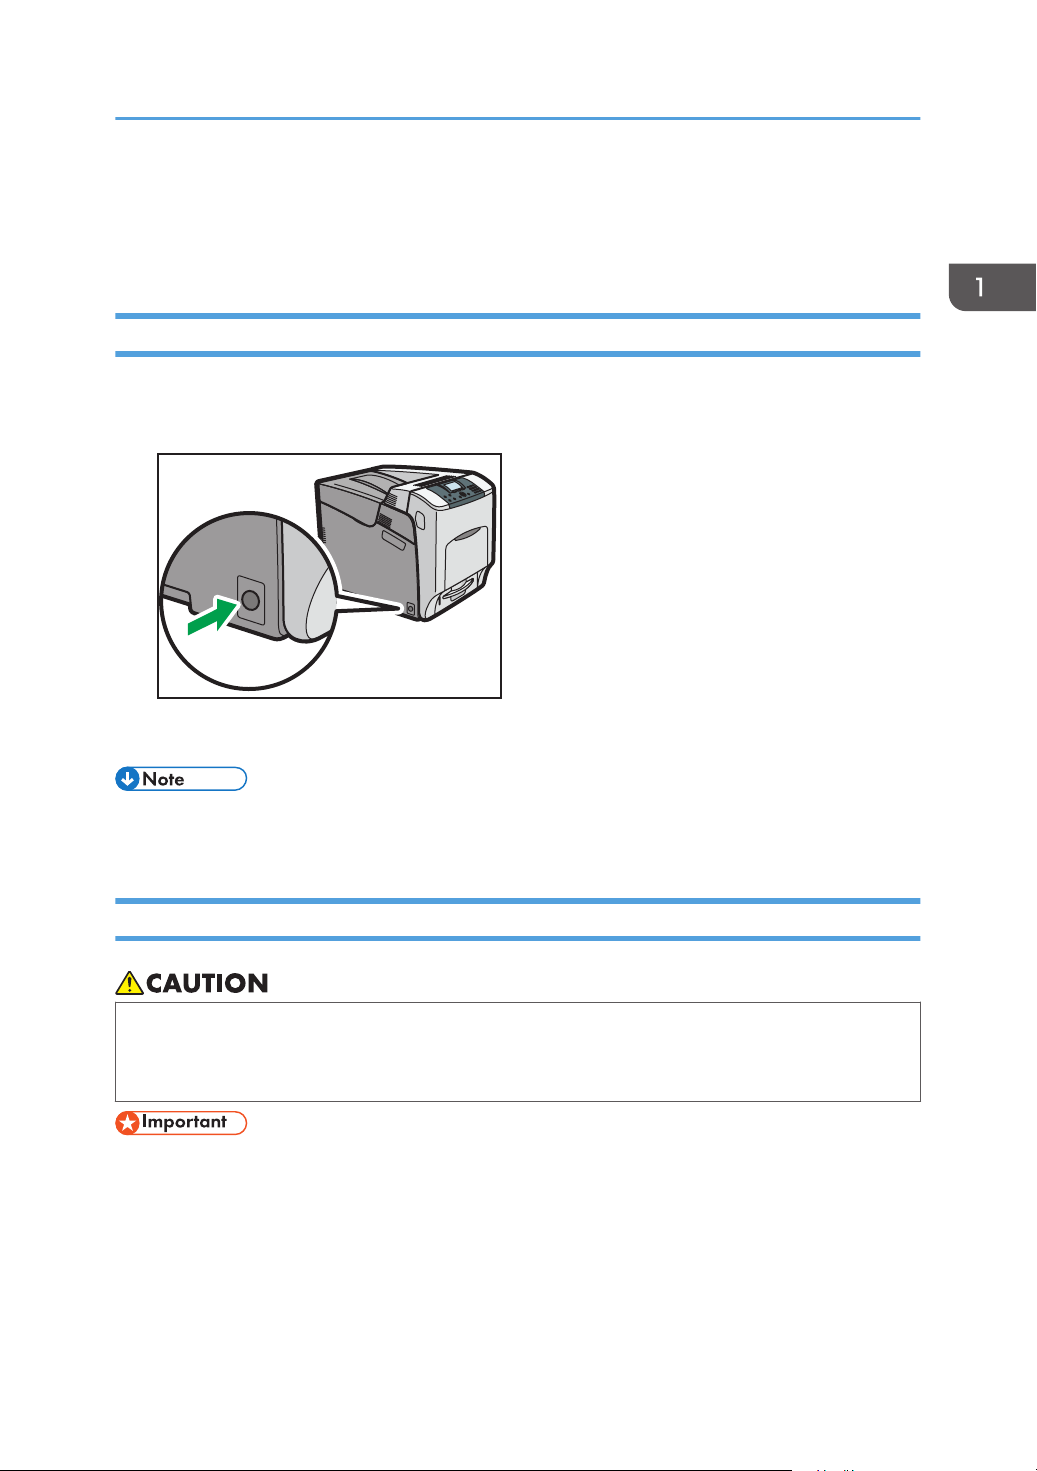
Turing On the Power
1. Make sure the power cord is firmly plugged into the wall outlet.
2. Push the main power switch.
Turning On/Off the Power
The power indicator turns on.
• After you switch the main power on, a screen may appear to indicate that the printer is initializing.
Do not switch the power off during this process. Initialization takes about three minutes.
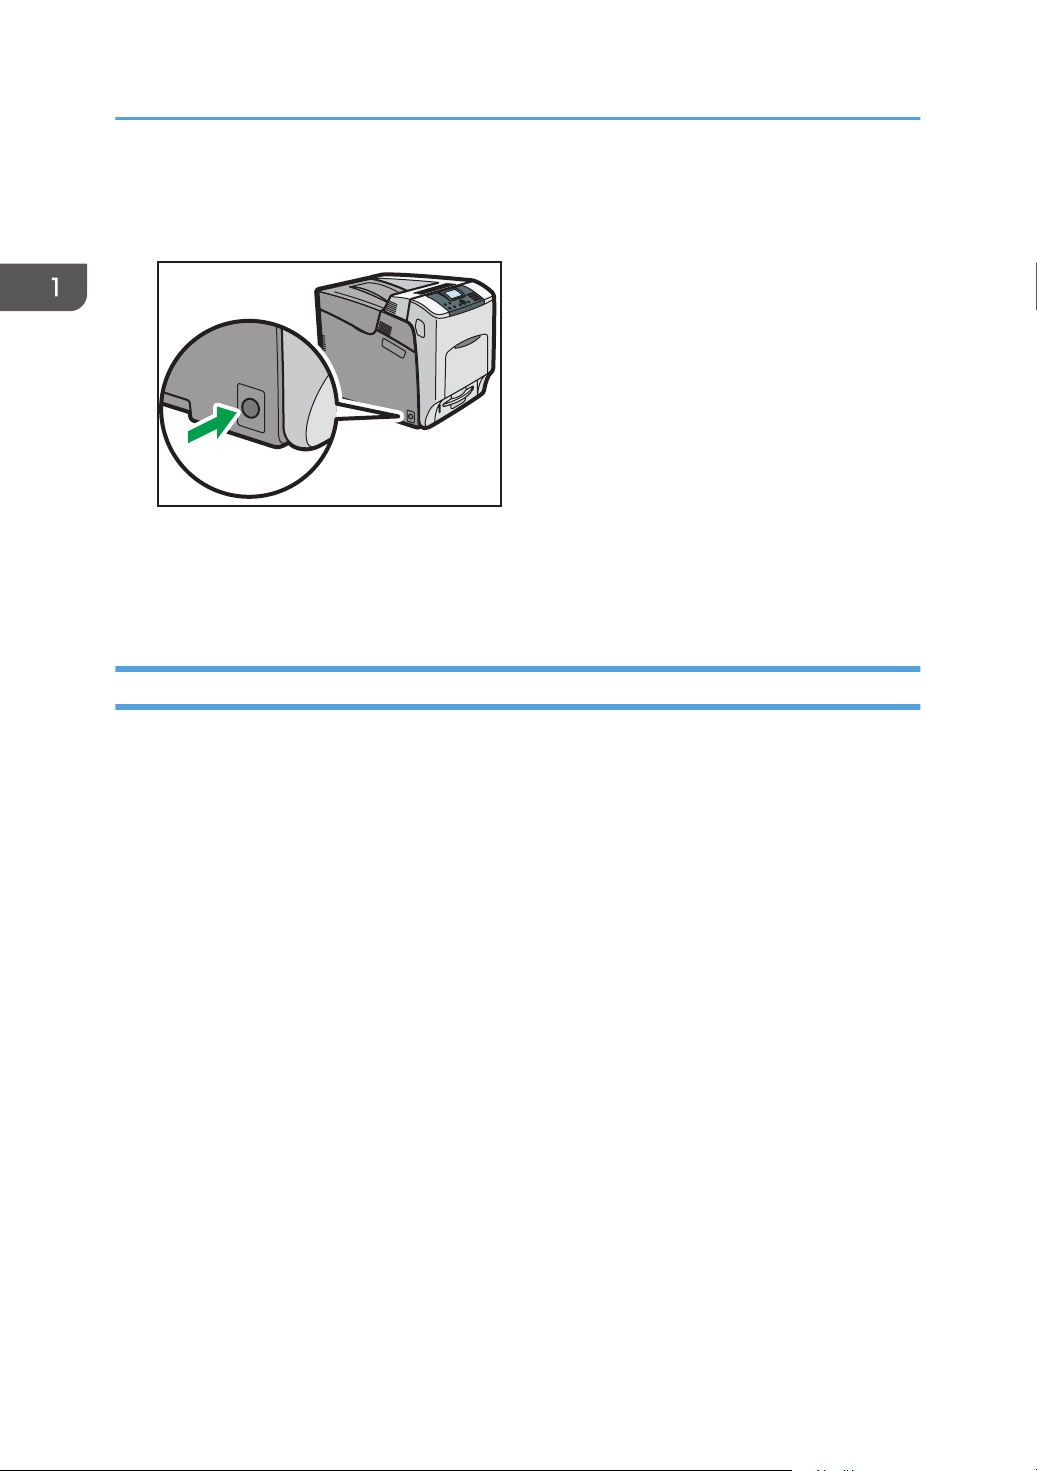
Turning Off the Power
• When disconnecting the power cord from the wall outlet, always pull the plug, not the cord.
Pulling the cord can damage the power cord. Use of damaged power cords could result in fire
or electric shock.
• Do not press and hold the main power switch when turning off the printer. Doing so shuts down the
printer forcefully and may damage the hard disk and the SDRAM module, causing a malfunction of
the printer.
• Before unplugging the power cord plug, turn off the power switch and make sure the power switch
indicator turns off. Not doing so may result in damage to the hard disk or memory, leading to a
malfunction.
17
DJF005
1. Getting Started
• Do not turn off the power while the printer is in operation.
1. Push the main power switch.
The main power is turned off automatically when the shutdown process is complete.
If the shutdown process is not complete within the period of time displayed on the screen, contact
your service representative.
Saving Energy
This printer has the following energy saving functions:
Low Power mode
If the printer is not used for a certain period of time, it enters Low Power mode.
In Low Power mode, the printer consumes less electricity than in the standby mode by turning off the
display and lowering the temperature of the fusing unit heater. If the printer receives a job, it
increases the temperature of the fusing unit and perform printing, but the display remains off.
You can configure the period of time the printer waits before it enters Low Power mode in [Low
Power Mode Timer]. For details, see "System", Operating Instructions.
To exit Low Power mode, do one of the following:
• Start print jobs
• Press any key on the control panel
• Open any cover
• Open any paper tray
The printer also exits Low Power mode when the ECO Night Sensor detects an increase in the
ambient light level.
Fusing Unit Off mode
18
If you do not use the printer for a certain period after an operation, the display will turn off and the
printer goes into Fusing Unit Off mode. The printer uses less electricity in Fusing Unit Off mode.

Turning On/Off the Power
When the printer is in Fusing Unit Off mode, the display is on but the fusing unit heater is off to save
energy. In this mode, you can change the printer settings on the control panel. However, the printer
must exit this mode to print.
You can change the amount of time that the printer waits before switching to Fusing Unit Off mode
under [Fusing Unit Off Mode Timer]. For details, see "System", Operating Instructions.
To exit Fusing Unit Off mode, do one of the following:
• Start print jobs
• Display the [Maintenance] screen on the control panel
• Operate the control panel when [Exit Fusing Unit Off Mode] is set to [On Operating Control
Panel]
Sleep mode
If the printer remains inactive for a specified period after entering Fusing Unit Off mode, it enters
Sleep mode to further reduce the power consumption. The printer also enters Sleep mode when:
• The printer waits before entering Sleep mode is set in [Sleep Mode Timer]
• It is the day and time specified in [Weekly Timer]
The printer can print jobs from computers.
You can change the amount of time that the printer waits before switching to Sleep mode.
For details about setting [Sleep Mode Timer] and [Weekly Timer], see "System", Operating
Instructions.
To exit Sleep mode, do one of the following:
• Press one of the keys on the control panel
• Start print jobs
ECO Night Sensor
ECO Night Sensor can detect darkness and automatically turn off this product's power.
If ECO Night Sensor is enabled and detects darkness in a room after the lights are turned off, the
sensor automatically turns the power off and reduces the power consumption of this product to 1W
or less.
The default settings of ECO Night Sensor are enabled.
To change the settings, see "System", Operating Instructions.
• The ECO Night Sensor function's factory default is [Auto Power Off Only]. If the printer is
located in an environment where the ambient light level is low (such as in a hallway or a
location with motion sensor lighting), it is advisable that you either keep this function disabled
or adjust its sensitivity.
• You can configure the printer to automatically turn its power on when it detects an increase in
the ambient light level. The printer may also react to daylight and turn its power on. If the
19

1. Getting Started
printer is located in an environment where it is exposed to direct sunlight, it is advisable that
you do not change the factory default configuration and only enable [Auto Power Off Only].
• The energy saving functions will not activate when:
• Communicating with external devices
• The hard disk is active
• A warning message is displayed
• The service call message is displayed
• Paper is jammed
• The printer's covers are opened
• Toner is being replenished
• The printer settings screen is displayed
• Fixed warm-up is in progress
• Data is being processed
• Operations are suspended during printing
• The Data In indicator is on or flashing
• The sample print, locked print, hold print, or stored print screen is displayed
• Accessing the printer using Web Image Monitor
• The printer consumes less energy when in Sleep mode, but it takes longer to start printing.
• If two or more energy saving functions are set, the function for which the predetermined conditions
to enter energy saving mode are met takes effect first.
20
DJF006
Displaying the Printer Configuration Screens Using the Control Panel
Displaying the Printer Configuration Screens
Using the Control Panel
Configuring Printer Settings from the [Menu] key
The configuration screens allow you to change or set defaults.
• If Administrator Authentication Management is specified, contact your administrator.
1. Press the [Menu] key.
2. Select the settings you want to change.
Press the [ ] or [ ] key to select the next or previous items.
3. Press the [OK] key.
• Any changes you make with configuration screens remain in effect even if the main power switch is
turned off.
• To cancel changes made to settings and return to the initial display, press the [Escape] key.
21

1. Getting Started
Using Web Image Monitor
• You cannot configure the printer settings using Web Image Monitor from a computer connected to
the USB device server's network. Be sure to access Web Image Monitor from the printer's network.
Using Web Image Monitor, you can check the printer status and change settings.
Available operations
The following operations can be remotely performed using Web Image Monitor from a client
computer.
• Displaying printer status or settings
• Checking the print job status or history
• Interrupting currently printing jobs
• Resetting the printer
• Managing the Address Book
• Configuring printer settings
• Configuring network protocol settings
• Configuring security settings
Configuring the printer
To perform the operations from Web Image Monitor, TCP/IP is required. After the printer is
configured to use TCP/IP, operations from Web Image Monitor become available.
Recommended Web browser
• Windows:
Internet Explorer 6.0 or higher
Firefox 10 and 15 or higher
Google Chrome 19 or higher
• Mac OS:
Safari 3.0 or higher
Firefox 10 and 15 or higher
Google Chrome 19 or higher
Web Image Monitor supports screen reader software. We recommend JAWS 7.0 or a later
version.
22
• Display and operation problems may occur if you do not enable JavaScript and cookies, or if you
are using a non-recommended Web browser.

Using Web Image Monitor
• If you are using a proxy server, change the Web browser settings. Contact your administrator for
information about the settings.
• We recommend using Web Image Monitor in the same network.
• If the printer is firewall-protected, it cannot be accessed from computers outside the firewall.
• If the printer under DHCP is used, the IP address may be changed automatically by the DHCP
server settings. Enable DDNS setting on the printer, and then connect using the printer's host name.
Alternatively, set a static IP address to the DHCP server.
• If the HTTP port is disabled, a connection to the printer using the printer's URL cannot be
established. SSL settings must be enabled on this printer. For details, contact your network
administrator.
• If Firefox is used, fonts and colors may be different, or tables may not appear properly configured.
• When using a host name under Windows Server 2003/2003 R2/2008/2008 R2/2012/2012
R2 with IPv6 protocol, perform host name resolution using an external DNS server. The host file
cannot be used.
• To use JAWS 7.0 under Web Image Monitor, you must be running Windows and Internet Explorer
6.0 or a later version.
• If you are using Internet Explorer 8.0 or higher, downloading will be slower than with other
browsers. To download faster with Internet Explorer 8.0 or higher, open the browser's [Internet
Options] menu and register the printer's URL as a trusted site, and then disable SmartScreen filter
for trusted sites. For details about these settings, see the Internet Explorer Help files.
• You can access Web Image Monitor more quickly by registering the printer's URL as a bookmark.
Note that the URL you register must be the URL of the top page, which is the page that appears
before login. If you register the URL of a page that appears after login, Web Image Monitor will
not open properly from the bookmark.
• If user authentication is activated, you must enter your login user name and password to use Web
Image Monitor. For Details, see "Logging In Using Web Image Monitor", Operating Instructions.
• When you configure settings using Web Image Monitor, do not log in from the control panel. The
settings you have configured using Web Image Monitor may become invalid.
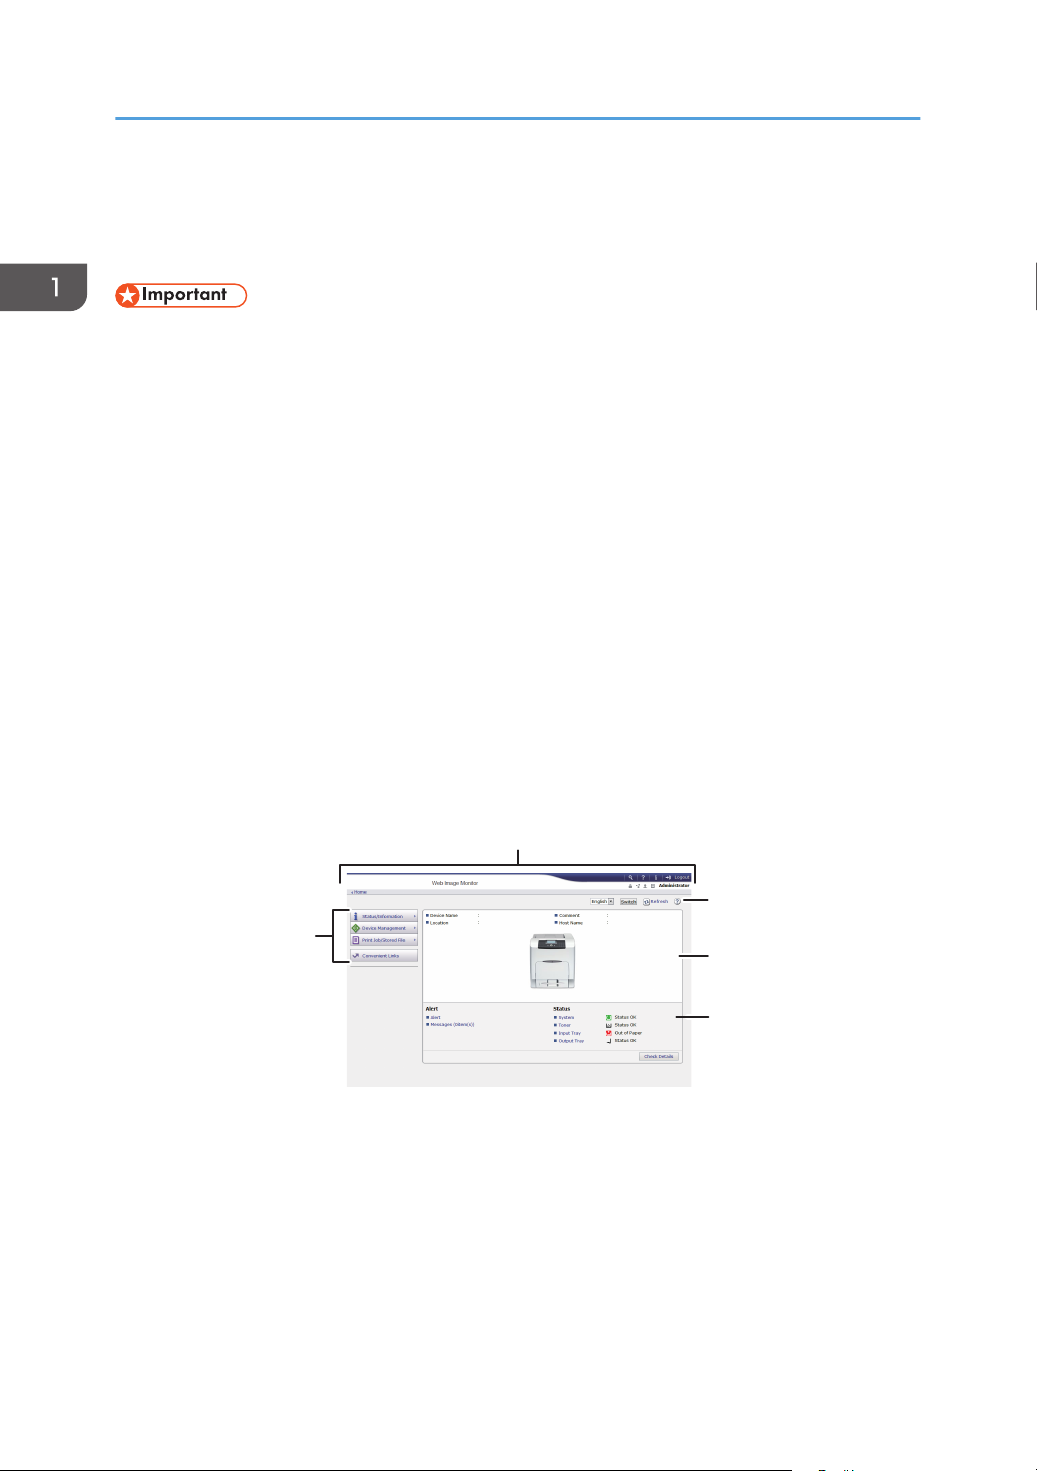
Displaying the top page
There are two modes available with Web Image Monitor: guest mode and administrator mode.
Displayed items may differ depending on the printer type.
Guest mode
This mode requires no login to enter.
In the guest mode, the printer status, settings, and print job status can be viewed, but the printer
settings cannot be changed.
23
1
2
3
5
4
DFJ135
1. Getting Started
Administrator mode
This mode requires an administrator login to enter.
In the administrator mode, you can configure various printer settings.
• When entering an IPv4 address, do not begin segments with zeros. For example: If the address is
"192.168.001.010", you must enter it as "192.168.1.10".
1. Start your Web browser.
2. Enter "http://(printer's IP address or host name)/" in your Web browser's address bar.
The top page of Web Image Monitor appears.
If the printer's host name has been registered on the DNS or WINS server, you can enter it.
When setting SSL, a protocol for encrypted communication, under the environment in which server
authentication is issued, enter "https://(printer's IP address or host name)/".
3. To log in to Web Image Monitor in the administrator mode, click [Login] on the top page.
The window for entering the login user name and password appears.
4. Enter your login user name and password, and then click [Login].
For details about the login user name and password, contact your administrator.
Depending on the configuration of your Web browser, the login user name and password might be
saved. If you do not want to save them, configure your Web browser's settings so that this
information is not saved.
1. Menu area
Displays the content of a selected menu item.
2. Header area
Displays the dialog box for switching to the user mode and administrator mode and the menu for each mode.
Also displays the link to Help and dialog box for keyword search.
24

Using Web Image Monitor
3. Refresh/Help
(Refresh): Click at the upper right in the work area to update the printer information. Click the Web
browser's [Refresh] button to refresh the entire browser screen.
(Help): Use Help to view or download Help file contents.
4. Basic Information area
Displays the basic information of the printer.
5. Work area
Displays the contents of the item selected in the menu area.
25

1. Getting Started
26

2. Loading Paper
This chapter describes available trays for each paper size and type, and explains how to load paper in
paper trays.
Paper Loading Procedure
To achieve the print results you expect, it is important to select an appropriate input tray according to the
size, type, and weight of the paper you want to use for printing. You also need to specify the paper size
and type properly using the control panel or Web Image Monitor.
Follow the procedure below to load paper.
1. Check the paper tray available for the size, type, and weight of the paper you want to
use for printing.
For details about available paper trays for each paper size and type, see page 28 "Paper Size
Specifications" and page 30 "Paper Type Specifications".
2. Change the paper size and type settings for the tray you selected.
Use the control panel of the printer or Web Image Monitor to change the paper size and type.
For details about changing paper settings using the control panel, see page 46 "Paper Settings".
3. Load paper into the tray.
For details about loading paper, see page 35 "Loading Paper into Paper Trays" or page 38
"Loading Paper into the Bypass Tray".
For details about loading envelopes, see page 42 "Loading Envelopes".
27
2. Loading Paper
Paper Size Specifications
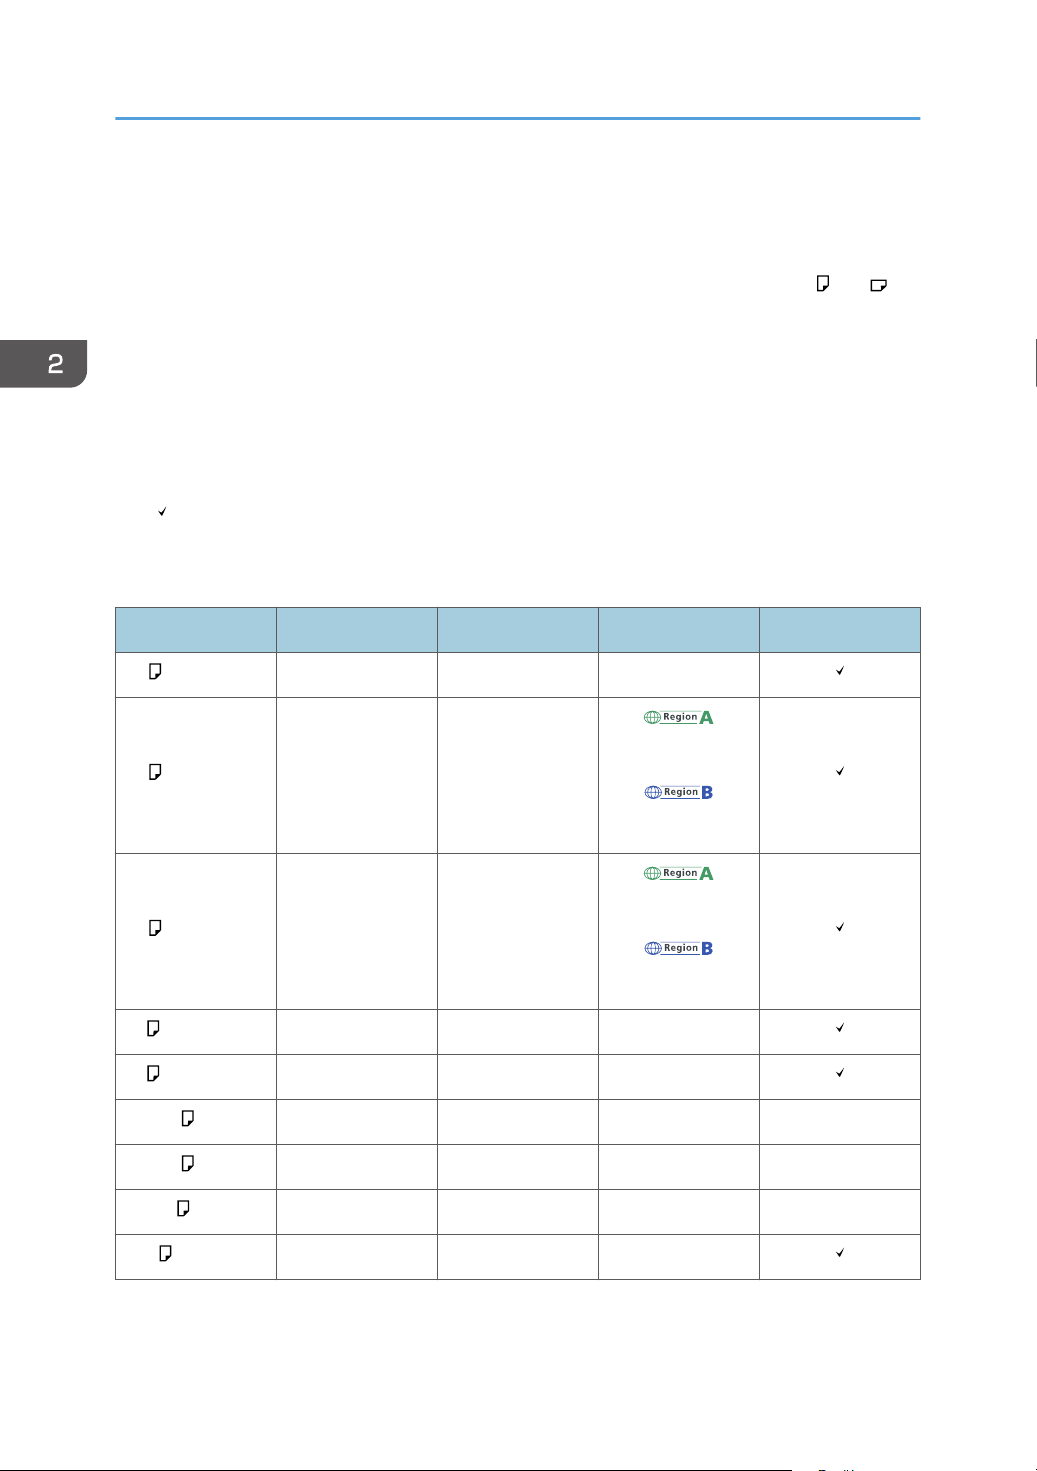
The following tables show the paper sizes that can be loaded in each paper tray. The "Paper size"
column shows the names of paper sizes and their dimensions in millimeters and inches. The and
icons indicate the paper orientation in relation to the printer body.
The letters in the tables indicate the following:
• A: The paper size is detected automatically. You can also select the paper size using the control
panel.
• B: Select the paper size using the control panel.
• C: Select the paper size using the printer driver.
• : You can print on both sides of paper.
• -: Not supported
Metric sizes
Paper size name Actual size Bypass tray Trays 1–4 Two-sided
A4 210 × 297 mm B A
A5 148 × 210 mm B
A6 105 × 148 mm B
B5 182 × 257 mm B B
B6 128 × 182 mm B B
C5 Env 162 × 229 mm B B -
C6 Env 114 × 162 mm B B -
DL Env 110 × 220 mm B B -
16K 195 × 267 mm B B
A
B
A
B
28
 Loading...