


User’s Guide
Guide to the Machine
Paper Specifications and Adding Paper
Printing Documents
Copying Originals
Scanning Originals
Sending and Receiving a Fax
Configuring the Machine Using the Control
Panel
Configuring the Machine Using Utilities
Maintaining the Machine
Troubleshooting
Configuring Network Settings Using OS X
Appendix
For safe and correct use, be sure to read Safety Information before using the machine.

TABLE OF CONTENTS |
|
How to Find Information about Operations and Troubleshooting............................................................... |
12 |
Operating Manual (Printed)....................................................................................................................... |
12 |
Operating Manual (Digital Format)........................................................................................................... |
12 |
How to Read This Manual............................................................................................................................... |
14 |
Introduction................................................................................................................................................... |
14 |
Symbols Used in This Manual..................................................................................................................... |
14 |
Model-Specific Information........................................................................................................................ |
14 |
Disclaimer..................................................................................................................................................... |
15 |
Notes............................................................................................................................................................ |
15 |
Note to Administrator.................................................................................................................................. |
16 |
List of Option................................................................................................................................................ |
16 |
About IP Address......................................................................................................................................... |
17 |
1. Guide to the Machine |
|
Guide to Components...................................................................................................................................... |
19 |
Exterior.......................................................................................................................................................... |
19 |
Interior........................................................................................................................................................... |
21 |
Control Panel (When Using the Touch Panel Model)............................................................................... |
22 |
Control Panel (When Using the Four-line LCD Panel Model).................................................................. |
24 |
Installing Option............................................................................................................................................... |
26 |
Attaching Paper Feed Unit.......................................................................................................................... |
26 |
Installing the Wireless LAN option............................................................................................................. |
27 |
How to Use the [Home] Screen (When Using the Touch Panel Model)..................................................... |
30 |
Displaying the [Home] Screen (When Using the Touch Panel Model)................................................... |
30 |
How to Use the [Home] Screen (When Using the Touch Panel Model)................................................. |
30 |
Customizing the [Home] Screen (When Using the Touch Panel Model).................................................... |
33 |
How to Customize the [Home] Screen (When Using the Touch Panel Model)...................................... |
33 |
Adding to the [Home] Screen Shortcuts to Favorite Items (When Using the Touch Panel Model)....... |
33 |
Changing the Order of Icons on the [Home] Screen (When Using the Touch Panel Model)............... |
34 |
Deleting an Icon on the [Home] Screen (When Using the Touch Panel Model).................................... |
34 |
Registering Frequently Used Functions (When Using the Touch Panel Model).......................................... |
35 |
Registering Functions in a Favorite Item (When Using the Touch Panel Model).................................... |
35 |
Recalling a Favorite Item (When Using the Touch Panel Model)............................................................ |
36 |
Deleting a Favorite Item (When Using the Touch Panel Model).............................................................. |
37 |
1

Displaying Frequently Used Modes Preferentially (When Using the Touch Panel Model)....................... |
38 |
Changing Operation Modes (When Using the Four-line LCD Panel Model)............................................. |
39 |
Multi-access...................................................................................................................................................... |
40 |
About Operation Tools.................................................................................................................................... |
42 |
Assigning a Setting to the Shortcut Key (When Using the Four-line LCD Panel Model)............................ |
44 |
Assigning a Setting Using the Control Panel (When Using the Four-line LCD Panel Model)................ |
44 |
Assigning a Setting Using Web Image Monitor (When Using the Four-line LCD Panel Model).......... |
44 |
Accessing the Function Assigned to the Shortcut Key (When Using the Four-line LCD Panel Model)...... |
|
....................................................................................................................................................................... |
45 |
Entering Characters (When Using the Touch Panel Model)......................................................................... |
46 |
Character Entry Display (When Using the Touch Panel Model)............................................................. |
46 |
Available Characters (When Using the Touch Panel Model).................................................................. |
47 |
Entering Text (When Using the Touch Panel Model)................................................................................ |
47 |
Entering Characters (When Using the Four-line LCD Panel Model)............................................................ |
49 |
Using Application for Smart Devices.............................................................................................................. |
50 |
Connecting a Smart Device to the Machine Using NFC.............................................................................. |
52 |
Writing the Machine's Information to NFC with a Smart Device............................................................. |
52 |
Using the Application on a Smart Device by Using NFC......................................................................... |
53 |
2. Paper Specifications and Adding Paper |
|
Workflow for Loading Paper and Configuring Paper Sizes and Types...................................................... |
55 |
Loading Paper.................................................................................................................................................. |
56 |
Loading Paper into Tray1 and 2................................................................................................................ |
56 |
Loading Paper into Bypass Tray................................................................................................................. |
60 |
Loading Envelopes....................................................................................................................................... |
61 |
Specifying Paper Type and Paper Size Using the Control Panel................................................................. |
64 |
Specifying the Paper Type.......................................................................................................................... |
64 |
Specifying the Standard Paper Size........................................................................................................... |
66 |
Specifying a Custom Paper Size................................................................................................................ |
67 |
Specifying Paper Type and Paper Size Using Smart Organizing Monitor................................................. |
69 |
Specifying a Custom Paper Size................................................................................................................ |
70 |
Specifying Paper Type and Paper Size Using Web Image Monitor........................................................... |
71 |
Specifying a Custom Paper Size................................................................................................................ |
71 |
Specifying Paper Type and Paper Size Using the Printer Driver.................................................................. |
72 |
2

When Using Windows................................................................................................................................ |
72 |
When Using OS X........................................................................................................................................ |
73 |
Supported Paper.............................................................................................................................................. |
74 |
Specifications of Paper Types..................................................................................................................... |
77 |
Non-Recommended Paper Types.............................................................................................................. |
84 |
Paper Storage.............................................................................................................................................. |
85 |
Print Area...................................................................................................................................................... |
85 |
Placing Originals.............................................................................................................................................. |
89 |
Placing Originals on the Exposure Glass................................................................................................... |
89 |
Placing Originals in the Auto Document Feeder....................................................................................... |
89 |
About Originals............................................................................................................................................ |
90 |
3. Printing Documents |
|
What You Can Do with the Printer Function................................................................................................... |
93 |
Configuring Option Settings for the Printer.................................................................................................... |
94 |
Conditions for Bidirectional Communication............................................................................................. |
94 |
If Bidirectional Communication is Disabled............................................................................................... |
94 |
Displaying the Printing Preferences Dialog Box............................................................................................. |
96 |
Displaying the Printing Preferences Dialog Box from the [Start] Menu................................................... |
96 |
Displaying the Printing Preferences Dialog Box in an Application.......................................................... |
96 |
Basic Operation of Printing............................................................................................................................. |
98 |
If a Paper Mismatch Occurs....................................................................................................................... |
99 |
Canceling a Print Job................................................................................................................................ |
100 |
Printing Confidential Documents................................................................................................................... |
102 |
Storing a Locked Print file......................................................................................................................... |
102 |
Printing a Locked Print file......................................................................................................................... |
103 |
Deleting a Locked Print file....................................................................................................................... |
105 |
Printing with Mopria...................................................................................................................................... |
107 |
Using Various Print Functions........................................................................................................................ |
108 |
Print Quality Functions............................................................................................................................... |
108 |
Print Output Functions................................................................................................................................ |
109 |
4. Copying Originals |
|
What You Can Do with the Copier Function............................................................................................... |
111 |
Copier Mode Screen.................................................................................................................................... |
112 |
3

Basic Operation of Copying......................................................................................................................... |
114 |
Canceling a Copy..................................................................................................................................... |
116 |
Making Enlarged or Reduced Copies......................................................................................................... |
118 |
Specifying Reduce/Enlarge..................................................................................................................... |
119 |
Copying Single-Sided Originals with 2-Sided and Combined Printing.................................................... |
121 |
Specifying Combined and 2-sided Copies............................................................................................. |
124 |
Copying 2-Sided Originals with 2-Sided and Combined Printing............................................................ |
126 |
Duplex Copying Using the ADF............................................................................................................... |
127 |
Duplex Copying Manually Using the Exposure Glass........................................................................... |
129 |
Copying an ID Card...................................................................................................................................... |
131 |
Specifying Scan Settings for Copying.......................................................................................................... |
135 |
Adjusting Image Density........................................................................................................................... |
135 |
Selecting the Document Type According to Original............................................................................. |
136 |
5. Scanning Originals |
|
What You Can Do with the Scanner Function............................................................................................. |
139 |
Scanner Mode Screen.................................................................................................................................. |
140 |
Registering Scan Destinations....................................................................................................................... |
142 |
Modifying Scan Destinations.................................................................................................................... |
148 |
Deleting Scan Destinations....................................................................................................................... |
148 |
Basic Operation of Scan to Folder............................................................................................................... |
150 |
Printing the Check Sheet....................................................................................................................... |
150 |
Confirming the User Name and Computer Name............................................................................. |
151 |
Creating a Shared Folder on a Computer.......................................................................................... |
153 |
Specifying Access Privileges for the Created Shared Folder............................................................ |
155 |
Registering a Shared Folder in the Machine's Address Book........................................................... |
155 |
Send Scanned Files to a Shared Folder.............................................................................................. |
156 |
Basic Operation of Scan to E-mail............................................................................................................... |
160 |
Configuring SMTP and DNS Settings.................................................................................................. |
160 |
Registering Destination E-mail Addresses to the Address Book........................................................ |
161 |
Sending Scanned Files by E-mail........................................................................................................ |
161 |
Basic Operation of Scan to FTP.................................................................................................................... |
165 |
Configuring FTP Server Settings........................................................................................................... |
165 |
Sending Scanned Files to an FTP Server............................................................................................. |
165 |
4

Specifying the Scan Destination Using [Resend] (When Using the Touch Panel Model)........................ |
169 |
Basic Procedures for Saving Scan Files on a USB Flash Memory Device................................................ |
170 |
Scanning from Smart Organizing Monitor.................................................................................................. |
175 |
Scanner Settings You Can Configure for Smart Organizing Monitor.................................................. |
176 |
Basic Operation for TWAIN Scanning........................................................................................................ |
179 |
Using TWAIN scanner.............................................................................................................................. |
179 |
TWAIN scanning....................................................................................................................................... |
179 |
Settings you can configure in the TWAIN dialog box........................................................................... |
180 |
Basic Operation for WIA Scanning............................................................................................................. |
182 |
Basic Operation for ICA Scanning............................................................................................................... |
183 |
Installing the ICA Driver............................................................................................................................ |
183 |
Using ICA Scanner.................................................................................................................................... |
183 |
ICA Scanning............................................................................................................................................. |
183 |
Settings you can configure in the ICA dialog box.................................................................................. |
184 |
About SANE Scanning.................................................................................................................................. |
186 |
Specifying Scan Settings for Scanning........................................................................................................ |
187 |
Specifying the Scanning Size According to the Size of the Original.................................................... |
187 |
Adjusting Image Density........................................................................................................................... |
188 |
Specifying Resolution................................................................................................................................ |
190 |
6. Sending and Receiving a Fax |
|
What You Can Do with the Fax Function..................................................................................................... |
193 |
Fax Setting Workflows.................................................................................................................................. |
194 |
Fax Mode Screen.......................................................................................................................................... |
196 |
Registering Fax Destinations......................................................................................................................... |
198 |
Registering Fax Destinations Using the Control Panel............................................................................ |
198 |
Registering Fax Destinations Using Web Image Monitor...................................................................... |
200 |
Preventing Transmission to the Wrong Destination................................................................................. |
202 |
Sending a Fax................................................................................................................................................ |
203 |
Selecting Transmission Mode................................................................................................................... |
203 |
Basic Operation for Sending a Fax......................................................................................................... |
204 |
Canceling a Transmission......................................................................................................................... |
207 |
Specifying the Fax Destination................................................................................................................. |
209 |
Useful Sending Functions.......................................................................................................................... |
212 |
5

Specifying Scan Settings for Faxing........................................................................................................ |
215 |
Using the Fax Function from a Computer (LAN-Fax).................................................................................. |
217 |
Basic Operation for Sending Faxes from a Computer........................................................................... |
217 |
Configuring Transmission Settings............................................................................................................ |
219 |
Configuring the LAN-Fax Address Book................................................................................................. |
219 |
Editing a Fax Cover Sheet........................................................................................................................ |
222 |
Receiving a Fax.............................................................................................................................................. |
223 |
Selecting Reception Mode....................................................................................................................... |
223 |
Forwarding or Storing Faxes in Memory................................................................................................ |
227 |
Receiving or Rejecting Faxes from Special Senders............................................................................... |
231 |
Lists/Reports Related to Fax......................................................................................................................... |
234 |
7. Configuring the Machine Using the Control Panel |
|
Basic Operation............................................................................................................................................. |
235 |
Menu Chart.................................................................................................................................................... |
237 |
Copier Features Settings (When Using the Touch Panel Model)............................................................... |
239 |
Scanner Features Settings (When Using the Touch Panel Model)............................................................ |
244 |
Fax Features Settings (When Using the Touch Panel Model).................................................................... |
247 |
Address Book Settings (When Using the Touch Panel Model).................................................................. |
255 |
System Settings (When Using the Touch Panel Model).............................................................................. |
256 |
Printer Features Settings (When Using the Touch Panel Model)................................................................ |
262 |
Paper Settings (When Using the Touch Panel Model)................................................................................ |
266 |
Administrator Tools Settings (When Using the Touch Panel Model)......................................................... |
271 |
Printing Lists/Reports (When Using the Touch Panel Model).................................................................... |
279 |
Printing the Configuration Page (When Using the Touch Panel Model)............................................... |
279 |
Configuration Page................................................................................................................................... |
279 |
Types of Lists/Reports (When Using the Touch Panel Model).............................................................. |
280 |
Network Settings (When Using the Touch Panel Model)........................................................................... |
282 |
@Remote (When Using the Touch Panel Model)........................................................................................ |
286 |
Copier Features Settings (When Using the Four-line LCD Panel Model).................................................. |
287 |
Scanner Features Settings (When Using the Four-line LCD Panel Model)............................................... |
292 |
System Settings (When Using the Four-line LCD Panel Model)................................................................. |
294 |
Printer Features Settings (When Using the Four-line LCD Panel Model)................................................... |
299 |
Tray Paper Settings (When Using the Four-line LCD Panel Model).......................................................... |
304 |
6

Administrator Tools Settings (When Using the Four-line LCD Panel Model)............................................ |
310 |
Printing Lists/Reports (When Using the Four-line LCD Panel Model)........................................................ |
316 |
Printing the Configuration Page (When Using the Four-line LCD Panel Model).................................. |
316 |
Configuration Page................................................................................................................................... |
316 |
Types of Lists/Reports (When Using the Four-line LCD Panel Model)................................................. |
317 |
Network Settings (When Using the Four-line LCD Panel Model).............................................................. |
319 |
Network Wizard (When Using the Four-line LCD Panel Model).............................................................. |
323 |
@Remote (When Using the Four-line LCD Panel Model)........................................................................... |
324 |
8. Configuring the Machine Using Utilities |
|
Available Setting Functions Using Web Image Monitor and Smart Organizing Monitor...................... |
327 |
Using Web Image Monitor........................................................................................................................... |
329 |
Displaying Top Page..................................................................................................................................... |
330 |
Changing the Interface Language........................................................................................................... |
331 |
Checking the System Information................................................................................................................. |
332 |
Status Tab................................................................................................................................................... |
332 |
Counter Tab............................................................................................................................................... |
333 |
Configuring the System Settings................................................................................................................... |
335 |
Sound Volume Adjustment Tab................................................................................................................ |
335 |
Tray Paper Settings Tab............................................................................................................................ |
335 |
Copier Tab................................................................................................................................................. |
338 |
Fax Tab (Only When Using the Touch Panel Model)............................................................................ |
338 |
Priority Tray Tab......................................................................................................................................... |
341 |
Toner Management Tab........................................................................................................................... |
341 |
Interface Tab.............................................................................................................................................. |
342 |
Shortcut to Function Tab (Only When Using the Four-line LCD Panel Model).................................... |
343 |
Registering Destinations................................................................................................................................ |
344 |
Registering Fax Special Senders (Only When Using the Touch Panel Model)........................................ |
345 |
Configuring the Network Settings................................................................................................................ |
346 |
Network Status Tab................................................................................................................................... |
346 |
IPv6 Configuration Tab............................................................................................................................. |
347 |
Network Application Tab......................................................................................................................... |
347 |
DNS Tab.................................................................................................................................................... |
348 |
Auto E-mail Notification Tab.................................................................................................................... |
349 |
7

SNMP Tab................................................................................................................................................. |
350 |
SMTP Tab................................................................................................................................................... |
351 |
POP3 Tab................................................................................................................................................... |
352 |
Wireless Tab.............................................................................................................................................. |
352 |
Google Cloud Tab.................................................................................................................................... |
354 |
Airprint Tab................................................................................................................................................ |
354 |
Certificate Tab........................................................................................................................................... |
355 |
Configuring the IPsec Settings....................................................................................................................... |
358 |
IPsec Global Settings Tab......................................................................................................................... |
358 |
IPsec Policy List Tab................................................................................................................................... |
358 |
Printing Lists/Reports..................................................................................................................................... |
362 |
Configuring the Administrator Settings......................................................................................................... |
363 |
Administrator Tab...................................................................................................................................... |
363 |
Reset Settings Tab...................................................................................................................................... |
363 |
Backup Setting Tab................................................................................................................................... |
364 |
Restore Setting Tab.................................................................................................................................... |
365 |
Set Date/Time Tab.................................................................................................................................... |
365 |
Energy Saver Mode Tab.......................................................................................................................... |
366 |
PCL6 Mode................................................................................................................................................ |
367 |
Using Smart Organizing Monitor................................................................................................................. |
368 |
Displaying the Smart Organizing Monitor Dialog................................................................................. |
368 |
Checking the Status Information............................................................................................................... |
368 |
Configuring the Machine Settings............................................................................................................ |
369 |
Printing the Configuration Page................................................................................................................ |
371 |
Configuration Page................................................................................................................................... |
371 |
Types of Lists/Reports............................................................................................................................... |
372 |
9. Maintaining the Machine |
|
Replacing the Print Cartridge........................................................................................................................ |
375 |
Cautions When Cleaning.............................................................................................................................. |
379 |
Cleaning the Friction Pad and Paper Feed Roller....................................................................................... |
380 |
Cleaning the Exposure Glass........................................................................................................................ |
382 |
Cleaning the Auto Document Feeder........................................................................................................... |
383 |
Moving and Transporting the Machine....................................................................................................... |
384 |
8
Disposal...................................................................................................................................................... |
385 |
Where to Inquire....................................................................................................................................... |
385 |
10. Troubleshooting |
|
Error and Status Messages on the Screen................................................................................................... |
387 |
Panel Indicator............................................................................................................................................... |
401 |
Error and Status Messages Appear on Smart Organizing Monitor.......................................................... |
402 |
Removing Paper Jams.................................................................................................................................... |
404 |
Removing Printing Jams............................................................................................................................. |
405 |
Removing Scanning Jams......................................................................................................................... |
414 |
When You Cannot Print Test Page............................................................................................................... |
416 |
Paper Feed Problems..................................................................................................................................... |
417 |
Print Quality Problems................................................................................................................................... |
420 |
Checking the Condition of the Machine.................................................................................................. |
420 |
Checking the Printer Driver Settings......................................................................................................... |
421 |
Printer Problems............................................................................................................................................. |
423 |
When You Cannot Print Properly............................................................................................................. |
423 |
When You Cannot Print Clearly............................................................................................................... |
426 |
When Paper Is Not Fed or Ejected Properly........................................................................................... |
428 |
Other Printing Problems............................................................................................................................ |
428 |
Copier Problems............................................................................................................................................ |
429 |
When You Cannot Make Clear Copies.................................................................................................. |
429 |
When You Cannot Make Copies as Wanted......................................................................................... |
430 |
Scanner Problems.......................................................................................................................................... |
431 |
When You Cannot Browse the Network to Send a Scan File............................................................... |
431 |
When Scanning Is Not Done As Expected............................................................................................. |
431 |
Fax Problems (When Using the Touch Panel Model)................................................................................. |
432 |
When You Cannot Send or Receive Fax Messages As Wanted (When Using the Touch Panel Model). |
|
.................................................................................................................................................................... |
432 |
When an Error Is Notified via a Report or E-mail (When Using the Touch Panel Model).................. |
435 |
Error Code (When Using the Touch Panel Model)................................................................................ |
436 |
Common Problems......................................................................................................................................... |
439 |
11. Configuring Network Settings Using OS X |
|
Installing the Printer Driver............................................................................................................................ |
443 |
9

Installing Smart Organizing Monitor |
........................................................................................................... |
|
444 |
Connecting the Machine to a Wired ...........................................................................................Network |
|
445 |
|
Using a USB Cable................................................................................................................................... |
|
|
445 |
Using an Ethernet Cable........................................................................................................................... |
|
|
445 |
Connecting the Machine to a Wireless ........................................................................................Network |
|
449 |
|
Using the Wi-Fi Setup Wizard................................................................................................................. |
|
|
449 |
Using the WPS Button............................................................................................................................... |
|
|
451 |
Using a PIN Code..................................................................................................................................... |
|
|
453 |
12. Appendix |
|
|
|
Transmission Using IPsec............................................................................................................................... |
|
|
457 |
Encryption and Authentication by ..................................................................................................IPsec |
|
457 |
|
Security Association.................................................................................................................................. |
|
|
458 |
Encryption Key Exchange Settings .........................................................................Configuration Flow |
|
459 |
|
Specifying Encryption Key Exchange ........................................................................................Settings |
|
460 |
|
Specifying IPsec Settings on the Computer............................................................................................. |
|
460 |
|
Enabling and Disabling IPsec Using ..........................................................................the Control Panel |
|
462 |
|
Notes About the Toner.................................................................................................................................. |
|
|
464 |
Specifications of the Machine...................................................................................................................... |
|
|
465 |
General Function Specifications.............................................................................................................. |
|
|
465 |
Printer Function Specifications.................................................................................................................. |
|
|
467 |
Copier Function Specifications................................................................................................................. |
|
|
468 |
Scanner Function Specifications............................................................................................................... |
|
|
468 |
Fax Function Specifications (When .....................................................Using the Touch Panel Model) |
|
469 |
|
Paper Feed Unit PB1130.......................................................................................................................... |
|
|
470 |
Consumables.................................................................................................................................................. |
|
|
471 |
Print Cartridge............................................................................................................................................ |
|
|
471 |
Information for This Machine........................................................................................................................ |
|
|
472 |
User Information on Electrical & Electronic ..........Equipment |
(mainly Europe and Asia) |
472 |
|
Note for the Battery and/or Accumulator .........................................Symbol (For EU countries only) |
473 |
||
Environmental Advice for Users ............................................................... |
(mainly Europe) |
|
473 |
Notice To NFC Users ................................................................................ |
(mainly Europe) |
|
474 |
NOTES TO USERS REGARDING .............................................FACSIMILE UNIT (NEW ZEALAND) |
474 |
||
Notes to users in the state of California ..........................................................(Notes to Users in USA) |
|
475 |
|
10

Notes to users in the United States of America....................................................................................... |
475 |
Notes to Canadian Users regarding Facsimile Unit............................................................................... |
477 |
Remarques à l'attention des utilisateurs canadiens................................................................................. |
477 |
ENERGY STAR Program........................................................................................................................... |
478 |
Saving Energy............................................................................................................................................ |
478 |
Trademarks..................................................................................................................................................... |
481 |
INDEX........................................................................................................................................................... |
485 |
11

How to Find Information about Operations and Troubleshooting
You can find support information about operating the machine and troubleshooting in the Operating Manual (printed), Operating Manual (digital format), and Help (online).
Operating Manual (Printed)
The following manuals are provided with this machine.
Safety Information
This manual explains the safety precautions that should be followed when using the machine. Be sure to read this manual before using the machine.
Setup Guide
This manual explains how to set up the machine. It also explains how to remove the machine from the packaging and how to connect it to a computer.
Operating Manual (Digital Format)
Operating manuals can be viewed from Ricoh's website or from the provided CD-ROM.
Viewing from a web browser
Access the Internet from a web browser.
Confirm that the computer or the machine is connected to the network. Download the operating manuals from http://www.ricoh.com/.
Viewing from the provided CD-ROM
Operating manuals can also be viewed from the provided CD-ROM.
•When using Windows
1.Insert the CD-ROM into the CD-ROM drive.
2.Click [Read Manual] and follow the instructions on the screen.
The PDF file manual opens.
•When using OS X
1.Insert the CD-ROM into the CD-ROM drive.
2.Double-click Manuals.htm file, located on the CD-ROM root directory.
3.Select the language.
4.Click [Read PDF manuals].
12

5. Click the manual you want to refer to.
The PDF file manual opens.
13

How to Read This Manual
Introduction
This manual contains detailed instructions and notes on the operation and use of this machine. For your safety and benefit, read this manual carefully before using the machine. Keep this manual in a handy place for quick reference.
Symbols Used in This Manual
This manual uses the following symbols:
Indicates points to pay attention to when using the machine, and explanations of likely causes of paper misfeeds, damage to originals, or loss of data. Be sure to read these explanations.
Indicates supplementary explanations of the machine’s functions, and instructions on resolving user errors.
[ ]
Indicates the names of keys on the machine's display or control panels.
Model-Specific Information
This section explains how you can identify the region your machine belongs to.
There is a label on the rear of the machine, located in the position shown below. The label contains details that identify the region your machine belongs to. Read the label.
DYG231
14

The following information is region-specific. Read the information under the symbol that corresponds to the region of your machine.


 (mainly Europe and Asia)
If the label contains the following, your machine is a region A model:
•CODE XXXX -27
•220–240 V


 (mainly North America)
If the label contains the following, your machine is a region B model:
•CODE XXXX -17
•120–127 V
•Dimensions in this manual are given in two units of measure: metric and inch. If your machine is a Region A model, refer to the metric units. If your machine is a Region B model, refer to the inch units.
Disclaimer
To the maximum extent permitted by applicable laws, in no event will the manufacturer be liable for any damages whatsoever arising out of failures of this machine, losses of the registered data, or the use or non-use of this product and operation manuals provided with it.
Make sure that you always copy or have backups of the data registered in this machine. Documents or data might be erased due to your operational errors or malfunctions of the machine.
In no event will the manufacturer be responsible for any documents created by you using this machine or any results from the data executed by you.
For good output quality, the manufacturer recommends that you use genuine toner from the manufacturer.
Notes
Contents of this manual are subject to change without prior notice.
The manufacturer shall not be responsible for any damage or expense that might result from the use of parts other than genuine parts from the manufacturer with your office products.
Two kinds of size notation are employed in this manual.
Some illustrations in this manual might be slightly different from the machine.
The illustrations of the control panel and the machine in this manual are for the touch panel model.
15

Note to Administrator
Password
Certain configurations of this machine can be password-protected to prevent unauthorized modifications by others. We strongly recommend you to create your own password immediately.
The following are the operations that can be password-protected:
When Using the Touch Panel Model
•Entering the [Address Book], [Network Settings], or [Administrator Tools] menu using the control panel
You can access these menus without a password by factory default.
The setting for creating a password can be found in [Administrator Tools].
•Configuring the machine using Web Image Monitor
You can configure the machine using Web Image Monitor without a password by factory default. The setting for creating a password can be found in [Administrator Settings].
For details about creating passwords, see page 363 "Configuring the Administrator Settings".
When Using the Four-line LCD Panel Model
•Entering the [Network Settings], [Network Wizard], or [Admin. Tools] menu using the control panel
You can access these menus without a password by factory default. The setting for creating a password can be found in [Admin. Tools].
•Configuring the machine using Web Image Monitor
You can configure the machine using Web Image Monitor without a password by factory default. The setting for creating a password can be found in [Administrator Settings].
For details about creating passwords, see page 363 "Configuring the Administrator Settings".
List of Option
|
|
Option List |
Referred to as |
|
|
|
|
Paper Feed Unit PB1130 |
Paper feed unit |
||
|
|
|
|
IEEE 802.11 Interface Unit Type P16 |
Wireless LAN option |
||
|
|
|
|
|
|
|
|
|
|
|
|
• If Paper feed unit is attached, "Tray 2" appears on the machine's control panel.
16

About IP Address
In this manual, "IP address" covers both IPv4 and IPv6 environments. Read the instructions that are relevant to the environment you are using.
17

18

1. Guide to the Machine
This chapter describes preparations for using the machine and its operating instructions.
Guide to Components
This section introduces the names of the various parts on the front and rear side of the machine and outlines their functions.
Exterior
1 |
2 |
3 |
4 |
20
19 |
|
|
|
|
18 |
|
|
|
|
17 |
|
|
|
|
16 |
|
|
|
|
12 |
|
|
|
|
15 |
|
|
|
|
12 |
|
|
|
|
|
|
|
|
5 |
|
|
|
|
6 |
|
|
|
|
7 |
|
|
|
|
8 |
|
|
|
|
9 |
14 |
13 |
12 |
11 |
10 |
|
|
|
|
DYG226 |
No. |
Name |
Description |
|
|
|
1 |
Control Panel |
Contains a screen and keys for machine control. |
|
|
|
2 |
ADF Cover |
Open this cover to remove originals jammed in the ADF. |
|
|
|
19

1. Guide to the Machine
No. |
Name |
Description |
|
|
|
3 |
Input Tray for the ADF |
Place stacks of originals here. They will feed in |
|
|
automatically. This tray can hold up to 35 sheets of |
|
|
plain paper. |
|
|
|
4 |
Auto Document Feeder |
The ADF is integrated with the exposure glass cover. |
|
(Exposure Glass Cover) |
Open this cover to place originals on the exposure |
|
|
glass. |
|
|
|
5 |
External Telephone Connector |
For connecting an external telephone. |
|
(only the Touch Panel Model) |
|
|
|
|
6 |
G3 (analog) Line Interface |
For connecting a telephone line. |
|
Connector (only the Touch Panel |
|
|
Model) |
|
|
|
|
7 |
USB Port for wireless LAN option |
Insert the wireless LAN option to connect with a wireless |
|
|
LAN when the machine's power is turned off. |
|
|
|
8 |
USB Port |
For connecting the machine to a computer using a USB |
|
|
cable. |
|
|
|
9 |
Ethernet Port |
For connecting the machine to the network using a |
|
|
network interface cable. |
|
|
|
10 |
Tray 1 Rear Cover |
This cover opens when you load paper longer than A4 |
|
|
in Tray 1. |
|
|
|
11 |
Rear Cover |
Open this cover to remove jammed paper or to lower |
|
|
the levers inside before printing on envelopes. |
|
|
|
12 |
Side Fence |
Adjust this fence to the paper size. |
|
|
|
13 |
Bypass Tray |
This tray can hold up to 50 sheets of plain paper. |
|
|
|
14 |
Tray 1 |
This tray can hold up to 250 sheets of plain paper. |
|
|
|
15 |
End Fence |
Adjust this fence to the paper size. |
|
|
|
16 |
Front Cover |
Open this cover to replace the print cartridge or remove |
|
|
jammed paper. |
|
|
|
17 |
USB Flash Disk Port |
Insert a USB flash memory device to store scanned files |
|
|
using the Scan to USB function. |
|
|
|
18 |
Standard Tray |
Printed paper is output here. Up to 50 sheets of plain |
|
|
paper can be stacked here. |
|
|
|
20

|
|
|
|
Guide to Components |
|
|
|
|
|
|
|
|
|
|
|
|
No. |
Name |
Description |
|
|
|
|
|
19 |
Stop Fence |
Raise this fence to prevent paper from falling off. |
||
|
|
|
|
|
20 |
Exposure Glass |
Place originals here sheet by sheet. |
||
|
|
|
|
|
|
|
|
|
|
|
|
|
|
|
•If it is difficult to take printed paper out of the output tray, you can lift the control panel and make it easier to take the printed paper out.
DYG227 |
Interior |
2 |
2 |
1
|
|
DYG229 |
|
|
|
No. |
Name |
Description |
|
|
|
1 |
Print Cartridge |
A replacement consumable that is required to make prints on |
|
|
paper. It needs to be replaced when the alert indicator flashes. For |
|
|
details about replacing the cartridge, see page 375 "Replacing |
|
|
the Print Cartridge". |
|
|
|
21

1. Guide to the Machine
No. |
Name |
Description |
|
|
|
2 |
Envelope Levers |
Lower these levers when copying or printing on envelopes. Pull up |
|
|
these levers back when copying or printing on paper other than |
|
|
envelopes. |
|
|
|
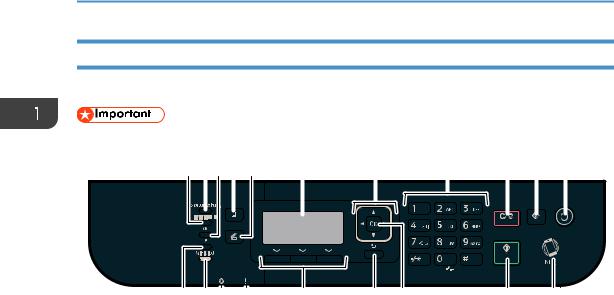
Control Panel (When Using the Touch Panel Model)
This description is for SP 330SFN/3710SF only.
• When you push the [Power] key, wait at least a second after the indicator has lit up or gone out.
1 |
2 |
3 |
4 |
5 |
6 |
|
7 |
8 |
9 |
10 |
|
|
|
|
DYG317 |
|
|
|
|
|
No. |
Name |
|
|
Description |
|
|
|
|
|
1 |
NFC |
|
|
Allows you to connect a smart device to the machine when you |
|
|
|
|
touch NFC on a smart device using the application corresponding |
|
|
|
|
to the machine. |
|
|
|
|
For details, see page 50 "Using Application for Smart Devices". |
|
|
|
|
|
2 |
[Home] key |
|
|
Press to display the [Home] screen. For details, see page 30 |
|
|
|
|
"How to Use the [Home] Screen (When Using the Touch Panel |
|
|
|
|
Model)". |
|
|
|
|
|
3 |
Display panel |
|
|
This is a touch panel display that features icons, keys, and |
|
|
|
|
shortcuts that allow you to navigate the screens of the various |
|
|
|
|
functions and provide you with information about operation status |
|
|
|
|
and other messages. |
|
|
|
|
|
22

|
|
|
|
Guide to Components |
|
|
|
|
|
|
|
|
|
|
|
|
No. |
Name |
Description |
|
|
|
|
|
4 |
Number keys |
Use to enter the numbers for copies, fax numbers and data for the |
||
|
|
|
|
selected function. |
|
|
|
|
|
5 |
[Clear/Stop] key |
• While the machine is processing a job: press to cancel the |
||
|
|
|
|
current job. |
|
|
|
|
• While configuring the machine settings: press to cancel the |
|
|
|
|
current setting and return to standby mode. |
|
|
|
|
• While in standby mode: press to cancel temporary settings |
|
|
|
|
such as image density or resolution. |
|
|
|
|
|
6 |
[Power] key |
Press to turn the main power on or off. |
||
|
|
|
|
This indicator lights up when the machine is turned on. |
|
|
|
|
To turn off the machine, press and hold down this key for at least |
|
|
|
|
three seconds. |
|
|
|
|
If you press this key for less than 3 seconds, the machine switches |
|
|
|
|
to Energy Saver mode. To recover Energy Saver mode, press this |
|
|
|
|
key again for less than 3 seconds. |
|
|
|
|
|
7 |
Fax indicator |
Indicates the status of the fax functions. Lights up when received |
||
|
|
|
|
faxes that have not been printed out exist in the machine's |
|
|
|
|
memory. |
|
|
|
|
|
8 |
Data In indicator |
This indicator flashes when the machine receives print data from a |
||
|
|
|
|
host device. |
|
|
|
|
This indicator lights up when there is a Locked Print file stored in |
|
|
|
|
the machine. |
|
|
|
|
|
9 |
Alert indicator |
Flashes when the toner is nearly empty, or lights up when the |
||
|
|
|
|
machine runs out of toner or a machine error occurs. |
|
|
|
|
When an alert is issued, check the messages on the screen. For |
|
|
|
|
details about the messages that appear on the screen, see |
|
|
|
|
page 387 "Error and Status Messages on the Screen". |
|
|
|
|
|
10 |
[Start] key |
Press to scan or copy or start sending a fax. |
||
|
|
|
|
|
|
|
|
|
|
|
|
|
|
|
•The backlight of the screen is turned off when the machine is in Energy Saver mode.
•When the machine is processing a job, you cannot display the menu for configuring the machine. You can confirm the machine's status by checking messages on the screen. If you see messages such as "Printing...", "Copying...", or "Processing...", wait until the current job is finished.
23
1. Guide to the Machine
Control Panel (When Using the Four-line LCD Panel Model)
This description is for SP 330SN only.
• When you push the [Power] key, wait at least a second after the indicator has lit up or gone out.
1 |
2 |
3 |
4 |
5 |
6 |
7 |
8 |
9 |
10 |
11 |
||||||||
|
|
|
|
|
|
|
|
|
|
|
|
|
|
|
|
|
|
|
|
|
|
|
|
|
|
|
|
|
|
|
|
|
|
|
|
|
|
|
|
|
|
|
|
|
|
|
|
|
|
|
|
|
|
|
|
|
|
|
|
|
|
|
|
|
|
|
|
|
|
|
|
|
|
|
|
12 |
13 14 |
15 |
16 |
17 |
18 |
19 |
20 |
DYG318 |
No. |
Name |
Description |
|
|
|
1 |
[Image Quality] key |
Press to select the scan quality for the current job. |
|
|
|
2 |
[Shortcut to Func.] key |
Press to use the function pre-assigned to this key. |
|
|
|
3 |
[Density] key |
Press to adjust the image density for the current job. |
|
|
|
4 |
[Copy] key |
Press to switch the machine to copier mode. |
|
|
|
5 |
[Scanner] key |
Press to switch the machine to scanner mode. |
|
|
|
6 |
Screen |
Displays the current status and messages. |
|
|
|
7 |
Scroll Keys |
Press to move the cursor in the direction indicated by the key. |
|
|
|
8 |
Number Keys |
Press to enter numerical values when specifying settings such as |
|
|
copy quantities or to enter letters when specifying names. |
|
|
|
9 |
[Clear/Stop] key |
Press to cancel or stop print jobs, document copying, scanning, |
|
|
and other actions in progress. |
|
|
|
10 |
[User Tools] key |
Press to display the menu for configuring the machine's system |
|
|
settings. |
|
|
|
24

Guide to Components
No. |
Name |
Description |
|
|
|
11 |
[Power] key |
Press to turn the main power on or off. |
|
|
This indicator lights up when the machine is turned on. |
|
|
To turn off the machine, press and hold down this key for at least |
|
|
three seconds. |
|
|
If you press this key for less than 3 seconds, the machine switches |
|
|
to Energy Saver mode. To recover Energy Saver mode, press this |
|
|
key again for less than 3 seconds. |
|
|
|
12 |
[Duplex] key |
Press to print on both sides of paper. |
|
|
|
13 |
[Wi-Fi Direct] key |
Pressing this key enables Wi-Fi while Wi-Fi is disabled and the |
|
|
wireless LAN option is installed to the USB port on the back of the |
|
|
machine. Press this key while Wi-Fi is enabled to activate or |
|
|
deactivate the Wi-Fi Direct function. |
|
|
This indicator lights up when the Wi-Fi Direct function is active. |
|
|
To use this key, the wireless LAN option needs to be installed to |
|
|
the machine when the machine's power is turned off. |
|
|
|
14 |
Data In Indicator |
This indicator flashes when the machine receives print data from a |
|
|
host device. |
|
|
This indicator lights up when there is a Locked Print file stored in |
|
|
the machine. |
|
|
|
15 |
Alert Indicator |
Flashes when the toner is nearly empty, or lights up when the |
|
|
machine runs out of toner or a machine error occurs. |
|
|
|
16 |
Selection keys |
Press the key underneath an item shown on the bottom line of the |
|
|
screen to select it. |
|
|
|
17 |
[Back] key |
Press to cancel the last operation or to return to the previous level |
|
|
of the menu tree. |
|
|
|
18 |
[OK] Key |
Press to confirm settings and specified values, or to move to the |
|
|
next menu level. |
|
|
|
19 |
[Start] key |
Press to start scanning or copying. |
|
|
|
20 |
NFC |
Allows you to connect a smart device to the machine when you |
|
|
touch NFC on a smart device using the application corresponding |
|
|
to the machine. |
|
|
For details, see page 50 "Using Application for Smart Devices". |
|
|
|
25
1. Guide to the Machine
Installing Option
This section explains how to install options.
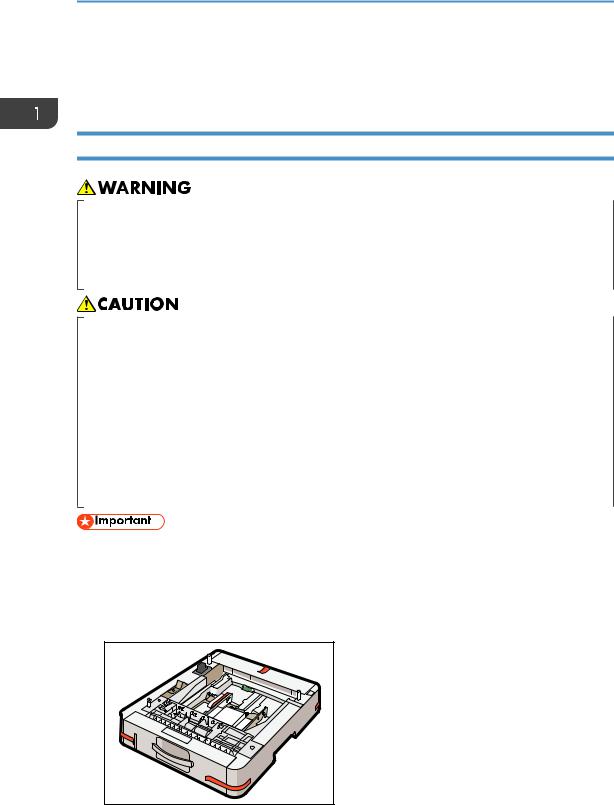
Attaching Paper Feed Unit
•Touching the prongs of the power cable's plug with anything metallic constitutes a fire and electric shock hazard.
•It is dangerous to handle the power cord plug with wet hands. Doing so could result in electric shock.
•Before installing or removing options, always disconnect the power cord plugs from the wall outlet and allow time for the main unit to fully cool. Failing to take these precautions could result in burns.
•The machine weighs approximately 18 kg (40 lb.). Lift the machine using the inset grips on both sides of the machine, and then move it horizontally to the place where you want to use it.
•Lifting the paper feed unit carelessly or dropping may cause injury.
•Before moving the machine, unplug the power cord from the wall outlet. If the cord is unplugged abruptly, it could become damaged. Damaged plugs or cords can cause an electrical or fire hazard.
•Tray 1 is required to print using the optional paper feed unit. Without Tray 1, paper jams will occur.
•Do not hold the tray to lift the machine.
1.Turn off the machine's power, and then pull the power plug out of the wall outlet.
2.Remove the adhesive tape and the cushioning material from the optional paper feed unit.
DYG315 |
26

Installing Option
3. Lift the machine using the inset grips on both sides of the machine.
DYH051
4.There are three upright pins on the optional paper feed unit. Align the holes of the machine with the pins, and then lower the machine slowly.
DYG316
5. Insert the power plug into the wall outlet, and then turn on the power.
•After installing the optional paper feed unit, select Tray 2 in the printer driver. For details, see the printer driver Help.
•If the new device is listed in the column of configuration options, it has been properly installed.
•If the optional paper feed unit is not installed properly, try to install it again by repeating the procedure. If the problem persists, contact your sales or service representative.
•For details about printing the configuration page, see page 279 "Printing Lists/Reports (When Using the Touch Panel Model)" or page 316 "Printing Lists/Reports (When Using the Four-line LCD Panel Model)".
Installing the Wireless LAN option
•Before using the option, you must configure settings from the control panel. For details, see Setup Guide.
27

1.Guide to the Machine
•Before beginning work, ground yourself by touching something metal to discharge any static electricity. Static electricity can damage the interface units.
•Do not subject the interface units to physical shocks.
• Be sure to turn off the machine before installing the wireless LAN option.
•Insert the wireless LAN option into the USB port on the back of the machine. Do not insert it into the USB flash disk port of the front of the machine.
•We recommend installing the printer driver on your computer after completing the configuration for the wireless LAN option.
1.Check the contents of the package.
2.Turn the machine off and unplug the power cord.
3.Fully insert the option.
DYG339
Check that the option is firmly connected to the USB port.
4.Plug in the power cord, and then turn on the machine.
5.Configure settings from the control panel.
For details, see Setup Guide.
•When using the touch panel model
Check that the wireless LAN option was correctly installed by printing the configuration page. If it is correctly installed, "Wireless (Wi-Fi) Status" will appear for "Network Settings" on the configuration page. For details about printing the configuration page, see page 279 "Printing Lists/Reports (When Using the Touch Panel Model)".
•When using the four-line LCD panel model
Check that the wireless LAN option was correctly installed by printing the configuration page. If it is correctly installed, "Wireless (Wi-Fi) Status" will appear for "Network Settings" on the configuration page. For details about printing the configuration page, see page 316 "Printing Lists/Reports (When Using the Four-line LCD Panel Model)".
28
 Loading...