


 Loading...
Model OP-P1/MF1
Machine Code:
M133, M134, M135, M141, M142, M143, M144, M145, M146, M147, M148, M149, M150, M151, M162, M163, M164, M165, M166, M167, M168, M169, M191
Field Service Manual
June, 2013

Safety, Symbols, Trademarks, and Important
Safety Notices
Conventions
Commonly Used Icons for Replacements and Adjustments
Symbol |
What it means |
|
|
|
Binding screw (shoulder hexagonal head) |
|
|
|
Binding screw (round flathead) |
|
|
|
Black screw (heavy, fusing unit, TCRU) |
|
|
|
Bushing |
|
|
|
C-ring |
|
|
|
Connector |
|
|
|
E-ring |
|
|
|
FFC (Flat Film Connector) |
|
|
|
FFC (Flat Film Connector) |
|
|
|
Gear |
|
|
|
Harness clamp |
|
|
|
Harness clamp (metal: fusing unit) |
|
|
|
Hook (or tab release) |
|
|
|
Knob screw (black) |
|
|
|
Knob screw (silver) |
|
|
|
Pivot screw |
|
|
|
Screw (common screw) |
|
|
|
Shoulder screw |
|
|
1
Symbol |
What it means |
|
|
Spring
Standoff
Stud screw
Tapping screw (wide threads for plastic)
Timing belt
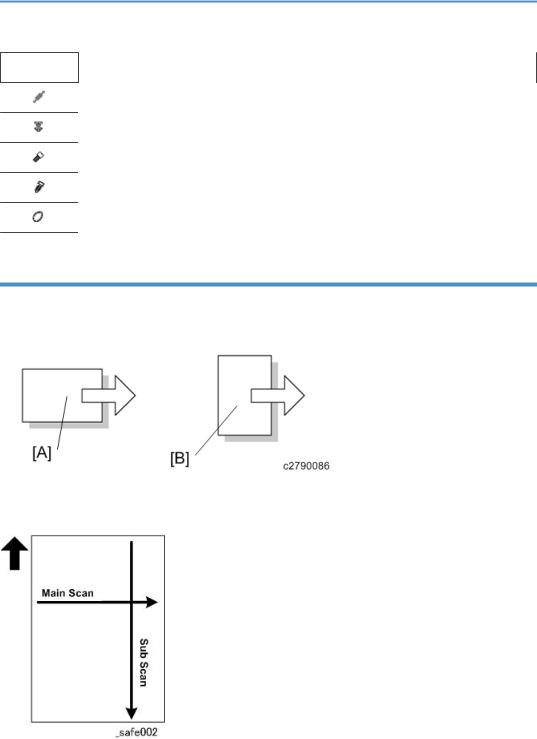
Paper Feed: SEF/LEF
The notations "SEF" and "LEF" describe the direction of paper feed. The arrows indicate the direction of paper feed.
[A]Short Edge Feed (SEF)
[B]Long Edge Feed (LEF)
In this manual "Main Scan" means "Horizontal" and "Sub Scan" means "Vertical", both relative to the direction of paper feed.
2

Smart Organizing Monitor
In this service manual "Smart Organizing Monitor" is often abbreviated as "SOM".
•The detailed procedure for entering the service mode of the Smart Organizing Monitor is provided in the training materials for these machines. The procedure for entering the service mode is not described in the service manuals.
•Service technicians must know how to enter the service mode before servicing these machines. Please refer to the training materials.
Machine Names
Name |
Abbrev. |
Model No. |
|
|
|
SP 200 |
P |
M133 |
|
|
|
SP 200 |
P |
M162 |
|
|
|
SP 200N |
P |
M144 |
|
|
|
SP 200N |
P |
M163 |
|
|
|
SP 201N |
P |
M145 |
|
|
|
SP 200Nw |
P |
M164 |
|
|
|
SP 201Nw |
P |
M146 |
|
|
|
SP 200S |
TiO |
M134 |
|
|
|
SP 200S |
TiO |
M165 |
|
|
|
SP 201S |
TiO |
M142 |
|
|
|
SP 202S |
TiO |
M191 |
|
|
|
SP 203S |
TiO |
M147 |
|
|
|
SP 202SN |
TiO |
M166 |
|
|
|
SP 204SN |
TiO |
M148 |
|
|
|
SP 201SF |
FiO |
M135 |
|
|
|
SP 200SF |
FiO |
M141 |
|
|
|
SP 202SF |
FiO |
M143 |
|
|
|
3

Name |
Abbrev. |
Model No. |
|
|
|
SP 203SF |
FiO |
M167 |
|
|
|
SP 204SF |
FiO |
M149 |
|
|
|
SP 203SFN |
FiO |
M168 |
|
|
|
SP 204SFN |
FiO |
M150 |
|
|
|
SP 203SFNw |
FiO |
M169 |
|
|
|
SP 204SFNw |
FiO |
M151 |
|
|
|
The abbreviated notations in the second column above (not used in these service manuals) are used in the operating instructions to distinguish the machine models:
•P: Printer only
•TiO: Three-in-1 (printer, copier, scanner)
•FiO: Four-in-1 (printer, copier, scanner, fax)
•Throughout this manual the machines are referenced by the model numbers only: M133, M162, M144, M163, M145, M134, M165, M147, M142, M166, M148, M135, M141, M143, M167, M149, M168, M150, M146, M164, M151, M169, and M191.
AIO (All In One) Cartridge
The AIO (print cartridge) in the center of the machine is permanently sealed around these main elements of the printing mechanisms: 1) OPC drum, 2) charge unit, 3) development unit, 4) drum cleaning unit, and 5) toner supply unit.
•This print cartridge is called the "AIO" (All-In-One) throughout this service manual.
•When toner runs out, the AIO can be refilled by the service technician or the AIO can be replaced by the operator. Refilling requires removal of two caps: the square cap to dump the toner and the round cap for refilling. These two parts are the only service parts for the AIO. There are no other service parts for the AIO.
•The AIO can be easily removed and replaced by the user. For more details, please refer to the operating instructions.
4
Key Presses
Symbol |
What It Means |
|
|
|
|
[Key] |
The names of machine operation panel keys and PC keyboard keys are enclosed in |
|
square brackets. |
||
|
||
|
|
|
|
This means to press one of the arrow keys to move the menu selector up/down ( ) or |
|
Select |
left/right ( ) to the menu selection you want and then press [OK] on the machine |
|
|
operation panel. |
|
|
|
|
|
A right angle bracket means to select a menu item (enclosed in quotation marks) by |
|
|
pressing the right or left arrow key and then pressing [OK]. For example, |
|
> |
[User Tools] > Select "System Settings" > "Tray Paper Settings" |
|
|
means, Press the [User Tools], press the right arrow to highlight "System Settings" and |
|
|
press [OK], and then press [OK] to select "Tray Paper Settings". |
|
|
|
RoHS Compliance
These machines are fully compliant with Chinese RoHS and contain no restricted materials such as lead, mercury, cadmium, hexavalent chrome, polybrominated biphenyl, or polybrominated diphenyl ether.
Warnings, Cautions, Notes
In this manual, the following important symbols and notations are used.
•A Warning indicates a potentially hazardous situation. Failure to obey a Warning could result in death or serious injury.
•A Caution indicates a potentially hazardous situation. Failure to obey a Caution could result in minor or moderate injury or damage to the machine or other property.
•Obey these guidelines to avoid problems such as misfeeds, damage to originals, loss of valuable data and to prevent damage to the machine.
•This information provides tips and advice about how to best service the machine.
5
General Safety Instructions
For your safety, please read this manual carefully before you use this product. Keep this manual handy for future reference.
Safety Information
Always obey the following safety precautions when using this product. Safety During Operation
In this manual, the following important symbols and notations are used.
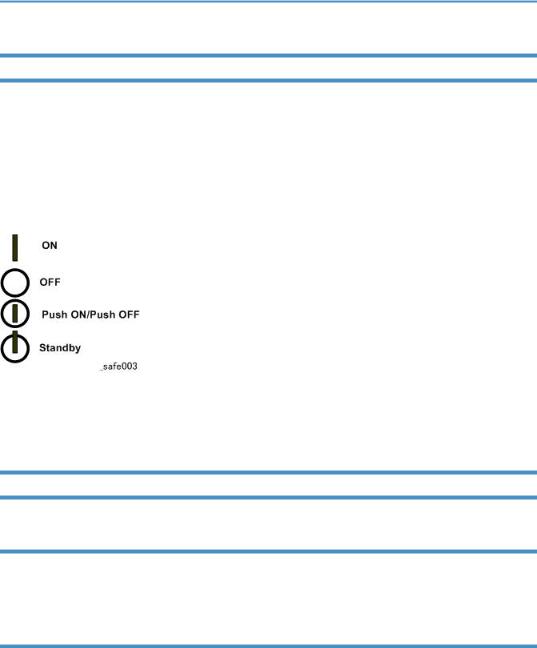
Switches and Symbols
Where symbols are used on or near switches on machines for Europe and other areas, the meaning of each symbol conforms with IEC60417.
Responsibilities of the Customer Engineer
Customer Engineer
Maintenance shall be done only by trained customer engineers who have completed service training for the machine and all optional devices designed for use with the machine.
Reference Material for Maintenance
•Maintenance shall be done using the special tools and procedures prescribed for maintenance of the machine described in the reference materials (service manuals, technical bulletins, operating instructions, and safety guidelines for customer engineers).
•Use only consumable supplies and replacement parts designed for use with the machine.
6
Before Installation, Maintenance
Shipping and Moving the Machine
•Work carefully when lifting or moving the machine. If the machine is heavy, two or more customer engineers may be required to prevent injuries (muscle strains, spinal injuries, etc.) or damage to the machine if it is dropped or tipped over.
•Personnel moving or working around the machine should always wear proper clothing and footwear. Never wear loose fitting clothing or accessories (neckties, loose sweaters, bracelets, etc.) or casual footwear (slippers, sandals, etc.) when lifting or moving the machine.
•Always unplug the power cord from the power source before you move the machine. Before you move the product, arrange the power cord so it will not fall under the machine.
Power
•Always disconnect the power plug before doing any maintenance procedure. After switching off the machine, power is still supplied to the main machine and other devices. To prevent electrical shock, switch the machine off, wait for a few seconds, then unplug the machine from the power source.
•Before you do any checks or adjustments after turning the machine off, work carefully to avoid injury. After removing covers or opening the machine to do checks or adjustments, never touch electrical components or moving parts (gears, timing belts, etc.).
•After turning the machine on with any cover removed, keep your hands away from electrical components and moving parts. Never touch the cover of the fusing unit, gears, timing belts, etc.
Installation, Disassembly, and Adjustments
•After installation, maintenance, or adjustment, always check the operation of the machine to make sure that it is operating normally. This ensures that all shipping materials, protective materials, wires and tags, metal brackets, etc., removed for installation, have been removed and that no tools remain inside the machine. This also ensures that all release interlock switches have been restored to normal operation.
•Never use your fingers to check moving parts causing spurious noise. Never use your fingers to lubricate moving parts while the machine is operating.
7
Special Tools
•Use only standard tools approved for machine maintenance.
•For special adjustments, use only the special tools and lubricants described in the service manual. Using tools incorrectly, or using tools that could damage parts, could damage the machine or cause injuries.
During Maintenance
General
•Before you begin a maintenance procedure: 1) Switch the machine off, 2) Disconnect the power plug from the power source, 3) Allow the machine to cool for at least 10 minutes.
•Avoid touching the components inside the machine that are labeled as hot surfaces.
Safety Devices
•Never remove any safety device unless it requires replacement. Always replace safety devices immediately.
•Never do any procedure that defeats the function of any safety device. Modification or removal of a safety device (fuse, switch, etc.) could lead to a fire and personal injury. Always test the operation of the machine to ensure that it is operating normally and safely after removal and replacement of any safety device.
•For replacements use only the correct fuses or circuit breakers rated for use with the machine. Using replacement devices not designed for use with the machine could lead to a fire and personal injuries.
Organic Cleaners
•During preventive maintenance, never use any organic cleaners (alcohol, etc.) other than those described in the service manual.
•Make sure the room is well ventilated before using any organic cleaner. Use organic solvents in small amounts to avoid breathing the fumes and becoming nauseous.
8
•Switch the machine off, unplug it, and allow it to cool before doing preventive maintenance. To avoid fire or explosion, never use an organic cleaner near any part that generates heat.
•Wash your hands thoroughly after cleaning parts with an organic cleaner to prevent contamination of food, drinks, etc. which could cause illness.
•Clean the floor completely after accidental spillage to prevent slippery surfaces that could cause accidents leading to hand or leg injuries. Use dry rags to soak up spills.
Power Plug and Power Cord
•Before servicing the machine (especially when responding to a service call), always make sure that the power plug has been inserted completely into the power source. A partially inserted plug could lead to heat generation (due to a power surge caused by high resistance) and cause a fire or other problems.
•Always check the power plug and make sure that it is free of dust and lint. Clean it if necessary. A dirty plug can generate heat which could cause a fire.
•Inspect the length of the power cord for cuts or other damage. Replace the power cord if necessary. A frayed or otherwise damaged power cord can cause a short circuit which could lead to a fire or personal injury from electrical shock.
•Check the length of the power cord between the machine and power supply. Make sure the power cord is not coiled or wrapped around any object such as a table leg. Coiling the power cord can cause excessive heat to build up and could cause a fire.
•Make sure that the area around the power source is free of obstacles so the power cord can be removed quickly in case of an emergency.
•Make sure that the power cord is grounded (earthed) at the power source with the ground wire on the plug.
•Connect the power cord directly into the power source. Never use an extension cord.
•When you disconnect the power plug from the power source, always pull on the plug, not the cable.
After Installation, Servicing
Disposal of Used Items
• Never incinerate used toner, toner cartridges, or AIO units.
9

•Toner thrown into a fire can ignite or explode and cause serious injury. At the work site always carefully wrap used toner and toner cartridges with plastic bags to avoid spillage before disposal or removal.
•Always dispose of used items (developer, toner, toner cartridges, OPC drums, AIO units, etc.) in accordance with the local laws and regulations regarding the disposal of such items.
•To protect the environment, never dispose of this product or any kind of waste from consumables at a household waste collection point. Dispose of these items at one of our dealers or at an authorized collection site.
•Return used drums to the service center for handling in accordance with company policy regarding the recycling or disposal of such items.
Points to Confirm with Operators
At the end of installation or a service call, instruct the user about use of the machine. Emphasize the following points.
•Show operators how to remove jammed paper and troubleshoot other minor problems by following the procedures described in the operating instructions.
•Point out the parts inside the machine that they should never touch or attempt to remove.
•Confirm that operators know how to store and dispose of consumables.
•Make sure that all operators have access to an operating instruction manual for the machine.
•Confirm that operators have read and understand all the safety instructions described in the operating instructions.
•Demonstrate how to turn off the power and disconnect the power plug (by pulling the plug, not the cord) if any of the following events occur: 1) something has spilled into the product, 2) service or repair of the product is necessary, 3) the product cover has been damaged.
•Caution operators about removing paper fasteners around the machine. They should never allow paper clips, staples, or any other small metallic objects to fall into the machine.
Special Safety Instructions for Toner
Accidental Physical Exposure
•Work carefully when removing paper jams or replacing toner bottles or cartridges to avoid spilling toner on clothing or the hands.
10

•If toner is inhaled, immediately gargle with large amounts of cold water and move to a well ventilated location. If there are signs of irritation or other problems, seek medical attention.
•If toner gets on the skin, wash immediately with soap and cold running water.
•If toner gets into the eyes, flush the eyes with cold running water or eye wash. If there are signs of irritation or other problems, seek medical attention.
•If toner is swallowed, drink a large amount of cold water to dilute the ingested toner. If there are signs of any problem, seek medical attention.
•If toner spills on clothing, wash the affected area immediately with soap and cold water. Never use hot water! Hot water can cause toner to set and permanently stain fabric.
Handling and Storing Toner
•Toner, used toner, and developer are extremely flammable.
•Never store toner, developer, toner cartridges, or toner bottles (including empty toner bottles or cartridges), or AIO units in a location where they will be exposed to high temperature or an open flame.
•Do not use a vacuum cleaner to remove spilled toner (including used toner). Vacuumed toner may cause a fire or explosion due to sparks or electrical contact inside the cleaner. However, it is possible to use a cleaner designed to be dust explosion-proof. If toner is spilled over the floor, sweep up spilled toner slowly and clean up any remaining toner with a wet cloth.
•Always store toner and developer supplies such as toner and developer packages, cartridges, bottles (including used toner and empty bottles and cartridges) and AIO units out of the reach of children.
•Always store fresh toner supplies or empty bottles or cartridges in a cool, dry location that is not exposed to direct sunlight.
Toner Disposal
•Never attempt to incinerate toner, used toner, or empty toner containers (bottles or cartridges). Burning toner can explode and scatter, causing serious burns.
•Always wrap used toner and empty toner bottles and cartridges in plastic bags to avoid spillage. Follow the local laws and regulations regarding the disposal of such items.
•Dispose of used toner and toner cartridges at one of our dealers or at an authorized collection site. Always dispose of used toner cartridges and toner bottles in accordance with the local laws and regulations regarding the disposal of such items.
11

Safety Instructions for the Machine
Prevention of Physical Injury
1.Before disassembling or assembling parts of the machine and peripherals, make sure that the machine and peripheral power cords are unplugged.
2.The plug should be near the machine and easily accessible.
3.Note that some components of the machine and the paper tray unit are supplied with electrical voltage even if the main power switch is turned off.
4.If any adjustment or operation check has to be made with exterior covers off or open while the main switch is turned on, keep hands away from electrified or mechanically driven components.
5.If the [Start] key is pressed before the machine completes the warm-up period (the [Start] key starts blinking red and green), keep hands away from the mechanical and the electrical components, because the machine starts making copies as soon as the warm-up period is completed.
6.The inside and the metal parts of the fusing unit become extremely hot while the machine is operating. Be careful to avoid touching those components with your bare hands.
7.To prevent a fire or explosion, keep the machine away from flammable liquids, gases, and aerosols.
Health Safety Conditions
1.If the machine has ozone filters, never operate the machine without the ozone filters installed. Always replace the ozone filters with the specified types at the proper intervals.
2.To avoid possible accumulation of ozone in the work area, locate the machine in a large well ventilated room that has an air turnover rate of more than 30m3/hr/person.
3.Toner and developer are non-toxic, but if you get either of them in your eyes by accident, it may cause temporary eye discomfort. Try to remove with eye drops or flush with water as first aid. If unsuccessful, get medical attention.
Observance of Electrical Safety Standards
1.The machine and its peripherals must be installed and maintained by a customer service representative who has completed the training course on those models.
2.The NVRAM on the system control board has a lithium battery which can explode if replaced incorrectly. Replace the NVRAM only with an identical one. The manufacturer recommends replacing the entire NVRAM. Do not recharge or burn this battery. Used NVRAM must be handled in accordance with local regulations.
12
Safety and Ecological Notes for Disposal
1.Never incinerate toner bottles or used toner. Toner dust may ignite suddenly when exposed to an open flame.
2.Dispose of used toner, developer, and organic photoconductors in accordance with local regulations. (These are non-toxic supplies.)
3.Dispose of replaced parts in accordance with local regulations.
4.When keeping used lithium batteries in order to dispose of them later, do not put more than 100 batteries per sealed box. Storing larger numbers or not sealing them apart may lead to chemical reactions and heat build-up.
•The danger of explosion exists if a battery of this type is incorrectly replaced.
•Replace only with the same or an equivalent type recommended by the manufacturer. Discard used batteries in accordance with the manufacturer's instructions.
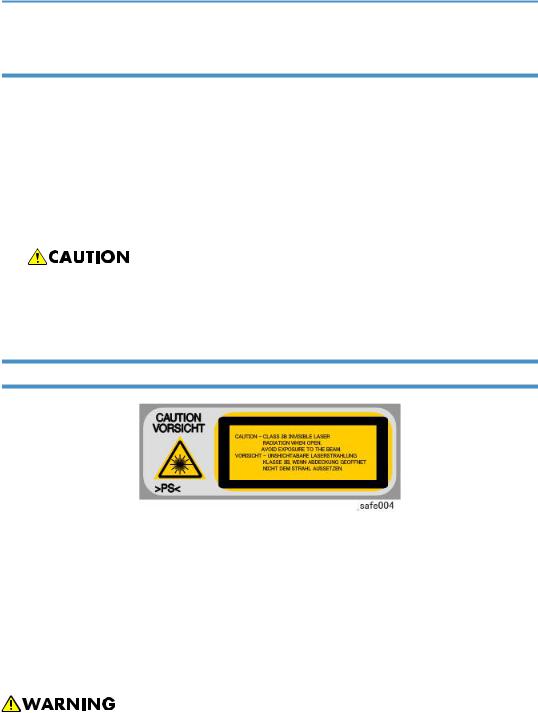
Laser Safety
1.The Center for Devices and Radiological Health (CDRH) prohibits the repair of laser-based optical units in the field.
2.The optical housing unit can only be repaired in a factory or at a location with the requisite equipment.
3.The laser subsystem is replaceable in the field by a qualified Customer Engineer.
4.The laser chassis is not repairable in the field.
5.Customer engineers are therefore directed to return all chassis and laser subsystems to the factory or service depot when replacement of the optical subsystem is required.
•Use of controls, or adjustment, or performance of procedures other than those specified in this manual may result in hazardous radiation exposure.
•Turn off the main switch before attempting any of the procedures in the Laser Unit section. Laser beams can seriously damage your eyes.
13

Trademarks
•Microsoft®, and Windows® are registered trademarks of Microsoft Corporation in the United States and /or other countries.
•PostScript® is a registered trademark of Adobe Systems, Incorporated.
•PCL® is a registered trademark of Hewlett-Packard Company.
•Ethernet® is a registered trademark of Xerox Corporation.
•PowerPC® is a registered trademark of International Business Machines Corporation.
•Other product names used herein are for identification purposes only and may be trademarks of their respective companies. We disclaim any and all rights involved with those marks.
14

TABLE OF CONTENTS |
|
Safety, Symbols, Trademarks, and Important Safety Notices........................................................................ |
1 |
Conventions.................................................................................................................................................... |
1 |
Commonly Used Icons for Replacements and Adjustments............................................................... |
1 |
Paper Feed: SEF/LEF............................................................................................................................. |
2 |
Smart Organizing Monitor................................................................................................................... |
3 |
Machine Names.................................................................................................................................... |
3 |
AIO (All In One) Cartridge................................................................................................................... |
4 |
Key Presses............................................................................................................................................. |
5 |
RoHS Compliance................................................................................................................................. |
5 |
Warnings, Cautions, Notes........................................................................................................................... |
5 |
General Safety Instructions............................................................................................................................ |
6 |
Responsibilities of the Customer Engineer.................................................................................................... |
6 |
Customer Engineer................................................................................................................................ |
6 |
Reference Material for Maintenance................................................................................................... |
6 |
Before Installation, Maintenance.................................................................................................................. |
7 |
Shipping and Moving the Machine..................................................................................................... |
7 |
Power...................................................................................................................................................... |
7 |
Installation, Disassembly, and Adjustments......................................................................................... |
7 |
Special Tools.......................................................................................................................................... |
8 |
During Maintenance...................................................................................................................................... |
8 |
General.................................................................................................................................................. |
8 |
Safety Devices........................................................................................................................................ |
8 |
Organic Cleaners.................................................................................................................................. |
8 |
Power Plug and Power Cord................................................................................................................ |
9 |
After Installation, Servicing............................................................................................................................ |
9 |
Disposal of Used Items.......................................................................................................................... |
9 |
Points to Confirm with Operators....................................................................................................... |
10 |
Special Safety Instructions for Toner.......................................................................................................... |
10 |
Accidental Physical Exposure............................................................................................................ |
10 |
Handling and Storing Toner............................................................................................................... |
11 |
Toner Disposal..................................................................................................................................... |
11 |
Safety Instructions for the Machine............................................................................................................ |
12 |
Prevention of Physical Injury............................................................................................................... |
12 |
15

Health Safety Conditions.................................................................................................................... |
|
|
|
|
|
|
|
12 |
||
Observance of Electrical Safety Standards...................................................................................... |
|
|
|
|
|
12 |
||||
Safety and Ecological Notes for Disposal........................................................................................ |
|
|
|
|
|
13 |
||||
Laser Safety.................................................................................................................................................. |
|
|
|
|
|
|
|
|
|
13 |
Trademarks................................................................................................................................................... |
|
|
|
|
|
|
|
|
|
14 |
1. Product Information |
|
|
|
|
|
|
|
|
||
Specifications.................................................................................................................................................... |
|
|
|
|
|
|
|
|
|
23 |
New Product Information................................................................................................................................ |
|
|
|
|
|
|
|
|
24 |
|
Series Machines Compared....................................................................................................................... |
|
|
|
|
|
|
|
24 |
||
General Differences............................................................................................................................ |
|
|
|
|
|
|
|
24 |
||
Common AIO...................................................................................................................................... |
|
|
|
|
|
|
|
|
26 |
|
Feature Summary......................................................................................................................................... |
|
|
|
|
|
|
|
|
27 |
|
General Features................................................................................................................................. |
|
|
|
|
|
|
|
|
27 |
|
Duplex Printing.................................................................................................................................... |
|
|
|
|
|
|
|
|
28 |
|
Important Points to Remember............................................................................................................ |
|
|
|
|
|
|
28 |
|||
About AIO units............................................................................................................................................ |
|
|
|
|
|
|
|
|
29 |
|
M145, M147, M148, M146.......................................................................................................... |
|
|
|
|
|
|
29 |
|||
M149, M150, M151........................................................................................................................ |
|
|
|
|
|
|
|
29 |
||
M133, M134, M162, M144, M163, M165, M142, M166, M146, M191......................... |
|
29 |
||||||||
M135, M141, M143, M167, M168, M169............................................................................... |
|
|
|
|
29 |
|||||
Criteria for Determining the Amount of Remaining Toner and Reporting a Toner-end Alert |
........30 |
|||||||||
AIO Unit Specifications...................................................................................................................... |
|
|
|
|
|
|
|
30 |
||
General Configuration................................................................................................................................ |
|
|
|
|
|
|
|
|
32 |
|
M133, M162, M144, M163, M145, M146, M164 Configuration.......................................... |
|
|
32 |
|||||||
M134, M165, M147, M142 Configuration.................................................................................. |
|
|
|
|
|
33 |
||||
M135, M141, M166, M148, M143, M167, M149, M168, M150, M151, M169, M191 |
||||||||||
Configuration....................................................................................................................................... |
|
|
|
|
|
|
|
|
35 |
|
Operation Panels......................................................................................................................................... |
|
|
|
|
|
|
|
|
36 |
|
M133, M134, M162, M163, M145, M146, M164 Operation Panel..................................... |
|
|
37 |
|||||||
M134, M142, M165, M147 Operation Panel............................................................................. |
|
|
|
|
38 |
|||||
M135, |
M141, |
M143, |
M166, |
M148, |
M167, |
M149, |
M168, |
M150, |
M151, |
M169 |
Operation Panel.................................................................................................................................. |
|
|
|
|
|
|
|
|
39 |
|
M191 Operation Panel...................................................................................................................... |
|
|
|
|
|
|
|
40 |
||
Alert LEDs............................................................................................................................................. |
|
|
|
|
|
|
|
|
40 |
|
16

Overview...................................................................................................................................................... |
41 |
Paper Path............................................................................................................................................ |
41 |
Drive Layout......................................................................................................................................... |
43 |
Image Writing...................................................................................................................................... |
44 |
2. Installation |
|
Installation Requirements................................................................................................................................. |
45 |
Installation Procedure.................................................................................................................................. |
45 |
Environment.................................................................................................................................................. |
45 |
Power Requirement...................................................................................................................................... |
46 |
Machine Level.............................................................................................................................................. |
46 |
Space Requirements.................................................................................................................................... |
46 |
Moving the Machine................................................................................................................................... |
48 |
Smart Organizing Monitor.......................................................................................................................... |
48 |
Important Features....................................................................................................................................... |
48 |
3. Preventive Maintenance |
|
Cleaning the Machine..................................................................................................................................... |
51 |
Before Cleaning........................................................................................................................................... |
51 |
Routine Cleaning.......................................................................................................................................... |
51 |
4. Replacement and Adjustments |
|
Before You Begin............................................................................................................................................. |
53 |
Precautions................................................................................................................................................... |
53 |
Special Tools................................................................................................................................................ |
53 |
Printing the Test Page and Reports............................................................................................................. |
53 |
Basic Procedures.............................................................................................................................................. |
56 |
Before You Begin......................................................................................................................................... |
56 |
M133, M162, M144, M163, M145, M146, M164 Covers.............................................................. |
56 |
AIO....................................................................................................................................................... |
56 |
Front Cover.......................................................................................................................................... |
57 |
Right Cover.......................................................................................................................................... |
58 |
Left Cover............................................................................................................................................. |
59 |
Top Cover............................................................................................................................................ |
61 |
Rear Cover........................................................................................................................................... |
61 |
M134, M141, M165, M147, M142 Covers, Platen Cover, Flatbed Unit.......................................... |
62 |
17

Platen Cover........................................................................................................................................ |
62 |
AIO....................................................................................................................................................... |
62 |
Front Cover.......................................................................................................................................... |
63 |
Right Cover.......................................................................................................................................... |
63 |
Left Cover............................................................................................................................................. |
65 |
Rear Cover........................................................................................................................................... |
66 |
Left Hinge............................................................................................................................................. |
66 |
Flatbed Scanner Unit.......................................................................................................................... |
69 |
Inner Cover.......................................................................................................................................... |
71 |
M135, M143, M167, M149, M168, M150, M166, M148, M191, M151, M169 Covers, |
|
Flatbed Unit, ADF......................................................................................................................................... |
72 |
Original Feed Tray.............................................................................................................................. |
72 |
AIO....................................................................................................................................................... |
72 |
Front Cover.......................................................................................................................................... |
73 |
Right Cover.......................................................................................................................................... |
73 |
Left Cover............................................................................................................................................. |
75 |
Left Hinge............................................................................................................................................. |
77 |
Rear Cover........................................................................................................................................... |
80 |
ADF/Flatbed Unit................................................................................................................................ |
80 |
Inner Cover.......................................................................................................................................... |
82 |
Removing the Fusing Unit............................................................................................................................ |
82 |
Utilities and Maintenance........................................................................................................................... |
87 |
Operation Panels............................................................................................................................................. |
90 |
M133, M162, M144, M163, M145, M146, M164 Operation Panel............................................. |
90 |
M134, M165, M147, M142 Operation Panel / Panel Cover............................................................ |
90 |
M135, M141, M143, M167, M149, M168, M150, M166, M148, M151, M169, M191 |
|
Operation Panel........................................................................................................................................... |
93 |
Laser Unit.......................................................................................................................................................... |
95 |
Removing the Laser Unit.............................................................................................................................. |
95 |
After Replacing the Laser Unit..................................................................................................................... |
96 |
Paper Pass......................................................................................................................................................... |
99 |
Paper Feed Roller...................................................................................................................................... |
100 |
Friction Pad................................................................................................................................................ |
102 |
Paper Transport Roller.............................................................................................................................. |
103 |
18
Image Transfer Roller................................................................................................................................ |
105 |
Paper Exit Roller........................................................................................................................................ |
108 |
Sensors........................................................................................................................................................... |
109 |
Registration Sensor.................................................................................................................................... |
109 |
Paper End Sensor...................................................................................................................................... |
110 |
Bypass Set Sensor..................................................................................................................................... |
110 |
Paper Exit Sensor....................................................................................................................................... |
111 |
Main Motor.................................................................................................................................................... |
113 |
Removing the Main Motor........................................................................................................................ |
113 |
Reinstalling the Main Motor..................................................................................................................... |
114 |
Clutch.............................................................................................................................................................. |
116 |
Paper Feed Clutch..................................................................................................................................... |
116 |
Switches.......................................................................................................................................................... |
117 |
Front Door Switch...................................................................................................................................... |
117 |
Interlock Switch.......................................................................................................................................... |
119 |
Fusing Unit...................................................................................................................................................... |
121 |
Separating the Fusing Unit........................................................................................................................ |
121 |
Fusing Exit Roller........................................................................................................................................ |
122 |
Pressure Roller............................................................................................................................................ |
123 |
Hot Roller, Fusing Lamp............................................................................................................................ |
123 |
Thermostat.................................................................................................................................................. |
125 |
Thermistor .................................................................................................................................................. |
126 |
Ground Plate.............................................................................................................................................. |
127 |
PCB................................................................................................................................................................. |
128 |
M133, M162, M144, M163, M145, M146, M164 Main Board.................................................. |
128 |
M134, M141, M165, M147, M142 Main Board............................................................................. |
129 |
M135, M143, M167, M149, M168, M150, M166, M148, M151, M169, M191 Main Board.... |
|
.................................................................................................................................................................... |
130 |
After Replacing the Main Board.............................................................................................................. |
131 |
M135, M141, M143, M167, M149, M168, M150, M151, M169 Fax Board.......................... |
133 |
M135, M141, M143, M167, M149, M168, M150, M151, M169 Fax Speaker....................... |
133 |
PSU............................................................................................................................................................. |
134 |
H.V.P.P........................................................................................................................................................ |
136 |
19

Wi-Fi Module............................................................................................................................................ |
139 |
Scanner Unit................................................................................................................................................... |
141 |
ADF (M135, M143, M167, M149, M168, M150, M166, M148, M151, M169, M191)........... |
142 |
Refilling the AIO............................................................................................................................................. |
143 |
Before You Begin....................................................................................................................................... |
143 |
AIO, Toner Packs.............................................................................................................................. |
143 |
Toner End Alert: M133, M134, M142, M162, M163, M165, M166, M164, M191........ |
143 |
Toner End Alert: M135, M141, M143, M167, M168, M169................................................. |
143 |
More About the Toner End Option................................................................................................. |
144 |
What You Need........................................................................................................................................ |
145 |
Refill Procedure.......................................................................................................................................... |
145 |
Removing Old Toner........................................................................................................................ |
146 |
Filling the AIO with New Toner....................................................................................................... |
147 |
5. System Maintenance Reference |
|
Firmware Update........................................................................................................................................... |
153 |
Before Updating the Firmware................................................................................................................. |
153 |
Firmware Update Procedure.................................................................................................................... |
153 |
Utilities............................................................................................................................................................. |
160 |
Overview of Utilities.................................................................................................................................. |
160 |
Smart Organizing Monitor....................................................................................................................... |
160 |
Initial Screen...................................................................................................................................... |
162 |
Status Tab Change Button................................................................................................................ |
164 |
Job Log Tab....................................................................................................................................... |
165 |
User Tool Tab.................................................................................................................................... |
168 |
IP Address Setting dialog................................................................................................................. |
169 |
System Tab........................................................................................................................................ |
170 |
Printer Tab......................................................................................................................................... |
172 |
Copy Tab........................................................................................................................................... |
173 |
Fax Tab.............................................................................................................................................. |
176 |
Scanner Tab...................................................................................................................................... |
177 |
Wi-FI Tab........................................................................................................................................... |
179 |
Smart Organizing Monitor Service Mode.............................................................................................. |
186 |
What Is Service Mode?................................................................................................................... |
186 |
20

Service Mode Screen....................................................................................................................... |
186 |
M166, M148, M141, M167, M149, M135, M168, M143, M151, M169, M191 User Tool |
|
Specification.............................................................................................................................................. |
193 |
System Settings.................................................................................................................................. |
194 |
Printer Features Settings.................................................................................................................... |
200 |
Copier Features Settings.................................................................................................................. |
200 |
Fax Features Settings (M141, M167, M149, M135, M168, M150, M143, M151, M169)..... |
|
............................................................................................................................................................ |
202 |
Scanner Features Settings................................................................................................................ |
208 |
Network Settings (M168, M150, M143, M151, M164).......................................................... |
211 |
Address Book Settings (M135, M141, M143, M167, M149, M168, M150, M151, M169)... |
|
............................................................................................................................................................ |
212 |
Printing Lists/Reports (M166, M148, M141, M167, M149, M135, M168, M150, M143, |
|
M151, M169)................................................................................................................................. |
212 |
Fax Maintenance (M135, M141, M143, M167, M149, M168, M150, M151, M169)............ |
213 |
Fax Test (M135, M141, M143, M167, M149, M168, M150, M151, M169)............................ |
221 |
6. Troubleshooting |
|
Service Calls................................................................................................................................................... |
223 |
Overview.................................................................................................................................................... |
223 |
General............................................................................................................................................. |
223 |
Fusing Related SC Codes................................................................................................................. |
224 |
When an Error Occurs..................................................................................................................... |
224 |
Executing Fuser SC Reset.......................................................................................................................... |
226 |
SC Tables................................................................................................................................................... |
227 |
SC Table Key.................................................................................................................................... |
227 |
SC100: Scanning............................................................................................................................. |
228 |
SC200: Scanning............................................................................................................................. |
228 |
SC400: Around the Drum................................................................................................................ |
230 |
SC500: Paper Feed, Transport....................................................................................................... |
231 |
SC600: Communication.................................................................................................................. |
235 |
SC800: Other................................................................................................................................... |
236 |
Error Codes................................................................................................................................................ |
236 |
Classification..................................................................................................................................... |
236 |
FATAL................................................................................................................................................. |
237 |
21

Error................................................................................................................................................... |
238 |
Supplement....................................................................................................................................... |
244 |
Image Problems............................................................................................................................................. |
249 |
Overview.................................................................................................................................................... |
249 |
Printing the Test Page................................................................................................................................ |
250 |
Print the Test Page without Smart Organizing Monitor.................................................................. |
251 |
Dark Lines in Halftone Areas.................................................................................................................... |
251 |
Common Problems......................................................................................................................................... |
253 |
All Models.................................................................................................................................................. |
253 |
M133, M134, M162, M144, M163, M165, M142, M166, M164, M191................................ |
254 |
M135, M141, M143, M167, M168, M169...................................................................................... |
254 |
7. Energy Saving |
|
Energy Save................................................................................................................................................... |
257 |
Energy Save Modes.................................................................................................................................. |
257 |
Energy Save Operation................................................................................................................... |
257 |
Timer Settings and Return to Standby Mode.................................................................................. |
258 |
Recommendations............................................................................................................................ |
258 |
Paper Save..................................................................................................................................................... |
259 |
Effectiveness of Duplex/Combine Functions........................................................................................... |
259 |
1. Duplex........................................................................................................................................... |
259 |
2. Combine Mode............................................................................................................................ |
259 |
3. Duplex + Combine....................................................................................................................... |
259 |
Total Counter..................................................................................................................................... |
260 |
22

1. Product Information
Specifications
See "Appendices" for the following information:
•Before You Read These Specifications
•General Specifications
•Printer Specifications
•Copier Specifications (M134, M165, M147, M142, M166, M148, M135, M141, M143, M167, M149, M168, M150, M151, M169, M191)
•Scanner Specifications (M134, M165, M147, M142, M166, M148, M135, M141, M143, M167, M149, M168, M150, M151, M169, M191)
•Fax Specifications (M135, M141, M143, M167, M149, M168, M150, M151, M169)
•Reports
•Software Specifications
23

1. Product Information
New Product Information
Series Machines Compared
General Differences
•Throughout this manual the machines are referenced by the model numbers only: M133, M162, M144, M163, M145, M134, M165, M147, M142, M166, M148, M135, M141, M143, M167, M149, M168, M150, M140, M164, M151, M169, and M191.
The 18-type machines can be identified by their external appearances.
24

New Product Information
|
Model |
ADF/ |
n/usb/ |
Display |
AIO:R/NR |
Scan to |
Handset |
|
Platen |
wifi |
USB |
||||
|
|
|
|
|
|||
|
|
|
|
|
|
|
|
|
M135 |
ADF |
usb |
2-LINE |
R |
- |
Y |
|
|
|
|
|
|
|
|
|
M141 |
Platen |
usb |
2-LINE |
R |
- |
Y |
|
|
|
|
|
|
|
|
|
M143 |
ADF |
n |
2-LINE |
R |
- |
Y |
|
|
|
|
|
|
|
|
|
M167 |
ADF |
usb |
2-LINE |
R |
- |
|
|
|
|
|
|
|
|
|
4in1 |
M149 |
ADF |
usb |
2-LINE |
NR |
- |
- |
|
|
|
|
|
|
|
|
|
M168 |
ADF |
n |
2-LINE |
R |
Y |
- |
|
|
|
|
|
|
|
|
|
M150 |
ADF |
n |
2-LINE |
NR |
Y |
- |
|
|
|
|
|
|
|
|
|
M169 |
ADF |
wifi |
2-LINE |
R |
Y |
- |
|
|
|
|
|
|
|
|
|
M151 |
ADF |
wifi |
2-LINE |
NR |
Y |
- |
|
|
|
|
|
|
|
|
|
M134 |
Platen |
usb |
2-digit |
R |
- |
- |
|
|
|
|
|
|
|
|
|
M165 |
Platen |
usb |
2-digit |
R |
- |
- |
|
|
|
|
|
|
|
|
|
M147 |
Platen |
usb |
2-digit |
NR |
- |
- |
|
|
|
|
|
|
|
|
3in1 |
M142 |
Platen |
n |
2-digit |
R |
- |
- |
|
|
|
|
|
|
|
|
|
M166 |
ADF |
n |
2-LINE |
R |
Y |
- |
|
|
|
|
|
|
|
|
|
M148 |
ADF |
n |
2-LINE |
NR |
Y |
- |
|
|
|
|
|
|
|
|
|
M191 |
ADF |
usb |
2-LINE |
R |
- |
- |
|
|
|
|
|
|
|
|
|
M133 |
- |
usb |
2 LEDs |
R |
- |
- |
|
|
|
|
|
|
|
|
|
M162 |
- |
usb |
2 LEDs |
R |
- |
- |
|
|
|
|
|
|
|
|
|
M144 |
- |
n |
2 LEDs |
R |
- |
- |
|
|
|
|
|
|
|
|
Printer |
M163 |
- |
n |
2 LEDs |
R |
- |
- |
|
|
|
|
|
|
|
|
|
M145 |
- |
n |
2 LEDs |
NR |
- |
- |
|
|
|
|
|
|
|
|
|
M164 |
- |
wifi |
2 LEDs |
R |
- |
- |
|
|
|
|
|
|
|
|
|
M146 |
- |
wifi |
2 LEDs |
NR |
- |
- |
|
|
|
|
|
|
|
|
Y: Support - : Not support
25
1. Product Information
ADF/Platen: ADF=ADF model, Platen= Platen cover model(Non-ADF) n/usb: n=network model, usb=usb model, wifi=wi-fi model AIO:R/NR: R=Refill model, NR=Not Refill model
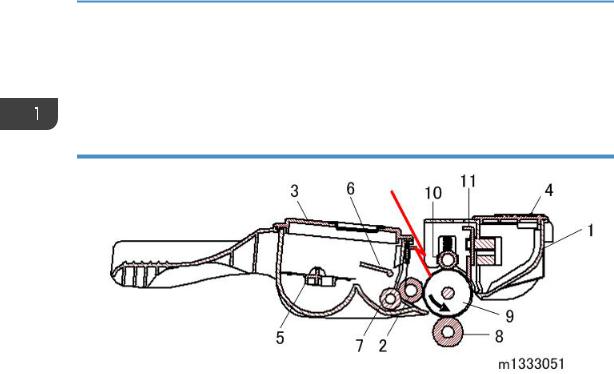
Common AIO
No. |
Part |
No. |
Part |
|
|
|
|
1 |
Waste Toner Tank |
7 |
Toner Supply Roller |
|
|
|
|
2 |
Development Roller |
8 |
Image Transfer Roller |
|
|
|
|
3 |
Toner Hopper |
9 |
Drum |
|
|
|
|
4 |
ID Chip |
10 |
Charge Roller |
|
|
|
|
5 |
Agitator |
11 |
Cleaning Blade |
|
|
|
|
6 |
Agitator Feeler |
|
|
|
|
|
|
•Throughout the service manual this unit is called the "AIO" (All-In-One).
•The AIO is common to all machines of this series.
•There are no serviceable parts inside the AIO. (Disassembly of an AIO is never required.)
•When the AIO runs out of toner, the toner waste tank can be emptied and the toner supply tank can be refilled with fresh developer/toner.
•An AIO can be refilled up to three times (this is the approximate service life of the drum). The refillings greatly extend the service life of the AIO.
•The AIO can be easily removed and replaced by the user.
26

New Product Information
•The AIO has an ID chip which helps the machine to detect when an AIO is set and when a new AIO has been installed.
Feature Summary
General Features
Unlike other machines in their class, these machines are not inkjet or GelJet printers—they are laser printers. The three machines of this series have these common features:
•Thin printers have a small footprint and require little space.
•They are extremely light and easy to carry:
•4in1 models: 11.1 kg (24.5 lb.) or less
•3in1 models: 9.9 kg (21.8 lb.) or less
•Printer models: 7.2 kg (15.9 lb.) or less
•Their AIO units are identical and allow up to three refills with non-toxic developer/toner. Here is a quick feature comparison.
|
M133 |
|
M135 |
|
|
|
|
|
M143 |
|
|
||
|
M162 |
|
|
|
||
|
M134 |
M167 |
|
|
||
|
M144 |
|
M166 |
|||
|
M165 |
M149 |
|
|||
Standard Features |
M163 |
M141 |
M148 |
|||
M147 |
M168 |
|||||
|
M145 |
|
M191 |
|||
|
M142 |
M150 |
|
|||
|
M146 |
|
|
|||
|
|
M151 |
|
|
||
|
M164 |
|
|
|
||
|
|
M169 |
|
|
||
|
|
|
|
|
||
|
|
|
|
|
|
|
ADF Unit |
No |
No |
Yes |
No |
Yes |
|
|
|
|
|
|
|
|
Fax Unit |
No |
No |
Yes |
Yes |
No |
|
|
|
|
|
|
|
|
Operation Panel |
2 keys & 2 LEDs |
2-digit |
2-line |
2-line |
2-line |
|
|
|
|
|
|
|
|
Output Tray |
Yes |
Yes |
Yes |
Yes |
Yes |
|
(50 sheets) |
||||||
|
|
|
|
|
||
|
|
|
|
|
|
|
Paper Tray |
Yes |
Yes |
Yes |
Yes |
Yes |
|
(150 sheets) |
||||||
|
|
|
|
|
||
|
|
|
|
|
|
|
Platen |
No |
Yes |
No |
Yes |
No |
|
|
|
|
|
|
|
27

1. Product Information
The following features are not supported by these machines:
•Bulk paper feed unit (only one small tray is available)
•USB2 Print
•NRS support (no UZ, Basil, or Cumin options available)
•Memory expansion
•HDD expansion
•G3 expansion (no G3 option available)
•PictBridge
Duplex Printing
These machines have no mechanism for automatic duplexing.
•However, the operator can run a print job and print on the first side of the pages, remove the printed sheets from the output tray, turn the stack over so the blank side is facing up, load the stack in the paper feed tray, and then run another job to print on the second sides of the pages.
•Both portrait and landscape printing are possible. Duplex printing must be set up with the print application. For more details, refer to the operating instructions.
Important Points to Remember
These are very important points to keep in mind while using the service manual:
•Functionality. M135, M166, M148, M143, M167, M149, M168, M150, M151, M169, and M191 have both the ADF and flatbed unit.
•Smart Organizing Monitor. This utility (installed with the printer driver at installation) is used to configure the system and handle errors of all machines of this series.
•Message and error displays. M135, M141, M166, M148, M143, M167, M149, M168, M150, M151, M169, and M191 have a 2-line display that can show errors (SC codes) and messages. The M134, M165, M147, M142, M146, and M164 display are limited to two digits, and the M133, M162, M144, M163, and M145 have no display. The Service Mode of Smart Organizing Monitor can be used to view error messages for all machines.
•User Tool. The M135, M141, M143, M167, M149, M168, M150, M151, M169, and M191 have a [User Tool] button which opens the User Tool menu settings used to configure the machine. The Service Mode of the Smart Organizing Monitor is used to configure all machines.
•Scanning. The M135, M141, M165, M147, M142, M166, M148, M143, M167, M149, M168, M150, M151, and M169 both support applications that use the TWAIN and WIA drivers for scanning. The originals can be scanned and saved directly onto a computer disk.
28
Loading...