


 Loading...
User Guide
Guide to Components
Setting up the Printer
Print Media
Printing
Copying
Scanning
Drivers
Print Over Wi-Fi
Keys and Indicators
Machine Maintenance
Troubleshooting
Printer Configurations (WEB page)
Appendix
For safe and correct use, be sure to read Safety Information before using the machine.

TABLE OF CONTENTS |
|
How to Read the Manual................................................................................................................................ |
3 |
Important Safety Instructions ................................................................................................. |
5 |
Important Safety Instructions ................................................................................................. |
8 |
ENERGY STAR Program................................................................................................................................ |
10 |
1.Guide to Components
2.Setting up the Printer
Opening the Paper Feed............................................................................................................................... |
13 |
|
Loading Paper................................................................................................................................................ |
14 |
|
Connecting the Printer to a Power Socket................................................................................................... |
16 |
|
Starting the Printer......................................................................................................................................... |
17 |
|
Installing Printer Drivers and “RICOH Printer” Software.......................................................................... |
18 |
|
Printing a Test Page........................................................................................................................................ |
2 5 |
|
Printing a Configuration Page...................................................................................................................... |
26 |
|
3. |
Print Media |
|
Supported Paper............................................................................................................................................ |
2 7 |
|
Non-Recommended Paper Types................................................................................................................ |
28 |
|
Print Area........................................................................................................................................................ |
2 9 |
|
4. |
Printing |
|
Print Jobs......................................................................................................................................................... |
3 0 |
|
Canceling Print Jobs...................................................................................................................................... |
32 |
|
5. |
Copying |
|
Placing Originals........................................................................................................................................... |
3 4 |
|
Basic Copying................................................................................................................................................ |
36 |
|
Copying Both sides of an ID Card onto one side of Paper....................................................................... |
38 |
|
Canceling a Copying.................................................................................................................................... |
41 |
|
6. |
Scanning |
|
Scanning with a PC....................................................................................................................................... |
42 |
|
7. |
Drivers |
|
Supported System Environment.................................................................................................................... |
4 8 |
|
1

Drivers Used in Windows.............................................................................................................................. |
49 |
Drivers Used in Mac...................................................................................................................................... |
62 |
8. Print Over Wi-Fi |
|
Wi-Fi Configuration and Installation........................................................................................................... |
6 6 |
Installation of Wireless Driver Program in Mac OS System...................................................................... |
73 |
Print over Wi-Fi.............................................................................................................................................. |
78 |
9. Keys and Indicators |
|
Introduction.................................................................................................................................................... |
79 |
LED Indicator and Status Description.......................................................................................................... |
8 0 |
10. Machine Maintenance |
|
Maintaining the Toner Cartridge................................................................................................................. |
8 5 |
Replacing the Toner Cartridge..................................................................................................................... |
87 |
Cleaning the Printer....................................................................................................................................... |
89 |
11. Troubleshooting |
|
FAQs................................................................................................................................................................ |
91 |
Paper Feed Problems..................................................................................................................................... |
9 2 |
Removing Paper Jams.................................................................................................................................... |
9 3 |
Print Quality Problems................................................................................................................................. |
101 |
Printing Problems........................................................................................................................................ |
102 |
Scanning Problems..................................................................................................................................... |
104 |
LED Indicator Status for Errors and Operation Guide............................................................................ |
105 |
12.Printer Configurations (WEB page) |
|
Overview..................................................................................................................................................... |
106 |
13. Appendix |
|
Precautions about Toner............................................................................................................................. |
109 |
Moving and Transporting the Machine..................................................................................................... |
110 |
Toner Cartridge............................................................................................................................................ |
111 |
Specifications of the Machine.................................................................................................................... |
112 |
Trademark..................................................................................................................................................... |
115 |
2

How to Read the Manual
Symbols Used in the Manual
The symbols used in this manual have the following meanings.
Indicates an explanation containing points to pay attention to when operating the software, restrictions, or other information. Be sure to read the explanation.
Indicates an explanation containing information that is useful to know, a supplementary operating procedure, or other information.
Indicates reference information that may be helpful. [ ]
Indicates a screen item or button name.

 (mainly Europe and Asia)


 (mainly North America)
Differences in the functions of Region A and Region B models are indicated by two symbols. Read the information indicated by the symbol that corresponds to the region of the model you are using.
Introduction
This manual contains detailed instructions and notes on the operation and use of this machine. For your safety and benefit, read this manual carefully before using the machine. Keep this manual in a handy place for quick reference.
Legal Prohibition
Do not copy or print any item for which reproduction is prohibited by law. Copying or printing the following items is generally prohibited by local law:
bank notes, revenue stamps, bonds, stock certificates, bank drafts, checks, passports, driver’s licenses.
The preceding list is meant as a guide only and is not inclusive. We assume no responsibility for its completeness or accuracy. If you have any questions concerning the legality of copying or printing certain items, consult with your legal advisor.
This machine is equipped with a function that prevents making counterfeit bank bills. Due to this function the original images similar to bank bills may not be copied properly.
3

Disclaimer
Contents of this manual are subject to change without prior notice. In no event will the company be liable for direct, indirect, special, incidental, or consequential damages as a result of handling or operating the machine.
To the maximum extent permitted by applicable laws, in no event will the manufacturer be liable for any damages whatsoever arising out of failures of this machine, losses of the registered data, or the use or non-use of this product and operation manuals provided with it.
Make sure that you always copy or have backups of the data registered in this machine. Documents or data might be erased due to your operational errors or malfunctions of the machine.
In no event will the manufacturer be responsible for any documents created by you using this machine or any results from the data executed by you.
For good output quality, the manufacturer recommends that you use genuine toner from the manufacturer.
The manufacturer shall not be responsible for any damage or expense that might result from the use of parts other than genuine parts from the manufacturer with your office products.
Two kinds of size notation are employed in this manual.
Some illustrations or explanations in this guide may differ from your product due to improvement or change in the product.
4
Important Safety Instructions


User Information on Electrical & Electronic Equipment
Users in the countries where this symbol shown in this section has been specified in national law on collection and treatment of E-waste
Our Products contain high quality components and are designed to facilitate recycling. Our products or product packaging are marked with the symbol below.
The symbol indicates that the product must not be treated as municipal waste. It must be disposed of separately via the appropriate return and collection systems available. By following these instructions you ensure that this product is treated correctly and help to reduce potential impacts on the environment and human health, which could otherwise result from inappropriate handling. Recycling of products helps to conserve natural resources and protect the environment.
For more detailed information on collection and recycling systems for this product, please contact the shop where you purchased it, your local dealer or sales/service representatives.
All Other Users
If you wish to discard this product, please contact your local authorities, the shop where you bought this product, your local dealer or sales/service representatives.
For Users in India
This product complies with the “India E-waste Rule 2011” and prohibits use of lead, mercury, hexavalent chromium, polybrominated biphenyls or polybrominated diphenyl ethers in concentrations exceeding 0.1 weight % and 0.01 weight % for cadmium, except for the exemptions set in Schedule 2 of the Rule.
5

For Turkey only
Üretici:
Ricoh Company, Ltd. 8-13-1 Ginza,
Chuo-ku, Tokyo 104-8222 Japan
+81-36278-2111(English only/Sadece İngilizce)
Environmental Advice for Users
Users in the EU, Switzerland and Norway
Consumables yield
Please refer to either the User’s Manual for this information or the packaging of the consumable.
Recycled paper
The machine can use recycled paper which is produced in accordance with European standard EN 12281:2002 or DIN 19309. For products using EP printing technology, the machine can print on 64g/m2 paper, which contains less raw materials and represents a significant resource reduction.
Duplex printing (if applicable)
Duplex printing enables both sides of a sheet of paper to be used. This saves paper and reduces the size of printed documents so that fewer sheets are used. We recommend that this feature is enabled whenever you print.
Toner and ink cartridge return program
Toner and ink cartridge for recycling will be accepted free of charge from users in accordance with local regulations.
For details about the return program, please refer to the Web page below or consult your service person.
https://www.ricoh-return.com/
6

Energy efficiency
The amount of electricity a machine consumes depends as much on its specifications as it does on the way you use it. The machine is designed to allow you to reduce electricity costs by switching to Ready mode after it prints the last page. If required, it can immediately print again from this mode.
If no additional prints are required and a specified period of time passes, the device switches to an energy saving mode.
In these modes, the machine consumes less power (watts). If the machine is to print again, it needs a little longer to return from an energy saving mode than from Ready mode.
For maximum energy savings, we recommend that the default setting for power management is used.
Products that comply with the Energy Star requirement are always energy efficient.
7

Important Safety Instructions


Notes to Users in the State of California
Perchlorate Material - special handling may apply. See: www.dtsc.ca.gov/hazardouswaste/perchlorate
Notes to USA Users of FCC Requirements
Part 15 of the FCC Rules
Note
This equipment has been tested and found to comply with the limits for a Class B digital device, pursuant to Part 15 of the FCC Rules. These limits are designed to provide reasonable protection against harmful interference in a residential installation. This equipment generates, uses and can radiate radio frequency energy and, if not installed and used in accordance with the instructions, may cause harmful interference to radio communications. However, there is no guarantee that interference will not occur in a particular installation. If this equipment does cause harmful interference to radio or television reception, which can be determined by turning the equipment off and on, the user is encouraged to try to correct the interference by one more of the following measures:
•Reorient or relocate the receiving antenna.
•Increase the separation between the equipment and receiver.
•Connect the equipment into an outlet on a circuit different from that to which the receiver is connected.
•Consult the dealer or an experienced radio /TV technician for help.
This device complies with part 15 of the FCC Rules.
Operation is subject to the following two conditions:
(1)This device may not cause harmful interference, and
(2)This device must accept any interference received, including interference that may cause undesired operation.
Changes or modifications not expressly approved by the party responsible for compliance could void the user’s authority to operate the equipment.
Caution
Changes or modifications not expressly approved by the party responsible for compliance could void the user’s authority to operate the equipment.
Country Code Statement
For product available in the USA/Canada market, only channel 1~11 can be operated. Selection of other channels is not possible.
8
CAUTION:
Any changes or modifications not expressly approved by the grantee of this device could void the user’s authority to operate the equipment. This transmitter must not be co-located or operating in conjunction with any other antenna or transmitter.
Federal Communication Commission (FCC) Radiation Exposure Statement
This equipment complies with FCC radiation exposure limits set forth for an uncontrolled environment and meets the FCC radio frequency (RF) Exposure Guidelines. This equipment has very low levels of RF energy that it deemed to comply without maximum permissive exposure evaluation (MPE). But it is desirable that it should be installed and operated keeping the radiator at least 20cm or more away from person’s body (excluding extremities: hands, wrists, feet and ankles).
9

ENERGY STAR Program
ENERGY STAR® Program Requirements for Imaging Equipment
The ENERGY STAR® Program Requirements for Imaging Equipment encourage energy conservation by promoting energy efficient computers and other office equipment.
The program backs the development and dissemination of products that feature energy saving functions.
It is an open program in which manufacturers participate voluntarily.
Targeted products are computers, monitors, printers, facsimiles, copiers, scanners, and multifunction devices. Energy Star standards and logos are internationally uniform.
This machine is equipped with the following Energy Saver mode: The machine recovers from Energy Saver mode when it receives a print job or when any key is pressed.
This machine automatically enters Energy Saver mode about 60 seconds after the last operation is completed.
Specifications
Energy Saver mode |
Power Consumption*1 |
1.2 W or less |
|
Default Interval |
60 seconds |
|
|
|
|
Recovery Time*1 |
25 seconds or less |
*1 Recovery time and power consumption may differ depending on the conditions and environment of the machine.
10

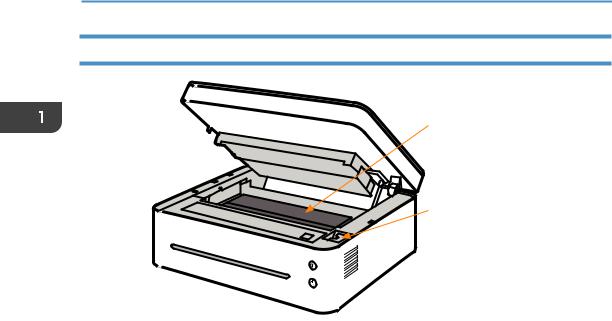
1. Guide to Components
This section introduces the names of the parts in front, at the back and inside the machine.
Exterior
Scanner glass
Scanner cover
|
Start key |
Paper exit |
Power key |
|
 USB port
|
Power port |
Paper tray |
|
|
|
|
|
|
•Please see “9. Keys and Indicators” for details of key functions and how indicators display the printer device status.
11
1. Guide to Components
Interior
Toner cartridge
Paper jam release lever
12

2. Setting up the Printer
Opening the Paper Feed
1. Open the feed tray.
DPJ011
2. Pull out the Extension Panel 1.
 Extension Panel 1
DPJ012
3. Flip open the Extension Panel 2.
Extension Panel 2
DPJ013
13

2. Setting up the Printer
Loading Paper
This section explains how to load paper into the paper feed.
•Please see “3. Print Media” for details of print media.
1.Before loading the paper, bend the sheets back and forth and fan the stack.
Use a flat surface such as a desk to line up the edges of the sheets.
DPJ103
•Doing this helps to prevent paper jams.
2.Slide the paper guides outward, then load paper with the print side up.
2
1
1
DPJ204
3.Do not load too much paper at a time. The feed tray can hold 50 sheets (A4 70g/m²) maximum.
14

4. Pinch the paper guide clip and slide it to fit the paper size.
DPJ203
•Please make sure to set the paper size and type when loading paper. When printing, please specify the paper size and type in the printer driver so the settings can be used for printing the loaded paper.
•Please see “3. Print Media” for how to specify the paper size and type in the printer driver.
•Curled paper may cause paper jams. Please flatten curled paper before loading it.
•Do not push the paper guide too far. This may cause the paper to bend.
•Failure to adjust the paper guide may cause a paper jam.
•If you need to add paper to the paper feed while printing, remove any remaining paper in the paper feed first and then add new paper. Adding new sheets to the feed tray while there is paper remaining may cause paper jams or concurrent feeding of multiple sheets.
15
2. Setting up the Printer
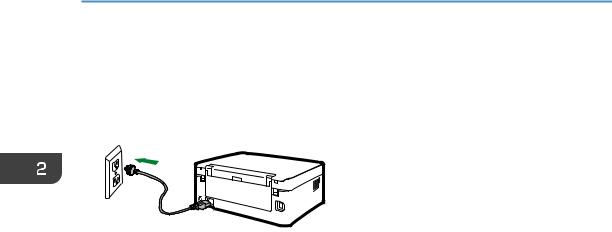
Connecting the Printer to a Power Socket
1.Plug the power cable into the power port at the back of the printer.
DPJ010
2.Plug the other end of the power cable into a properly grounded AC power supply socket.
16

Starting the Printer
Hold the  power key for 0.5 seconds or longer to start the printer.
The indicator display shown below indicates that the printer is ready.
Start indicator is off.
Power indicator is green.
•After the printer starts, the scanner will perform auto calibration. Please wait for the process to complete.
17

2. Setting up the Printer
Installing Printer Drivers and “RICOH Printer”
Software
Different Models
Some functions may not be available on all models or in all countries/regions. Drivers and “RICOH Printer” software are listed below.
Drivers and “RICOH Printer” |
|
|
|
SP 150SU |
|
SP 150SUw |
software |
|
|
|
|
||
|
|
|
|
|
|
|
|
|
|
|
|
|
|
Printer Driver |
|
|
|
4 |
|
4 |
|
|
|
|
|
|
|
Scanner Driver |
|
|
|
4 |
|
4 |
|
|
|
|
|
|
|
“RICOH Printer” |
|
|
|
4 |
|
4 |
(Windows & Mac) |
|
|
|
|
||
|
|
|
|
|
|
|
|
|
|
|
|
|
|
“RICOH Printer” (Android & iOS) |
|
|
4 |
|||
|
|
|
|
|
|
|
Three ways to install drivers |
Quick Installation (USB) |
|
||||
|
Wi-Fi Configure and Installation |
|
||||
|
Network Installation |
|
||||
Installing “RICOH Printer” soft- |
“RICOH Printer” software will be installed on your device by |
|||||
ware |
default when you choose Quick Install (USB), or Wi-Fi Config- |
|||||
|
ure and Installation. |
|
||||
|
Install “RICOH Printer” separately using the Software option |
|||||
|
when you choose Network Installation for installing a printer |
|||||
|
driver. |
|
||||
|
|
|
• Please see the User Guide for “RICOH Printer” for details. |
|||
|
|
|
||||
|
|
|
||||
Before installing printer drivers |
Please confirm the following items: |
|
||||
• Your computer has 128MB or more of internal memory.
• Your computer has 200 MB or more free space available on the hard disk.
• Your computer has a Windows or Apple Mac operating system which supported by this printer.
18
• Please see “7. Drivers” for more information about compatible operating systems.
Quick Installation (USB)
Installing drivers on Windows
Here the example is Windows 7. Your specific operating system decides the steps you will take.
1.Start the printer and connect the computer and printer with the USB cable.
2.Insert the CD-ROM supplied with this product into the computer’s CD-ROM drive.
3.Select proper installation directory for your printer model. Click “setup.exe” to start the installation.
4.Select a language when the installation program interface comes up.
5.Click [Quick Installation (USB)]. Please study the Agreement. If you accept the agreement, please tick the box in front of [I have agreed...] and then click [Next].
6.The program will start installing automatically.
19

2.Setting up the Printer
7.Click [Finish] after the installation is completed.
The printer is ready for use after the printer driver program is installed.
Installing drivers on Mac OS
1.Start the printer and connect the computer and printer with the USB cable.
2.Insert the CD-ROM supplied with this product into the computer’s CD-ROM drive.
3.Double click the CD disk icon on the computer desktop.
4.Double click the Install icon. A window will pop up as shown in the screenshot below.
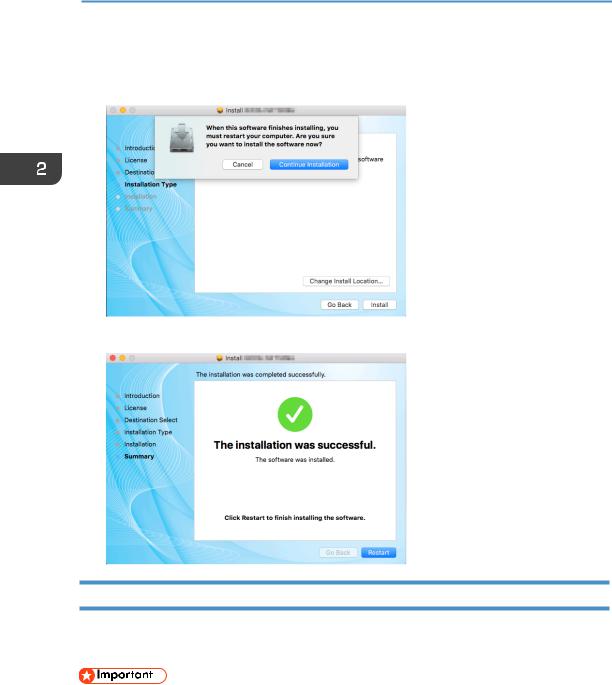
5.Click [Continue] in the introduction window.
6.When the License Agreement interface appears, please select the required language.
20

7.Please carefully read the software License Agreement, and click [Continue].
8.If you accept the terms of the license agreement, please click [Agree] to continue installation.
9.Click [Install], and the system will perform a default install of the software.
21
2. Setting up the Printer
10.For Mac OS X, enter the administrator name and password and click [Install
Software].
11.Click [Continue Installation].
12. Click [Restart] to complete the installation.
Wi-Fi Configure and Installation
If you want the wireless features when you use the printer for the first time, you need to set up the wireless configuration before you can operate the printer wirelessly.
•Some features are unavailable to a certain model or in a certain country/region.
•Regarding specific configurations and features of a model, please see “Different Models”.
•Regarding the installation of the wireless printer driver, please see “8. Print Over Wi-Fi”.
22

Network Installation
Please install the wireless printer driver the first time you use a printer that already has wireless configuration.
• Some functions and optional items may not be available on all models or in all countries/regions.
•Regarding specific configurations and features of a model, please see “Different Models”.
•Regarding the installation of the wireless printer driver, please see “8. Print Over Wi-Fi”.
Upgrading Printer Drivers
You can upgrade the installed printer driver by following the steps below.
1.In the [Start] menu, click [Devices and Printers].
•Windows Server 2003/2003 R2:
In the [Start] menu, select [Printers and Faxes].
•Windows Vista, Windows Server 2008:
In the [Start] menu, select [Control Panel] and click [Hardware and Sound]-[Printer]
•Windows 8/8.1/10, Windows Server 2012/2012 R2:
Click [Settings] on the charm bar, and then click [Control Panel]. When the window pops up, click [View devices and printers].
2.Right click the icon of the printer you want to modify, and click [Printer Properties].
•Windows Vista, Windows Server 2003/2008: Right click the icon, and click [Properties].
3.Click the [Advanced] tab.
4.Click [New Driver...], and click [Next].
5.Click [Have Disk....].
6.Click [Browse...], and select the location of the printer driver.
7.Click [OK] and specify the printer model.
8.Click [Next].
9.Click [Finish].
10.Click [OK] to close Printer Properties window.
11.Restart the computer.
23

2. Setting up the Printer
Uninstalling Printer Drivers
You can use the uninstall program also can uninstall the printer driver by following the steps below.
1.In the [Start] menu, click [Devices and Printers].
•Windows Server 2003/2003 R2:
In the [Start] menu, select [Printers and Faxes].
•Windows Vista, Windows Server 2008:
In the [Start] menu, select [Control Panel] and click [Hardware and Sound]-[Printer].
•Windows 8/8.1/10, Windows Server 2012/2012 R2:
Click [Settings] on the charm bar, and then click [Control Panel]. When the window pops up, click [View devices and printers].
2.Right click the icon of the printer you want to delete, and click [Remove Device].
•Windows Vista, Windows Server 2003/2003 R2/2008: Right click the icon you want to delete and click [Delete].
3.Click [Yes].
4.Click any printer icon, and click [Print Server Properties].
5.Click the [Driver] tab.
6.If [Change Driver Settings] is displayed, please click it.
7.Select the type of printer that you want to delete, and then click Click [Delete].
8.Select [Remove Driver And Driver Package] and click [OK].
9.Click [Yes].
10.Click [Delete].
11.Click [OK].
12.Click [Close] to close the Print Server Properties window.
24

Printing a Test Page
At the end of driver installation,there will be a print test page option,and you can also print the test page by the following.
1.Click [Start], then [Devices and Printers]. Right click your printer and select
[Printer Properties] to display the properties dialog box (As shown below).
2.Click [Print Test Page].
If the test page is successfully printed, the RICOH SP 150SU/SP 150SUw has been configured correctly.
25

2. Setting up the Printer
Printing a Configuration Page
The configuration page shows your printer settings, such as printer model name, network parameters, name and password of Soft AP, Toner Volume, Waste Toner Box and Print Count.
When the printer is in the state of standby, quickly press the power key three times in 1.5 seconds and observe the indicator light.
Start indicator is off.
Power indicator alternates between green and off every second.
26

3. Print Media
Supported Paper
Paper Sizes
• A4 |
|
• Letter |
8½” × 11 |
• Legal |
8½” × 14 |
• B5 |
|
• A5 LEF |
|
• A5 SEF |
|
• B6 LEF |
|
• B6 SEF |
|
• A6 |
|
• Executive |
7¼” × 10½ |
•16K
•Custom Paper Size
Custom Paper Size supports the following sizes:
• Width |
Approx. 76.2-216mm (3-8.5 inches) |
• Length |
Approx. 116-355.6mm (4.57-14 inches) |
Paper Types
• Plain Paper |
(70-90 g/m²) |
• Recycled Paper |
(70-90 g/m²) |
• Thick Paper |
(90-105 g/m²) |
• Thin Paper |
(60-70 g/m²) |
Paper Capacity
• Paper tray 50 sheets (70 g/m²)
27

3. Print Media
Non-Recommended Paper Types
Do not use the following types of paper:
•Special paper for ink-jet printers
•Special paper for viscous inks
•Curled, folded or creased paper
•Twisted paper
•Corrugated paper
•Wet paper
•Dirty or torn paper
•Excessively dry paper that may produce static
•Printed paper except that with header/footer designs
•Paper printed by non-laser printers (e.g. monochrome or color copiers, ink-jet printers, etc) in particular may cause failures
•Special paper such as thermal paper and carbon paper
•Paper weighing heavier or lighter than the limit
•Paper with windows, holes, perforations, cutouts, or embossing
•Paper with clips or staples
•Envelopes
•Poorly stored paper can cause paper misfeeds, print quality degradation, or malfunctions.
•Use of any of the paper types listed above may damage the product. Such damage is not covered by the warranty.
28
Loading...