

Page 1

20-511 .fm Page 1 Wednesday, August 4, 1999 2:1 3 PM
OWNER’S MANUAL
Direct Entry Programmable Scanner
Please read before using this equipment.
Cat. No.
20-511
PRO-66
50-Channel
Page 2

20-511 .fm Page 2 Wednesday, August 4, 1999 2:1 3 PM
FEATURES
Your new RadioShac k PRO-66 50- Chan nel Dir ect Ent ry Pr ogrammab le
Scanner lets you in on all the action! This scanner gives you direct access to more than 28,000 frequencies that include the police department, fire department, ambulance, amateur radio, and transportation
services. You can sel ect u p to 5 0 c hannels fo r your sc anner t o scan and
you can change your selection at any time.
The sec ret t o you r sc an ner’s ab ility to sca n s o ma ny f requencies is its
custom-designed microprocessor — a tiny, built-in computer. Your
scanner also has th ese special features:
8-Digit Liquid Crystal Display
bers as well as mode and status indicators.
50 Programmable Cha nnels
ner ’s memor y.
Band Search
quencies, and direct the search upward or downward through the
bands.
Direct Search
Lockout Function
channels while scanning.
Search Skip
skip during a band or direct search to avoid unwant ed frequencies.
Monitor Memory
during a frequen cy search, which you can then tr ansfer into a channel.
Two-Second Scan Delay
fore moving to another channel, so you can hear more replies.
Weather Band Key
cies so you can hear about current weather conditions.
Keylock
gramming.
— lets you search the frequency bands for active fre-
— lets you search from the current frequency.
— lets you set your scanner to skip over specified
— lets you select up to 20 frequencies for the scanner to
— lets you temporarily store a frequency you locate
— scans seven preprogrammed weather frequen-
— prevent s you from accidentally changing the scanner’ s pro-
— shows channel and frequency num -
— let you store f requencies i nto the sc an-
— lets you delay scanning for 2 seconds be-
1996 Tandy Corporation.
RadioShack is a trademark used by Tandy Corporation.
2
All Rights Reserved.
Page 3

20-511 .fm Page 3 Wednesday, August 4, 1999 2:1 3 PM
Memory Backup — keeps the channel frequencies stored in memory
for up to 1 hour during a power loss .
Low Battery Alarm — lets you know when the batteries get low.
Three Power Sources — let you power the scanner from internal bat-
teries, a standard AC outlet (using an optional AC adapter), or a vehicle’s battery (using an optional DC power cor d).
Ni-Cd Battery Charging Circuit — lets you recharge nickel-cadmium
batteries while t hey are inside the batter y com partment.
BNC Connector — lets you c onnec t the s uppli ed fle xible antenna or an
optional outdoor antenna.
Audio Output Jack — lets you connect optional earphones or headphones so you can listen privately, o r external speakers so you can listen in a noisy area.
Your scanner can recei ve all of these bands:
• 29–54 MHz (VHF Low and 6-Meter Ham Band)
• 137–144 MHz (Government)
• 144–148 MHz (2-Meter Ham Band)
• 148–174 MHz (VHF High)
• 406–450 MHz (Ham radio and gove rnment)
• 450–470 MHz (UHF Standard)
• 470–512 MHz (UHF “T” Band)
• 806–823.9375 MHz (Public Service)
• 851–868.9375 MHz (UHF Hi)
• 896.1125–956 MHz (UHF Hi, 33 Centimeter Amateur Radio)
In addition, your scanner is preprogrammed with the following weather
service channels:
• 162.400 MHz
• 162.425 MHz
• 162.450 MHz
• 162.475 MHz
• 162.500 MHz
• 162.525 MHz
• 162.550 MHz
3
Page 4

20-511 .fm Page 4 Wednesday, August 4, 1999 2:1 3 PM
This owner’s manual also includes the section “Guide to the Action
Bands” on Page 30, which lets you tar get service s in your area by givi ng
you frequency ranges to search. You can then store any of these frequencies into memory for easy scanning.
For your re cords, we r ecommen d yo u recor d your sca nner’s ser ial number in the space provided. The serial number is on the scanner’s back
panel.
Serial Number _____________
FCC NOTICE
Your scanner might cause radio or TV interference even when it is operating properly. To determine whether your scanner is causing the interference, turn off your scanner. If the interference goes away, your
scanner is caus ing i t. Tr y the foll owing metho ds to elim inat e the i nter ference:
• Move your scanner away from the receiver
• Connect your scanner to an outlet that is on a different electrical
circuit from the receiver
• Contact your loc al RadioShack store for hel p
If you cannot eliminate t he interference, the FCC requires that you stop
using your scanner.
Note:
Mobile use of th is scanner is unlawful or requires a permit i n some
areas. Check the laws in your area.
4
Page 5

20-511 .fm Page 5 Wednesday, August 4, 1999 2:1 3 PM
SCANNING LEGALLY
Your scanner cover s freque nci es use d by many dif fe rent gr oups incl uding police and fir e departments , ambulance ser vices, gover nment agencies, private companies, amateur radio services, military operations,
pager services, and wireline (telephone and telegraph) service providers. It is legal to listen to almost every transmission your scanner can
receive. However, there are some transmissions you should never intentionally li sten to. These includ e:
• Telephone conversations (either cellular, cordless, or other private
means of telephone signal transmission)
• Pager transmissions
• Any scrambled or enc rypted transmis sions
According to the Electronic Communications Privacy Act (ECPA), you
are subject to fines and possi ble impris onment for i ntentionally listening
to, using, or divulging the contents of such a transmission unless you
have the consent of a party to the conversation (unless such activity is
otherwise illegal).
RadioShack encourages responsible, l egal scanner use.
5
Page 6

20-511 .fm Page 6 Wednesday, August 4, 1999 2:1 3 PM
CONTENTS
Preparation . . . . . . . . . . . . . . . . . . . . . . . . . . . . . . . . . . . . . . . . . . . . . 8
Power Sources . . . . . . . . . . . . . . . . . . . . . . . . . . . . . . . . . . . . . . . 8
Using Internal Batteries. . . . . . . . . . . . . . . . . . . . . . . . . . . . . . . . . 8
Important Information about the External Power Jacks . . . . . . . .9
Using Standard AC Power . . . . . . . . . . . . . . . . . . . . . . . . . . . . . 10
Using Vehicle Battery Power. . . . . . . . . . . . . . . . . . . . . . . . . . . . 12
Charging Nickel-Cadmium Batteries. . . . . . . . . . . . . . . . . . . . . . 13
Connecting the Ant enna. . . . . . . . . . . . . . . . . . . . . . . . . . . . . . . 14
Connecting an Opti onal Antenna . . . . . . . . . . . . . . . . . . . . . .14
Connecting an Earphone/Headphones . . . . . . . . . . . . . . . . . . . .15
Listening Safely . . . . . . . . . . . . . . . . . . . . . . . . . . . . . . . . . . .15
Traffic Safety. . . . . . . . . . . . . . . . . . . . . . . . . . . . . . . . . . . . . . 15
Connecting an Extension Speaker . . . . . . . . . . . . . . . . . . . . . . .16
Attaching the Belt Clip. . . . . . . . . . . . . . . . . . . . . . . . . . . . . . . . . 16
Understanding Your Scanner . . . . . . . . . . . . . . . . . . . . . . . . . . . . . 17
A Look at the Keypad . . . . . . . . . . . . . . . . . . . . . . . . . . . . . . . . . 17
A Look at the Display . . . . . . . . . . . . . . . . . . . . . . . . . . . . . . . . .18
Operation . . . . . . . . . . . . . . . . . . . . . . . . . . . . . . . . . . . . . . . . . . . . . 20
Turn ing on the Scanner and Setting Sque lch . . . . . . . . . . . . . . .20
Storing Freque ncies . . . . . . . . . . . . . . . . . . . . . . . . . . . . . . . . . .21
Searching For and Sto ring Active Frequenci es. . . . . . . . . . . . . .22
Band Search. . . . . . . . . . . . . . . . . . . . . . . . . . . . . . . . . . . . . .22
Direct Search . . . . . . . . . . . . . . . . . . . . . . . . . . . . . . . . . . . . . 23
Search Skip Memory . . . . . . . . . . . . . . . . . . . . . . . . . . . . . . . 24
Listening to the Monitor Memory. . . . . . . . . . . . . . . . . . . . . . . . . 25
Moving a Frequency fr om the Monitor Memory to a Channel. . .25
Scanning the Stored Channels. . . . . . . . . . . . . . . . . . . . . . . . . .26
Using the 2-Second Delay . . . . . . . . . . . . . . . . . . . . . . . . . . .26
Locking Out Channels . . . . . . . . . . . . . . . . . . . . . . . . . . . . . .27
Manually Select ing a Channel. . . . . . . . . . . . . . . . . . . . . . . . . . . 27
Listening to the Weather Band . . . . . . . . . . . . . . . . . . . . . . . . . . 28
Using the Keylock . . . . . . . . . . . . . . . . . . . . . . . . . . . . . . . . . . . . 28
A General Guide to Scanning. . . . . . . . . . . . . . . . . . . . . . . . . . . . . 29
Guide to Frequenci es . . . . . . . . . . . . . . . . . . . . . . . . . . . . . . . . . 29
National Weather Frequencies. . . . . . . . . . . . . . . . . . . . . . . . 29
Birdie Frequen cies . . . . . . . . . . . . . . . . . . . . . . . . . . . . . . . . .29
Guide to the Action Bands . . . . . . . . . . . . . . . . . . . . . . . . . . . . . 30
Typical Band Usage . . . . . . . . . . . . . . . . . . . . . . . . . . . . . . . . 30
Primary Usage . . . . . . . . . . . . . . . . . . . . . . . . . . . . . . . . . . . .30
Specified Intervals . . . . . . . . . . . . . . . . . . . . . . . . . . . . . . . . .31
Band Allocation. . . . . . . . . . . . . . . . . . . . . . . . . . . . . . . . . . . . . . 31
Avoiding Image Frequencies. . . . . . . . . . . . . . . . . . . . . . . . . . . . 35
Frequency Conversion . . . . . . . . . . . . . . . . . . . . . . . . . . . . . . . .35
6
Page 7

20-511 .fm Page 7 Wednesday, August 4, 1999 2:1 3 PM
Trou bleshooting . . . . . . . . . . . . . . . . . . . . . . . . . . . . . . . . . . . . . . . .36
Resetting the Scanner. . . . . . . . . . . . . . . . . . . . . . . . . . . . . . . . .37
Care and Maintenance . . . . . . . . . . . . . . . . . . . . . . . . . . . . . . . . . . .38
Specifications . . . . . . . . . . . . . . . . . . . . . . . . . . . . . . . . . . . . . . . . . .39
7
Page 8

20-511 .fm Page 8 Wednesday, August 4, 1999 2:1 3 PM
PREPARATION
POWER SOURCES
You can power your scanner from any of three sources:
• Internal batteries (not suppli ed)
• Standard AC power (usi ng an optional AC adapter)
• Vehicle batt e ry power (us ing an optio nal DC power cord)
USING INTERNAL BATTERIES
You can power your scanner wi th four AA batteries. For the longest operation and best performance, we recommend alkaline batteries (such
as Cat. No. 23 -552). Or, you can use recha rge able ni ckel- cadmi um batteries (Cat. No. 23- 125).
Warning:
nickel-ca dmium batter ies inside t he battery compartmen t. However, you
must never use this circuit when you have installed non-rechargeable
batteries in the scanner. Be sure to read “Important Information about
the External Pow er Jack s” on P age 9 a nd “C har ging Nickel-Cadmium
Batteries” on Page13.
Follow these steps to install or replace batteries.
1. If the scanner is on, turn
2. Press the tab on the battery compartment cover, and lift off the
3. Remove any old batteries from the compartment and cover.
The scanner has a built-in circuit that lets you recharge
VOLUME/OFF
clicks to turn it off.
cove r.
Caution:
promptly and properly. Do not bury or burn them.
Always dispose of old non-rechargeable batteries
counterclockwise until it
8
Page 9

20-511 .fm Page 9 Wednesday, August 4, 1999 2:1 3 PM
4. Install two batteries in the compartment and two in the cover as
indicated by the polarity symbols (+ and –) mark ed inside.
Cautions:
• Never mix rechargeable and non-rechargeable batteries, or
rechargeable bat teries of different capacities.
• Use only fresh batteries of the required size and type. Always
remove old or weak batteries. Batteries can leak chemical s that
destroy electr onic circuits.
5. Replace the cover.
B
If flashe s on the displ ay and the scanner beeps every 15 sec onds, immediately replace or recharge all four batteries.
IMPORTANT INFORMATION ABOUT THE
EXTERNAL POWER JACKS
The scanner has two external power jacks —
is important that you understand the purpose of each jack before you
connect any adapter to the scanner.
POWER
POWER
CHARGE
and
CHARGE
. It
9
Page 10

20-511 .fm Page 10 Wednesda y, Augus t 4, 1999 2:13 P M
POWER
The
jack powers the scanner and
disconnects
the internal batteries. You can use this jack to connect an external power source (AC
adapter or DC power cord ) regardl ess of t he type of batter ies you i nstall.
CHARGE
The
charges
jack supplies power to operate the scanner and
the internal batteries. Use the
CHARGE
jack only when you in-
also
stall rechargeable nickel-cadmium batteries.
Warning:
Never use the
CHARGE
jack with non- rechar geable b atter ie s.
If you try to recharge non-r echargeable bat teries, they become very hot
and could explode.
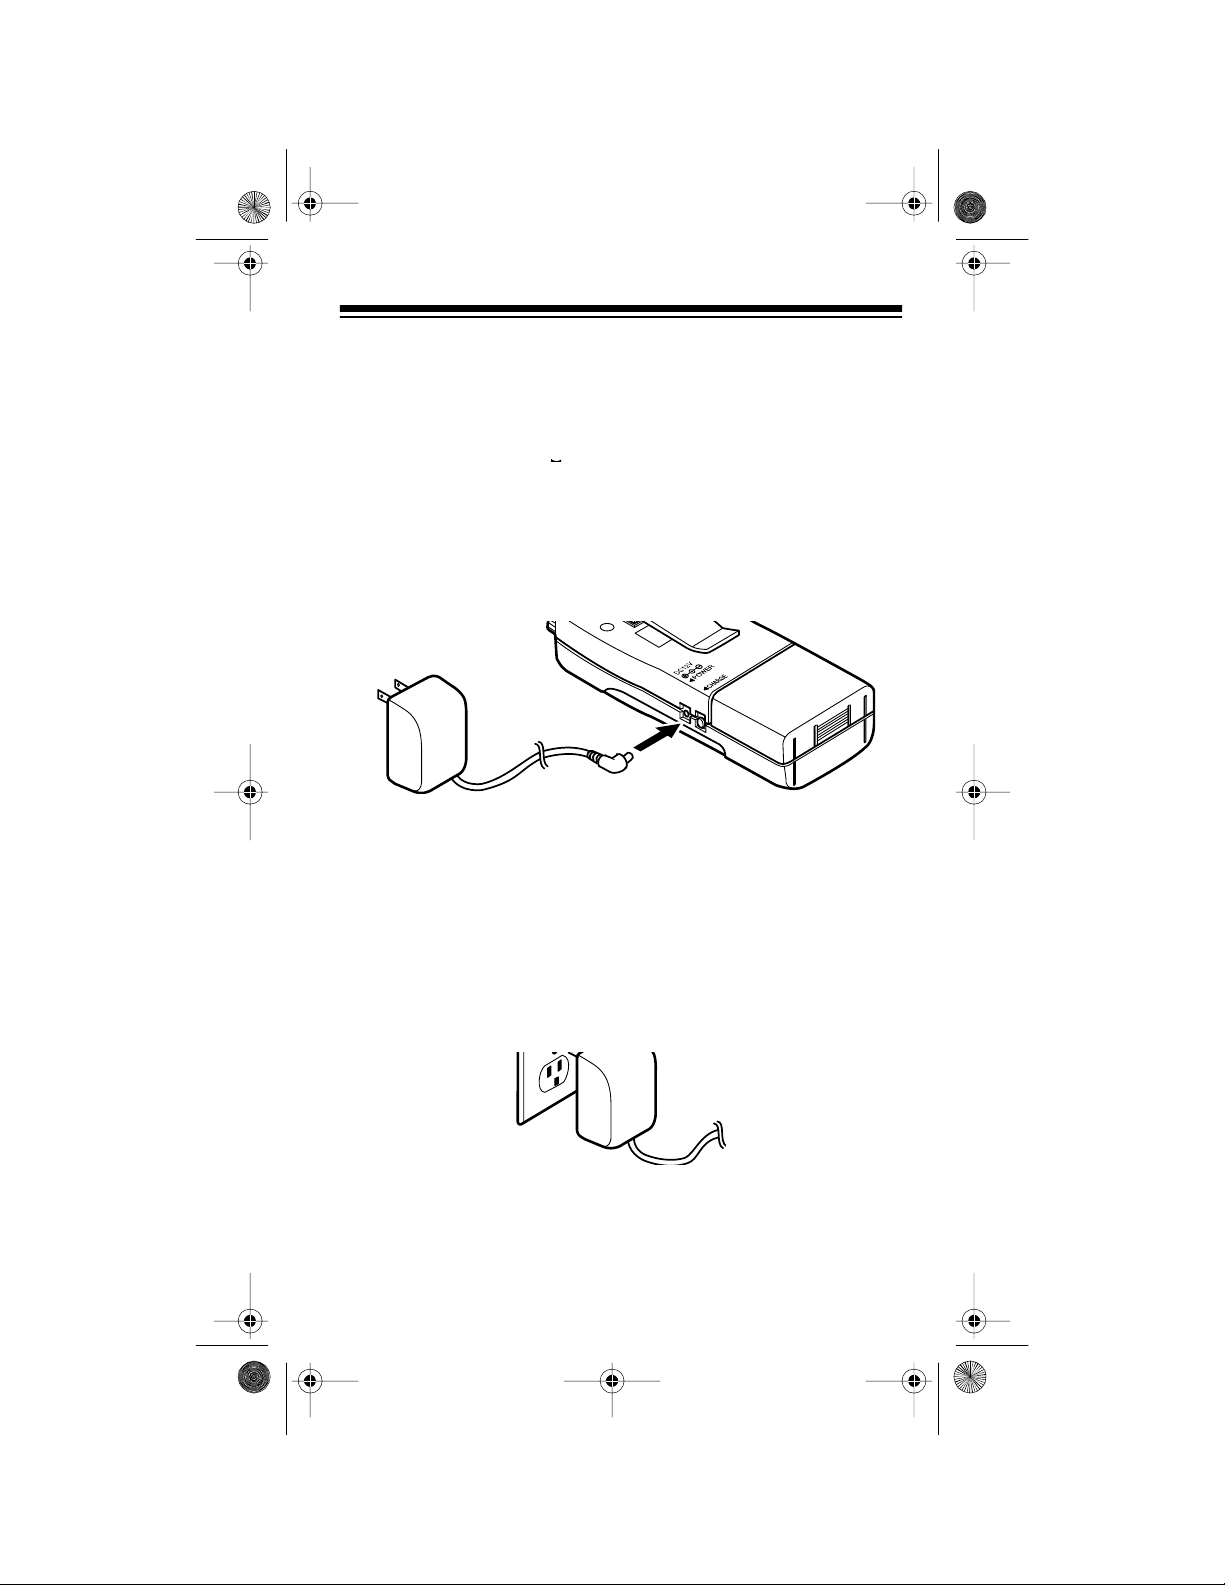
USING STANDARD AC POWER
To power the scanne r from AC powe r, you need an AC ad apte r such as
Cat. No. 273-1652 (not supplied).
Warning:
cord, receptacle, or other outlet unless the blades can be fully inserted
to prevent blad e exposure.
Cautions:
• You must use an AC adapter that supplies 12 volts and delivers at
• Be sure you connect the AC adapter to the scanner before you
Note:
jack and reduces it to the 6 volts required by the scanner.
Do not use an AC adapter’s polari zed plug with an extension
least 200 milliamps. Its center tip must be set to positive, and its
plug must correctly fit the scanner’s
POWER
and
CHARGE
jacks.
The recommended adapter meets these specifications. Using an
adapter that does not meet these specifications could damage the
scanner or the adapt er.
connect it to a standard AC outlet. Then disconnect the adapter
from the AC outlet before you disconnect it from the scanner .
The scanner receives a 12-volt input at the
CHARGE
POWER
or
10
Page 11
20-511 .fm Page 11 Wednesda y, Augus t 4, 1999 2:13 P M
1. Connect the adapter’s blu e-ti pped barrel plug to the adapter’s cor d
and set the barrel plug’ s tip to positiv e.
2. Insert the adapter’s blue-tipped barrel plug into your scanner’s
POWER
jack.
Note:
If you ins talled rechargeable nick el- cadmium batteries in the
scanner, remove the plastic cap from the
cap in the
POWER
jack. Connect the AC adapter to the
CHARGE
jack and put the
CHARGE
jack. This powers the scanner and recharges the batteries at the
same tim e. See “Charging Nicke l-Cadmium Batteries” on Page 13.
3. Plug the adapter’s power module into a standard AC outlet.
11
Page 12
20-511 .fm Page 12 Wednesda y, Augus t 4, 1999 2:13 P M
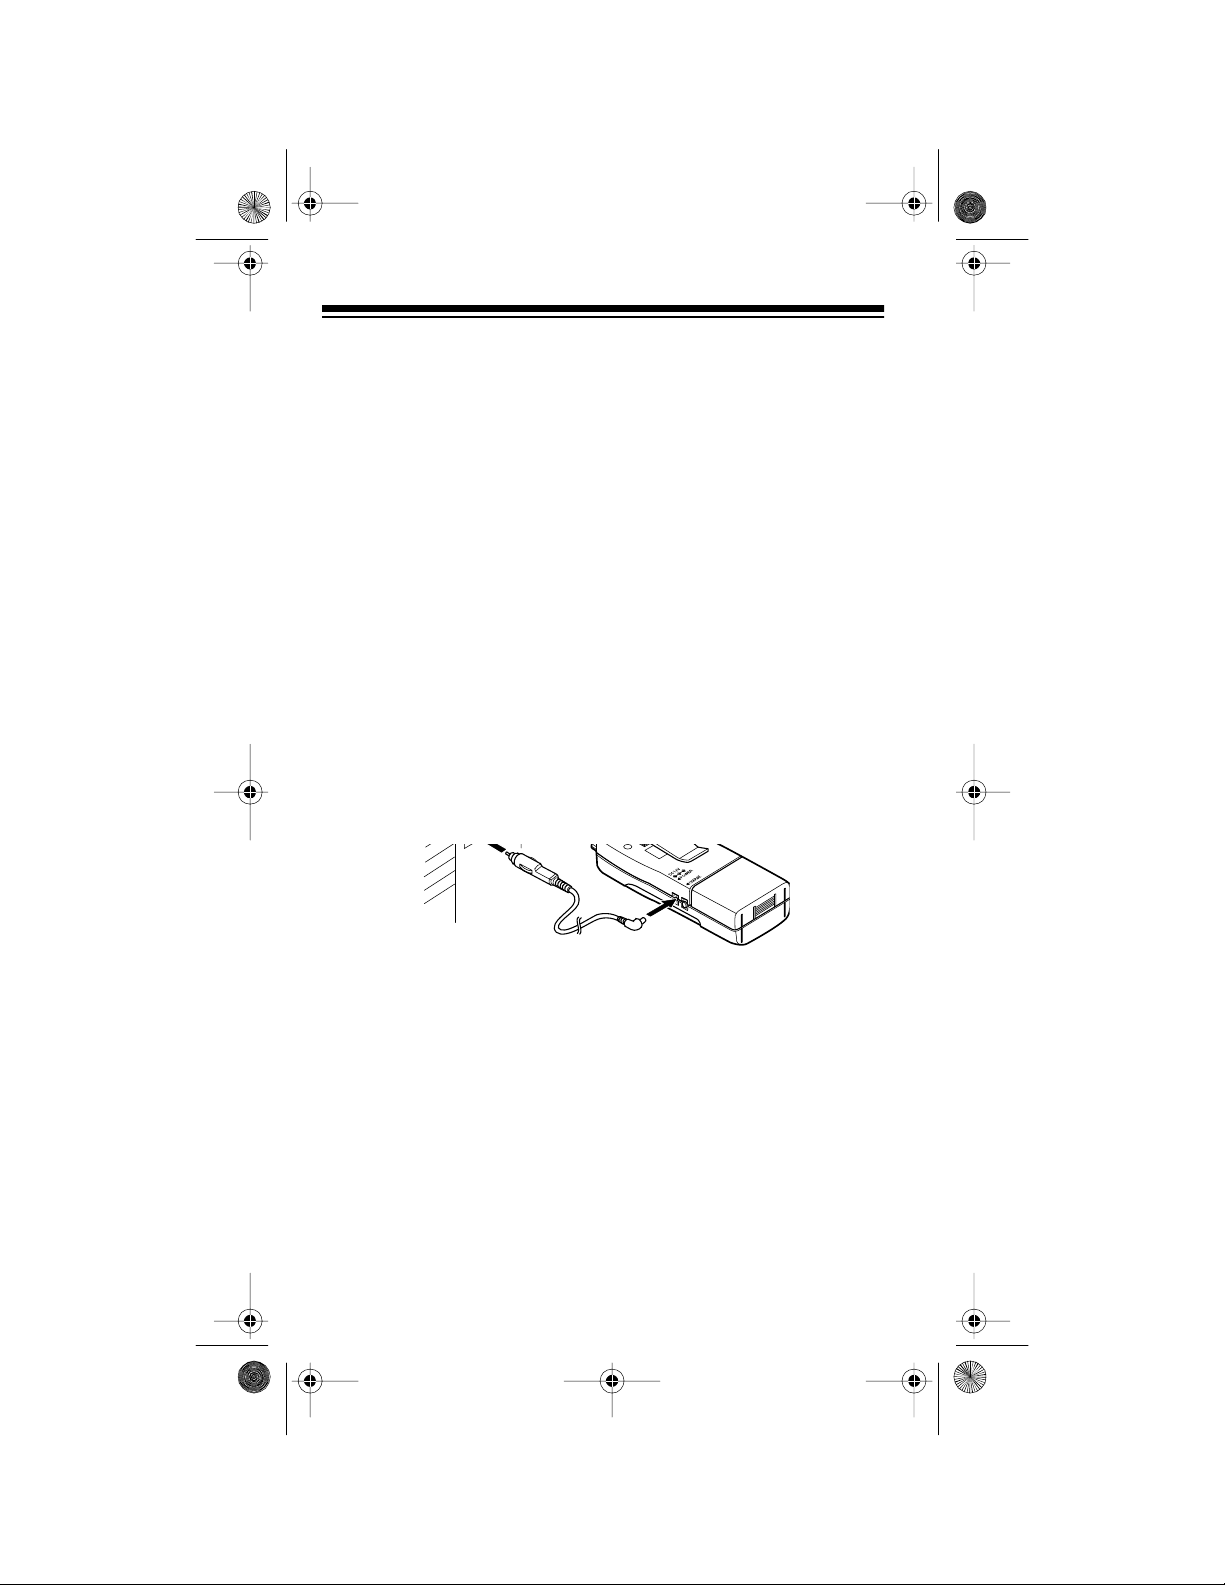
USING VEHICLE BATTERY POWER
You can power the scanner from your vehicle’s cigarette lighter socket
with an optional DC cigarette lighter power cor d (such as Cat. No. 270-
1533).
Cautions:
• The recommended DC power cord supplies 12 volts and delivers
at least 200 milliamps. Its center tip is set to positive and its plug
properly fits the scanner’s
POWER
power cord that does not meet these specifications could damage
the scanner or the power cord.
• To protect your vehicle’s electrical system, always plug the power
cord into the scanner before you plug it into your vehicle’s cigarette-lighter socket. Always unplug the power cord from the vehicle’s ci garette lighte r socket before you unplug it from the scanner.
and
CHARGE
jacks. Using a
Note:
The scanner receives a 12-volt input at the
CHARGE
or
POWER
jack and reduces it to the 6 volts required by the scanner.
1. Plug the power cord’s barrel plug into your scanner’s
POWER
jack.
2. Plug the other end of the power cord into your vehicle’s cigarettelighter socket.
Notes:
• If you installed rechargeable nickel-cadmium batteries in the
scanner, remove the plastic cap from the
the cap in the
CHARGE
POWER
jack. Connect the DC power cord to the
jack. This powers the scanner and recharges the bat-
CHARGE
jack and put
teries at the same time. See “Charging Nickel-Cadmium Batteries” on Page 13.
12
Page 13

20-511 .fm Page 13 Wednesda y, Augus t 4, 1999 2:13 P M
• If the scanner does not operate properly when you use a DC
power cord, unplug the power cord from the cigarette lighter
socket and clean the socket to remove ashes and debris. If it
still doe s not operate properly, check the fuse in the power cord.
CHARGING NICKEL-CADMIUM BATTERIES
The scanner has a buil t-in circuit that lets you r echarge nickel-cadmium
batteries while t hey are in t he scanner. To charge the batteri es, remov e
the plastic cap from the scanner’s
POWER
jack. Then connect an AC adap ter or DC power cord t o the jac k
(see “Using Standar d AC Power” on Page 10 or “Using Vehicle Batter y
Power” on Page 12).
CHARGE
jack and put the cap in the
Warning:
ner’s
Do not connect either an adapter or power cord to the scan-
CHARGE
jack if you installed non-rechargeable batteries (standard, extra-life, or alkaline). Non-rechargeable batteries become hot
and can even explode if you try to recharge them.
It takes about 10 to 18 hours to recharge batteries that are fully discharged. You can op erate the s canner whil e rechargi ng nickel- cadmium
batteries, but the charging time is lengthened.
The first time you use ni ckel-cad mium batteri es, charge th em at least 24
hours to bring them to a full charge.
Notes:
• Nickel-cadmiu m batteri es last longer and del iver more power if you
occasionally let them fully discharge. To do this, simply use the
scanner until it begins beeping every 15 seconds or appears in
B
the display.
• To prevent damaging nickel-cadmium batteries, never charge
them in an area where the temperature is above 90°F or below
40°F.
Important:
At the end of a rechargeable battery’s useful life, it must be
recycled or disposed of properly. Contact your local, county, or state
hazardous waste management authorities for information on recycling
or disposal program s in your area. Some optio ns that might be avail able
are: municipal curb- side col lecti on, drop -off box es at retail ers , recycli ng
collection centers, and mail-back programs.
13
Page 14

20-511 .fm Page 14 Wednesda y, Augus t 4, 1999 2:13 P M
CONNECTING THE ANTENNA
Follow these s teps to attach the suppli ed flexib le antenna t o the connector on the top of your scanner.
1. Align the slots around the antenna’ s connector with the tabs on the
jack.
2. Press the antenna down over the jack and rotate the antenna’s
base clockwise until it locks i nto place.
Connecting an Optional Antenna
The antenna connector on your scanner makes it easy to use the scanner with a variety of antenna s. Inst ead of the su ppl ied ante nna, you can
attach a different one, such as an external mobile antenna or outdoor
base antenna. Your local RadioShack store sells a variety of ant ennas.
Always use 50-ohm coaxial cable, such as RG-58 or RG-8, to connect
an outdoor ant enna . For l engths ove r 50 fe et, us e RG-8 lo w-loss diele ctric coaxial cable. I f your ant enna’s ca ble does not have a BNC conne ctor, you will also need a BNC adapter (available at your local
RadioShack store).
Warning:
antenna. If the antenna starts to fall, let it go! It could contact overhead
power lines . If the ant enna to uches a power line, c ontact with the ant enna, mast, cable, or guy wires can cause electrocution and death! Call
the power company to remove the antenna. Do not attempt to do so
yourself.
14
Use extreme caution when installing or removing an outdoor
Page 15

20-511 .fm Page 15 Wednesda y, Augus t 4, 1999 2:13 P M
CONNECTING AN EARPHONE/
HEADPHONES
For private listening, you can plug an earphone or mono headphones
(such as RadioShack Cat. No. 33-175 or 20-210) into the jack on top
of your scanner. Thi s automatically disconnects the internal speaker.
Listening Safely
To protect your hearing, follow these guidelines when you use an earphone or headphones.
• Do not listen at extremely high volume levels. Extended highvolume listening can lead to permanent hearing loss.
• Set the volume to the lowest setting before you begin listening.
After you begin list ening, adjust the volum e to a comfortable level.
• Once you set the volume, do not increase it. Over time, your ears
adapt to the volume level, so a volume level that does not cause
discomfort might still damage your heari ng.
Traffic Safety
Do not wear an earphone or headphones while operating a motor vehicle or riding a bicycle. This can create a traffic hazard and is illegal in
some areas.
Even though some earphones and headphones ar e desig ned to let you
hear some outside soun ds when l isten ing at norma l volume l evels, they
still present a traffic hazard.
15
Page 16

20-511 .fm Page 16 Wednesda y, Augus t 4, 1999 2:13 P M
CONNECTING AN EXTENSION SPEAKER
In a noisy area , an extensi on speaker (s uch as RadioShack Cat. No. 21-
549) or an amplified speaker (such as RadioShack Cat. No. 21-541),
positioned in the right place, might provide more comfortable listening.
Plug the speaker cable’s
1
/8-inch mini-pl ug into your scanner ’s jack.
ATTACHING THE BELT CLIP
You can atta ch the sup plied bel t cl ip t o mak e your sca nner eas ie r to use
when you are on the go. Use the supplied screws to atta ch the belt clip
to the scanner. Then sli de the belt clip over you r bel t or waistband.
Belt Clip
16
Page 17

20-511 .fm Page 17 Wednesda y, Augus t 4, 1999 2:13 P M
UNDERSTANDING YOUR SCANNER
A LOOK AT THE KEYPAD
Your scanner’s keys might seem confusing at first, but this information
should help you understand each key’s function.
SCAN
— scans through the stored channels.
MANUAL
ber or frequency.
DELAY
L-OUT/S/S
quency during band or di rect search.
CLEAR/
point in a frequency.
MON/0
Enters the number 0 for a channel or a frequency.
WX/E
key entry into memory.
KEYLOCK
changes.
t and s — enter the down or up search mode direction.
HOLD/BAND
band.
1-9
— stops scanning and lets you di rectly enter a channel num-
— programs a 2-second delay for the selected channel .
— lets you lock out a select ed channel. Skips a speci fied fre-
— erases an incorrect entry or an error. Enters the decimal
•
— stores frequencies into and accesses the monitor memory.
— scans through the prepr ogrammed weather chan nels. Stores a
— locks/unlocks the keypad to prevent accidental program
— pauses the frequency search. Searches the selected
— enters the numbers for a channel or a frequency.
K
17
Page 18

20-511 .fm Page 18 Wednesda y, Augus t 4, 1999 2:13 P M
A LOOK AT THE DISPLAY
The display has several indicators that show the scanner’s current operating mode. A quick look at the display will help you understand how
to operate your sc anner.
— appears during a band search (b also appears) or a direct
SRCH
search (
SCAN
also appears).
d
— appears when you scan channels.
— appears when you manually select a channel.
MAN
— appears when you listen to a monitor memory.
MON
— appears when you scan the preprogrammed weather channel s.
WX
K
— flashes when you lock the keypad.
B
— flashes when batteries are low.
— appears when you program a channel for a 2-second del ay before
D
scanning or when you listen to a channel programmed with the delay
feature.
— appears when you manually select a locked channel, or during a
L
search hold when the frequency is stored in search skip memory.
t and s
Error
18
— indicate the search or weather scan direction.
— appears when you make an entr y error.
Page 19

20-511 .fm Page 19 Wednesda y, Augus t 4, 1999 2:13 P M
— appears during a band search.
b
— appears during a direct search.
d
— appears during a band search hold.
H
— appears during a direct search hold.
h
19
Page 20

OFF
PRO-66
20-511 .fm Page 20 Wednesda y, Augus t 4, 1999 2:13 P M
OPERATION
TURNING ON THE SCANNER AND SETTING
SQUELCH
1. Turn
2. Turn
SQUELCH
VOLUME/OFF
grammed channels, the scanner automatically scans those channels.
fully clock wise.
clockwise until it clicks. If you already pro-
OFF
PRO-66
3. Press
MANUAL
rent channel.
to stop the scanning. The display shows the cur-
4. Turn
half way.
20
VOLUME/OFF
clockwise to set the scanner’s volume about
OFF
PRO-66
Page 21

20-511 .fm Page 21 Wednesda y, Augus t 4, 1999 2:13 P M
5. Slowly turn
SQUELCH
counterclockwise until you hear a hissing
sound.
6. Adjust
7. Slowly turn
Note:
VOLUME/OFF
SQUELCH
to a comfortable list ening level.
clockwise unti l the hissing sound stops.
If you want to listen to a weak or distant station, turn
SQUELCH
counterclockwise to increase receiver sensitivity. If reception is poor,
SQUELCH
turn
clockwise to decrease receiver sensitivity.
STORING FREQUENCIES
Follow these steps to store frequencies into channels.
1. Press
MANUAL
a frequency, then press
ber appears on the display.
2. Use the number keys and
ing the decimal point) you want to store.
, enter the channel number wh ere you want to store
MANUAL
again. The desi red channel num-
•
CLEAR/
to enter the frequency (includ-
3. Press
WX/E
to store the frequency.
21
Page 22

20-511 .fm Page 22 Wednesda y, Augus t 4, 1999 2:13 P M
Notes:
• If you make a mistake in Step 2,
and the scanner beeps three times. Simply start again from
Step 2.
• Your scanner automatically rounds the entered frequency to the
nearest valid frequency. For example, if you try to enter a frequency of 151.473, your scanner accepts it as 151.475.
4. Repeat Steps 1 - 3 to program more channels. Or, if you want to
program the next channel in sequence, press
Steps 2 and 3.
Notes:
• VHF band frequencies (30- 300 MHz) are found at .005 MHz steps.
UHF band frequencies (300-3000 MHz) are found at .0125 MHz
steps.
• Without battery or external adapter power, the scanner protects
the frequenci es stored in memory for about 60 minutes.
Error
appears on the display
MANUAL
and repeat
SEARCHING FOR AND STORING ACTIVE
FREQUENCIES
Band Search
A band search lets you search for active transmissions within any one
of the eight pre-programmed frequency bands.
29–54 MHz 137–144 MHz 144–148 MHz
148–174 MHz 406–450 MHz 450–470 MHz
470–51 2 MHz 806–956 MHz
Follow these ste p s to search for active frequencies.
1. Press
2. To select a differ ent frequency band, repeated ly press
22
MANUAL
ously selected frequency band for 2 seconds, then automatically
starts searching.
until the desired frequency band appears on the display.
, then
HOLD/BAND
. The scanner display s the previ-
HOLD/BAND
Page 23

20-511 .fm Page 23 Wednesda y, Augus t 4, 1999 2:13 P M
3. To change the search direction, pr ess t to search downward or s t o
search upward.
b, SRCH
, and t or s appear on the display.
4. When the scanner stops on an active frequency, you ca n do one of
the follow ing:
• To store the displayed frequency into the monitor memory,
MON/0
press
.
appears on the display.
MON
• To continue the search, press t or s.
• To hold the frequency, press
HOLD/BAND
. H appears on the
display. To continue the search, press and ho ld t or s for about 1
second. Or, you can press
HOLD/BAND
to continue the search.
The scanner briefl y displays the frequency band (if you pressed
HOLD/BAND
), then resumes searching.
Notes:
• If you want to s tep t hrough the fr equencies while
is displayed,
H
press t or s.
• If you tune to a search skip frequency,
appears on the display.
L
See “Search Skip Memory” on Page24.
• If you want to change the frequency band, repeatedly press
HOLD/BAND
. The selected frequency band is displayed.
Direct Search
You can search up or down for more frequenc ies from the current ly displayed frequency.
1. Press
MANUAL
2. Use the number keys and
ing the decimal point) where you want to start the search, or enter
the channel number containing the starting frequency and press
MANUAL
3. Press t to search downward or s to search upward from the
selected frequency.
4. When the scanner stops on a transmission, you can do one of the
following:
• To store the displayed frequency into the monitor memory,
press
.
MON/0.
.
CLEAR/
d, SRCH
appears on the display.
MON
, and t or s appear on the display.
•
to enter the frequency (includ-
23
Page 24

20-511 .fm Page 24 Wednesda y, Augus t 4, 1999 2:13 P M
• To continue the search, press t or s.
• To hold the frequency, press
HOLD/BAND.
h appears on the display. To continue the search, press and hold t or s for about 1
second.
Notes:
• If you want t o step through the frequencies while
is displayed,
h
press t or s.
• If you tune to a search skip frequency,
appears on the dis-
L
play (see “Search Skip Memory” on Page 24).
• If you press
search.
HOLD/BAND
b, SRCH
, the scanner restarts as a band
, and t or s appear on the display.
Search Skip Memory
You can skip up to 20 specified frequencies during a band or direct
search. This lets you avoid unwanted frequencies or ones you have already stored in a channel.
To skip a fr equency, press
quency during a band or direct search. The scanner st ores the fr equency in memory and resumes the search.
To clear a single frequency from skip memory so the scanner can stop
on it during a band or direct search, press
search, press t or s to select the frequency, then press
disappears fro m the display.
L
L-OUT/S/S
when the scanner s tops on the fre-
HOLD/BAND
to hold the
L-OUT/S /S
until
To clear all the skip frequencies at once, while in the search mode,
press
HOLD/BAND
, then press and hold
L-OUT/S/S
until the scanner
beeps twice (about 3 seconds).
Notes:
• If you program more than 20 frequencies to skip, each new frequency replaces one you stored earlier, starting from the first
stored freque ncy.
• You can select the skipped frequency when the scanner is in the
hold mode. The scanner displays
when you select a skipped fre-
L
quency.
24
Page 25

20-511 .fm Page 25 Wednesda y, Augus t 4, 1999 2:13 P M
LISTENING TO THE MONITOR MEMORY
The scanner has one monitor memory. You can use this memory to
temporarily store a f requency while you decide whether to store it into a
channel. Thi s is handy f or quickly storing an active frequency when you
search through an entire band . Once you have te mporari ly stor ed a frequency into t he s canner’ s moni tor memory, y ou ca n lis ten to it by pr essing
MANUAL
then
MON/0
.
MOVING A FREQUENCY FROM THE
MONITOR MEMORY TO A CHANNEL
Follow these steps to move a frequency stored in the monitor memory
to a permanent channel.
1. Press
2. Enter the number for the channel where you want to store the
3. Press
MANUAL
monitor frequency. The channel number appears on the display.
MANUAL
appears.
.
appears on the display.
MAN
. The frequency currently assigned to that channel
25
Page 26

20-511 .fm Page 26 Wednesda y, Augus t 4, 1999 2:13 P M
4. Press
5. Press
MON/0
. The entered frequency appears, and the channel
number starts flashing.
WX/E
. The scanner stores the frequency into the selected
channel, and the channel number stops flashing.
SCANNING THE STORED CHANNELS
To scan the stored channels, press
through all non-locked channels (see “Locking Out Channels” on
Page 27).
Using the 2-Second Delay
Many agencies use a t wo-wa y radio s ystem tha t has a period of sever al
seconds between a quer y and a reply. To av oid missing a reply, you can
program a 2-second delay into any channel. When the s canner stops on
an active channel wit h a programmed delay, i t cont inues to monitor the
channel for 2 second s after the act ivity stops bef ore resumi ng scanning.
SCAN
. Your scanner then scans
To program a 2-second delay into a specific channel while the scanner
is scanning, manually select the desired channel then press
appears on the displ ay.
To program a 2 -second delay when t he scanner has st opped on an active channel during scanning, quickly press
number is displa yed.
26
appears on the display.
D
DELAY
while the channel
DELAY
.
D
Page 27

20-511 .fm Page 27 Wednesda y, Augus t 4, 1999 2:13 P M
To turn off the 2-se cond delay on any active c hannel, pr ess
while the channel numbe r is displayed.
disappears fro m the display.
D
DELAY
again
Locking Out Channels
You can increase the effect ive scanni ng speed by locki ng out indivi dual
channels that have a con tinuou s tran smis sion, such as a weather channel. To lock out a channel, manually select the channel and press
OUT/S/S
so L appears on the display.
L-
Notes:
• You can still manually select locked out channels.
• You can lock out all channels.
To remove the lock- out from a cha nnel, man ually select the channel a nd
L-OUT /S /S
press
To remove the lock-out from all channels, press
and hold
Note:
You cannot remove the lock- out from empty channel s.
so L disappears from the display.
L-OUT/S/S
until the scanner beeps twice (about 3 seconds).
MANUAL
, then press
MANUALLY SELECTING A CHANNEL
You can continuously monitor a single channel without scanning. This
is useful if you hear an emergency broadcast on a channel and do not
want to miss any details — even though there might be periods of silence — or if you want to monitor a specific channel.
Follow these steps to manually select a channel.
1. Press
MANUAL
.
2. Enter the channel number .
3. Press
MANUAL
again.
Or, if your scanner is scanning and stops at the desired channel, press
MANUAL
one time. (Pressing
MANUAL
additional times causes your
scanner to step through the channels.) To r esum e automatic scanning,
SCAN
press
. Your scanner then sca ns throug h all non- locked channels.
27
Page 28

20-511 .fm Page 28 Wednesda y, Augus t 4, 1999 2:13 P M
LISTENING TO THE WEATHER BAND
The FCC (Federal Communications Commission) has allocated 11
channels for use by the National O ceanic and Atmospher ic Administration (NOAA). We have pr epr ogramm ed your sc anner wi th t he seven fr equencies most commonly used by NOAA (see “National Weather
Frequencies” on Page 29).
To hear your local forecast and regional weather information, simply
WX/E
press
and
Your scanner should st op within a few seconds, then you hear the local
weather broadcast. If the broad cast is weak, you can press
to scan through the rest of the weather band.
. Your scanner begins scanning through the weather band,
appears on the displ ay.
WX
WX/E
again
USING THE KEYLOCK
Once you program your scanne r, you can protect it fr om acc identa l program changes by turning on the keylock featur e. When locked, the only
controls that oper ate are
SQUELCH
Note:
nels.
To turn on the keylock, press and hold
display. To turn it off, press and hold
the display.
28
.
The keylock does not prevent the scanner from scanning chan-
SCAN, MANUAL, KEYLOCK, VOLUME/OFF
KEYLOCK
KEYLOCK
until flashes on the
K
until disappears from
K
, and
Page 29

20-511 .fm Page 29 Wednesda y, Augus t 4, 1999 2:13 P M
A GENERAL GUIDE TO SCANNING
Reception of the frequen cies covered by you r scanner is mainl y “line-ofsight.” That mean s you usu all y canno t h ear sta tions th at are beyon d the
horizon.
GUIDE TO FREQUENCIES
National Weather Frequencies
161. 650* 161.775* 162.400 162.4 25
162.440* 162.450 162.475 162.500
162.525 162.550 163.275*
* Not preprogrammed in this scanner.
Birdie Frequencies
Every scanner h as b irdi e f requenci es . Bir dies a re signal s c reated insi de
the scanner’s recei ver. These ope rating fr equencies mig ht interfer e with
broadcasts on the same frequencies. If you program one of these frequencies, you hear only noise on that frequency. If the interference is
not severe, you might be ab le to turn
birdie.
SQUELCH
clockwise to cut out the
The birdie frequencies on this unit to watch for are:
52.0 MHz 145.6 MHz 156.0 MHz 166.4 MHz 171.25 MHz
To find the birdies in your scan ner, begin by disconne cting the antenna
and moving it away from the scanner. Make sure that no other nearby
radio or TV set s are turne d on near the s canner. Use t he search f unction
and scan every frequency range from its lowest frequency to the highest. Occasional ly, the sear ching will st op as if it had found a sig nal, often
without any sound. That is a birdie. Make a list of all the birdies in your
scanner for future reference.
29
Page 30

20-511 .fm Page 30 Wednesda y, Augus t 4, 1999 2:13 P M
GUIDE TO THE ACTION BANDS
Ty pical Band Usage
VHF Band (30.00–300.0 MHz)
Low Rang e 29.00–50.00 MHz
6-Meter Amateur 50.00–54.00 MHz
U.S. Government 137.00–144.00 MHz
2-Meter Amateur 144.00–148.00 MHz
High Range 148.00–174.00 MHz
UHF Band (300.00 MHz–3.0 GHz)
U.S. Government 406.00–420.00 MHz
70-cm Amateur 420.00–450.00 MHz
Low Rang e 450.00–470.00 MHz
FM-TV Audio Broadcas t, Wide Band 470. 00–512.00 MHz
Public Service 806.00–823.93 MHz
Conventional Systems 851.00–856.00 MHz
Conventional/Trunked Systems 856.00–861.00 MHz
Trunked Syst ems 861.00–866.00 MHz
Public Safety 866.00–868.93 MHz
High Range 896.11–902.00 MHz
33-Centimeter Amateur 902. 00–928.00 MHz
Private Trunked 935.00–940.00 MHz
General Trunked 940.00–941.00 MHz
Fixed Services 941.00–944.00 MHz
Studio-to-T ransmitter Broadcast Links 944.00–952.00 MHz
Private Fixed Services, Paging 952.00–956.00 MHz
Primary U sage
As a general rule, most of the radio activity is concentrated on the following freque ncies:
VHF Band
Activities Frequencies
Gover nment, Police, and Fire 153.785–155.980 MHz
Emergency Services 158.7 30–159.460 MHz
Railroad 160.000–161.900 MHz
30
Page 31

y
20-511 .fm Page 31 Wednesda y, Augus t 4, 1999 2:13 P M
UHF Band
Activities Frequencies
Land-M obile “Paired ” Frequencies 450.00 0–470.000 MHz
Base Stations 451.025–454.95 0 MHz
Mobile Units 456.025–459.950 MHz
Repeater Units 460.025–464.975 MHz
Control Stations 465.02 5–469.975 MHz
Note: Remote control st ations and mobi le units ope rate at 5 MHz higher
than their associated base stations and relay repeater units.
Spe cified In t ervals
Frequencies in different bands are accessible only at specific intervals.
For example:
Band T
VHF, HAM, and Government 5.0 kHz steps
All Others 12.5 kHz steps
pe Specifi ed Inte rva l
BAND ALLOCATION
To help decide which frequency ranges to scan, use the following listing of
the typical services that use the frequencies your scanner receives. These
frequencies are subject to change, and might vary from area to area. For a
more complete listing, refer to the “Pol ice Cal l Radi o G uide i ncluding Fire
and Emergency Services,” available at your local RadioShack store.
Abbreviations Services
BIFC . . . . . . . . . . . . . . . . . . . . . . . . . . . . . . . Boise (ID) Interagency Fire Cache
BUS. . . . . . . . . . . . . . . . . . . . . . . . . . . . . . . . . . . . . . . . . . . . . . . . . . . . Business
CAP. . . . . . . . . . . . . . . . . . . . . . . . . . . . . . . . . . . . . . . . . . . . . . . . Civil Air Patrol
CB . . . . . . . . . . . . . . . . . . . . . . . . . . . . . . . . . . . . . . . . . . . . . . . . . Citizens Band
CCA. . . . . . . . . . . . . . . . . . . . . . . . . . . . . . . . . . . . . . . . . . . . . . Common Carrier
CSB. . . . . . . . . . . . . . . . . . . . . . . . . . . . . . . . . . . . . . . . . Conventional Systems
CTSB. . . . . . . . . . . . . . . . . . . . . . . . . . . . . . . . . Conventional/Trunked Systems
FIRE . . . . . . . . . . . . . . . . . . . . . . . . . . . . . . . . . . . . . . . . . . . . . Fire Department
HAM . . . . . . . . . . . . . . . . . . . . . . . . . . . . . . . . . . . . . . . . .Amateur (Ham) Radio
GOVT . . . . . . . . . . . . . . . . . . . . . . . . . . . . . . . . . . . . . . . . . Federal Government
GMR . . . . . . . . . . . . . . . . . . . . . . . . . . . . . . . . . . . . . . . . . General Mobile Radio
GTR. . . . . . . . . . . . . . . . . . . . . . . . . . . . . . . . . . . . . . . . . . . . . .General Trunked
IND . . . . . . . . . . . . . . . . . . . . . . . . . . . . . . . . . . . . . . . . . . . . .Industrial Services
. . . . . . . . . . . . . (Manufacturing, Construction, Farming, Forest Products)
MAR . . . . . . . . . . . . . . . . . . . . . . . . . . . . . . . . . . . . . . . . Military Amateur Radio
31
Page 32

20-511 .fm Page 32 Wednesda y, Augus t 4, 1999 2:13 P M
MARI . . . . . . . . . . . . . . . . . . . . . . . . . . . . . . . . . . . . . . . . Maritime Limited Coast
. . . . . . . . . . . . . . . . . . . . . . . . . . . . . . . (Coast Guard, Marine Telephone,
. . . . . . . . . . . . . . . . . . . . . . . . . . . . . . .Shipboard Radio, Private Stations)
MARS . . . . . . . . . . . . . . . . . . . . . . . . . . . . . . . . . .Military Affiliate Radio System
MED . . . . . . . . . . . . . . . . . . . . . . . . . . . . . . . . . . . Emergency/Medical Services
MIL . . . . . . . . . . . . . . . . . . . . . . . . . . . . . . . . . . . . . . . . . . . . . . . . . .U.S. Military
MOV . . . . . . . . . . . . . . . . . . . . . . . . . . . . . . . . . . . Motion Picture/Video Industry
NEW . . . . . . . . . . . . . . . . . . . . . . . . . . . . . . . . . . . . . . . . . . .New Mobile Narrow
NEWS . . . . . . . . . . . . . . . . . . . . . . . . . . . . Relay Press (Newspaper Reporters)
OIL. . . . . . . . . . . . . . . . . . . . . . . . . . . . . . . . . . . . . . . . . . Oil/Petroleum Industry
POL . . . . . . . . . . . . . . . . . . . . . . . . . . . . . . . . . . . . . . . . . . . . Police Department
PUB. . . . . . . . . . . . . . . . . . . . . . . . . . . . . . . . . . . . . . . . . . . . . . . Public Services
. . . . . . . . . . . . (Public Safety, Local Government, Forestry Conservation)
PSB . . . . . . . . . . . . . . . . . . . . . . . . . . . . . . . . . . . . . . . . . . . . . . . . . Public Safety
PTR . . . . . . . . . . . . . . . . . . . . . . . . . . . . . . . . . . . . . . . . . . . . . . .Private Trunked
ROAD . . . . . . . . . . . . . . . . . . . . . . . . . . . . . . . . . Road & Highway Maintenance
RTV . . . . . . . . . . . . . . . . . . . . . . . . . . . . . . Radio/TV Remote Broadcast Pickup
TAXI. . . . . . . . . . . . . . . . . . . . . . . . . . . . . . . . . . . . . . . . . . . . . . . . .T axi Services
TELB . . . . . . . . . . . . . . . . . . . . . . . . . . . . . . . . . . . . . . . . . . . . Mobile Telephone
. . . . . . . . . . . . . . .(Aircraft, Radio Common Carrier, Landline Companies)
TELC . . . . . . . . . . . . . . . . . . . . . . . . . . . . . . . . . . . . . . . . . . . . .Cordless Phones
TELM. . . . . . . . . . . . . . . . . . . . . . . . . . . . . . . . . . . . . . . Telephone Maintenance
TOW . . . . . . . . . . . . . . . . . . . . . . . . . . . . . . . . . . . . . . . . . . . . . . . . . Tow Trucks
TRAN. . . . . . . . . . . . . . . . . . . . . . . . . . . . . . . . . . . . . . . Transportation Services
. . . . . . . . . . . . . . . . . . . . . . .(Trucks, Tow Trucks, Buses, Railroad, Other)
TSB . . . . . . . . . . . . . . . . . . . . . . . . . . . . . . . . . . . . . . . . . . . . . Trunked Systems
TVn . . . . . . . . . . . . . . . . . . . . . . . . . . . . . . . . . . . . . . . . FM-TV Audio Broadcast
USXX. . . . . . . . . . . . . . . . . . . . . . . . . . . . . . . . . . . . . . . . Government Classified
UTIL. . . . . . . . . . . . . . . . . . . . . . . . . . . . . . . . . . . . . . . . . Power & Water Utilities
WTHR . . . . . . . . . . . . . . . . . . . . . . . . . . . . . . . . . . . . . . . . . . . . . . . . . . Weather
VERY HIGH FREQUENCY (VHF)— (3 0 MHz–300 MHz)
VHF Low Band—(29.7–50 MHz—in 5 kHz steps)
29.900–30.550 . . . . . . . . . . . . . . . . . . . . . . . . . . . . . . . . . . . . . . . . . GOVT, MIL
30.580–31.980 . . . . . . . . . . . . . . . . . . . . . . . . . . . . . . . . . . . . . . . . . . IND, PUB
32.000–32.990 . . . . . . . . . . . . . . . . . . . . . . . . . . . . . . . . . . . . . . . . . GOVT, MIL
33.020–33.980 . . . . . . . . . . . . . . . . . . . . . . . . . . . . . . . . . . . . . .BUS, IND, PUB
34.010–34.990 . . . . . . . . . . . . . . . . . . . . . . . . . . . . . . . . . . . . . . . . . GOVT, MIL
35.020–35.980 . . . . . . . . . . . . . . . . . . . . . . . . . . . . . . . . BUS, PUB, IND, TELM
36.000–36.230 . . . . . . . . . . . . . . . . . . . . . . . . . . . . . . . . . . . . . . . . . GOVT, MIL
36.250 . . . . . . . . . . . . . . . . . . . . . . . . . . . . . . . . . . . . . . . . . . . .Oil Spill Cleanup
36.270–36.990 . . . . . . . . . . . . . . . . . . . . . . . . . . . . . . . . . . . . . . . . . GOVT, MIL
37.020–37.980 . . . . . . . . . . . . . . . . . . . . . . . . . . . . . . . . . . . . . . . . . . PUB, IND
38.000–39.000 . . . . . . . . . . . . . . . . . . . . . . . . . . . . . . . . . . . . . . . . . GOVT, MIL
39.020–39.980 . . . . . . . . . . . . . . . . . . . . . . . . . . . . . . . . . . . . . . . . . . . . . . PUB
40.000–42.000 . . . . . . . . . . . . . . . . . . . . . . . . . . . . . . . . . . . .GOVT, MIL, MARI
42.020–42.940 . . . . . . . . . . . . . . . . . . . . . . . . . . . . . . . . . . . . . . . . . . . . . . POL
42.960–43.180 . . . . . . . . . . . . . . . . . . . . . . . . . . . . . . . . . . . . . . . . . . . . . . . IND
43.220–43.680 . . . . . . . . . . . . . . . . . . . . . . . . . . . . . . . . . . . . TELM, IND, PUB
43.700–44.600 . . . . . . . . . . . . . . . . . . . . . . . . . . . . . . . . . . . . . . . . . . . . . TRAN
44.620–46.580 . . . . . . . . . . . . . . . . . . . . . . . . . . . . . . . . . . . . . . . . . . POL, PUB
46.600–46.990 . . . . . . . . . . . . . . . . . . . . . . . . . . . . . . . . . . . . . . . .GOVT, TELC
47.020–47.400 . . . . . . . . . . . . . . . . . . . . . . . . . . . . . . . . . . . . . . . . . . . . . . PUB
47.420 . . . . . . . . . . . . . . . . . . . . . . . . . . . . . . . . . . . . . . . . American Red Cross
47.440–49.580 . . . . . . . . . . . . . . . . . . . . . . . . . . . . . . . . . . . . . . . . . . IND, PUB
49.610–49.990 . . . . . . . . . . . . . . . . . . . . . . . . . . . . . . . . . . . . . . . . . MIL, TELC
32
Page 33

20-511 .fm Page 33 Wednesda y, Augus t 4, 1999 2:13 P M
6-Meter Amateur Band—(50–54 MHz)
50.00–54.00 . . . . . . . . . . . . . . . . . . . . . . . . . . . . . . . . . . . . . . . . . . . . . . . . HAM
U.S. Governmen t Band (137–144 MHz)
137.000–144.000 . . . . . . . . . . . . . . . . . . . . . . . . . . . . . . . . . . . . . . . GOVT, MIL
2-Meter Amateur Band (144–148 MHz)
144.000–148.000 . . . . . . . . . . . . . . . . . . . . . . . . . . . . . . . . . . . . . . . . . . . . HAM
VHF High Band (148–174 MHz)
148.050–150.345 . . . . . . . . . . . . . . . . . . . . . . . . . . . . . . . . . . . .CAP, MAR, MIL
150.775–150.790 . . . . . . . . . . . . . . . . . . . . . . . . . . . . . . . . . . . . . . . . . . . . MED
150.815–150.980 . . . . . . . . . . . . . . . . . . . . . . . . . . . . . .TOW, Oil Spill Cleanup
150.995–151.475 . . . . . . . . . . . . . . . . . . . . . . . . . . . . . . . . . . . . . . ROAD, POL
151.490–151.955 . . . . . . . . . . . . . . . . . . . . . . . . . . . . . . . . . . . . . . . . IND, BUS
151.985 . . . . . . . . . . . . . . . . . . . . . . . . . . . . . . . . . . . . . . . . . . . . . . . . . . . TELM
152.0075 . . . . . . . . . . . . . . . . . . . . . . . . . . . . . . . . . . . . . . . . . . . . . . . . . . . MED
152.030–152.240 . . . . . . . . . . . . . . . . . . . . . . . . . . . . . . . . . . . . . . . . . . . .TELB
152.270–152.480 . . . . . . . . . . . . . . . . . . . . . . . . . . . . . . . . . . . .IND, TAXI, BUS
152.510–152.840 . . . . . . . . . . . . . . . . . . . . . . . . . . . . . . . . . . . . . . . . . . . .TELB
152.870–153.020 . . . . . . . . . . . . . . . . . . . . . . . . . . . . . . . . . . . . . . . . IND, MOV
153.035–153.725 . . . . . . . . . . . . . . . . . . . . . . . . . . . . . . . . . . . . IND, OIL, UTIL
153.740–154.445 . . . . . . . . . . . . . . . . . . . . . . . . . . . . . . . . . . . . . . . PUB, FIRE
154.490–154.570 . . . . . . . . . . . . . . . . . . . . . . . . . . . . . . . . . . . . . . . . IND, BUS
154.585 . . . . . . . . . . . . . . . . . . . . . . . . . . . . . . . . . . . . . . . . . . . Oil Spill Cleanup
154.600–154.625 . . . . . . . . . . . . . . . . . . . . . . . . . . . . . . . . . . . . . . . . . . . . .BUS
154.655–156.240 . . . . . . . . . . . . . . . . . . . . . . . . . . . . .MED, ROAD, POL, PUB
156.255–157.425 . . . . . . . . . . . . . . . . . . . . . . . . . . . . . . . . . . . . . . . . OIL, MARI
157.450 . . . . . . . . . . . . . . . . . . . . . . . . . . . . . . . . . . . . . . . . . . . . . . . . . . . . MED
157.470–157.515 . . . . . . . . . . . . . . . . . . . . . . . . . . . . . . . . . . . . . . . . . . . . TOW
157.530–157.725 . . . . . . . . . . . . . . . . . . . . . . . . . . . . . . . . . . . . . . . . IND, TAXI
157.740 . . . . . . . . . . . . . . . . . . . . . . . . . . . . . . . . . . . . . . . . . . . . . . . . . . . . .BUS
157.770–158.100 . . . . . . . . . . . . . . . . . . . . . . . . . . . . . . . . . . . . . . . . . . . .TELB
158.130–158.460 . . . . . . . . . . . . . . . . . . . . . . . . . . BUS, IND, OIL, TELM, UTIL
158.490–158.700 . . . . . . . . . . . . . . . . . . . . . . . . . . . . . . . . . . . . . . . . . . . .TELB
158.730–159.465 . . . . . . . . . . . . . . . . . . . . . . . . . . . . . . . . . .POL, PUB, ROAD
159.480 . . . . . . . . . . . . . . . . . . . . . . . . . . . . . . . . . . . . . . . . . . . . . . . . . . . . . OIL
159.495–161.565 . . . . . . . . . . . . . . . . . . . . . . . . . . . . . . . . . . . . . . . . . . . TRAN
161.580–162.000 . . . . . . . . . . . . . . . . . . . . . . . . . . . . . . . . . . . OIL, MARI, RTV
162.0125–162.35 . . . . . . . . . . . . . . . . . . . . . . . . . . . . . . . . . GOVT, MIL, USXX
162.400–162.550 . . . . . . . . . . . . . . . . . . . . . . . . . . . . . . . . . . . . . . . . . . .WTHR
162.5625–162.6375 . . . . . . . . . . . . . . . . . . . . . . . . . . . . . . . GOVT, MIL, USXX
162.6625 . . . . . . . . . . . . . . . . . . . . . . . . . . . . . . . . . . . . . . . . . . . . . . . . . . . MED
162.6875–163.225 . . . . . . . . . . . . . . . . . . . . . . . . . . . . . . . . GOVT, MIL, USXX
163.250 . . . . . . . . . . . . . . . . . . . . . . . . . . . . . . . . . . . . . . . . . . . . . . . . . . . . MED
163.275–166.225 . . . . . . . . . . . . . . . . . . . . . . . . . . . . . . . . . GOVT, MIL, USXX
166.250 . . . . . . . . . . . . . . . . . . . . . . . . . . . . . . . . . . . . . . . . . . GOVT, RTV, FIRE
166.275–169.400 . . . . . . . . . . . . . . . . . . . . . . . . . . . . . . . . . . . . . . GOVT, BIFC
169.445–169.505 . . . . . . . . . . . . . . . . . . . . . . . . . . . . . . Wireless Mikes, GOVT
169.55–169.9875 . . . . . . . . . . . . . . . . . . . . . . . . . . . . . . . . . GOVT, MIL, USXX
170.000–170.150 . . . . . . . . . . . . . . . . . . . . . . . . . . . . . BIFC, GOVT, RTV, FIRE
170.175–170.225 . . . . . . . . . . . . . . . . . . . . . . . . . . . . . . . . . . . . . . . . . . . GOVT
170.245–170.305 . . . . . . . . . . . . . . . . . . . . . . . . . . . . . . . . . . . . Wireless Mikes
170.350–170.400 . . . . . . . . . . . . . . . . . . . . . . . . . . . . . . . . . . . . . . . GOVT, MIL
170.425–170.450 . . . . . . . . . . . . . . . . . . . . . . . . . . . . . . . . . . . . . . . . . . . . BIFC
170.475 . . . . . . . . . . . . . . . . . . . . . . . . . . . . . . . . . . . . . . . . . . . . . . . . . . . . .PUB
170.4875–173.175 . . . . . . . . . . . . . . . . . . . . . . . . .GOVT, PUB, Wireless Mikes
33
Page 34

20-511 .fm Page 34 Wednesda y, Augus t 4, 1999 2:13 P M
173.225–173.5375 . . . . . . . . . . . . . . . . . . . . . . . . . . . . MOV, NEWS, UTIL, MIL
173.5625–173.5875 . . . . . . . . . . . . . . . . . . . . . . . . . .MIL Medical/Crash Crews
173.60–173.9875 . . . . . . . . . . . . . . . . . . . . . . . . . . . . . . . . . . . . . . . . . . . GOVT
ULTRA HIGH FREQUENCY (UHF) (300 MHz–3 GHz)
U. S. Government Band (406–420 MHz)
406.125–419.975 . . . . . . . . . . . . . . . . . . . . . . . . . . . . . . . . . . . . . GOVT, USXX
70-cm Amateur Band (420–450 MHz)
420.000–450.000 . . . . . . . . . . . . . . . . . . . . . . . . . . . . . . . . . . . . . . . . . . . . HAM
Low Band (450–470 MHz)
450.050–450.925 . . . . . . . . . . . . . . . . . . . . . . . . . . . . . . . . . . . . . . . . . . . . .RTV
451.025–452.025 . . . . . . . . . . . . . . . . . . . . . . . . . . . . . . .IND, OIL, TELM, UTIL
452.0375–453.00 . . . . . . . . . . . . . . . . . . . . . . . IND, TAXI, TRAN TOW, NEWS
453.0125–454.000 . . . . . . . . . . . . . . . . . . . . . . . . . . . . . . . . . . . . . . . .PUB, OIL
454.025–454.975 . . . . . . . . . . . . . . . . . . . . . . . . . . . . . . . . . . . . . . . . . . . .TELB
455.050–455.925 . . . . . . . . . . . . . . . . . . . . . . . . . . . . . . . . . . . . . . . . . . . . .RTV
457.525–457.600 . . . . . . . . . . . . . . . . . . . . . . . . . . . . . . . . . . . . . . . . . . . . .BUS
458.025–458.175 . . . . . . . . . . . . . . . . . . . . . . . . . . . . . . . . . . . . . . . . . . . . MED
460.0125–460.6375 . . . . . . . . . . . . . . . . . . . . . . . . . . . . . . . . . FIRE, POL, PUB
460.650–462.175 . . . . . . . . . . . . . . . . . . . . . . . . . . . . . . . . . . . . . . . . . . . . .BUS
462.1875–462.450 . . . . . . . . . . . . . . . . . . . . . . . . . . . . . . . . . . . . . . . BUS, IND
462.4625–462.525 . . . . . . . . . . . . . . . . . . . . . . . . . . . . . .IND, OIL, TELM, UTIL
462.550–462.925 . . . . . . . . . . . . . . . . . . . . . . . . . . . . . . . . . . . . . . . GMR, BUS
462.9375–463.1875 . . . . . . . . . . . . . . . . . . . . . . . . . . . . . . . . . . . . . . . . . . MED
463.200–467.925 . . . . . . . . . . . . . . . . . . . . . . . . . . . . . . . . . . . . . . . . . . . . .BUS
FM-TV Audio Broadcast, UHF Wide Band (470–512 MHz)
(Channels 14 through 69 in 6 MHz steps)
475.750 . . . . . . . . . . . . . . . . . . . . . . . . . . . . . . . . . . . . . . . . . . . . . . . Channel 14
481.750 . . . . . . . . . . . . . . . . . . . . . . . . . . . . . . . . . . . . . . . . . . . . . . . Channel 15
487.750 . . . . . . . . . . . . . . . . . . . . . . . . . . . . . . . . . . . . . . . . . . . . . . . Channel 16
..
..
511.750 . . . . . . . . . . . . . . . . . . . . . . . . . . . . . . . . . . . . . . . . . . . . . . . Channel 20
Some cities use the 470–512 MHz band for land/mobile service.
Note:
Conventional Systems Band – Locally Assigned
851.0125–855.9875 . . . . . . . . . . . . . . . . . . . . . . . . . . . . . . . . . . . . . . . . . . .CSB
Conventional/Trunked Systems Band – Locally Assigned
856.0125–860.9875 . . . . . . . . . . . . . . . . . . . . . . . . . . . . . . . . . . . . . . . . . CTSB
Trunked Systems Band – Locally Assigned
861.0125–865.9875 . . . . . . . . . . . . . . . . . . . . . . . . . . . . . . . . . . . . . . . . . . .TSB
Public Safety Band – Locally Assigned
866.0125–868.9875 . . . . . . . . . . . . . . . . . . . . . . . . . . . . . . . . . . . . . . . . . . .PSB
33-Centimeter Amateur Band (902–928 MHz)
902.0000–928.0000 . . . . . . . . . . . . . . . . . . . . . . . . . . . . . . . . . . . . . . . . . . HAM
Private Trunked
935.0125–939.9875 . . . . . . . . . . . . . . . . . . . . . . . . . . . . . . . . . . . . . . . . . . .PTR
General Trunked
940.0125–940.9875 . . . . . . . . . . . . . . . . . . . . . . . . . . . . . . . . . . . . . . . . . . GTR
34
Page 35

20-511 .fm Page 35 Wednesda y, Augus t 4, 1999 2:13 P M
AVOIDING IMAGE FREQUENCIES
You might discover one of your regular stations on another frequency
that is not listed. It might be what is known as an image frequency. For
example, you might find a service that regularly uses a frequency of
453.075 also on 474.775.
To see if it is an image, do a litt le math.
Note the new frequency. 474.775
Double the intermed iat e frequency of 10.85 MHz (2 1.700)
and subtract it from the new frequency. –21.700
If the answer is the regular frequency, 453.075
then you have tuned to an image.
Occasionally, you might get interference on a weak or distant channel
from a strong broadcast 21.7 MHz below the tuned frequency. This is
rare, and the ima ge signal is usua lly cl eared when ever there i s a broadcast on the actual frequency.
FREQUENCY CONVERSION
The tuning location of a station can be expressed in frequency (kHz or
MHz) or in wavelength (meters). The fol lowing information can help you
make the necessary conversions.
1 MHz (million) = 1,000 kHz (thousand)
To convert MHz to kHz, multiply the number of megaher tz by 1,000:
9.62 (MHz) x 1000 = 9620 kHz
To convert from kHz to MHz, divide the number of kilohertz by 1,000:
2780 (kHz) ÷ 1000 = 2.780 MHz
To convert MHz to meters, divi de 300 by the number of megahertz:
300 ÷ 7.1 MHz = 42.25 meters
35
Page 36

20-511 .fm Page 36 Wednesda y, Augus t 4, 1999 2:13 P M
TROUBLESHOOTING
If you have problems, here are some suggestions that might help. If
none of these sugge stions help, take your scann er to your local
RadioShack st ore for assistan ce.
PROBLEM POSSIBLE CAUSE REMEDY
Keys do not w ork or
displa y ch anges at
random.
Scann er is on but
will not scan.
Scanner is totally
inoperative.
The scanner’s display dims or the
scanner sounds a
tone ev ery 15-30
seconds.
Keypad does not
work.
B
flashes on the dis-
play.
Undetermined error. Reset the scanner (see
•The SQUELCH
control is no t correctly adjusted.
• Only one channel
or no c hannels are
progr ammed.
No power. • Check the batteries,
The optional AC or DC
power adapter is not
connected.
Batteries are not correctly installed.
Batteries need to be
replaced.
The keylock function is
activated.
The batteries are weak. Rec harge the rechargeable
“Resetting the Scanner” on
Page 37).
• Adjust SQUELCH
clockwise.
• Program more than
one channel.
or make sure the
scanne r is pl ugged
into a work in g AC or
DC outlet.
• Recharge the rechargeable batteries
or replace the nonrechargeable batteries.
Be sure the adapter is fully
inserted in to the DC 12V
jack.
Make sure the batteries’ +
and – terminals are properly aligned.
Insert new batteries or recharge rechargeable batteries.
Press
KEYLOCK
appears from the display to
turn off the keylock.
batt eries, or replace the
non-rechargeable batteries.
K
until dis-
36
Page 37

20-511 .fm Page 37 Wednesda y, Augus t 4, 1999 2:13 P M
PROBLEM POSS IBLE CAUSE REMEDY
Poor or no re ce ption.
Error
the disp la y.
In the scan mode,
the scan ner locks
on frequencies that
have an unc le ar
transmission.
appears on
• Batteries are
weak or dead.
• Environment is
not suitable for
reception by the
scanner.
• Improperl y connected antenn a.
Programming error. Reprogram the frequency
Progr ammed frequencies are the same as
“birdie” frequencies.
• Check the batteries,
• Relocate the scanner
• Be sure the antenn a is
correctly.
Avoid programming fre-
quencies listed under “Birdie Frequencies” on
Page 29 or only listen to
them manually.
or make sure the
scanner is plug ged
into a working A C or
DC outlet.
and try again.
proper l y co nn ec t e d.
RESETTING THE SCANNER
If the scan ner’s disp lay locks up or does not work pro perly aft er you connect power, you might hav e to res et the scanner.
Caution:
grammed into the scanner. Before you reset the scanner, try turning it
off and on to see if it begins working properly. Use the following procedure only when you are sure your scanner is not working pro perly.
1. Tur n off the scanner.
2. While you press and hold down the
This procedure clears all the information you have pro-
2
and 9 keys, turn on t he scan-
ner.
37
Page 38

20-511 .fm Page 38 Wednesda y, Augus t 4, 1999 2:13 P M
CARE AND MAINTENANCE
Your RadioShack PRO-66 50-Channel Direct Entry Programmable
Scanner is an example of superior design and craftsmanship. The following suggest ions wi ll help yo u car e for your sca nner so you can enjoy
it for yea rs.
Keep the scanner dry. If it gets wet, wipe it dry immediately.
Liquids can cont ain minerals that can corrode the electronic
circuits.
Use only fresh batteries of the recommen ded size and typ e.
Always remove old and weak batteries. They can leak
chemicals that destroy electronic circuits.
Handle the scanner gently and carefully. Dropping it can
damage circuit boards and cases and can cause the scanner to work improperly.
Use and store the scanner only in normal temperature environments. Temperature extremes can shorten the life of
electronic devices, damage batteries, and distort or melt
plastic parts.
Keep the scanner away from dust and di rt , which can c ause
premature wear of parts.
Wipe the scanner with a damp cloth occasionally to keep it
looking new. Do not u se harsh c hemi cals, clean ing so lv ents,
CLEANER
or strong deterge nts to clean the scanner.
Modifying or tampering with your scanner’s internal components can
cause a malfunction and might invalidate the scanner’s warranty and
void your FCC authorization to operate it. If your scanner is not operating as it should, take it to your local RadioShack store for assistance.
38
Page 39

20-511 .fm Page 39 Wednesda y, Augus t 4, 1999 2:13 P M
SPECIFICATIONS
Frequency Coverage:
29–54 MHz (in 5 kHz steps)
137–174 MHz (in 5 kHz steps)
406–512 MHz (in 12.5 kHz steps)
806.0000–823.9375 MHz (in 12.5 kHz steps)
851.0000–868.9375 MHz (in 12.5 kHz steps)
896.1125–956.0000 MHz (in 12.5 kHz steps)
Channels of Operation . . . . . . . . . . . . . . . . . . . . . . . . . . . 50 Channels
Sensitivity:
(FM: 20 dB S/N at 3 kHz deviation):
29–54 MHz . . . . . . . . . . . . . . . . . . . . . . . . . . . . . . . . . . . . . 0.4 µV
137–174 MHz . . . . . . . . . . . . . . . . . . . . . . . . . . . . . . . . . . . 0.5 µV
406–512 MHz . . . . . . . . . . . . . . . . . . . . . . . . . . . . . . . . . . . 0.6 µV
806–956 MHz . . . . . . . . . . . . . . . . . . . . . . . . . . . . . . . . . . . 0.6 µV
Selectivity:
±10 kHz . . . . . . . . . . . . . . . . . . . . . . . . . . . . . . . . . . . . . . . . . –6 dB
±17 kHz. . . . . . . . . . . . . . . . . . . . . . . . . . . . . . . . . . . . . . . . –50 dB
Scan Speed . . . . . . . . . . . . . . . . . . . . . . . . . . . . . . . 15 Channels/Sec.
Search Speed. . . . . . . . . . . . . . . . . . . . . . . . . . . . . . . . . 20 Steps/Sec.
Delay Time . . . . . . . . . . . . . . . . . . . . . . . . . . . . . . . . . . . . . . 2 Seconds
Acceptable RF Displacement . . . . . . . . . . . . . . . . . . . . . . . . . . . ±6 kHz
IF Frequencies . . . . . . . . . . . . . . . . . . . . . . . . 10.85 MHz and 450 kHz
Squelch Sensitivity:
Threshold . . . . . . . . . . . . . . . . . . . . . . . . . . . . . .Less than 0.4 mV
Tight (S+N)/N. . . . . . . . . . . . . . . . . . . . . . . . . . . . . . . . . . . . . 25 dB
Built-in Speaker . . . .1
Power Requirement . . . . . . . . . . . . . . DC 4 AA Batteries (6.0 VDC), or
Vehicle Battery DC Power Cord (Cat. No. 270-1533), or
Current Drain:
Squelched . . . . . . . . . . . . . . . . . . . . . . . . . . . . . . . . . . . . . . 45 mA
Full Volume Unsquelched . . . . . . . . . . . . . . . . . . . . . . . . . 125 mA
Dimensions (HWD). . . . . . . . . . . . . . . . . . . . 6
Weight. . . . . . . . . . . . . . . . . . . . . . . . . . . . . . . . . . . . . . . 8.8 oz (250 g)
Specifications are typical; individu al units might vary. Specifications are
subject to change and imp rovement without noti ce.
9
/16 Inches (4 cm) 8 Ohm, 0.5 W , Dynamic Type
4 AA Rechargeable Ni-Cd Batter ies (4.8 VDC), or
AC Adapter (Cat. No. 273-1652)
3
11
8
× 2
/
/16 × 19/16 Inches
(162 × 68.5 × 39 mm)
39
Page 40

20-511 .fm Page 40 Wednesda y, Augus t 4, 1999 2:13 P M
RadioShack Limited Warranty
This product is warranted against defects for 1 year from date of purchase
from RadioShack company-owned stores and authorized RadioShack franchisees and dealers. Within this period, we will repair it without charge for parts
and labo r. Simpl y
date to an y Radi oSha ck store . Warran ty does not co ver tra nspor tation cost s.
Nor does it cover a product subjected to misuse or accidental damage.
EXCEPT AS PROVIDED HEREIN, RADIOSHACK MAKES NO EXPRESS
WARRANTIES AND ANY IMPLIED WARRANTIES ARE LIMITED IN DURATION TO THE DURATION OF THE WRITTEN LIMITED WARRANTIES CONTA INED HEREIN. Some states do not permit limitation or exclusion of implied
warrant ies; ther efo re, the afo res aid limit ati on(s ) or ex clus ion (s) m ay no t appl y
to the purchaser.
This warranty gives you specific legal r ights and you may also have other rights which
vary from state to state.
bring your R adioShack sales sl ip
We Service What We Sell
as proof of purchase
10/95
RadioShack
A Division o f Ta ndy Corporat i on
Fort Worth, Texas 76102
1A6 Printed in the Philippines
UBZZ01259ZZ
 Loading...