


CDR802-00S
Audio CD Recorder / 3 CD Changer
CDR-800
CDR-800
xp CDR 800/00 eng.-1.1 25-07-2001 12:50 Pagina 1

2
Important notes for users in the U.K.
Mains plug
This apparatus is fitted with an approved moulded 13 Amp
plug.To change a fuse in this type of plug proceed as follows:
1 Remove fuse cover and fuse.
2 Fix new fuse which should be a BS1362 5 Amp,A.S.T.A. or BSI
approved type.
3 Refit the fuse cover.
If the fitted plug is not suitable for your socket outlets, it
should be cut off and an appropriate plug fitted in its place.
If the mains plug contains a fuse, this should have a value of
5 Amp. If a plug without a fuse is used, the fuse at the
distribution board should not be greater than 5 Amp.
Note:The severed plug must be disposed to avoid a possible
shock hazard should it be inserted into a 13 Amp socket else-
where.
How to connect a plug
The wires in the mains lead are coloured with the following
code: blue = neutral (N), brown = live (L).
0 As these colours may not correspond with the colour
markings identifying the terminals in your plug, proceed as fol-
lows:
– Connect the blue wire to the terminal marked N or
coloured black.
– Connect the brown wire to the terminal marked L or
coloured red.
– Do not connect either wire to the earth terminal in the
plug, marked E (or e) or coloured green (or green and
yellow).
Before replacing the plug cover, make certain that the cord
grip is clamped over the sheath of the lead - not simply over
the two wires.
Copyright in the U.K.
Recording and playback of material may require consent. See
Copyright Act 1956 and The Performer’s Protection Acts 1958
to 1972.
Norge
Typeskilt finnes på apparatens bakside.
Observer: Nettbryteren er sekundert innkoplet. Den innebygde
netdelen er derfor ikke frakoplet nettet så lenge apparatet er
tilsluttet nettkontakten.
For å redusere faren for brann eller elektrisk støt; skal apparatet ikke
utsettes for regn eller fuktighet.
For Customer Use:
Read carefully the information located at the back plate
of your CD recorder/player and enter below the
Serial N°. Retain this information for future reference.
Model N°. ..............CDR800........................................................
Serial N°............................................................................................................
xp CDR 800/00 eng.-1.1 18-07-2001 13:54 Pagina 2

Index
3
English
Français
Español
________________________________________________________________________
48
Deutsch
________________________________________________________________________
71
Enlish
___________________________________________________________________________
4
Fraçais
_________________________________________________________________________
26
EspañolDeutsch
xp CDR 800/00 eng.-1.1 18-07-2001 13:54 Pagina 3
The following text contains updated information in addition to the
supplied instruction manual.
Loading discs, page 13
MP3 discs only When loading an MP3-CD,there will be no upcounting of tracks and the
volume name will not be shown.
When displaying album or track names, CD and the disc tray number
or CDR are not displayed (in order to display the name better).
Changing discs during play/recording It is not possible to open the CD changer during recording.
Playing,page 13
Playing During playback of an MP3 disc, pressing DISPLAY will display the album
number, track number and track name.
When playback of an MP3 disc is stopped, CD and the disc tray number
or CDR are not displayed but only the first track name of the current album
(in order to display the name better).
Playing,page 14
MP3 Disc navigation During playback, press DISPLAY to display the album number, track number
and track name.
Track selection and playback When rotating the ¡ EASY JOG ™, the display shows TRACK together with
the track number.
Playing,page 15
Shuffle and repeat Please ignore the note about MP3 discs during shuffle play.
REPEAT DISC is not possible for an MP3 disc.
REPEAT TRACK is not possible during SHUFFLE.
Programming,page 16
Programming track numbers A program with MP3 tracks can only be created from one CD.
About recording,page 17
Adjusting the record level
The record level from the internal changer can only be adjusted during
recording.
Special features, page 23
Text edit (on CD recorder only) - Deleting and substituting a character
You do not have to press YES to confirm deleting or substituting a character.
Addendum CDR-800 / CDR-802
English
3103 306 1846 1 Printed in Hungary Cmm/RR/0135
Add. CDR800/00/eng. 03-09-2001 10:56 Pagina 1

Le texte suivant contient de l’information actualisée pour compléter le
mode d’emploi fourni.
Chargement des disques, page 35
Uniquement les disques MP3 discs Lorsque vous insérez un CD MP3, le comptage incrémental continu des titres
n’aura pas lieu et le nom du volume ne sera pas affiché.
Lors de l’affichage du nom de l’album ou des titres, CD et le numéro du
plateau du disque ou CDR ne seront pas affichés (pour améliorer l’affichage
du nom).
Changement de disques pendant
la lecture/l’enregistrement Il n’est pas possible d’ouvrir le changeur de CD en cours d’enregistrement.
Lecture, page 35
Lecture Pendant la lecture d’un disque MP3, si on appuie sur DISPLAY, cela affichera le
numéro de l’album, le numéro du titre et le nom du titre.
Lorsque la lecture d’un disque MP3 est arrêtée, CD et le numéro du plateau
du disque ou CDR ne seront pas affichés, mais uniquement le nom du
premier titre de l’album actuel (pour améliorer l’affichage du nom).
Lecture, page 36
Navigation sur le disque MP3 Pendant la lecture, appuyer sur DISPLAY pour afficher le numéro de l’album,
le numéro du titre et le nom du titre.
Sélection d’un titre et lecture Lorsque vous tournez la commande ¡ EASY JOG ™, TRACK s’affiche ainsi
que le numéro du titre.
Lecture, page 37
Lecture en ordre aléatoire et répétition Veuillez ignorer la remarque sur les disque MP3 pendant la lecture en ordre
aléatoire (Shuffle).
La répétition d’un disque (REPEAT DISC) n’est pas possible pour un disque
MP3.
La répétition d’un titre (REPEAT TRACK) n’est pas possible en cours de lecture
en ordre aléatoire (SHUFFLE).
Programmation,page 38
Programmation des numéros de titres Un programme de titres MP3 ne peut être composé que de titres d’un seul
CD.
A propos de l’enregistrement, page 39
Réglage du niveau de l’enregistrement Le niveau d’enregistrement du changeur interne ne peut être changé qu’en
cours d enregistrement.
Options spéciales, page 45
Edition de texte (uniquement sur graveur de CD) -
Effacement et remplacement d’un caractère
Il n’est pas nécessaire d’appuyer sur YES pour confirmer l’effacement ou le
remplacement d’un caractère.
Addendum CDR-800 / CDR-802
3103 306 1846 1 Printed in Hungary Cmm/RR/0135
Français
Add. CDR800/00/fra. 03-09-2001 10:57 Pagina 1
El texto siguiente contiene información actualizada que complementa
el manual de instrucciones suministrado.
Colocación de discos, página 57
Discos MP3 solamente Cuando se coloca un MP3-CD,no se realizará un recuento ascendente de las
pistas y el nombre del álbum no se mostrará.
Cuando se muestran nombres de álbum o pista, no se muestra CD ni el
número de bandeja de disco ni CDR (para mostrar mejor el nombre).
Cambio de discos durante la
reproducción/grabación No es posible abrir el cambiador de CD durante la grabación.
Reproducción, página 57
Reproducción Durante la reproducción de un disco MP3 disc, al pulsarse DISPLAY se
mostrará el número de álbum, el número de pista y el nombre de pista.
Cuando se detiene la reproducción de un disco MP3, no se muestra CD ni el
número de bandeja de disco ni CDR sino tan sólo el nombre de la primera
pista del álbum en curso (para mostrar mejor el nombre).
Reproducción, página 58
Navegación de disco MP3 Durante la reproducción, pulse DISPLAY para mostrar el número de álbum,el
número de pista y el nombre de pista.
Selección y reproducción de pista Al girar ¡ EASY JOG ™, la pantalla muestra TRACK junto con el número de la
pista.
Reproducción, página 59
Reproducción al azar y repetición No haga caso de la nota sobre discos MP3 durante la reproducción al azar.
La repetición de disco (REPEAT DISC) no es posible para un disco MP3.
No es posible repetir una pista (REPEAT TRACK) durante la reproducción al
azar (SHUFFLE).
Programación,página 60
Programación de números de pista Un programa con pistas MP3 solamente puede estar compuesto de pistas
de 1 CD.
Información sobre la grabaciones, página 61
Ajuste del nivel de grabación
El nivel de grabación del cambiador interno solamente puede cambiarse
durante la grabación.
Funciones especiales, página 68
Edición de texto (en el grabador de CD solamente) - Borrado y sustitución de un carácter
No tiene que pulsar YES para confirmar el borrado o la sustitución de un
carácter.
Anexo del CDR-800 / CDR-802
Español
3103 306 1846 1 Printed in Hungary Cmm/RR/0135
Add. CDR800/00/spa. 03-09-2001 11:17 Pagina 1

Der folgende Text enthält aktualisierte, über die mitgelieferte Anleitung
hinausgehende Informationen.
Einlegen von CDs
, Seite 80
Nur bei MP3-Disks Beim Einlegen einer MP3-CD werden Titel nicht weitergezählt, und der Name
des Bandes wird nicht gezeigt.
Bei der Anzeige von Album- oder Titelnamen werden CD und die Nummer
der CD-Lade oder CDR nicht angezeigt (um den Namen besser anzuzeigen).
Disks bei Wiedergabe/Aufnahme
wechseln Das Öffnen des CD-Wechslers bei der Aufnahme ist nicht möglich.
Wiedergabe, Seite 80
Wiedergabe Bei der Wiedergabe einer MP3 CD werden durch Drücken von DISPLAY die
Albumnummer, die Titelnummer und der Titelname angezeigt.
Wenn die Wiedergabe einer MP3 CD angehalten wird, werden CD und die
Nummer der CD-Lade oder CDR nicht angezeigt; stattdessen wird nur der
erste Titelname des aktuellen Albums angezeigt (um den Namen besser
anzuzeigen).
Wiedergabe, Seite 81
MP3-Disk – Navigation Drücken Sie DISPLAY bei der Wiedergabe, um die Albumnummer, die
Titelnummer und den Titelnamen anzuzeigen.
Titel-Auswahl und -Wiedergabe Beim Drehen von ¡ EASY JOG ™, erscheint track nebst Titelnummer im
Display.
Wiedergabe, Seite 82
’Shuffle & Repeat’ Bitte lassen Sie den Hinweis zu MP3 CDs bei der Shuffle-Wiedergabe außer
Acht.
REPEAT DISC ist bei einer MP3 CD nicht möglich.
REPEAT TRACK ist bei SHUFFLE nicht möglich.
Programmieren, Seite 83
Programmieren von Titelnummern Ein Programm mit MP3-Titeln kann nur aus Titeln von 1 CD
zusammengestellt werden.
Aufnahme allgemein, Seite 85
Den Aufnahmepegel einstellen
Der Aufnahmepegel vom internen Wechsler kann nur während der Aufnahme
geändert werden.
Sonderfunktionen, Seite 91
Edit Text (nur am CD recorder) -
Ein Zeichen löschen und substituieren
Sie brauchen nicht YES zu drücken, um Löschung oder Austausch eines
Zeichens zu bestätigen.
CDR-800 / CDR-802 - Nachtrag
Deutsch
3103 306 1846 1 Printed in Hungary Cmm/RR/0135
Add. CDR800/00/dui. 03-09-2001 10:58 Pagina 1
General information
Environmental information ................................................................5
Specifications .............................................................................................5
Supplied accessories..............................................................................5
Discs for recording.................................................................................5
Discs for playback....................................................................................5
Some words about MP3.....................................................................6
Maintenance...............................................................................................6
Disc handling ............................................................................................6
Controls...............................................................................................7
Display
Display indications...................................................................................8
Connections................................................................................9
Installation
Setup recommendations.....................................................................9
Connections general .............................................................................9
Analog connections.............................................................................10
Digital connections..............................................................................10
Power supply/Mains.............................................................................11
Demo mode ...........................................................................................11
Remote control
Inserting batteries in the remote control...............................12
Remote control commands ...........................................................12
Loading discs..............................................................13
Playing
Playing .........................................................................................................13
Track selection and searching........................................................14
MP3 Disc navigation............................................................................14
Shuffle and repeat................................................................................15
CD text display......................................................................................15
Programming
Programming track numbers.........................................................16
Changing a program ...........................................................................16
Clearing a program..............................................................................16
Making a program for recording..................................................16
About recording
Basic information ..................................................................................17
Direct Line Recording (DLR) ........................................................17
Auto Level Control (ALC)..............................................................17
Adjusting the record level ...............................................................17
Internal recording
Recording single track........................................................................18
Recording an entire CD...................................................................18
Recording a program .........................................................................18
Further recording possibilities.......................................................19
External recording
Analog or digital recording..............................................................20
Automatic track increment.............................................................20
Recording with automatic start....................................................20
Manual recording..................................................................................21
(Un)finalizing, erasing
Finalizing CDR & CDRW discs.....................................................21
Unfinalizing CDRW discs.................................................................22
Erasing from a CDRW disc ............................................................22
Special features
Text edit (on CD recorder only) ................................................23
A-B editing (on CD changer only).............................................24
Troubleshooting..............................................................25
Table of contents
4
English
xp CDR 800/00 eng.-1.1 18-07-2001 13:54 Pagina 4

Environmental information
All redundant packing material has been omitted.We have
done our utmost to make the packaging easily separable
into three mono materials: cardboard (box), polystrene
foam (buffer) and polyethylene (bags, protective foam
sheet).
Your set consists of materials which can be recycled if
disassembled by a specialized company. Please observe the
local regulations regarding the disposal of packing materials,
exhausted batteries and old equipment.
As an ENERGY STAR® partner,
Philips has determined that this
product meets the ENERGY
STAR® guidelines for energy
efficiency.
Specifications
Subject to modification without notice.
General
Power consumption.....................................................................18 W
Power consumption in Standby ...................................< 0.65 W
Operating temperature ........................................................5-35° C
Weight.................................................................................................5.0 kg
Dimensions.....................................................435 x 347 x 122 mm
Audio
Frequency response................................................2Hz-22.050 Hz
Playback S/N (A-weighted)..................................................115 dB
Playback S/N................................................................................ 110 dB
Playback Dynamic Range..........................................................98 dB
Playback Total Harmonic Distortion ...............................- 96 dB
Channel separation ...................................................................105 dB
Recording S/N (A-weighted).................................................94 dB
Recording S/N digital without SRC...............equal to source
Recording Dynamic Range ......................................................94 dB
RecordingTotal Harmonic Distortion + noise..........- 86 dB
Digital/Optical input..........................................................12-96 kHz
Laser
Type....................................................Semiconductor laser GaAlAs
Wave length ..............................................775-795 nm (at 25° C)
Output power....................2.5 mW (Read,) 35 mW (Write)
Beam divergence................................................................60 degrees
The type plate is located at the back of the set.
This product complies with the radio interference
requirements of the European Union.
CAUTION
Use of controls or adjustments or performance of
procedures other than herein may result in hazardous
radiation exposure or other unsafe operation.
Supplied accessories
– 2 Analog audio cables (with red and white plugs)
– Mains cable
– 2 batteries for the remote control, size AA
– Remote control
Discs for recording
For recording, make sure to use special audio discs only.
These discs are marked with “Digital Audio” and the logos
shown below.
There are two different types of audio discs for the use on
this CD recorder:
– CD-Audio Recordable (CDR) discs
These discs can be recorded on once and
play in all standard CD players and CD
recorders, when they are finalized.
– CD-Audio ReWritable (CDRW) discs
These discs can be recorded on, erased and
re-recorded many times and play in CDRW
compatible CD players and CD recorders,
when they are finalized.
– All Philips CD players and CD recorders
with the sticker shown here are CDRW
compatible.
To ensure proper working of the set we recommend the
use of Philips audio CDR and audio CDRW discs only.
Note: Do not use a computer CDR or CDRW as recording will
not work!
Recording is permissible insofar as copyright or other
rights of third parties are not infringed upon.
In certain countries including the UK and certain
Commonwealth countries, use of the product as
shown or suggested in this user manual may require
the permission of copyright holders.
Discs for playback
For playback on this CD changer and CD recorder you can
use following audio discs:
– All pre-recorded audio CDs
– All audio CDR and audio CDRW discs
– MP3-CDs (CD-ROMs with MP3 tracks) - make
sure filename ends with .mp3
Note: CDR(W) discs that are not finalized can only be played
in the CD recorder tray.
ReWritable
Recordable
General information
5
English
CAUTION
INVISIBLE RADIATION WHEN OPEN.
AVOID EXPOSURE TO BEAM.
Note:This warning is located inside the enclosure.
xp CDR 800/00 eng.-1.1 18-07-2001 13:54 Pagina 5
Some words about MP3
The revolutionary new music compression technology MP3
(MPEG Audio Layer-3) enables to shrink down original
digital audio sound data with a factor of up to 10 without
losing significant sound quality.This allows you to record up
to 10 hours of CD-like quality music on a single CD-ROM.
Making your own MP3-CD
Basically there are two sources for MP3 music on CD.You
can either create (“rip”) it from your own digital audio CDs
or download legal MP3 music from the Internet.
Record (“burn”) the music from your hard disc on CD-
ROM with your home PC (make sure filename ends
with .mp3). Once finished, you can play your MP3-CD on
this set and enjoy the music.
Data rate
The data rate is of great importance with MP3. It indicates
how fast bits are transfered.
Stereo music on a CD shows a data rate of about
1400 kilobits per second (kbps). To achieve a good MP3
quality a bit rate of 128 kbps is recommended.
As the encoding rate is user-selectable, make sure to reach
this data rate for MP3 as recordings less than 128 kbps will
suffer from a degradation in sound quality.
Recording
Downloading MP3 files from the Internet or ripping songs
from your own digital audio CDs is a delicate process, also
influenced by the quality of the encoder program and
speed of your PC.This may sometimes result in “drop-outs”
which you may experience while listening to your MP3-CD.
In any case make sure to use a recording speed not faster
than indicated on the CD-ROM and avoid running other
programs simultaneously on your PC during the recording
process.
It is not possible to “burn” an MP3-CD on this CD
recorder.
It is not possible to record from an MP3-CD.
Supported formats
Following formats are supported on this
CD recorder/changer:
– Disc format: ISO 9660 or Joliet
– Filename: .mp3 (tracks), .m3u or .pls (playlists)
– Bit rate: 32–320 kbps (128 kbps advised) or variable bit
rate
Note: Use the ISO 9660 disc format when burning the CD-
ROM. UDF disc format (e.g.”DirectCD” or
“WinOnCD”) is not supported.
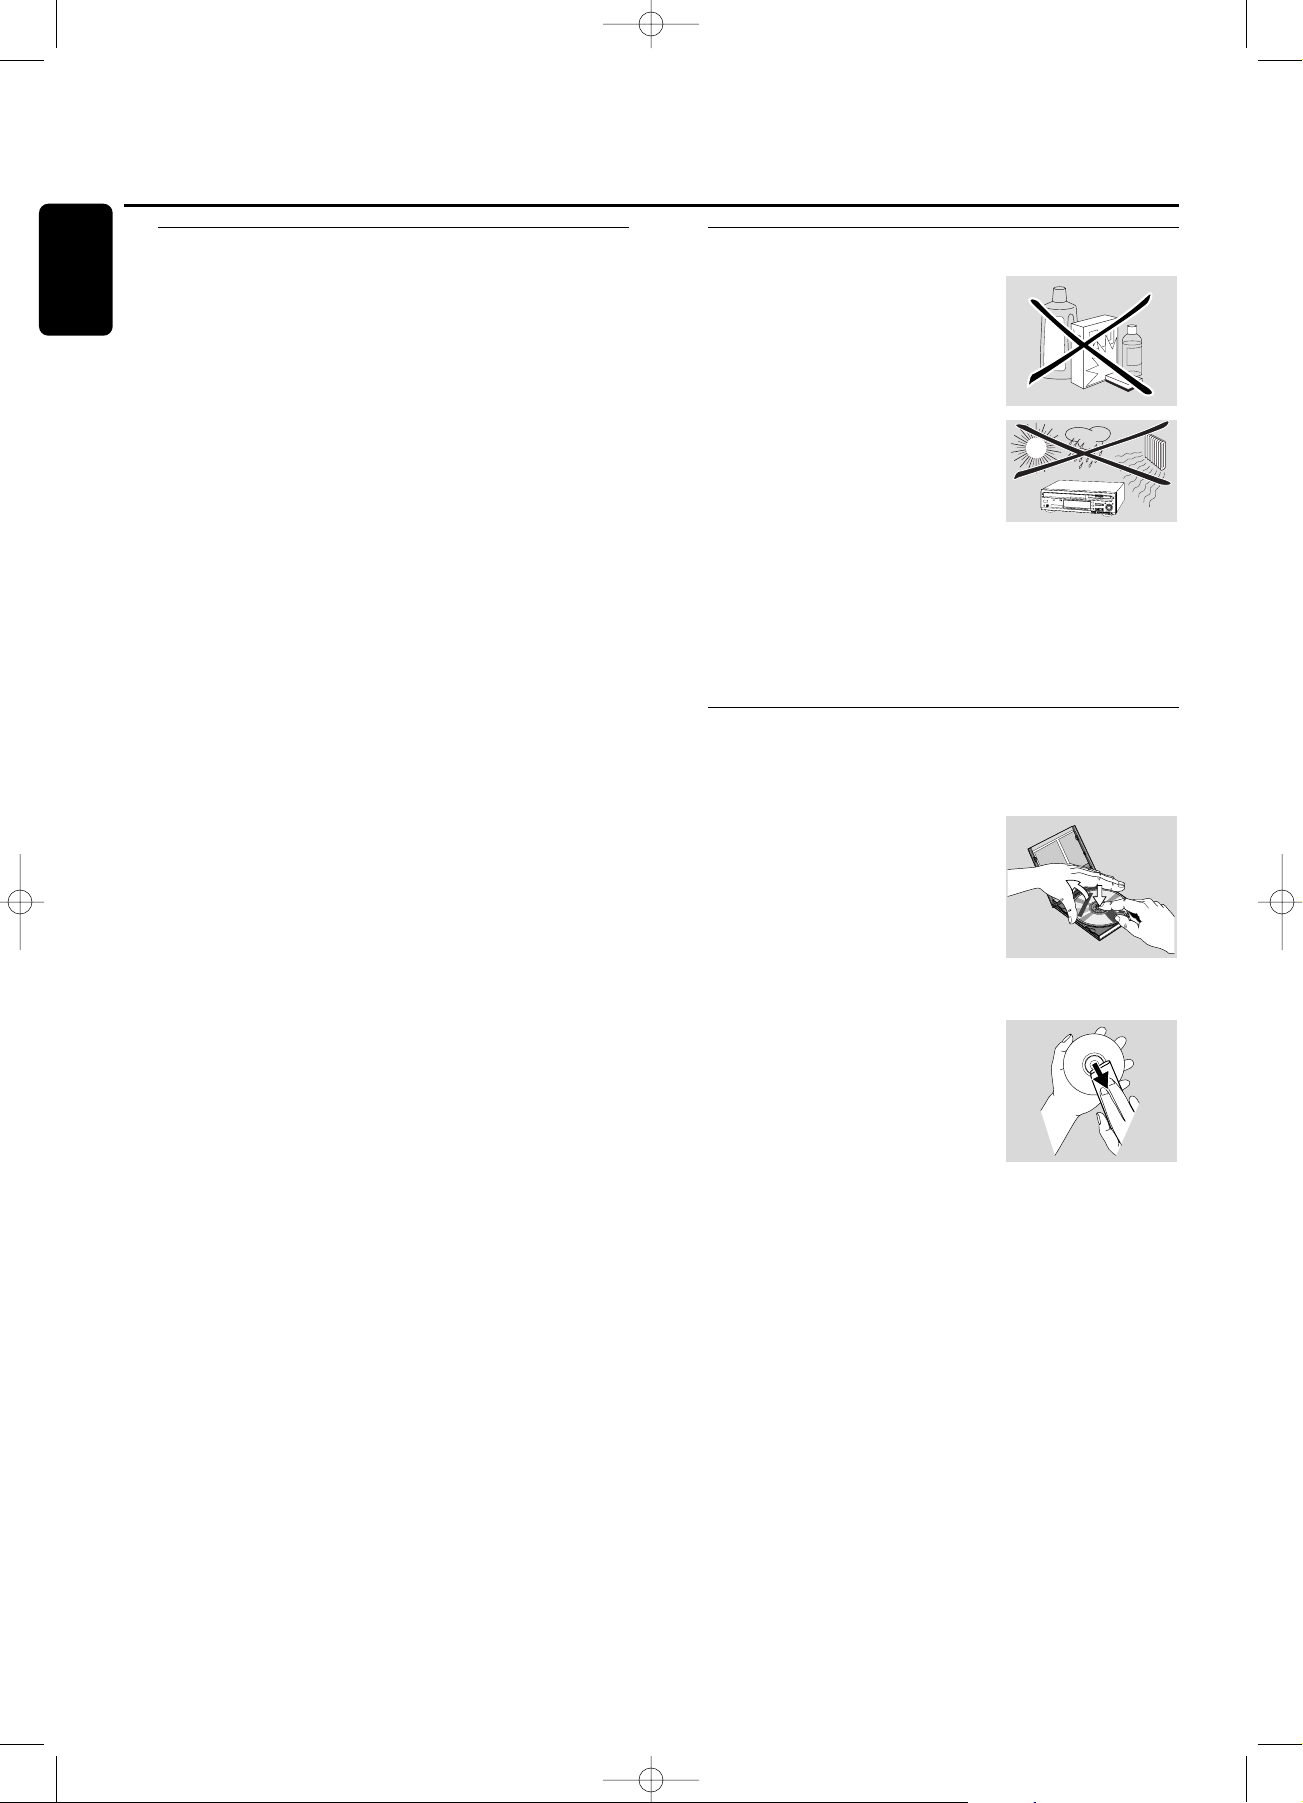
Maintenance
Clean the set with a soft, slightly
dampened lint-free cloth. Do not use
any cleaning agents as they may have
a corrosive effect.
Do not expose the set,
batteries or CDs to humidity,rain,
sand or excessive heat (caused by
heating equipment or direct sunlight).
The lenses may cloud over when the set is suddenly moved
from cold to warm surroundings. Playing a CD(RW) is not
possible then. Leave the set in a warm environment until
the moisture evaporates.
Disc handling
For recording it is very important to use dust and scratch
free discs.
To take a CD(RW) out of its box
easily, press the centre spindle while
lifting the CD(RW).Always pick up a
CD(RW) by the edge and put it back
after use. Never write on a CD or
attach a sticker to it.Write only on
the printed side of a CDR or
CDRW,and only with a soft felt-tipped pen.
To clean a CD(RW), wipe it in a
straight line from the centre toward
the edge using a soft, lint-free cloth.
A cleaning agent may damage the
disc!
6
.
O
Y
E
M
I
C
A
N
T
O
(
H
e
a
r
M
y
V
o
i
c
e
)
7
.
D
O
N
'
T
W
A
N
N
A
L
O
S
E
Y
O
U
8
.
G
E
T
O
N
Y
O
U
R
F
E
E
T
9
.
Y
O
U
R
L
O
V
E
I
S
B
E
D
F
O
R
M
E
1
0
.
C
U
T
S
B
O
T
H
W
A
Y
S
1
1
.
O
Y
E
M
I
C
A
N
T
O
(
S
p
a
n
i
s
h
V
e
r
s
i
o
n
)
1
2
.
S
I
V
O
Y
A
P
E
R
D
E
R
T
E
E
P
C
4
6
5
1
4
5
2
B
I
E
M
/
S
T
E
M
R
A
S
T
E
R
E
O
Al
l r
ig
h
ts
o
f
th
e
pr
o
d
u
ce
r a
nd
o
f
th
e
o
w
ne
r o
f
t
he
re
co
rd
e
d
w
or
k
res
e
r
ve
d
.
U
n
a
ut
h
or
is
ed
co
p
yin
g,
p
ubl
ic
pe
rf
or
m
a
n
ce,
b
r
oad
ca
s
ti
n
g
, h
irin
g
or
r
e
nta
l
o
f
th
is
re
co
rd
ing
p
r
o
hib
it
ed
. M
ade
in
A
u
s
t
ri
a
1
.
A
Y
,
A
Y
,
I
2
.
H
E
R
E
W
E
A
R
E
3
.
S
A
Y
4
.
T
H
I
N
K
A
B
O
U
T
Y
O
U
N
O
W
5
.
N
O
T
H
I
N
'
N
E
W
C
O
M
P
A
C
T
D
I
G
I
T
A
L
A
U
D
I
O
1
2
General information
6
English
xp CDR 800/00 eng.-1.1 18-07-2001 13:54 Pagina 6
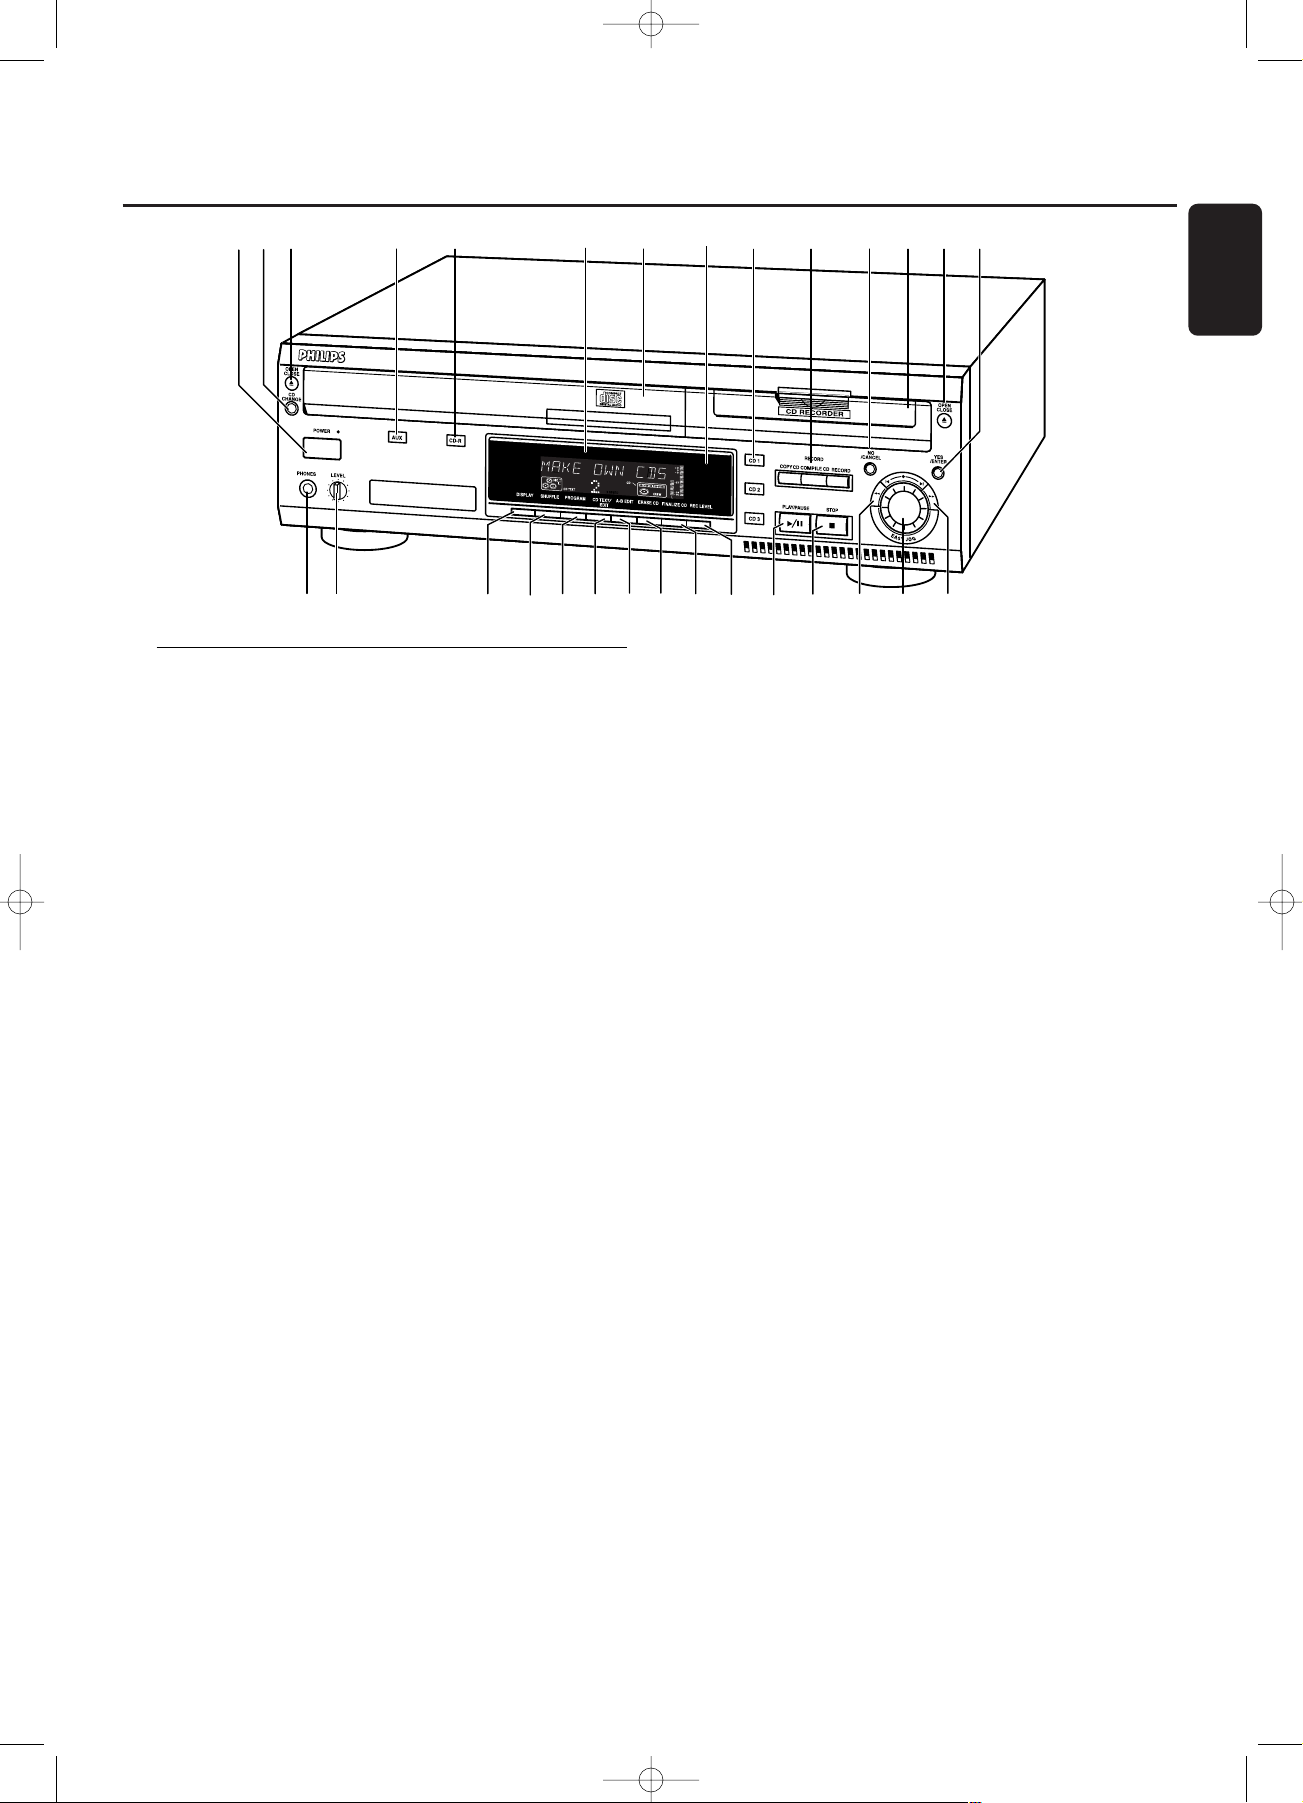
Controls
General
1 POWER
switches the CD recorder/changer ON and OFF
STANDBY indicator
lights up when the set is in Standby
4 AUX
selects external input
5 CDR
selects CD recorder
6 Display
information screen
8 IR sensor
receives signals from the remote control
9 CD 1, 2, 3
selects CD changer and switches to CD 1, 2 or 3
! NO/CANCEL
cancels a selection
$ YES/ENTER
confirms a selection
% PHONES
socket for headphones
^ LEVEL
headphones volume control
& DISPLAY
selects display information
* SHUFFLE
plays discs in changer and recorder or program in random
order
( PROGRAM
opens/closes program memory
) CD TEXT/edit
- makes CD text scroll over display once
- opens Text Edit mode
∞ PLAY/PAUSE 2/;
starts play/interrupts play/recording
§ STOP 9
stops playback or recording
≥ 5
- searches backward
- controls the cursor in various menus
• ¡ EASY JOG ™
selects next/previous menu item or track
ª 6
- searches forward
- controls the cursor in various menus
CD changer
2 CD CHANGE
selects next disc in CD changer
3 OPEN/CLOSE /
opens/closes changer tray
7 Disc tray
¡ A-B EDIT
opens A-B Edit mode to create your own ‘tracks’
CD recorder
0 Recording keys
COPY CD - selects high speed with auto finalize recording
mode
COMPILE CD - selects high speed recording mode/opens
program memory
RECORD - selects other recording modes
@ Disc tray
# OPEN/CLOSE /
opens/closes recorder tray
™ ERASE CD
erases recordings on CDRW
£ FINALIZE CD
finalizes/unfinalizes disc
≤ REC(ording) LEVEL
enables the EASY JOG key to set the recording level control
Controls
7
English
3
•
$
&
%
1
2
4
5
8
6
7
9
0
!
@
#
^
*
(
)
¡
™
£
≤
∞§
≥
ª
xp CDR 800/00 eng.-1.1 18-07-2001 13:54 Pagina 7
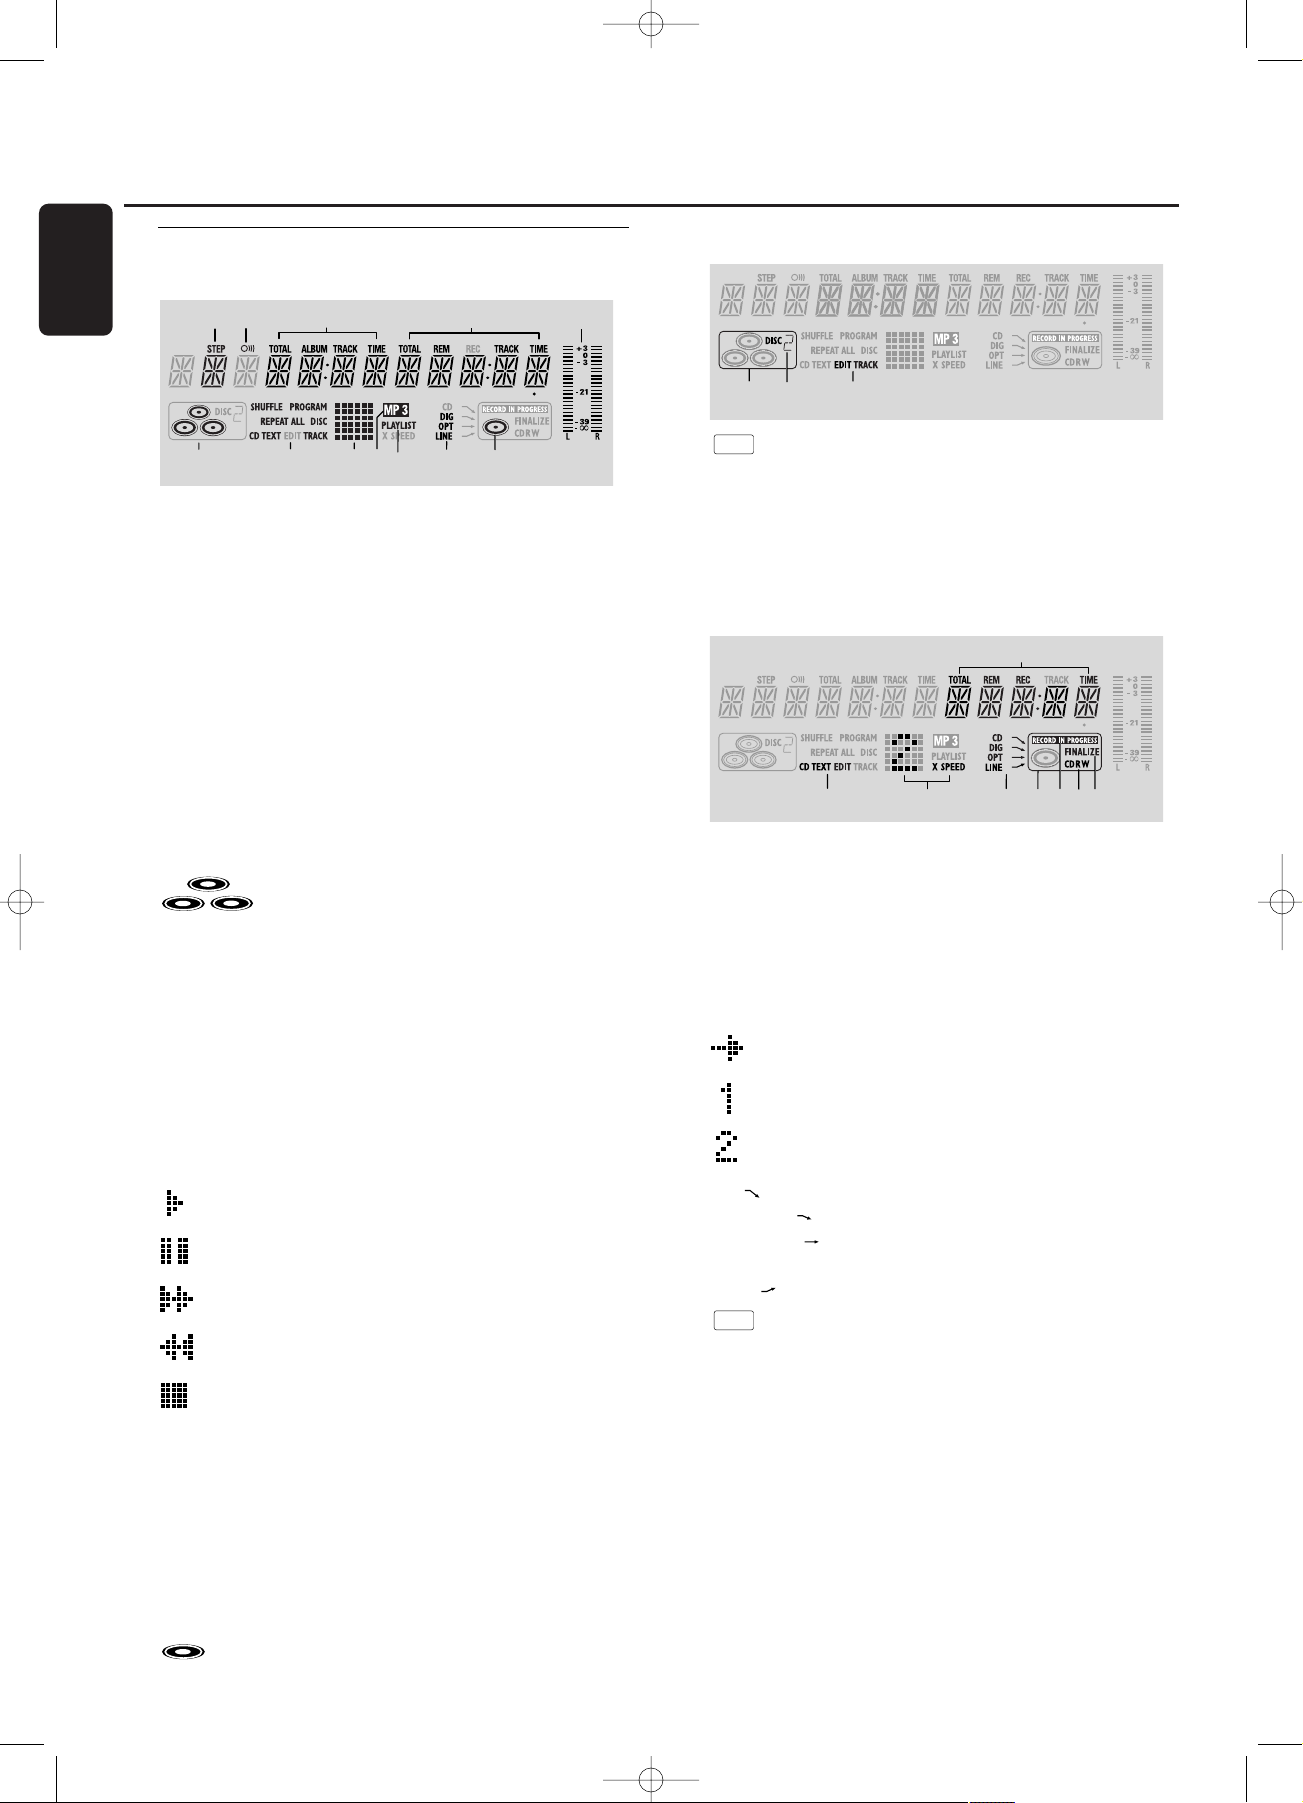
Display indications
General
1 STEP
indicates the number of tracks in a program
2 }
remote control active
3 TOTAL TIME - total time of recording source
TRACK - track number
ALBUM - album number (MP3)
TOTAL TRACK - total amount of tracks on the disc
4 TRACK TIME - track time
REM TRACK TIME - remaining track time
TOTAL REM TIME - total remaining time
5 L/R = =
indicates the audio signal level
6 - CD(s) inserted in compartment
1, 2 and/or 3
7 SHUFFLE - plays tracks in random order
PROGRAM - flashes during programming/ lights in
program mode
REPEAT ALL - lights up when all tracks on all discs in the
set are repeated/when a program is repeated
REPEAT DISC - lights up when a complete disc is
repeated
REPEAT TRACK - lights up when a track is repeated
CD TEXT - CD TEXT available
8 Status matrix
-
playback
-
pause
-
fast search forward
-
fast search backward
- stop
9 MP3
CD selected contains MP3 files
0 PLAYLIST
playlist of MP3 album selected
! DIG(ital) - coaxial digital input selected
OPT(ical) - optical digital input selected
LINE - analog line input selected
@ - CD inserted
CD Changer
1 - CD changer selected
2
DISC
2 - disc in play or selected
3 EDIT TRACK
lights up when the A-B- Edit feature is activated
CD recorder
1 TOTAL REM REC TIME - remaining recording time
REM REC TIME - remaining time on CDR(W)
REM TIME - remaining time when finalizing/erasing
2 CD TEXT EDIT
lights up when the Text Edit feature is activated
3 Status matrix
- recording active (flashes)
X SPEED
- normal speed recording
X SPEED
- double speed recording
4 CD - internal recording activated
DIG(ital) - digital input selected for external recording
OPT(ical) - optical input selected for external
recording
LINE - analog input selected for external recording
5 - CD recorder selected
6 RECORD IN PROGRESS
lights during recording
7 CD - CD inserted (a pre-recorded CD or finalized CD-R
or CD-RW disc)
CD R - unfinalized CD R disc inserted
CD RW - unfinalized CD RW disc inserted
8 FINALIZE
lights up during finalizing a recording, or when the disc will
be finalized after the current recording
2
7
3
4
5
8
6
1
1
3
2
1
2
7
8
9
0
3
5
4
6
!
@
Display
8
English
xp CDR 800/00 eng.-1.1 18-07-2001 13:54 Pagina 8
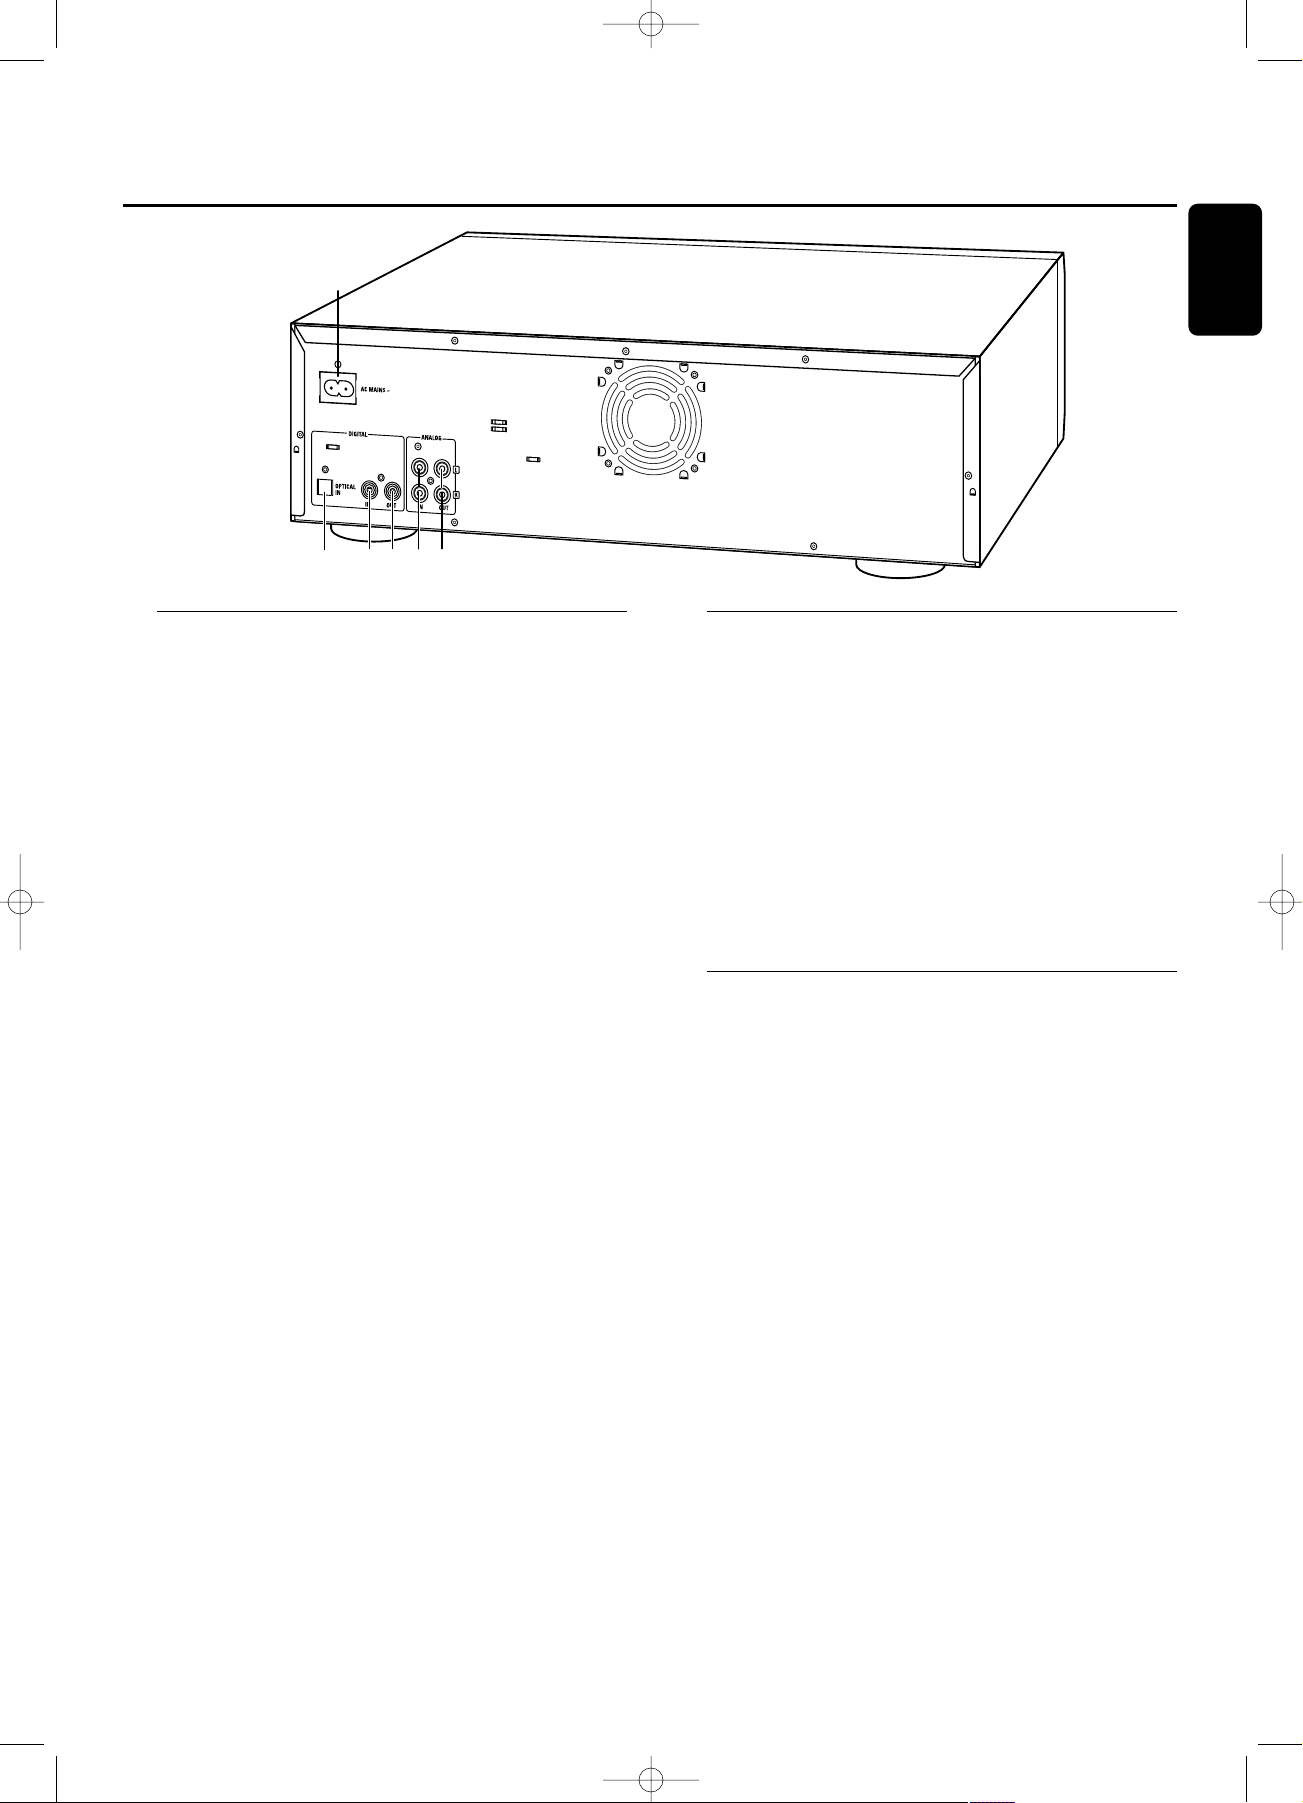
Connections
1 connection to the mains
2 OPTICAL IN
connects to the digital optical output of an external digital
source (CD player, DVD, DAT, etc.), so you can record from this
source (AUX OPTICAL)
3 DIGITAL IN
connects to the digital coaxial output of an external digital
source (CD player, DVD, DAT, etc.), so you can record from this
source (AUX DIGITAL)
4 DIGITAL OUT
connects to the digital coaxial input of an amplifier/receiver, so
you can listen to playback of the set via the amplifier/receiver
5 ANALOG IN
connects to the line (analog) output of an amplifier/receiver or
other analog source (tape deck, tuner etc.), so you can record
from this source (AUX ANALOG). For recording from a record
player both recorder and record player should be connected to
an amplifier/receiver
6 ANALOG OUT
connects to the line (analog) input of an amplifier/receiver, so
you can listen to playback of the set via the amplifier/receiver
Setup recommendations
– Place the set on a solid, vibration free surface.
– Make sure there is sufficient space around the set to
prevent overheating.
– Do not place the set near a source of heat or in direct
sunlight.
– Do not use the set under extremely damp conditions.
– If the set is placed in a cabinet, make sure that a 2.5
cm space remains free on all sides of the CD recorder
for proper ventilation.
– Active mobile phones near to the set may cause
malfunctions.
– Place the set below your receiver.
Connections general
NEVER MAKE OR CHANGE CONNECTIONS WITH
THE POWER SWITCHED ON
For playback on both recorder deck and changer deck the
set should be connected to your amplifier/receiver. For this
the following outputs are present:
– Digital coaxial output (DIGITAL OUT);
– Analog output (ANALOG OUT).
For external recording the following inputs are present:
– Digital optical input (OPTICAL IN);
– Digital coaxial input (DIGITAL IN);
– Analog input (ANALOG IN).
These inputs can be connected to the corresponding
output(s) of your amplifier/receiver or directly to the
corresponding output(s) of the external source. Record
players cannot be connected directly to the set.
The connections you make will depend upon the
possibilities your audio equipment offers and how you are
going to use the set. Please refer to the user manuals for
your other audio equipment first.
Digital recordings (optical or coaxial) give the
best performance in audio and usability.
If possible, always make both digital and analog connections.
In this way you can always make analog recordings when
digital recording is not possible.
Connections Installation
9
English
2
3
4
5 6
1
xp CDR 800/00 eng.-1.1 18-07-2001 13:54 Pagina 9
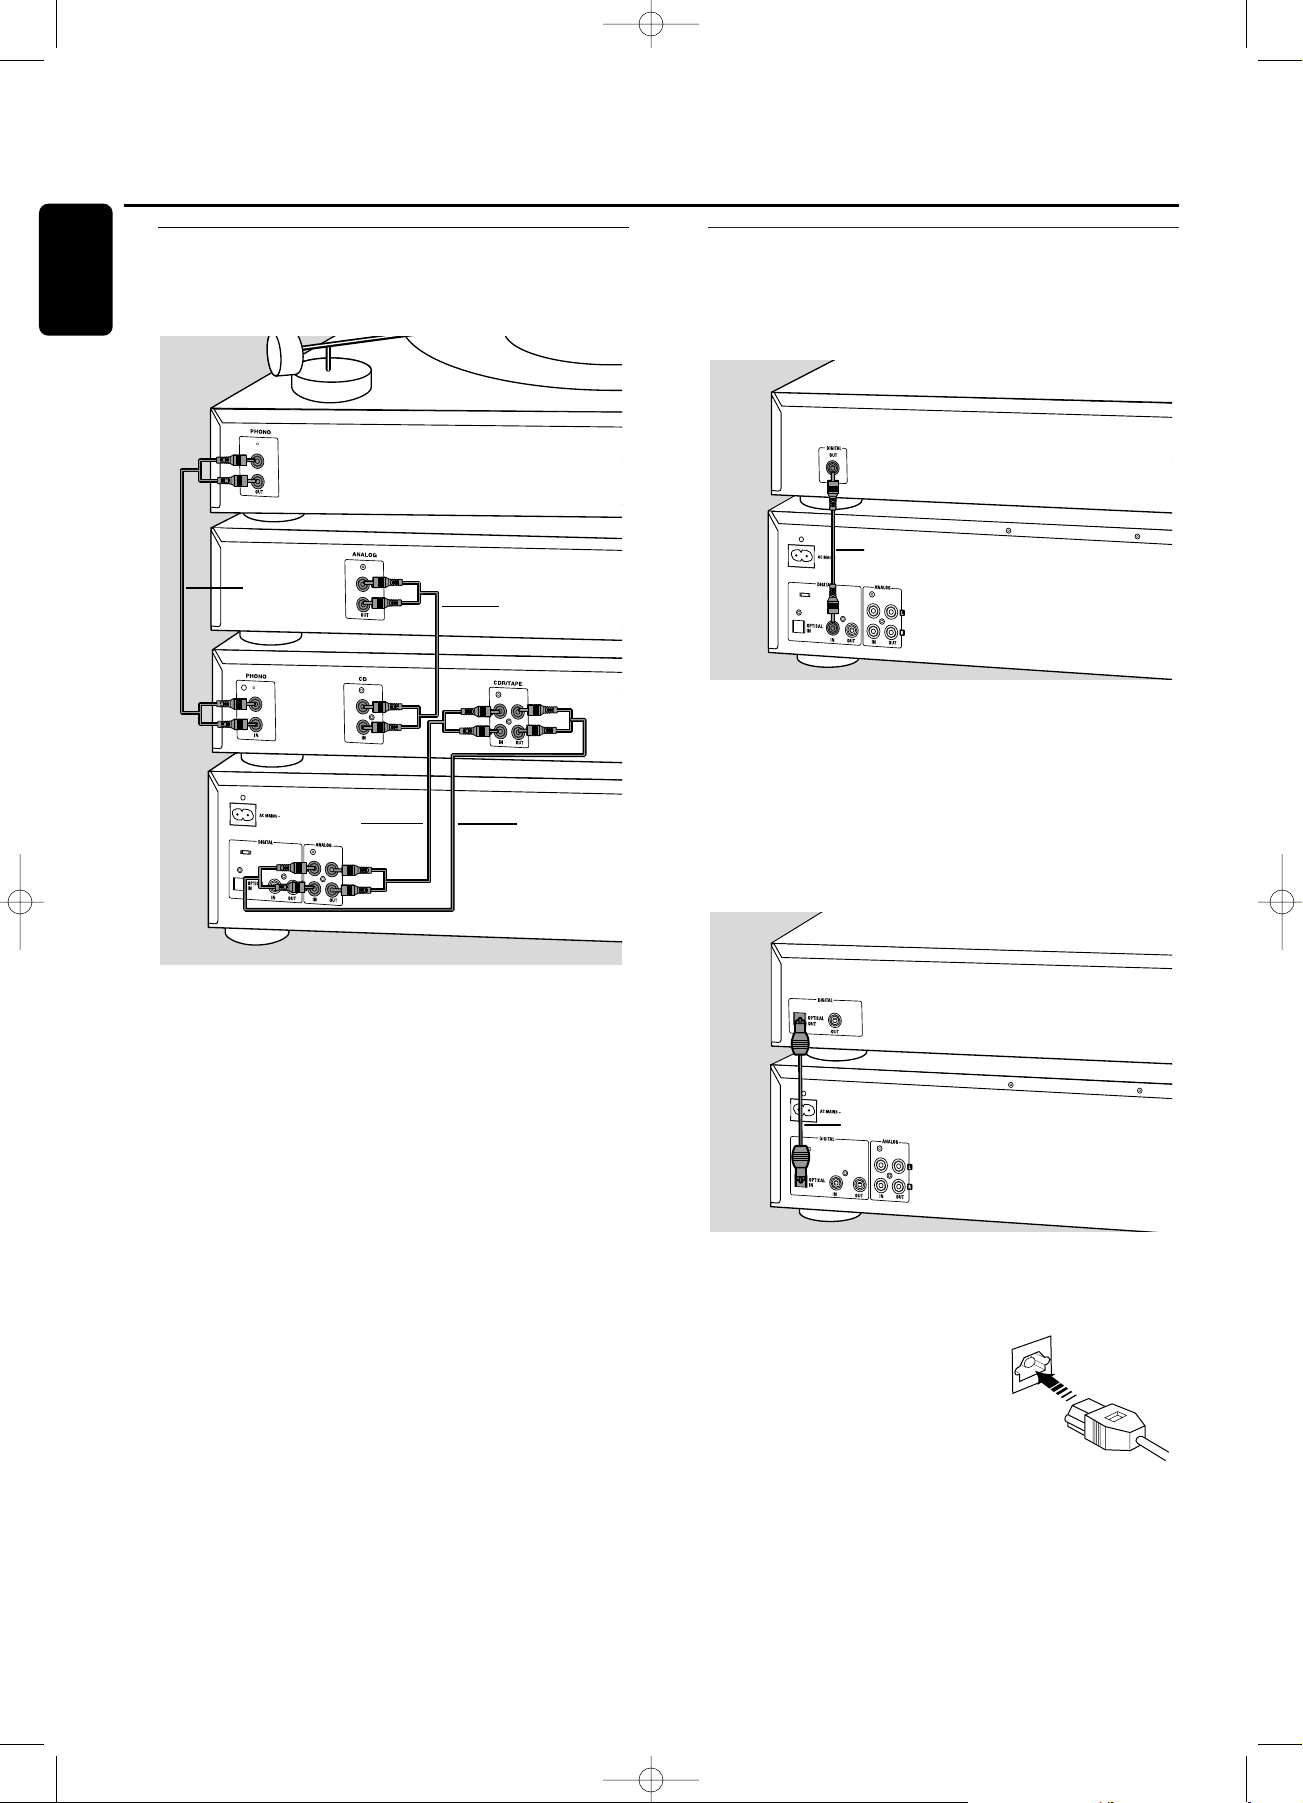
Analog connections
These connections are required for playback and recording via
an amplifier/receiver, equipped with an analog in- and outputs.
1 Connect supplied audio cable between the ANALOG
OUT-sockets on the set and the ANALOG input sockets of
the amplifier/receiver (TAPE IN, CD-R,AUX or PLAY IN).
Insert the red plugs into the R sockets, and the white plugs
into the L sockets.
2 Connect supplied audio cable between the ANALOG IN-
sockets on the set and the analog outputs of the
amplifier/receiver (CDR OUT,TAPE OUT,AUX OUT, REC
OUT etc.).
Insert the red plugs into the R sockets, and the white plugs
into the L sockets.
3 Connect all other components of your system (tape deck,
CD player, tuner, record player etc.) via their ANALOG
OUT-sockets to the appropriate analog input sockets of
the amplifier/receiver (CD IN,TUNER IN, AUX IN,
PHONO IN etc.).
➜ Any analog device, connected to the amplifier/receiver
can now be used as recording source (AUX ANALOG).
Digital connections
Direct digital coaxial connection
This connection is required for direct recording from a digital
coaxial source (e.g a CD player, DVD, DAT).
1 Connect a digital coaxial cable between the DIGITAL IN-
socket on the set and the DIGITAL OUT socket of the
digital source.
➜ Recording can now be done via the digital coaxial input
(AUX DIGITAL).
Direct digital optical connection
This connection is required for direct recording from a digital
optical source (e.g. a CD player, DVD, DAT).
1 Remove the dust caps from the digital optical connections
of both source and CD recorder. Keep the caps in a safe
place.
2 Connect an optical fibre-optic cable
between the OPTICAL IN socket of
the set and the OPTICAL OUT
socket of the source.
Make sure you insert both plugs
fully, until a click is heard.
➜ Recording can now be done via the digital optical input
(AUX OPTICAL).
“click”
CD RECORDER
CD PLAYER
2
CD RECORDER
3
CD PLAYER
2
CD RECORDER
AMPLIFIER/
RECEIVER
CD PLAYER
1
RECORD PLAYER
3
3
Installation
10
English
xp CDR 800/00 eng.-1.1 18-07-2001 13:54 Pagina 10

Digital coaxial connections via a digital receiver
If you have a receiver with digital coaxial in- and outputs, these
connections allow you to make digital recordings from various
sources, connected to the receiver.
1 Connect a digital coaxial cable between the DIGITAL IN-
and OUT sockets on the set and e.g. the (digital) AUX in-
and output sockets on the digital receiver.
➜ Any digital device, connected to the digital input sockets
of the digital receiver (e.g. CD and DVD) can now be
used as recording source.
Power supply/Mains
The type plate is located on the rear of the set.
1 Check whether the mains voltage as shown on the type
plate corresponds to your local mains voltage. If it does not,
consult your dealer or service organisation.
2 Make sure all connections have been made before
switching on the mains supply.
3 Connect the mains cable supplied to AC MAINS ~ and to
the wall socket.This switches on the mains supply.
4 Press POWER to switch on the set.
➜ WELCOME TO PHILIPS AUDIO will be displayed.
0 Press POWER again to switch off the set.
When the set is switched off, it is still consuming some
power.To disconnect the set from the mains completely,
remove the mains plug from the wall socket.
Demo mode
The demo mode displays various features of the set and
will start automatically when no key has been pressed for
several minutes or during Standby mode.
To cancel demo mode
0 Keep STOP
9
on the set pressed for at least 5 seconds.
➜ The demo mode is cancelled permanently.
3
CD RECORDER
1
DIGITAL
RECEIVER
1
CD RECORDER
Installation
11
English
xp CDR 800/00 eng.-1.1 18-07-2001 13:54 Pagina 11
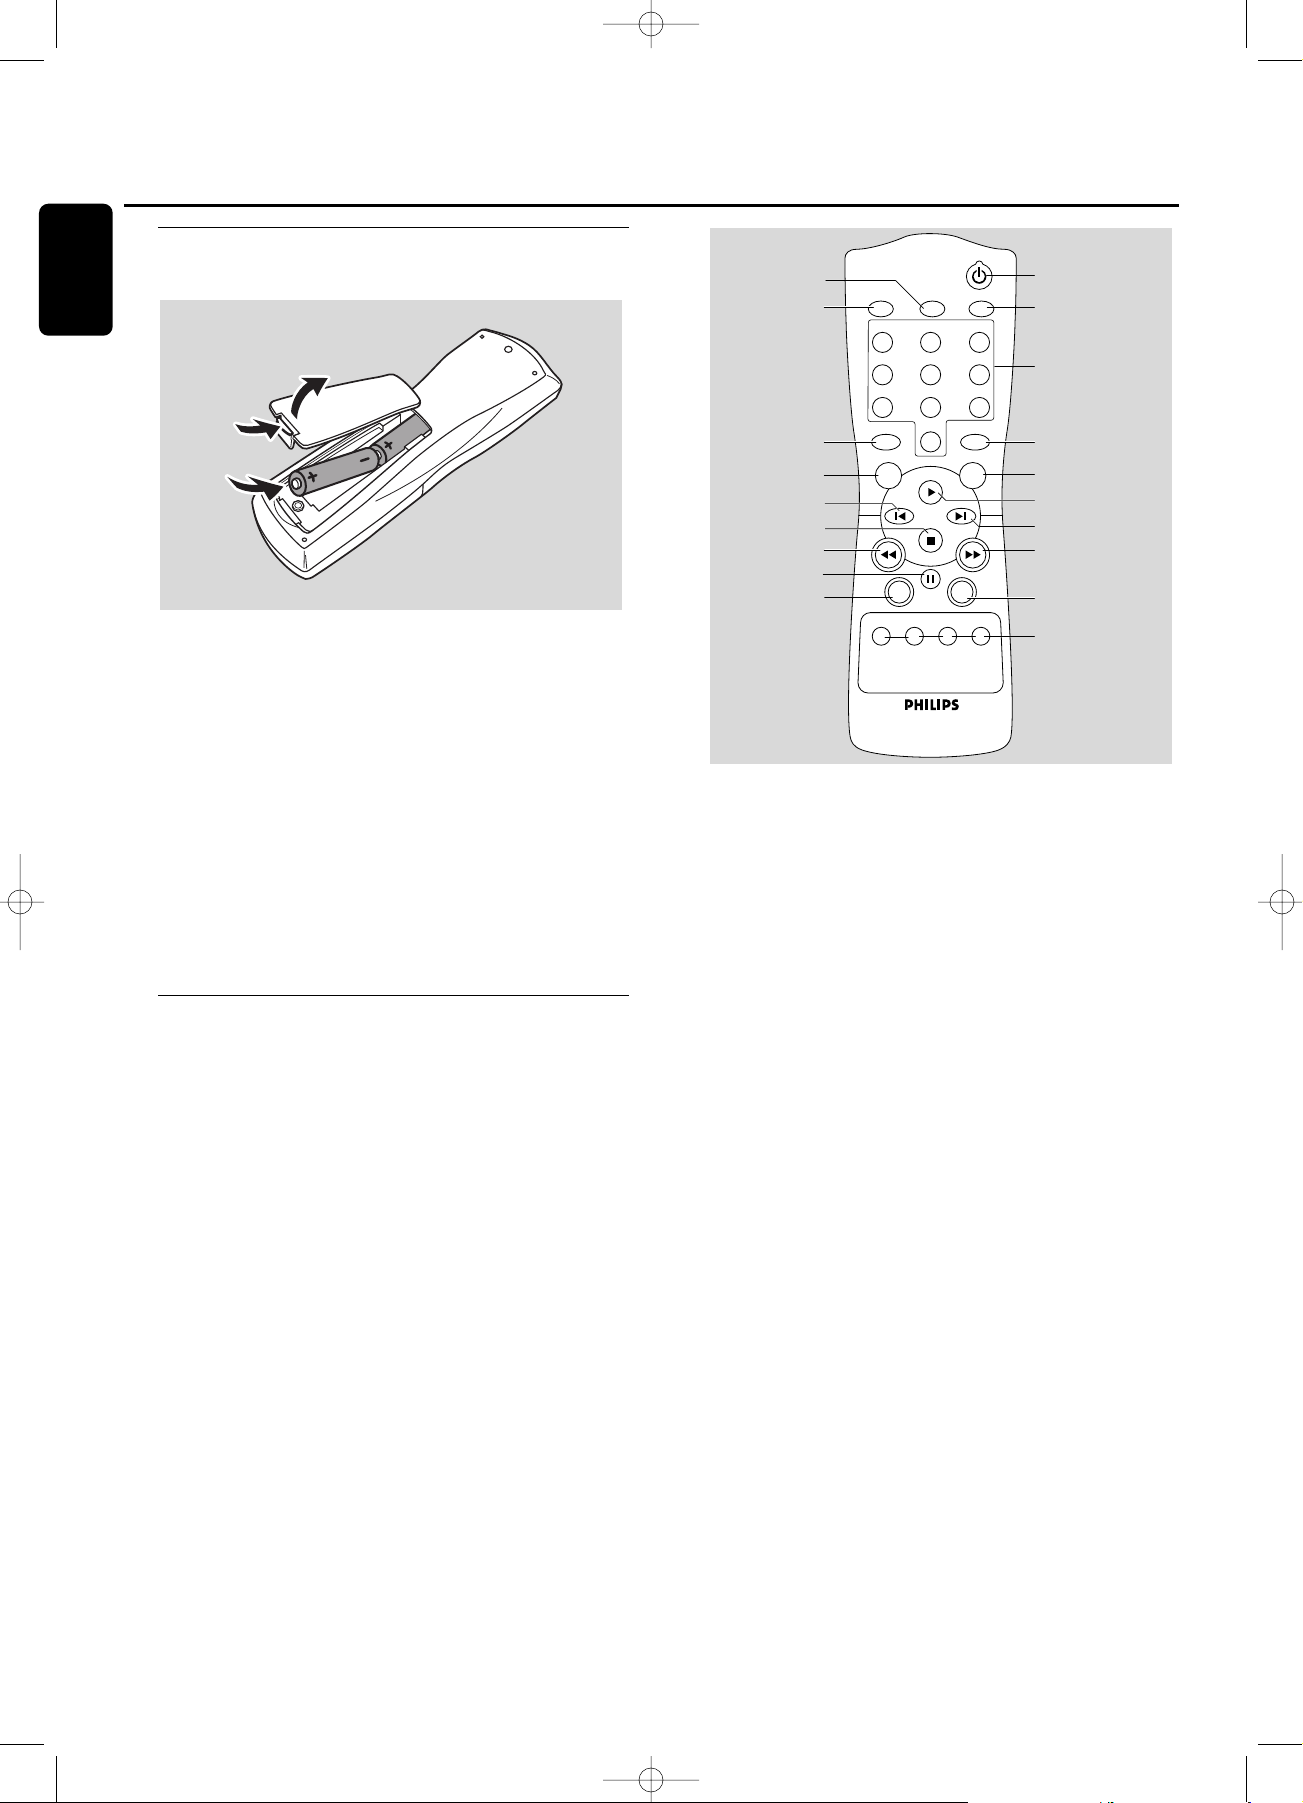
Inserting batteries in the remote
control
1 Open the battery compartment cover.
2 Insert 2 batteries (AA, LR6 or UM-3; as supplied) as shown.
3 Replace the cover.
Note:We recommend you use 2 batteries of the same type
and condition.
Batteries contain chemical substances, so they should
be disposed of properly.
Note: Unless stated otherwise all controls are on the front of
the recorder.When provided on the remote control, you can
also use the corresponding buttons, after selecting CD recorder
or CD changer.
Remote control commands
1 y
switches to Standby
2 CD TEXT
scrolls CD text
3 Number/alphabet keys 0 - 9
- selects a track by number
- selects character for text input
SPACE - inserts space during text input
4 PROGRAM
opens/closes program memory
5 YES
confirms a selection
6
2
starts playback
7
™
selects next menu item or
track
8
6
- searches forward
- cursor control in various menus
9 REPEAT
repeat play
0 CD 1,2, 3
selects disc in CD changer
CDR
selects CD recorder
! SHUFFLE
plays all discs or program in random order
@ ;
interrupts playback/recording
#
5
- searches backward
- cursor control in various menus
$
9
stops playback or recording
% ¡
selects previous menu item or track
^ NO
cancels a selection
& TEXT EDIT
opens Text Edit mode
* BRIGHTNESS
sets the brightness of the display
( TRACK INCR(ement)
- selects automatic track increment mode
- increments track number during recording
123
456
789
0
SPACE
UVW
MN
DEF
TRACK INCR.
PROGRAM
XYZ
OPQ
GHI
CD TEXT
CD 3 CDRCD 2CD 1
REPEATSHUFFLE
NO YES
TEXT EDIT
RST
JKL
ABC
BRIGHTNESS
1
2
3
4
5
6
7
8
9
0
*
&
^
$
#
!
@
%
(
Remote control
12
English
xp CDR 800/00 eng.-1.1 18-07-2001 13:54 Pagina 12
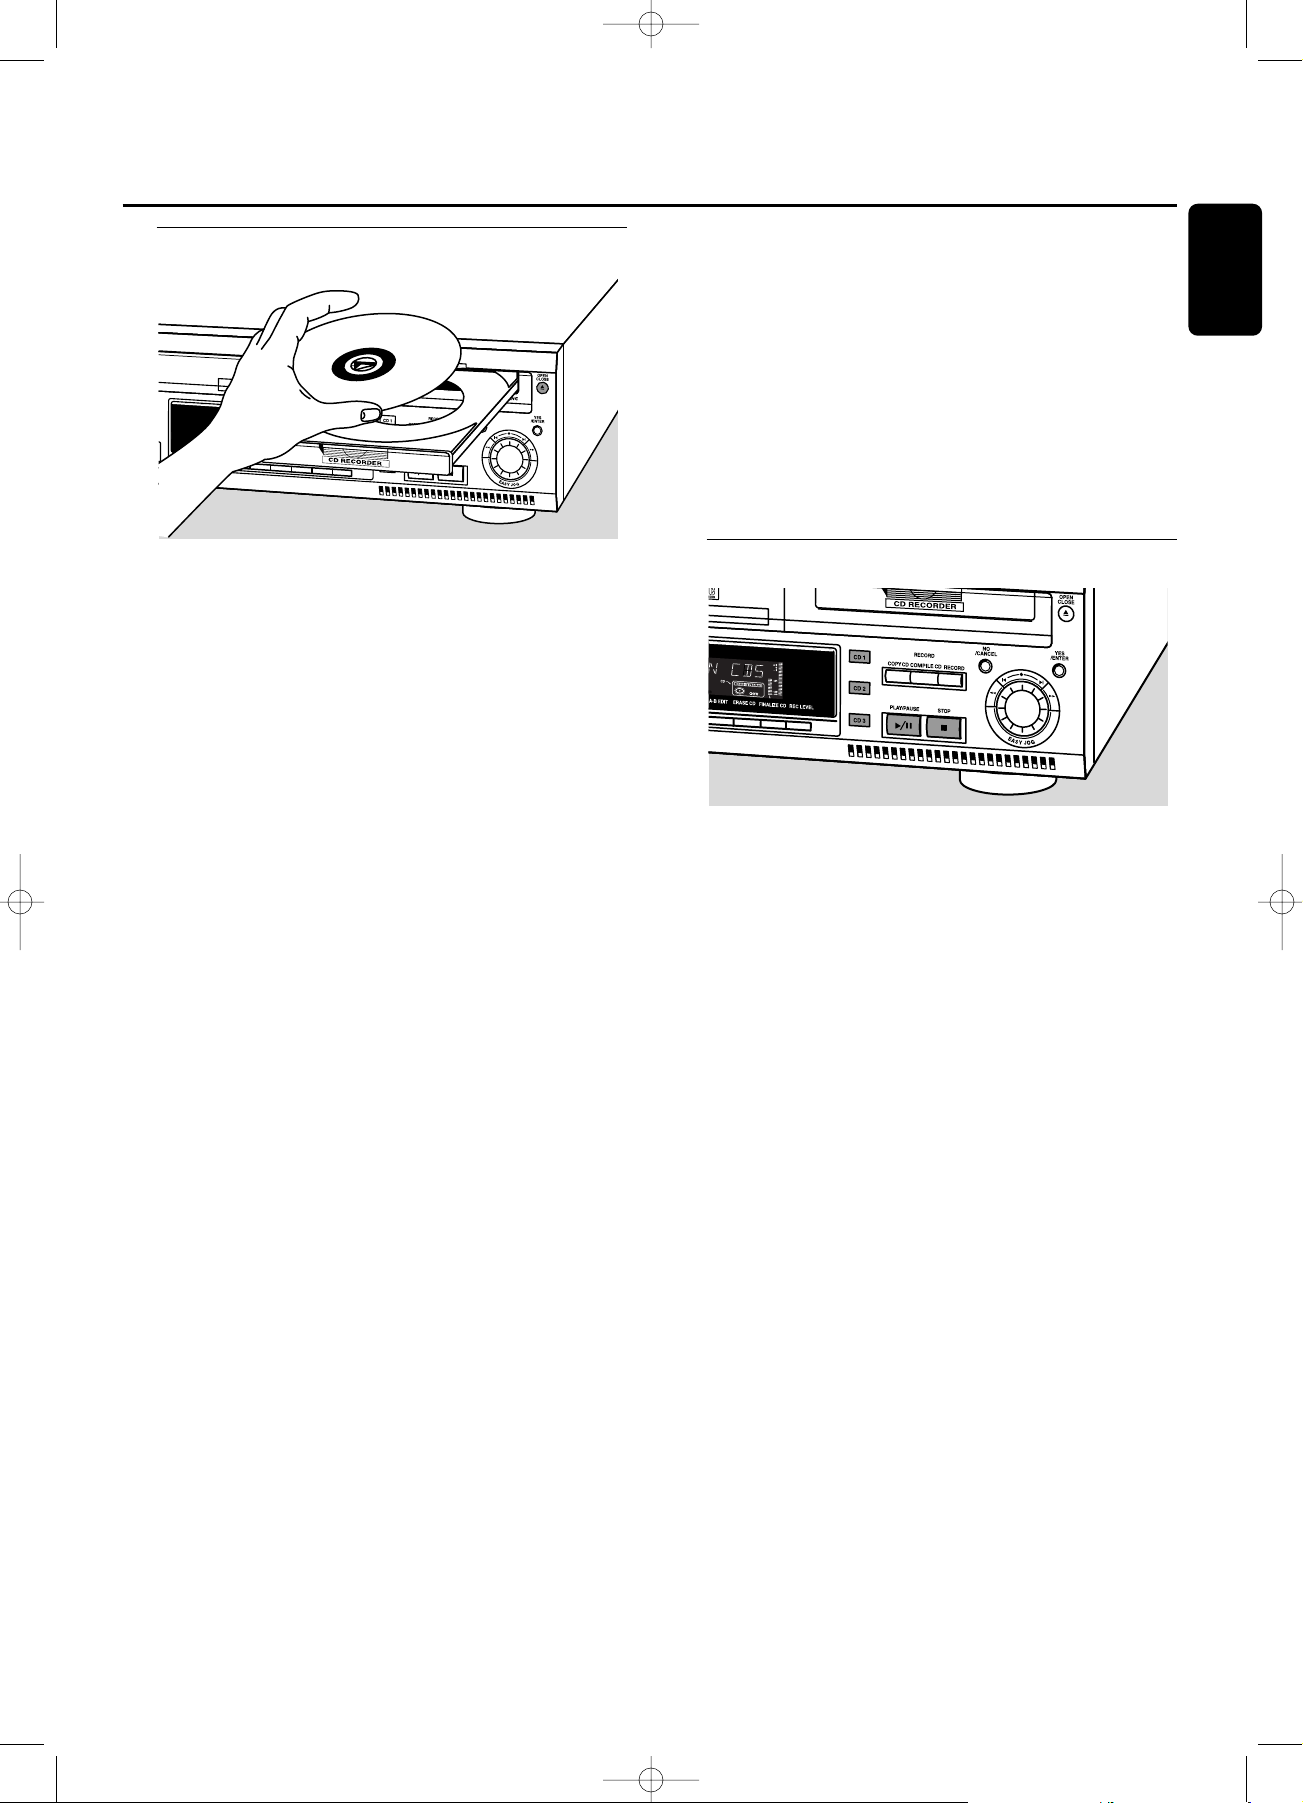
Loading discs
Important!
1) This set is designed for regular CD(RW)s.
Therefore, do not use any accessories such as disc
stabilizer rings or CD treatment sheets, etc. as offered
on the market, because they may cause jamming of
the changer mechanism.
2) Do not load more than one disc into one tray.
1 CD changer: Press OPEN/CLOSE / to open the disc
compartment.
➜ OPEN CHANGER lights up.
CD recorder: Press OPEN/CLOSE / to open the disc
tray.
➜ OPEN CDR lights up.
Note: Opening the changer disc compartment or recorder disc
tray will clear any program present.
2 CD changer:Insert CDs in the two outer disc trays, label
side up.
0 To insert a third disc press CD CHANGE.
➜ The CD carousel tray will rotate once.
CD recorder: Inser t a disc in the tray,label side up.
3 CD changer: Press OPEN/CLOSE / again or gently push
the compartment to close it.
➜ READING is displayed.
➜ The display will show CD, the number of the the last
selected tray, its number of tracks and total playing time.
CD recorder: Press OPEN/CLOSE / again or gently push
the tray to close it.
➜ READING is displayed.
➜ If an unfinalized disc is inserted, INITIALIZING is
displayed.
➜ The display will show the type of disc inserted, its
number of tracks and the total playing time of the disc.
MP3 discs only:
➜ READING is displayed, followed by a continuous
upcounting of tracks and MP3 lights up.
➜ CD, the disc tray number or CDR and the first album
name are displayed.
Changing discs during play/recording
1 Press OPEN/CLOSE / to open the disc compartment.
➜ OPEN CHANGER lights up.
2 The CDs in the two outer disc trays can be changed while
play or recording continues.
Playing
1 Press CDR, CD 1, 2 or 3 to select the required disc.
2 Press PLAY/PAUSE 2/; to start play.
➜ CDR, CD 1, 2 or 3, the number of the current track
and elapsed playing time are displayed.
0 Press DISPLAY repeatedly to display:
➜ track number, remaining playing time of current track;
➜ track number, remaining playing time of disc;
➜ track number, actual playing time of current track;
➜ for MP3 discs, pressing DISPLAY will only display album
name and elapsed playing time.
3 To stop play, press STOP 9.
➜ CDR, CD 1, 2 or 3, the number of tracks and the
total playing time of the disc appear on the display.
➜ when an MP3 disc was playing, CD, the disc tray number
or CDR and the first album name are displayed.
0 To interrupt play temporarily, press PLAY/PAUSE 2/;.
➜ The time where playback is interrupted is blinking.
0 To continue play, press PLAY/PAUSE 2/; again.
Loading discs Playing
13
English
xp CDR 800/00 eng.-1.1 18-07-2001 13:54 Pagina 13
Track selection and searching
Track selection in STOP mode
1 First select the required disc with CDR, CD 1, 2 or 3.
2 Rotate the ¡ EASY JOG ™ control to select the required
track number.
3 Press PLAY/PAUSE 2/; to start playing.
Track selection during play
1 Rotate the ¡ EASY JOG ™ control to select the required
track number.
➜ Play skips to the beginning of the selected track.
Notes:
Track numbers can also be selected with the ¡™keys or
the numerical keys on the remote control (for 2- or 3-digit
track numbers, press the keys in rapid succession).
For tracks on another disc, first select the required disc by
pressing CD 1, CD 2, CD 3 or CDR.
Searching during play
1 Hold down 5 or 6.
➜ The set first searches backwards or forwards with sound
at low volume, then speeds up with sound muted.
2 Release the button at the desired passage.
➜ Normal playback continues.
Note: During palyback of a MP3 track, or Shuffle, Repeat Track
or Programmed play,search is restricted to within the track
being played at the time.
MP3 Disc navigation
Track selection is done differently during playback of MP3
CD’s. Unless otherwise indicated operation of all other
functions is the same for both MP3 CDs as well as for
normal CD(RW)s.
Album selection and playback
1 Rotate the ¡ EASY JOG ™ control to select the required
album number, then release the control.
➜ The display shows ALBUM together with the album
number.
➜ The album name is scrolled as soon as you release
the ¡ EASY JOG ™ control.
2 Press PLAY/PAUSE 2/; to start play from the selected
album.
Track selection and playback
1 Select the required album and press YES.
2 Rotate the ¡ EASY JOG ™ control to select the required
track number, then release the control.
➜ The display shows TRACK together with the track
number.
➜ The track name is scrolled as soon as you release the
¡ EASY JOG ™ control.
3 Press PLAY/PAUSE 2/; to start play from the selected
track.
0 If NO is pressed, the recorder returns to album selection
mode.
Notes:
At the end of your album selection you will recognize an
album called VARIOUS.This album contains all tracks, which
have not been saved in an album when making the MP3-CD.
If you wish to play a playlist, select it directly by rotating the
¡ EASY JOG ™ control and then pressing PLAY/PAUSE 2/;.
Playing
14
English
xp CDR 800/00 eng.-1.1 18-07-2001 13:54 Pagina 14
Shuffle and repeat
Playing tracks in random order (Shuffle)
1 Press SHUFFLE before or during play.
➜ All tracks of loaded discs in both changer and recorder
(SHUFFLE ALL) or the tracks in the program (SHUFFLE
PROGRAM) are played in random order.
2 Press SHUFFLE again to return to normal play.
Note:When an MP3 disc is encountered during shuffle play
only the tracks on the MP3 disc will be played in random order.
After the last track has been played, shuffle play will continue
with the next disc.
Repeating disc(s), a track or a program
1 Press REPEAT on the remote control repeatedly during
play to select:
➜ REPEAT TRACK: the current track will be repeated;
➜ REPEAT DISC: the current disc will be repeated;
➜ REPEAT ALL: all discs in the set or all discs/tracks in the
program will be repeated.
2 To return to normal play, press REPEAT on the remote
control one or more times until:
➜ The REPEAT label disappears from the display.
Note: REPEAT DISC is not possible during SHUFFLE or while
playing a program.
CD text display
This feature allows to display information such as album
title or track title contained on a specially encoded CD.
0 Make sure to insert a CD with CD text.
➜ CD TEXT is shown and the album title and album artist’s
name is scrolled once.
CD text when playback is stopped
0 Press CD TEXT/edit to see the following information, which
will be scrolled once (if available):
– Album artist’s name
– Album title
CD text during playback
0 Press CD TEXT/edit to see the following information, which
will be scrolled once (if available):
– Track artist’s name
– Track title
ID3-tag
This feature allows the display of information such as album
title or track title contained on an MP3-track.
0 If you created an ID3-tag on your MP3-CD, press
CD TEXT/edit during playback to display the following ID3-
tag information:
– Album title
– Track artist’s name
– Track title
Playing
15
English
xp CDR 800/00 eng.-1.1 18-07-2001 13:54 Pagina 15

Programming track numbers
– A program can be composed of tracks in both changer
and recorder deck.
– Any track can be stored more than once with a
maximum of 99 tracks.
– If you exceed the maximum of 99 tracks the display
shows PROGRAM FULL.
1 Load the desired disc(s) in the disc tray(s).
2 Select the first required disc by pressing CD 1, CD 2, CD 3,
or CDR.
3 Press PROGRAM.
➜ PROGRAM starts blinking and PROGRAM is displayed.
4 Rotate the ¡ EASY JOG ™ control to select the required
tracknumbers on the selected disc and store each track by
pressing YES.
For normal Audio CD(RW) discs only:
0 If you wish to store all tracks of the selected disc, rotate the
¡ EASY JOG ™ control to select ALL and press YES to
store the complete disc in the memory.
➜ The number of programmed tracks (STEP), PROG and
the total program time are displayed.
5 Select and store all required CD’s and/or tracks in the same
way.
6 Press PROGRAM to end programming.
➜ PROGRAM stays shown and the program is currently
available.
Changing a program
1 If necessary press STOP 9.
2 Press PROGRAM to enter Program mode.
Erasing tracks
3 Select the tracknumbers you wish to erase with 5 or 6
and erase each number by pressing NO.
➜ CLEARED is displayed briefly.
➜ The next programmed track number will move up to this
position and is displayed together with the step number
and the total program time.
Adding tracks
3 Rotate the ¡ EASY JOG ™ control to select the
tracknumbers you wish to add to the program and store
each track by pressing YES.
➜ The number of programmed tracks (STEP), PROG and
the total program time are displayed.
4 Press PROGRAM to end programming.
➜ PROGRAM stays shown and the program is currently
available.
Clearing a program
1 If necessary press STOP 9.
2 Press NO.
➜ CLEAR PROG ? is displayed.
3 Press YES to clear the program.
➜ PROG CLEARED will be displayed and PROGRAM goes
off.
Making a program for recording
If the program is used for recording only tracks from discs
in the changer should be programmed. Also see chapter
“Recording a program”.
Programming
16
English
xp CDR 800/00 eng.-1.1 18-07-2001 13:54 Pagina 16

Basic information
We will describe:
– Recording from internal CD changer
– Recording from an external source
– Finalizing CDR(W) discs:
Finalizing a CDR(W) disc is a simple procedure,
necessary to:
– play a recorded CDR on a standard CD player;
– play a recorded CDRW on a CDRW compatible CD
player.
– Unfinalizing CDRWdiscs:
Necessary to add new recordings to the disc or to erase the
disc.
– Erasing from CDRWdiscs
0
The recording procedure is the same for CDR and CDRW
discs. Make sure that the CDR(W) is absolutely free of
scratches and dust particles.
0
It is advisable to use a CDRW disc for your first try.
0
For recordings, the minimum track length is 4 seconds.You
can record up to a maximum of 99 tracks on a disc.The
minimum of recording time left on the disc is 7 seconds.
Else, DISC FULL is displayed and you cannot enter into
the record mode. If the length of the source material is
longer than the remaining recording time on the CDR(W)
DOES NOT FIT is displayed.
0
CD TEXT on the original CD is recorded automatically.
When a track with copy protected text is encountered
TEXT PROTECT will be displayed.
Copyright protection
The Serial Copy Management System (SCMS) prevents the
making of a digital copy from a digital copy.The system
allows making a digital recording from the original, however
in some countries this may require the authorization of
copyright holders.
When you try to record a copy protected material from an
external source, COPY PROTECT will be displayed. No
further digital recording is possible then.
When you try to record a copy protected material from
the internal CD changer no digital recording is possible,
however the CD recorder will automatically switch to
analog recording. It is not possible to copy an MP3-CD.
Remarks on recording
0
Recording can be stopped manually by pressing STOP 9
otherwise recording will stop automatically.
0
During recording the elapsed recording time can be
checked by pressing DISPLAY.
Direct Line Recording (DLR)
The CD recorder is equipped with the high-performance
Direct Line Recording (DLR) technique. It ensures a perfect
recording of the source material, meaning a true “bit for
bit” recording. DLR will not be active, when ALC is used or
when the record level is adjusted.
Auto Level Control (ALC)
Auto Level Control ensures that the tracks on the
recorded disc have a similar volume level. Always the
already recorded tracks of the CDR(W) disc will be taken
as reference for the volume level of the following
recordings.
Auto level control becomes automatically active,
when:
– COMPILE CD is being used,
– a disc, a track or a track edit is being high speed
recorded and the CDR(W) has recordings on it, or
– a program (consisting from more than one disc) from
the CD changer is being high speed recorded.
Auto level control will not become active, when:
– using COPY CD,
– making recordings from an external source, or
– making normal recordings in listen mode.
Switching ALC permanently off
1 If necessary press STOP 9 to stop playback.
2 Press CDR to select the CD recorder.
3 Press REC LEVEL to select:
➜ ALC OFF:ALC is permanently switched off.
0 To enable ALC press REC LEVEL again to select:
➜ ALC ON:ALC is enabled.
Adjusting the record level
You can adjust the reference record level for both digital
and analog recordings from the internal changer as well as
from external sources.This is also possible when ALC is
active.This feature can also be used for fading your
recordings in or out.
1 Select the recording source with CD1, CD2 or CD3 for
internal recording or with AUX for external recording.
2 Press REC LEVEL on the set to enable the
¡ EASY JOG ™ control to adjust the record level.
3 Rotate the ¡ EASY JOG ™ control to the left to adjust the
desired record level.
➜ The actual record level (in dB) will be displayed.
Note:The loudest sounds on the source should not reach 0 dB
maximum (first red level).
About recording
17
English
xp CDR 800/00 eng.-1.1 18-07-2001 13:54 Pagina 17

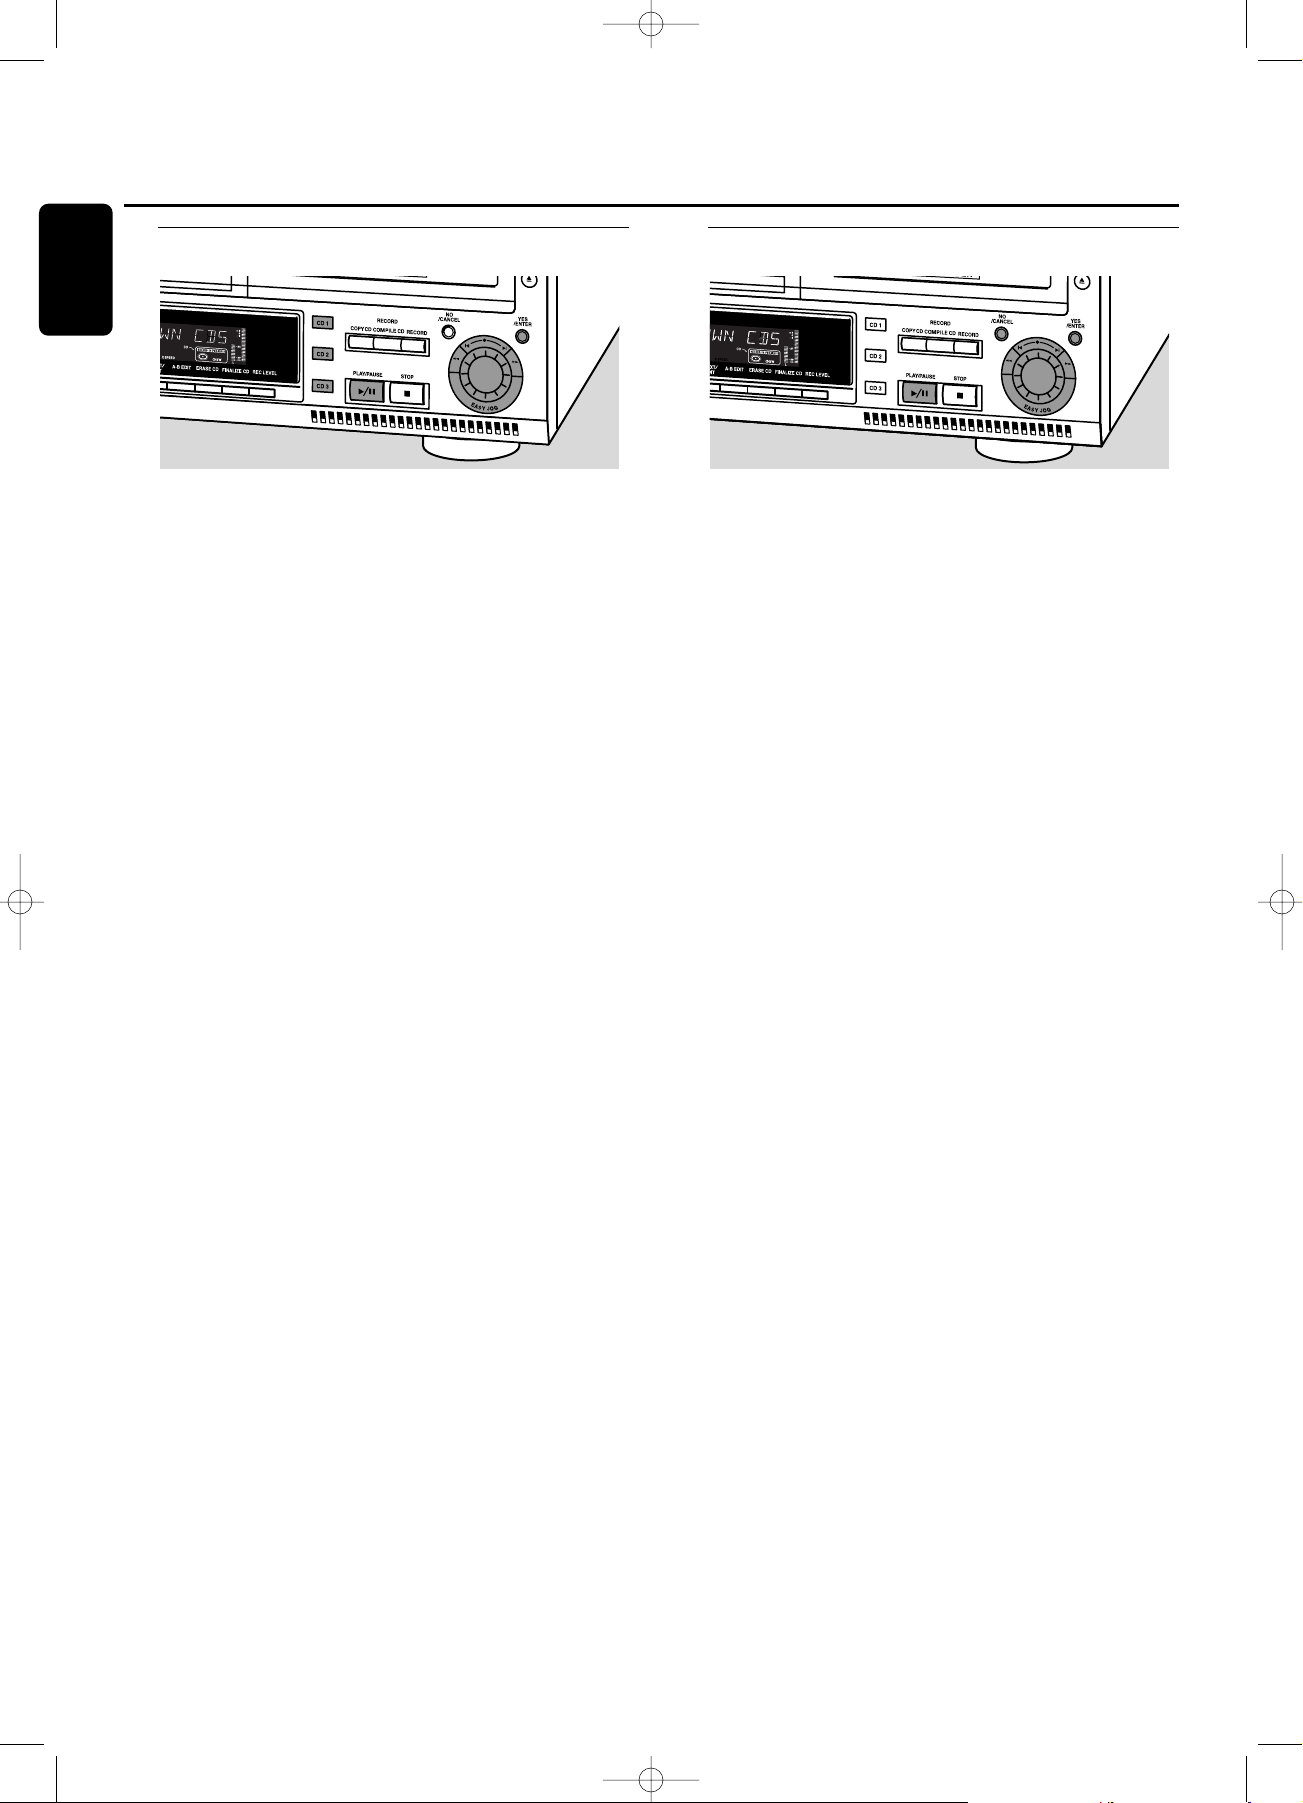
Recording a single track
Recording a single track during playback
1 Make sure the CDR(W) is absolutely free of scratches and
dust particles and insert it into the CD recorder tray.
2 Play your desired track on the CD changer.
3 Press RECORD on the set to enter the recording menu.
➜
REC TR and the tracknumber are displayed.
4 Press either:
YES to start recording,
➜ The arrow lights,
RECORD IN PROGRESS
is shown, playback
and recording start from the beginning of the selected track
and the actual recording time left starts to count down.
or
NO to continue playback.
Do not forget to finalize!
Recording an entire CD
High speed recording and automatic finalizing of
the current disc
1 Make sure the CDR(W) is absolutely free of scratches and
dust particles and insert it into the CD recorder tray.
2 Select the required disc by pressing CD1, CD2 or CD3.
3 Press COPY CD to enter into the record mode.
➜ The arrow and the YES key start blinking.The remaining
recording time of the CDR(W), the total playing time of the
source CD and RECORD CD1 (or 2, 3) ? are displayed.
4 Press YES to start recording and finalizing.
➜
The arrow lights, RECORD IN PROGRESS and FINALIZE
are shown, high speed recording and finalizing start and
the actual recording time left starts to count down.
Note: If a program was already available before pressing COPY
CD, this will be ignored.
PROGRAM
goes off and the current disc
will be recorded.After finishing the recording,
PROGRAM
is
shown and the program is available again.
Do not forget to finalize!
Recording a program
High speed recording and automatic finalizing
(optional) of the current program
1 Make sure the CDR(W) is absolutely free of scratches and
dust particles and insert it into the CD recorder tray.
2 Select and store all desired tracks in the CD changer
memory (see “Programming track numbers”).
3 Press COMPILE CD to enter into the record mode.
➜
The arrow starts blinking.The remaining recording time
of the CDR(W), the total playing time of the program
and REC PROG ? are displayed.
Note: If no program is available and you press COMPILE CD,
you enter immediately into the program menu. Start
programming and return to the record mode by pressing
PROGRAM or COMPILE CD.
4 Press either:
NO to change the program.
➜
PROGRAM
starts blinking.Now you can change the
program (see “Programming”) and return to the record
mode by pressing COMPILE CD.
or
YES to confirm recording.
➜ AUTO FINAL ? is displayed.
5 Press either:
YES, if the CDR(W) is to be finalized after recording,
or
NO,if the CDR(W) is not to be finalized after recording.
➜
The arrow lights, RECORD IN PROGRESS is shown, high
speed recording and finalize (if selected) start and the
actual recording time left starts to count down.
Do not forget to finalize!
Internal recording
18
English
xp CDR 800/00 eng.-1.1 18-07-2001 13:54 Pagina 18
Further recording possibilities
High speed recording of an entire disc,a track, a
program or a A-B edit
1 Make sure the CDR(W) is absolutely free of scratches and
dust particles and insert it into the CD recorder tray.
2 Press either CD 1, CD 2 or CD 3 to select the disc you
wish to record from.
3 Press RECORD on the set to enter into the recording
menu.
4 Rotate the ¡ EASY JOG ™ control to select one of the
following high speed record modes:
If a disc from the CD changer is selected:
➜
REC CD X FAST ?: for high speed recording of an
entire disc.
0 Continue with step 5.
➜
REC TR FAST ?: for high speed recording of a track.
0 Press YES to confirm.
0 Rotate the ¡ EASY JOG ™ control to select the
required track.
➜
REC TR NN ? is displayed.
0 Continue with step 6.
If a program is available:
➜
PROG FAST ?: for high speed recording of the selected
program.
If a A-B edit is available (see “A-B Editing”):
➜
A-B FAST ?: for high speed recording of the A–B track.
5 Press YES to confirm your selection.
➜
The arrow starts blinking.The remaining recording time
of the CDR(W), the total recording time of the
CDR(W) and either RECORD CD1 (or 2, 3)?, REC
PROG ? or REC A-B ? are displayed.
6 Press YES to start high speed recording.
➜
The arrow lights,
RECORD IN PROGRESS
is shown, high
speed recording starts and the actual recording time left
starts to count down.
Do not forget to finalize!
Normal recording and listening of an entire disc,a
track, a program or a A-B edit
1 Make sure the CDR(W) is absolutely free of scratches and
dust particles and insert it into the CD recorder tray.
2 Select the required disc by pressing CD1, CD2 or CD3.
3 Press RECORD to enter the recording mode.
4 Rotate the ¡ EASY JOG ™ control to select one of the
following normal record options:
If CD changer is selected:
➜
REC CD X ?: for listening to the entire disc during
normal recording.
0 Continue with step 5.
➜
REC TRACK ?: for listening to the track during normal
recording.
0 Press YES to confirm.
0 Rotate the ¡ EASY JOG ™ control to select the
required track.
➜
REC TR NN ? is displayed.
0 Continue with step 6.
If a program is available:
➜
REC PROG ?: for listening to the program during
normal recording.
If a A-B edit is available (see “A-B Editing”):
➜
REC A-B ?: for listening to the A–B track during normal
recording.
5 Press YES to confirm your selection.
➜
The arrow starts blinking.The remaining recording time
of the CDR(W), the total recording time of the CD,
track or program and RECORD ? are displayed.
6 Press YES to start recording.
➜
The arrow lights, RECORD IN PROGRESS is shown, normal
speed recording starts and the actual recording time left
starts to count down.
Do not forget to finalize!
Internal recording
19
English
xp CDR 800/00 eng.-1.1 18-07-2001 13:54 Pagina 19
Analog or digital recording
When making recordings from an external source, we
recommend to do analog recording only if digital recording
is not possible. Digital recording will usually result in better
sound quality.
See chapter “Connections” to see which connections are
required.
If a digital source is selected:
➜
In case no digital signal is received, the input label
(DIG or OPT) starts flashing and NO SIGNAL is
displayed.
0 Press DISPLAY to display the input sample rate
(SRC XX, X KHZ).
➜
BIT PERFECT is displayed when an exact CD standard
signal is received which can be recorded with Direct Line
Recording.
Automatic track increment for
analog sources
When digitally recording from a CD player/changer
(internal or external) track increments are automatically
taken over from the source.When recording from analog
sources (AUX ANALOG), track increment is done, based on
silences (pauses) in the source material. Select one of the
following settings with the TRACK INCR(ement) key on the
remote control:
➜
CD/DVD: when recording from CD,DAT, DCC or DVD;
➜
TAPE/TUNER: when recording from a cassette deck or
tuner;
➜
TURNTABLE: when recording from a record player,
➜
MANUAL: switches the function off.
Default setting is TAPE/TUNER.
Notes:
Auto track increment is dependant on the quality of the
source material and therefore not always possible.
Track numbers can always be incremented manually by
pressing TRACK INCR(ement) on the remote control during
recording.The minimum track length is 4 seconds.
Track numbers cannot be changed after recording.
Recording with automatic start
Recording with automatic start from an external
source
1 Make sure the CDR(W) is absolutely free of scratches and
dust particles and insert it into the CD recorder tray.
2 Press repeatedly AUX to select the input for the external
source you want to record from.
➜
AUX DIGITAL is displayed if the digital coaxial input
(DIGITAL IN) is selected.
➜
AUX OPTICAL is displayed if the digital optical input
(OPTICAL IN) is selected.
➜
AUX ANALOG is displayed if the analog input
(ANALOG IN) is selected.
3 Press RECORD on the set to enter into the recording
menu.
4 Rotate the ¡ EASY JOG ™ control to select either:
➜
AUX CD ?: for recording with synchronised start of an
entire disc;
➜
AUX TRACK ?: for recording with synchronised start of
a single track.
5 Press YES to confirm your selection.
➜
PRESS PLAY ON EXTERNAL SOURCE is displayed.
6 Start playback on the external source you wish to record
from.
➜
The CD recorder starts to record simultaneously and
RECORD IN PROGRESS is shown.The remaining recording
time of the CDR(W) is displayed.
Note: If you start recording within a track, recording starts at
the beginning of the next track or after a silence for analog
sources.
7 If a digital source is selected:
➜
After the recording process, the CD recorder stops
automatically.
Note: Recordings from DAT or DCC will automatically stop
after 20 seconds silence.
If an analog source is selected:
➜
After the recording process, the CD recorder stops after
a silence of 20 seconds on the source material.
0 To stop manually, press STOP
9
on the set.
➜
RECORD IN PROGRESS goes off.
Do not forget to finalize!
123
DEF
TRACK INCR.
GHI
CD TEXT
ABC
BRIGHTNESS
External recording
20
English
xp CDR 800/00 eng.-1.1 18-07-2001 13:54 Pagina 20
Manual recording
Manual recording from an external source
This feature enables you to manually start and stop a
recording from any external source.You can use manual
recording for recording live music, or for particular music
like classical music which cannot be recorded with
automatic start.
1 Make sure the CDR(W) is absolutely free of scratches and
dust particles and insert it into the CD recorder tray.
2 Press repeatedly AUX to select the input for the external
source you want to record from.
➜
AUX DIGITAL is displayed if the digital coaxial input
(DIGITAL IN) is selected.
➜
AUX OPTICAL is displayed if the digital optical input
(OPTICAL IN) is selected.
➜
AUX ANALOG is displayed if the analog input
(ANALOG IN) is selected.
3 Press RECORD on the set to enter the recording menu.
4 Rotate the ¡ EASY JOG ™ control to select the record
type.
➜
AUX MANUAL ?: for manual start of recording.
5 Press YES to confirm your selection.
➜
PREPARING is displayed.
➜
RECORD ? is displayed, followed by AUX and the
remaining recording time of the CDR(W).
Both messages will be swapped continuously.
6 Start playback on the external source in order to set the
optimal recording level on the CD recorder
(see “Adjusting the Record Level”).
7 Stop playback on the external source.
8 Go to the beginning of the desired track.
9 Press YES and simultaneously start playback on the external
source.
➜
The CD recorder starts to record and RECORD IN
PROGRESS is shown.The remaining recording time left of
the CDR(W) is displayed.
Note: If CHECK INPUT is flashing, check the digital
connection.
10 To stop recording, press STOP
9
on the set.
➜
UPDATE is displayed and RECORD IN PROGRESS goes
off.
Do not forget to finalize!
Finalizing CDR & CDRW discs
Finalizing a CDR(W) disc is a simple procedure, necessary to:
– play a recorded CDR on a standard CD player;
– play a recorded CDRW on a CDRW compatible CD
player;
– avoid further unwanted recordings on a disc;
– avoid erasure of tracks on a CDRW.
Notes:
Finalizing will take about 2 minutes.
After finalization of the CDR(W), CDR(W) changes to CD
on the display.
During finalization no other operating commands can be
executed.
After finalizing no more recording is possible on a CDR.
Auto finalizing
When you use either COPY CD or COMPILE CD, your
recordings will be finalized automatically (see.“High speed
recording and automatic finalizing”).
Manual finalizing when recording is in progress
1 Press FINALIZE CD on the set during recording.
➜
AUTO FINAL ? is displayed.
2 Press YES to confirm.
➜
FINALIZE is shown.The finalization will start after
recording and the actual finalizing time left will start to
count down.
Manual finalizing when recording is stopped
1 Insert the CDR(W) you want to finalize in the CD
recorder tray.
2 Press CDR to select the CD recorder.
3 Press FINALIZE CD on the set.
➜
FINALIZE CD ? is displayed.
4 Press YES to start finalizing.
➜
FINALIZE is shown, FINAL is displayed and the actual
finalizing time left starts to count down.
External recording (Un)finalizing, erasing
21
English
xp CDR 800/00 eng.-1.1 18-07-2001 13:54 Pagina 21

Unfinalizing CDRW discs
If you want to record (or erase) on (from) an finalized
CDRW, you have to unfinalize it first.
Notes:
Unfinalizing will take approximately 2 minutes.
After unfinalizing of the CDRW, CD changes to CDRW on
the display.
1 Insert the CDRW you want to unfinalize in the CD
recorder tray.
2 Press CDR to select the CD recorder.
3 Press FINALIZE on the set.
➜ UNFINALIZE CD ? is displayed.
4 Press YES to start unfinalizing.
➜ UNFINAL is displayed and the operation time left starts
to count down.
Erasing from a CDRW disc
It is possible to erase one or more tracks (starting from the
end of the last track) or the entire CDRW. Erasing is only
possible on unfinalized CD-RW discs. If you try to erase a
finalized CD-RW, the disc will be unfinalized first before it
will be erased.
Erasing an entire CDRW
1 Insert the CDRW you want to erase in the CD recorder
tray.
2 Press CDR to select the CD recorder.
3 Press ERASE CD to enter into the erasing menu.
➜ ERASE DISC lights up.
4 Press YES.
➜ ERASE ? lights up.
5 Press YES to start erasing.
➜ ERASE is displayed and the operation time left starts to
count down.
Erasing one or more tracks
1 Insert the CDRW you want to erase in the CD recorder
tray.
2 Press CDR to select the CD recorder.
3 Press ERASE CD to enter into the erasing menu.
➜ ERASE DISC lights up.
4 Rotate the ¡ EASY JOG ™ control until the display shows:
➜ ERASE TR and the track number (e.g. 10 +) light up.
5 Rotate the ¡ EASY JOG ™ control to select the track
number(s) you wish to erase.
6 Press YES.
➜ ERASE ? lights up and the remaining disc time and the
remaining number of tracks are shown on the display.
7 Press YES to start erasing.
➜ ERASE lights up and the operation time left starts to
count down.
Note:When erasing more tracks, the tracks to be erased
must be selected in sequence, starting from the last recorded
track. Example:The CDRW has 5 tracks recorded on it. Now,
you can erase track 5 and 4.You can also erase track 5, 4 and
3, however you cannot erase track 5 and 3!
(Un)finalizing, erasing
22
English
xp CDR 800/00 eng.-1.1 18-07-2001 13:54 Pagina 22

Text edit (on CD recorder only)
Storing text in STOP mode
After you have recorded your CDR(W) you can enter text,
e.g. names for discs and tracks.The text will be displayed
during playback on this set and other sets with the CD Text
feature.You can enter up to 60 characters per text field.
Only use an unfinalized CDR or CDRW (finalized CDRW
must be unfinalized first).
1 If necessary press STOP 9.
2 Press CDR to select the CD recorder.
3 Press CD TEXT/edit to enter into the CD text edit menu.
➜
CD TEXT EDIT is blinking and CD TEXT EDIT is
displayed.
4 Rotate the ¡ EASY JOG ™ control to select either:
➜
ALBUM ARTIST: for editing the CD artist;
➜
ALBUM TITLE: for editing the CD title;
➜
ARTIST TR 1 or (2, 3,…): for editing the artist of track
1 or (2, 3,…);
➜
TITLE TR 1 or (2, 3,…): for editing the title of track 1
or (2, 3,…).
5 Press YES to confirm the selection.
➜
The place where the first character can be entered is
blinking.
6 Rotate the ¡ EASY JOG ™ control to select a character.
You can also select characters with the ¡™keys or the
alphabet keys on the remote control.
➜
After selecting a character,the cursor automatically
moves to the next position.
7 Repeat step 6 for adding further characters.
8 Press YES to save the characters that have been selected
and to exit to the last position in the text editing menu.
➜
UPDATE is displayed.
Auto copied text
When an artists name has been stored for a track, it will be
copied automatically into the next track.
0 Press either:
YES to confirm the copied text.
or
NO to delete the copied text and to enter a new one.
Inserting a space
1 Press 5 or 6 to move to the position where the space is
to be inserted.
➜
The position starts blinking.
2 Press YES to confirm the position of the insert character.
➜
A space will be inserted, text will move to the right.
0 You can also use the SPACE button on the remote control
to insert a space.
Deleting and substituting a character
1 Press 5 or 6 to move to the characters position to be
deleted or substituted.
➜
The character starts blinking.
If you want to delete the character:
2 Press NO.
➜
The character is deleted and the text is shifted one
position to the left.
If you want to substitute the character:
2 Rotate the ¡ EASY JOG ™ control to select a new
character.
3 Press YES to confirm the selection.
0 To change another character press 5 or 6.
Erasing text
Text erasing is only possible when the CDR(W) is not
finalized yet.A finalized CDRW needs to be unfinalized
first.
1 Press CD TEXT/edit to enter into the text edit menu.
➜
CD TEXT EDIT starts blinking and CD TEXT EDIT is
displayed.
2 Rotate the ¡ EASY JOG ™ control to select the text erase
menu.
➜
ERASE TEXT is displayed.
3 Press YES to confirm.
4 Rotate the ¡ EASY JOG ™ control to select either:
➜
ALL TEXT CD: all text of the selected will be erased in
one step.
➜
ALL TEXT TR NN: all text of the selected track will be
erased in one step.
➜
CD TITLE: album title and album artist of the selected
CD will be erased in one step.
5 Press YES to start erasing.
Erasing from the memory
When the text memory of your CD recorder is full, the
messages MEMORY FULL and FINALIZE DISC will be
displayed. If you still want to add a new disc to the text
memory, you have either to erase another disc from the
memory or you have to finalize another disc.
Special features
23
English
xp CDR 800/00 eng.-1.1 18-07-2001 13:54 Pagina 23
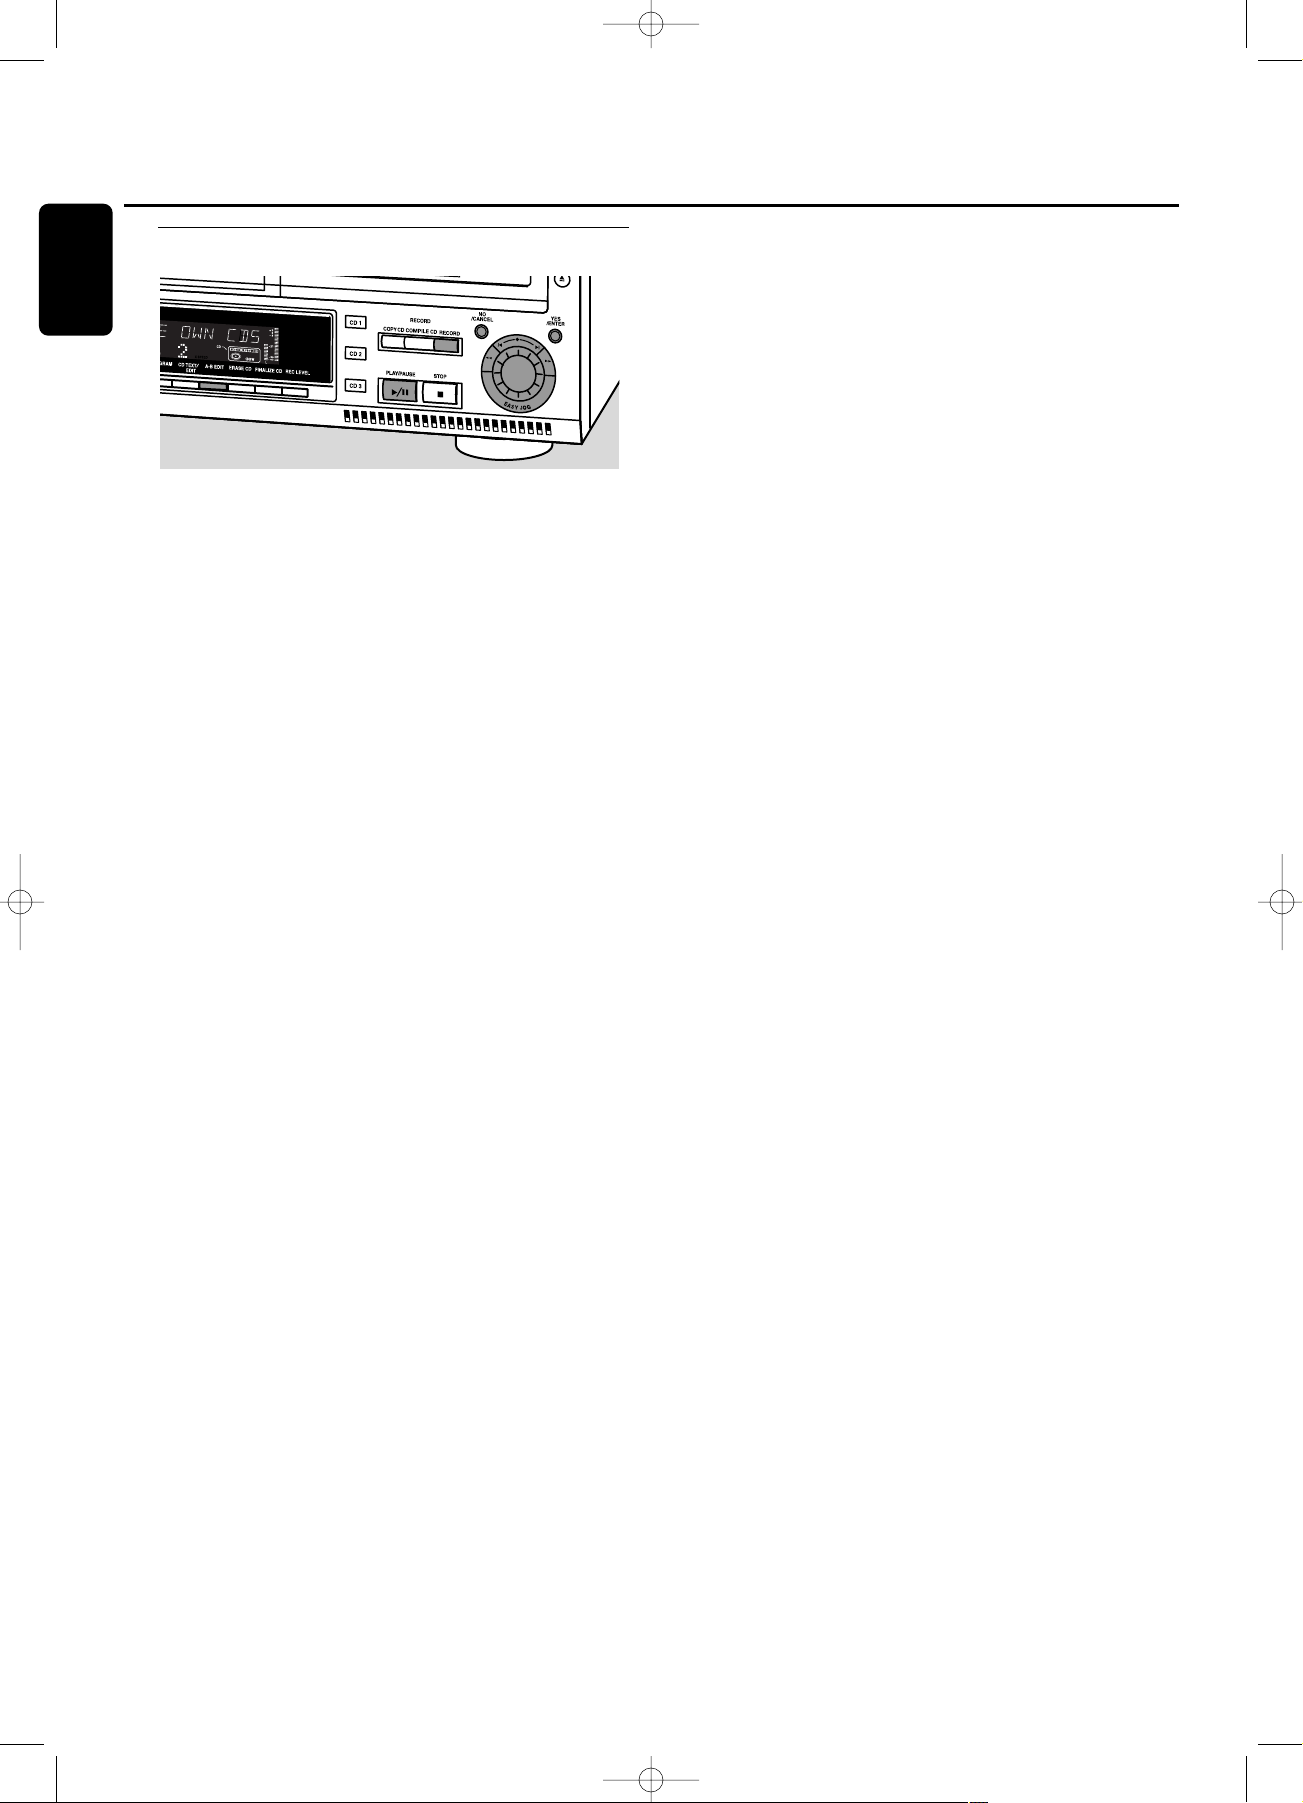
A-B editing (on CD changer only)
You can create a “track” by marking a passage of music
within one track on the current disc.This new “track” can
be used for recording or playing.The minimum track length
is 4 seconds.
Note:You can only make an A-B edit for a normal Audio
CD(RW).
1 Press A-B EDIT on the set.
➜
EDIT TRACK starts blinking, TRACK and the current track
number ? are displayed.
2 Rotate the ¡ EASY JOG ™ control until the desired track
number is displayed.
3 Press YES to confirm the selected track.
➜
FROM A = XX : XX and the track time will be displayed.
The first 4 seconds of the track will be played
continously.The initial position of marker A is always the
start of the chosen track.
0 To fast forward to the desired start position press 5 or 6
on the set.
0 To fine tune the position then rotate the ¡ EASY JOG ™
control.
4 Press YES or A-B EDIT to confirm the position of marker a.
➜
TO B = XX : XX and the new “track” time will be
displayed.The first 4 seconds before marker position B
until marker position B will be played continously.The
initial position of marker B is always the position of
marker A plus 4 seconds.
0 To fast forward to the desired stop position press 5 or 6
on the set.
To fine tune the position rotate the ¡ EASY JOG ™
control.
5 Press YES or A-B EDIT to confirm the marked passage.
➜
EDIT TRACK is shown, A-B and the track edit time are
displayed.
➜
The new “track” will be stored.
0 Press PLAY/PAUSE 2/; to play the ”track”.
0 Press RECORD to record the ”track”
(also see ”Recording”).
Note:A-B EDIT can also be pressed during play.The Track Edit
procedure will then start from the position where A-B EDIT was
pressed.
Clearing the A-B edit
1 Press NO during stop.
➜
CLEAR A-B ? is displayed.
2 Press YES to clear the markers.
➜
The markers A-B are cleared.
Note: If you open the CD changer tray the A-B edit is deleted.
Special features
24
English
xp CDR 800/00 eng.-1.1 18-07-2001 13:54 Pagina 24

WARNING
Under no circumstances should you try to repair the set yourself as this
will invalidate the guarantee.
Do not open the set as there is a risk of electric shock.
If a fault occurs, first check the points listed,before taking the set for
repair.If you are unable to solve a problem by following these hints,
consult your dealer or service centre.
Laser safety
This unit employs a laser. Only a qualified service person should remove
the cover or attempt to service this device, due to possible eye injury.
Problem Solution:
No power – ensure that the ON/OFF button is on: the set is in standby mode, press any
key to activate it
– ensure that the mains cable is plugged in correctly
No sound – check the audio connections
– try using a different source on the amplifier
Remote control does not work – first select the right source on the remote control
– point the remote control directly at the set
Will not record – clean the disc
– check if CDR(W) is an unfinalized disc
– check that the disc is recordable and replace if necessary
– the disc is not an AUDIO disc (WRONG DISC)
Recording is distorted – make sure the recording level is correct
Recorded tracks do not start or stop – try another auto track setting
at the correct time or tracks have been – check if there are at least 2.7 seconds silence in between the tracks
merged together (analog recording only)
– insert track increments manually with the remote control
20 second pause between recordings – see “Recording with automatic star t“
Recorded disc does not play – finalize the CDR(W)
in other standard CD player – insert the CDRW in a CDRW compatible player
Stops during recording – use Philips audio CDR(W)s
– in case recording process is interrupted (power loss, mechanical shock), start
recording again with a new disc
Missing directories on MP3-CD – only albums with playable files will be shown
INSERT DISC indication – replace or clean the disc
– insert a CD(RW),label upwards
– wait until the lens has cleared
USE AUDIO CD indication – insert a digital audio disc marked with “Digital audio” and the special logo
CHECK INPUT indication – select the correct input
– make sure the digital source is switched on
– make sure the connection cable is properly connected
Unexpected start of Demo mode – Keep STOP
9
on the set pressed for at least 5 seconds to cancel Demo
(automatic display of recorder features) mode permanently
Set does not react – unplug the set, then replug it
Troubleshooting
25
English
xp CDR 800/00 eng.-1.1 18-07-2001 13:54 Pagina 25
Généralités
Informations relatives à l’environnement................................27
Caractéristiques techniques ...........................................................27
Accessoires fournis..............................................................................27
Disques destinés à l’enregistrement ..........................................27
Disques destinés à la lecture ........................................................28
Quelques mots sur le MP3.............................................................28
Entretien ....................................................................................................28
Manipulation des disques ...............................................................28
Commandes............................................................................29
Affichage
Indications sur l’affichage .................................................................30
Connexions................................................................................31
Installation
Recommandations pour l’installation ........................................31
Généralités sur les connexions ...................................................31
Connexions analogiques...................................................................37
Connexions numériques..................................................................32
Alimentation/Secteur..........................................................................33
Mode démo.............................................................................................33
Télécommande
Mise en place des piles dans la télécommande ..................34
Commandes de la télécommande.............................................34
Chargement des disques..............................35
Lecture
Lecture........................................................................................................35
Sélection d’un titre et recherche.................................................36
Navigation sur le disque MP3........................................................36
Lecture en ordre aléatoire et répétition.................................37
Affichage du texte du CD...............................................................37
Programmation
Programmation des numéros de titres....................................38
Modification d’un programme ......................................................38
Effacement d’un programme .........................................................38
Réaliser un programme pour un enregistrement ..............38
A propos de l’enregistrement
Informations générales ......................................................................39
Enregistrement en ligne directe (DLR)....................................39
Contrôle automatique du niveau de volume (ALC).......39
Réglage du niveau de l’enregistrement ...................................39
Enregistrement interne
Enregistrement d’un seul titre.......................................................40
Enregistrement d’un CD complet...............................................40
Enregistrement d’un programme ................................................40
Autres possibilités d’enregistrement..........................................41
Enregistrement externe
Enregistrement analogique ou numérique.............................42
Incrémentation automatique des titres....................................42
Enregistrement avec démarrage automatique.....................42
Enregistrement manuel .....................................................................43
(Dé)finalisation, effacement
Finalisation des disques CDR & CDRW ................................43
Définalisation des disques CDRW ...........................................44
Effacement d’un disque CDRW ...............................................44
Options spéciales
Edition de texte (uniquement sur graveur de CD)..........45
Edition d’un passage A-B
(uniquement sur changeur de CD)............................................46
Recherche de pannes...........................................47
ATTENTION
L’utilisation de commandes,de réglages ou l’exécution de
procédures autres que celles décrites dans le présent
manuel peuvent entraîner une exposition à un
rayonnement dangereux ou d’avoir d’autres
conséquences sur le plan de la sécurité.
Table des matières
26
Français
ATTENTION
RAYONNEMENT LASER INVISIBLE APRES OUVERTURE.
EVITER L’EXPOSITION AU FAISCEAU.
Remarque: Cet avertissement figure à l’intérieur du
boîtier.
xp CDR800/00 fra.-2.1 18-07-2001 13:56 Pagina 26
 Loading...