


Return your Warranty Registration card today to ensure you receive all the benefits you’re entitled to.
Once your PHILIPS purchase is registered, you’re eligible to receive all the privileges of owning a PHILIPS product. So complete and return the Warranty Registration Card enclosed with your purchase at once. And take advantage of these important benefits.
|
Warranty |
|
|
Owner |
|
|
|
|
|
|
|
||||||
|
|
|
|
|
|
|||
|
|
|
|
|
Confirmation |
|||
|
|
|
|
|||||
|
|
|
|
|
||||
|
your product within |
Your completed Warranty |
||||||
|
days confirms your right to |
Registration Card serves as |
||||||
|
protection under the |
verification of ownership in the |
||||||
|
and conditions of your PHILIPS |
event of product theft or loss. |
||||||
. |
|
|
|
|
|
|
|
|
Model Registration
Returning your Warranty Registration Card right away guarantees you’ll receive all the information and special offers which you qualify for as the owner of your model.
Congratulations on your purchase, and welcome to the “family!”
|
|
|
|
|
T |
|
|
|
|
|
|
|
|
A |
I |
O |
|
|
|
|
|
|
R |
|
|
|
N |
|
|
|
|
|
T |
|
|
|
|
|
|
|
|
I |
S |
|
|
|
N |
|
|
G |
|
|
|
|
|
|
E |
||
|
|
|
|
|
|
|
E |
||
E |
|
Hurry! |
D |
||||||
R |
|
||||||||
|
|
|
|
|
|
|
|
E |
|
S |
|
|
|
|
|
|
W |
D |
|
|
|
|
|
|
|
|
|||
Y |
|
|
|
|
|
|
|||
|
|
|
|
|
|
|
|||
|
A |
|
|
|
|
|
|
||
|
|
|
D |
|
|
|
I |
|
|
|
|
|
|
|
|
T |
|
|
|
|
|
|
0 |
|
|
|
|
|
|
|
|
|
1 |
N |
H |
|
|
||
|
|
|
|
|
|
||||
|
|
|
|
|
|
I |
|
|
|
Dear PHILIPS product owner:
Thank you for your confidence in PHILIPS.You’ve selected one of the best-built, best-backed products available today.And we’ll do everything in our power to keep you happy with your purchase for many years to come. As a member of the PHILIPS “family,” you’re entitled to protection by one of the most comprehensive warranties and outstanding service networks in the industry.
What’s more, your purchase guarantees you’ll receive all the information and special offers for which you qualify, plus easy access to accessories from our convenient home shopping network.
And most importantly you can count on our uncompromising commitment to your total satisfaction. All of this is our way of saying welcome–and thanks for investing in a PHILIPS product.
Sincerely,
Robert Minkhorst
President and Chief Executive Officer
P.S. Remember, to get the most from your PHILIPS product, you must return your Warranty Registration Card within 10 days. So please mail it to us right now!
Know these safetysymbols
C A U T I O N
RISK OF ELECTRIC SHOCK
DO NOT OPEN
CAUTION: TO REDUCE THE RISK OF ELECTRIC SHOCK, DO NOT REMOVE COVER (OR BACK). NO USER-SERVICEABLE PARTS INSIDE. REFER SERVICING TO QUALIFIED SERVICE PERSONNEL.
 This “bolt of lightning” indicates uninsulated material within your unit which may cause an electrical shock. For the safety of everyone in your household, please do not remove product covering.
The “exclamation point” calls attention to features for which you should read the enclosed literature closely to prevent operating and maintenance problems.
WARNING:TO PREVENT FIRE OR SHOCK HAZARD, DO NOT EXPOSE THIS EQUIPMENT TO RAIN OR MOISTURE.
CAUTION:To prevent electric shock, match wide blade of plug to wide slot, and fully insert.
ATTENTION: Pour éviter les chocs électriques, introduire la lame la plus large de la fiche dans la borne correspondante de la prise et pousser jusqu’au fond.
INTERNET ADDRESS: http://www.philipsusa.com
2
IMPORTANT SAFETY INSTRUCTIONS Read before operating equipment
1.Read these instructions.
2.Keep these instructions.
3.Heed all warnings.
4.Follow all instructions.
5.Do not use this apparatus near water.
6.Clean only with a dry cloth.
7.Do not block any of the ventilation openings. Install in accordance with the manufacturers instructions.
8.Do not install near any heat sources such as radiators, heat registers, stoves, or other apparatus (including amplifiers) that produce heat.
9.Do not defeat the safety purpose of the polarized or groundingtype plug. A polarized plug has two blades with one wider than the other. A grounding type plug has two blades and third grounding prong.The wide blade or third prong are provided for your safety.When the provided plug does not fit into your outlet, consult an electrician for replacement of the obsolete outlet.
10.Protect the power cord from being walked on or pinched particularly at plugs, convenience receptacles, and the point where they exit from the apparatus.
11.Only use attachments/accessories specified by the manufacturer.
12.Use only with a cart, stand, tripod, bracket, or table specified by the manufacturer, or sold with the apparatus.When a cart is used, use caution when moving the cart/apparatus combination to avoid injury
from tip-over.
13.Unplug this apparatus during lightning storms or when unused for long periods of time.
14.Refer all servicing to qualified service personnel. Servicing is required when the apparatus has been damaged in any way, such as power-supply cord or plug is damaged, liquid has been spilled or objects have fallen into apparatus, the apparatus has been exposed to rain or moisture, does not operate normally, or has been dropped.
15.This product may contain lead or mercury. Disposal of these materials may be regulated due to environmental considerations. For disposal or recycling information, please contact your local authorities or the Electronic Industries Alliance: www.eiae.org.
16.Damage Requiring Service - The appliance should be serviced by qualified service personnel when:
A.The power supply cord or the plug has been damaged; or
B.Objects have fallen, or liquid has been spilled into the appliance; or
C.The appliance has been exposed to rain; or
D.The appliance does not appear to operate normally or exhibits a marked change in performance; or
E.The appliance has been dropped, or the enclosure damaged.
17.Tilt/Stability - All televisions must comply with recommended international global safety standards for tilt and stability properties of its cabinets design.
• Do not compromise these design standards by applying excessive pull force to the front, or top, of the cabinet which could ultimately overturn the product.
• Also, do not endanger yourself, or children, by placing electronic equipment/toys on the top of the cabinet. Such items could unsuspectingly fall from the top of the set and cause product damage and/or personal injury.
18.Wall or Ceiling Mounting - The appliance should be mounted to a wall or ceiling only as recommended by the manufacturer.
19.Power Lines - An outdoor antenna should be located away from power lines.
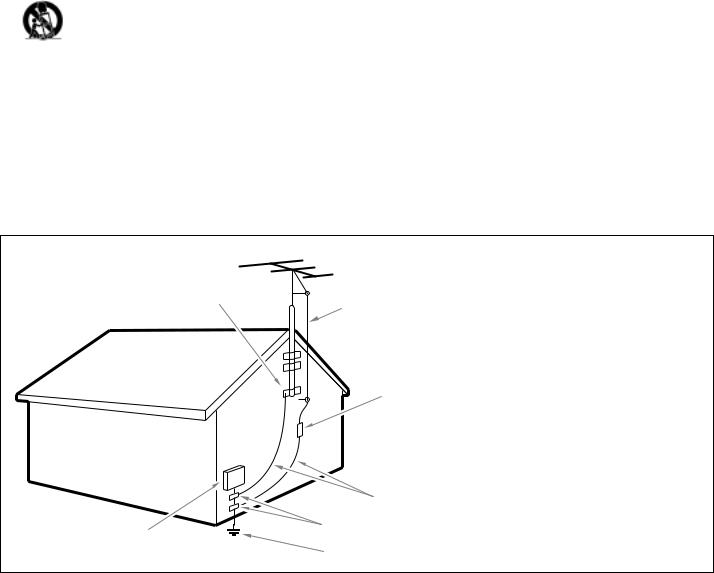
20.Outdoor Antenna Grounding - If an outside antenna is connected to the receiver, be sure the antenna system is grounded so as to provide some protection against voltage surges and built up static charges.
Section 810 of the National Electric Code, ANSI/NFPA No. 701984, provides information with respect to proper grounding of the mats and supporting structure grounding of the lead-in wire to an antenna-discharge unit, size of grounding connectors, location of antenna-discharge unit, connection to grounding electrodes and requirements for the grounding electrode. See Figure below.
21.Objects and Liquid Entry - Care should be taken so that objects do not fall and liquids are not spilled into the enclosure through openings.
EXAMPLE OF ANTENNA GROUNDING AS PER NATIONAL ELECTRICAL CODE (NEC)
GROUND CLAMP
ANTENNA LEAD IN WIRE
ANTENNA DISCHARGE UNIT (NEC SECTION 810-20)
GROUNDING CONDUCTORS (NEC SECTION 810-21)
GROUND CLAMPS
ELECTRIC SERVICE EQUIPMENT
POWER SERVICE GROUNDING ELECTRODE SYSTEM (NEC ART 250, PART H)
Note to the CATV system installer :This reminder is provided to call the CATV system installer’s attention to Article 820-40 of the NEC that provides guidelines for proper grounding and, in particular, specifies that the cable ground shall be connected to the grounding system of the building, as close to the point of cable entry as practical.

Contents
Installation |
|
Preparation ..................................................................................................... |
4 |
Pronto remote control ......................................................................... |
5-10 |
Use of the menus and the menu system ........................................ |
11-12 |
Keypad on top of the TV........................................................................... |
12 |
Installation |
|
Select the menu language ................................................................... |
13 |
Store TV channels ................................................................................ |
13 |
Operation |
|
TV menu |
|
Picture menu..................................................................................... |
14-15 |
Sound menu ..................................................................................... |
15-17 |
Channels menu |
|
Channel Lock ................................................................................ |
17 |
TV Ratings Lock ........................................................................... |
18 |
Movie Ratings Lock ...................................................................... |
19 |
Set/Change PIN ............................................................................ |
20 |
Settings menu |
|
Speakers ........................................................................................... |
21-22 |
General ............................................................................................. |
23-27 |
Source ..................................................................................................... |
28 |
Dual Screen / PIP ....................................................................................... |
29 |
Multi-PIP ...................................................................................................... |
30 |
Connect peripheral equipment |
|
Connecting and selecting accessory devices ................................. |
31-35 |
Connecting external speakers/amplifier ............................................... |
36 |
Recording...................................................................................................... |
37 |
Before Calling Service ........................................................................ |
38 |
Tips .............................................................................................................. |
39 |
Index ........................................................................................................... |
39 |
Glossary ..................................................................................................... |
40 |
Service/Warranty Information ................................................. |
41-43 |
American
3

ANT. / CABLE
TV
power 1 2 3
source 4 5 6
freeze 7 8 9
surf 0
Preparation
the power plug in a wall socket before all connections
on a solid surface.
min. 4ft
leave at least 2” free all around the TV. the TV on a carpet.
unsafe situations, do not place any objects on top of the TV. sunlight and exposure to rain or water.
TV signal to the ANT./CABLE jack at the back of the TV. quality use the suppressor-aerial cable supplied.
plug in the wall socket. Refer to the rear of the TV set operation voltage. Consult your local dealer if your AC power
.To prevent damaging the power (AC) cord which could do not place the TV on the cord.
Control
full-use Pronto Owner’s Manual supplied for complete function and operation.
the (4-AA) batteries into the battery compartment, be for the current device tab item category.
switch A on the front of your TV or tap the power button three Pronto touchscreen TV control panels.
on the front of the TV lights up and the screen comes on.
on your set for the first time, the Install menu appears on the screen.
shown on the screen to guide you through the first use of your TV.
4 Preparation
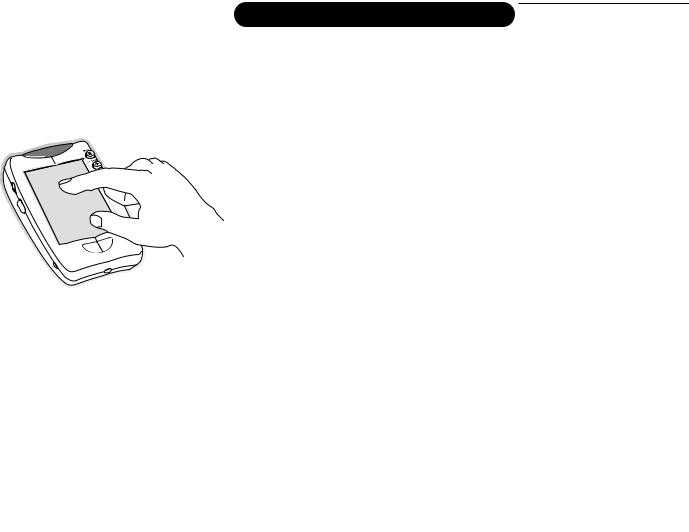
To use the Pronto remote control
displays for TV and other device
with the TV control panels. the Pronto for, refer to the
and adjust the TV, as well as select other program functions.
with your finger to display
your finger or even with your finger
you see on the screen.
. It shuts off automatically to stays on, see the Pronto manual.
. Never use force.
screen.You might damage the
immediately. Never immerse the Pronto
anything on the LCD touchscreen
.
slightly if needed).
Preparation 5

Pronto remote control
TV |
TV |
VCR |
|
||
Cable |
3 |
DBS |
2 |
|
|
PreAmp |
Tuner |
|
5 |
6 |
|
LD |
9 |
DVD |
8 |
|
|
CD |
. |
CDR |
|
||
0 |
|
|
Contrast dial
Turn it to adjust the contrast of the control panel.
Macro menu
Refer to the Pronto manual.
|
|
|
|
MUTE |
|
|
|
TV |
CHANNEL |
|
|
|
+ |
|
power |
1 |
2 |
3 |
VOLUME |
|
|
|
|
|
source |
4 |
5 |
6 |
+ |
|
||||
freeze |
7 |
8 |
9 |
|
surf |
|
0 |
|
|
Page 6 |
Page 7 |
|
|
|
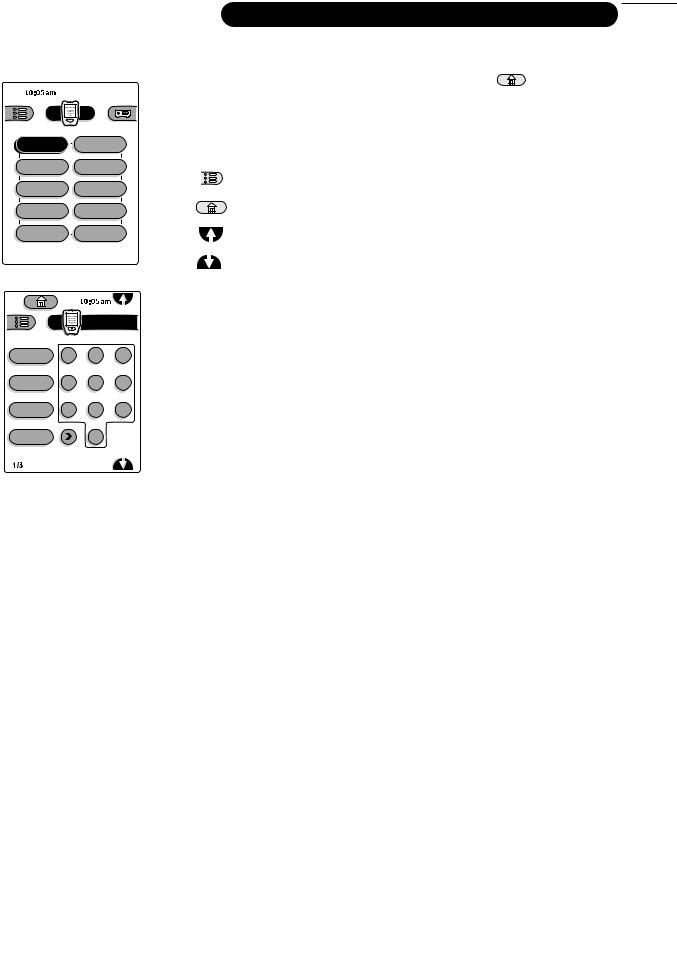
Pronto icon
Press and hold for 3 seconds to go to Setup.
Refer to the Pronto manual.
 Scroll button
Tap to scroll to previous control panel.
¬Mute button
Temporarily interrupt the sound or restore it.
CHANNEL buttons
To browse through the TV channels or sources stored.
VOLUME
Press + or - to adjust the volume.
11
TV
TV
|
|
|
|
|
|
|
TV |
|
|
3 |
|
|
|
|
|
|
|
Cable 3 |
|
|
|
|
power |
|
1 |
|
2 |
|
|
|
|
|
|
|
|
|
|
||
|
|
|
|
|
|
|
|
|
|
|
|
|
TV |
|
odePreAmp |
6 |
|||
|
|
|
|
sound |
m |
|
5 |
||
|
q |
|
|
|
4 |
|
|||
|
|
|
source |
audio |
LD |
|
|||
|
|
|
|
alt |
9 |
||||
|
|
|
|
|
|
7 |
8 |
||
|
|
|
|
|
|
|
|||
b |
|
|
|
freeze |
|
|
|
||
|
|
|
|
sound |
|
||||
|
|
OK |
auto |
|
|
CD |
|
||
c |
|
|
|
active |
control0 |
|
|||
|
|
|
|
|
|
|
|||
fi |
|
K |
|
surf |
|
|
|
|
|
O |
|
auto |
picture |
|
|||||
|
|
|
|
|
|||||
|
|
|
|
|
|
|
|||
zoom |
|
|
|
menu1/3 |
|
|
|
|
|
|
|
|
|
|
|
|
|
|
|
info+
VCR DBS Tuner DVD CDR
 Scroll button
Tap to scroll to next control panel.
Functional TV Control Panels
Besides the Home page control panel, the Pronto Remote Control contains three control panels for the TV.
For panels related to other devices, refer to the Pronto manual.
6 Pronto remote
TV VCR
Cable DBS
PreAmp Tuner
LD DVD
CD CDR
TV
power 1 2 3
source 4 5 6
freeze 7 8 9
surf 0
Page 6 Page 7
TV control panels on the Pronto Remote Control
operate. If the
1/3
TV power
|
where you |
freeze |
among |
|
Replay, |
|
a frozen |
|
seconds of a |
|
3, to |
|
PIP |
|
to display |
|
various |
12 |
|
surf |
|
|
- or nine |
|
in case of a |
|
surf. |
|
television |
|
number |
|
to panel 2 |
|
list. |
|
bottom of |
|
the Surf |
Pronto remote control 7
TV
qsound mode
alt audio
auto sound
OK  active control auto picture
Page 6 Page 7
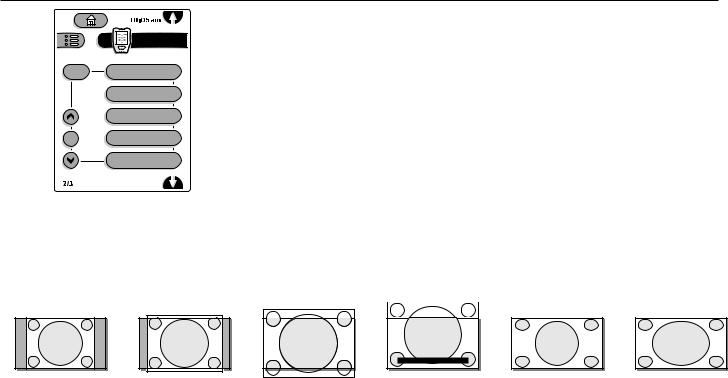
2/3 This is the second control panel of three
Tap the up/down cursor to select a list item.
Tap the right cursor button to adjust the selected list item.
Tap the OK button to activate the selection made or to switch off the Active Control menu.
qTap this button to summon a list of available display formats for showing video images in the traditional 4:3 proportions.
Tap this button repeatedly or tap the cursor up/down to select another display format: Automatic, Superzoom, 4:3, Movie Expand 14:9, Movie Expand 16:9, 16:9 Subtitle,Wide Screen.
When in Movie Expand 14:9, Movie Expand 16:9 or Superzoom you can make subtitles visible with the cursor up/down.
Automatic makes the picture fill the screen as much as possible.
Superzoom removes the black bars on the sides of 4:3 programs with minimal distortion.
abc defghij klm nopqrs tu
4:3 |
Movie Expand 14:9 Movie Expand 16:9 |
16:9 subtitle |
Superzoom |
Widescreen |
sound mode Tap this button to summon a list of available sound modes: Stereo, 3 Stereo, Hall or Surround. (See Sound menu, p. 16.)
alt audio When you tune a channel where SAP (Second Audio Program) is available, you can toggle between Main and SAP. If not available, only Main can be selected.
auto sound Tap this button to show a list of predefined sound settings, each corresponding with specific factory settings of treble and bass.You can also use the cursor up/down
Personal refers to the personal preference settings of sound selected in the sound menu;
Note: The moment you are in a predefined auto sound setting and you modify a setting in the sound menu, all values of the sound menu will overwrite the previously made personal auto sound settings.
8 Pronto remote control

active control Active Control is a pro-active and automatic system.The TV continuously measures and corrects all incoming signals in order to provide the best picture possible.Thanks to the Ambient Light Sensor which measures the light conditions of the room in which the TV is situated, the contrast, dynamic contrast, noise reduction, sharpness and color picture settings are adjusted automatically. The light sensor is active when the Active Control function is switched to Medium or Maximum.
Tap the active control button repeatedly to show the Active Control menu with values Off, Minimum, Medium or Maximum.
Off Sharpness and Dynamic Contrast are controlled automatically Minimum Sharpness, Dynamic Contrast and Noise Reduction are controlled
automatically.
Medium Dynamic Contrast, Color, Sharpness and Noise reduction are controlled automatically.
Maximum Contrast, Dynamic Contrast, Color, Sharpness and Noise reduction are controlled automatically.
Tap the cursor in the right direction while the selected Active Control setting information is on top of the screen.
The Active Control Demo appears.
The picture settings are being adapted continuously and automatically. The Demo items cannot be selected.
The sliders will be moving, showing how the TV is tweaking the current picture and dependent of the selected Auto Picture setting which is displayed above the sliders. None of the sliders is user controllable.
Tap the OK button to switch off the Demo.
Note: Active Control is not available for digital signals via AV4.
auto picture Tap this button to show a list of predefined picture settings. Each setting corresponds with specific factory settings of Contrast, Brightness, Color, Sharpness, Color Enhancement and Dynamic Contrast.
You can also use the cursor up/down to select the settings.
Personal refers to the personal preference settings of picture selected in the picture menu.
Note: The moment you are in a predefined auto picture setting and you modify a setting in the picture menu, all values of the picture menu will overwrite the previously made personal auto picture settings.
Pronto remote control 9
TV
b
c
OK
fi
zoom
info+ menu
Page 6 Page 7
11 WPIX 12:47
4:3 Stereo (cc) MAIN+ TV-PG-DLSV Kids with Guns
Widescreen Surround 05:22
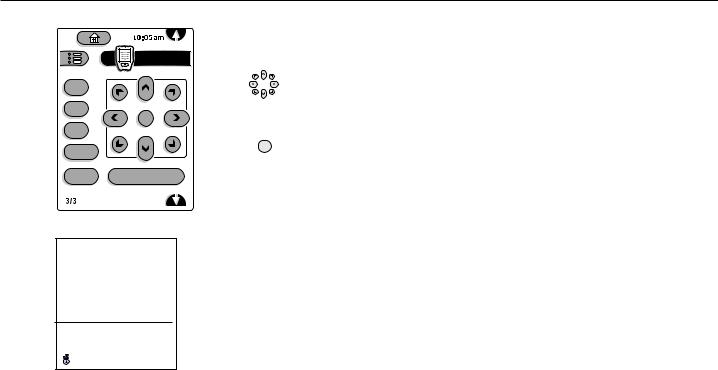
3/3 |
This is the third control panel of three |
|
Tap the up/down, left/right cursor buttons to move up or down the list of |
|
controls and to make adjustments to the selected controls. |
|
Tap any of the diagonal cursor buttons up right, up left,down right or down left |
|
to exit the current menu branch. |
OK |
Tap the OK button to activate your choice when it is requested. |
|
|
menu |
Tap the menu button to display/cancel the on-screen main menu. |
info+ Tap this button to display (when available) information about the current channel and program or source.
The information display is divided in two zones.
The upper zone presents the time and information on the current program: number, name, video and audio formats of the incoming signal, CC availability, availability of alternate or secondary audio programs (a plus sign appears if you have more than one choice), ratings and program title if available.
The lower zone presents information about the currently selected settings: display format, sound mode and (if on) the sleep timer icon and the minutes remaining.
bDual Screen/PIP on/off
See Settings, General menu, p. 23 and Dual Screen/PIP, p. 29.
cSwitching screens in Dual Screen or PIP
See Settings, General menu, p. 23 and Dual Screen/PIP, p. 29.
fiMulti-PIP
Tap fi to turn on/off Multi-PIP.
The Multi-PIP format that launches on the button press is determined by the selection you made in the Multi-PIP Format list in the General menu, see
Settings, General, p. 24 and Multi-PIP Format, p. 30.
Note: Continuing to hold the fi button down will cycle the TV through the various formats (PIP3, PIP8, PIP12), launching a new format after each second the button is
held down.
Tap the fi button again to return to a full main screen picture.
zoom Tap the zoom button to activate the zoom function.
Tap the OK button repeatedly to select one of the zoom magnifications (x1, x4, x9, x16).
Additionally you can shift the selected zoom window over the screen with the cursor buttons up/down, left/right or in a diagonal way.
The zoom window is reset after selecting another TV channel, another display format or when another display format is selected automatically.
Zooming is disabled in Dual Screen mode.
Tap the zoom button again to deactivate the zoom function.
10 Pronto remote control
TV
b
c
OK
fi
zoom
info+
Page 6 |
7 |
Picture
TV
Natural Motion
Off
On (Progressive)
On (1050i lines)
Brightness
Color 
Tint 
Contrast 
puck
pipes
balls
To use the menus and the menu system
&Tap the menu button on the third touchscreen TV control panel of the Pronto to summon the main menu.
Picture |
Sound |
Channels |
TV 
Install 
Settings 
(Exit) 
Note: Should your Pronto remote control be lost or broken you can still use the keys on top the TV. E.g. press the M key to summon the Main menu.
The M key functions as both Menu and OK on the remote control.
The Main menu contains the item Exit to dismiss the menu, only when you turn on your TV for the first time, or when the Main menu is summoned with the M key on of the TV.
é Tap the up/down cursor buttons to select the TV, Install or Settings menu.
“ Tap the left/right cursor buttons to select the menu item.
‘ Tap the up/down cursor buttons again to select the control you want to select or adjust. For instance, see Picture menu.
( Tap the menu button again to turn off the main menu.
The menu system
Pipes, balls and a puck
The hierarchy of menus and controls is represented by an animated visual mechanism of pipes, balls and a puck.
constantly shows the current whereabouts, continually expands the view of the immediate neighborhood, and preserves a view of places left behind.
The puck |
the user’s point of focus, by surrounding the ball |
indicating |
user’s current position in the menu hierarchy. |
The puck |
always present when the menu system is displayed. |
The puck |
divided into 4 wedge-shaped regions.They correspond to the |
directional controls (up/down, left/right) on the remote control.
In this way users can navigate through the menu hierarchy to arrive at the control they wish to adjust.
Tapping button on the remote control shifts focus from the current ball to the next one connected by a pipe in that direction.
Balls represent a branch of the menu hierarchy.
All menu are represented by balls. Each ball is identified with an identifying text label.
When items (balls) of a menu level are more numerous than can fit comfortably on the TV display, only a portion of the items are shown as balls
along the |
.Those omitted are indicated by a cluster of balls which |
indicates |
there are ‘more’. |
Pipes connect balls together and show the path the user can traverse through the menu . Pipes represent individual branches of the menu hierarchy
Interaction bars
Every pathway in the menu structure leads eventually to a bar, where users can set levels, change values or adjust some aspect of system performance.
menus 11
Picture Sound
TV


|
|
|
|
Automatic |
|
|
|
|
|
|
|
|
|
Superzoom |
Display Format |
|
|
|
4:3 |
|
||||
|
|
|
|
Movie Expand 14:9 |
|
|
|
|
Movie Expand 16:9 |
|
|
|
|
|
|
|
|
|
16:9 Subtitle |
|
|
|
|
Widescreen |
|
|
|
|
|
|
|
|
|
|
List controls
A list control is used to select one or more items from a list of options. For instance, the Display Format option list with 4:3, Movie Expand 14:9, etc. Tap the right button to move the puck into the list. At least one item is the current value and is highlighted as such.
Moving the puck up or down with the up/down button causes the list to move down or up.
A single-value list allows only one item to be selected at one time and deselects another.
In a multi-value list any number of items can be selected, even allowing more to be selected.They are represented by a checkmark in the box next to the label. E.g.TV Ratings lock.
Confirmation prompt or OK buttons
A confirmation prompt is a puck and ball with a task label on the left and sometimes additional text info on the right.
Tap the OK button to proceed.
P
M V
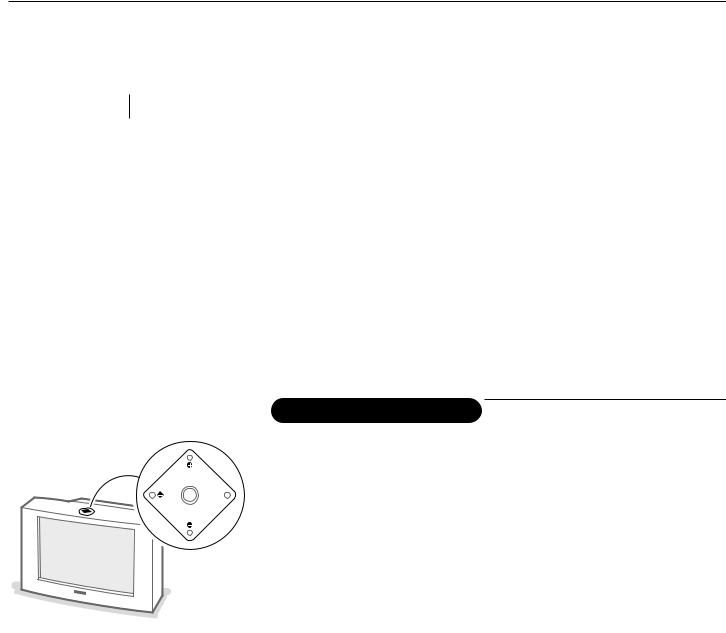
Keypad on top of the TV
be temporarily unavailable, or lost or TV allows you to summon and to navigate
and to control the volume.
Main Menu and to confirm the selection button)
up/down in the menus. left/right in the menus.
key to dismiss the Main Menu.
the P- or + keys enable you - or + keys to adjust the volume.
12 Use of the menus

Installation
Select the menu language
TV
b
c
OK
fi
zoom
info+ menu
Page 6 Page 7
Picture Sound Channels
on the Pronto.
time and no channels are stored so far, the TV Install menu, but disconnected from the rest
has an additional item exit with which the
appears on the screen. The explanation a time next to each language. Choose your
button on the remote control. Proceed with the
TV 
Install 
Settings 
Menu Language
Install
English 
French 
Spanish 
Autoprogram
Install 
Automatic 
 Start
Start
Antenna 

Cable 

Install.
Language.
your preferred language and tap the OK
Store TV channels
& Select Autoprogram in the Install menu.
éPress the cursor down to select Automatic, Antenna or Cable.
Note: It is recommended to choose for the Automatic way of autoprogramming.
In case of difficulties in autoprogramming with the automatic method, choose for Antenna or Cable whether antenna or cable signals are present.
When Automatic is selected, the TV will automatically detect whether or not cable signal input is present.
When Antenna is selected, the TV will detect antenna signals and will search for all antenna TV channels available in your local area.
When Cable is selected, the TV will detect cable signals and will search for all cable TV channels available in your local area.
“ Press the cursor right.
Note: All channels must be unlocked in order to autoprogram. If requested, enter your PIN code to unlock all channels. (See Channels in the TV menu, p. 17.)
‘The message Searching appears and the progress of autoprogramming is displayed.
When Autoprogramming is complete, the puck navigates to Stop. A message appears confirming the completion together with the total number of channels found.
Note: when you navigate to Stop before autoprogramming is complete, you are given the option to continue.
Available channels: with cable: max. from 1 to 125 off air: max. from 2 to 69
Note: In case a particular channel is too weak for the autoprogramming to identify, after installation is complete, you should tune to that channel by using the digit keys on the remote control.
If the channel is not acquired, a message will appear that the channel is not available.
Installation 13
 Loading...