


Operating Instructions
<Operations and Settings>
Remote Camera Controller
Model No. AW RP120G
REMOTE |
CAMERA |
|
|
|
CONTROLLER |
|
|
|
|
AW- |
|
|
|
|
|
|
|
|
RP120 |
How the Operating Instructions are configured
<Basics>:
The <Basics> describes the procedure for connection with the required equipment and for installation. Before installing this unit, be sure to take the time to read through <Basics> to ensure that the unit will be installed correctly.
<Operations and Settings> (this manual):
This <Operations and Settings> describes how to operate the unit and how to establish its settings.
ENGLISH
M1212HO0 -FJ |
VQT4T93A(E) |

Contents
How to turn on and off the power of the remote cameras.. . . . . . . . .3
How to turn on the power of the remote cameras.. . . . . . . . . . . . . . . .3 How to turn off the power of the remote cameras.. . . . . . . . . . . . . . . .4
Making image adjustments for the selected remote camera .. . . . . .5
Setting the gain.. . . . . . . . . . . . . . . . . . . . . . . . . . . . . . . . . . . . . . . . . .6 Setting the pedestal. . . . . . . . . . . . . . . . . . . . . . . . . . . . . . . . . . . . . . .6 Setting the white balance .. . . . . . . . . . . . . . . . . . . . . . . . . . . . . . . . . .6 Setting the black balance .. . . . . . . . . . . . . . . . . . . . . . . . . . . . . . . . . .7 Selecting the color bars.. . . . . . . . . . . . . . . . . . . . . . . . . . . . . . . . . . . .8 Setting the detail.. . . . . . . . . . . . . . . . . . . . . . . . . . . . . . . . . . . . . . . . .8 Adjusting the shutter speed.. . . . . . . . . . . . . . . . . . . . . . . . . . . . . . . . .8 Setting the shooting mode (SCENE 1 to SCENE 4).. . . . . . . . . . . . . .9 Setting an ND filter .. . . . . . . . . . . . . . . . . . . . . . . . . . . . . . . . . . . . . .10
Operating the OSD menu of a remote camera.. . . . . . . . . . . . . . . . . 11
Operating preset memory (PMEM).. .. .. .. .. .. .. .. .. .. .. .. .. .. .. .. .. .. .. .. .. .. .. .. .. .. ..12
Registering preset memory (STORE).. . . . . . . . . . . . . . . . . . . . . . . .13 Recalling preset memory (RECALL).. . . . . . . . . . . . . . . . . . . . . . . . .13 Deleting preset memory (DELETE).. . . . . . . . . . . . . . . . . . . . . . . . . .13 Setting the operation items for when preset memory
is recalled (PRESET SCOPE).. . . . . . . . . . . . . . . . . . . . . . . . . . . .14 Setting the speed at which to move to the position
set in the preset memory (PRESET SPEED).. . . . . . . . . . . . . . . .14
Operating preset memory groups (PMEM GROUP).. . . . . . . . . . . . .16
Setting the operation mode (SEPARATE/ALL).. . . . . . . . . . . . . . . . .16 Creating preset memory groups.. . . . . . . . . . . . . . . . . . . . . . . . . . . .16 Recalling preset memory groups. . . . . . . . . . . . . . . . . . . . . . . . . . . .17
Operating tracing memory (TMEM).. . . . . . . . . . . . . . . . . . . . . . . . . .18
Registering tracing memory (STORE).. . . . . . . . . . . . . . . . . . . . . . . .18 Recalling tracing memory (RECALL) .. . . . . . . . . . . . . . . . . . . . . . . .19 Deleting tracing memory (DELETE).. . . . . . . . . . . . . . . . . . . . . . . . .20 Restoring tracing memory (RESTORE).. .. .. .. .. .. .. .. .. .. .. .. .. .. .. .. .. .. .. .. .. .. ..20 Setting the items to recall when recalling tracing memory .. . . . . . . .21
Configuring the remote camera operation settings.. . . . . . . . . . . . .22
Adjusting the operation speed of the pan, tilt, zoom, and focus.. . . .22 Setting the PAN/TILT lever inclination and speed.. . . . . . . . . . . . . . .22 Setting the pan, tilt, zoom, and focus operation directions.. . . . . . . .23 Setting the minimum lens zoom start speed.. . . . . . . . . . . . . . . . . . .24 Setting the speed of the pan and tilt operations
for telephoto shooting.. . . . . . . . . . . . . . . . . . . . . . . . . . . . . . . . . .24 Setting the movement ranges (limiter function)
of a remote camera.. . . . . . . . . . . . . . . . . . . . . . . . . . . . . . . . . . . .25 Returning a remote cameras to its home position.. . . . . . . . . . . . . . .25 Controlling the peripheral devices connected
to a remote camera.. . . . . . . . . . . . . . . . . . . . . . . . . . . . . . . . . . . .26
Configuring the unit operation settings.. . . . . . . . . . . . . . . . . . . . . .27
Enabling or disabling operation with the ENABLE buttons.. . . . . . . .27 Enabling or disabling operation of the ENABLE buttons
by menu operation. . . . . . . . . . . . . . . . . . . . . . . . . . . . . . . . . . . . .28 Enabling or disabling menu operation.. . . . . . . . . . . . . . . . . . . . . . . .28 Switching the focus operation and iris operation.. . . . . . . . . . . . . . . .29 Setting the LCD panel backlight.. . . . . . . . . . . . . . . . . . . . . . . . . . . .29 Assigning functions to the USER buttons.. . . . . . . . . . . . . . . . . . . . .30
Setting linking with a switcher.. . . . . . . . . . . . . . . . . . . . . . . . . . . . . .31
Registering the camera numbers that will correspond to the image inputs of the switcher. . . . . . . . . . . . . . . . . . . . . . . . . . . . . . . . . . .31
Enabling or disabling the function for linking with the switcher.. . . . .31
Setting the functions for when the unit is linked
with the switcher.. . . . . . . . . . . . . . . . . . . . . . . . . . . . . . . . . . . . . . . . .32
BUSCONT function.. . . . . . . . . . . . . . . . . . . . . . . . . . . . . . . . . . . . . .32 FOCUS ASSIST function.. . . . . . . . . . . . . . . . . . . . . . . . . . . . . . . . . .33 CAMERA SELECT view function.. .. .. .. .. .. .. .. .. .. .. .. .. .. .. .. .. .. .. .. .. .. .. .. .. .. .. ..33 TALLY IP function.. . . . . . . . . . . . . . . . . . . . . . . . . . . . . . . . . . . . . . .34 Operating the switcher with the PAN/TILT lever
and ZOOM button.. . . . . . . . . . . . . . . . . . . . . . . . . . . . . . . . . . . . .34 CAM INF function.. . . . . . . . . . . . . . . . . . . . . . . . . . . . . . . . . . . . . . .35
Memory card operations.. . . . . . . . . . . . . . . . . . . . . . . . . . . . . . . . . . .36
Initializing a memory card (INIT).. . . . . . . . . . . . . . . . . . . . . . . . . . . .37 Saving data to a memory card (SAVE).. . . . . . . . . . . . . . . . . . . . . . .37 Loading data from a memory card (LOAD).. . . . . . . . . . . . . . . . . . . .38 Deleting the files saved to a memory card (DELETE).. . . . . . . . . . . .38
Tally settings.. . . . . . . . . . . . . . . . . . . . . . . . . . . . . . . . . . . . . . . . . . . .39
Registering the camera numbers that will correspond
to the TALLY inputs.. . . . . . . . . . . . . . . . . . . . . . . . . . . . . . . . . . . .39 Setting the sending of tally information from the unit
to remote cameras .. . . . . . . . . . . . . . . . . . . . . . . . . . . . . . . . . . . .39
Checking alarm information.. . . . . . . . . . . . . . . . . . . . . . . . . . . . . . . .40
Displaying alarm information.. . . . . . . . . . . . . . . . . . . . . . . . . . . . . . .40
Returning the unit to the factory default state (INITIALIZE).. . . . . .41
Returning the unit to the factory default state.. . . . . . . . . . . . . . . . . .42
Control interface for external devices.. . . . . . . . . . . . . . . . . . . . . . . .43
Setup Software .. . . . . . . . . . . . . . . . . . . . . . . . . . . . . . . . . . . . . . . . . .45
Installing the software.. . . . . . . . . . . . . . . . . . . . . . . . . . . . . . . . . . . .45 Configuring the settings of the personal computer.. . . . . . . . . . . . . .45 Connecting the personal computer.. . . . . . . . . . . . . . . . . . . . . . . . . .46 Registering the unit in Setup Software.. . . . . . . . . . . . . . . . . . . . . . .47 Settings for connecting with the remote cameras and switcher .. . . .48 Setting user authentication.. . . . . . . . . . . . . . . . . . . . . . . . . . . . . . . .50
Operations of AW HE2 .. . . . . . . . . . . . . . . . . . . . . . . . . . . . . . . . . . . .51 Table of setting items (dedicated dials and buttons).. . . . . . . . . . . .52 Table of setting items (menus).. . . . . . . . . . . . . . . . . . . . . . . . . . . . . .53 Messages.. . . . . . . . . . . . . . . . . . . . . . . . . . . . . . . . . . . . . . . . . . . . . . .56 Index.. . . . . . . . . . . . . . . . . . . . . . . . . . . . . . . . . . . . . . . . . . . . . . . . . . .58
2
How to turn on and off the power of the remote cameras
How to turn on the power of the remote cameras
The power of the remote cameras in the standby state can be turned on from the unit..
There are the following methods of turning on the power.. zzTurning on the power one camera at a time
zzTurning on the power of the cameras simultaneously with the turning on of the unit’s power
zzTurning on the power of multiple camerasTurning on the power of all the cameras
Turning on the power of the selected camera group
Each of these methods is described in turn below..
Turning on the power one camera at a time
1.Select the remote camera..
When the corresponding camera selection button [CAMERA SELECT/GROUP SELECT] is held down for approximately 3 seconds, the name of the remote camera is displayed on the top line of the LCD panel and “POWER: OFF↓” is displayed on the bottom line..
2.Turn the F2 dial to select “ON” while keeping the camera selection button held down and then press the F2 dial..
CAM1<AW-HE120>
 POWER:ON
2
1
Turning on the power of the cameras simultaneously with the turning on of the unit’s power
1.Set the MENU button to ON..
2.Open CAMERA SETUP menu [24]..
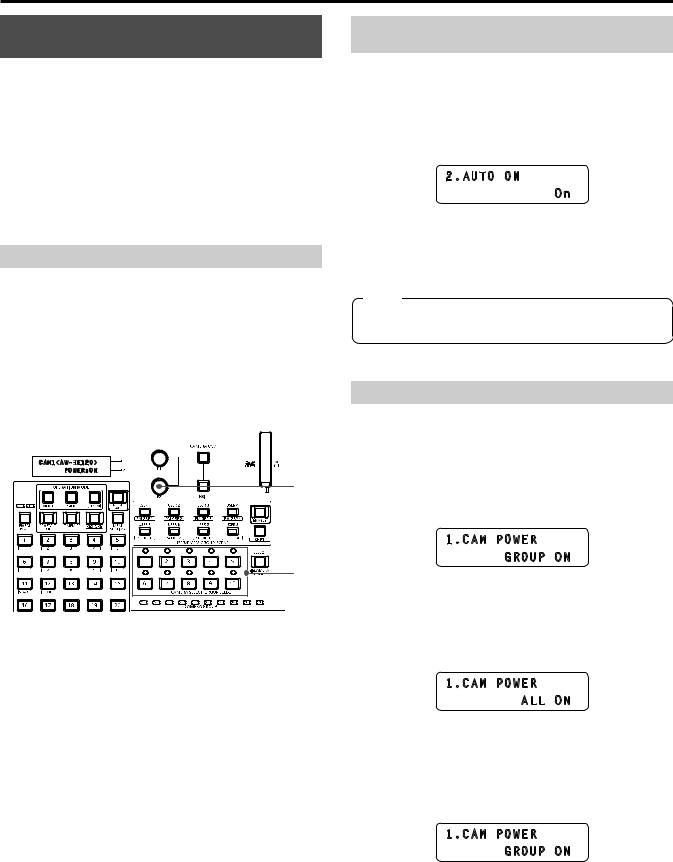
3.Turn the F1 dial to display the “2. AUTO ON” item..
2.AUTO ON
On
4.Turn the F2 dial to select “On” and press the F2 dial..
The power of the remote cameras set to “Serial” or “Network” in CTRL TYPE menu [36] will now turn on simultaneously with the turning on of the unit’s power..
Note
zzDepending on the number of cameras connected, it may take some time before you can operate the unit..
Turning on the power of multiple cameras
1.Set the MENU button to ON..
Press the MENU button to turn on its indicator..
2.Open CAMERA SETUP menu [24]..
3.Turn the F1 dial to display the “1. CAM POWER” item..
1.CAM POWER GROUP ON
Turning on the power of all the cameras
4. Turn the F2 dial to select “ALL ON” and press the F2 dial..
1.CAM POWER
ALL ON
Turning on the power of the selected camera group
4.Turn the F2 dial to select “GROUP ON” and press the F2 dial..
1.CAM POWER GROUP ON
3
How to turn on and off the power of the remote cameras (continued)
How to turn off the power of the remote cameras
The power of the remote cameras can be turned off from the unit.. There are the following methods of turning off the power.. zzTurning off the power one camera at a time
zzTurning off the power of multiple camerasTurning off the power of all the cameras
Turning off the power of the selected camera group
Each of these methods is described in turn below..
Turning off the power one camera at a time
1.Select the remote camera..
When the corresponding camera selection button [CAMERA SELECT/GROUP SELECT] is held down for approximately 3 seconds, the name of the remote camera is displayed on the top line of the LCD panel and “POWER: ON↓” is displayed on the bottom line..
2.Turn the F2 dial to select “OFF” while keeping the camera selection button held down and then press the F2 dial..
CAM1<AW-HE120>
 POWER:OFF
2
Turning off the power of multiple cameras
1.Set the MENU button to ON..
2.Open CAMERA SETUP menu [24]..
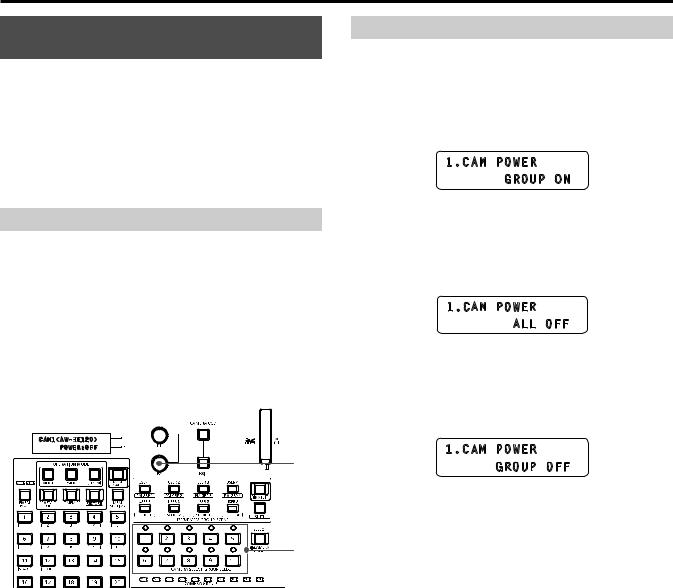
3.Turn the F1 dial to display the “1. CAM POWER” item..
1.CAM POWER GROUP ON
Turning off the power of all the cameras
4. Turn the F2 dial to select “ALL OFF” and press the F2 dial..
1.CAM POWER
ALL OFF
Turning off the power of the selected camera group
4..Turn the F2 dial to select “GROUP OFF” and press the F2 dial..
1.CAM POWER GROUP OFF
1
4
Making image adjustments for the selected remote camera
The following settings and adjustments can be made for the selected remote camera directly from this unit..
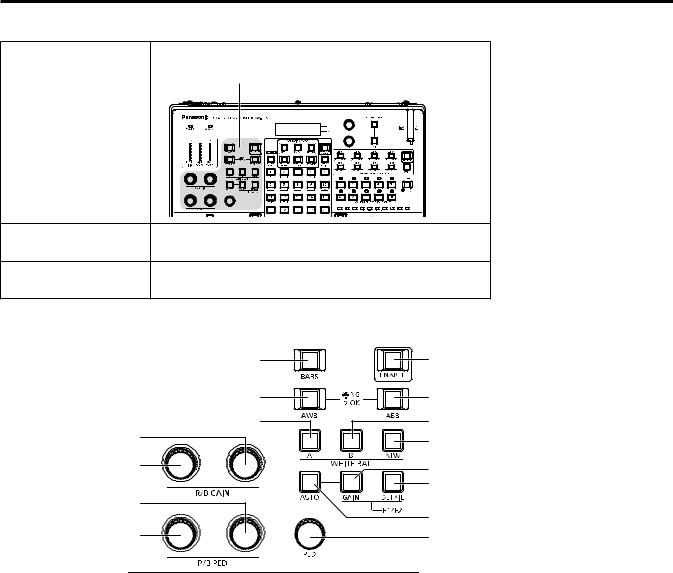
Image adjustments can be made using the dedicated buttons and dials in the color adjustment section..
zzGain
zzPedestal zzR and B gain zzR and B pedestal
zzWhite balance zzBlack balance zzColor bar selection zzDetail
zzShutter speed |
Image adjustments can be made by menu operation.. |
zzShooting mode selection |
The shooting mode can be selected with SCENE1 to SCENE4.. |
<Color adjustment section>
BARS button |
Color adjustment ENABLE button |
AWB button |
ABB button |
WHITE BAL A button |
WHITE BAL B button |
B GAIN dial |
ATW button |
|
|
R GAIN dial |
GAIN button |
|
|
|
DETAIL button |
B PED dial |
AUTO GAIN button |
|
|
R PED dial |
PED dial |
zzWhen the color adjustment ENABLE button indicator is off, operation of the color adjustment section is disabled.. Press the button to turn on its indicator and then perform operation..
zzThe setting value ranges of the gain, pedestal, R and B gain, R and B pedestal, detail, and shutter speed differ depending on the remote camera connected..
For the setting value ranges of each remote camera, refer to “Table of setting items (menus)” (pages 53 to 55).. zzOperation differs as follows when controlling AW HE60 and AW HE50..
•During auto iris (when the auto iris button indicator is on), the shutter speed is adjusted automatically.. The shutter speed value set from the unit is not immediately reflected for the camera output images at that time but instead is reflected when manual iris (when the auto iris indicator turns off) is set..
•While the shooting mode is set to “FullAuto”, the following occurs..
·Auto gain mode is fixed and the gain setting value cannot be changed from “AUTO”..
·ATW mode is fixed and the R and B gain setting values cannot be changed..
·Auto iris is fixed and the shutter speed setting value cannot be changed..
zzWith the AW HE2, some operations differ from those described in this section.. Refer to “Operations of AW HE2” (page 51)..
5
Making image adjustments for the selected remote camera (continued)
Setting the gain
In places which are too dark, increase the gain level, and in places which are too bright, reduce the gain level..
When the gain is increased, the noise level also increases..
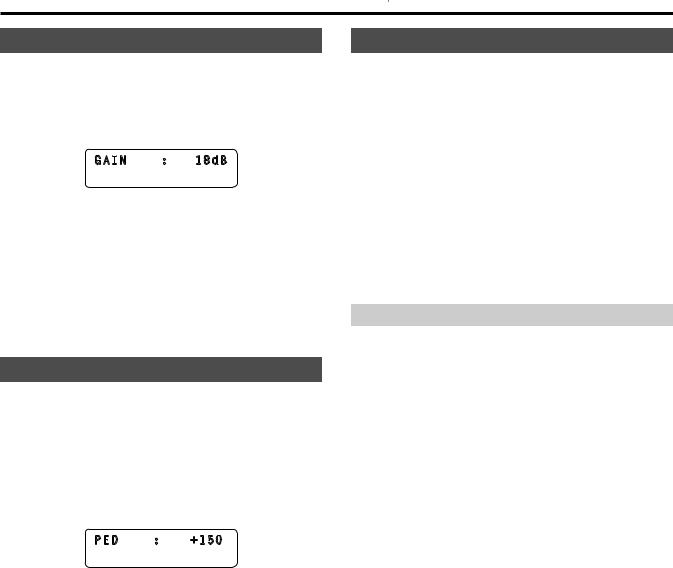
1.Press the GAIN button..
The current gain setting appears..
GAIN |
: |
18dB |
2.Turn the F1 dial to select a setting..
zzWhen the AUTO GAIN button is pressed, auto gain mode is enabled and the light quantity is adjusted automatically..
zzIf approximately 3 seconds elapses without the F1 dial being operated after the GAIN button is pressed, the previous LCD panel display is redisplayed..
Setting the pedestal
When using multiple cameras, you need to set the same the black level (pedestal level) for images shot with each camera..
1.Turn the PED dial to select a setting..
Adjustment in the minus (–) direction makes the parts closer to black, and adjustment in the plus (+) direction makes the parts closer to white..
zzThe setting value is displayed on the LCD panel during setting.. zzWhen the PED dial is pressed, the setting value does not change
and is only displayed..
PED : +150
Setting the white balance
Adjust the ratio between R, G, and B (the three primary colors) so that white will be reproduced accurately..
When the white balance is off, not only will white be reproduced poorly but the color tone of the entire picture will also deteriorate..
The white balance needs to be set when the lighting conditions and brightness have changed.. The white balance must also be adjusted when using a remote camera for the first time or when a remote camera has not been used for a prolonged period of time..
The white balance can be adjusted automatically or manually (fine adjustment after automatic adjustment), and results can be stored in two memory areas (A and B) of the remote camera.. The result in a memory area can be recalled by pressing the WHITE BALA button or WHITE BAL B button on the unit..
In addition, you can select the auto tracking white balance (ATW) mode for automatically tracking the white balance in accordance with the lighting conditions..
Automatically adjusting the white balance
1.With the selected remote camera, fill the screen with a white subject (white wall or paper)..
zzMake sure a shining object or very bright object does not appear on the screen..
2.Press the WHITE BAL A button to turn on its indicator..
3.Press the AWB button..
The AWB button indicator blinks and the white balance is adjusted automatically..
When adjustment ends successfully, the button indicator turns off and the adjustment results are registered to memory A..
When adjustment was not possible, the AWB button indicator turns on..
Try changing, for example, the lens iris, subject, and lighting conditions, and then perform adjustment again..
4.Press the WHITE BAL B button to turn on its indicator..
5.Press the AWB button..
Similar to step 3, the adjustment results are saved to memory B.. zzWhen the white balance is adjusted automatically, the R and
B GAIN setting values become “±0”..
6

Making image adjustments for the selected remote camera (continued)
Manually adjusting the white balance (R and B gain settings)
1.As with the automatic adjustment, fill the screen with a white subject..
2.Connect the video output of the currently selected remote camera to a waveform monitor..
3.Press the WHITE BAL A button to turn on its indicator..
4.Turn the R GAIN dial to select the R channel (red) setting, and turn the B GAIN dial to select the B channel (blue) setting..
The adjustment results are registered to memory A.. zzThe setting value is displayed during adjustment..
zzWhen the R GAIN dial and B GAIN dial are pressed, the setting values do not change and are only displayed..
R GAIN : +150
BGAIN : +150
5.Press the WHITE BAL B button to turn on its indicator..
Perform step 4 in the same way as with the WHITE BALA button to set memory B..
Auto tracking white adjustment (ATW)
You can select the auto tracking white balance (ATW) mode for automatically tracking the white balance in accordance with the lighting conditions..
1.Press the ATW button to turn on its indicator..
ATW mode is enabled..
zzIf there is no white on the screen, it may not be possible to compensate the white balance properly..
Also, it may not be possible to compensate the white balance properly depending on the lighting conditions..
Setting the black balance
The black balance needs to be adjusted when using a remote camera for the first time or when a remote camera has not been used for a prolonged period of time.
It also needs to be adjusted when significant changes have occurred in the ambient temperature or at the change of the seasons..
When the camera will be used with the same settings and under the same conditions, the black balance does not need to be adjusted again.. When the black balance is adjusted again, the previous memory data will be erased and replaced with the new black balance settings..
Automatically adjusting the black balance
1.Press the ABB button..
The ABB button indicator blinks and the black balance is adjusted by automatically closing the lens iris..
When adjustment ends successfully, the button indicator turns off and the adjustment results are registered..
When adjustment was not possible, the ABB button indicator turns on..
zzWhen the black balance is adjusted automatically, the R and B PED setting values return to “±0”..
Manually adjusting the black balance (R and B pedestal adjustment)
1.Connect the video output of the currently selected remote camera to a waveform monitor..
2.Press the auto iris button to turn its indicator off..
3.Turn the IRIS dial to close the lens iris..
4.Turn the R PED dial to select the R channel (red) setting, and turn the B PED dial to select the B channel (blue) setting..
zzThe setting value is displayed during adjustment..
zzWhen the R PED dial and B PED dial are pressed, the setting values do not change and are only displayed..
R |
PED |
: |
+150 |
B |
PED |
: |
+150 |
7
Making image adjustments for the selected remote camera (continued)
Selecting the color bars
Press the BARS button to output color bar signals from the remote camera..
Button indicator off: Outputs the signal for the images shot by the camera
Button indicator on : Outputs the color bar signal
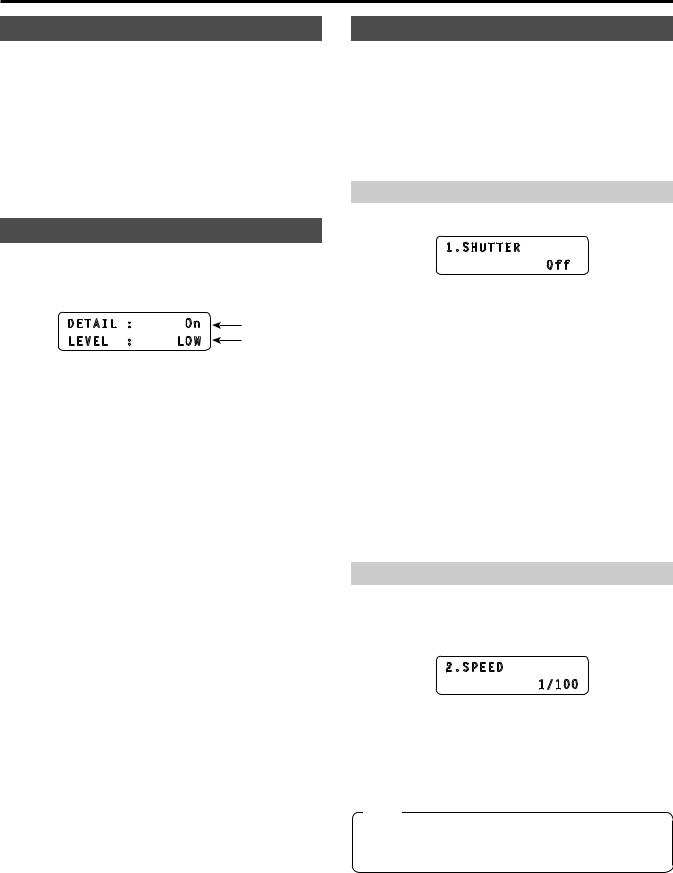
Setting the detail
The image detail (image sharpness) can be adjusted..
1.Press the DETAIL button..
The current detail setting appears..
DETAIL |
: |
On |
F1 dial |
LEVEL |
: |
LOW |
F2 dial |
2. Turn the F1 dial and F2 dial to select settings..
Adjusting the shutter speed
The shutter mode and shutter speed of a remote camera can be selected..
1.Press the MENU button to turn on its indicator..
2.Open SHUTTER menu [21]..
Setting the shutter mode
3. Turn the F1 dial to display the “1. SHUTTER” item..
1.SHUTTER
Off
4.Turn the F2 dial to select the shutter mode, and then press the F2 dial to confirm the selection..
Off |
: Turns off the electronic shutter.. |
Step |
: Operates the shutter at the shutter speed set in the |
|
“2. SPEED” item.. |
Synchro: Operates the shutter at the shutter speed set for the |
|
|
remote camera.. |
|
Set the shutter speed value for synchro mode in the OSD |
|
menu of the remote camera.. |
|
For details, refer to the Operating Instructions for the |
|
remote camera.. |
ELC |
: Controls the electronic shutter and automatically adjusts |
|
the light quantity.. |
zzThe shutter mode settings differ depending on the remote camera connected.. Check the Operating Instructions for the corresponding model..
Setting the shutter speed
When “Step” has been selected as the shutter mode, you can specify the shutter speed..
5.. Turn the F1 dial to display the “2. SPEED” item..
2.SPEED
1/100
6..Turn the F2 dial to adjust the shutter speed..
zzThe shutter speed settings differ depending on the remote camera connected.. Check the Operating Instructions for the corresponding model..
Note
zzFor a remote camera connected via a serial connection, when you change the camera group once and then return to the original camera group, the shutter speed is set to “1/100”..
8
Making image adjustments for the selected remote camera (continued)
Setting the shooting mode (SCENE 1 to SCENE 4)
Change the shooting mode (scene file) of the remote camera to match the shooting conditions..
Use the SCENE 1 to SCENE 4 buttons to change the shooting mode..
SCENE 3 button


 SHIFT button
SCENE 1 button SCENE 2 button |
SCENE 4 button |
1.Press the SHIFT button to turn on its indicator..
2.Press one of the SCENE 1 to SCENE 4 buttons..
The indicator of the pressed button turns on and the shooting mode changes..
zzThe names of shooting modes and operation of each mode differ depending on the model of remote camera.. For details, refer to the Operating Instructions for the remote camera..
The following shows the relationship between the SCENE 1 to SCENE 4 buttons on the unit and the shooting modes of the remote camera..
|
|
|
Remote camera shooting mode |
|
||
|
|
|
|
|
|
AW HE870 |
Button on unit |
AW HE120 |
AW HE60 |
|
AK HC1500 |
AW HE100 |
AW E860 |
|
AW E750 |
|||||
|
AW HE50 |
|
AK HC1800 |
|||
|
|
|
|
AW E650 |
||
|
|
|
|
|
|
|
|
|
|
|
|
|
AW E350 |
SCENE 1 |
Scene1 |
Manual1 |
|
CURRENT |
Halogen |
Halogen |
|
|
|
|
|
|
|
SCENE 2 |
Scene2 |
Manual2 |
|
PRESET |
Fluorescent |
Fluorescent |
|
|
|
|
|
|
|
SCENE 3 |
Scene3 |
Manual3 |
|
USER1 |
Daylight |
Outdoor |
|
|
|
|
|
|
|
SCENE 4 |
Scene4 |
FullAuto |
|
USER2 |
User |
User |
|
|
|
|
|
|
|
9

Making image adjustments for the selected remote camera (continued)
Setting an ND filter
The ND filter setting can be configured when the selected remote camera has a built in ND filter..
1. Press the MENU button to turn on its indicator..
2. Open ND FILTER menu [22]..
1.ND FILTER
ND1
3.Turn the F2 dial to select a setting, and then press the F2 dial to confirm the selection..
The settings displayed when you turn the F2 dial differ depending on the model of remote camera connected..
The following shows the menu display on the unit and the setting values of the remote cameras..
|
Remote camera setting values |
|||
|
|
|
AW HE50 |
|
|
|
|
AW HE60 |
|
Menu display |
|
|
AW HE100 |
|
|
AK HC1500 |
AW HE870 |
||
on the unit |
AW HE120 |
AW E860 |
||
AK HC1800 |
||||
|
|
AW E750 |
||
|
|
|
||
|
|
|
AW E650 |
|
|
|
|
AW E350 |
|
|
|
|
(*) |
|
ND1 |
Through |
Clear |
― |
|
|
|
|
|
|
ND2 |
1/4 |
1/4 |
― |
|
|
|
|
|
|
ND3 |
1/16 |
1/16 |
― |
|
|
|
|
|
|
ND4 |
1/64 |
1/64 |
― |
|
|
|
|
|
|
(*) “ND2↓”, “ND3↓”, and “ND4↓” can be displayed by turning the F2 dial but a selection cannot be confirmed by pressing the dial..
Selecting an ND filter with the USER buttons (USER 1 to USER 8)
The ND filter settings “ND1” to “ND4” can be assigned to the USER buttons (USER 1 to USER 8) to enable selection with the buttons..“Assigning functions to the USER buttons” (page 30)
1.Press one of the USER buttons (USER 1 to USER 8)..
The indicator of the selected button turns on and the corresponding ND filter is applied..
10
Operating the OSD menu of a remote camera
To set the advanced settings of a remote camera, operate the menu superimposed on the image output of the remote camera (this menu is referred to as the OSD menu in this manual).. The OSD menu of a connected remote camera can be operated from the unit..
F1 dial 


 CAMERA OSD button
F2 dial |
EXIT button |
1.Hold down the CAMERA OSD button to turn on its indicator..
The OSD menu of the selected remote camera appears and becomes able to be operated from the unit..
2.Operate the OSD menu..
Use the F1 dial, F2 dial, and EXIT button to operate the OSD menu.. Operation differs depending on the model connected..
<Table of operations>
Remote camera |
|
Dial/button operation |
OSD menu operation |
|
AW HE50 |
Turn the F1 dial.. |
zzMoves the items (*1).. |
||
zzSelects a setting (*2).. |
||||
|
|
|||
AW HE60 |
|
|
|
|
Press the F1 dial.. |
Confirms the change to the selected setting.. |
|||
AW HE120 |
||||
Press the EXIT button.. |
Cancels the selected setting.. |
|||
|
||||
|
|
|
|
|
AK HC1500 |
Turn the F1 dial.. |
zzMoves the items (*1).. |
||
AK HC1800 |
zzSelects a setting (*2).. |
|||
|
|
|||
AW HE870 |
|
|
|
|
Press the F1 dial.. |
Confirms the change to the selected setting.. |
|||
|
||||
|
|
|
||
AW E350 |
Turn the F1 dial.. |
Moves the items (*1).. |
||
Press the F1 dial.. |
Confirms the sub menu selection.. |
|||
AW E650 |
||||
AW E750 |
|
|
zzChanges the setting directly (*3).. |
|
AW E860 |
Turn the F2 dial.. |
|||
AW HE100 |
zzConfirms the sub menu selection.. |
|||
|
|
|||
|
|
|
|
|
(*1) Turn clockwise |
|
: Moves the items down.. |
|
|
Turn counterclockwise |
: Moves the items up.. |
|
||
(*2) Turn clockwise |
|
: Changes the setting in the plus (+) direction.. |
||
Turn counterclockwise |
: Changes the setting in the minus (–) direction.. |
|||
(*3) Turning the dial changes the setting and instantaneously reflects the new value on the remote camera..
Turn clockwise |
: |
Changes the setting in the plus (+) direction and confirms the value.. |
Turn counterclockwise |
: |
Changes the setting in the minus (–) direction and confirms the value.. |
3.Hold down the CAMERA OSD button to turn off its indicator..
The menus of the unit become able to be operated..
Notes
zzWhen the unit is operating the OSD menu of a remote camera, the CAMERA OSD button lighting state and OSD menu display state may no longer match and OSD menu operation may not be able to be performed properly if the OSD menu OFF operation is performed for the same remote camera from, for example, another remote camera controller or a wireless remote controller..
In such a case, hold down the CAMERA OSD button on the unit, and after the CAMERA OSD button lighting state (off) and OSD menu display state (OSD menu hidden) match, hold down the CAMERA OSD button again and then perform the operation..
zzIf a camera selection button [CAMERA SELECT/GROUP SELECT] is pressed to switch to another remote camera to control from the unit during the display of the OSD menu of a remote camera, the OSD menu of the remote camera that was selected disappears..
zzFor details on the menu items that are displayed, check the Operating Instructions for the corresponding model..
11

Operating preset memory (PMEM)
The preset memory of a remote camera can be operated from the unit.. The following settings that you have adjusted in advance can be stored in preset memory..
zzPan/tilt positions |
zzLens iris settings (manual iris only) |
zzZoom positions |
zzWhite balance settings |
zzFocus positions |
zzGain |
Notes
zzIf the MEM ENABLE button indicator is off, preset memory operation is not possible.. Press the button to turn on its indicator and then perform operation..
zzPreset numbers PMEM 1 to 10 are also used as start positions when recalling tracing memory.. Preset data may be overwritten by tracing memory operation..
zzThe number of preset memory that can be registered differs depending on the remote camera..
For details, check the Operating Instructions for the corresponding model..
zzThe white balance setting and gain are registered to only the preset memory of AW HE50, AW HE60, and AW HE120..
The white balance setting that is registered is that which results from application of manual R/B gain adjustment to the automatic white balance adjustment..
When the preset memory is recalled, the same color tones as at the time of registration are reproduced but the R/B gain values become 0..
MEM SETTING button
MEM ENABLE button
MEM DELETE button
PMEM button |
MEM STORE button |
PMEM PAGE |
indicators |
PMEM PAGE |
button |
Number buttons |
[1] to [50] |
zzChanging pages
Press one of the number buttons [1] to [50] to directly select any of the 50 preset memory..
Furthermore, pressing the PMEM PAGE button to change pages allows you to operate up to 100 preset memory for each camera..
Button indicator on |
Button indicator on |
Press the PMEM
PAGE button..
Page 1 selected |
|
Page 2 selected |
|
<Preset numbers and registered pages> |
|
|
|
Preset number |
Page number |
Number button |
|
PMEM 1 to PMEM 50 |
Page 1 |
|
[1] to [50] |
PMEM 51 to PMEM 100 |
Page 2 |
|
|
|
|
||
Example: When specifying preset number “PMEM 51”
1..Press the PMEM PAGE button to select Page 2..
2..Press number button [1]..
zzLighting of number button indicators
The lighting method of the number buttons differs depending on the remote camera or pan tilt head that the unit is controlling..
<Lighting method of number button indicators>
Remote cameras and |
Lighting method of number button |
pan tilt heads |
indicators |
AW HE50, AW HE60, |
The indicators of the number buttons with |
AW HE120 |
preset memory registered turn on.. |
AW HE100, AW PH360, |
The indicator of the number button that |
AW PH405, AW PH650, |
was last pressed turns on.. |
AW PH400 |
However, when preset memory is deleted |
|
in DELETE mode, all of the number |
|
buttons turn off.. |
12

Operating preset memory (PMEM) (continued)
Registering preset memory (STORE)
1.Press one of the camera selection buttons [CAMERA SELECT/GROUP SELECT] to select the remote camera to be operated..
2.Output the images to be shot to the monitor..
3.Press the PMEM button to turn on its indicator..
4.Press the MEM STORE button to turn on its indicator..
5.Operate the PAN/TILT lever and ZOOM button to determine the camera angle to register..
If necessary, adjust the focus and iris as well..
6.Hold down a number button to specify the preset number to register..
“STORE COMPLETE” appears on the second line of the LCD panel.. The current camera positions and settings are registered to the preset memory of the remote camera..
zzTo continue registering different camera angles to a preset memory belonging to the same “page number”, repeat steps 5 to 6..
Notes
zzWhen registering preset memory, hold down the number button..
zzIf a number button that already has preset memory registered is held down, the saved data will be deleted as it will be overwritten..
However, if a number button that already has tracing memory registered is held down, “Used by TMEM..” will be displayed on the LCD panel and the corresponding preset memory data will not be overwritten..
Recalling preset memory (RECALL)
1.Press one of the camera selection buttons [CAMERA SELECT/GROUP SELECT] to select the remote camera to be operated..
2.Press the PMEM button to turn on its indicator..
3.Hold down a number button to specify the preset number to recall..
The registered settings are recalled..
zzWhen the indicator of the MEM STORE button or MEM DELETE button is on, preset memory is not recalled when a number button is pressed..
Press the PMEM button or press the MEM STORE button or MEM DELETE button with the indicator turned on to turn off its indicator, and then perform the operation..
Deleting preset memory (DELETE)
1.Press one of the camera selection buttons [CAMERA SELECT/GROUP SELECT] to select the remote camera to be operated..
2.Press the PMEM button to turn on its indicator..
3.Press the MEM DELETE button to turn on its indicator..
4.Hold down a number button to specify the preset number to delete..
“DELETE COMPLETE” appears on the second line of the LCD panel and the registered settings are deleted..
Notes
zzWhen deleting preset memory, hold down the number button.. zzWhen the preset number used with tracing memory is held down, “Used by TMEM..” will be displayed on the LCD panel
and the corresponding preset memory data will not be deleted..
For details on tracing memory, refer to “Deleting tracing memory (DELETE)” (page 20)..
zzIf the above operation is performed when controlling AW PH400 (connected via AW IF400), “DELETE COMPLETE” is displayed on the LCD panel but deletion of the preset memory is not be executed and the registered settings are retained..
13
Operating preset memory (PMEM) (continued)
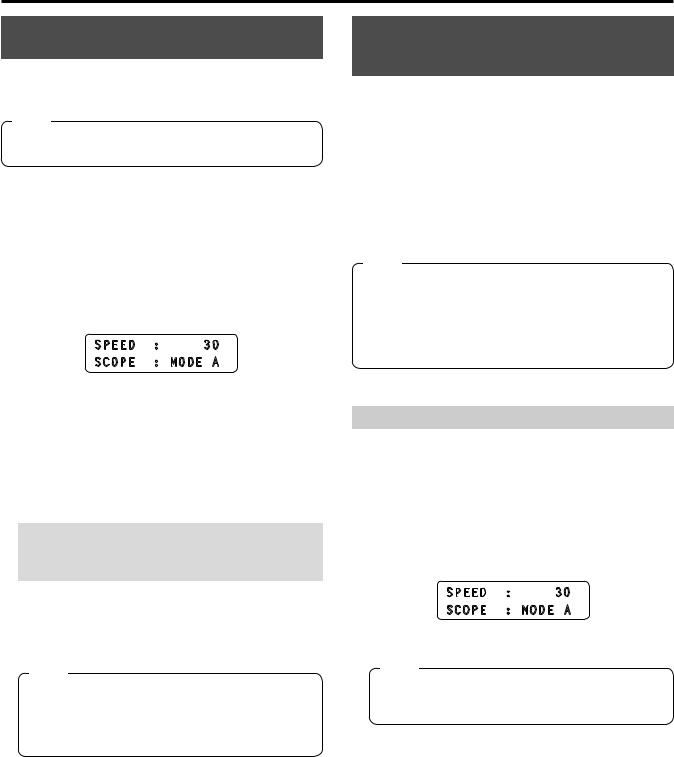
Setting the operation items for when preset memory is recalled (PRESET SCOPE)
You can select whether to recall all or only some of the settings registered to preset memory..
Note
zzThis function is enabled when AW HE50, AW HE60, or AW HE120 is selected..
1.Press one of the camera selection buttons [CAMERA SELECT/GROUP SELECT] to select the remote camera to be operated..
2.Press the PMEM button to turn on its indicator..
3.Press the MEM SETTING button..
The setting of the selected remote camera is displayed..
SPEED : 30
SCOPE : MODE A
zzIf approximately 3 seconds elapses without an operation being performed, the previous LCD panel display is redisplayed..
4.Turn the F2 dial to select a setting for the “SCOPE” item from MODE A to MODE C, and then press the F2 dial to confirm the selection..
The setting of the remote camera is changed..
This is applied the next time the preset memory is recalled..
<SCOPE settings and recalled items>
|
|
Recalled item |
|
|
Setting |
Pan, tilt, zoom, |
Iris |
White balance |
|
settings, |
||||
|
and focus |
|||
|
|
Gain |
||
|
|
|
||
MODE A |
√ |
√ |
√ |
|
MODE B |
√ |
√ |
— |
|
|
|
|
|
|
MODE C |
√ |
— |
— |
√: Recalled —: Not recalled
Note
zzMODE A to MODE C are not registered to the remote camera preset memory or the unit.. The settings become the common settings for when preset memory is recalled, and the same settings are applied regardless of which preset number is selected..
Setting the speed at which to move to the position set in the preset memory (PRESET SPEED)
The speed (PRESET SPEED) at which to move to the set position when preset memory is recalled can be set from the unit..
With this unit, you can select from the following two PRESET SPEED recall modes..
zzMove at the common PRESET SPEED set for the remote cameras.. zzMove at the PRESET SPEED registered for each preset number of
the unit..
This allows the remote cameras to be operated at a different speed for each preset number depending on operation, enabling video playback at a variety of speeds..
Note
zzThe movement speeds registered in the procedure below are registered to the corresponding camera numbers in the unit, and are not registered to the preset memory of the remote cameras.. Therefore, if the recall mode is set to “On” and the preset memory is recalled on a controller other than the AW RP120 on which the movement speed was registered, movement will be at a different speed even in the case of the same preset number..
Setting PRESET SPEED on remote cameras
1.Press one of the camera selection buttons [CAMERA SELECT/GROUP SELECT] to select the remote camera to be operated..
2.Press the PMEM button to turn on its indicator..
3.Press the MEM SETTING button..
The setting of the selected remote camera is displayed..
SPEED : 30
SCOPE : MODE A
zzIf approximately 3 seconds elapses without an operation being performed, the previous LCD panel display is redisplayed..
Note
zzWhen a remote camera other than AW HE50, AW HE60, or AW HE120 is controlled, the last value set for the corresponding remote camera on the unit is displayed..
4. Turn the F1 dial to select the setting of the “SPEED” item, and then press the F1 dial to confirm the selection..
The PRESET SPEED value is set on the remote cameras..
The following shows the relationship between the set value and the speed at which the remote camera moves to the set position when preset memory is recalled..
1 
 30 Slow Fast
14

Operating preset memory (PMEM) (continued)
Registering PRESET SPEED on the unit
To register the PRESET SPEED value to a preset number of the unit, perform the following steps after the previous procedure..
5.Press the MEM STORE button to turn on its indicator..
6.Hold down a number button to specify the preset number to register..
The current remote camera settings are registered to preset memory, and PRESET SPEED is registered to the unit..
zzTo continue registering a different PRESET SPEED value to a
preset memory belonging to the same “page number”, repeat steps 3 → 4 → 6..
Setting the PRESET SPEED recall mode
1.Press the MENU button to turn on its indicator..
2.Open CAMERA SETUP menu [24]..
3.Turn the F1 dial to display the “3. RECALL PST SPD” item..
3.RECALL PST SPD
Off
4.Turn the F2 dial to select the recall mode, and then press the F2 dial to confirm the selection..
Off |
: Recalling preset memory moves the remote cameras at the |
|
speed of the PRESET SPEED values set on the remote |
|
cameras.. |
On |
: Recalling preset memory moves the remote cameras at the |
|
speed of the PRESET SPEED value registered for each |
|
preset number on the unit.. |
15
Operating preset memory groups (PMEM GROUP)
The unit allows you register up to four “preset memory groups” created by selecting one preset memory for each of multiple remote cameras.. Pressing any of the PM GRP 1 to PM GRP 4 buttons simultaneously recalls all preset memory registered to the corresponding preset memory group..
The following setting procedures use the example of setting PMEM GROUP1 but the setting procedures are the same for PMEM GROUP2 to PMEM GROUP4..
Open the following menus and configure the settings..
<Preset memory groups and menu numbers>
Preset memory group |
Menu |
|
|
PMEM GROUP1 |
PM GRP1 menu [31] |
PMEM GROUP2 |
PM GRP2 menu [32] |
|
|
PMEM GROUP3 |
PM GRP3 menu [33] |
PMEM GROUP4 |
PM GRP4 menu [34] |
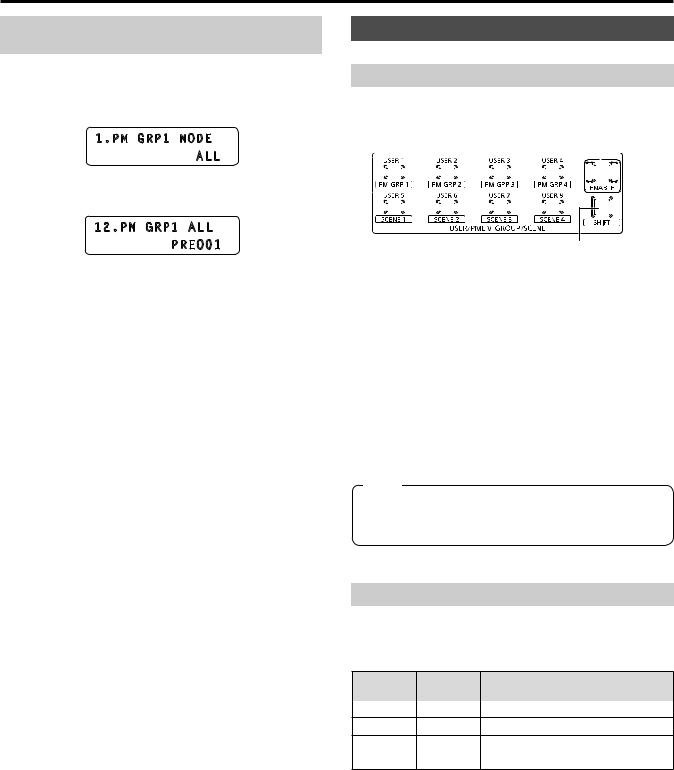
Setting the operation mode (SEPARATE/ ALL)
1. Press the MENU button to turn on its indicator..
2. Open PM GRP1 menu [31]..
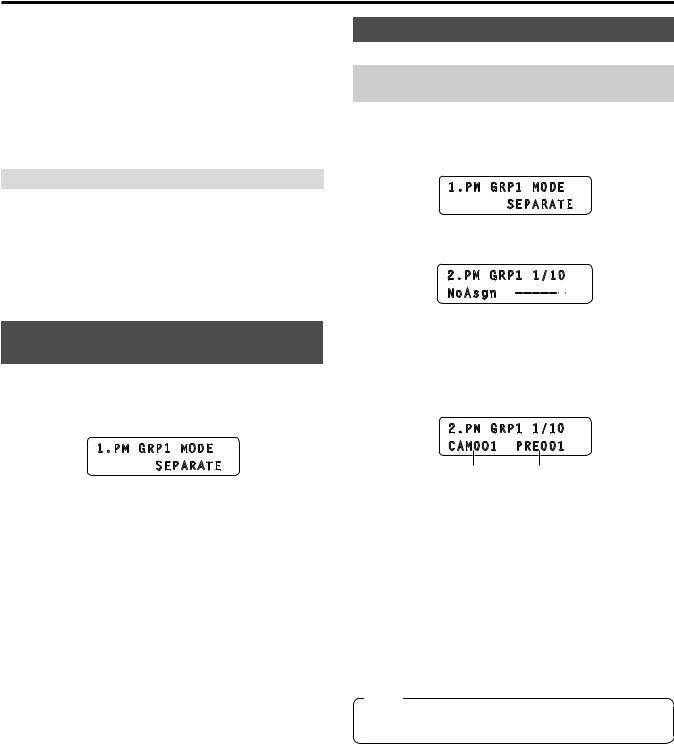
1.PM GRP1 MODE SEPARATE

3.Turn the F1 dial to display the “1. PM GRP1 MODE” item..
4.Turn the F2 dial to select the operation mode, and then press the F2 dial to confirm the selection..
OFF |
: Disables group creation.. |
|
Even if you press any of the PM GRP1 to PM GRP4 |
|
buttons, a preset memory group will not be recalled.. |
SEPARATE : Allows you to create a group by selecting a different
|
preset number from each remote camera.. |
|
Up to ten preset numbers can be registered to one |
|
group.. |
ALL |
: Allows you to create a group by selecting the same |
|
preset number from each remote camera.. |
|
One preset number for each of all the remote |
|
cameras registered to the unit can be registered to |
|
one group.. |
Creating preset memory groups
Registering the preset memory to recall when in SEPARATE mode
1. Press the MENU button to turn on its indicator..
2. Open PM GRP1 menu [31]..
1.PM GRP1 MODE SEPARATE

3. Turn the F1 dial to display the “2. PM GRP1 1/10” item..
2.PM GRP1 1/10 NoAsgn ——————
4.Turn the F2 dial to set the camera number and preset number to register to PMEM GROUP1..
If you turn the F2 dial to select the camera number and then press the F2 dial to confirm the selection, you will then be able to select the preset number..
Set the preset number in the same way as the camera number..
2.PM GRP1 1/10 CAM001 PRE001
Camera number Preset number
Camera number : Select from NoAsgn and CAM001 to CAM100.. When “NoAsgn” is set, preset memory is not registered..
Preset number : Select from PRE001 to PRE100..
5.Turn the F1 dial to display the “3. PM GRP1 2/10” to “11. PM GRP1 10/10” items..
6.Register the camera numbers and preset numbers.. zzConfigure the settings in the same way as step 4..
zzUp to ten preset memory can be registered to one group..
Note
zzDo not set the same camera number two or more times for one preset memory group..
16
Operating preset memory groups (PMEM GROUP) (continued)
Registering the preset memory to recall when in ALL mode
1. Press the MENU button to turn on its indicator..
2. Open PM GRP1 menu [31]..
1.PM GRP1 MODE ALL
3. Turn the F1 dial to display the “12. PM GRP1 ALL” item..
12.PM GRP1 ALL PRE001
4.Turn the F2 dial to select a preset number, and then press the F2 dial to confirm the selection..
Recalling preset memory groups
Pressing a button to recall a preset memory group
Use PM GRP 1 to PM GRP 4 to recall preset memory groups..
PM GRP 1 to PM GRP 4 buttons |
USER ENABLE button |
|||||||||||||||
|
|
|
|
|
|
|
|
|
|
|
|
|
|
|
|
|
|
|
|
|
|
|
|
|
|
|
|
|
|
|
|
|
|
|
|
|
|
|
|
|
|
|
|
|
|
|
|
|
|
|
|
|
|
|
|
|
|
|
|
|
|
|
|
|
|
|
|
|
|
|
|
|
|
|
|
|
|
|
|
|
|
|
|
|
|
|
|
|
|
|
|
|
|
|
|
|
|
|
|
|
|
|
|
|
|
|
|
|
|
|
|
|
|
|
|
|
|
|
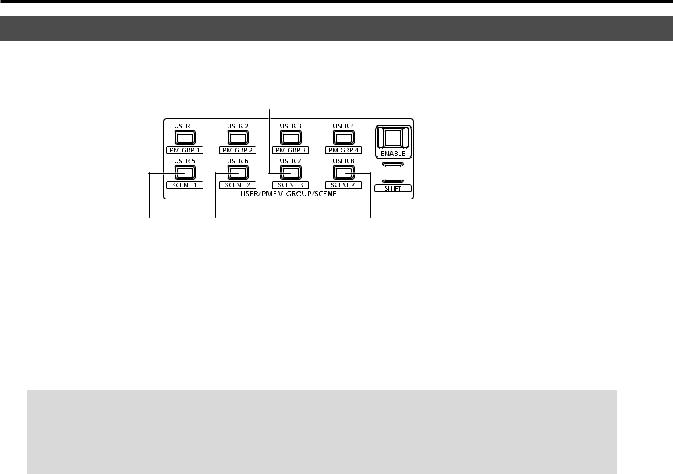
SHIFT button
1.Press the SHIFT button to turn on its indicator..
2.Press the PM GRP 1 button..
When the operation mode of PMEM GROUP1 is “SEPARATE”:
Simultaneously recalls each remote camera preset memory registered to the “2. PM GRP1 1/10” to “11. PM GRP1 10/10” items..
When the operation mode of PMEM GROUP1 is “ALL”:
The preset memory registered in the “12. PM GRP1 ALL” item is recalled for all of the remote cameras registered to the unit.. zzPreset memory is not recalled for a remote camera for which
“NoAsign” is set in CTRL TYPE menu [36]..
Note
zzIf the USER ENABLE button indicator is off, operation of the PM GRP 1 to PM GRP 4 buttons is not possible.. Perform operation while the button indicator is on..
Recalling a preset memory group by GPI input
A preset memory group can be recalled by contact input of the TALLY/ GPI connector on the rear panel of the unit..
<PIN numbers and preset memory groups>
Pin number |
Signal |
Corresponding preset memory group |
|
name |
|||
|
|
||
19 |
GPI IN 1 PMEM GROUP 1 |
||
7GPI IN 2 PMEM GROUP 2
20 |
GPI IN 3 |
PMEM GROUP 3 |
|
|
|
8 |
GPI IN 4 |
PMEM GROUP 4 |
“Control interface for external devices” (page 43)
17
Operating tracing memory (TMEM)
The unit incorporates tracing memory (TMEM) for recording a series of operations that were performed for a connected remote camera..
This feature allows you to duplicate the recorded operations of a remote camera..
<Tracing memory>
Recording target |
Camera numbers CAM1 to CAM10 |
Functions that |
Pan, tilt, zoom, focus, iris, and white balance |
can be recorded |
mode |
Recording time |
Up to 5 minutes per camera |
Number of |
Up to 10 per camera |
recording |
|
memory |
|
Record buttons |
Number buttons [1] to [10] |
Notes
zzIf the MEM ENABLE button indicator is off, tracing memory operation is not possible.. Perform operation while the button indicator is on..
zzPreset numbers PMEM 1 to 10 of the preset memory are used as start positions at the time of recalling tracing memory so they are overwritten when the tracing memory registration operation is performed..
zzThe last point when tracing memory is recalled may not match that at the time of recording because of the error of movement of the remote camera..
Taking precautions such as the following can help reduce the error..
•Use the lens zoom at the WIDE side (wide angle end)..
•Perform pan, tilt, zoom, and focus operations slowly..
•Set a short recording time..
Execute tracing memory recalling several times to sufficiently check the operation of the remote camera before you begin operation..
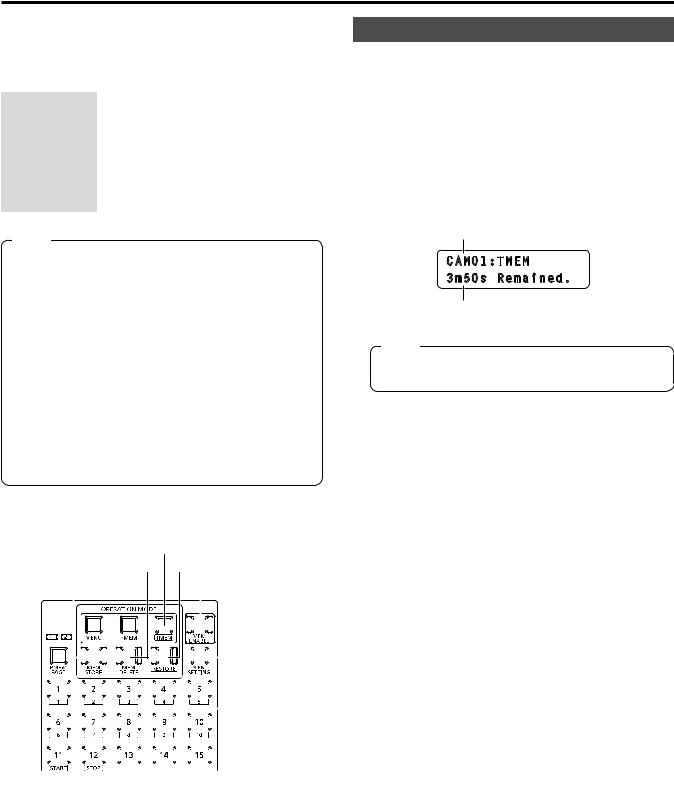
<Tracing memory operation section>
TMEM button
MEM DELETE button |
RESTORE button |
MEM STORE button |
MEM ENABLE button |
|
|
|
|
|
|
|
|
|
|
|
|
|
|
|
|
|
|
|
|
|
|
|
|
|
|
|
|
|
|
|
|
|
|
|
|
|
|
|
|
|
|
|
|
|
|
|
|
|
|
|
|
|
|
|
|
|
|
|
|
|
|
|
|
|
|
|
|
|
|
|
|
|
|
|
|
|
|
|
|
|
|
|
|
|
|
|
|
|
|
|
|
|
|
|
|
|
|
|
|
|
|
|
|
|
|
|
|
|
|
|
|
|
|
|
|
|
|
|
|
|
|
|
|
|
|
|
|
|
|
|
|
|
|
|
|
|
|
|
|
|
|
|
|
|
|
|
|
|
|
|
|
|
|
|
|
|
|
|
|
|
|
|
|
|
|
|
|
|
|
|
|
|
|
|
|
|
|
|
|
|
|
|
|
|
|
|
|
|
|
|
|
|
|
|
|
|
|
|
|
|
|
|
|
|
|
|
|
|
|
|
|
|
|
|
|
|
|
|
|
|
|
|
|
|
|
|
|
|
|
|
|
|
|
|
|
|
|
|
|
|
|
|
|
|
|
|
|
|
|
|
|
|
|
|
|
|
|
|
|
|
|
|
|
|
|
|
|
|
|
|
|
|
|
|
|
|
|
|
|
|
|
|
|
|
|
|
|
|
|
|
|
|
|
|
|
|
|
|
|
|
|
|
|
|
|
|
|
|
|
|
|
|
|
|
|
|
|
|
|
|
|
|
|
|
|
|
|
|
|
|
|
|
|
|
|
|
|
|
|
|
|
|
|
|
|
|
|
|
|
|
|
|
|
|
|
|
|
|
|
|
|
|
|
|
|
|
|
|
|
|
|
|
|
|
|
|
|
|
|
|
|
|
|
|
|
|
|
|
|
|
|
|
|
|
|
|
|
|
START button [11] |
|
Number buttons [1] to [10] |
|
|||||||||||||||||
|
|
|
|
|
|
|
|
|
|
|
|
|
|
|
|
|
|
|
|
|
|
|
|
|
|
|
|
STOP button [12] |
|
|
|
MEM SETTING button |
|||||||||
Registering tracing memory (STORE)
1.Press one of the camera selection buttons [CAMERA SELECT/GROUP SELECT] to select the remote camera to be operated..
2.Output the images to be shot to the monitor..
3.Press the TMEM button to turn on its indicator..
The tracing memory status appears..
The indicators of number buttons with registered tracing memory turn on..
Selected camera number
CAM01:TMEM
3m50s Remained.
Remaining possible recording time (max.. 5 m 00 s)
Note
zzA button with no tracing memory registered does not turn on even when it is a button with preset memory registered..
4.Press the MEM STORE button to turn on its indicator..
5.Operate the PAN/TILT lever and ZOOM button to determine the camera angle to register..
If necessary, adjust the focus, iris, and white balance as well..
zzTo record the focus operation and iris operation to tracing memory, press the auto focus button and auto iris button to turn off their indicators and then perform the operations..
18
 Loading...