


bb-hcm110
Table of contents
 Loading...
Troubleshooting
Network Camera
Model No.
KX-HCM110A
Table of Contents
Trademarks .......................................................................... 2
Abbreviations....................................................................... 2
Troubleshooting................................................................... 3
Indicator Error Codes ................................................................................ 3
Camera Setup Difficulties.......................................................................... 4
Camera Image/Page Display..................................................................... 7
Operation Bar .......................................................................................... 13
Audio Problems ....................................................................................... 14
Image Buffer/Image Transfer ................................................................... 18
IPv6 ......................................................................................................... 19
IPsec ....................................................................................................... 20
Miscellaneous ......................................................................................... 22

Troubleshooting
2
Trademarks
• Microsoft, Windows and ActiveX are either registered trademarks or
trademarks of Microsoft Corporation in the United States and/or other
countries.
• All other trademarks identified herein are the property of theirrespective
owners.
• This software is based in part on the work of the Independent JPEGGroup.
Abbreviations
• UPnP is the abbreviation for "Universal Plug and Play".
• "Network Camera" is called "Camera" in this manual.

Troubleshooting
[For assistance, please call: 1-800-272-7033] 3
Troubleshooting
The Panasonic Network Camera support website "http://panasonic.co.jp/pcc/
products/en/netwkcam/" includes various technical information other than the
contents in this troubleshooting section. Access it if problems occur.
Indicator Error Codes
Problem Cause and Remedy
Indicator lights
or blinks orange.
• Ethernet cable is not connected properly.
Connect the Ethernet cable properly.
• PC, Ethernet hub or router is not working.
Confirm that PC, Ethernet hub and router is working.
Indicator
continues
blinking orange.
• Indicator blinks orange when updating firmware.
If you access the camera on the web browser, Update
Firmware page will be displayed. Update the firmware
following the procedure (see page
137 of the Operating
Instructions on the Setup CD-ROM). If you fail to update the
firmware, see page 22.
Indicator
continues
blinking orange
(2-second
interval).
• The router on your network is turned off.
Turn the router on, and wait for a while until the ADSL line is
connected.
• An error occurs in UPnP
TM
port forwarding.
Set up the camera again in [Automatic Setup] by the Setup
Program following the procedures shown on the Getting
Started.
Indicator
continues
blinking green.
• Automatic setup is not complete.
Complete the setup following the Getting Started.
• The camera did not get its IP address from the DHCP server.
When setting [Automatic Setup] or [DHCP Setup], the
camera may not get its IP address due to network failures.
Ask your ISP or network administrator for more information.

Troubleshooting
4
Camera Setup Difficulties
Note
If you are experiencing any problems, it is recommended that you
temporarily disable all firewall, pop-up killer, and virus detection
software. Once the problem is identified and corrected, you can restart
the Setup Program.
Indicator does
not light up.
• Indicator display is disabled.
Check if the indicator control is disabled (see page 133 of the
Operating Instructions on the Setup CD-ROM).
• Confirm that the standard AC adaptor PQLV202 (Order No.
PQLV202Y) is being used.
Indicator
continues
blinking red.
• The camera may be malfunctioning.
If you cannot access the camera, the camera may be
malfunctioning. Call our customer call center.
Problem Cause and Remedy
Automatic Setup
fails using Setup
Program.
• More than 20 minutes have passed, after turning the camera
on.
Disconnect the plug of the AC cord from the outlet, and
reconnect it again. Set up the camera again.
• Multiple camera IP addresses are overlapping.
If you install multiple cameras, turn the camera on one by
one.
• A problem occurs during the setup.
After confirming that the network is active, disconnect the
plug of the AC cord from the outlet, and reconnect it again.
And set up the camera again.
Viewnetcam.com
registration fails
using Setup
Program.
• If you do not receive an E-mail from the Viewnetcam.com
service, your registered E-mail address may be incorrect.
Register your correct E-mail address again at the
Viewnetcam.com website at
http://www.viewnetcam.com.
Problem Cause and Remedy

Troubleshooting
[For assistance, please call: 1-800-272-7033] 5
DynamicDNS
registration fails
using Setup
Program.
• The router-connected PC has failed to access the Internet.
Refer to the router's manual and try to connect to the
Internet through your PC. Once Internet connection has
been confirmed, you can register to DynamicDNS.
Setup Program
does not list any
cameras.
• Your firewall or antivirus software is blocking the connection.
To avoid any possible problems, temporarily disable any
firewall or antivirus software, and set up the camera again.
If you cannot disable your firewall or antivirus software, you
can set up the camera using the MAC address (see the
Getting Started).
• The camera is connected over a different network.
Set up the camera from a PC under the same router.
• Confirm that an IP address is assigned to your PC.
If the IP address is not assigned to your PC, assign it to your
PC (see page 159 of the Operating Instructions on the
Setup CD-ROM).
Setup Program
fails to complete
successfully.
• Network problems may occur during setup.
Confirm that your network is working. Disconnect the plug
of the AC cord from the outlet, and reconnect it again. Then
set up the camera again.
UPnP
TM
port
forwarding setup
fails.
• UPnP
TM
is disabled on the router.
Enable UPnP
TM
on the router following the router manual.
• The camera is turned on before the router is turned on.
Turn the router on first, and then turn the camera on.
• The default gateway is not set, or the settings are wrong.
Set the default gateway correctly (see page 43 or page 48
of the Operating Instructions on the Setup CD-ROM).
• The router does not support UPnP
TM
.
Enable port forwarding on your router following the router
manual.
Problem Cause and Remedy

Troubleshooting
6
The camera IP
address and port
number have
been forgotten.
• Clicking [Camera Setup] on the Setup Program displays the
camera list. The camera list shows the MAC address labeled
beside the Ethernet (LAN) port. The camera IP address and
port number are shown next to the MAC address.
The password
has been
forgotten.
• Press the FACTORY DEFAULT RESET button to reset the
camera to default. Set up the camera again.
Error is displayed
on the camera
status by the
Setup Program.
• The Setup Program causes the error message.
Disconnect the plug of the AC cord from the outlet, and
reconnect it again.
Problem Cause and Remedy
Troubleshooting
[For assistance, please call: 1-800-272-7033] 7
Camera Image/Page Display
Problem Cause and Remedy
The Top page is
not displayed.
• The camera IP address has changed.
Enter the correct IP address in the address bar of the web
browser.
• You entered IPv6 address in the Internet Explorer.
Internet Explorer does not support IPv6 address access. Use
DynamicDNS services like Viewnetcam.com service.
• The network is congested.
Pages may not be displayed immediately. Wait for a while.
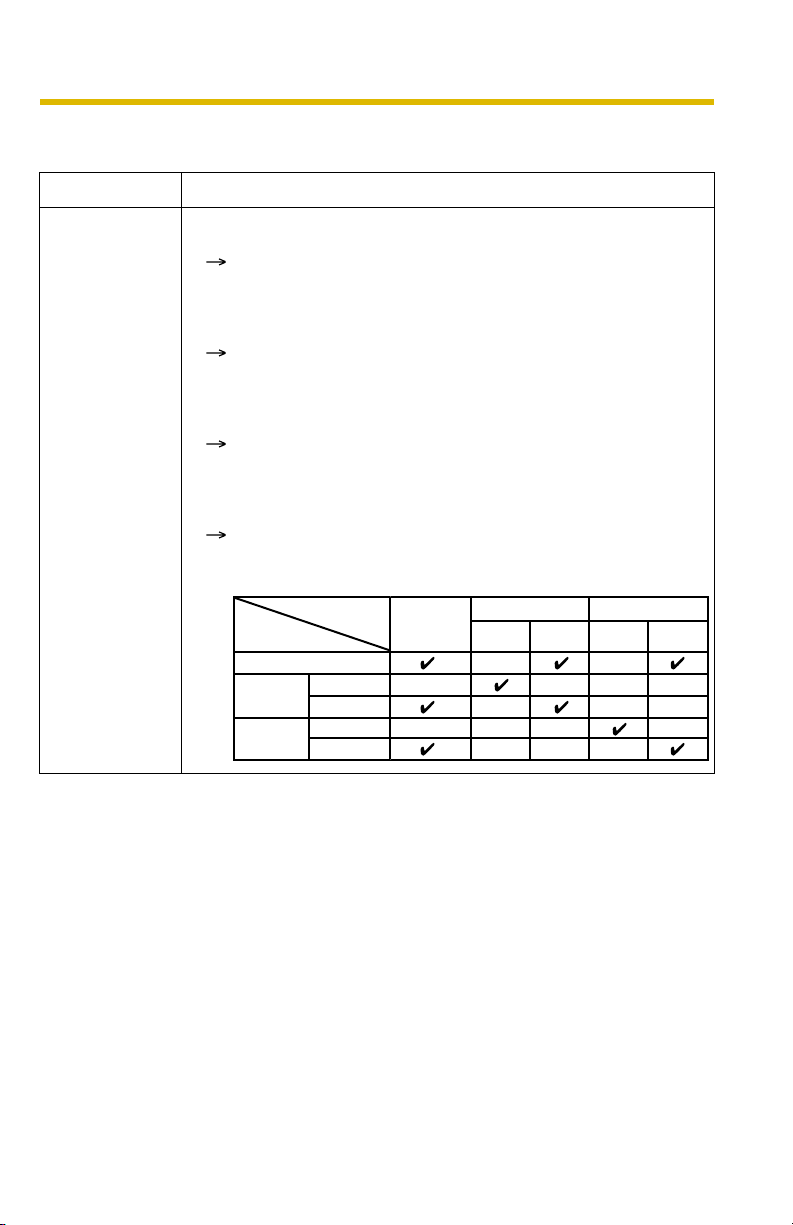
• The connection type is wrong (see page 47 or page 51 of the
Operating Instructions on the Setup CD-ROM).
If the camera is not connected to the network in the [Auto
Negotiation] setting, set up the camera and the router seeing
the following table.
Auto Negotiation
Network Camera
Router or hub
Auto
Negotiation
100Base-TX
10Base-TX
Full
Duplex
Half
Duplex
Full
Duplex
Half
Duplex
100Base-
TX
10Base-T
Full Duplex
Half Duplex
Full Duplex
Half Duplex
—
—
—
—
—
—
—
—
—
—
—
—
—
—
——

Troubleshooting
8
The Top page is
not displayed on
the LAN.
• The connected router does not have a loopback feature.
Access the camera with the local network IP address.
• The wrong IP address class is assigned to the camera.
If you access the camera on the LAN, the PC IP address and
the camera IP address must be set in the same class. Set the
camera IP address same as the class of the PC IP address
(see page
159 of the Operating Instructions on the Setup
CD-ROM).
• The web browser is accessing the proxy server.
Set the web browser to access the Internet directly (see page
164 of the Operating Instructions on the Setup CD-ROM).
• You access the camera on the same LAN by entering the
registered URL (or the router's global IP address) with the
DynamicDNS service.
To access the camera on the same LAN, use the address for
the local network address.
Problem Cause and Remedy
Loading...