


 Loading...
User Guide
Nokia 208 Dual SIM
Issue 1.0 EN

User Guide
Nokia 208 Dual SIM
Contents
Safety |
3 |
Take a self-portrait |
19 |
Get started |
4 |
Send a photo or video |
20 |
Keys and parts |
4 |
Maps & navigation |
21 |
Insert a SIM card and battery |
4 |
Find nearby places |
21 |
Insert a second SIM card |
6 |
Internet |
22 |
Insert a memory card |
6 |
Browse the web |
22 |
Charge the battery |
7 |
Add a website to your favourites |
22 |
Set which SIM card to use |
8 |
Office |
23 |
Copy content from your old phone |
8 |
Add a calendar entry |
23 |
Basics |
10 |
Change the time and date |
23 |
Explore your phone |
10 |
Set an alarm |
23 |
Display indicators |
11 |
Nokia Life |
24 |
Prolong battery life |
11 |
Phone management & connectivity |
25 |
Personalise your home screen |
12 |
Share your content using Slam |
25 |
Change your ringtone |
12 |
Back up content to a memory card |
25 |
Set a song as your ringtone |
12 |
Restore original settings |
26 |
Nokia Store |
13 |
Update your phone software |
26 |
Write text |
13 |
Access codes |
26 |
People & messaging |
14 |
Product and safety information |
28 |
Make or answer a call |
14 |
|
|
Save a name and phone number |
14 |
|
|
Send a message |
15 |
|
|
Check your voice mail |
15 |
|
|
Mail for Exchange |
16 |
|
|
Set up your mail account |
16 |
|
|
Send a mail |
17 |
|
|
Get social |
17 |
|
|
Chat with your friends |
18 |
|
|
Camera |
19 |
|
|
Take a photo |
19 |
|
|
© 2013 Nokia. All rights reserved. |
2 |
|

Safety
Read these simple guidelines. Not following them may be dangerous or illegal. For further info, read the complete user guide.
SWITCH OFF IN RESTRICTED AREAS
Switch the device off when mobile phone use is not allowed or when it may cause interference or danger, for example, in aircraft, in hospitals or near medical equipment, fuel, chemicals, or
blasting areas. Obey all instructions in restricted areas.
ROAD SAFETY COMES FIRST
Obey all local laws. Always keep your hands free to operate the vehicle while driving. Your first consideration while driving should be road safety.
INTERFERENCE
All wireless devices may be susceptible to interference, which could affect performance.
QUALIFIED SERVICE
Only qualified personnel may install or repair this product.
BATTERIES, CHARGERS, AND OTHER ACCESSORIES
Use only batteries, chargers, and other accessories approved by Nokia for use with this device. Do not connect incompatible products.
KEEP YOUR DEVICE DRY
Your device is not water-resistant. Keep it dry.
PROTECT YOUR HEARING
To prevent possible hearing damage, do not listen at high volume levels for long periods. Exercise caution when holding your device near your ear while the loudspeaker is in use.
SAR
This device meets RF exposure guidelines when used either in the normal use position against the ear or when positioned at least 1.5 centimetres (5/8 inch) away from the body. The specific maximum SAR values can be found in the Certification Information (SAR) section
of this user guide. For more info, go to www.sar-tick.com.
When a carry case, belt clip or other form of device holder is used for body-worn operation, it should not contain metal and should provide at least the above-stated separation distance from the body. Note that mobile devices may be transmitting even if you are not making a voice call.
© 2013 Nokia. All rights reserved. |
3 |
|

Get started
Get to grips with the basics, and have your phone up and running in no time.
Keys and parts
Explore the keys and parts of your new phone.
1 Audio connector (3.5 mm AHJ)
2 Micro-USB connector
3 |
Scroll key. Also used to change the volume. |
|
Press the key up or down. |
2 |
|
4 |
End/Power key |
|
5 Microphone
6 Call key
7 Selection keys
8 Earpiece
9 Camera lens. Before using the camera, remove the protective tape from the lens.
10 Back cover release button
11 Antenna area
Avoid touching the antenna area while the antenna is in use. Contact with antennas affects the communication quality and may reduce battery life due to higher power level during operation.
Do not connect products that create an output signal, as this may damage the device. Do not connect any voltage source to the audio connector. If you connect an external device or headset, other than those approved for use with this device, to the audio connector, pay special attention to volume levels.
Tip: Lock the keys when not using your phone. Select Menu, and press *. To unlock, select Unlock, and press *.
Your phone uses S40 software.
The images in this guide may differ from your device screen.
Insert a SIM card and battery
Learn how to insert a SIM card and the battery.
The SIM1 holder under the battery can be used for both 3G and 2G SIMs.The SIM2 slot on the right edge of the phone can only be used for 2G SIMs.
1. Press the release button, and lift and remove the back cover.
Note: Switch the device off and disconnect the charger and any other device before removing any covers. Avoid touching electronic components while changing any covers. Always store and use the device with any covers attached.
© 2013 Nokia. All rights reserved. |
4 |
|

2.If the battery is in the phone, lift it out.
3.Lift the cover of the SIM1 holder, and put the SIM in, contact area face down.
Important: This device is designed to be used with a mini-UICC SIM card, also known as a microSIM card only. A micro-SIM card is smaller than the standard SIM card. Use of incompatible SIM cards, or use of SIM card adapters, may damage the card or the device, and may corrupt data stored on the card.
4.Line up the battery contacts, and put the battery in.
5.Press the back cover down until it locks into place. To switch the phone on, press and hold the power key  until the phone vibrates.
© 2013 Nokia. All rights reserved. |
5 |
|
Insert a second SIM card
You can easily add a second SIM card (SIM2) without removing the battery. 1. Press the release button, and lift and remove the back cover.
Note: Switch the device off and disconnect the charger and any other device before removing any covers. Avoid touching electronic components while changing any covers. Always store and use the device with any covers attached.
If you only have one SIM card, put the card into the SIM1 card holder. Some features and services may only be available when using the SIM card in the SIM1 card holder. If there is a SIM card only in the SIM2 card holder, you can only make emergency calls.
Both SIM cards are available at the same time when the device is not being used, but while one SIM card is active, for example, making a call, the other is unavailable.
2.Push the SIM in with the contact area face down until it locks into place. The SIM2 slot can only be used for 2G SIMs.
3.To remove the SIM, push the card in until it's released, then pull it out.
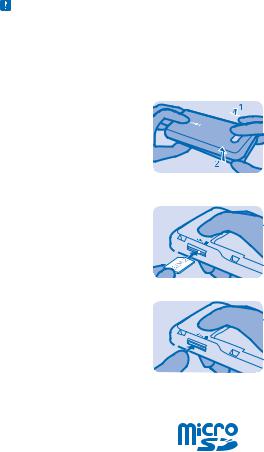
Insert a memory card
Read on to learn how to insert a memory card into your phone.
© 2013 Nokia. All rights reserved. |
6 |
|

Use only compatible memory cards approved for use with this device. Incompatible cards may damage the card and the device and corrupt data stored on the card.
1. Press the release button, and lift and remove the back cover.
Note: Switch the device off and disconnect the charger and any other device before removing any covers. Avoid touching electronic components while changing any covers. Always store and use the device with any covers attached.
2.Push the card in with the contact area face down until it locks into place.
3.To remove, push the card in, until it is released.
Important: Do not remove the memory card when an app is using it. Doing so may damage the memory card and the device and corrupt data stored on the card.
Charge the battery
Your battery has been partially charged at the factory, but you may need to recharge it before you can use your phone.
1. Plug the charger into a wall outlet.
© 2013 Nokia. All rights reserved. |
7 |
|

2. Connect the charger to the phone. When done, unplug the charger from the phone, then from the wall outlet.
If the battery is completely discharged, it may take several minutes before the charging indicator is displayed or before any calls can be made.
Tip: You can use USB charging when a wall outlet is not available. Data can be transferred while charging the device. The efficiency of USB charging power varies significantly, and it may take a long time for charging to start and the device to start functioning.
Set which SIM card to use
You can set the default SIM card to use to make a call, send a message, or connect to the internet. If you name your SIMs, you can see at a glance which is, for example, for work and which is for personal use.
1.Select Menu > SIM mgr..
2.To decide every time which SIM to use, select Ask every time.
3.Select SIM1 or SIM2 to set which SIM to use for which connection.
Rename your SIM card
Select Options > Rename.
Copy content from your old phone
Easily get your contacts, calendar entries, and other stuff to your new phone.
1. Switch Bluetooth on in both phones. To switch Bluetooth on on your new phone, select Menu >
Settings > Connectivity > Bluetooth.
© 2013 Nokia. All rights reserved. |
8 |
|
2.On your new phone, select Menu > Settings > Sync & backup > Copy from dev..
3.Select what you want to copy, then select Done.
4.Choose your old phone from the list of found devices.
5.If asked, create a one-time passcode (such as 123), and select OK.
6.Check that the codes match on both phones.
7.Follow the instructions shown on both phones.
© 2013 Nokia. All rights reserved. |
9 |
|

Basics
Learn how to get the most out of your new phone.
Explore your phone
Explore your phone with a simple key press.
1. To see the apps and features of your phone, press Menu.
Menu
2.To go to an app or feature, press the scroll key up, down, left, or right.
3.To open the app or select the feature, press Select.
Select
4. To go back to the previous view, press Back.
Back
5. To go back to the home screen, press  .
.
© 2013 Nokia. All rights reserved. |
10 |
|
Loading...