


239
Table of contents
 Loading...
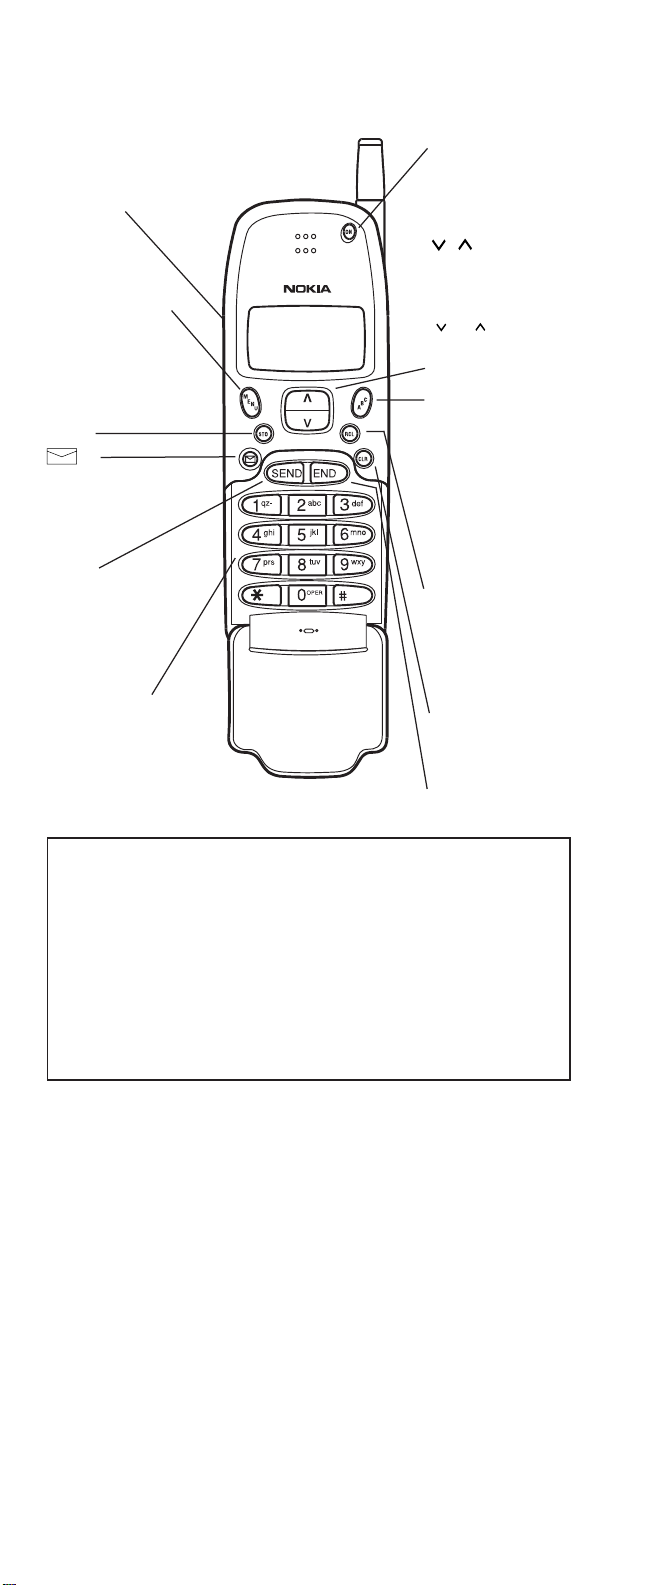
DESCRIPTION OF KEYS
Use the phone keys as follows:
For your information...
To install/charge the battery: ...................................................See page 8/9
To switch on:..............................................................................See page 10
To make a call:...........................................................................See page 11
To make an emergency call:.....................................................See page 13
To view your own number:....................................................... Press RCL 99
When using your phone in a call:
• Hold the phone to your ear, and speak normally; there is no need to move
the phone to your mouth.
In this owner’s manual:
• Keypresses are indicated in a bold typeface, e.g. MENU
.
• Display messages are indicated in an
italic
typeface, e.g.
CALL.
ON
Press and hold to
switch the phone on
or off.
ABC
Selects alpha mode/
number mode; press
once to select alpha
mode (i.e. to enter
characters or display
names), and press
again to select
number mode.
Scrolls the memory
locations. After
pressing MENU,
or scrolls the
menus and displays
options.
RCL
Recalls information
from a memory location. If the display is
full, shows hidden
digits.
CLR
Deletes characters
and clears display.
On the side of phone:
i and j
Select earpiece
volume.
MENU
Selects menu mode.
STO
Stores information in a
memory location. In a
menu, confirms a
setting.
Dials voicemail or
favorite number
stored in memory
location 98.
0 to 9,*and #
Enter numbers and
characters.
9 (for emergency
calls),
*
and # are also
used for one-touch
dial
ing.
SEND
Dials a number.
Pressing MENU SEND
in a call can send
DTMF data.
END
Ends a call.
9351288 NOKIA 239 english PRINTED IN CANADA

QUICK GUIDE
Adjust Volume Press to ∆ increase and ∇ to
(during a call) decrease the volume
Clear a digit Press the CLR key
Clear display Press and hold the CLR key
Ending a Call Press the END key
Last number redial Ensure the display is clear and press SEND
Making a call Key in the area code and phone
number and press the SEND key
Receiving a call Press any key except ON or the
volume keys
Switching on/off Press and hold the ON key
Memory Functions
9 Key Emergency Call Press and hold the 9 key
Displaying your own Press RCL 99
number
One-touch dialing Simply press any one of these keys to
dial the associated number
(#,
*
, 9, )
Search for a name Press ABC and then or
Search for a number Press or (with a clear display)
Speed dialing Key in the location number and press the
SEND key
The Menu Facility
Enter function Press the STO key
Enter menu facility Press the MENU key
Exit menu facility Press the CLR key
Menu shortcut Press the MENU key and then the
function shortcut number (listed on the
flip-side of this card)
Scroll Press to scroll forward and to
scroll backward
Select option Press the STO key

LIST OF MENU FUNCTIONS
Menu Name Shortcut Keys Description
LOCK PHONE MENU 0 (L) Locks/unlocks the phone.
SYSTEM SELECT MENU 1 Selects roaming mode
(system feature).
RINGING TYPE MENU 2 Selects the ringing tone type.
CALL TIMERS MENU 3 Displays length of calls.
(S) Resets the timers.
LIGHTS CONTROL MENU 4 Selects operation of
display and keypad lights.
KEYPAD TONES MENU 5 Switches keypad tones on/off.
RINGING VOLUME MENU 6 Selects volume of ringing tone.
NAM SELECT MENU 7 Displays and selects
cellular number/network.
AUTO ANSWER MENU 8 Sets automatic answer on/off.
ACCESSORY MENU MENU 9 Controls accessories
connected to the phone.
CLEAR LAST CALL MENU 1 0 Sets the last-called numbers to
be cleared or retained when
phone is switched off.
CHANGE LOCK CODE MENU 1 1(S) Allows you to change lock code.
DATA MODE MENU 1 2 Selects data mode (in a call).
EMERGENCY 9 KEY MENU 1 3 (L) Sets 9 key on/off for one-touch
dialing of emergency calls.
CALL BARRING MENU 1 4 (S) Sets call restrictions.
MEMORY LOCK MENU 1 5 (S) Sets memory access
restrictions.
ACTIVATE KEYGUARD MENU ABC Locks/unlocks the keypad.
or MENU 1 6
SEND DTMF MENU SEND Sends DTMF tones (in a call).
or MENU 1 7
SID SCREEN MENU 1 8 (L) Selects SID to on/off.
(L) = requires entry of 4-digit lock code (default is 1234).
(S) = requires entry of 5-digit security code (default is 12345).

1
CONTENTS
Important Safety Information...................... 3
Emergency Calls............................................................4
Display Indicators...............................................7
Getting Started.....................................................8
Installing the battery ...................................................8
Charging the battery ..................................................8
Switching on .............................................................10
Switching off .............................................................10
Basic Functions.................................................11
Receiving a call ........................................................11
Making a call.............................................................11
Activating PIN Calls ..................................................12
Making emergency calls ..........................................13
Quick ways of dialing................................................14
Making international calls .....................................14
One-touch dialing..................................................14
Using voicemail/favorite number...........................16
Speed dialing............................................................17
Last number redial.................................................17
Using the Memory.............................................18
General information .................................................18
Memory locations...................................................18
Memory linking.......................................................20
Storing information....................................................20
Entering a name........................................................22
Correcting mistakes .................................................22
Displaying ‘hidden’ numbers....................................23
Clearing the contents of a memory location.............23
Moving the contents of a memory location ..............23
Recalling information by memory
location number.....................................................24
Recalling information by name.................................25
Scrolling for a number ..............................................25
Searching for a name...............................................25
Using the scratchpad memory.................................26
Reminder message facility.......................................27
Displaying your own number....................................27
Changing the wake-up message.............................27

Menu Functions..................................................29
Using the menu.........................................................29
List of menu functions...............................................31
Description of menu functions..................................32
Lock Phone (Menu 0).............................................32
System Select (Menu 1).........................................33
Ringing Type (Menu 2)..........................................34
Call Timers (Menu 3)..............................................35
Lights Control (Menu 4).........................................36
Keypad Tones (Menu 5)........................................36
Ringing Volume (Menu 6)......................................37
NAM Select (Menu 7).............................................37
Auto Answer (Menu 8)...........................................38
Accessory Menu (Menu 9) ....................................38
Clear Last Call (Menu 10)......................................39
Change Lock Code (Menu 11)..............................39
Data Mode (Menu 12)............................................40
Emergency 9 Key (Menu 13).................................40
Call Barring (Menu 14)...........................................41
Memory Lock (Menu 15)........................................42
Activate Keyguard (Menu 16)................................43
Send DTMF (Menu 17) ..........................................44
SID Screen (Menu 18) ...........................................46
Hook Flash Function and 3 Party Calls..................47
Battery Information.........................................48
Reference Information...................................51
List of display messages..........................................51
List of tones...............................................................54
Care and Maintenance.............................................55
Troubleshooting........................................................55
Accessories..............................................................56
Index.........................................................................60
Technical information................................................63
2

IMPORTANT SAFETY
INFORMATION
TRAFFIC SAFETY
Do not use a hand-held telephone while driving a
vehicle. If using a hand-held telephone, park the
vehicle before conversing.
Always secure the phone in its holder; do not place
the phone on the passenger seat or where it can
break loose in a collision or sudden stop.
The use of an alert device to operate a vehicle’s lights
or horn on public roads is not permitted.
Remember, road safety always comes first!
OPERATING ENVIRONMENT
Remember to follow any special regulations in force in
any area and always switch off your phone whenever it
is forbidden to use it, or when it may cause interference
or danger.
Operation of any radio transmitting equipment,
including cellular telephones, may interfere with the
functionality of inadequately-protected medical
devices. Consult a physician or the manufacturer of
the medical device if you have any questions.
Other electronic equipment may also be subject to
interference.
As with other mobile radio transmitting equipment,
users are advised that for the satisfactory operation of
the equipment and for the safety of personnel, it is
recommended that the equipment should only be
used in the normal operating position.
Users are advised to switch off the phone when at a
refueling point (service station). Users are reminded of
the need to observe restrictions on the use of radio
equipment in fuel depots (fuel storage and distribution
areas), chemical plants, or where blasting operations
are in progress.
Do not store or carry flammable liquids, gases, or
explosive materials in the same compartment as the
phone, its parts, or accessories.
3

Only qualified personnel should install or service the
phone in a vehicle. Faulty installation or service may
be dangerous and may invalidate any warranty which
may apply to the unit.
Electronic fuel-injection systems, electronic anti-skid
braking systems, electronic cruise-control systems
and other electronic systems can malfunction due to
the lack of protection from radio signals. Check regularly that all cellular phone equipment in your vehicle is
mounted securely and operating properly.
Switch off your cellular telephone when in an aircraft.
The use of cellular telephones in an aircraft may be
dangerous to the operation of the aircraft, disrupt the
cellular network, and is illegal.
Failure to observe these instructions may lead to suspension or denial of cellular services to the offender,
or legal action or both.
EMERGENCY CALLS
IMPORTANT!
This phone, like any cellular phone, operates using
radio signals, cellular and landline networks as well as
user-programmed functions which cannot guarantee
connection in all conditions. Therefore you should
never rely solely upon any cellular telephone or similar
radio device for essential communications
(e.g. medical emergencies).
Remember, to make or receive any calls the phone
must be switched on and in a service area with
adequate cellular signal strength.
Locking the phone or restricting calls does not prevent
making emergency calls with the phone. To make an
emergency call, if the phone is not on, switch it on.
If the
ALPHA
indicator is shown on the display, clear it
by pressing the ABC key. Press and hold the CLR key
for several seconds to ready the phone for calls.
Key in the emergency number for your present
location (e.g. 911, 112 or other official emergency
number). Emergency numbers vary by location.
Press the SEND key.
4

If Keyguard is in use, you may have to deactivate it
(press MENU ABC) before you can make an
emergency call. Consult this document and your local
cellular service provider.
Emergency calls may not be possible on all cellular
phone networks or when certain network services
and/or phone features are in use. Check with local
cellular service providers.
When making an emergency call, remember to give all
the necessary information as accurately as possible.
Remember that your cellular phone may be the only
means of communication at the scene of an accident –
do not cut off the call until given permission to do so.
USING THIS GUIDE
The cellular phone described in this guide is approved
for use on the AMPS network. The AMPS manual
activation commands for various services are not
presented in this guide (e.g. using *and # for
activating or deactivating services). The phone
nevertheless is capable of handling commands given
in that form. For these commands, please consult with
your service providers.
A number of features included in this guide are called
Network Services. They are special services provided
by cellular service providers. Before you can take
advantage of any of these Network Services, you must
subscribe to the service(s) you want from your home
service provider. You can then activate these features
as described in this guide.
The operation of the phone requires successive key
depressions; two keys are never to be pressed
simultaneously.
WARRANTY NOTE
Use only batteries, antennas and chargers approved
by the phone manufacturer. The use of any other
types will invalidate any approval or warranty applying
to the telephone, and may be dangerous.
5

FCC/INDUSTRY CANADA NOTICE
Your phone may cause TV or radio interference
(e.g. when using telephone in close proximity of
receiving equipment). The FCC/Industry Canada
can require you to stop using your telephone if such
interference cannot be eliminated. If you require
assistance, contact your local service facility.
THIS DEVICE COMPLIES WITH PART 15 OF
THE FCC RULES. OPERATION IS SUBJECT TO
THE CONDITION THAT THIS DEVICE DOES
NOT CAUSE HARMFUL INTERFERENCE.
6

DISPLAY INDICATORS
A AB Indicator Shows which network is in use:
A
– System A only
B
– System B only
A B
– Both systems
Blank
– Home area only
B Signal Indicator Shows approximate received
signal strength.
C ON Indicator Shows that phone is switched
on.
D ROAM Indicator Shows which system the
phone is using:
On
– home system in a non-
home area.
Flashing
– non-home system.
Off
– home system in the home
area.
E IN USE Indicator Shows that a call is in progress.
F NO SVC Indicator Shows that cellular service is
not available. If the SID List is
Active, the “NO” will flash.
G Battery Indicator Shows approximate capacity
remaining.
Scrolls
when charging is in
progress.
Flashes
to show that battery is
too hot or cold and will not be
charged.
ON
S
B
MENU
IN USE
ROAM NO SVC
ALPHA
J
C
H
2
A
AB
I
D E F
G
7

If charging while phone is
switched off, the indicator bars
disappear, but Bremains on.
H Number Shows menu or memory
location selected.
I MENU Indicator Shows that menu mode has
been selected.
J ALPHA Indicator Shows that alpha mode has
been selected; letters can be
entered, and names can be
displayed.
GETTING STARTED
INSTALLING THE BATTERY
1 Place the base of the
battery into the lower part
of the phone, taking care
to line up the screw in the
lower right corner with the
indent in the battery
plastic.
B Push the top of the battery toward the upper part
of the phone, until the catch clicks.
To remove battery, when required:
1 Press and hold catch.
B Pull top of battery away
from phone.
C Detach battery from the
phone.
CHARGING THE BATTERY
TO ACHIEVE FULL BATTERY CAPACITY,
NEW BATTERIES MUST BE CHARGED
WITH THE PHONE OFF
FOR AT LEAST 24 HOURS
BEFORE INITIAL USE.
STOP
8

9
1 Take the charger supplied,
and fit the connector into
the phone.
B Connect the charger to a
standard AC outlet
(or cigarette lighter
receptacle).
C The phone will beep to indicate the charger has
been connected properly.
D For fastest charging, make sure the phone is off.
E Leave the battery on charge for 24 hours before
initial use. After the first use, the charging times
depend on the type of battery fitted, and charger
used; approximate times are shown below:
Battery Type
Charger Type *BTH-8S BTH-8SM BTH-8H BTH-8HM
Standard Travel 90 mins 110 mins 5 hrs 5.5 hrs
Charger
(ACH-3U)
Rapid Travel 40 mins 60 mins 70 mins 100 mins
Charger
(ACH-4U)
or Rapid Cigarette Lighter Charger (LCH-2)
*Subject to availability.
F When charging is complete, disconnect the
charger from the outlet and from the phone.
For further details, please refer to ‘Charging
Indications’ (below), and ‘Battery Information’
(page 48).
Charging indications:
– When the phone is switched off, and the charger is
connected, only the ‘B’ part of the battery indicator
will be visible.
– When the phone is switched on, and charging is in
progress, the bars on the battery charge indicator
will ‘scroll’. When the battery is fully charged, the
scrolling will stop and all bars will be on (steady).

SWITCHING ON
A If your phone has an extendable antenna, extend
the antenna fully.
B Press and hold the ON key.
The phone will carry out a short selftest, briefly displaying the ‘wake-up’
message. (This message is programmed by your dealer, but you
may change it if you wish; refer to
‘Changing the wake-up message’,
page 27, for further details).
When the ONindicator appears, the phone is ready for
use.
If the
NO SVC
indicator remains on, then you may be
outside the cellular service area, and will not be able
to make or receive calls.
Remember, to make or receive any calls, your
phone must be switched on and in service.
If you are using the SID function (refer to ‘SID Screen
(Menu 18)’, page 46, for details):
When SID is switched on, and specific carriers are not
available in your area, then the NOpart of the
NO SVC
indicator may flash; in this instance you may be able to
make emergency calls, but will not be able to make or
receive any calls.
As with any other radio-transmitting devices, avoid
prolonged contact with the antenna when the phone
is switched on.
SWITCHING OFF
A Press and hold the ON key.
The display will become blank.
If the charger is connected, the Bindicator will remain
on, and charging will continue.
NOTE: Switch off the phone before removing the
battery.
10

11
BASIC FUNCTIONS
RECEIVING A CALL
A Press any key except ON or the volume keys.
An incoming call is indicated by a ringing tone, and
the
CALL
message flashing on the display.
If the
SILENT SERVICE
option (Menu 6) has been
selected there will be no ringing tone; the keypad and
display lights will flash instead, and only a short beep
will be heard (refer to ‘Ringing volume (Menu 6)’,
page 37).
If you do not answer a call, the
CALL
message will
remain on the display (indicating a missed call); to
clear the display, press any key.
‘Any-key answering’ facility: Any key (except ON or
the volume keys) may be pressed to answer a call
(except when ‘keyguard’ is active). If ‘keyguard’ is
active, you must press the SEND key to answer the
call. If you receive a call while entering a number, the
call will be answered on the first keypress after the
ringing starts.
B To end the call, press END.
MAKING A CALL
A For best reception, pull the
antenna up to extend fully. Do not
leave the antenna partly extended.
B Open the keypad cover. Enter the
number you wish to dial. Remember
to include the area code (if this is
necessary on your system) even if you
are making a local call. The number will
be displayed.
C To correct a mistake, press CLR to delete the last
digit, or press and hold CLR to clear the whole
display (then re-enter the number).
D Press SEND. The
IN USE
indicator will appear on
the display, and the number will disappear when
the call is connected.
E To end the call, press END.

Notes:
If NO SVC is displayed:
You are outside the cellular service area.
If
NOT ALLOWED
is displayed:
The call is not allowed or your phone is locked.
(Refer to ‘Call Barring (Menu 14)’, page 41 and ‘Lock
phone (Menu 0)’, page 32).
If the signal is poor:
The quality of your call depends on the signal strength
of the cellular signal in your
area. The signal strength
indicator on the display (‘S‘ in
diagram right) shows received
signal strength. The more bars
showing, the stronger the
signal.
If the signal is poor, try moving to a different position.
If you are using the phone in a building, you may find
that reception is better near a window.
To adjust the earpiece volume:
On the side of the phone, press ∆ to increase the volume (maximum level is 5) or ∇ to decrease the volume
(minimum level is 1). The volume level you select is
displayed. If you try to adjust the volume below level 1,
or above level 5, the phone gives a warning beep.
If you are using the handsfree option, the handsfree
volume is adjusted. The volume levels for the phone,
and handsfree option, are stored independently.
ACTIVATING PIN CALLS
This function allows you to activate or deactivate the
PIN call. When this function is set to on, the PIN code
is requested at the call setup.
To activate the PIN call:
A Enter the control code
*
, #, 7, 4, 6, 2, 2, 5, 5, #
(spells *# PIN CALL #).
The phone prompts for your four-digit
PIN CODE?
B Enter your PIN code and press STO.
ON
S
B
IN USE
12

13
The message
PIN CALL ON
is briefly displayed con-
firming the PIN call activation.
To deactivate the PIN call:
A Enter the control code
*
, #, 7, 4, 6, 2, 2, 5, 5, #
(spells *# PIN CALL #).
The phone prompts for your four-digit
PIN CODE?
B Press STO without entering the PIN code.
The message
PIN CALL OFF
is briefly displayed con-
firming the PIN call deactivation.
To make a call when the PIN call is set to on:
A Make the call in the usual way.
The message
PIN CALL
is displayed. The phone
prompts you to wait for a tone
(WAIT FOR A
PROMPT)
.
B After the tone, press the SEND key.
• The message
SENDING PIN
is displayed. If the
message remains on the display, press the SEND
key to resend the PIN code. Wait for your call to
be connected.
Note: When the phone is set to PIN CALL ON, an
emergency call to the emergency number programmed into your phone (e.g., 911 or another official
emergency number) will be dialed as a normal call
without the PIN code request.
MAKING EMERGENCY CALLS
EITHER:
A If the phone is not on, switch it on.
B Press and hold the CLR key for several seconds
to ready the phone for calls.
C Key in the emergency number for your present
location (e.g. 911, 112 or other official emergency
number). Emergency numbers vary by location.
D Press SEND.
OR:
Press 9 for two seconds or more.

14
Note: Official emergency numbers vary by location
(e.g. 911, 112 or other official emergency number).
However, only one emergency number is programmed
into your phone to be dialed automatically by one key
emergency dialing, which may not be the proper
number in all circumstances. One key emergency
dialing does not operate when the keyguard feature is
in use and when the Emergency 9 key function is set
to OFF. Emergency 9 key is set to OFF when the
phone leaves the factory.
QUICK WAYS OF DIALING
Making international calls
To make an international call, either dial the number
in the normal way (i.e. starting with the international
prefix), or use the built-in quick method, utilizing the
internationally-recognized ‘+’ character; ‘+’ is available
on the *key.
To use the quick method:
Press
**
(‘+’ will be displayed), instead of entering
the international prefix, then dial the remainder of the
number. For example, calling a UK number can be
done by entering a number starting ‘
**
4 4’.
When sent, the international prefix (for the NAM
currrently selected) will be generated automatically.
Note, however, that if you store a number using the
international prefix ‘+’, then when recalled it will be
displayed with the appropriate dialing code.
Note: To allow international calls, ‘Call Barring
(Menu 14)
’, page 41 must be set to
‘ALLOW ALL’
.
One-touch dialing
The phone is equipped with 4 one-touch dialing keys.
Simply press any one of these keys to dial the
associated number (you do not need to press SEND).
The following keys offer one-touch dialing:
*
Dials the number stored in memory location 96;
press and hold the key for 2 seconds. You may
store any number in this location.

15
# Dials the number stored in memory location 97;
press and hold the key for 2 seconds. You may
store any number in this location.
9 Dials the emergency number (programmed by
your dealer); press and hold the key for 2
seconds. This function will not operate if keyguard is active, or if the ‘Emergency 9 key’
function (Menu 13) is set to OFF.
The emergency number is programmed by your
dealer, and stored in a special location. You
cannot change this number, neither can you
recall the number to the display without dialing
the number. Refer to ‘Making Emergency Calls’,
on page 13.
Dials the number stored in memory location 98.
This location may already contain your voicemail
number string, but you may store any number in
this location (e.g. if you are not a subscriber to
voicemail). Refer to ‘Using voicemail/favorite
number’, page 16, for further details.
NOTE: When keyguard is activated, none of these
keys are operational for one-touch dialing.
When in a call, the *, # and 9 keys do not operate as
one-touch dialing keys; instead, they revert to their
normal (DTMF tone-dialing) functions.
When in a call, the key does not operate to make
a further call. Instead, pressing this key would force
DTMF data to be sent if there is data waiting to be
sent. For example, the string stored in voicemail memory location 98 might contain the voicemail phone
number, then a ‘w’ and some DTMF data; once a call
to the voicemail number had been established, a second press of the key will send the DTMF data.
You may link any memory location to a one-touch
dialing key; this will enable you to dial the phone
number stored in that location, by simply pressing the
key. To do this, store the number of the memory
location (i.e. one or two digits only) to be linked, in
any of the one-touch dialing memory locations.
For example, to link the number stored in memory
location 33 to the key, store ‘33’ in memory
location 98 (voicemail/favorite number); then, when

16
you press , the phone number in memory
location 33 will be dialed automatically (speed dialed).
This function has the following benefit:
You may change the ‘favorite’ number which is dialed
when the key is pressed; e.g. you may keep
several such numbers in normal memory locations,
and select the required number by simply storing its
location number in location 98, as required. This is
preferable to copying contents that exist in other
locations to location 98, as this cannot be done when
the contents has a name (any particular name can be
stored in only one location).
Using voicemail/favorite number
The (voicemail) key is designed to allow access to
your voicemail (or favorite number) simply by pressing
the key once (there is no need to press SEND). Once
a call is established, a second press of this key will send
a PIN number (or DTMF string) if this has been stored.
The voicemail/favorite number facility uses the number
stored in memory location 98. You may store any
number in this location, if you do not wish to use the
voicemail facility. Whatever number is in location 98
will be dialed automatically when is pressed.
A typical voicemail number string would be:
‘222w3333’, where ‘222’ is the voicemail number
allocated to you by your cellular service supplier,
‘w’ is the wait character (this is entered by pressing
****
), ‘3333’ is your voicemail PIN code (which
would be sent after the second press of the key).
Please note that the voicemail service is a system
feature, and may not be available on your network.
To be able to use voicemail, it must be available on
your network, and you must be a subscriber to this
service. For further details, ask your network provider.
For specific operating instructions refer to the
appropriate documentation which may be issued by
your network provider.

17
SPEED DIALING
Speed dialing is the quickest way to recall and dial a
number, and is particularly useful for frequently-used
numbers. You can speed dial any number already
stored in a memory location either by entering the
memory location number or the name stored with the
number to be called.
A Enter the number of the memory location containing
the number to be dialed (e.g. 2).
Alternatively, press ABC (to select alpha mode), then
enter the name stored with the number to be dialed.
B Press SEND.
The phone will recall the number/name from memory,
display it briefly, then dial the number. If the memory
location contains no number, or the name was not
found, then no call attempt will be made. If the
memory location is empty, the message
EMPTY
(if in number mode) or
NOT FOUND
(if in alpha mode)
will be displayed.
Last number redial
The last five phone numbers you called or attempted
to call are stored in the phone’s memory location 0
(L0-L4). This stack of the five last dialed numbers
remains in the phone’s memory when the phone is
switched off.
To redial a last dialed number:
1 If there are any characters on the display, clear
the display by pressing and holding the CLR key.
B Press the SEND key to display the last dialed
number. Use the key to scroll through the
last dialed numbers. To view the associated
names, if the dialed calls were made from the
phone directory, press the ABC key and then start
scrolling by using the key. The location number is displayed in the upper right corner of the
display (L0-L4).
• If the stack of the last dialed numbers is empty,
the message
LOCATION EMPTY
will be
displayed.
C To make a call to the displayed number or name,
press the SEND key.
Loading...