


1100
Table of contents
 Loading...
Nokia 1100
User Guide
Note: Spanish translation follows page 50 of the English guide.
Portuguese translation follows page 36 of the Spanish guide.

LEGAL INFORMATION
PART NO. 9310129, ISSUE NO. 1
Copyright © 2003 Nokia. All rights reserved.
Nokia, Nokia Connecting People, Xpress-on, Navi-key, and the Nokia Original Enhancements logos are
trademarks or registered trademarks of Nokia Corporation. Other company and product names mentioned
herein may be trademarks or trade names of their respective owners.
Printed in Mexico, 09/2003
Includes RSA BSAFE cryptographic or security protocol software from RSA Security.
The information contained in this user guide was written for the Nokia 1100 product. Nokia operates a
policy of ongoing development. Nokia reserves the right to make changes to any of the products
described in this document without prior notice.
UNDER NO CIRCUMSTANCES SHALL NOKIA BE RESPONSIBLE FOR ANY LOSS OF DATA OR INCOME OR
ANY SPECIAL, INCIDENTAL, AND CONSEQUENTIAL OR INDIRECT DAMAGES HOWSOEVER CAUSED. THE
CONTENTS OF THIS DOCUMENT ARE PROVIDED "AS IS." EXCEPT AS REQUIRED BY APPLICABLE LAW,
NO WARRANTIES OF ANY KIND, EITHER EXPRESS OR IMPLIED, INCLUDING, BUT NOT LIMITED TO, THE
IMPLIED WARRANTIES OF MERCHANTABILITY AND FITNESS FOR A PARTICULAR PURPOSE, ARE MADE IN
RELATION TO THE ACCURACY AND RELIABILITY O R CONTENTS OF THIS DOCUMENT. NOKIA RESERVES THE
RIGHT TO REVISE THIS DOCUMENT OR WITHDRAW IT AT ANY TIME WITHOUT PRIOR NOTICE.
EXPORT CONTROLS
This device contains commodities, technology, or software exported from the United States in accordance
with the Export Administration regulations. Diversion contrary to U.S. or Canadian law is prohibited.
FCC/INDUSTRY CANADA NOTICE
Your device may cause TV or radio interference (for example, when using a telephone in close proximity
to receiving equipment). The FCC or Industry Canada can require you to stop using your telephone if such
interference cannot be eliminated. If you require assistance, contact your local service facility. This device
complies with part 15 of the FCC rules. Operation is subject to the condition that this device does not
cause harmful interference.
PATENT NUMBERS
U.S. Patent Nos. 5818437, 5953541, 6011554 and other pending patents associated with this product’s
hardware and software
Manufactured or sold under one or more of the following U.S. Patents:
5818437 5953541 6011554 6594472 5845219 5892475
6151507 5692032 5479476 6094587 6115617 6487397
6347218 5241583 5794142 5870683 6026161 6185295
6188909 6043760 6292668 6049796 5920826 5956633
544816 5669482 5701392 5754976 4969192 RE32580

Contents
1 For your safety. . . . . . . . . . . . . . . . . . . . . . . . . . . . . . . . . . . . . . . . . . . . . 1
About your device . . . . . . . . . . . . . . . . . . . . . . . . . . . . . . . . . . . . . . . . . . . . . . . . . . 2
Network Services . . . . . . . . . . . . . . . . . . . . . . . . . . . . . . . . . . . . . . . . . . . . . . . . . . . 2
Accessibility solutions . . . . . . . . . . . . . . . . . . . . . . . . . . . . . . . . . . . . . . . . . . . . . . . 3
Charger and enhancements. . . . . . . . . . . . . . . . . . . . . . . . . . . . . . . . . . . . . . . . . . . 3
2 Get started. . . . . . . . . . . . . . . . . . . . . . . . . . . . . . . . . . . . . . . . . . . . . . . . 4
FInd the label . . . . . . . . . . . . . . . . . . . . . . . . . . . . . . . . . . . . . . . . . . . . . . . . . . . . . . 4
Insert the SIM card . . . . . . . . . . . . . . . . . . . . . . . . . . . . . . . . . . . . . . . . . . . . . . . . . 4
Charge the battery . . . . . . . . . . . . . . . . . . . . . . . . . . . . . . . . . . . . . . . . . . . . . . . . . . 5
Keys and connectors . . . . . . . . . . . . . . . . . . . . . . . . . . . . . . . . . . . . . . . . . . . . . . . . 6
Display and standby mode. . . . . . . . . . . . . . . . . . . . . . . . . . . . . . . . . . . . . . . . . . . . 7
Change covers . . . . . . . . . . . . . . . . . . . . . . . . . . . . . . . . . . . . . . . . . . . . . . . . . . . . . 8
Attach the wrist strap . . . . . . . . . . . . . . . . . . . . . . . . . . . . . . . . . . . . . . . . . . . . . . . 8
3 Call functions. . . . . . . . . . . . . . . . . . . . . . . . . . . . . . . . . . . . . . . . . . . . . . 9
Make a call . . . . . . . . . . . . . . . . . . . . . . . . . . . . . . . . . . . . . . . . . . . . . . . . . . . . . . . . 9
Answer a call . . . . . . . . . . . . . . . . . . . . . . . . . . . . . . . . . . . . . . . . . . . . . . . . . . . . . 10
In-call operations . . . . . . . . . . . . . . . . . . . . . . . . . . . . . . . . . . . . . . . . . . . . . . . . . . 10
Listen to voice mail . . . . . . . . . . . . . . . . . . . . . . . . . . . . . . . . . . . . . . . . . . . . . . . . 10
Lock the keypad . . . . . . . . . . . . . . . . . . . . . . . . . . . . . . . . . . . . . . . . . . . . . . . . . . . 10
4 Writing text. . . . . . . . . . . . . . . . . . . . . . . . . . . . . . . . . . . . . . . . . . . . . . 11
Predictive text . . . . . . . . . . . . . . . . . . . . . . . . . . . . . . . . . . . . . . . . . . . . . . . . . . . . 11
traditional text input . . . . . . . . . . . . . . . . . . . . . . . . . . . . . . . . . . . . . . . . . . . . . . . 12
5 Menu functions . . . . . . . . . . . . . . . . . . . . . . . . . . . . . . . . . . . . . . . . . . . 13
List of menu functions . . . . . . . . . . . . . . . . . . . . . . . . . . . . . . . . . . . . . . . . . . . . . . 13
Messages (Menu 0-1) . . . . . . . . . . . . . . . . . . . . . . . . . . . . . . . . . . . . . . . . . . . . . . 14
Contacts (Menu 2) . . . . . . . . . . . . . . . . . . . . . . . . . . . . . . . . . . . . . . . . . . . . . . . . . 17
Call log (Menu 4) . . . . . . . . . . . . . . . . . . . . . . . . . . . . . . . . . . . . . . . . . . . . . . . . . . 18
Tones (Menu 5) . . . . . . . . . . . . . . . . . . . . . . . . . . . . . . . . . . . . . . . . . . . . . . . . . . . . 19
Profiles (Menu 6) . . . . . . . . . . . . . . . . . . . . . . . . . . . . . . . . . . . . . . . . . . . . . . . . . . 20
Nokia 1100 User Guide iii Copyright © Nokia 2003

Settings (Menu 7). . . . . . . . . . . . . . . . . . . . . . . . . . . . . . . . . . . . . . . . . . . . . . . . . . 20
Alarm clock (Menu 8). . . . . . . . . . . . . . . . . . . . . . . . . . . . . . . . . . . . . . . . . . . . . . . 23
Reminders (Menu 9) . . . . . . . . . . . . . . . . . . . . . . . . . . . . . . . . . . . . . . . . . . . . . . . . 23
Games (Menu 10) . . . . . . . . . . . . . . . . . . . . . . . . . . . . . . . . . . . . . . . . . . . . . . . . . . 24
Extras (Menu 11) . . . . . . . . . . . . . . . . . . . . . . . . . . . . . . . . . . . . . . . . . . . . . . . . . . 24
SIM services (Menu 12) . . . . . . . . . . . . . . . . . . . . . . . . . . . . . . . . . . . . . . . . . . . . . 26
Enhancements . . . . . . . . . . . . . . . . . . . . . . . . . . . . . . . . . . . . . . . . . . . . . . . . . . . . 26
6 Reference Information . . . . . . . . . . . . . . . . . . . . . . . . . . . . . . . . . . . . . . 27
Battery information . . . . . . . . . . . . . . . . . . . . . . . . . . . . . . . . . . . . . . . . . . . . . . . . 27
Enhancements . . . . . . . . . . . . . . . . . . . . . . . . . . . . . . . . . . . . . . . . . . . . . . . . . . . . 28
Enhancements, Batteries, and Chargers . . . . . . . . . . . . . . . . . . . . . . . . . . . . . . . . 28
Care and maintenance . . . . . . . . . . . . . . . . . . . . . . . . . . . . . . . . . . . . . . . . . . . . . . 28
Additional safety information . . . . . . . . . . . . . . . . . . . . . . . . . . . . . . . . . . . . . . . . 29
7 Nokia One-Year Limited Warranty . . . . . . . . . . . . . . . . . . . . . . . . . . . . . 34
Appendix A Message from the CTIA . . . . . . . . . . . . . . . . . . . . . . . . . . . . 39
Appendix B Message from the FDA . . . . . . . . . . . . . . . . . . . . . . . . . . . . 43
Index . . . . . . . . . . . . . . . . . . . . . . . . . . . . . . . . . . . . . . . . . . . . . . . . . . . 49
iv Copyright © Nokia 2003
For your safety
1 For your safety
Read these simple guidelines. Not following them may be dangerous or illegal. Read the
complete user guide for further information.
SWITCH ON SAFELY
Do not switch on the phone when wireless phone use is prohibited or when it
may cause interference or danger.
ROAD SAFETY COMES FIRST
Obey all local laws. Always keep your hands free to operate the vehicle while
driving. Your first consideration while driving should be road safety.
INTERFERENCE
All wireless phones may be susceptible to interference, which could
affect performance.
SWITCH OFF IN HOSPITALS
Follow any restrictions. Switch the phone off near medical equipment.
SWITCH OFF IN AIRCRAFT
Follow any restrictions. Wireless devices can cause interference in aircraft.
SWITCH OFF WHEN REFUELING
Don't use the phone at a refueling point. Don't use near fuel or chemicals.
SWITCH OFF NEAR BLASTING
Follow any restrictions. Don’t use the phone where blasting is in progress.
USE SENSIBLY
Use only in the normal position as explained in the product documentation. Do
not touch the antenna unnecessarily.
QUALIFIED SERVICE
Only qualified personnel may install or repair this product.
Nokia 11 0 0 User Guide 1 Copyright © Nokia 2003
ENHANCEMENTS
Use only approved enhancements and batteries. Do not connect incompatible
products.
WATER-RESISTANCE
Your phone is not water-resistant. Keep it dry.
BACKUP COPIES
Remember to make back-up copies or keep a written record of all important
information stored in your phone.
EMERGENCY CALLS
Ensure the phone is switched on and in service. Press C as many times as needed
to clear the display and return to the main screen. Enter the emergency number,
then press Call. Give your location. Do not end the call until told to do so.
• ABOUT YOUR DEVICE
The wireless device described in this guide is approved for use on the GSM network. Contact
your service provider for more information about networks.
When using the features in this device, obey all laws and respect privacy and legitimate
rights of others.
Warning: To use any features in this device, other than the alarm clock, the phone
must be switched on. Do not switch the device on when wireless phone use may
cause interference or danger.
• NETWORK SERVICES
To use the phone you must have service from a wireless service provider. Many of the features
in this device depend on features in the wireless network to function. These network services
may not be available on all networks or you may have to make specific arrangements with
your service provider before you can utilize network services. Your service provider may need
to give you additional instructions for their use and explain what charges will apply. Some
networks may have limitations that affect how you can use network services. For instance,
some networks may not support all language-dependent characters and services.
Your service provider may have requested that certain features be disabled or not activated
in your device. If so, they will not appear on your device menu. Contact your service provider
for more information.
2 Copyright © Nokia 2003
For your safety
• ACCESSIBILITY SOLUTIONS
Nokia is committed to making mobile phones easy to use for all individuals, including those
with disabilities. Nokia maintains an internet site that is dedicated to accessibility solutions. For
more information about phone features, enhancements, alternate format user guides, and
other Nokia products designed with your needs in mind, visit the web site at:
www.nokiaaccessibility.com.
The Nokia 1100 phone is equipped with a universal 2.5-mm accessory jack that can be used
to connect any “cellular ready” or “cellular compatible” TTY/TDD device cable.
Important: Once your TTY/TDD device is connected, you must use the phone menu
Menu > Settings > Enhancement settings > TTY/TDD to enable the TTY/TDD mode.
• CHARGER AND ENHANCEMENTS
Check the model number of any charger before use with this device. This device is intended
for use when supplied with power from ACP-7, ACP-8, ACP-12 and, LCH-9 and LCH-12.
Warning: Use only batteries, chargers and enhancements approved by the phone
manufacturer for use with this particular phone model. The use of any other types
may invalidate any approval or warranty applying to the phone, and may be dangerous.
For availability of approved ehancements, please check with your dealer.
When you disconnect the power cord of any enhancement, grasp and pull the plug,
not the cord.
Nokia 11 0 0 User Guide 3 Copyright © Nokia 2003
2 Get started
• FIND THE LABEL
If you ever need to call Nokia Customer Care or your service provider, you will need to provide
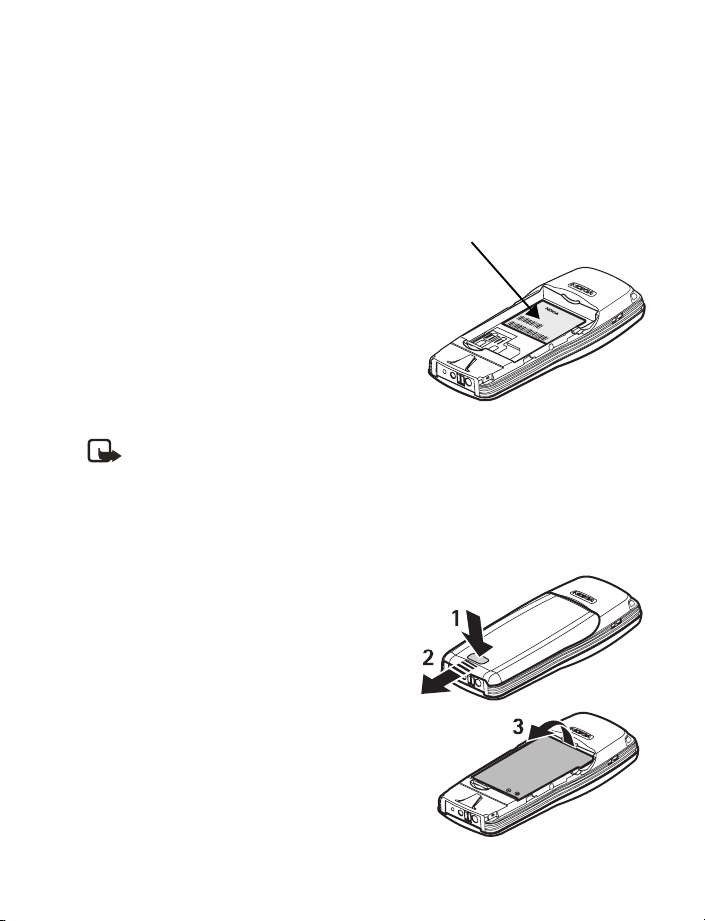
specific information about your phone. This information appears on the phone label.
The label is on the back of the phone
(under the battery). It shows the following:
• Model number
1100a (approved for the GSM 900/1800
network) or 1100b (approved for the GSM
850/1900 network).
• Phone type (a technical designation)
• International Mobile Equipment Identification
(IMEI)
Do not remove or deface the label.
• INSERT THE SIM CARD
Note: Before installing the SIM card, make sure that the phone is switched off,
disconnected from the charger or any other device and then remove the battery.
Keep all miniature SIM cards out of the reach of small children. The SIM card and
contacts are easily damaged by scratches or bending, so be careful when handling,
inserting or removing the card. For availability and information on using SIM card
services, contact your SIM card vendor. This may be the service provider, network
operator, or other vendor.
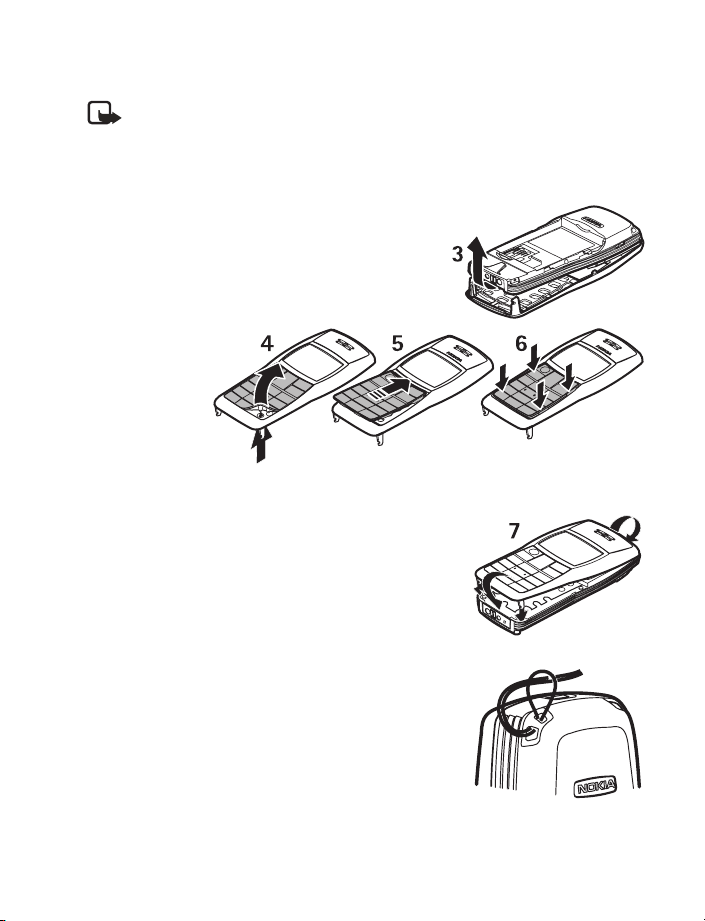
1 Remove the back cover (1 and 2).
Information
label
2 Remove the battery (3).
3 Insert the SIM card with the gold area down and
the bevelled corner on the right (4 and 5).
4 Copyright © Nokia 2003
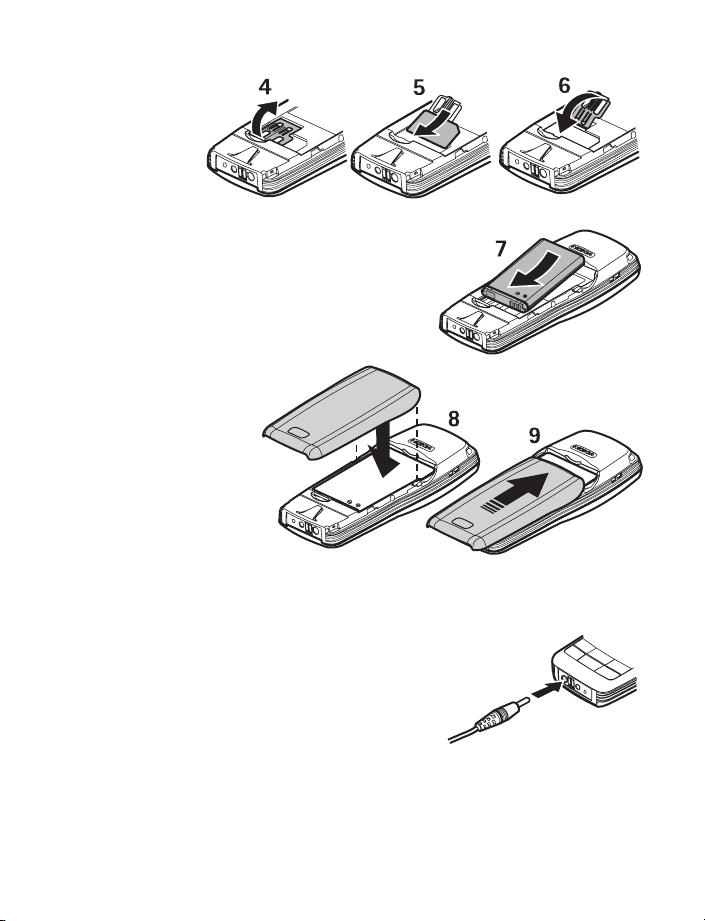
4 Close the
SIM card
holder and
press to
lock it (6).
5 Align the gold connectors on the battery with the
connectors on the phone and insert the battery (7).
6 Replace the back
cover (8 and 9).
• CHARGE THE BATTERY
Do not charge the battery if the phone covers are removed.
1 Connect the charger plug into the connector in
the phone.
2 Connect the charger to an ac wall outlet.
The battery indicator bar starts scrolling.
• Charging a BL-5C battery with the ACP-7
charger takes up to 3 hours.
• If Not charging appears, wait for a while,
disconnect the charger, reconnect it, and retry.
If charging still fails, contact your dealer.
When the battery is fully charged, the bar stops scrolling. Disconnect the charger from
the phone and the ac outlet.
Get started
Nokia 11 0 0 User Guide 5 Copyright © Nokia 2003
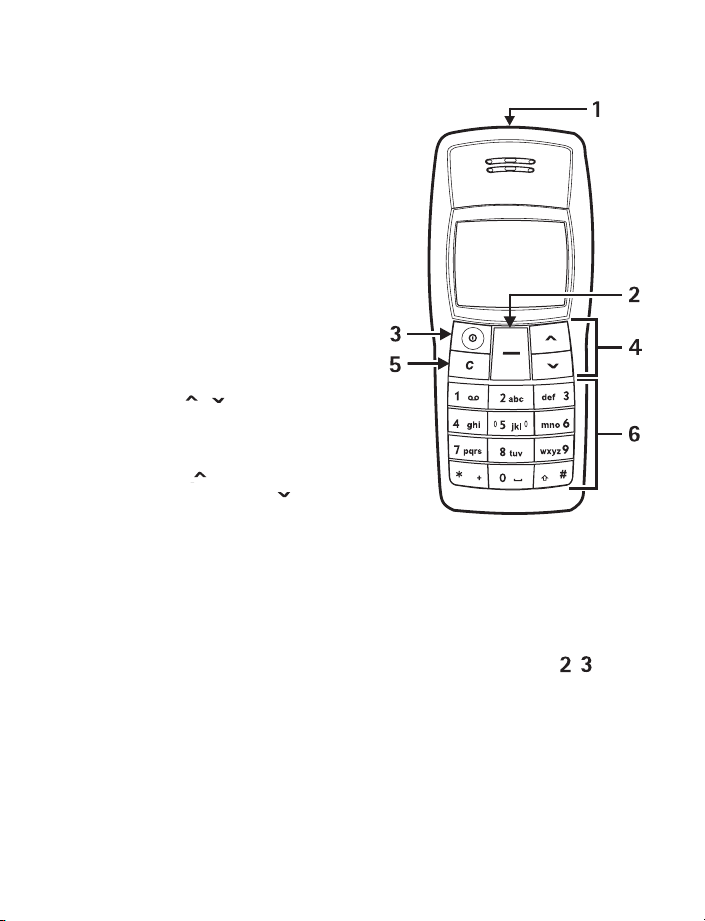
• KEYS AND CONNECTORS
1 Flashlight See “Flashlight” on page 26.
2 Nokia Navi™ key
Text above the Navi key shows the
current function of the key. In this
guide, instructions such as “Press Menu”
mean to press the key located beneath
the word Menu.
3 Power key
Press and hold to switch the phone on or
off. Press and release for quick access to
a list of profiles [see “Profiles (Menu 6)”
on page 20]. When the keypad is locked,
press to turn on the display lights for
about 15 seconds.
4 Scroll keys
Scroll through names, phone numbers,
menus or settings. Adjusts the earpiece
volume during a call. In the standby
mode, press to show the list of last
dialed numbers and press to show
names and phone numbers saved
in Contacts.
5Clear/Exit, or C key
Deletes characters from the display and exits from different functions.
6 Use keys 0 through 9 to enter numbers and characters.
Use the
and # keys for various purposes in different functions.
7 Charger connector
8 Headset connector
9 Microphone
*
6 Copyright © Nokia 2003
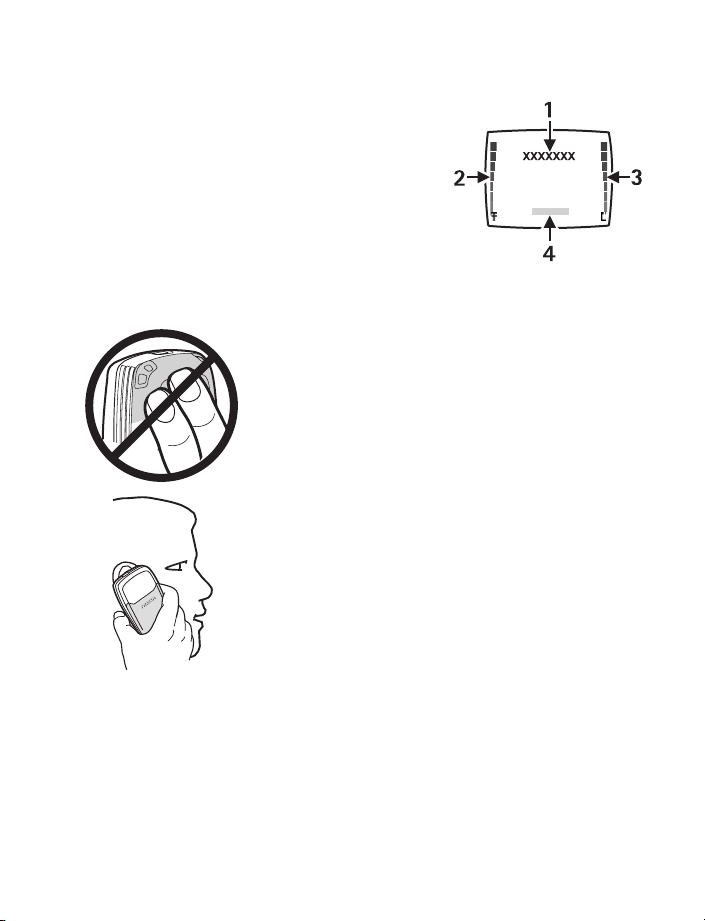
• DISPLAY AND STANDBY MODE
In the standby mode, the indicators described below
appear when the phone is ready for use and no
characters have been keyed in.
1 Cellular network in use, or the operator logo
2 Signal intensity of the cellular network at your
current location
3 Battery charge level
4 Current function of the Navi key
TIPS ON EFFICIENT OPERATION:
Your phone has a built-in antenna. As with any other radio
transmitting device, do not touch the antenna unnecessarily
when the device is switched on. Contact with the antenna
affects call quality and may cause the phone to operate at a
higher power level than otherwise needed. Avoid contact with
the antenna area when operating the phone to optimize the
antenna performance and the battery life.
Hold the phone as you would any other telephone with the
antenna pointed up and over your shoulder.
Get started
Nokia 11 0 0 User Guide 7 Copyright © Nokia 2003
• CHANGE COVERS
Note: Before removing the cover, always switch off the power and disconnect the
charger and any other device. Avoid touching electronic components while changing
the covers. Always store and use the device with the covers attached.
1 Remove the back cover of the phone and battery. See steps 1 and 2 in “Insert the SIM
card” on page 4.
2 Carefully remove the front cover (3).
3 Remove the
keymat
carefully (4).
Insert the
new keymat
(5) and make
sure it is
properly
positioned
(6).
4 Align the top of the front cover with the top of the
phone and press the front cover to lock it into place (7).
5 Insert the battery and replace the back cover. See steps
4 and 5 in “Insert the SIM card” on page 4.
• ATTACH THE WRIST STRAP
Thread the strap through the holes as shown, and tighten it.
8 Copyright © Nokia 2003

3 Call functions
• MAKE A CALL
1 Key in the phone number including the area code.
Press C to delete the last entered digit.
2 Press Call.
Press to increase or to decrease the volume of the earpiece or headset.
3 Press End to end the call.
Use the phone book
In the standby mode, press to find the name you want, then press Call.
Conference calling
Conference calling is a network service that allows up to four people to participate in the
same call.
1 Call the first participant.
2 To call a new participant, press Options > New call, and enter the number or select it
from the phone book.
3 When the call is answered, press Options > Conference, to join the conference call.
4 To add another participant, repeat steps 1 to 3.
5 To end the conference call, press End.
Redialing
Press , scroll to the phone number or name you want, and press Call.
1-touch dialing
Assign a phone number to a key:
1 Press Menu > Settings > Call settings >1-touch dialing and select On.
2 Press C to return to the standby mode.
3 Press Menu > Contacts > 1-touch dialing.
4 Select the key you want, (2–9) and press Assign.
5 Select Assign to call or Assign to SMS.
6 Scroll the name or number you want and press Select.
To use 1-touch dialing, press and hold the corresponding number key.
Call functions
Nokia 11 0 0 User Guide 9 Copyright © Nokia 2003

• ANSWER A CALL
In the standby mode, press Answer. To divert or reject the call without answering, press C.
• IN-CALL OPERATIONS
During a call, press C and Options for some of the following functions. Many of these are
network services. Hold or Unhold, New call, Answer, Reject, End all calls, Contacts, Send
DTMF, Swap, Menu and Mute or Unmute, Flashlight on or Flashlight off.
• LISTEN TO VOICE MAIL
Voice mailbox is a network service. For more information, and to receive your voice mailbox
number, contact your service provider.
Press and hold 1. To change the voice mailbox number, see “Voice mailbox number” on
page 17.
To forward calls to your voice mailbox, refer to “Call settings” on page 21.
• LOCK THE KEYPAD
The keypad lock prevents accidental key presses.
To lock or unlock the keypad, press Menu >
appears.
You can also Automatic keyguard to lock the keypad after a certain period of time. Refer to
“Keyguard settings” on page 22.
Note: When the Keyguard is on, calls still may be possible to the official emergency
number programmed into your phone. Key in the emergency number and press Call.
quickly. When the keypad is locked,
*
10 Copyright © Nokia 2003

4Writing text
You can enter text two ways: use the traditional text input (indicated with ) or using
predictive text input (indicated with ).
• PREDICTIVE TEXT
Set on or off
When writing text, press Options > Predictive text > English > OK.
To revert to traditional text input, select Prediction off.
Tip: To quickly set the predictive text input on or off when writing text,
press # twice.
Use predictive text
Predictive text input is an easy way to write text. It is based on a built-in dictionary to which
you can also add new words.
1 Key in the word you want by pressing each key once for one letter. The word changes
after each keystroke. For example, to write ‘Nokia’ when the English dictionary is
selected, press 66542.
• To delete the character to the left of the cursor, press C. To clear the screen, press
and hold C.
• To switch between upper and lowercase, or between traditional and predictive text
input, press # repeatedly and check the indicator at the top of the display.
• To switch between letters and numbers, press and hold #.
• To get a list of special characters, press and hold
and press Use.
• To insert a number, press and hold the number key you want. To insert several
numbers, press and hold # and key in the numbers.
2 If the displayed word is the one you want, press 0 and start writing the next word.
• To change the word, press
• If the "?" is displayed after the word, the word is not in the dictionary. To add the
word to the dictionary, press Spell, key in the word (using traditional text input),
and press OK.
repeatedly until the word you want appears.
*
, select the character you want,
*
Writing text
Nokia 11 0 0 User Guide 11 Copyright © Nokia 2003

Writing compound words
Key in the first half of the word, press , and key in the second half.
• TRADITIONAL TEXT INPUT
Press the key marked with the letter that you want repeatedly until the letter appears.
Use the following functions to edit the text:
• To add a space, press 0.
• To add a punctuation mark or special character, press 1 repeatedly, or press
the desired character, and press Use.
• To move the cursor left or right, press or , respectively.
• To delete the character to the left of the cursor, press C. To clear the screen, press and
hold this key.
• To switch between upper and lower case, press #.
• To add a number, press and hold the desired key. To switch between letters and
numbers, press and hold #.
• To key in a letter which is on the same key as the previous one, press or
(or wait until the cursor appears), and key in the new letter.
, select
*
12 Copyright © Nokia 2003
Menu functions
5Menu functions
You can use the key features in the menus in the following ways:
SCROLLING
1 Press Menu in the standby mode.
2 Press or to scroll to the main menu you want, and press Select to enter it.
Press C to exit a main menu.
3 If the menu contains submenus, scroll to the one you want and press Select to enter
it. Press C to exit a submenu.
If you do not want to save the changes you made to menu settings, press and hold C.
SHORTCUT
The menus, submenus, and setting options are numbered. These numbers are called
shortcut numbers.
In the standby mode, press Menu and key in quickly, within three seconds, the shortcut
number of the menu you want to access. Repeat for submenus.
For example, if you want to activate Call waiting service, press Menu > 7 (for Settings),
2 (for Call settings), 4 for Call waiting service), 1 (for Activate).
Note that the shortcut number for Messages is 0-1 because there are more than 10 menus.
• LIST OF MENU FUNCTIONS
Messages 0-1
Alarm clock 8
Contacts 2
Call log 4
Tones 5
Profiles 6
Settings 7
Nokia 11 0 0 User Guide 13 Copyright © Nokia 2003
Reminders 9
Games 10
Extras 11
SIM services 12
(if available)

• MESSAGES (MENU 0-1)
Write messages
Your Nokia 1100 phone lets you send text messages beyond the
normal 160-character limit (check with your service provider to make sure their system can
handle long messages). If your message exceeds 160 characters, it will be sent as a series of
two to four messages. As you write the message, look in the upper right part of the screen. You
can see the message length indicator counting backwards from 459. For example, 420/1means
that you have used 39 characters and the message will be sent in one part. But 298/2 means
that you have used 161 characters, so the message will be divided and sent in two parts.
Using special (Unicode) characters, such as ë, â, á, ì,
characters in your message, the indicator may not show the message length correctly.
Before the message is sent, the Nokia 1100 phone tells you if the message exceeds the
maximum length allowed for one message. You can cancel sending by pressing Cancel or
you can save the message in the inbox.
To send a message, the phone number of your message center has to be saved in the phone.
See “Message settings” on page 16.
1 In the standby mode, press Menu > Messages > Create message.
2 Key in the message. The number of available characters and the current part number
are shown on the top right of the display.
3 When the message is complete, press Options > Send, key in the recipient’s phone
number, and press OK.
If you want to send the message to several people, select Sending options and Send to
many, scroll to the first recipient, and press Send. Repeat this for each recipient.
To send a message to a predefined distribution list, select Sending options and Send
to list. To define and edit distribution lists, see “Distribution lists” on page 15.
Other options are Insert options, Use template, Small fonts, Save message, Clear
text, Predictive text, Instructions, and Exit editor.
Note: When sending messages using the SMS network service, your phone may
display the words Message sent. This is an indication that the message has been
sent by your phone to the message center number programmed into your phone. This
is not an indication that the message has been received at the intended destination.
For more details about SMS services, check with your service provider.
takes up more space. If there are special
14 Copyright © Nokia 2003

Menu functions
Read a text message (Inbox)
When you have received text messages in the standby mode, the number of new messages
as well as a are shown on the display.
1 Press Show to view the messages immediately.
To view the messages later, press C. When ready to read the message, go to the Inbox
menu (Menu 0-1-2).
2 Use the scroll keys to browse through the message.
While reading the message, you can press Options for these functions: Delete, Reply,
Edit, Use, Forward, As reminder, Small fonts, and Details.
Sent items
The Sent items menu lets you view the copies of the messages that you have sent.
Press Options for these functions: Use, Forward, Delete, Edit, Details.
Drafts
In the Drafts menu, you can view the messages you have saved in the Write message menu.
Picture messages
You can receive and send messages that contain pictures (network service). Picture messages
are saved in the phone. Note that each picture message comprises several text messages.
Therefore, sending one picture message may cost more than one text message.
Note: This function can be used only if it is supported by your network operator or
service provider. Only compatible phones that offer picture message features can
receive and display picture messages.
RECEIVING A PICTURE MESSAGE
To view the message immediately, press Show. Press Options and you have the following
options for the picture message: Delete, Reply, Chat, Edit text, Save picture, as screensaver,
Use number, Copy to Reminder and Details.
Distribution lists
If you need to send messages frequently to a fixed group of recipients, you can define a
distribution list and use it when sending a message. You can define up to 6 distribution
lists with up to 10 recipients in each. The phone sends a text message to each recipient
separately.
To view and edit distribution lists, press Menu > Messages > Distribution lists.
Press Options to create a distribution list.
If a message fails to be sent to one or more recipients, a report listing the number of failures,
successful sendings and not found names will be displayed. You can select each category by
pressing Select.
Nokia 11 0 0 User Guide 15 Copyright © Nokia 2003

• Names in the not found group are names in the distribution list that have been deleted
from the phone book. Press Remove to remove them.
• Resend to resend the message to the failed recipients.
• View to view the list of failed recipients.
Templates
You can view or edit the preset messages (templates) that you can use for writing a message.
Smileys
You can edit and store the smileys such as ":-)", and use them in compiling messages.
Delete messages
Press Menu > Messages > Delete messages.
To delete all read messages from all folders, select All read > OK. When Delete read
messages from all folders? appears, press OK.
To delete all the read messages in a folder, scroll to the folder and press OK. Then press OK
when Delete all read messages from folder? appears.
Message settings
The phone offers two kinds of message settings: settings specific to each setting group
(profile) and settings common to all text messages.
TEXT MSG (MENU 0-1-1-0-1)
This profile contains settings needed for sending text and picture messages. The settings
include Message center number (get this number from your service provider), Messages sent
as, Message validity, and Rename sending profile. You must have the message center
number to send text and picture messages. The total number of profiles depends on how
many your SIM card offers.
COMMON (MENU 0-1-1-0-2)
The settings in this submenu apply to all text messages that you send, regardless of the
chosen profile. The available settings are: Delivery reports, Reply via same center and
Character support.
Select Character support to define how the phone handles Unicode characters in text
messages. (Check with your service provider for availability.)
The Full option sends all Unicode characters in a text message to a compatible phone
(if supported by your network).
The Reduced option tries to convert Unicode characters into the corresponding nonUnicode characters (for example ’á’ to ’a’). If no non-Unicode counterpart exists, the
characters are sent unchanged.
16 Copyright © Nokia 2003
Menu functions
Info service
With this network service, you can receive messages on various topics from the network.
For details, contact your service provider.
Voice mailbox number
You can save and change the phone number of your voice mailbox (network service).
Service command editor
You can send service requests to your service provider. Key in the characters you want. Press
and hold
# to switch between letters and numbers. Press Send to send the request.
• CONTACTS (MENU 2)
You can save names and phone numbers in phone memory (internal
phone book) and in SIM card memory (SIM phone book). The internal
phone book can store up to 50 names.
Searching for a name and phone number
In the standby mode, press Menu > Contacts > Find. Key in the first characters of the name
you are looking for and press Find. Scroll to find the name you want.
If the name or phone number is saved in SIM card memory, is shown at the upper right
corner of the display; if it is saved in phone internal memory, is shown instead.
Tip: For a quick search, press in the standby mode, key in the first letter of the
name. Scroll to find the name you want.
You can also use the following options:
• Service Nos. to call the service numbers of your service provider if the numbers are
included on your SIM card (network service).
• Add contact to save names and phone numbers in the phone book.
• Delete to delete names and phone numbers from the phone book one by one or all
at once.
• Edit to edit the names and numbers in Contacts.
• Copy to copy names and phone numbers all at once or one by one from phone memory
to SIM card memory, or vice versa.
• Assign tone to set the phone to play the ringing tone you want when you receive a call
from a particular phone number. Select the phone number or name you want and press
Assign. Note that this function only works when both the network and the phone are
able to identify and send the caller´s identity.
• Send phone no. to send a person´s phone number as an over the air (OTA) message if
supported by the network.
Nokia 11 0 0 User Guide 17 Copyright © Nokia 2003
Phone book settings
In the standby mode, press Menu > Contacts > Settings. Then select from the following:
Memory in use—to select whether the names and phone numbers are saved in SIM card
or Phone. Note that when you change the SIM card, SIM card memory is automatically
selected.
Contacts view—to select how the names and phone numbers are shown, either Name +
number (one name and number at a time), or Contacts list (three names at a time).
Memory status—to check how many names and phone numbers are already saved and how
many can still be saved in each phone book.
• CALL LOG (MENU 4)
The call log records information about calls you make and receive.
The phone stores the numbers of the last ten calls that you missed,
the last ten calls that you received, and the last ten calls that you
dialed. For call log to work properly:
• You must be in a digital network, your service provider must support caller ID, and it
must be enabled in the phone.
• Your calls cannot be blocked.
• Your phone must be on and within the service area, or in a compatible network
if roaming.
Check missed, received, or dialed calls
1 From the menu select Call log; then select either Missed calls, Received calls, or
Dialed numbers.
2 Scroll through the list of numbers and highlight your selection.
3 Select Options; then select one of the following options:
Call—Dial the number from the call log.
Send message—Send a text message to the person who called you or whom you called.
Call time—Show the time when the call was connected.
Edit number—Edit the number and save it with a name to your phone book.
Save—Enter a name for the number and save both to your phone book.
Delete—Erase the number from the call list.
Delete recent call lists
Note: You cannot undo this operation.
From the menus, select Call log > Delete recent call lists > All, Missed, Dialed, or Received.
18 Copyright © Nokia 2003
Menu functions
Call timers
Your phone tracks the amount of time you spend on each call.
Note: The actual time invoiced for calls by your service provider may vary,
depending upon network features, rounding off for billing, and so forth.
View call durations
1 From the menus, select Call log > Call timers.
2 Select one of the following options:
3 Duration of last call—Show the call duration of the last call.
4 Duration of all calls—Show the call duration of all calls that have been made and
received since you reset the timers.
5 Duration of received calls—Show the duration of all received calls.
6 Duration of dialed calls—Show the duration of all calls dialed.
7Clear timers—Clear all call timers for the currently selected phone number. (Your phone
includes separate timers for each number used.) This action cannot be undone.
Clear call timers
8 Press Menu > Call log > Call timers > Clear timers.
9 Enter your security code and select OK.
Prepaid credit
Note: This feature is not available in all areas and may not appear in the menu.
Check with your service provider for availability.
When using a prepaid SIM card, you can make calls only when there are enough credit units
on the SIM card (network service). Options are Credit info display (show or hide remaining
units in the standby mode), Credit available (amount of remaining units), Last event costs,
and Recharge status.
Note: When no charging or currency units remain, calls may only be possible to the
emergency number programmed into your phone (for example, 911).
• TONES (MENU 5)
In this menu, you can change the settings of the currently selected
profile and create ringing tones of your own. See “Profiles (Menu 6)”
on page 20.
Ringing tone—Sets the tone that you hear when you receive a call.
Ringing volume—Sets the volume level for the ringing and message alert tones.
Ringing options—Defines how the phone notifies you of incoming voice calls. For example,
when Silent is selected, the phone stays silent when you receive a call and is shown in
the standby mode.
Nokia 11 0 0 User Guide 19 Copyright © Nokia 2003
Message alert tone—Sets the tone that you hear when you receive a text message.
Keypad tones—Sets the volume for keypad tones.
Warning tones—Sets the phone to sound tones, e.g. when the battery is running out of power.
Vibrating alert—Sets the phone to vibrate when you receive a call or a text message.
The vibrator does not operate when the phone is connected to a charger.
Rhythmic backlight alert—Sets the backlights of the phone to flash in the rhythm of the
selected ringing tone or message alert tone.
• PROFILES (MENU 6)
You can customize the phone for different events and environments.
Initially, personalize the setting groups and profiles to your liking and
then you only need to activate a profile to use it.
Activate and customize
In the Profiles menu, select a profile and press OK.
To change the settings of the profile, select Customize > OK. Available options are Ringing
tone, Ringing volume, Ringing options, Message alert tone, Keypad tones, Warning
tones, Vibrating alert, Rhythmic backlight alert, Screen saver, or Rename (not available
under Normal). Select the option you want and press OK.
You can also change the settings of the currently selected profile in Tone settings, see
“Tones (Menu 5)” on page 19.
Tip: To activate a profile quickly in the standby mode or during a call, press and
release the power key, scroll to the desired profile, and press OK.
• SETTINGS (MENU 7)
In this menu you can adjust various settings of the phone. You can
also reset some menu settings to their default values by choosing
Restore factory settings.
Time and date settings
CLOCK
Lets you set the phone to show the current time in the standby mode, adjust the time, and
select the 12- or 24-hour time format. If the battery was removed from the phone, you may
need to set the time again.
DATE SETTING
Lets you set the correct date. If the battery was removed from the phone, you may need to
set the date again.
20 Copyright © Nokia 2003

Menu functions
AUTO UPDATE OF DATE & TIME
This network service updates the date and time according to the current time zone.
The automatic update of date and time does not change the time you have set for the
alarm clock or the reminder notes. They are in local time. Updating may cause some
alarms that you have set to expire without sounding.
Call settings
• Call forwarding forwards incoming calls to your voice mailbox or to some other phone
number (network service).
Select the forwarding option you want, for example, select Forward if busy to forward
the calls when you are on a call or when you reject a call.
Several forwarding options may be active at the same time. When Forward all voice
calls is active, appears.
Set the selected option on (Activate) or off (Cancel), check whether the option is
activated by selecting Check status, or specify a delay for certain diverts in Set delay
(not available for all forwarding options).
• Automatic redial sets your phone to redial up to ten times after an unsuccessful
call attempt.
• 1-touch dialing lets you press and hold the 1-touch dial keys (2–9) to dial names and
phone numbers assigned to the corresponding keys.
• Call waiting is a network service that notifies you of a new incoming call while you
have a call in progress. Press Answer to answer the waiting call and put the first call
on hold. Press End to end the active call.
• Send my own caller ID when calling is a network service that lets your phone number
appear to (Default or Yes) or be hidden from (No) the person you are calling. When you
select Preset, the setting agreed with your service provider is used.
Phone settings
Language—To select the language for the display texts.
Cell info display—To set the phone to indicate when it is used in a cellular network based
on Micro Cellular Network (MCN) technology (network service). For more information,
contact your service provider.
Welcome note—You can key in a message that will be shown briefly on the display when
the phone is switched on.
Network selection—To set the phone to automatically select a cellular network available in
your area, or you can select the network manually. The network you select must have a
roaming agreement with your home network.
Confirm SIM service actions—To set the phone to show or hide confirmation messages
when you use the SIM card services [see “SIM services (Menu 12)” on page 26].
Nokia 11 0 0 User Guide 21 Copyright © Nokia 2003

Enhancement settings
You can use your phone with many Nokia enhancements. However, the Enhancement
settings menu appears only after an accessory has been connected to the phone at least
once. You can select a default profile that will be associated with each accessory.
• Headset (such as the HDC-5 or HDE-2)
• Handsfree Car kit (such as the CARK-125 or PPH-1)
• Loopset (LPS-3)
• TTY/TDD Adapter (HDA-9)
Keyguard settings
Use Automatic keyguard to automatically lock the phone keypad after a preset time delay.
The phone must be idle in the standby mode. You can also lock the keypad of the phone with
Keyguard code.
• Select Menu > Settings > Keyguard settings > Automatic keyguard > On. When Set
delay appears, key in the time and press OK. You can set the time from 10 seconds to
60 minutes. To deactivate the automatic keyguard, select Off.
• Select Menu > Settings > Keyguard settings > Keyguard code request, key in the
security code, and press OK. After you have selected On, the phone asks for the security
code every time you press Unlock. To deactivate the security keyguard, select Off.
See also “Lock the keypad” on page 10.
Security settings
Note: When calls are restricted, calls still may be possible to the official emergency
number programmed into your phone.
Several types of codes are used in the phone:
• The security code, supplied with the phone, protects your phone against unauthorized
use. The preset code is 12345.
• The PIN code, supplied with the SIM card, protects the card against unauthorized use.
The preset code is 1234. If you enter the PIN code incorrectly three times in succession,
the SIM card is blocked. You must enter the PUK code to unblock the SIM card and set
a new PIN code.
• The PIN2 code is supplied with some SIM cards and is required to access certain
services, such as charging unit counters. If you enter the PIN2 code incorrectly three
times in succession, PIN2 code blocked appears on the display, and you will be asked
for the PUK2 code.
• The PUK and PUK2 codes may be supplied with the SIM card. If this is not the case,
contact your local service provider.
PIN code request—You can set your phone to ask for the PIN code of the SIM card when
the phone is switched on. Some SIM cards require activating this function at all times.
22 Copyright © Nokia 2003
Menu functions
Call restrictions—This network service lets you restrict incoming and outgoing calls with
your phone. Choose an option and select Activate, Cancel, or check whether a service is
activated (Check status).
Fixed dialling—This network service lets you lets you restrict outgoing calls to selected
phone numbers.
Closed user group—This network service lets you specify a group of people whom you can
call and who can call you.
Security level—Sets the phone to ask for the security code when a new SIM card is inserted
in the phone or when you select the internal phone book.
Note: When you change the security level, all the recent calls lists are cleared,
including missed calls, received calls and dialed numbers.
Change of access codes—Lets you change the security code, PIN code, PIN2 code, or
restriction password. These codes can include the numbers 0 to 9 only.
Avoid using access codes similar to the emergency numbers, such as 911, to prevent
accidental dialling of the emergency number.
Restore factory settings
To reset some of the menu settings to their original values. Press Menu > Settings >
Restore factory settings. Key in the security code and press OK. The names and phone
numbers saved in the phone book are not deleted.
• ALARM CLOCK (MENU 8)
You can set the alarm to sound at the time you want just once, or
repeatedly, for example every working day.
Press Menu > Alarm clock. Key in the time for the alarm. When the
alarm sounds, pressing C to stop it. If you press Snooze, the alarm stops and rings again in
5 minutes.
If the alarm time is reached while the phone is switched off, the phone switches itself on
and starts sounding the alarm tone. If you press C, the phone asks whether you want to
activate the phone for calls. Press C to switch off the phone or Yes to make and receive calls.
Note: Do not press Yes when wireless phone use is prohibited or when it may cause
interference or danger.
• REMINDERS (MENU 9)
Note: Your phone must be switched on to use this function.
Do not switch on the phone when wireless phone use is
prohibited or when it may cause interference or danger.
With this memory aid, you can save up to 10 short text notes with an alarm. The alarm is
activated when the set date and time is reached.
Nokia 11 0 0 User Guide 23 Copyright © Nokia 2003
You can select: Add new, View all, Delete, Edit or To calendar to add a new reminder, view,
edit or send the existing reminders and delete the reminders one by one or all at once.
When the reminder time is reached, you can stop the alarm by pressing C. If you press
Snooze, the phone alarms again in about 10 minutes.
• GAMES (MENU 10)
The phone offers you some games to play. Each game is provided
with a brief help text.
Adjust common game settings
Select Settings. You can set the sounds, lights, and vibrations (Shakes) for the game.
Note that when Warning tones (Menu 5-1-6) is off, there may be no sound even if
Game sounds is on. When Vibrating alert (Menu 5-1-7) is off, the phone does not
vibrate even if Shakes is on.
• EXTRAS (MENU 11)
Calculator
The phone is provided with a calculator that can also be used for rough
currency conversions.
Note: This calculator has limited accuracy and is designed for simple calculations.
Select Menu > Extras > Calculator.
MAKE A CALCULATION
• The keys 1-9 insert a digit. The # key inserts a decimal point. Press C to delete the last
digit. To change the sign, press Options and select Change sign.
• Press
• To get the result, press Options and select Equals. Press and hold C to clear the display
CURRENCY CONVERSION
To save the exchange rate, press Options > Exchange rate > Foreign unit expressed in
domestic units or Domestic unit expressed in foreign units, key in the value (press # for
a decimal point), and press OK.
To make the conversion, key in the currency amount to be converted, press Options >
In domestic or In foreign.
once for add (+), twice for subtract (-), three times for multiply (*), and four times
*
for divide (/).
for a new calculation.
24 Copyright © Nokia 2003
Menu functions
Stopwatch
The stopwatch can be used for time measurement, for example in different sports. Select
Menu > Extras > Stopwatch.
Press Start to start timing. To take the time, press Stop. When the timing is stopped, press
Options for Start, Reset, or Exit. If you select Start, timing continues from the previous
stop time. Reset stops the current timing and sets the time to zero.
To set the timing to continue in the background, press C three times. While the time is
running, is flashing in the standby mode.
Note: Using the stopwatch consumes the battery and phone operating time will
be reduced. Be careful not to let it run in the background when performing other
operations with your phone.
Countdown timer
You can set the alarm to sound after a period of lapsed time. The countdown timer contains
two separate timers. Traditional timer enables you to activate the timer quickly for simple tasks.
Interval timers enables you to save cyclic time periods, for example, for different exercises.
Select Menu > Extras > Countdown timer. Key in the alarm time and press OK. You can
also key in a note for the alarm, change the time and stop the timer.
When the timer is running, is shown in the standby mode.
When the alarm time is reached, the phone sounds a tone and a note for the alarm appears.
Press any key to stop the alarm.
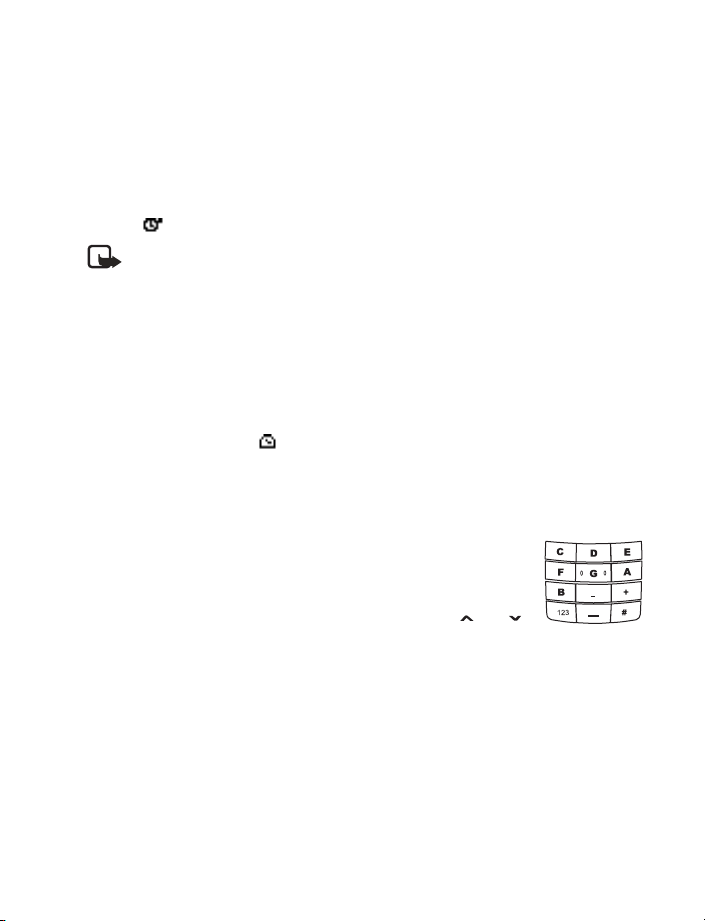
Composer
You can create your own ringing tones. Select the tone that you want
to edit and key in the notes. For example, press 4 for note F.
The 8 key shortens (-) and the 9 key lengthens (+) the duration of the
note or rest. Insert a rest with 0. The
makes the note sharp (not available for notes E and B). Use and
to move the cursor left or right. Press C to delete a note or rest to the
left of the cursor.
When the tone is complete, press Options and select Play, Save, Tempo, Clear screen
or Exit
key sets the octave and the # key
*
Screen saver
Choose a picture for the phone display. Select Menu > Extras > Screen saver, then scroll
to select the picture. You can choose the Time-out duration so the picture appears after a
pause of only five seconds or as long as 10 minutes. The picture stays visible until you press
any key. Note that the screen saver overrides all the graphics and texts on the display in the
standby mode.
Nokia 11 0 0 User Guide 25 Copyright © Nokia 2003
Loading...