


Nokia 1
User Guide
Issue 2018-03-05 en

Nokia 1 User Guide
About this user guide
Important: For important information on the safe use of your device and battery, read “For your safety” and “Product Safety” info in the printed user guide, or at www.nokia.com/support before you take the device into use. To find out how to get started with your new device, read the printed user guide.
© 2018 HMD Global Oy. All rights reserved. |
2 |
Nokia 1 User Guide
Table of Contents
About this user guide |
2 |
Get started |
6 |
Keep your phone up to date |
6 |
Keys and parts |
6 |
Insert or remove SIM and memory card |
7 |
Charge your phone |
8 |
Switch on and set up your phone |
9 |
Dual SIM settings |
9 |
Lock or unlock your phone |
10 |
Use the touch screen |
11 |
Basics |
15 |
Personalize your phone |
15 |
Open and close an app |
15 |
Notifications |
16 |
Control volume |
17 |
Screenshots |
17 |
Battery life |
17 |
Save on data roaming costs |
18 |
Write text |
19 |
Date and time |
22 |
Clock and alarm |
23 |
Calculator |
24 |
Accessibility |
24 |
Connect with your friends and family |
26 |
Calls |
26 |
Contacts |
26 |
Send and receive messages |
27 |
28 |
|
Get social |
29 |
Camera |
31 |
Camera basics |
31 |
© 2018 HMD Global Oy. All rights reserved. |
3 |
Nokia 1 User Guide
Your photos and videos |
32 |
Internet and connections |
33 |
Activate Wi-Fi |
33 |
Use a mobile data connection |
33 |
Browse the web |
34 |
Bluetooth® |
36 |
VPN |
38 |
Music and videos |
39 |
Music |
39 |
Videos |
40 |
FM Radio |
40 |
Organize your day |
42 |
Calendar |
42 |
Maps |
43 |
Find places and get directions |
43 |
Use location services |
43 |
Apps and services |
45 |
Google Play |
45 |
Software updates and backups |
47 |
Update your phone software |
47 |
Back up your data |
47 |
Restore original settings and remove private content from your phone |
48 |
Storage |
48 |
Protect your phone |
50 |
Protect your phone with a screen lock |
50 |
Change your SIM PIN code |
50 |
Access codes |
50 |
Product and safety information |
53 |
For your safety |
53 |
Network services and costs |
56 |
Emergency calls |
56 |
Take care of your device |
57 |
Recycle |
58 |
Crossed-out wheelie bin symbol |
58 |
Battery and charger information |
59 |
© 2018 HMD Global Oy. All rights reserved. |
4 |
Nokia 1 User Guide
Small children |
60 |
Medical devices |
61 |
Implanted medical devices |
61 |
Hearing |
61 |
Protect your device from harmful content |
62 |
Vehicles |
62 |
Potentially explosive environments |
62 |
Certification information (SAR) |
63 |
About Digital Rights Management |
64 |
Copyrights and notices |
64 |
© 2018 HMD Global Oy. All rights reserved. |
5 |
Nokia 1 User Guide
Get started
Keep your phone up to date
YOUR PHONE SOFTWARE
Keep your phone up to date and accept available software updates to get new and enhanced features for your phone. Updating the software may also improve your phone’s performance.
Keys and parts
Explore your new phone.
YOUR PHONE
© 2018 HMD Global Oy. All rights reserved. |
6 |
Nokia 1 User Guide
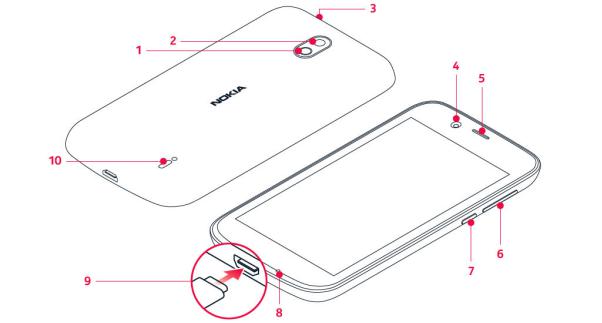
This user guide applies to the following models: TA-1047, TA-1060, TA-1056, TA-1079, and TA-1066.
1. Flash |
6. |
Volume keys |
2. Camera |
7. |
Power/Lock key |
3. Headset connector |
8. |
Microphone |
4. Front camera |
9. |
USB connector |
5. Earpiece |
10. |
Loudspeaker |
|
|
Some of the accessories mentioned |
in this user guide, such as charger, headset or data cable, may be sold separately.
PARTS AND CONNECTORS, MAGNETISM
Do not connect to products that create an output signal, as this may damage the device. Do not connect any voltage source to the audio connector. If you connect an external device or headset, other than those approved for use with this device, to the audio connector, pay special attention to volume levels.
Parts of the device are magnetic. Metallic materials may be attracted to the device. Do not place credit cards or other magnetic stripe cards near the device for extended periods of time, since the cards may be damaged.
Insert or remove SIM and memory card
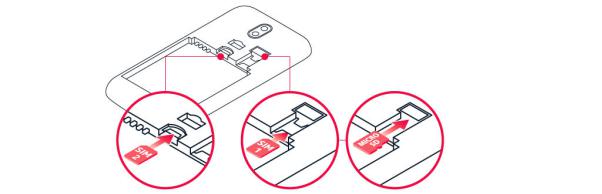
INSERT SIM AND MEMORY CARD
1. Open the back cover: insert your fingernails in the seam between the cover and
© 2018 HMD Global Oy. All rights reserved. |
7 |
Nokia 1 User Guide
display, and bend the cover open.
2.If the battery is in the phone, lift it out.
3.Slide the nano-SIM in the SIM slot face down. If you have a dual SIM phone, slide the second SIM in the SIM2 slot.¹
4.Slide the memory card in the memory card slot face down.
Use only compatible memory cards approved for use with this device. Incompatible cards may damage the card and the device and corrupt data stored on the card.
Note: On dual SIM capable devices, both SIM1 and SIM2 slots support 4G networks. However, if your SIM1 and SIM2 are both LTE SIM cards, the primary SIM supports 4G/3G/2G networks, while the secondary SIM can only support 2G. For more information on your SIM cards, contact your service provider.
REMOVE SIM AND MEMORY CARD
Remove the back cover, lift the battery out, and slide the cards out of their slots.
Note: Switch the device off and disconnect the charger and any other device before removing any covers. Avoid touching electronic components while changing any covers. Always store and use the device with any covers attached.
¹
Use only original nano-SIM cards. Use of incompatible SIM cards may damage the card or the device, and may corrupt data stored on the card.
Charge your phone
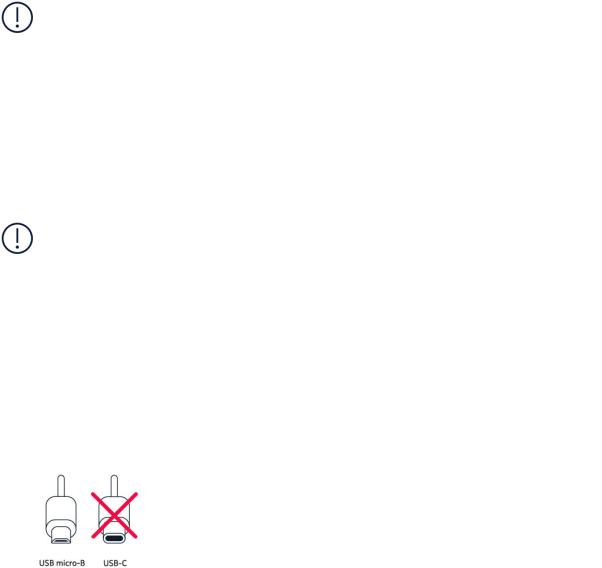
CHARGE THE BATTERY
1.Plug a compatible charger into a wall outlet.
2.Connect the cable to your phone.
Your phone supports the USB micro-B cable. You can also charge your phone from a computer with a USB cable, but it may take a longer time.
© 2018 HMD Global Oy. All rights reserved. |
8 |

Nokia 1 User Guide
If the battery is completely discharged, it may take several minutes before the charging indicator is displayed.
Switch on and set up your phone
When you switch your phone on for the first time, your phone guides you to set up your network connections and phone settings.
SWITCH ON YOUR PHONE
1.To switch on your phone, press and hold the power key until the phone vibrates.
2.When the phone is switched on, choose your language and region.
3.Follow the instructions shown on your phone.
TRANSFER DATA FROM YOUR PREVIOUS PHONE
You can transfer data from an old phone to your new phone using your Google account.
To back up data on your old phone to your Google account, refer to your old phone’s user guide.
1. Tap Settings > Users & accounts > Add account > Google .
2.Select which data you want to restore on your new phone. The sync starts automatically once your phone is connected to the internet.
RESTORE APP SETTINGS FROM YOUR PREVIOUS ANDROID PHONE
If your previous phone was an Android, and back up to Google account is enabled on it, you can restore your app settings and Wi-Fi passwords.
1.Tap Settings > System > Backup .
2.Switch Backup to Google Drive to On .
© 2018 HMD Global Oy. All rights reserved. |
9 |

Nokia 1 User Guide
Dual SIM settings
If you have a dual SIM variant, you can have 2 SIMs in your phone, for example, one for your work and one for your personal use.
Note: On dual SIM capable devices, both SIM1 and SIM2 slots support 4G networks. However, if your SIM1 and SIM2 are both LTE SIM cards, the primary SIM supports 4G/3G/2G networks, while the secondary SIM can only support 2G. For more information on your SIM cards, contact your service provider.
CHOOSE WHICH SIM TO USE
When, for example, making a call, you can choose which SIM to use by tapping the corresponding SIM 1 or SIM 2 button after you dial the number.
Your phone shows the network status for both SIMs separately. Both SIM cards are available at the same time when the device is not being used, but while one SIM card is active, when, for example, making a call, the other may be unavailable.
MANAGE YOUR SIMS
Don't want work to interfere with your free time? Or do you have a cheaper data connection on one SIM? You can decide which SIM you want to use.
Tap Settings > Network & Internet > SIM Cards .
RENAME A SIM CARD
Tap the SIM you want to rename, and type in the name you want.
SELECT WHICH SIM TO USE FOR CALLS OR DATA CONNECTION
Under Preferred SIM for , tap the setting you want to change and select the SIM.
© 2018 HMD Global Oy. All rights reserved. |
10 |
Nokia 1 User Guide
Lock or unlock your phone
LOCK YOUR PHONE
If you want to avoid accidentally making a call when your phone is in your pocket or bag, you can lock your keys and screen.
To lock your keys and screen, press the power key.
UNLOCK THE KEYS AND SCREEN
Press the power key, and swipe up across the screen. If asked, provide additional credentials.
Use the touch screen
Important: Avoid scratching the touch screen. Never use an actual pen, pencil, or other sharp object on the touch screen.
© 2018 HMD Global Oy. All rights reserved. |
11 |
Nokia 1 User Guide
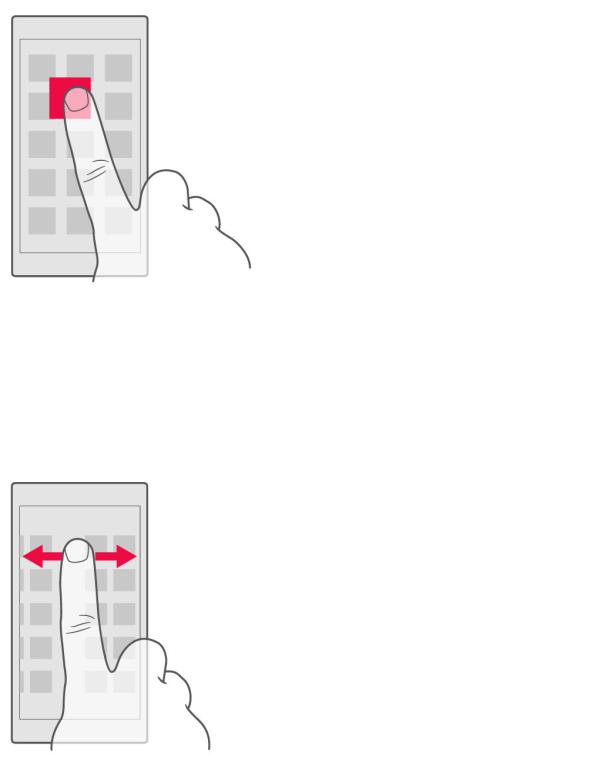
TAP AND HOLD TO DRAG AN ITEM
Place your finger on the item for a couple of seconds, and slide your finger across the screen.
SWIPE
Place your finger on the screen, and slide your finger in the direction you want.
© 2018 HMD Global Oy. All rights reserved. |
12 |

Nokia 1 User Guide
SCROLL THROUGH A LONG LIST OR MENU
Slide your finger quickly in a flicking motion up or down the screen, and lift your finger. To stop the scrolling, tap the screen.
ZOOM IN OR OUT
Place 2 fingers on an item, such as a map, photo, or web page, and slide your fingers apart or together.
© 2018 HMD Global Oy. All rights reserved. |
13 |

Nokia 1 User Guide
LOCK THE SCREEN ORIENTATION
The screen rotates automatically when you turn the phone 90 degrees.
To lock the screen in portrait mode, swipe down from the top of the screen, and tap Auto-rotate to switch to Portrait .
USE THE NAVIGATION KEYS
To see which apps you have open, tap the overview key c.
To switch to another app, tap the app you want. To close an app, tap the icon next to it.
To go back to the previous screen you were in, tap the back key . Your phone remembers all the apps and websites you've visited since the last time your screen was locked.
To go to the home screen, tap the home key . The app you were in stays open in the background.
© 2018 HMD Global Oy. All rights reserved. |
14 |

Nokia 1 User Guide
Basics
Personalize your phone
Learn how to personalize the home screen and how to change ringtones.
CHANGE YOUR WALLPAPER
Tap Settings > Display > Wallpaper .
CHANGE YOUR PHONE RINGTONE
Tap Settings > Sound > Phone ringtone (SIM1) or Phone ringtone (SIM2) and select the ringtone.
CHANGE YOUR MESSAGE NOTIFICATION TONE
Tap Settings > Sound > Advanced > Default notification sound .
Open and close an app
OPEN AN APP
On the home screen, tap an app icon to open it. To open one of the apps running in the background, tap c, and select the app.
© 2018 HMD Global Oy. All rights reserved. |
15 |

Nokia 1 User Guide
CLOSE AN APP
Tap c, and tap on the app you want to close.
FIND YOUR APPS
On the home screen, swipe up from the bottom of the screen to see all your apps.
Notifications
Stay in touch with what's happening on your phone with notifications.
USE THE NOTIFICATION PANEL
When you receive new notifications, such as messages or missed calls, indicator icons appear on the status bar at the top of the screen. To see more information about the notifications, drag the status bar down. To close the view, swipe up on the screen.
To open the notification panel, drag the status bar down. To close the notification panel, swipe up on the screen.
To change the notification settings of an app, tap Settings > Apps & notifications > Notifications > App notifications and tap the app name to open the app settings.
USE THE QUICK SETTING ICONS
To activate features, tap the quick settings icons on the notification panel. To see
© 2018 HMD Global Oy. All rights reserved. |
16 |

Nokia 1 User Guide
more icons, drag the menu down.
To rearrange the icons, tap , tap and hold an icon, and then drag it to another location.
Control volume
CHANGE THE VOLUME
If you have trouble hearing your phone ringing in noisy environments, or calls are too loud, you can change the volume to your liking by using the volume keys on the side of your phone.
Do not connect to products that create an output signal, as this may damage the device. Do not connect any voltage source to the audio connector. If you connect an external device or headset, other than those approved for use with this device, to the audio connector, pay special attention to volume levels.
CHANGE THE VOLUME FOR MEDIA AND APPS
Press a volume key on the side of your phone to see the volume status bar, tap , and drag the sliders on the volume bars left or right.
Screenshots
TAKE A SCREENSHOT
To take a screenshot, open the notification panel, and drag the status bar downwards. Tap Screenshot . You can view captured images in Photos .
It is not possible to capture a screenshot while using some apps and features.
© 2018 HMD Global Oy. All rights reserved. |
17 |

Nokia 1 User Guide
Battery life
EXTEND BATTERY LIFE
To save power:
1.Always charge the battery fully.
2.Mute unnecessary sounds, such as touch sounds. Tap Settings > Sound > Advanced , and under Other sounds and vibrations , select which sounds to keep.
3.Use a wired headset, rather than the loudspeaker.
4.Set the phone screen to switch off after a short time. Tap Settings > Display > Sleep and select the time.
5. |
Tap |
Settings |
> |
Display |
> |
Brightness level |
. Make sure that |
Adaptive brightness |
||||||
is off. To adjust the brightness, drag the brightness level slider. |
||||||||||||||
6. |
Stop apps from running in the background: tap c, and close the apps you don’t |
|||||||||||||
need. |
||||||||||||||
7. |
Switch on the power saver: tap |
Settings |
> |
Battery |
> |
Battery saver |
, and switch |
|||||||
to On .
8.Switch location services off when you don't need them: tap Settings > Security & location and switch Location to Off .
9.Use network connections selectively:
Switch Bluetooth on only when needed.
Use a Wi-Fi connection to connect to the internet, rather than a mobile data connection.
Stop your phone scanning for available wireless networks. Tap Settings > Network & Internet > Wi-Fi , and switch to Off .
If you're listening to music or otherwise using your phone, but don't want to make or receive calls, switch the airplane mode on. Tap Settings > Network & Internet > Airplane mode .
Airplane mode closes connections to the mobile network and switches your device’s wireless features off.
© 2018 HMD Global Oy. All rights reserved. |
18 |

Nokia 1 User Guide
Save on data roaming costs
You can cut data roaming costs and save on your phone bills by changing mobile data settings. To use the optimal connection method, change the Wi-Fi and mobile networks settings.
Data roaming means using your phone to receive data over networks that your network service provider doesn't own or operate. Connecting to the internet when roaming, especially when abroad, can increase data costs substantially.
Using a Wi-Fi connection is generally faster and less expensive than using a mobile data connection. If both Wi-Fi and mobile data connections are available, your phone uses the Wi-Fi connection.
CONNECT TO A WI-FI NETWORK
1. Tap Settings > Network & Internet > Wi-Fi .
2.Make sure Wi-Fi networking is switched to On .
3.Select the connection you want to use.
CLOSE THE MOBILE DATA CONNECTION
Swipe down from the top of the screen, tap |
Mobile data |
and switch |
Mobile data |
off. |
|
|
|
Tip:To follow your data usage, tap Settings > Network & Internet > Data usage .
STOP DATA ROAMING
Tap Settings > Network & Internet > Mobile network , and switch Data roaming off.
© 2018 HMD Global Oy. All rights reserved. |
19 |
Nokia 1 User Guide
Write text
Learn how to write text quickly and efficiently using your phone’s keyboard.
USE THE ON-SCREEN KEYBOARD
Writing with the on-screen keyboard is easy. You can use the keyboard when holding your phone in portrait or landscape mode. The keyboard layout can vary in different apps and languages.
To open the on-screen keyboard, tap a text box.
SWITCH BETWEEN UPPER AND LOWER CASE CHARACTERS
Tap the shift key. To switch caps lock mode on, double-tap the key. To return to normal mode, tap the shift key again.
TYPE IN A NUMBER OR SPECIAL CHARACTER
Tap the numbers and symbols key. Some special character keys bring up more symbols. To see more symbols, tap and hold a symbol or special character.
INSERT EMOJIS
Tap the emoji key, and select the emoji.
COPY OR PASTE TEXT
Tap and hold a word, drag the markers before and after the word to highlight the section you want to copy, and tap COPY . To paste the text, tap where you want to paste the text and select PASTE .
© 2018 HMD Global Oy. All rights reserved. |
20 |
 Loading...