


SERVICE MANUAL
Digital Music Vault
M 52
NAD
M 52
Digital Music Vault


 ® M52 Digital Music Vault
Quick Setup Guide
WHAT’S IN THE BOX
IMPORTANT!
•The NAD M50 that appears in this guide is a reference model only and not included in the NAD M52 package.
•The NAD M52 is compatible only with the NAD M50.
•The NAD M52 cannot be connected directly to a PC or MAC.
•Check out the NAD website, http://nadelectronics.com/products/masters-series/M52-Digital-Music-Vault, for further information about the NAD M52.
CONNECT!
NAD M50 Digital
Music Player
POWER UP!
NAD M52 Digital Music Vault
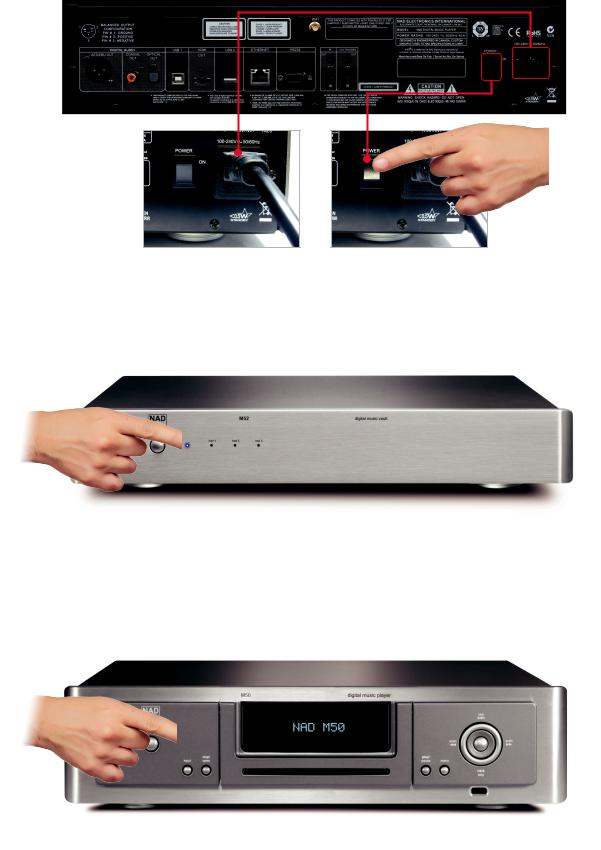
NAD M50 Digital Music Player
©2013 NAD ELECTRONICS INTERNATIONAL, A DIVISION OF LENBROOK INDUSTRIES LIMITED
All rights reserved. NAD and the NAD logo are trademarks of NAD Electronics International, a division of Lenbrook Industries Limited. M52_QS_v04 - Jan 2013
M52 References for Service Manual (Rev. A)
M52 LED Indication
standby: power LED amber, HDD LEDs off
power up: power LED steady blue, HDD LEDs interleaving flashing red/blue
short time power loss (e.g. USB unplug and plug back in a second or two): Power LED steady blue, HDD LEDs flashing red/blue at the same time
unit active healthily: all LEDs steady blue and the unit can be accessed and recognized
unit has invalid RAID set: all LEDs steady blue but the unit can't be accessed or not recognized. rebuilding: LED of the rebuilding HDD flashing blue
rebuild success: LED of the rebuilding HDD steady blue rebuild failure: LED of the rebuilding HDD flashing red individual disk healthy: LED of the HDD steady blue disk failure: LED of the HDD flashing red
disk missing: LED of the HDD steady red
NOTE:
1)“unit has invalid RAID set” may be caused by inserting a HDD that was part of other RAID set unit. Wiping the last few sectors of the HDD will solve the problem (see “Rebuild” note 1). Or if it’s caused by something else, re initialize and reconfigure the RAID set is required which will cause the data loss.
2)“disk failure” may be caused by SATA port failure if the disk itself is healthy. Replacing the failed disk with a new one or unplug and plug back the failed disk, and rebuild RAID array will solve the problem (see how to rebuild RAID array section).
Initialize /Configure the RAID Array
1) When is RAID array initialization needed
When the RAID array is invalid or when two or more of the HDDs are replaced, re initialization of the RAID array is required. But the initialization will destroy all data previously stored on the disks and is completely irreversible!
2) How to initialize and configure RAID array
Make sure all the hard disks are healthy.
•Power on the unit
•Press "reset" button at the rear panel soon after the hard disk LEDs starts to flash
•Press "reset" button again after the LEDs flash 20 times after the above step. After this step, all the HDD LEDs become steady blue. At this point, all the data in the hard disks are lost and the unit has to be formatted.
•Partition and format the unit
Rebuild
1) When is RAID array rebuild needed
If one and only one of the hard disks is either missing or fails, i.e. that hard disk's LED becomes steady red or flashing red, the unit RAID array needs rebuild.
If two or more than two hard disks fail, RAID array can't be rebuilt and the data in the unit will be lost. At this point, to continue use the unit, you will have to replace all the broken/failed hard disks and re initialize the RAID array.
2) How to rebuild a RAID array with same healthy HDD in the unit
This case happens when one healthy HDD is removed and then put back at the same position.
•Power down the unit
•Unplug one healthy HDD
•Power up the unit until it’s steady (2 HDDs LED blue, unplugged HDD LED red) – this step leaves the unit in degraded mode
•Power down the unit
•Plug the HDD back
•Power up the unit – this step will rebuild the RAID array of the unit
3) How to rebuild a RAID array with a new healthy HDD
This case happens when one HDD is replaced with a new healthy HDD.
•Power down the unit
•Remove the failed/broken hard disk
•Replace it with a new healthy hard disk
•Power back on the unit. Press the tiny "reset" button at the rear panel after HDD LEDs flashes 22 times. This will start the RAID array rebuild. During rebuild, the new HDD LED will be flashing blue and the rest LEDs are steady blue.
 Loading...