


 ® C 556
Turntable
Owner’s Manual Manuel d’Installation Manual del Usuario Manual do Proprietário Manuale delle Istruzioni Bedienungsanleitung Gebruikershandleiding Bruksanvisning
SVENSKA NEDERLANDS DEUTSCH ITALIANO PORTUGUÊS ESPAÑOL FRANÇAIS ENGLISH

ENGLISH
IMPORTANT SAFETY INSTRUCTIONS
PRECAUTIONS
Read the Operating Instructions carefully and completely before operating the unit. Be sure to keep the Operating Instructions for future reference. All warnings and cautions in the Operating Instructions and on the unit should be strictly followed, as well as the safety suggestions below.
INSTALLATION
1Water and Moisture - Do not use this unit near water, such as near a bathtub, washbowl, swimming pool, or the like.
2Heat - Do not use this unit near sources of heat, including heating vents, stoves, or other appliances that generate heat. It also should not be placed in temperatures less than 5°C (41°F) or greater than 35°C (95°F).
3Mounting surface - Place the unit on a flat, even surface.
4Ventilation - The unit should be situated with adequate space around it so that proper ventilation is assured. Allow 10 cm (4 inches) clearance from the rear and the top of the unit, and 5 cm (2 inches) from each side. Do not place on a bed, rug, or similar surface that may block the ventilation openings. Do not install the unit in a bookcase cabinet, or airtight rack where ventilation may be impeded.
5Objects and liquid entry - Take care that objects or liquids do not get inside the unit through the ventilation openings.
6Carts and stands - When placed or mounted on a stand or cart, the
unit should be moved with care. Quick stops, excessive force, and uneven surfaces may cause the unit and cart to overturn or fall.
7Wall or ceiling mounting - The unit should not be mounted on a wall or ceiling, unless specified in the Operating Instructions.
WARNING!
TO REDUCE THE RISK OF FIRE OR ELECTRONIC SHOCK, DO NOT EXPOSE THIS APPLIANCE TO RAIN OR MOISTURE
This product is manufactured to comply with the radio interference requirements of EEC DIRECTIVE 89/68/EEC and 73/23/EEC
ELECTRIC POWER
1Power Sources - Connect this unit only to power sources specified in the Operating Instructions, and as marked on the unit.
2Polarization - As a safety feature, some units are equipped with polarized AC power plugs which can only be inserted one way into a power outlet. If it is difficult or impossible to insert the AC power plug into an outlet, turn the plug over and try again. If it still does not easily insert into the outlet, please call a qualified service technician to service or replace the outlet. Avoid defeating the safety feature of the polarized plug, do not force it into a power outlet.
3AC power cord - When disconnecting the AC power cord, pull it out by the AC power plug. Do not pull the cord itself. Never handle the AC power plug with wet hands, as this could result in fire or shock. Power cords should be routed to avoid being severely bent, pinched, or walked upon. Pay particular attention to the cord from the unit to the power socket. Avoid overloading AC outlets and extension cords beyond their capacity, as this could result in fire or shock.
4Extension cord - To help prevent electric shock, do not use a polarized AC power plug with an extension cord, receptacle, or other outlet unless the polarized plug can be completely inserted to prevent exposure of the blades of the plug.
5When not in use - The primary method of isolating the turntable from the mains supply is to disconnect the mains plug. Ensure that the mains plug remains accessible at all times. Unplug the AC power cord from the AC outlet if the unit will not be used for several months or more.
EXPLANATION OF GRAPHICAL SYMBOLS
The lightning flash with arrowhead symbol, within an equilateral triangle, is intended to alert the user to the presence of uninsulated “dangerous voltage” within the product’s enclosure that may be of sufficient magnitude to constitute a risk of electric shock to persons.
The exclamation point within an equilateral triangle is intended to alert the user to the presence of important operating and maintenance (servicing) instructions in the literature accompanying the appliance.
CAUTION
Modifications or adjustments to this product, which are not expressly approved by the manufacturer, may void the user’s right or authority to operate this product.
MAINTENANCE
Clean the unit only as recommended in the Operating Instructions.
DAMAGE REQUIRING SERVICE
Have the unit serviced by a qualified service technician if
•The AC power plug has been damaged.
•Foreign objects or liquid have got inside the unit.
•The unit has been exposed to rain or water.
•The unit does not seem to operate normally.
•The unit exhibits a marked change in performance.
•The unit has been dropped, or the cabinet has been damaged
DO NOT ATTEMPT TO SERVICE THE UNIT YOURSELF.
NOTES ON ENVIRONMENTAL PROTECTION
At the end of its useful life, this product must not be disposed of with regular household waste but must be returned to a collection point for the recycling of electrical and electronic equipment. The symbol on the product, user’s manual and packaging, point this out.
The materials can be reused in accordance with their markings. Through re-use, recycling of raw materials or other forms of recycling of old products, you are making an important contribution to the protection of our environment. Your local administrative office can advise you of the responsible waste disposal point.
INFORMATION ABOUT COLLECTION AND DISPOSAL OF WASTE BATTERIES (DIRECTIVE 2006/66/EC OF THE EUROPEAN PARLIAMENT AND THE COUNCIL OF EUROPEAN UNION) (FOR EUROPEAN CUSTOMERS ONLY)
Batteries bearing any of these symbols indicate that they should be treated as “separate collection” and not as municipal waste. It is encouraged that necessary measures are implemented to maximize the separate collection of waste batteries and to minimize the disposal of batteries as mixed municipal waste.
End-users are exhorted not to dispose waste batteries as unsorted municipal waste. In order to achieve a high
level of recycling waste batteries, discard waste batteries separately and properly through an accessible collection
point in your vicinity. For more information about collection and recycling of waste batteries, please contact your local municipality, your waste disposal service or the point of sale where you purchased the items.
By ensuring compliance and conformance to proper disposal of waste batteries, potential hazardous effects on human health is prevented and the negative impact of batteries and waste batteries on the environment is minimized, thus contributing to the protection, preservation and quality improvement of the environment.
OWNER’S RECORD
For your convenience, record the model number and serial number in the space provided below. Please refer to them when you contact your dealer in case of difficulty.
Model No. :. . . . . . . . . . . . . . . . . . . .
Serial No. :. . . . . . . . . . . . . . . . . . . .
2
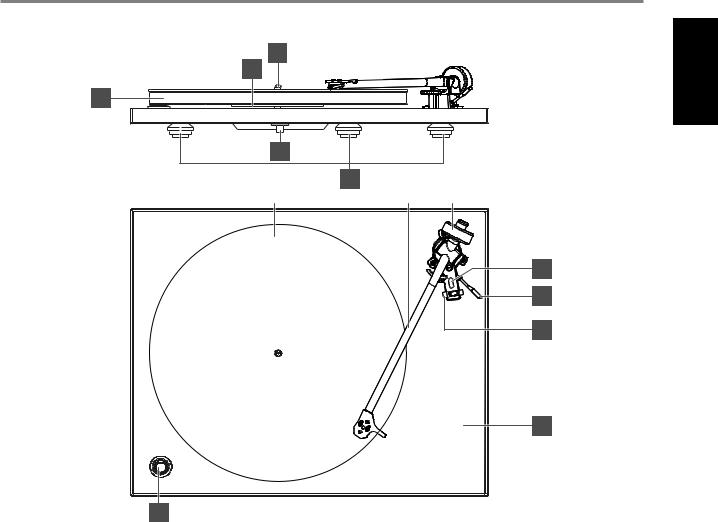
IDENTIFICATION OF CONTROLS
3
2
1
4
5
6 |
|
7 |
|
8 |
|
|
|
|
|
9
10
11
12
13
ENGLISH |
|
FRANÇAIS |
|
ESPAÑOL |
|
PORTUGUÊS |
||||
1 |
Platter |
|
1 |
Plateau |
|
1 |
Plato |
|
1 |
Prato |
2 |
Sub platter |
2 |
Plateau interne |
2 |
Subplato |
2 |
Sub-prato |
|||
3 |
Spindle |
3 |
Axe |
3 |
Eje |
3 |
Eixo |
|||
4 |
Bearing |
4 |
Palier |
4 |
Cojinete |
4 |
Suporte |
|||
5 |
Anti-vibration feet |
5 |
Pieds antivibratoires |
5 |
Patas contra la vibración |
5 |
Pés anti-vibração |
|||
6 |
Mat |
6 |
Couvre-plateau |
6 |
Esterilla |
6 |
Tapete |
|||
7 |
Tonearm |
7 |
Bras |
7 |
Brazo |
7 |
Braço do gira-discos |
|||
8 |
Counterweight |
8 |
Contrepoids |
8 |
Contrapeso |
8 |
Contrapeso |
|||
9 |
Bias adjustment |
9 |
Réglage del’antiskating |
9 |
Ajuste delantideslizamiento |
9 |
Dispositivo anti-resvalo |
|||
10 |
Lift/lower mechanism |
10 |
Lève-bras |
10 |
Mecanismo desubida/bajada |
10 |
Mecanismo de levantamento / |
|||
11 |
Arm clip |
11 |
Agrafe de bras |
11 |
Clip del brazo |
|
|
descida |
||
12 |
Plinth |
12 |
Support |
12 |
Plinto |
11 |
Gancho do braço |
|||
13 |
On/off switch |
13 |
Interrupteur Marche/Arrêt (On/Off) |
13 |
Interruptor de encendido/ |
12 |
Mesa fono-reprodutora |
|||
|
|
|
|
|
|
|
apagado (On/Off ) |
13 |
Interruptor de Ligar / Desligar |
|
ITALIANO |
|
DEUTSCH |
|
NEDERLANDS |
|
SVENSKA |
||||
1 |
Piastra |
|
1 |
Plattenteller |
|
1 |
Draaitafel |
|
1 |
Skivtallrik |
2 |
Sottopiastra |
2 |
Unterteller |
2 |
Subchassis |
2 |
Undertallrik |
|||
3 |
Mandrino |
3 |
Spindel |
3 |
As |
3 |
Spindel |
|||
4 |
Supporto |
4 |
Lager |
4 |
Lager |
4 |
Lager |
|||
5 |
Piedino antivibrazioni |
5 |
Antivibrationsfuß |
5 |
Dempers |
5 |
Anti-vibrations fötter |
|||
6 |
Tappetino |
6 |
Matte |
6 |
Mat |
6 |
Skivmatta |
|||
7 |
Braccio del rivelatore acustico |
7 |
Tonarm |
7 |
Toonarm |
7 |
Tonarm |
|||
8 |
Contrappeso |
8 |
Gegengewicht |
8 |
Contragewicht |
8 |
Motvikt |
|||
9 |
Regolazionedell’impulso |
9 |
Anti-Skating-Einsteller |
9 |
Antiskating |
9 |
Justering avsidokraft |
|||
|
diinclinazione |
10 |
Tonarmlift |
10 |
Omhoog- /omlaagmechanise |
10 |
Tonarmslyft |
|||
10 |
Meccanismo disollevamento / |
11 |
Tonarmclip |
11 |
Armklem |
11 |
Lås för tonarmen |
|||
|
abbassamento |
12 |
Sockel |
12 |
Kast |
12 |
Plinth |
|||
11 |
Fermaglio braccio |
13 |
Ein-/Ausschalter |
13 |
Aan/uit-schakelaar |
13 |
Huvudströmbrytaren |
|||
12Piedistallo
13Interruttore acceso/spento
ENGLISH
3

ENGLISH
USING THE C 556
This turntable has been engineered to give extremely good musical reproduction. Inherent in the design are several features that improve sound quality and focus the manufacturing costs where they are most needed.
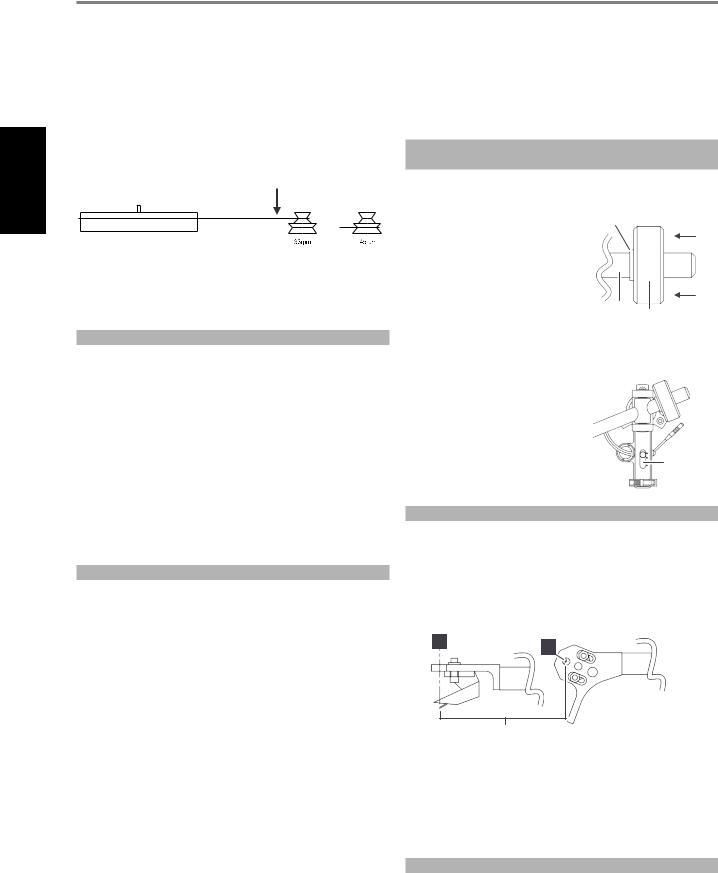
Example: Speed change is achieved by manually moving the drive belt from one pulley to another as shown below.
QUICKSTART FOR FACTORY FITTED CARTRIDGE
The C 556 is designed to be setup and used seamlessly. Setup the factory fitted cartridge by the following setup instruction.
1 Push the counterweight as close as |
Stop point |
|||
possible to the stop point in order to |
|
|
|
|
attain the correct tracking weight. This |
|
|
|
|
will automatically set the tonearm to |
|
|
|
|
within the recommended tracking |
|
|
|
|
|
|
|
|
|
|
|
|
|
|
range for the factory fitted stylus (1.5g |
|
|
|
|
– 2.0g). |
Tonearm |
|
|
|
|
||||
|
|
Counterweight |
||
The cost saving from the use of manual speed change allows a very expensive low vibration motor with an accuracy exceeding that of conventional designs to be employed.
NOTES ON INSTALLATION
1Try to mount the turntable on a rigid, level surface. A light shelf screwed to the wall or in an alcove would be ideal. Avoid mounting on hollow or heavy cabinets, or anything mounted on a wooden floor.
2DO NOT lift the centre hub from its bearing. The bearing is factory assembled with a film of thick lubricant. Disturbance of this can cause serious problems with speed variation and wear.
3The tonearm is automatically earthed (or ground) through the arm cable screening. No other earthing should be necessary.
4Save the packing, in case the turntable has to be transported in the future.
TIPS AND SUGGESTIONS
1Try to keep the lid closed while playing records. This will prevent dust falling onto the records and make cleaning unnecessary. There may also be a sound improvement.
2Try to leave the turntable running during a record playing session. Switch ON before the start, and only switch OFF after the last record has finished. Changing records while the platter revolves is easier than it sounds!
3When the record reaches the end of one side, remember to lift the stylus off the surface of the record using the lift/lower mechanism.
4When switching on the turntable, especially at 45rpm, it is recommended to give the platter a quick spin clockwise as the “ON” switch is pressed. This relieves strain on the motor and belt.
5No maintenance should be necessary. If the turntable is working well, leave it alone. Some settling of the anti-vibration feet may cause the turntable to lean backwards slightly after a few months, but this is nothing to worry about.
6Don’t use a record cleaner that works as the record plays, or any cleaners that use water or fluids. Don’t touch the playing surface of records. Visible dust on the record surface is simply brushed aside by the stylus, and any that collects there can easily be blown away.
7Don’t use any polishes on the turntable or lid. To clean or dust, wipe gently with a soft cotton duster (slightly damp, only if necessary).
ENJOY THE MUSIC!
2Set the Bias adjustment slider to the same number as the tracking weight. For example, 1.5g tracking weight = 1.5g on the Bias slider.
Bias slider
ADVANCED SET-UP
A tracking pressure gauge is required to correctly apply the required down force when changing the factory fitted cartridge with a new or different cartridge. The down force must correspond to the upper limit of the cartridge maker’s recommended range.
1 Align the new cartridge correctly as shown.
A |
A |
|
Stylus tip
2Adjust the cartridge position in the head-shell so that the stylus tip is vertically aligned with the front of the hole marked A.
3Ensure the cartridge is sitting square in the head-shell before fully tightening. Do not over tighten!
4Set the Bias adjustment slider to the same number as the tracking weight.
CONNECTING THE C 556
Use the external phono leads to connect the C 556 to an amplifier. Use an external Phono Preamplifier (like one of NAD’s Phono Preamplifier series) if your amplifier has no integrated phono stage.
4

SPECIFICATIONS
GENERAL
TURNTABLE
Drive system |
Belt drive |
Motor |
High torque synchronous motor |
Speed |
33.3 and 45.1 rpm |
Suspension system |
3 energy absorbent synthetic rubber feet |
TONEARM |
|
|
|
Operation |
Manual |
Length |
289 mm total length; 244 mm pivot to |
|
stylus |
Effective mass |
9 g |
Overhang |
19.1 mm |
Cable capacitance |
150-400 pF |
CARTRIDGE SPECIFICATION: ORTOFON OM5E |
|
TRANSDUCER CHARACTERISTICS |
|
|
|
Frequency response |
±2 dB (20 Hz – 20 kHz) |
Channel balance |
2 dB at 1 kHz |
Channel separation |
22 dB at 1 kHz, 15 dB at 15 kHz |
Output voltage |
4 mV at 1 kHz, 5cm/sec. |
Tracking force range |
1.5 - 2.0 g (15-20 mN) |
Tracking force recommended |
1.75 g (17.5 mN) |
Vertical tracking angle |
20 degrees |
Stylus radius |
Elliptical 0.00072 x 0.0003 inch; 18µ x 8µ |
Stylus type |
r/R 8/18µ |
ELECTRICAL CHARACTERISTICS
Recommended load resistance |
47 kohms |
Recommended load capacitance |
200 – 600 pF |
Internal inductance |
450 mH |
Internal impedance, DC resistance |
750 ohms |
MECHANICAL CHARACTERISTICS |
|
|
|
Cartridge weight |
5 g |
Tracking weight |
1.5 - 2.0 g (15-20 mN) |
Replacement stylus unit |
Stylus 5E |
|
|
PHYSICAL SPECIFICATIONS |
|
Unit Dimension (W x H x D) with dust |
447 x 115 x 360 mm |
cover down |
17 ³/ x 4 9/ x 14 ³/ inches |
Net Weight |
4 kg (8.8 lbs) |
Shipping Weight |
7 kg (15.4 lbs) |
Specifications are subject to change without notice.
For updated documentation and features, please log onto www.NADelectronics.com for the latest information about the C 556.
ENGLISH
5
FRANÇAIS
UTILISATION DU C 556
Cette platine tourne-disques a été conçue et fabriquée pour une reproduction musicale d’excellente qualité. Dès la phase de conception, les fonctionnalités ont été centrées sur une amélioration de la qualité
sonore de manière à consacrer les coûts de la fabrication aux points les plus importants.
Exemple : Le changement de vitesse se fait en déplaçant la courroie d’entraînement d’une poulie à une autre, comme le montre le schéma ci-dessous.
L’économie réalisée grâce à ce changement de vitesse manuel a permis d’incorporer un moteur très onéreux, dont le niveau vibratoire est extrêmement bas et la précision bien supérieure aux modèles traditionnels.
NOTES CONCERNANT L’INSTALLATION
1Dans la mesure du possible, posez la platine tourne-disques sur une surface plane et rigide. Une étagère légère vissée au mur ou dans une alcôve sont des solutions idéales. Évitez de poser la platine sur un meuble creux ou lourd, ou sur n’importe quel meuble posé sur un sol en bois.
2NE SOULEVEZ PAS le moyeu central de son palier. Le palier a été assemblé chez le fabricant avec une couche de lubrifiant épais. Si vous dérangez cet assemblage, cela peut entraîner de graves problèmes d’usure et d’oscillations de vitesse.
3Le bras de lecture est automatiquement relié à la terre (ou à la masse) via le blindage du câble du bras. Aucune autre mise à la terre ne devrait être nécessaire.
4Conservez les emballages, pour le cas où vous auriez besoin de transporter la platine tourne-disques à nouveau.
CONSEILS ET SUGGESTIONS
1Dans la mesure du possible, le couvercle doit rester fermé pendant la lecture des disques. Cette précaution empêche la poussière de se
déposer sur les disques et rend leur nettoyage inutile. Elle permet aussi d’améliorer la reproduction du son.
2Dans la mesure du possible, laissez tourner le plateau en permanence pendant une séance d’écoute de disques. Mettez l’appareil en marche avant de commencer et ne l’éteignez pas avant la fin du dernier disque. Changer un disque alors que le plateau tourne, ce n’est pas aussi facile que l’on puisse le penser !
3Lorsque vous avez fini d’écouter une face d’un disque, n’oubliez pas de relever la pointe de la surface du disque en vous servant du lève-bras.
4Lorsque vous mettez la platine tourne-disques en marche, surtout à 45 tr/mn, il est recommandé de lancer manuellement le plateau dans le sens des aiguilles d’une montre au moment où vous appuyez sur le
bouton « MARCHE ». En procédant ainsi, vous diminuerez les contraintes sur le moteur et la courroie.
5Aucune maintenance n’est normalement nécessaire. Si la platine tourne-disques fonctionne correctement, ne touchez à rien. Après quelques mois, il se pourrait que les pieds antivibratoires se tassent un peu, faisant pencher la platine légèrement en arrière, mais cela ne doit susciter aucune inquiétude.
6N’utilisez pas d’appareil qui nettoie les disques pendant la lecture, ni de dispositif de nettoyage qui fonctionne avec de l’eau ou un liquide quelconque. Ne touchez pas la surface de lecture des disques. Toute poussière visible à la surface du disque est simplement balayée par la pointe; en cas d’accumulation de poussières au niveau de la pointe, il suffit de la dégager en soufflant dessus.
7N’utilisez aucun produit pour nettoyer la platine ou son couvercle. Pour éliminer la poussière, essuyez doucement avec un chiffon doux (légèrement humecté si c’est vraiment nécessaire).
IL NE VOUS RESTE PLUS QU’À PROFITER DE LA MUSIQUE !
DÉMARRAGE RAPIDE POUR LA CELLULE DE LECTURE INSTALLÉE EN USINE
Le C 556 est conçu pour être installé et utilisé en toute simplicité. Réglez la cellule de lecture installée en usine en suivant les instructions de réglage.
1Poussez le contrepoids aussi près que possible du point d’arrêt afin d’obtenir la force d’appui exacte. Cela règlera automatiquement le bras dans la plage de force d’appui recommandée pour la pointe de lecture installée en usine (1,5 – 2,0 g).
2Réglez la glissière de compensation de la force centripète au même nombre que le contrepoids. Par exemple,
force d’appui de 1,5 g = 1,5 g sur la glissière de compensation de la force centripète.
Stop point
Tonearm
Counterweight
Bias slider
RÉGLAGE AVANCÉ
Une jauge de force d’appui est nécessaire pour appliquer la force d’appui nécessaire lorsque la cellule installée en usine est remplacée par une nouvelle cellule ou une cellule différente. La force d’appui doit correspondre à la limite supérieure de la plage recommandée par le fabricant de la cellule.
1 Alignez correctement la nouvelle cellule comme montré.
A |
A |
|
Stylus tip
2Ajustez la position de la cellule dans le support de tête afin que la pointe de lecture soit verticalement alignée avec l’avant du trou A.
3Assurez-vous que la cellule est posée à l’équerre dans le support de tête avant de serrer. Évitez de trop serrer !
4Réglez la glissière de compensation de la force centripète au même nombre que le contrepoids.
RACCORDEMENT DU C 556
Utilisez les câbles phono externes pour raccorder le C 556 à un amplificateur. Si votre amplificateur n’est pas doté d’un étage phono intégré, utilisez un préampli phono externe (comme un des modèles de la gamme de préamplificateurs phono de NAD).
6
 Loading...