


 Loading...
MOTOROLA EX126
Getting Started Guide

Congratulations
MOTOROLA EX126
Your MOTOROLA EX126 phone is loaded with premium features including music, photos, videos, browsing, and more—all in a streamlined touchscreen design.
•Music. Tap, tap, play—instant music. Just open your media player and select a playlist.
•Photos. Use your phone’s camera to take photos and send them to your friends.
•Web. Surf to your heart’s content. Search, browse, everything you want to do, all made easier.
We’ve crammed all the main features of your phone into this handy guide, and in a matter of minutes we’ll show you just how easy your phone is to use. You may be surprised at what you discover.
Caution: Before assembling, charging, or using your phone for the first time, please read the important legal and safety information packaged with your product.
More
•Accessories: Find accessories for your phone at www.motorola.com/products.
Congratulations 1

Your phone
the important keys & connectors
3.5mm Headset Jack 
Micro USB
Connector
Charge or connect to PC.
Earpiece 
Touchscreen 
Call Key

Confirm
Key
 Stylus
 Camera (on
back of phone)

 Power/
Lock Key
 Volume Keys
Camera
Key

 End Key
 Microphone
Note: Your phone might look a little different.
2 Your phone
Contents
Let’s go . . . . . . . . . . . . . . . . . . . . . . . . . . . . . . . . . . . 4 Touchscreen & keys . . . . . . . . . . . . . . . . . . . . . . . . . 6 Home screen . . . . . . . . . . . . . . . . . . . . . . . . . . . . . . 9 Calls . . . . . . . . . . . . . . . . . . . . . . . . . . . . . . . . . . . . . 12 Contacts . . . . . . . . . . . . . . . . . . . . . . . . . . . . . . . . . . 14 Messaging . . . . . . . . . . . . . . . . . . . . . . . . . . . . . . . . 16 Web . . . . . . . . . . . . . . . . . . . . . . . . . . . . . . . . . . . . . 18 Bluetooth® wireless. . . . . . . . . . . . . . . . . . . . . . . . . 19 Manage your life . . . . . . . . . . . . . . . . . . . . . . . . . . . 21 Tips & tricks . . . . . . . . . . . . . . . . . . . . . . . . . . . . . . 24 Personalize . . . . . . . . . . . . . . . . . . . . . . . . . . . . . . . 26 Text entry . . . . . . . . . . . . . . . . . . . . . . . . . . . . . . . . 29 Photos. . . . . . . . . . . . . . . . . . . . . . . . . . . . . . . . . . . 30 Media player . . . . . . . . . . . . . . . . . . . . . . . . . . . . . . 32 Radio. . . . . . . . . . . . . . . . . . . . . . . . . . . . . . . . . . . . 34 Security. . . . . . . . . . . . . . . . . . . . . . . . . . . . . . . . . . 35 Troubleshooting . . . . . . . . . . . . . . . . . . . . . . . . . . . 37 Safety, Regulatory & Legal . . . . . . . . . . . . . . . . . . . 39
Contents 3

Let’s go
let’s get you up and running
Assemble & charge
1 cover off 2 SIM card in
3 battery in |
4 microSD in |
5 cover on |
6 charge up |
4H
Caution: Please read “Battery Use & Safety” on page 39.
4 Let’s go

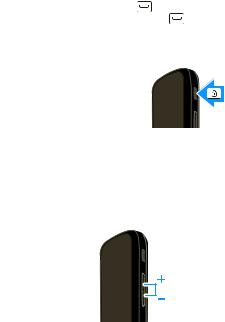
Turn it on & off
To turn your phone on or off, press and hold Power/Lock  (on the side of the phone).
Make & answer calls
To make a call from the home
screen, tap 
 with the stylus to open the dialer. Enter a number, then press Call
To answer a call, press Call  . To turn off the incoming call alert, tap Reject.
To end a call, press End  .
.
Cool content & more
Surf the web for cool content and more (see “Web” on page 18). An optional microSD memory card can be installed in your phone—you can load it up with photos, videos, and music from your computer.
Let’s go |
5 |
Touchscreen & keys
a few essentials
Touch tips
Here are some tips on how to navigate around your phone.
Tap
To choose an icon or option, tap it with the stylus. Try it: In the home screen, tap  to open the main menu.
Drag
To scroll through a list or move slowly, drag across the touchscreen. Try it: In the
home screen, tap  Messaging, then drag your
list up or down.
Tip: When you drag a list, a scroll bar appears on the right. Drag the scroll bar to move the list.
L2 |
10:42 AM |
M essaging
Write messag
 Inbox
Inbox

 Drafts
 Outbox
Sent messages
 Archive
Delete messa
 Email
Email
OK |
Back |
6 Touchscreen & keys

Flick
To scroll through a list or move quickly, flick across the touchscreen (drag quickly and release).
Tip: When you flick a long list, tap the screen to stop it from scrolling.
Key tips
Confirm, send, & end
L2 |
10:42 AM |
M essaging
Write message
 Inbox
Inbox

 Drafts
 Outbox
Sent messages
 Archive
Delete es
 Email
Email
OK |
Back |
From the home |
|
|
|
|
|
|
|
|
screen, press |
|
|
|
|
|
|
|
|
Confirm |
to open |
|
|
|
|
|
|
|
the main menu. |
|
|
|
|
|
|
|
|
When you’re in a |
|
|
|
|
|
|
|
|
|
|
|
|
|
|
|
||
menu, press |
|
Call |
Confirm |
|
|
End |
||
Confirm |
to select |
Key |
Key |
|
|
Key |
||
the highlighted menu
item or perform the option shown in the bottom center of the touchscreen.
Touchscreen & keys |
7 |
From the home screen, press Call |
to go to the |
|
All calls list. Tap a number, and press Call |
to call it. |
|
Press End  to end calls and exit menus.
Sleep & wake up
To save your battery, prevent
accidental taps, or when you want
to wipe smudges off your touchscreen, put the touchscreen to
sleep by pressing Power/Lock  . To wake up the touchscreen, just
press Power/Lock  again.
To change how long your phone waits before the
screen goes to sleep automatically, tap 

>  Settings > Phone settings > Display > Screen saver > Waiting.
Adjust volume
Press the volume keys to change the ring volume (in the home screen), or the earpiece volume (during a call).
 Volume Keys
When playing music or video files, press the
volume keys to adjust media volume.
8 Touchscreen & keys

Home screen
quick access to the things you need most
Quick start: Home screen
The home screen gives you all your latest information in one place. It’s what you see when you turn on the phone or press End  from a menu. It’s basically like this:
L2 |
|
|
10:42 AM |
Status Indicators |
11 |
12 |
1 |
|
|
|
|
|
||
10 |
|
2 |
12 |
Widgets |
9 |
|
3 |
8 |
4 |
Apr |
7 6 |
5 |
Mon |
AM PM |
12:00 AM |
|
|
|
12:00 AM |

 Abu Dha..


 12:00 AM
Tap and hold in the home screen to see the widgets list.
Flick left or right to open more panels of widgets & shortcuts.

 Visible Panel Indicator
Shortcuts
Tap to open.
Note: Your home screen might look a little different.
Home screen |
9 |
The home screen extends beyond what you see on the screen to give you more room for adding widgets. Flick the home screen left and right to see more panels.
Widgets
Add a widget, such as a clock, slide show, or a calendar that shows upcoming appointments.
To add widgets, tap and hold the home screen for a few seconds until a widget list shows. Tap the widget you want, then tap Ok.
Shortcuts
Your shortcuts are shown at the bottom of the home screen.
Main menu
All the apps on your phone are shown in your main menu.
To open the main menu, from the home screen,
tap  . Tap an app to open it, and tap Back to return to the home screen. You can also press End
  to return to the home screen at any time.
10 Home screen
Phone status & notifications
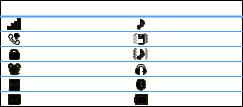
The status bar at the top of the screen contains icons that tell you about messages and phone status.
status indicators
Signal Strength |
General Profile |
Active Call |
Meeting Profile |
Phone Lock |
Outdoor Profile |
Alarm |
Headset |
Roaming Service |
Bluetooth® |
New Messages |
Battery |
Home screen 11

Calls
it’s good to talk
In-call options
During a call, tap Options to make a new call, and more. Tap  to turn the speakerphone on and
  to turn the speakerphone off.
Redial
1Tap  >
>  Call History
2Tap the contact you want to call, and then press Call  .
.
Save a contact
1Tap 

 and enter a number.
2Tap Options > Save to Phonebook > Add new contact or Replace existing.
3Enter contact details and tap Done, then Yes.
12 Calls

Emergency calls
Note: Your service provider programs one or more emergency phone numbers (such as 911 or 112) that you can call under any circumstances, even when your phone is locked. Emergency numbers vary by country. Your pre-programmed emergency number(s) may not work in all locations, and sometimes an emergency call cannot be placed due to network, environmental, or interference issues.
1Tap 

 (if your phone is locked, tap Emergency Call).
2Enter the emergency number.
3Press Call  to call the emergency number.
Cool down
In very limited circumstances, such as where your phone has been exposed to extreme heat, “Cool Down” message screens will appear. To avoid possible damage to your battery and phone, you should follow these instructions until the phone is within its recommended temperature range. When your phone is in “Cool Down” mode, only emergency calls can be made.
Calls 13
Contacts
contacts like you’ve never had before
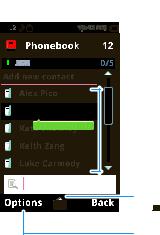
Quick start: Contacts
Find it:  Phonebook
L2 |
10:42 AM |
12
abc
Add new contact
Alex Pico
Dan Smith
Kate (212)5550707
 Keith Zang
 L uke Carmody
0/5
 Tap or drag to scroll up/down through the contact list.
 Contacts List
Tap to view contact information.
Search
Back Tap
Tap  to open keypad & enter search text.
Tap to view, call, text, edit, delete, copy, move, or send the selected contact.
Tip: To see more contacts, flick or drag up or down.
14 Contacts

Create contacts
Find it:  Phonebook > Add new contact
Enter the contact name and details, then tap Done
> Yes.
Call contacts
Tap a contact, then press Call  .
.
Tip: Press the volume keys to scroll to a contact, then press Call  .
.
Contacts 15

Messaging
sometimes its best to text or email...
Create & send messages
Find it:  Messaging > Write message
Use the touchscreen keypad to enter your message. Tap Options to insert a picture, sound, or video. When you finish composing the message, tap Options
> Send to to enter phone numbers or select message
recipients from your phonebook. To send the message, tap Options > Send.
Receive a message
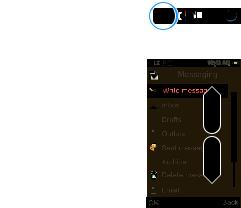
When you receive a message, your phone plays an alert and shows the new message indicator  at the top of the screen.
To read the new message, tap View.
To read messages stored in your inbox, tap  Messaging > Inbox.
16 Messaging

Set up an account
Find it:  Messaging > Email > Email accounts, press Options > New account > Yes
The email setup wizard will guide you through setting up your email account.
Create a new email
Find it:  Messaging > Email > Write Email
Enter the recipient email address and message, then tap Done > Send.
Messaging 17

Web
surf the web with your phone
Note: To use the browser, you must have data service activated for your account (additional fees may apply for this service).
Use your phone’s browser to surf your favorite web sites, upload videos to a video blog, and download files and applications to your phone. Log onto your internet-based email account to check your email.
Find it: 
 Internet > Internet service
•To go to your home page, tap Homepage.
•To go to a web page, tap Input address.
•To bookmark a web page, tap Options
> Add to Bookmarks.
•To go to a link on a web page, tap it.
Note: If you can’t connect, contact your service provider.
18 Web
Loading...