


 Loading...
Compact Portable Digital Two Way Radio with Analog Capability
EVX-S24
Operating Manual
IP67 Dustand Waterproof

Contents
Introduction..................................................................... |
1 |
Class B Digital Device..................................................... |
2 |
Important Safety Information........................................ |
3 |
Consignes de sécurité importantes................................. |
5 |
Controls & Connectors................................................... |
7 |
LCD Icon & Indicators................................................... |
8 |
Before You Begin.............................................................. |
9 |
Battery Pack Installation.............................................. |
9 |
Battery Pack Removal................................................. |
9 |
Belt Clip Installation.................................................. |
10 |
Antenna Installation................................................... |
10 |
Battery Charging........................................................ |
11 |
Low Battery Indication.............................................. |
12 |
Operation........................................................................ |
13 |
Preliminary Steps....................................................... |
13 |
Operation Quick Start................................................ |
13 |
Automatic Time-Out Timer....................................... |
15 |
ARTS™ (Auto Range Transpond System)................ |
16 |
LOCK......................................................................... |
16 |
Advanced Operation..................................................... |
17 |
Programmable Key Functions ................................... |
17 |
Description of Operating Functions .......................... |
19 |
User Set (Menu) Mode.................................................. |
31 |
Optional Accessories...................................................... |
39 |
Warranty Policy............................................................. |
40 |
Congratulations!
You now have at your fingertips a valuable communications tool, a Motorola Solutions two-way radio! Rugged, reliable and easy to use, your Motorola Solutions radio will keep you in constant touch with your colleagues for years to come, with negligible maintenance down-time. Please take a few minutes to read this manual carefully. The information presented here will allow you to derive maximum performance from your radio, in case questions arise later on.
Important Note
rThere are no owner-serviceable parts inside the radio. All service jobs must be referred to an authorized Motorola
Solutions Service Representative.
rIn order to maintain the specified water integrity performance, periodic maintenance is recommended.
rShould the radio sustain a severe shock (e.g. if it is dropped), the water integrity may be compromised, requiring service. Should this occur, contact your Authorized Motorola Solutions Dealer.

Introduction
The EVX-S24 is full-featured, compact Portable Digital/Analog Transceiver designed for business communications in the UHF Land Mobile band. The EVX-S24 supports up to 256 user configurable channels within a maximum 16 groups, supporting a wide variety of business applications.
Channel frequency data for the transceiver is stored in flash memory, which is easily programmed by Motorola Solutions licensed dealers using a standard PC and the following Motorola Solutions programming equipment:
rCE157 PC Programming Software
rCB000262A01 Micro USB Programming Cable
This manual will describe in detail the many advanced features of the EVX-S24. After reading this manual, you may wish to consult with your Network Administrator regarding precise details of the configuration of this equipment for use in your application.
Important Notice for North American Users Regarding 406 MHz Guard Band
The U.S. Coast Guard and National Oceanographic and Atmospheric Administration have requested the cooperation of the U.S. Federal Communications Commission in preserving the integrity of the protected frequency range 406.0 to 406.1 MHz, which is reserved for use by distress beacons. Do not attempt to program this apparatus, under any circumstances, for operation in the frequency range 406.0 - 406.1 MHz if the apparatus is to be used in or near North
America.
Warning - Frequency band 406 - 406.1 MHz is reserved for use ONLY as a distress beacon by the US Coast Guard and NOAA. Under no circumstance should this frequency band be part of the pre programmed operating frequencies of this radio.
EVX-S24 Operating Manual |
1 |

Class B Digital Device
NOTE: This equipment has been tested and found to comply with the limits for a Class B digital device, pursuant to part 15 of the FCC Rules. These limits are designed to provide reasonable protection against harmful interference in a residential installation. This equipment generates uses and can radiate radio frequency energy and, if not installed and used in accordance with the instructions, may cause harmful interference to radio communications. However, there is no guarantee that interference will not occur in a particular installation. If this equipment does cause harmful interference to radio or television reception, which can be determined by turning the equipment off and on, the user is encouraged to try to correct the interference by one or more of the following measures:
rReorient or relocate the receiving antenna.
rIncrease the separation between the equipment and receiver.
rConnect the equipment into an outlet on a circuit different from that to which the receiver is connected.
rConsult the dealer or an experienced radio/TV technician for help.
2 |
EVX-S24 Operating Manual |

Important Safety Information
English
ATTENTION!
This radio is restricted to Occupational use only. Before using the radio, read the RF Energy Exposure and Product
Safety Guide for Portable Two-Way Radios which contains important operating instructions for safe usage and RF energy awareness and control for Compliance with applicable standards and Regulations.
For a list of Motorola Solutions-approved antennas and other accessories, visit the following website: http://www.motorolasolutions.com
Any modification to this device, not expressly authorized by Motorola Solutions, may void the user’s authority to operate this device.
Under Industry Canada regulations, this radio transmitter may only operate using an antenna of a type and maximum (or lesser) gain approved for the transmitter by Industry Canada. To reduce potential radio interference to other users, the antenna type and its gain should be so chosen that the equivalent isotropically radiated power (e.i.r.p.) is not more than that necessary for successful communication.
This radio transmitter has been approved by Industry Canada to operate with Motorola Solutions-approved antenna with the maximum permissible gain and required antenna impedance for each antenna type indicated. Antenna types not included in this list, having a gain greater than the maximum gain indicated for that type, are strictly prohibited for use with this device.
EVX-S24 Operating Manual |
3 |

Important Safety Information
English
Notice to Users (FCC and Industry Canada)
This device complies with Part 15 of the FCC rules and Industry Canada’s license-exempt RSS’s per the following conditions:
•This device may not cause harmful interference.
•This device must accept any interference received, including interference that may cause undesired operation.
•Changes or modifications made to this device, not expressly approved by Motorola Solutions, could void the authority of the user to operate this equipment.
4 |
EVX-S24 Operating Manual |

Consignes de sécurité importantes
French
ATTENTION!
Cette radio ne doit être utilisée qu’à des fins professionnelles. Avant d’utiliser la radio, lisez le guide Radios bidirectionnelles portatives : exposition aux radiofréquences et sécurité du produit, qui contient d’importantes instructions de fonctionnement pour une utilisation sécuritaire et des informations sur l’exposition aux fréquences radioélectriques, dans le but d’assurer votre conformité aux normes et règlements en vigueur.
Visitez le site Web suivant pour obtenir la liste des antennes et autres accessoires approuvés par Motorola Solutions: http://www.motorolasolutions.com
Toute modification effectuée à cet appareil sans l’autorisation explicite de Motorola Solutions peut annuler l’autorisation d’utiliser cet appareil.
Selon la réglementation d’Industrie Canada, cet émetteur radio ne peut être utilisé qu’avec une antenne dont le type et le gain maximal (ou minimal) sont approuvés par
Industrie Canada pour cet émetteur. Afin de limiter les interférences radio pour les autres utilisateurs, le type et le gain de l’antenne doivent être choisis de façon à ce que la puissance isotrope rayonnée équivalente (P.I.R.E.) ne soit pas plus forte qu’il ne le faut pour établir la communication.
Cet émetteur radio a été approuvé par Industrie Canada pour utilisation avec une antenne approuvée par Motorola Solutions offrant le gain maximal autorisé et l’impédance requise pour le type d’antenne indiqué. Il est strictement interdit d’utiliser avec cet appareil tout type d’antenne ne figurant pas dans cette liste et présentant un gain supérieur au maximum indiqué pour le type.
EVX-S24 Operating Manual |
5 |

Consignes de sécurité importantes
French
Avis aux utilisateurs (FCC et Industrie Canada)
Le présent appareil est conforme aux CNR d’Industrie Canada applicables aux appareils radio exempts de licence et à la partie 15 des règlements de la FCC.
•Cet appareil ne doit pas causer d’interférence nuisible.
•Cet appareil doit accepter toute interférence reçue, y compris les interférences pouvant entraîner un fonctionnement indésirable.
•Toute modification effectuée à cet appareil sans l’autorisation explicite de Motorola Solutions peut annuler l’autorisation d’utiliser cet appareil.
6 |
EVX-S24 Operating Manual |

Controls & Connectors
Antenna Jack 
MIC/SP Jack
(External MIC/SP)
 VOL (Volume)/PWR (Power) Knob
LED Indicator (Programmable) |
|
|
|
|||||||||
Default settings are: |
|
|
|
|
|
|
|
|
|
|
|
|
Steady Blue: |
Transmitting in Progress (Digital) |
|
|
|
||||||||
Steady Red: |
Transmitting in Progress (Analog) |
|
|
|
||||||||
Blinking Green: |
Busy Channel |
|
|
|
||||||||
Steady Green: |
Channel Monitor |
|
|
|
||||||||
Blinking Yellow: |
Emergency function is active |
|
|
|
||||||||
Blinking Red: |
Low Battery Power |
|
|
|
||||||||
|
|
|
|
|
|
|
|
|
|
|
|
|
|
|
|
|
|
|
|
|
|
|
|
|
|
|
|
|
PTT Switch |
LCD (Liquid Crystal Display) |
|
|||||
|
|
|
|
|
||||||
[ |
] |
( |
) |
[q]/[p] |
Key |
(Programmable) |
|
|||
|
Default settings are: |
|
|
|||||||
SIDE |
Key Programmable |
|
Press Key: Channel Up/Down |
|
||||||
|
|
Default settings are: |
|
Press & Hold Key: Speed Channel Up/Down |
||||||
|
|
Press Key: LAMP “On” |
|
|||||||
|
|
[ |
|
( |
)] |
( |
|
) |
||
Press and Hold Key: Non Assignment |
MODE |
Programmable |
||||||||
|
|
|
|
|
|
|
Key |
|
||
|
|
|
|
|
Default settings are: |
|
|
|||
|
|
|
|
|
Press Key: User Set Mode Active |
|
||||
|
|
|
|
|
Press & Hold Key: Key Lock Function |
|
||||
|
|
Micro USB Jack |
|
|
|
|
|
|
|
|
|
Battery Cover Latch |
|
|
|
|
|
|
|
||
|
|
|
(Rear Side) |
|
|
|
|
|
|
|
|
|
|
Microphone |
Speaker |
|
|
|
|
|
|
EVX-S24 Operating Manual |
7 |
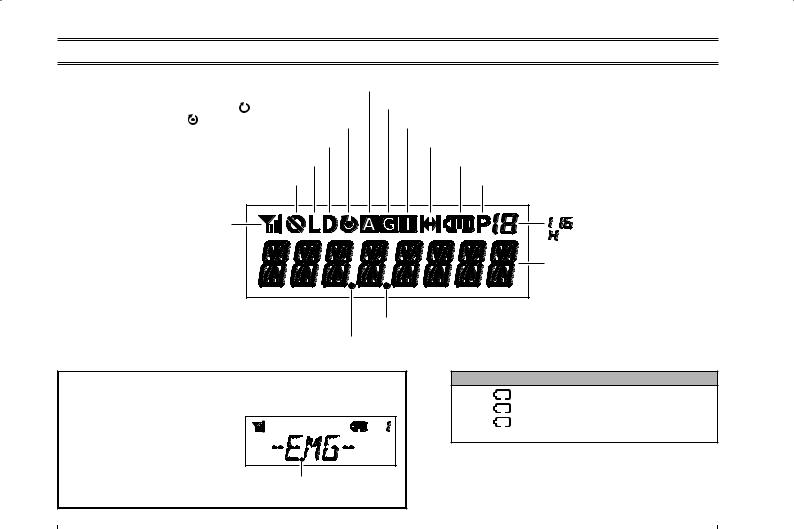
LCD Icon & Indicators
|
TX ID Type is “All Call” |
|
: “Scan” is enabled |
TX ID Type is “Group Call” |
|
TX ID Type is “Individual Call (Private Call)” |
||
: “Priority Scan” is Activated |
||
“Dual Watch” is activated |
“Talk-Around” is enabled |
|
Low Transmit Power Mode “On” |
Battery Gauge |
|
“Privacy” or “Encryption” is activated |
Priority-2 Channel |
TX Power & RSSI Indicator |
~ |
: Group |
Number |
(Four Steps) |
: Priority-1 |
Channel |
|
|
8-character |
|
|
|
Alpha-numeric Display |
||
“Group Scan” is enabled “Lone Worker” is activated
These small dot indication will appear continuously until deactivated, regardless of the operation status of other active features.
For example, the LCD pictured to the right shows an active emergency feature, which continues to be visible even during an emergency call, when activated on the radio.
Battery Gauge
 : Full Battery Power
 : Moderate Battery Power
 : Low Battery Power
 w/blink : Poor Battery Power (Charge the Battery)
8 |
EVX-S24 Operating Manual |
Before You Begin
Battery Pack Installation |
|
|
Battery Pack Removal |
||
1. |
Make sure that the VOL/PWR knob powered off, by |
1. Turn the radio off and remove any protective cases. |
|||
|
turning the knob counter clockwise to a complete stop. |
2. |
Slide the Battery Cover Latch into the “UNLOCK” |
||
2. |
Slide the Battery Cover Latch into the “UNLOCK” |
|
side, then remove the Battery Cover. |
||
|
position, then remove the Battery Cover. |
|
3. |
Pinch the top side of the Battery Pack, then pull out |
|
3. Install the BT100X Battery Pack into the battery com- |
|
the Battery Pack. |
|||
|
partment of the transceiver. |
|
|
|
|
4. Re-attach the battery cover by aligning the tabs of the |
|
|
|||
|
battery cover with the slots on the transceiver and slid- |
|
|||
|
|
|
|||
|
ing into position. |
|
|
|
|
5. Slide the Battery Cover Latch into the “LOCK” posi- |
|
|
|||
|
tion. |
|
|
|
|
|
|
|
Red dot mark |
|
|
|
|
|
|
||
|
|
|
(When locked, the red dot mark disappears.) |
||
|
|
|
|
|
|
|
|
|
|
|
CAUTION |
|
|
|
|
|
|
|
|
|
|
r Risk of explosion if battery is replaced by an |
|
|
Use the Motorola Solu- |
|
|
|
|
|
tions BT100X Lithium- |
|
|
|
incorrect type. Dispose of used batteries ac- |
|
Ion Battery Pack only. |
|
|
|
cording to the instructions. |
|
|
|
|
||
|
|
|
|
|
r Do not attempt to open any of the recharge- |
|
|
|
|
|
able Lithium-Ion packs, as they could ex- |
|
|
|
|
|
plode if accidentally short-circuited. |
EVX-S24 Operating Manual |
9 |
Before You Begin
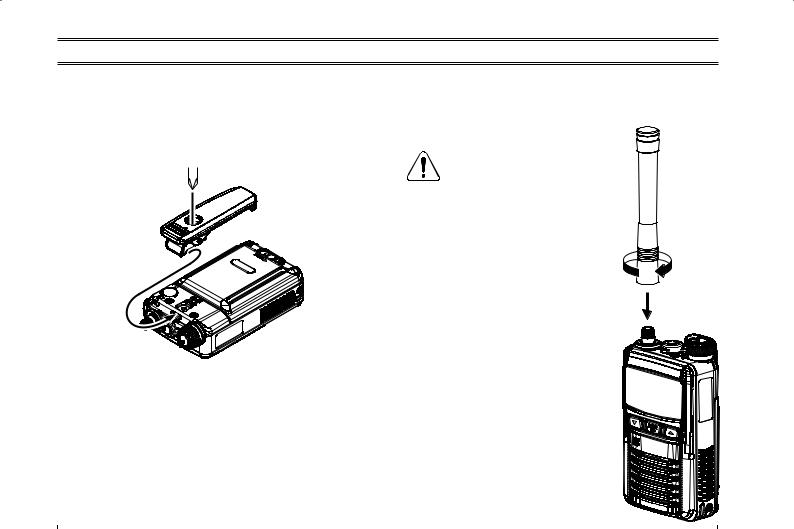
Belt Clip Installation
Align the tab in the upper side of the Belt Clip to the slot on the transceiver, and then secure the Belt Clip by tightening the belt clip screw to the radio chassis with a Phillips head screwdriver.
Antenna Installation
Hold the bottom end of the antenna, then screw it onto the mating connector on the transceiver until snug. Do not over-tighten with extreme force.
Never transmit without having an antenna connected.
10 |
EVX-S24 Operating Manual |

Before You Begin
Battery Charging
Turn the transceiver off.
Open the Rubber Cover of the USB Jack.
Insert the Micro USB plug from the optional Power Supply Adapter into the Micro USB jack on the transceiver, and then connect the Power Supply Adapter to the AC line outlet.
If the battery pack is installed correctly, the LED indicator on the top of the transceiver will glow red and the charging starts. A fully-discharged battery pack will charge completely in 1.5 - 4.5 hours.
When charging is completed, the LED indicator will turn off.
AC Line Out
 Turn the transceiver off
AC Adapter
Micro USB jack
Disconnect the Micro USB plug from the transceiver and close the Rubber Cover of the USB Jack.
Unplug the Power Supply Adapter from the AC line outlet.
1) Turn the transceiver off, when charging the battery.
2)Always use the Motorola Solutions BT100X LithiumIon Battery Pack.
3)Batteries carry a risk of explosion if replaced by an incorrect type.
4)Use only the Motorola Solutions Power Supply Adapter, or Motorola Solutions approved Charger.
5)Do not connect the USB charger other than Power Supply Adapter, as cause to damage the battery and transceiver.
6)Motorola Solutions prohibits the battery charge with a combination of the common Micro USB cable and USB power supply.
7)To reduce the risk of explosion, recharge the batteries outside of hazardous locations.
8)Perform the battery charging where the ambient temperature range +41 °F to +104 °F (+5 °C to +40 °C). Charging outside of this temperature range could cause damage to the battery pack.
9)The Battery Pack should not be exposed to excessive
EVX-S24 Operating Manual |
11 |

Before You Begin
heat such as sunshine, fire, or similar heat sources.
10) This transceiver does not keep the Dustand Waterproof rating (IP67) when the Rubber Cover is not secured over the USB jack.
Low Battery Indication
As the battery discharges during use, the voltage gradually becomes lower. When the battery voltage becomes too low, substitute a freshly charged battery and recharge the depleted pack. The LED indicator on the top of the radio will blink red when the battery voltage is low.
You may confirm the battery condition by the Battery Gauge on the display. See page 8 for more information.
12 |
EVX-S24 Operating Manual |
Loading...