


Operating instructions for Washing machine PREMIER NOVO
It is essentialto read these operating instructions before installing or using the machine, to avoid the risk of accident, or damage to the machine.
Q\}
M.-Nr. 04 947 050

Caring for our environment
Disposal of the packing material
The transport and protective packing has been selected from materials which are environmentally friendly for disposal and can normally be recycled. Rather than just throwing these materials away, please ensure they are offered for recycling.
Disposal of your old appliance
Old appliances contain materials which can be recycled. Please contact your dealer, your local waste collection centre or scrap merchant about potential recycling schemes. Ensure that the appliance presents no danger to children while being stored for disposal. See the appropriate advice in the “Warning and safety instructions”.
2

Contents
Caring for our environment
Disposal of the packing material . . . . . . . . . . . . . . . . . . . . . . . . . . . . . . . . . . . . . . . 2 Disposal of your old machine/appliance . . . . . . . . . . . . . . . . . . . . . . . . . . . . . . . . . 2
Guide to the machine
General view . . . . . . . . . . . . . . . . . . . . . . . . . . . . . . . . . . . . . . . . . . . . . . . . . . . . . . 6 Control panel . . . . . . . . . . . . . . . . . . . . . . . . . . . . . . . . . . . . . . . . . . . . . . . . . . . . . . 7
Warning and Safety Instructions . . . . . . . . . . . . . . . . . . . . . . . . . . . . . . . . . . . . . 8
Washing environmentally and economically. . . . . . . . . . . . . . . . . . . . . . . . . . . 11
Before using for the first time
Flushing out the wash cabinet. . . . . . . . . . . . . . . . . . . . . . . . . . . . . . . . . . . . . . . . 12 Water hardness reminder. . . . . . . . . . . . . . . . . . . . . . . . . . . . . . . . . . . . . . . . . . . . 12
How to wash correctly
Brief guide . . . . . . . . . . . . . . . . . . . . . . . . . . . . . . . . . . . . . . . . . . . . . . . . . . . . . . . 13 Before washing . . . . . . . . . . . . . . . . . . . . . . . . . . . . . . . . . . . . . . . . . . . . . . . . . 13 To start a programme . . . . . . . . . . . . . . . . . . . . . . . . . . . . . . . . . . . . . . . . . . . . 14 After washing . . . . . . . . . . . . . . . . . . . . . . . . . . . . . . . . . . . . . . . . . . . . . . . . . . 16 Adding or removing washing after programme start . . . . . . . . . . . . . . . . . . . . . . . 17 Programme . . .. . . . . . . . . . . . . . . . . . . . . . . . . . . . . . . . . . . . . . . . . . . . . . . . . . . . 18
. . . interruption . . . . . . . . . . . . . . . . . . . . . . . . . . . . . . . . . . . . . . . . . . . . . . . . . 18
. . . alteration . . . . . . . . . . . . . . . . . . . . . . . . . . . . . . . . . . . . . . . . . . . . . . . . . . . 18
. . . Skipping a programme stage . . . . . . . . . . . . . . . . . . . . . . . . . . . . . . . . . . . 18
Adding detergent
It is important to dispense the correct amount, because . . . . . . . . . . . . . . . . . . . 19 Adding detergent. . . . . . . . . . . . . . . . . . . . . . . . . . . . . . . . . . . . . . . . . . . . . . . . . . 20 Water softeners . . . . . . . . . . . . . . . . . . . . . . . . . . . . . . . . . . . . . . . . . . . . . . . . . . . 20 Fabric conditioners, Texturisers, Liquid starch . . . . . . . . . . . . . . . . . . . . . . . . . . . 20 Automatic fabric conditioners, texturisers, or liquid starch. . . . . . . . . . . . . . . . 21 Separate fabric conditioner or texturiser . . . . . . . . . . . . . . . . . . . . . . . . . . . . . 21 Starching separately . . . . . . . . . . . . . . . . . . . . . . . . . . . . . . . . . . . . . . . . . . . . . 21
3

Contents
Programmes
Programme selection . . . . . . . . . . . . . . . . . . . . . . . . . . . . . . . . . . . . . . . . . . . . . . . 22 Sequence. . . . . . . . . . . . . . . . . . . . . . . . . . . . . . . . . . . . . . . . . . . . . . . . . . . . . . . . 24 Care symbols . . . . . . . . . . . . . . . . . . . . . . . . . . . . . . . . . . . . . . . . . . . . . . . . . . . . . 26
Additional options
Soak . . . . . . . . . . . . . . . . . . . . . . . . . . . . . . . . . . . . . . . . . . . . . . . . . . . . . . . . . . . . 27 Pre-wash . . . . . . . . . . . . . . . . . . . . . . . . . . . . . . . . . . . . . . . . . . . . . . . . . . . . . . . . 27 Short. . . . . . . . . . . . . . . . . . . . . . . . . . . . . . . . . . . . . . . . . . . . . . . . . . . . . . . . . . . . 27 Water plus . . . . . . . . . . . . . . . . . . . . . . . . . . . . . . . . . . . . . . . . . . . . . . . . . . . . . . . 28 Spin . . . . . . . . . . . . . . . . . . . . . . . . . . . . . . . . . . . . . . . . . . . . . . . . . . . . . . . . . . . . 28
"Without final spin". . . . . . . . . . . . . . . . . . . . . . . . . . . . . . . . . . . . . . . . . . . . . . . 28 "Rinse hold" . . . . . . . . . . . . . . . . . . . . . . . . . . . . . . . . . . . . . . . . . . . . . . . . . . . . 28 Electronic programme locking . . . . . . . . . . . . . . . . . . . . . . . . . . . . . . . . . . . . . . . . 29
Programmable functions
Maximum water level . . . . . . . . . . . . . . . . . . . . . . . . . . . . . . . . . . . . . . . . . . . . . . . 30 Water plus system . . . . . . . . . . . . . . . . . . . . . . . . . . . . . . . . . . . . . . . . . . . . . . . . . 31 Activating the compartmenti . . . . . . . . . . . . . . . . . . . . . . . . . . . . . . . . . . . . . . . 33 Soak time . . . . . . . . . . . . . . . . . . . . . . . . . . . . . . . . . . . . . . . . . . . . . . . . . . . . . . . . 34 Gentle action . . . . . . . . . . . . . . . . . . . . . . . . . . . . . . . . . . . . . . . . . . . . . . . . . . . . . 35 Top-up rinse for Cottons. . . . . . . . . . . . . . . . . . . . . . . . . . . . . . . . . . . . . . . . . . . . . 36 Memory function . . . . . . . . . . . . . . . . . . . . . . . . . . . . . . . . . . . . . . . . . . . . . . . . . . 37
Cleaning and care
Cleaning the washing machine . . . . . . . . . . . . . . . . . . . . . . . . . . . . . . . . . . . . . . . 38 Extra cleaning . . . . . . . . . . . . . . . . . . . . . . . . . . . . . . . . . . . . . . . . . . . . . . . . . . . . 38 Cleaning the detergent dispenser drawer . . . . . . . . . . . . . . . . . . . . . . . . . . . . . . . 39 Cleaning the fluff (drain) filter and pump . . . . . . . . . . . . . . . . . . . . . . . . . . . . . . . . 40 To clean the water inlet filters . . . . . . . . . . . . . . . . . . . . . . . . . . . . . . . . . . . . . . . . . 42
To clean the filter in the union in the open end of the inlet hose: . . . . . . . . . . . 42 To clean the filter in the water inlet valve: . . . . . . . . . . . . . . . . . . . . . . . . . . . . . 42
Problem solving guide
What to do,if . . . . . . . . . . . . . . . . . . . . . . . . . . . . . . . . . . . . . . . . . . . . . . . . . . . . . . 43 Opening the drum door in the event of a power failure . . . . . . . . . . . . . . . . . . . . . 47
4

Contents
After sales service
Customer contact. . . . . . . . . . . . . . . . . . . . . . . . . . . . . . . . . . . . . . . . . . . . . . . . . . 48 Future updates (PC). . . . . . . . . . . . . . . . . . . . . . . . . . . . . . . . . . . . . . . . . . . . . . . . 48
Installation
Installation surface . . . . . . . . . . . . . . . . . . . . . . . . . . . . . . . . . . . . . . . . . . . . . . . . . 49 Installation . . . . . . . . . . . . . . . . . . . . . . . . . . . . . . . . . . . . . . . . . . . . . . . . . . . . . . . 49 Removing the transit fitting. . . . . . . . . . . . . . . . . . . . . . . . . . . . . . . . . . . . . . . . . . . 49 Levelling the machine . . . . . . . . . . . . . . . . . . . . . . . . . . . . . . . . . . . . . . . . . . . . . . 51 Screwing out and adjusting the feet . . . . . . . . . . . . . . . . . . . . . . . . . . . . . . . . . 51 Building under . . . . . . . . . . . . . . . . . . . . . . . . . . . . . . . . . . . . . . . . . . . . . . . . . . . . 52 Washer and Dryer stack . . . . . . . . . . . . . . . . . . . . . . . . . . . . . . . . . . . . . . . . . . 52 Connection to water supply . . . . . . . . . . . . . . . . . . . . . . . . . . . . . . . . . . . . . . . . . . 53 Connection to the drainage system . . . . . . . . . . . . . . . . . . . . . . . . . . . . . . . . . . . . 54 Electrical connection U.K. . . . . . . . . . . . . . . . . . . . . . . . . . . . . . . . . . . . . . . . . . . . 55
Consumption data . . . . . . . . . . . . . . . . . . . . . . . . . . . . . . . . . . . . . . . . . . . . . . . . 56
Technical Data . . . . . . . . . . . . . . . . . . . . . . . . . . . . . . . . . . . . . . . . . . . . . . . . . . . 57
5

Guide to the machine
General view
|
|
|
|
|
|
|
|
|
|
|
|
|
|
|
|
|
|
|
|
|
|
|
|
|
|
|
|
|
|
|
|
|
|
|
|
|
|
|
|
|
|
|
|
|
|
|
|
|
|
|
|
|
|
|
|
|
|
|
|
|
|
|
|
|
|
|
|
|
|
|
|
|
|
|
|
|
|
|
|
|
|
|
|
|
|
|
|
|
|
|
|
|
|
|
|
|
|
|
|
|
|
|
|
|
|
|
|
|
|
|
|
|
|
|
|
|
|
|
|
|
|
|
|
|
|
|
|
|
|
|
|
|
|
|
|
|
|
|
|
|
|
|
|
|
|
|
|
|
|
|
|
|
|
|
|
|
|
|
|
|
|
|
|
|
|
|
|
1 |
Electric supply cable |
5 |
Facia panel with controls |
||||||||||
2 |
Inlet hose (able to withstand press- |
6 |
Door |
||||||||||
|
|
ures up to 70 bar) |
7 |
Access panel for drain pump, drain fil- |
|||||||||
|
|
|
|
|
|
|
|
|
|||||
3 |
Flexible drain hose (with detachable |
|
ter and emergency door release |
||||||||||
|
|
swivel elbow) |
8 |
Four height adjustable feet |
|||||||||
|
|
Detergent dispenser drawer |
|||||||||||
4 |
|
|
|
|
|
||||||||
6
Guide to the machine
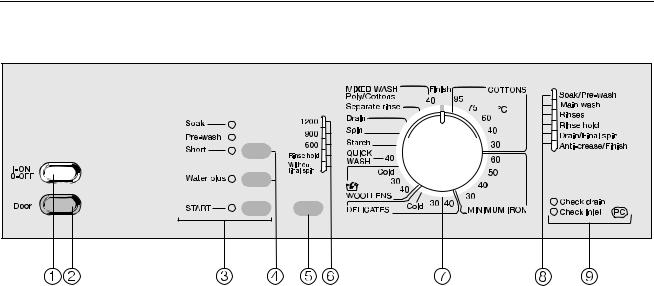
Control panel
b“I-ON / 0-OFF” button
To switch the machine ON or OFF or to interrupt a programme.
c “Door” button
opens the machine door.
d“START” button
starts the wash programme
eButtons for additional functions
The upper button is used to select either the "Soak", "pre-wash" or "Short wash" additional option.
The lower button is used to select the additional option "Water plus".
Indicator light on = selected Indicator light off = not selected
f “Spin” button
for spin speed, Rinse hold and Without final spin
gIndicator lights
showing the selected spin speed.
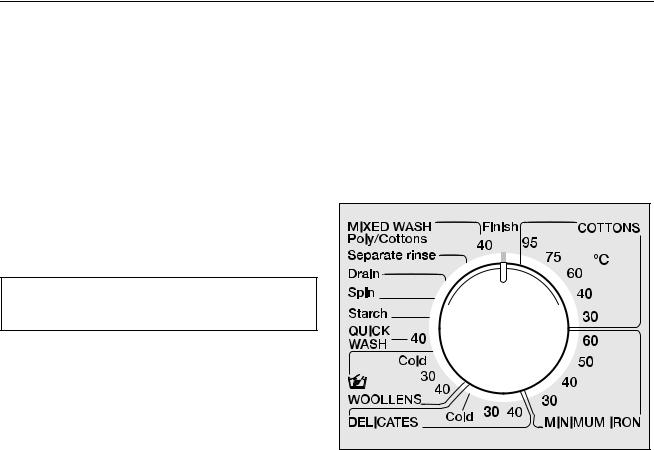
hProgramme selector
Can be turned clockwise and anticlockwise.
iProgramme sequence indicator lights
jCheck lights
7

Warning and safety instructions
Read the operating instructions before using this machine for the first time. They contain important information about the safety, use and maintenance of the machine. This way you will avoid the risk of accidents and damage to the machine. Keep these operating instructions in a safe place and ensure that new users are familiar with the content. Pass them on to any future owner of the machine.
Correct usage
Only use the washing machine to wash items which are specified by the manufacturer to be machine-wash-
able on the wash-care label, and textiles composed of hand-washable wool or wool blend fabrics as well as satin, lace, silk and other hand-washable garments.
Any other applications may be dangerous. The manufacturer is not liable for damage resulting from improper use or operation.
This appliance should not be operated by children. Supervise its use
by the elderly or infirm.
Technical safety
Before setting up the machine, check it for any externally visible
damage. Do not install and use a damaged machine.
Before connecting the machine, ensure that the connection data on
the data plate (fusing, voltage and frequency) match the mains electricity
8
supply. If in any doubt, consult a qualified electrician.
The electrical safety of this appliance can only be guaranteed
when continuity is complete between the machine and an effective earthing system which complies with local and national regulations. It is most important that this basic safety requirement is regularly tested by a qualified electrician.
The manufacturer cannot be held responsible for the consequences of an inadequate earthing system.
Do not connect the appliance to the mains electricity supply by an
extension lead. Extension leads do not guarantee the required safety of the appliance (e.g. danger of overheating).
The machine is built in accordance with current safety requirements.
Unauthorised repairs could result in unforeseen dangers for the user, for which the manufacturer cannot accept responsibility. Repairs should only be undertaken by a Miele approved engineer.
Ensure current is not supplied to the appliance while maintenance or repair work is being carried out.
The machine is only completely isolated from the electricity supply
when:
–it is switched off at the wall socket and the plug is withdrawn, or
–it is switched off at the mains, or
–the mains fuse is withdrawn.

Warning and safety instructions
The best materials are used in the manufacture of this machine, and every care is taken to check all parts.
However, with time, deterioration of parts can occur, especially with such components as hoses, giving rise to leaks. Check the hose regularly for signs of wear, and change in good time, to avoid leaks and subsequent damage.
Faulty components must only be exchanged for Miele original spare
parts. Only when these parts are fitted can the safety standards of the machine be guaranteed.
Use
Do not install your washing machine in rooms where tempera-
tures below freezing may occur. Frozen hoses may burst under pressure. The reliability of the electronic control system may be impaired at temperatures below freezing point.
In countries where there are areas which may be subject to infesta-
tion by cockroaches or other vermin, pay particular attention to keeping the appliance and its surroundings in a clean condition at all times. Any damage which may be caused by cockroaches or other vermin will not be covered by the appliance guarantee.
Before using the machine for the first time, check that the transit fit-
ting at the rear of the machine has been removed (see section on "Installation"). During spinning, a transit fitting which is still in place may result in damage to both the machine and adjacent furniture or appliances.
Turn off the stopcock if the machine is to be left for any length of
time (e.g. holiday), especially if there is no floor drain (gully) in the immediate vicinity.
Flooding danger.
If hooking the drain hose into a wash basin, check that the water can drain off quickly enough to prevent the sink from overflowing.
Make sure the drain hose is secure, so that the force of the water flowing out of the hose does not dislodge it. Otherwise this will result in flooding.
Take care to ensure that foreign objects (e.g. nails, needles, coins,
paper clips, etc.) do not find their way into the machine with the washing (e.g. in pockets). Foreign objects can damage components of the machine, which in turn can result in damage to the washing.
9

Warning and safety instructions
If the correct amount of detergent is dispensed, the machine should not need to be descaled. If, however,
you do wish to descale the machine only use proprietary non-corrosive descaling agents and strictly observe the instructions. Consult the Miele Customer Service Department.
Textiles which have been pretreated in solvent based cleaning
agents must be thoroughly rinsed in clean water before being washed in the machine.
Never use solvent based cleaning agents in this machine, as this may
result in damage to component parts and create toxic fumes. Such detergents also pose a fire and explosion hazard.
Only use dyes specified by the manufacturer as being suitable for
use in a washing machine. Always observe the manufacturer’s instructions carefully.
Dye removers may contain sulphur compounds which cause damage
such as corrosion. Do not use dye removers in this machine.
For machines with a ’porthole’ door, remember that the porthole
glass will be hot when washing at very high temperatures. Do not let children touch it.
Always make sure the drum is stationary before reaching in to
remove washing. Reaching into a moving drum is extremely dangerous.
Accessories
Accessory parts may only be fitted when expressly approved by
Miele. If other parts are used, guarantee, performance and product liability claims may be invalidated.
Disposal of your old machine
Before discarding an old machine unplug it. Render the plug useless.
Cut off the cable directly behind the appliance to prevent misuse.
10
Washing environmentally and economically
–Water consumption and energy usage are determined by the size of the load. Load to the maximum recommended for the programme selected.
–The washing times can vary considerably due to the automatic load adjustment feature. Depending on the amount of the load, the main wash may be shortened and one rinse omitted.
–Use the Mixed Wash poly/cottons programme or the Quick Wash programme for smaller amounts of laundry.
–To save energy wash normally and lightly soiled laundry at lower temperatures. The 95°C Cottons programme is probably only needed in exceptional circumstances, e.g. for oil based stains or where a very hot wash is required.
–A main wash (programme without pre-wash) is sufficient to clean normally soiled laundry.
–By using the additional option “Soak” you can select a lower temperature in the main wash.
–Use the additional option "Soak" instead of “Pre-wash" with heavily soiled laundry.
If “Soak” is followed immediately by a main wash the same suds are used.
–Use the "Short" wash option for normally or very lightly soiled laundry.
–Do not exceed the amounts of detergent which may be recommended by the manufacturer on the packaging.
–Reduce the amounts of detergent with smaller loads, (e.g. with a half load, approx. one third less detergent).
–Select the highest suitable spin speed in the wash programme when tumble drying afterwards.
11

Before using for the first time
Before using the machine for the first time ensure that it is correctly installed and connected. See the relevant section under "Installation". Also check that the fluff filter is securely tightened. Otherwise there is a risk of water leakage during use.
For safety reasons spinning is not possible until the machine has been prepared for using for the first time. To activate the spinning function you must run a wash programme without any laundry).
This also activates the ball valve. The ball valve prevents detergent escaping from the suds container into the sump during a wash programme, thus making maximum use of the detergent.
The wash programme must be run without detergent.
Using detergent could result in an excessive build-up of foam.
Turn on the stopcock.
Press the "I-ON/0-OFF" button in.
Turn the programme selector to "COTTONS 40°C".
Press the "START" button.
When this programme has finished your washing machine is ready for using for the first time.
12

How to wash correctly
Brief guide
The headings numbered (1,2,3,...) show the operating sequence and can be used as a brief guide.
Before washing
1Prepare the wash load.
Empty all pockets.
Foreign objects (e.g. nails, coins, paper clips, etc.) can cause damage to textiles and components in the machine.
Sort the laundry
Most garments have a textile care label in the collar or side seam. Sort the washing by care label symbols. (See the section on these symbols for their explanation).
Dark textiles often contain excess dye and should be washed separately several times before being included in a mixed load.
Delicate textiles should be washed separately in a delicates programme (use a washing bag where appropriate).
Do not wash any items in this machine which are specified by the manufacturer as non-machine washable on the care label. (h symbol)
Pre-treat the laundry
Badly soiled areas, e.g. collars and cuffs, and water soluble stains can be pre-treated with bar soap, liquid detergent or detergent mixed into a solution or paste.
With particularly stubborn stains ask your dry cleaner for advice. Do not used solvent-based cleaning agents in this machine.
–Curtains:
Remove lead weights and strips or place in a laundry bag.
–Underwiring and collar stiffeners:
Any loose wiring in bras, shirt collar stiffeners, etc. should be removed or sewn in.
–Knitted garments, trousers and jeans, T-shirts and sweat shirts:
Turn inside out, if recommended by the manufacturer.
13
How to wash correctly
2Press the “Door” button.
3Load the drum.
Unfold washing and load loosely in the drum. To achieve best results it is advisable to make up mixed loads consisting of both large and small items. This improves the washing effect and helps distribute the load evenly to keep the machine stable and reduce the noise level during spinning.
Overloading reduces the wash result and causes more creasing.
To start a programme
7Press in the “I-ON/0-OFF” button.
–The programme selector should be pointing to Finish, the indicator light "Anti crease/Finish" is lit up in the sequence display.
Maximum load weights are noted below:
COTTONS . . . . . . . . . . . . . . . . . 5.0 kg MINIMUM IRON . . . . . . . . . . . . . 2.5 kg DELICATES/SYNTHETICS . . . . . 1.0 kg WOOLLENS / . . . . . . . . . . . . . 1.0 kg QUICK WASH. . . . . . . . . . . . . . . 2.5 kg MIXED WASH (Poly/Cottons) . . . 3.0 kg
4Shut the door with a light swing but do not slam it. Do not push on the door to shut it.
Make sure that there is no obstruction between the drum door and seal.
5Open the stopcock.
6Add detergent.
See section on “detergent” for details.
8 Turn the programme selector to the programme required
See section “Programmes, Programme survey”.
14

How to wash correctly
9Select any additional option required.
A maximum of two additional options can be chosen, provided they are compatible with the programme selected, (see the Programme survey in the Section on programmes). Only one option out of "Soak", "Pre-wash" and "Short wash" can be selected.
Press the button for the "Soak", "Prewash" or "Short wash" additional options, until the indicator for the chosen option lights up.
Press the button for the "Water plus" option, if required.
An additional option that has been selected can be de-selected by pressing the button.
0Select a spin speed.
Press the “Spin” button enough times until the indicator light for the required final spin speed lights up.
In some programmes the maximum spin speed is limited. The machine will not allow a higher spin speed to be selected. (see section on "programmes").
Memory-Function
If the last time a programme was run an additional option or different spin speed was selected,the machine will have stored this information in its memory.
The next time that programme is selected the machine offers the additional option and / or spin already stored in memory. (see “Programmable functions”)
!Press the "Start" button.
The programme now starts.
15

How to wash correctly
After washing
"Press the “Door” button.
~Press and release the “I-On/0-Off” button.
$Remove the washing.
Only remove washing from the machine once the drum has stopped turning, otherwise you may seriously injure yourself.
%Check the folds in the door seal for any small articles e.g. buttons which might be lodged there.
&Close the stopcock.
/Close the drum door.
Otherwise there is a danger of objects being placed inadvertently in the drum. If these remained unnoticed and were washed in the next load, they could damage the washing.
16

How to wash correctly
Adding or removing washing after programme start
Washing can be added or removed after the programme has already started, when using the following programmes.
–COTTONS
–MINIMUM IRON
–WOOLLENS /
–QUICK WASH
–Starch
–MIXED WASH
Press the“Door” button and hold it until the door springs open.
Add or remove items
Shut the door.
The programme will automatically continue.
–Apart from some exceptional cases the door can be opened during all sections of COTTONS, WOOLLENS, QUICK WASH, Starch and MIXED WASH - Poly/Cottons (high cotton percentage) programmes.
–With MINIMUM IRON and
MIXED WASH - Poly/Cottons (high polyester percentage) the door can be opened during the main wash with some exceptions.
General exceptions:
The door cannot be opened when:
–the suds temperature is above 55°C .
–the additional option “Water plus” has been selected,
–programme locking is switched on,
–the programme has reached the “Final spin" stage.
17

How to wash correctly
Programme . . .
. . . interruption
Press the “I-ON/0-OFF” button.
To continue with the same programme press the“I-ON/0-OFF” button again.
. . . alteration
The machine will accept the following changes after the "Start" button has been pressed,
–selection of a different temperature, extra selection or de-selection of the “Water plus” option can be carried out up to 6 minutes after start.
–the spin speed for final spin can be changed if the programme permits.
After start it is no longer possible to select a different programme.
If a different programme or 6 minutes after start another temperature is selected the indicator light "Anticrease/Finish" flashes. This does not affect the programme sequence. The indicator light goes out when the programme selector is set back to the programme or temperature previously chosen.
18
To select a different programme proceed as follows:
With the “I-On/0-Off” button switch off the appliance.
Turn the programme selector to "Finish".
Switch the machine on with the “I-On/0-Off” button.
Select a new programme.
Press the “START” button.
. . . Skipping a programme stage
Turn the programme selector to “Finish”.
As soon as the programme sequence light for the stage at which the programme should continue starts flashing:
Turn the programme selector switch to the appropriate programme within 4 seconds.
When programme locking has been activated the programme cannot be changed nor can a programme stage be repeated or left out.
 Loading...