


PM1214
Table of contents
 Loading...
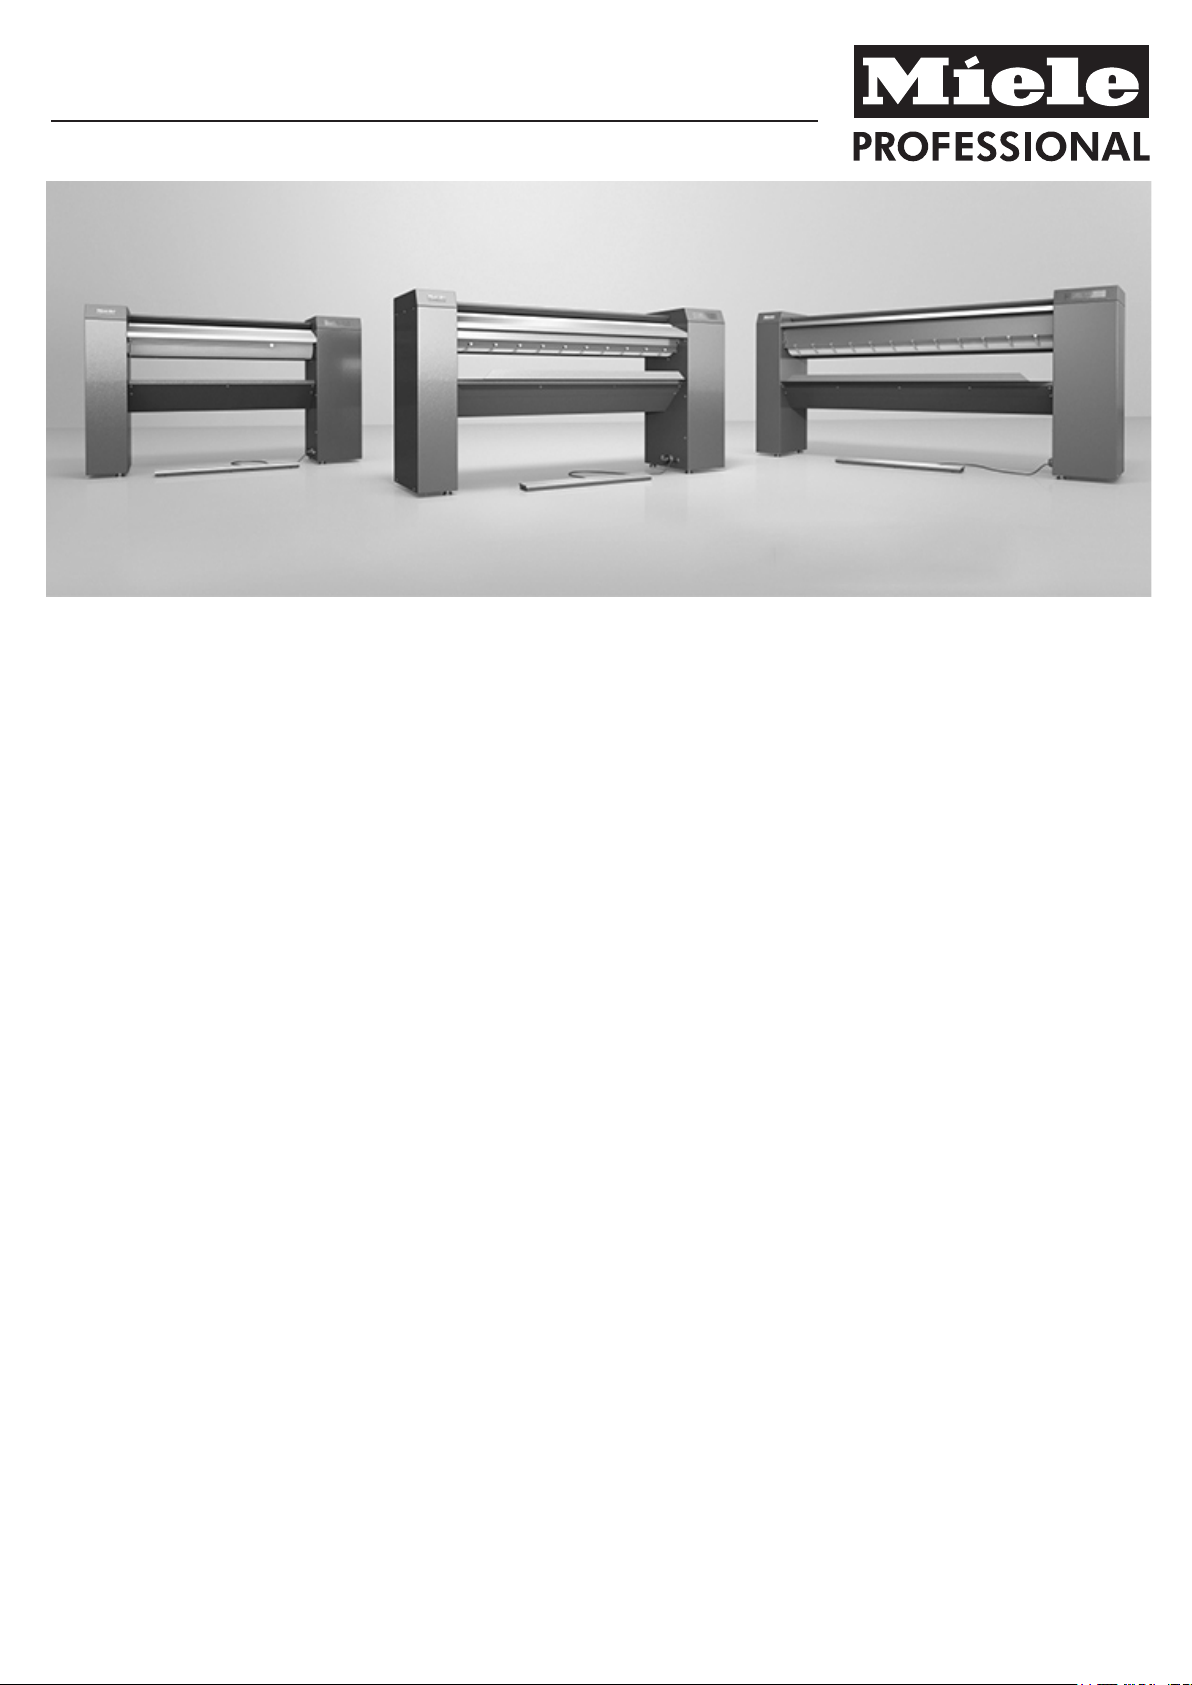
PM 1210
PM 1214
PM 1217
en Operating instructions Commercial Rotary Iron
fr Mode d'emploi Repasseuses professionnelles
M.-Nr. 10025790
en, fr - CA

2
en-CA ................................................................................................................................ 4
fr-CA .................................................................................................................................. 23

en-CA - Contents
3
Warning and Safety instructions........................................................................................ 4
Correct application................................................................................................................ 4
Technical and electrical safety .............................................................................................. 4
Operation............................................................................................................................... 5
Using accessories ................................................................................................................ 5
Notes on the use of this rotary iron ...................................................................................... 5
Caring for the environment.................................................................................................
7
Disposal of the packing material ........................................................................................... 7
Disposing of your old appliance............................................................................................ 7
Guide to the machine ..........................................................................................................
8
Control buttons on the Touch display ................................................................................... 9
Display symbols on the control panel ................................................................................. 10
Finger guard ........................................................................................................................ 11
Laundry rod ......................................................................................................................... 11
Preparing the laundry........................................................................................................
12
Residual moisture in the laundry ......................................................................................... 12
Preparing the laundry .......................................................................................................... 12
Operation............................................................................................................................
13
Preparing for use ................................................................................................................. 13
Ironing.................................................................................................................................. 13
Selecting the temperature............................................................................................... 13
Changing the pre-set temperature for a temperature selection button........................... 13
Selecting the ironer speed .............................................................................................. 14
Setting the ironer speed.................................................................................................. 14
Changing the pre-set roller speed for a roller speed selection button............................ 14
Laundry feed ................................................................................................................... 14
Pauses in ironing............................................................................................................. 14
Standby mode................................................................................................................. 15
FlexControl footswitch .................................................................................................... 15
Pick-off bands................................................................................................................. 15
After ironing ......................................................................................................................... 15
Ironing with a coin-operated payment system .................................................................... 15
Notes...................................................................................................................................
16
Changing the temperature unit (°C / °F) .............................................................................. 16
Favorites setting .................................................................................................................. 16
Increasing the life of the roller cover ................................................................................... 16
Power failure during ironing................................................................................................. 16
Peak load (option)................................................................................................................ 16
Fault messages ................................................................................................................... 17
Cleaning and care.............................................................................................................. 18
Cleaning and waxing the heater plate................................................................................. 18
Waxing the heater plate....................................................................................................... 18
Roller cover and padding instructions................................................................................. 19
Removing the roller cover.................................................................................................... 19
Fitting the roller cover.......................................................................................................... 19
Miele Service ....................................................................................................................... 20

en-CA - Warning and Safety instructions
4
This rotary iron complies with current safety requirements. Inappropriate use can, how‐
ever, lead to personal injury and damage to property.
To avoid the risk of accidents and damage to the rotary iron, please read these instruc‐
tio
ns carefully before using it for the first time. They contain important information on its
safety, use and maintenance.
If other persons are being shown how to operate the rotary iron, they must be given or
i
nformed of these important safety Instructions.
Keep these instructions in a safe place and ensure that new users are familiar with the
co
ntent. Pass them on to any future owner.
Correct application
This rotary iron must be used as described in these instructions and must be checked on a
r
egular basis to make sure it is functioning correctly. Maintenance must be carried out
when necessary.
This r
otary iron is only intended for ironing fabrics that were washed in water, and which
have a care label stating that the article is suitable for machine ironing.
This r
otary iron is a commercial machine. It is not intended for use in the domestic envi‐
ronment. If the rotary iron is operated in a publically accessible place, it is the supervisor's
responsibility to ensure suitable measures are in place to protect users from any source of
risk or danger.
This r
otary iron is not intended for outdoor use.
Technical and electrical safety
This r
otary iron should not be operated in the same room as dry-cleaning equipment us‐
ing solvents containing PERC or CFCs.
The r
otary iron should only be operated in a suitable dry room.
Only oper
ate the rotary iron when all removable outer casings are in place so that it is
impossible to touch an electrical, moving, or heated component.
Do not damage, remove, or bypass the safety components or control elements of the
rotary iron.
Do not mak
e any alterations to the ironer, unless authorized to do so by Miele.
If
the controls or the electrical cabling insulation has been damaged, the rotary iron
must not be used until it has been repaired.
Repair and maint
enance work should be performed by a Miele service technician. Work
by unqualified persons could be dangerous.
Defective co
mponents should only be replaced by genuine Miele original spare parts.
Only with original Miele parts can the manufacturer guarantee the safety of the appliance.
The ele
ctrical safety of this rotary iron can only be guaranteed when connected to a cor‐
rectly installed earthing system on site. It is most important that this standard safety re‐
quirement is present and tested regularly. If in any doubt, please have the on-site electrical
system tested by a qualified electrician. Miele cannot be held liable for damage or injury
cased by the lack or inadequacy of an effective earthing system.

en-CA - Warning and Safety instructions
5
The r
otary iron is only completely isolated from the electricity supply when switched off
at the mains isolator, or the (on site) mains fuse is disconnected.
Operation
The r
otary iron may not be operated without supervision.
This r
otary iron can only be used by people with reduced physical, sensory, or mental
capabilities or lack of experience or knowledge if they are supervised while using it or have
been shown how to use it in a safe way and understand and recognize the consequences
of incorrect operation.
Chil
dren should be supervised when they are near the rotary iron. Do not allow children
to play with it!
In the heat
ed state and with the heater plate contacting the roller, there is a serious risk
of burning if you touch the edge of the heater plate on the laundry output side.
Do not set a hig
her ironing temperature than specified on the care label of the laundry. If
the ironing temperature is too high, the laundry can catch on fire.
When ir
oning double-layer laundry, do not reach between the layers to stretch the laun‐
dry. There is a danger that you will not be able to move your hands to the side of the heat‐
er plate in a timely manner. This also applies to reaching into pockets whose open sides
are facing the heater plate.
P
rovide sufficient lighting during the operation of the rotary iron.
K
eep the work area around the rotary iron free of objects.
Mak
e sure that a fire extinguisher is in the direct vicinity and can be used at any time.
There is a risk of fire if the ironing temperature is too high, the laundry is not suited for iron‐
ing, or the laundry was not cleaned in water!
The insta
llation and mounting of this rotary iron in non-stationary locations such as
ships may be performed only by specialized companies/specialists if they can guarantee
the prerequisites for the safe use of this rotary iron. In addition, the country-specific safety
regulations, standards, and safety provisions must be observed.
Using accessories
Accessory parts may only be fitted when expressly approved by Miele. If spare parts or
accessories from other manufacturers are used, any claims from guarantee, warranty
and/or product liability will be invalidated.
Notes on the use of this rotary iron
Only r
esponsible people over the age of 16 years who are completely familiar with the
operation of the rotary iron should use the infeed table.
When working
with the ironer, always wear close fitting clothes and keep long hair tied
back. Wide sleeves, apron straps, scarves and ties etc. could be taken in by the roller.
Remove rin
gs and bracelets before ironing.

en-CA - Warning and Safety instructions
6
Always smooth out wrinkl
es as far away as possible from the infeed point on the infeed
table. Feed pillow cases and duvet covers into the ironer with the open end first. Do not
hold the corners from the inside and do not reach into the straps of shirts and aprons.
Check the fun
ction of the safety devices daily. The rotary iron may only be operated with
properly functioning safety devices. This guarantees that crushing injuries, burns, and oth‐
er severe injuries can be prevented.
Befor
e switching the roller to the reverse mode, make sure that no one is endangered.
If other persons are being shown how to operate the rotary iron, they must be given or
i
nformed of these important safety Instructions.
Keep these instructions in a safe place and ensure that new users are familiar with the
co
ntent. Pass them on to any future owner.

en-CA - Caring for the environment
7
Disposal of the packing material
The packaging protects the machine from transport damage. The packaging materials
have been sele
cted from materials which are environmentally friendly for disposal and can
normally be recycled. Returning the packaging saves raw materials and reduces the
amount of waste.
Disposing of your old appliance
Old electrical and electronic equipment often still contain valuable materials. However, they
may al
so include harmful substances that were essential for proper functioning and safe
use. Improperly disposing of these items in your household waste can be harmful to your
health and the environment. Therefore, please do not dispose of your old appliance in your
regular household waste.
Please make sure that your old appliance is disposed of according to the regional disposal
r
egulations. Contact your local community waste collection / recycling centre or Miele for
advice. Please make sure that your old appliance is stored in a childproof manner until col‐
lection.
en-CA - Guide to the machine
8
a
Control panel (touch display)
b
Laundry infeed table
c
Finger guard
d
Roller
e
Heater plate with cover
f
Laundry outfeed table
g
FlexControl footswitch
h
Pick-off bands
i
Height adjustable screw feet
j
Base (optional)
k
Laundry box
Option PM 1210 PM 1214 PM 1217
Laundry rod Standard
Base X X X
en-CA - Guide to the machine
9
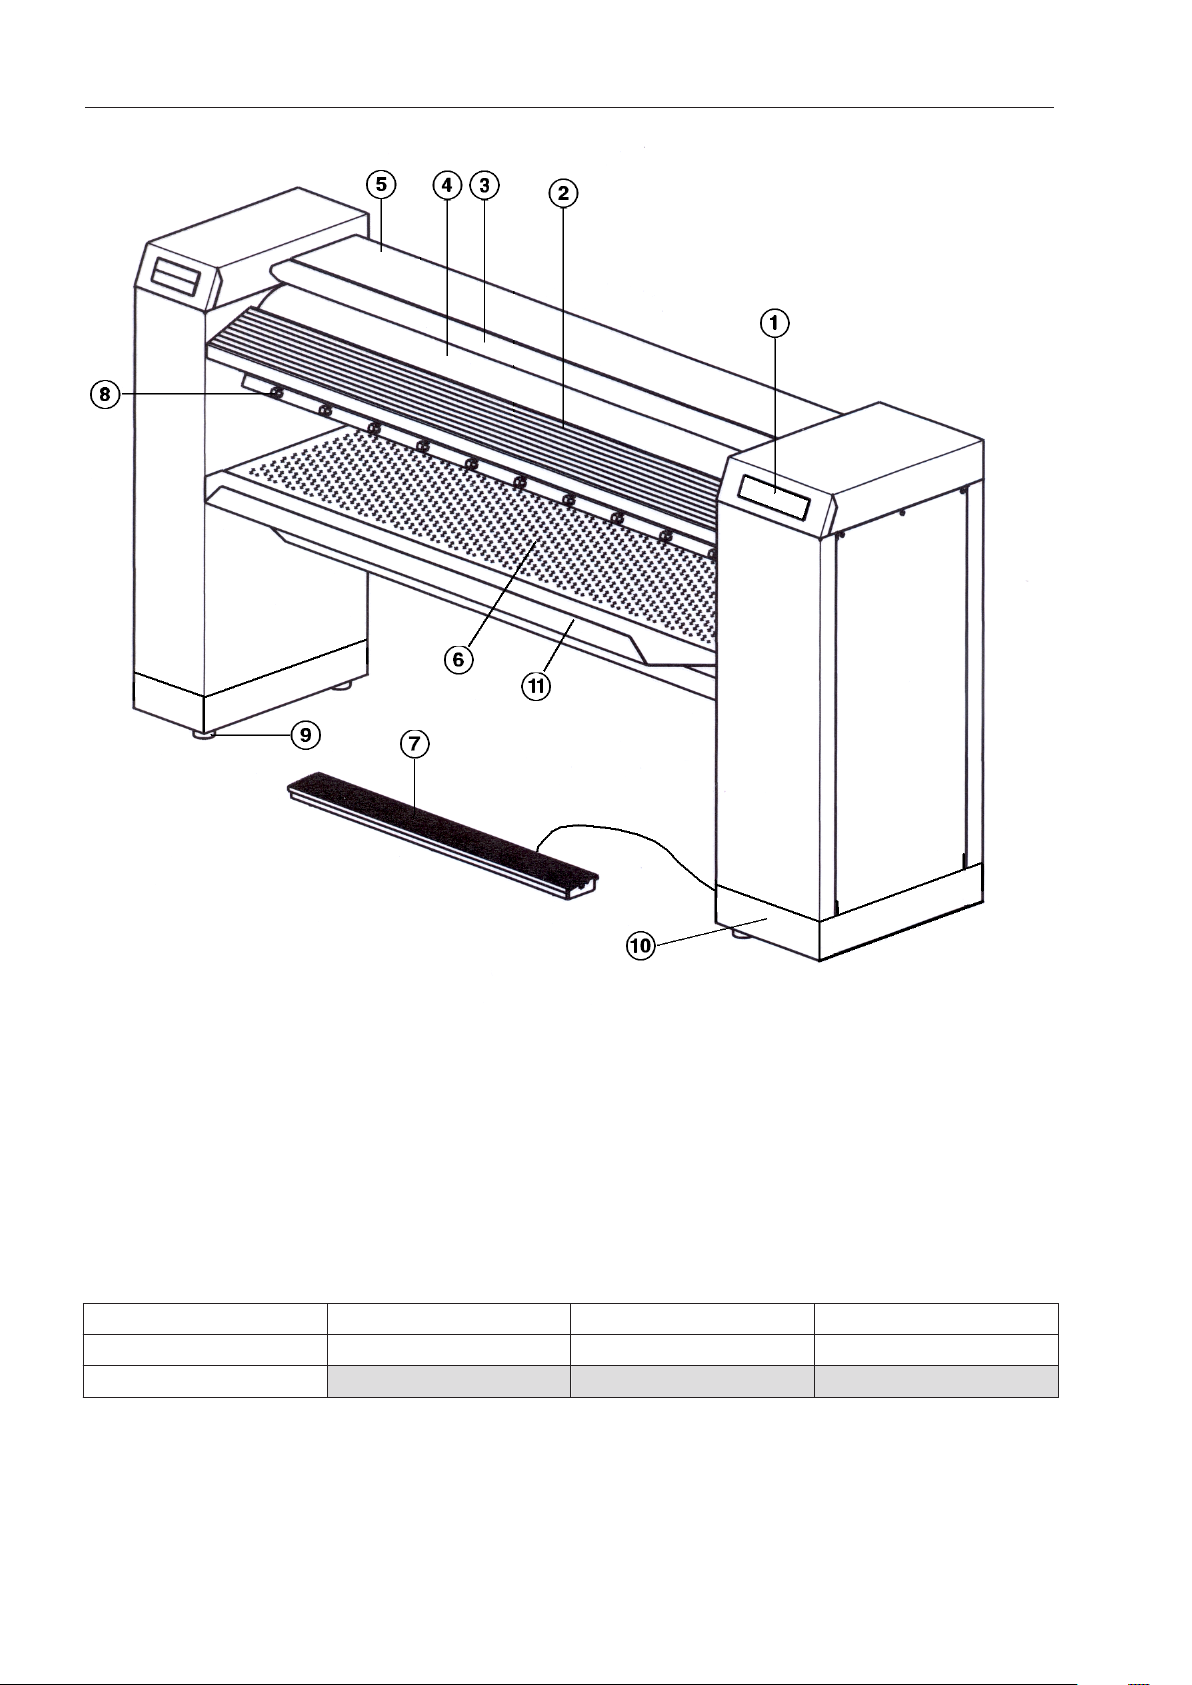
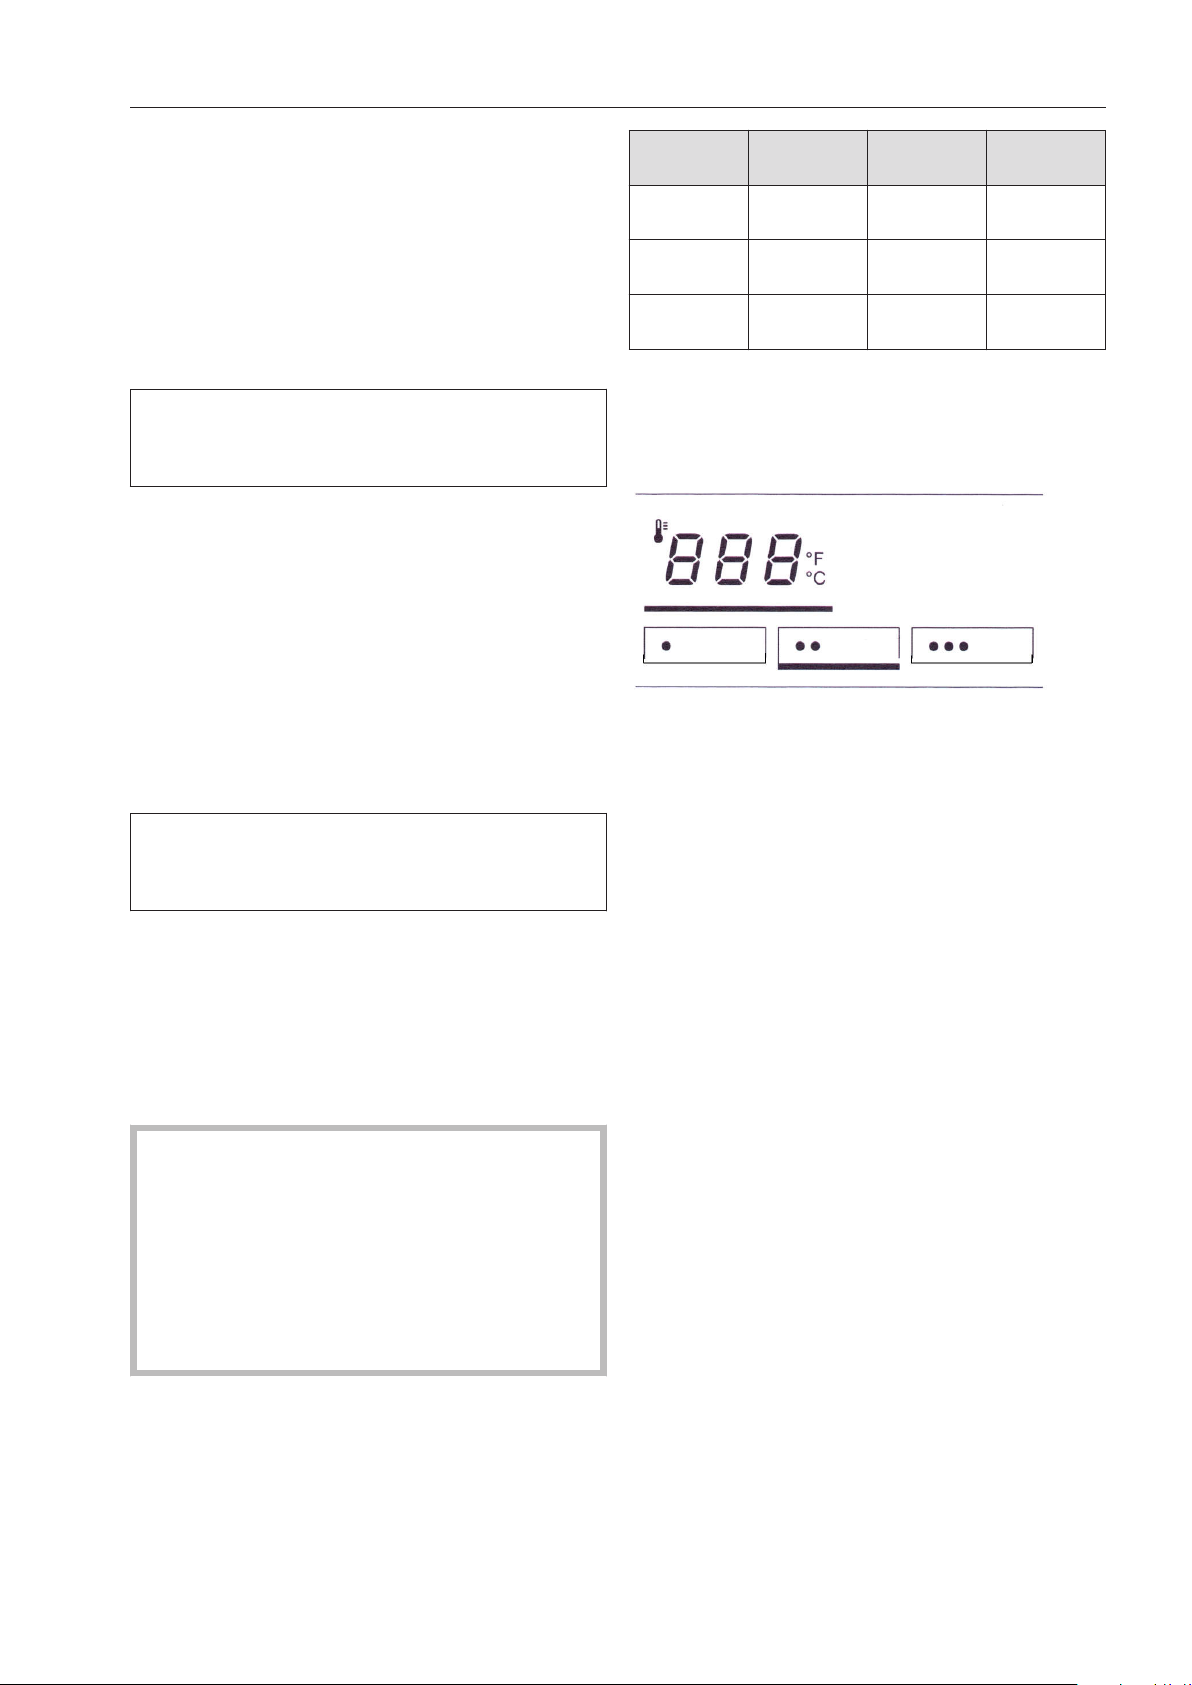
Control buttons on the Touch display
Top: temperature range, Bottom: ironing speed range
a
On/Off, Standby
b
Pause
c
Start
d
Temperature selection mode
e
Temperature selection button 1
f
Temperature selection button 2
g
Temperature selection button 3
h
Increase temperature / roller speed
i
Decrease temperature / roller speed
j
Favorites program
k
Maintenance position*
l
Clean / Wax
m
Roller speed selection mode
n
Roller speed selection button 1
o
Roller speed selection button 2
p
Roller speed selection button 3
* Button can be activated by Miele Service during commissioning.
When a button is successfully pressed, it is highlighted with a bar. When the
button
flashes, the rotary iron can be started.

en-CA - Guide to the machine
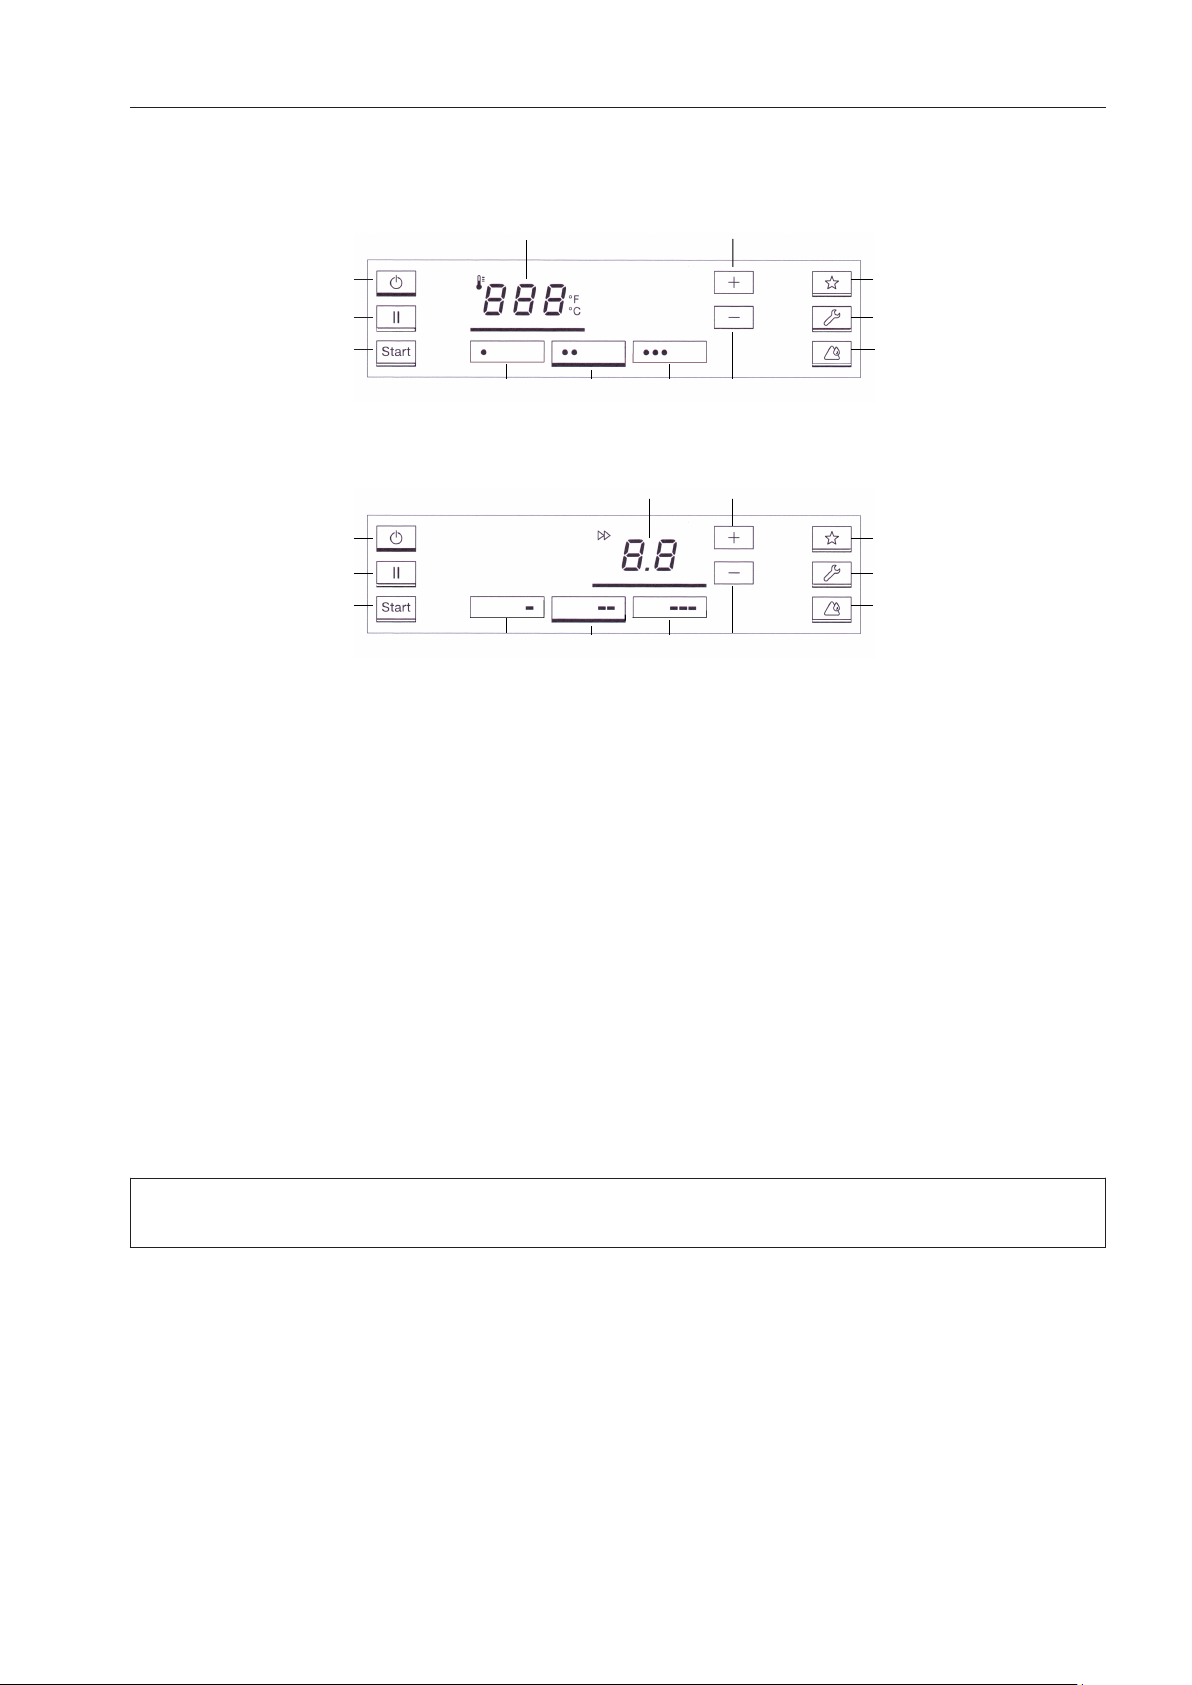
10
Display symbols on the control panel
a
Activate the finger guard
b
Heating on / temperature increasing
c
Cleaning and waxing (only for PM 1217)
d
Heating off / temperature too high
e
General fault
f
Constant incorrect laundry feed, left /
right
g
Pre-selection and display of temperature
in °C / °F
h
Pre-selection and display of roller speed
i
Roller speed range
j
Coin operation mode
k
Switch temperature units
en-CA - Guide to the machine
11
Finger guard
The finger guard is a safety device that
mu
st be checked daily for proper function
every time the ironer is turned on.
Activate the finger guard once while the
"Fing
er guard" symbol is flashing.
If finger tips get between the roller and the
finge
r guard, the roller is stopped immedi‐
ately and the heater plate is withdrawn.
When this happens, the "Finger guard" dis‐
play symbol will light constantly. During the
reverse mode of the roller, the finger guard
has no function. The ironer can be turned on
again by pressing the button.
Do not use the finger guard intentionally to
turn off the machine.
Laundry rod
(only for PM 1210)
Ironed laundry can be placed over the swing
out bar t
o prevent creasing.
en-CA - Preparing the laundry
12
Residual moisture in the laundry
For a good result and optimum iron per‐
formanc
e the ideal residual moisture level
for the PM 1214 and PM 1217 lies between
15% and 25%, for the PM 1210 at 15%.
The ideal residual moisture level depends
on the composition of the fabric.
Preparing the laundry
Before starting to ironer, sort the laundry ac‐
cor
ding to type and fabric. In the process,
pay attention to the care label. We recom‐
mend that the laundry be sorted in the fol‐
lowing order:
Material Symbol Temperature
Nylon, other synthet‐
ics
100 - 110°C
Then:
Wool, silk
111 - 150°C
And then
Cotton, linen
151 - 180°C
If it is necessary to switch to a lower tem‐
per
ature because the temperature is too
high, the display symbol will indicate that
the temperature is currently too high and the
heating is being deactivated. As soon as the
display symbol extinguishes, the selec‐
ted temperature is reached. Iron starched
laundry last so that any starch remaining on
the heater plate does not get onto other
laundry. Items with buttons must be fed in
such a way that the buttons are pointing to‐
wards the roller padding. If the buttons are
facing upwards, there is a danger that they
could be damaged or torn off when being
fed into the ironer. To protect the heater
plate, place a cloth over zippers, metal but‐
tons, and metal hooks before ironing. Do
not iron any kind of metal and plastic buckle
or extremely high buttons (such as ball-sha‐
ped buttons).
Before using the rotary iron for the first
time
, clean the heater plate by passing a
Miele cleaning cloth across the entire
width of the roller. Then, wax the heater
plate using the wax sparingly.
en-CA - Operation
13
Preparing for use
Switch
on the on-site mains switch.
Switch
the ironer on by pressing the On /
Off button.
The "Finger guard" symbol will flash in the
display
.
N
ow activate the finger guard by lifting it.
The finger guard is a safety feature which
must be check
ed for proper functioning
every time the ironer is switched on.
Ironing
Aft
er switching the ironer on, wait until it
has reached the minimum ironing temper‐
ature.
The symbol will appear in the display
and the ir
oner will heat up.
The butt
on begins to flash as soon as
the ironer has reached the minimum tem‐
perature.
The ironer is ready for operation when the
set t
emperature is reached and the
symbol no longer appears in the display.
N
ow press the flashing button to start
up the ironer.
The ironing process will begin.
Useful tip: Allo
w the roller to rotate for
about 5 minutes to enable the heat to equal‐
ize between the heater plate and the roller.
Danger of burns on the edge of the
h
eater plate!
There is danger of burning if the edge of
the
heater plate is touched on the laundry
outfeed side when the ironer is heated up
and the heater plate is engaged. There is
a warning sticker on the top and at the
back on the housing.
Selecting the temperature
Set the co
rresponding heater plate tem‐
perature according to the type of fabric.
Material Symbol Tempera‐
tur
e
Preset value
Nylon / artifi‐
cial silk
100 - 110°C
(212 - 230°F)
110°C
(230°F)
Wool, silk
111 - 150°C
(231 - 302°F)
125°C
(257°F)
Cotton, linen
151 - 185°C
(303 - 365°F)
180°C
(356°F)
The temperature can be selected either us‐
ing
the preset temperature ranges or directly
by using the "Increase temperature" or
"Decrease temperature" buttons.
P
ress the "Temperature selection mode"
button on the control panel. The
button will then be highlighted with a bar
underneath.
T
o set a temperature range, press the rele‐
vant temperature selection button, e.g.
(pre-set as factory default to 125°C/
257°F). The button will be highlighted with
a bar underneath.
Changing the pre-set temperature for a
t
emperature selection button
P
ress the temperature selection button
you want to change the value for.
Keep it pressed in. The bar will light up un‐
derneath it and the curr
ent temperature val‐
ue will appear in the display.
Press the "Increase temperature" or
"Decrease temperature" buttons to set
the temperature you want to save for that
button.
T
hen press and hold the selected temper‐
ature selection button (which is highligh‐
ted with a bar underneath) until it flashes
once.
Loading...