


NOTES ON THIS MANUAL
Keep these instructions with your computer at all times. The proper set up, use and care can help extend the life of your computer. In the event that you transfer ownership of this computer, please provide these instructions to the new owner.
This manual is divided into sections to help you find the information you require. Along with the Table of Contents, an Index has been provided to help you locate information.
In addition, many application programs include extensive help functions. As a general rule, you can access help functions by pressing F1 on the keyboard. These help functions are available to you when you use the Microsoft Windows® operating system or the various application programs.
ÂWe strongly recommend that you read the Online Manual for your Notebook, which can be found in the Start Menu.
Information about your PC
This interactive manual is designed to provide additional information about your Notebook as well as useful links accessible via the World Wide Web.
Windowsxp invites you to a tour (notes on the task bar) to familiarize yourself with the operating system. We listed further useful sources of information starting on page 50.

AUDIENCE
These instructions are intended for both the novice and advanced user. Regardless of the possible professional utilization, this Notebook is designed for day-to-day household use. The functions and applications for use with this Notebook have been designed with the entire family in mind.
DOCUMENT YOUR NOTEBOOK
It is important to document the details of your Notebook purchase in the event you need warranty service. The serial number can be found on the back of the Notebook:
Serial Number ......................................
Date of Purchase ......................................
Place of Purchase ......................................
QUALITY
Medion has selected the components in this computer for their high level of functionality, ease of use, safety and reliability.
Through balanced hardware and software design we are able to provide you with an innovative personal computer useful for applications relating to both work and leisure.
We are pleased to welcome you as our newest customer. Thank you for choosing Medion.
SERVICE
Medion is pleased to provide individualized customer service throughout the life of your Notebook. Please feel free to contact a customer service representative with any questions relating to this Notebook.
Copyright© 2005 Medion®. All rights reserved. Microsoft®, MS-DOS®, and Windows are registered trademarks of Microsoft Corporation in the U.S. and other countries. Pentium® is a registered trademark of Intel Corporation. The names of actual companies and products mentioned herein may be the trademarks of their respective owners.
This product incorporates copyright protection technology that is protected by method claims of certain U.S. patents and other intellectual property rights owned by Macrovision Corporation and other rights owners. Use of this copyright protection technology must be authorised by Macrovision Corporation, and is intended for home and other limited viewing uses only unless otherwise authorized by Macrovision Corporation. Reverse engineering or disassembly is prohibited.
Information in this document is subject to change without notice.
ii

Table of Contents: |
|
SAFETY AND MAINTENANCE........................................ |
1 |
Safety Instructions ................................................... |
3 |
Data Security........................................................ |
3 |
Operational Safety................................................. |
4 |
General Safety Information..................................... |
4 |
Important Additional Safety instructions ................... |
5 |
CD-ROM/CD-RW/DVD/DVD-RW Drive safety.............. |
6 |
TFT Display Safety................................................. |
6 |
Set-Up Location .................................................... |
7 |
Environmental conditions........................................ |
7 |
Power Adapter ...................................................... |
8 |
Cabling ................................................................ |
9 |
Modem ................................................................ |
9 |
Information about the regulatory compliance of |
|
wireless LAN ......................................................... |
9 |
Touch pad ............................................................ |
9 |
Battery operation ................................................ |
10 |
VIEWS & FIRST SETUP .............................................. |
11 |
Views of the Notebook ............................................ |
13 |
Scope of Delivery ................................................ |
13 |
Open Notebook ................................................... |
14 |
Front View.......................................................... |
14 |
Left Side ............................................................ |
15 |
Right Side .......................................................... |
15 |
Rear Side ........................................................... |
15 |
Indicators........................................................... |
16 |
Getting Started ...................................................... |
17 |
The Windows® XP Desktop.................................... |
20 |
MAIN COMPONENTS .................................................. |
23 |
Power Supply......................................................... |
25 |
On/Off button ..................................................... |
25 |
Power Adapter .................................................... |
26 |
Battery Operation................................................ |
27 |
Inserting the Battery........................................ |
27 |
Removing the battery....................................... |
27 |
Charging the Battery........................................ |
28 |
Discharging the Battery .................................... |
28 |
Battery Power ................................................. |
28 |
iii

Power Management ............................................. |
30 |
Standby Mode ................................................. |
30 |
Suspend (hibernate) mode................................ |
30 |
Display ................................................................. |
31 |
Opening and Closing the Display............................ |
31 |
Screen Resolution................................................ |
31 |
Connecting an External Monitor ............................. |
32 |
Data entry............................................................. |
34 |
The Keyboard ..................................................... |
34 |
Notebook-specific key combinations ................... |
34 |
Touch pad .......................................................... |
35 |
The Hard drive....................................................... |
36 |
Important Directories........................................... |
37 |
The Optical Drive.................................................... |
38 |
Connection ......................................................... |
38 |
Handling Discs .................................................... |
38 |
Loading a Disc .................................................... |
39 |
Playing Music CDs................................................ |
40 |
Playing DVD Movies ............................................. |
40 |
Writing CDs ........................................................ |
41 |
The Sound Card ..................................................... |
43 |
External Audio Ports ............................................ |
43 |
Modem ................................................................. |
44 |
Modem port........................................................ |
44 |
The Network.......................................................... |
45 |
What is a network? .............................................. |
45 |
Fast Ethernet-Network ..................................... |
45 |
Wireless LAN................................................... |
48 |
Universal Serial Bus (USB) Port ................................ |
49 |
Software ............................................................... |
50 |
Getting to Know Windows XP ................................ |
50 |
Windows® XP Manual ....................................... |
50 |
Windows® XP Tour........................................... |
50 |
Microsoft® Interactive Training .......................... |
50 |
Windows® XP Help and Support ......................... |
50 |
Software Help ..................................................... |
51 |
Device Drivers .................................................... |
51 |
Information about Your PC.................................... |
52 |
Digital Signatures ................................................ |
52 |
Windows Activation.......................................... |
53 |
iv

The BIOS Set-up-Program .................................... |
54 |
Running the BIOS Set-up.................................. |
54 |
Navigating the BIOS Utility ............................... |
54 |
FIRST AID ................................................................. |
55 |
FAQ – Frequently Asked Questions............................ |
57 |
Data and System Security ....................................... |
59 |
Data Security...................................................... |
59 |
Maintenance Programs ......................................... |
59 |
Password Reset Disk ............................................ |
59 |
Windows® Update................................................ |
60 |
Windows Update Information for Data Security .... |
61 |
System Recovery ................................................... |
62 |
Restoring Microsoft Windows XP ............................ |
62 |
System Restore powered by Symantec ................... |
63 |
Limits of Restore Factory Settings (Restore option 3) |
64 |
Performing the Restore..................................... |
64 |
Troubleshooting ..................................................... |
66 |
Localize the Cause............................................... |
66 |
Check Cables and Connections .......................... |
66 |
The Power On Self Test (POST).......................... |
66 |
Errors And Possible Causes ............................... |
67 |
Additional Support............................................... |
68 |
Driver Support .................................................... |
68 |
Maintenance .......................................................... |
69 |
Maintenance Instructions...................................... |
69 |
Cleaning and Care ............................................... |
69 |
Care of the TFT Display ........................................ |
69 |
Transporting the Notebook.................................... |
70 |
Securing your Notebook ................................... |
71 |
Using a safety lock........................................... |
71 |
Batteries and Proper Treatment ............................. |
72 |
Upgrades and Repairs .......................................... |
73 |
Notes for Service Engineers .............................. |
73 |
v

APPENDIX ................................................................. |
75 |
Standards ............................................................. |
77 |
Electromagnetic Compatibility ............................... |
77 |
Electrical Safety .................................................. |
78 |
Ergonomics ........................................................ |
78 |
Supplementary Information .................................. |
78 |
ISO 13406-2 Class II ........................................... |
78 |
FCC Compliance Statement................................... |
80 |
Warranty .............................................................. |
81 |
Limits of Liability ................................................. |
82 |
Local Law ........................................................... |
83 |
Making Copies of This Manual................................ |
83 |
Index ................................................................... |
84 |
vi

 Chapter 1
Safety and Maintenance
Safety
Subject |
Page |
Data Security................................................. |
3 |
Set-up Location.............................................. |
7 |
Environmental Conditions ................................ |
7 |
Modem ......................................................... |
9 |
Information about the regulatory compliance |
|
of wireless LAN Touch Pad ............................... |
9 |
Touchpad ..................................................... |
9 |
Battery Operation .......................................... |
10 |
Handling
Components
Aid
Appendix

2 |
|
SAFETY AND MAINTENANCE |

SAFETY INSTRUCTIONS
Please follow the instructions in this section for the safe operation of your Notebook:
Safety
• DO NOT open the case of the Notebook, the battery or the power adaptor. When the case is open there is a danger of severe electric shock.
• DO NOT insert objects through the slots and openings of the Notebook. This may lead to electric shock, electrical short-circuit or fire that will damage your Notebook.
•DO NOT allow small children to play unattended with electrical equipment.
•DO NOT cover the slots and openings of the
Notebook. These openings are for ventilation purposes. Covering these vents may lead to overheating.

 • This Notebook is NOT designed for use within industrial environments.
DATA SECURITY
The supplier does not assume liability for data loss or damage to data storage units, and no claims can be accepted for damages resulting from the loss of data or consequential losses.
SAFETY INSTRUCTIONS
Handling
Components
Aid
Appendix
3

OPERATIONAL SAFETY
It is important to follow all of the safety instructions in this manual to ensure the safety of you and your Notebook.
GENERAL SAFETY INFORMATION
If you find that:
•the power cord/power adapter is worn or damaged.
•liquid is spilled on the unit.
•the Notebook fails to work properly.
•the Notebook is dropped or the housing is damaged.
You should:
•shut-down your Notebook immediately.
•remove the power cord from the socket.
•contact Customer Service.
•do not restart unless you have contacted Customer Service.
How important is the information you will be storing on your Notebook? You need to guard against the loss of your data by making backup copies. You can backup your data onto CD, floppy disk, or other media such as Zip drives. It depends upon how much data you have. In this way, if something happens to the hard drive in your Notebook, you have another copy of your data.
4 |
|
SAFETY AND MAINTENANCE |
IMPORTANT ADDITIONAL SAFETY INSTRUCTIONS
When using any electronic equipment, basic safety precautions should always be taken. Following the guidelines below can reduce the risk of fire, electric shock and personal injury:
•Do not use this product near water (e.g., near a bathtub, lavatory or kitchens sink, in a wet basement or near a swimming pool).
•Avoid using a telephone/modem (other than a cordless type) during an electrical storm. There is a remote risk of electric shock from lightning.
•Do not use the telephone/modem to report a gas leak in the vicinity of the leak.
Lithium batteries cannot handle intense pressure, high temperatures or fire. Danger of explosion if replaced incorrectly. Replace batteries with a compatible type as recommended by the manufacturer. Lithium batteries are hazardous waste and require proper disposal. Contact the Medion Service Center for additional information on battery disposal.
SAFETY INSTRUCTIONS |
|
5 |
Safety
Handling
Components
Aid
Appendix

CD-ROM/CD-RW/DVD/DVD-RW DRIVE SAFETY
• CD-ROM-/CDRW-/DVD-drives are Laser Class 1 devices. These lasers must remain in their sealed casing.
•Danger — Invisible laser radiation when open. Avoid direct exposure to beam. This product is certified by the manufacturer to comply with DHHS rules 21CFR, Chapter 1, Subchapter J, applicable at date of manufacturer. Refer to optical drive labels for additional details.
•DO NOT remove the drive covers, as exposure to the lasers may be harmful.
•DO NOT look directly into the laser, even when wearing eye protection.
TFT DISPLAY SAFETY
• To avoid damage to the TFT Display, never open it a full 120º. Do not forcibly open it.
• In order to avoid damage to the display, do not touch it with your fingers or sharp objects.
• Never lift the Notebook by the TFT Display; doing so could break the hinges.
•There is a risk of injury if the TFT display breaks. Use protective gloves to pack up the broken pieces and contact customer service to arrange for proper disposal.
It is important to thoroughly wash your hands after handling a broken TFT display. There is a chance that chemicals may have been released.
6 |
|
SAFETY AND MAINTENANCE |

•Never place objects on top of the Notebook that would exert any pressure on the display. There is a danger that even slight pressure may break the TFT display.
SET-UP LOCATION
•Keep your Notebook and all connected peripherals away from moisture, dust, heat and direct sunlight. Failure to do so can lead to Notebook malfunction or damage.
•It is highly recommended you do not use the Notebook outdoors.
•Operate the Notebook and all peripherals on a stable, balanced and vibration-free surface.
•Do not leave the base of your Notebook on your lap or any part of your body for a long period of time while the Notebook is turned ON or is charging. The Notebook can become very warm while it is turned on or charging and can cause discomfort or injury from heat exposure.
ENVIRONMENTAL CONDITIONS
•The Notebook is most reliably operated at an ambient temperature between +41° and +104° F and at a relative humidity between 30% and 70% (without condensation).
•When powered off, the Notebook can be stored at temperatures between 32° and 140° F.
•Wait until the notebook has reached ambient (room) temperature before turning it on or connecting it to the power adapter. Drastic variations in temperature and humidity can create condensation within the PC and may cause it to short-circuit.
•For transporting the notebook keep the original packing.
SAFETY INSTRUCTIONS |
|
7 |
Safety
Components Handling
Aid
Appendix

POWER ADAPTER
•Do not open the power adapter housing. When the housing is open there is a danger of severe electric shock. It contains no user-serviceable parts.
•The electric outlet must be in the vicinity of the Notebook and within reach of the power adapter cables. DO NOT stretch the power cables tightly to reach an electric outlet.
•To disconnect your Notebook from the power source, or set the Notebook to battery operation, remove the power cord from the Notebook’s power socket.
•Only use the Notebook with a power adaptor (FSP090-1ADC21) operating at AC 115V~/60 Hz. In European countries use the Notebook at AC 220-240V~/50 Hz.
For details on power consumption, please refer to the rating plate on the rear of your Notebook. If you are unsure of the type of power supply available at the point of use, ask your local power company.
•Use only the supplied power cord and power adapter.
•If using an extension cord, make certain that it meets your local safety requirements. If in doubt, consult an electrician.
•To provide additional protection against electric shock, power surges, lightning strikes, or other electrical damage to your Notebook, we recommend the use of a surge protector.
8 |
|
SAFETY AND MAINTENANCE |

CABLING
•Arrange cables so no one can walk on or trip over them.
•DO NOT place objects on any of the cables.
Caution – To reduce the risk of fire, use only No. 26 AWG or larger telecommunication cords (applies to American Standards).
MODEM
•If your system has a modem, please make sure you connect it to an analogue telephone line only. Connecting to a digital PBX, a digital line designed for broadband services or ISDN, a shared service line or a payphone will damage the modem or the devices to which it is connected.
INFORMATION ABOUT THE REGULATORY COMPLIANCE OF WIRELESS LAN
The following low power radio equipment, which has separately been tested and approved according R&TTE guideline (1999/5/EC), is bundled with this notebook:
-Wireless LAN
These radio devices are marked individually with the CE mark. The declarations of conformity of these radio devices are available under
www.medion.com/conformity.
Safety
Handling
Components
TOUCH PAD
Light pressure with the tip of your finger is all that is required to operate the touch pad. Because the touch pad is electrostatic sensitive, objects cannot be used in place of your fingers. Using a pen or other object can damage the touch pad or cause the Notebook to malfunction.
SAFETY INSTRUCTIONS |
|
9 |
Aid
Appendix

BATTERY OPERATION
To extend the life and power of your battery and guarantee secure operation, the instructions below should be followed:
•Never expose the battery to direct sunlight or heat for long periods.
•Do not dispose of the battery by fire as they
may explode. Check with local codes for possible special disposal instructions.
• Do not open the battery housing; it contains no user-serviceable parts.
•Disregarding these instructions will lead to damage and under some circumstances may even cause the battery to explode.
•Keep the battery away from electrically conductive materials, chemical substances and cleaning agents.
•Only use the originally supplied power adapter to charge the battery.
•Fully discharge the battery before recharging it.
•Replace the battery only with the same type or an equivalent type recommended by the manufacturer.
•Charge the battery only until the battery charging light goes out. Also, refer to the instructions under "Charging the Battery" on page 28 for instructions on checking the battery level.
•Only change the battery when the unit is switched off.
•Batteries are classified as special waste and should always be disposed of properly. Contact Customer Service for more details.
•Keep batteries away from children at all times.
•Use only the batteries and power adapter/cord indicated in this manual.
10 |
|
SAFETY AND MAINTENANCE |

 Chapter 2
Views & first setup
Safety
Subject |
Page |
Scope of delivery................................................ |
13 |
Open Notebook .................................................. |
14 |
Front View......................................................... |
14 |
Left Side ........................................................... |
15 |
Right Side ......................................................... |
15 |
Rear Side .......................................................... |
15 |
Power and Status Indicators ................................ |
16 |
Getting started .................................................. |
17 |
Handling
Components
Aid
Appendix

12 |
|
VIEWS & FIRST SETUP |

VIEWS OF THE NOTEBOOK
SCOPE OF DELIVERY
Notebook
Battery
Power pack with mains lead (FSP065-AAC)
Modem cable
External optical drive with separate Y USB cable
Application-/Support-Disc
Microsoft Windows® XP Recovery Disc + manual
Instruction manual
Warranty card
VIEWS OF THE NOTEBOOK |
|
13 |
Safety
Handling
Components
Aid
Appendix
OPEN NOTEBOOK
1 |
|
2 |
|
3 |
|
4 |
|
5 |
|
6 |
6 |
7
8
9
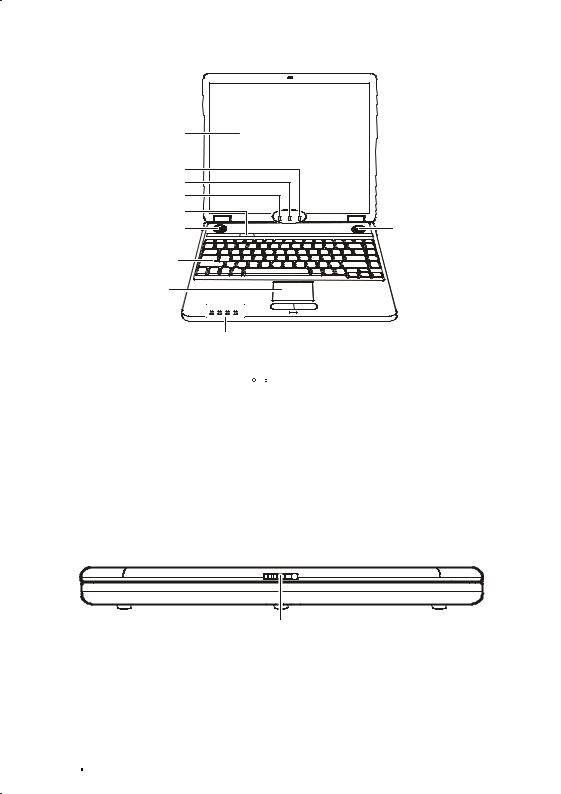
1- TFT display (Ö p. 31)
2- Battery charge indicator  (Ö p. 16)
3- Power supply indicator  (Ö p. 16)
4- Wireless LAN indicator  (Ö p. 16)
5- Power ON/OFF (Ö p. 25)
6- Stereo speaker
7- Keyboard (Ö p. 34)
8- Touch pad (Ö p. 35)
9- Device indicators (Ö p. 16)
FRONT VIEW
10
12 - Display catch (Ö p. 31)
14 |
|
VIEWS & FIRST SETUP |

LEFT SIDE
11 |
12 |
13 |
14 |
15 |
12 |
11 - Power socket 
 (Ö p. 26) 12 - USB 2.0 port
  (Ö p. 49) 13 - Audio Out
 (Ö p. 43)
14 - Microphone  (Ö p. 43)
15 - LAN port (RJ-45)  (Ö p. 45)
RIGHT SIDE
16
16 - Modem port (RJ-11) (Ö p. 44)
REAR SIDE
17 |
18 |
|
|
17 - Kensington® lock  (Ö p. 71) 18 - External monitor
  (Ö p. 32)
VIEWS OF THE NOTEBOOK |
|
15 |
Safety
Handling
Components
Aid
Appendix

INDICATORS
LED's indicate the power and operating system states of the Notebook. The meaning of each LED is:
BATTERY CHARGE INDICATOR
Below you will see the different meanings of this LED in various situations:
On |
Battery is charging. |
Blinking |
Battery is low. |
Off |
Battery is not charging. |
POWER SUPPLY INDICATOR
Below you will see the different meanings of the LED in various situations:
Off |
The system is powered off or is in Hipernate |
|
mode. |
On |
The notebook is in full operation. |
WIRELESS LAN
This LED wuld be lit when the wireless LAN function is activated. (optional feature)
ACCESS INDICATOR
This LED lights or flashes when the Notebook is accessing the hard disk.
NUM LOCK
This LED lights when NUM-Lock has been activated [Fn+NumLk]. It sets the keyboard so that numbers are assigned to certain characters, simplifying numerical data input.
CAPITAL LOCK
This LED lights when CAPS-Lock has been activated. This sets the keyboard to capital letters.
SCROLL LOCK
This LED indicates that the Scroll Lock key on the keyboard is activated [Fn+ScrLk]. The Scroll Lock key has different functions depending on the software you are
using.
16 |
|
VIEWS & FIRST SETUP |
GETTING STARTED
Before you get started using your notebook, first take a few moments to read the important section on Safety.
This Notebook comes with software fully pre-installed. You do not have to install any of the CDs supplied. However, with many programs (e.g., telephone CDs or encyclopaedias) it is necessary to insert the corresponding CD to access the data that is stored on it. The software will prompt you to do this when necessary.
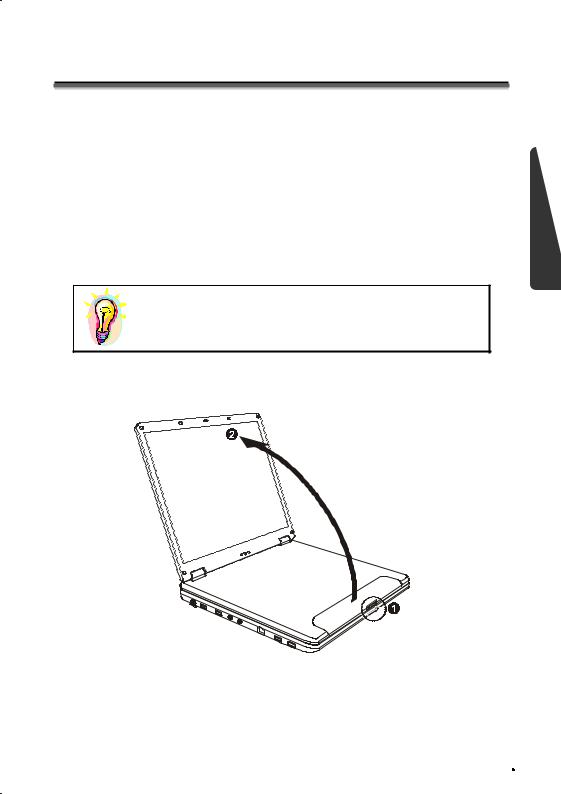
Step 1
•Before starting the Notebook please insert the battery.
If the battery level is insufficient, connect the power adapter.
•Open the display by pushing the latch-trip (10) to the right with your thumb and then open the display up to the required position with your thumbs and forefingers.
GETTING STARTED |
|
17 |
Safety
Handling
Components
Aid
Appendix

•Switch the Notebook on by operating the On/Off switch  (5). The Notebook will start and then run through various phases.
Note: Make sure there is no bootable CD (e.g., the Recovery CD) in the CD-ROM drive. Such disks will prevent the operating system from loading off the hard drive.
Your operating system is finished loading when a welcome screen is shown on your display.
18 |
|
VIEWS & FIRST SETUP |

Step 2
The greeting procedure will guide you through a series of dialogue boxes. The information in each dialogue box will explain the steps that need to be taken.
Should you have any questions just click on  .
.
Enter Personal Details
In one of the initial start-up dialog boxes a request will appear on the screen for you to enter your personal details. Please enter the requested information in the white input fields. You can select the fields by clicking on them with the mouse. When you press Enter, or click on the Continue button you progress to the next window.
License Agreement
The greeting procedure also displays the license agreement. Please read this carefully. It contains important legal information on the use of your software. In order to see the full text, use the mouse and the scroll bar on the right side of the screen to move downwards until you have reached the end of the document. You accept the agreement by clicking on the “I accept the agreement” option field. Only by doing so will you be entitled to use the product under lawful terms and conditions and be entitled to open the sealed Windows® manual.
Step 3
After the login procedure the Windows® desktop appears on your screen. This can be adjusted so that the screen of your computer looks different.
GETTING STARTED |
|
19 |
Safety
Handling
Components
Aid
Appendix
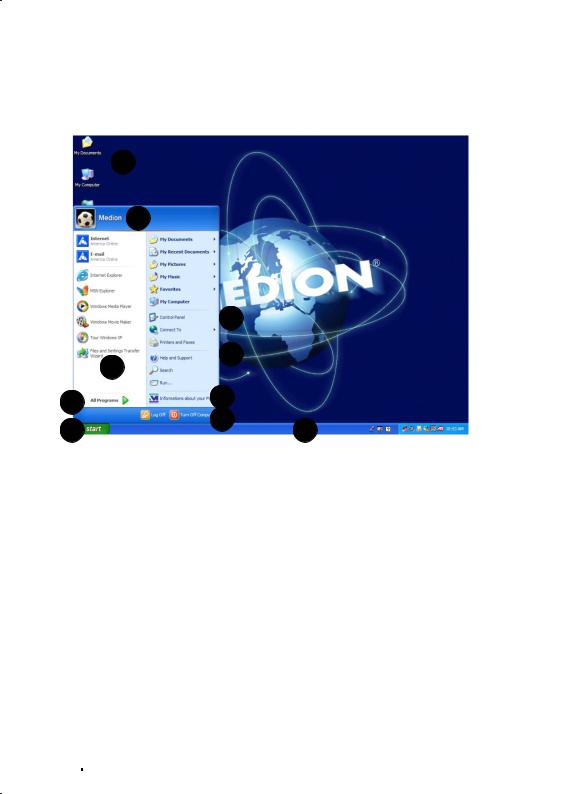
THE WINDOWS® XP DESKTOP
After the login procedure the Windows® XP desktop appears on your screen. (Your desktop might not look exactly like the one shown here.)
7
8
|
9 |
|
|
10 |
|
|
2 |
|
3 |
4 |
|
|
|
|
1 |
5 |
6 |
|
1.Start Button
Clicking the Start button brings up a menu where you can ac-
cess help, software programs, files, and settings. For more information, click Windows® XP Tour on the Start menu.
2.Program Bar
The most commonly used software programs are listed here.
3.All Programs
All of the software programs installed on your Notebook are ordinarily listed here. Click All Programs to reveal an extensive menu.
20 |
|
VIEWS & FIRST SETUP |

4.Information about your PC
Click this button to receive important information about your Notebook as well as valuable hints and additional assistance.
5.Turn Off Computer
Click this button to shut down Windows® XP and the Notebook.
6.Task Bar
Here you receive information and status reports about Windows® XP and which programs are running.
7.Desktop Icons
Desktop icons link to their respective programs. To start a program, double-click its desktop icon.
8.Logged in User
This tells you which user is logged in to your Notebook.
9.Control Panel
You can use the icons in Control Panel to change the appearance and functionality of Windows® XP. These icons represent options for configuring your Notebook.
10.Windows® XP Help
Here you can find information on using your Notebook, networking, backup, and many other tasks.
GETTING STARTED |
|
21 |
Safety
Handling
Components
Aid
Appendix

22 |
|
VIEWS & FIRST SETUP |
 Loading...