


|
|
Radio |
Instruction manual |
|
|
Radio |
Manuel d’instructions |
|
|
Radio |
Manual de instrucciones |
|
|
BMR100
2 |
10 |
12 |
3 |
14 |
|
|
|
1 |
4 |
5
6
7
9 
 8
8
13
|
|
L |
K |
J |
|
A |
|
|
|
|
B |
PM |
|
|
|
|
|
|
|
|
C |
|
|
I |
|
D |
|
|
H |
|
|
|
|
|
11 |
E |
|
|
G |
|
|
|
|
|
|
|
|
|
F |
2

14
11
1
18 
 17
17
19
3
10
5
15
15
16
2
19
4
8
9
6
3

Symbols
The following show the symbols used for the equipment. Be sure that you understand their meaning before use.
Symboles
Nous donnons ci-dessous les symboles utilisés pour l’appareil. Assurez-vous que vous en avez bien compris la signification avant d’utiliser l’outil.
Símbolos
A continuación se muestran los símbolos utilizados para el equipo. Asegúrese de que entiende su significado antes de usarla.
Read instruction manual.Lire le mode d’emploi.
Lea el manual de instrucciones.
Always recycle batteries
Toujours mettre les batteries au recyclage
Li-ion Recicle siempre las baterías
4
ENGLISH
IMPORTANT SAFETY
INSTRUCTIONS
WARNING:
When using electric tools, basic safety precautions should always be followed to reduce the risk of fire, electric shock, and personal injury, including the following:
1.Read this instruction manual and the charger instruction manual carefully before use.
2.Clean only with dry cloth.
3.Do not block any ventilation opening. Install in accordance with the manufacturer’s instruction.
4.Do not install near any heat sources such as radiators, heat registers, stoves, or other apparatus (including amplifiers) that produce heat.
5.Only use attachments/accessories specified by the manufacturer.
6.Unplug this apparatus during lighting storms or when unused for long periods of time.
7.A battery operated radio with integral batteries or a separate battery pack must be recharged only with the specified charger for the battery. A charger that may be suitable for one type of battery may create a risk of fire when used with another battery.
8.Use battery operated radio only with specifically designated battery packs. Use of any other batteries may create a risk of fire.
9.When battery pack is not in use, keep it away from other metal objects like: paper clips, coins, keys, nails, screws, or other small metal objects that can make a connection from one terminal to another. Shorting the battery terminals together may cause sparks, burns, or a fire.
10.Avoid body contact with grounded surfaces such as pipes, radiators, ranges and refrigerators. There is an increased risk of electric shock if your body is grounded.
SAVE THESE INSTRUCTIONS.
Features:
•AM/FM-stereo PLL Synthesized
•Large LCD display with illumination
•Manual/Preset/Scan tuning
•Rotary tuning and volume control
•5 preset stations each band
•Time and 2 alarm timers (radio and HWS buzzer) with Snooze
•Adjustable sleep (auto shut off) timer
•Stereo speaker for rich sound performance
•Ultra rugged design
•Water resistant to JIS 4
•Powered by both Makita battery pack and supplied power adaptor
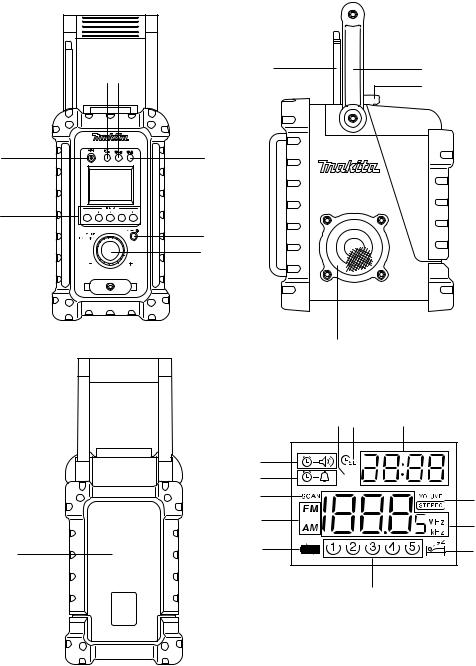
Explanation of general view
Controls:
1.Power and Sleep timer
2.Band/Tuning step selection and Mono button
3.Radio alarm set
4.Buzzer alarm set
5.Preset stations
6.Scan tuning and Time set
7.Volume and Tuning controls
8.DC IN socket
9.Headphone socket
10.Soft bended rod antenna
11.Battery compartment (including main battery pack and back up batteries)
12.Handle
13.Speaker
14.Battery compartment locker
15.Main battery compartment
16.Back up battery compartment
17.Red part
18.Button
19.Battry cartridge
LCD Display:
A.Radio alarm
B.HWS buzzer alarm
C.Scan tuning
D.Band Indicator
E.Low battery indicator
F.Preset stations
G.Sleep and Snooze status
H.Frequency
I.Stereo symbol and Volume
J.Clock
K.Time set
L.PM for clock
5
Battery Installation
Note:
Keeping back up batteries inside the compartment prevent stored data in preset memories from being lost.
1.Pull out the battery compartment locker to release battery compartment. There are main battery pack compartment and back up battery compartment.
(Fig.1 & 2)
2.Remove back up battery compartment cover and insert 2 fresh UM-3 (AA sizes). Make sure the batteries are with correct polarity as shown inside the compartment. Replace the battery cover.
3.After back up batteries are inserted, insert the main battery pack to power radio. The suitable battery packs for this radio listed as below.
Pod Battery:
9.6V: |
9135 |
| 9134 | 9122 | PA09 | 9120 |
12V: |
1235 |
| 1234 | 1222 | PA12 | 1220 |
14.4V: |
1435 |
| 1434 | 1422 | PA14 | 1420 |
18V: |
1835 |
| 1834 | 1822 | PA18 |
Slide Battery: |
||
9.6V: |
BH9033 | BH9033A | BH9020 | BH9020A |
|
12V: |
BH1233 | BH1233C | BH1220C |
|
14.4V: |
BH1433 | BH1420 | BL1430 |
|
18V: |
BL1830 |
|
24V: |
BH2433 | BH2420 |
|
The following tables indicate the operating time on a single charge.
Battery |
|
Battery Cartridge•Voltage |
|
Operating time* |
|||
Capacity |
9.6V |
12V |
14.4V |
18V |
24V |
(At Max. Volume) |
|
1.3 Ah |
PA09 |
PA12 |
PA14 |
PA18 |
– |
Approx. 7 hour |
|
9120 |
1220 |
1420 |
|||||
|
|
|
|
||||
|
9122 |
1222 |
1422 |
|
|
|
|
2.0 Ah |
BH9020 |
1822 |
BH2420 |
Approx. 11 hour |
|||
BH1220C |
BH1420 |
||||||
|
BH9020A |
|
|
|
|
|
|
2.6 Ah |
9134 |
1234 |
1434 |
1834 |
– |
Approx. 13 hour |
|
3.0 Ah |
9135 |
1235 |
1435 |
1835 |
– |
Approx. 16 hour |
|
BL1430 |
BL1830 |
||||||
|
|
|
|
|
|||
3.3 Ah |
BH9033 |
BH1233 |
BH1433 |
– |
BH2433 |
Approx. 17 hour |
|
BH9033A |
BH1233C |
||||||
*Operating time may differ by the type of battery, charging or operating conditions.
3-1. Installing or removing Slide battery cartridge (Fig. 3)
•To insert the battery cartridge, align the tongue on the battery cartridge with the groove in the housing and slip it into place. Always insert it all the way until it locks in place with a little click.
•Do not use force when inserting the battery cartridge. If the cartridge does not slide in easily, it is not being inserted correctly.
•To remove the battery cartridge, withdraw it from the tool while sliding the button on the front of the cartridge or pressing the buttons on both sides of the cartridge.
3-2. Installing or removing Pod battery cartridge (Fig.4)
•To insert the battery cartridge, align the tongue on the battery cartridge with the groove in the housing and slip it into place.
•Do not use force when inserting the battery cartridge. If the cartridge does not slide in easily, it is not being inserted correctly.
•To remove the battery cartridge, withdraw it from the Job site radio.
4.Replace battery compartment locker.
5.Reduced power, distortion and a “stuttering sound “or
low battery sign 
 that appears on the display are all the signs that the main battery pack needs to replace.
Note:
The battery pack can't be charged via the supplied AC power adaptor.
6.When low battery sign 
 appears and an “E” keeps on flashing is the time to replace the back up batteries.
Installing the Soft bended rod antenna (Fig.5)
Install the Soft bended rod antenna as show in the figure.
Using Supplied AC power adaptor (Fig.6)
Remove the rubber protector and insert the adaptor plug into the DC socket on the front side of the radio. Plug the adaptor into a standard mains socket outlet. Whenever the adaptor is used, the battery pack are automatically disconnected. The AC adaptor should be disconnected from the main supply when not in use.
Setting the clock
1.Clock can be set either when the radio is power on or off.
2.Display will show “-: - -” when the back up batteries are installed.
3.Long press the time set button 
 for more than
2 seconds, display will flash time set symbol 
 and also the hour digit, followed by a beep.
4.Rotate Tuning control to set the required hour.
5.Press  button to confirm hour setting, the minute digit will flash.
6.Rotate Tuning control to set the required minute.
7.Press the  button again to complete clock setting.
Operating the radio
This radio equips with three tuning methods – Scan tuning, Manual tuning and Memory presets recall.
Scan Tuning
1. Press the Power button to turn on the radio.
6
 Loading...