

Page 1
IAN 90546
LÁMPARA LED DE TECHO
BASE CON FARETTI LED DA SOFFITTO
LÁMPARA LED DE TECHO
Instrucciones de montaje y de advertencias de seguridad
LED CEILING LIGHT
Assembly and safety advice
BASE CON FARETTI LED
DA SOFFITTO
Istruzioni di sicurezza e montaggio
LED-DECKENLEUCHTE
Montage- und Sicherheitshinweise
90546_liv_LED-Deckenleuchten_Cover_ES_IT.indd 2 19.09.13 10:27
Page 2
ES Instrucciones de montaje y de advertencias de seguridad Página 3
IT / MT Istruzioni di sicurezza e montaggio Pagina 6
GB / MT Assembly and safety advice Page 9
DE / AT / CH Montage- und Sic herheitshinweise Seite 11
90546_liv_LED-Deckenleuchten_Cover_ES_IT.indd 3 19.09.13 10:27
Page 3
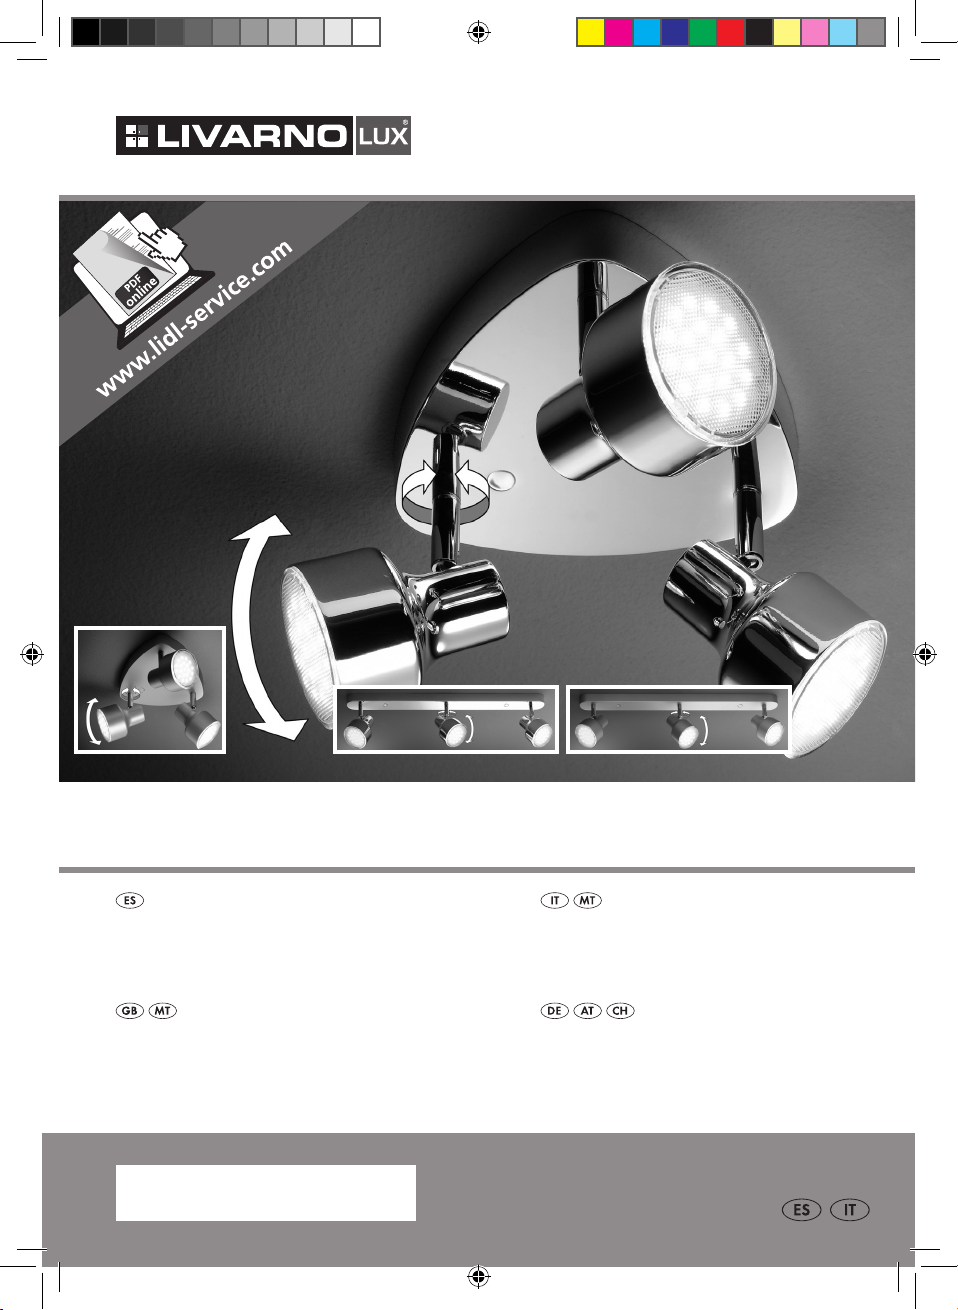
Lámpara LED de techo
Indicaciones de seguridad
Uso adecuado
Esta lámpara está diseñada exclusivamente para el
funcionamiento en espacios secos interiores. Este
producto no ha sido diseñado para un uso comercial.
Descripción de las piezas
1
Taco
2
Cable de alimentación de red (externo)
3
Manguera de tejido
4
Carcasa de la lámpara
5
Regleta
6
Tornillo
7
Tapa protectora
8
Foco
Características técnicas
Tensión de servicio: 230 V ~ 50 Hz
Bombilla: 20 LED SMD cada foco
(Las bombillas no son
reemplazables)
Potencia nominal: máx. 11,5 W
Clase de protección:
Números de modelo: Z31708A (triángulo,
cromado),
Z31708B (triángulo,
color titanio),
Z31708C (rail, cromado),
Z31708D (rail, color titanio)
Contenido
1 lámpara LED para techo
2 tornillos
2 tacos ø 6 mm
2 tapas de protección
2 mangueras de tejido
1 manual de instrucciones
¡LEA EL MANUAL DE INSTRUCCIONES ANTES
DE UTILIZAR EL PRODUCTO. CONSÉRVELO EN
UN LUGAR SEGURO!
Este producto puede ser utilizado
por niños mayores de 8 años, así
como por personas con capacidades físicas, sensoriales o mentales reducidas o
que cuenten con poca experiencia y/o falta
de conocimientos, siempre y cuando se les
haya enseñado cómo utilizar el aparato de
forma segura y hayan comprendido los peligros que pueden resultar de un mal uso del
mismo. No permita que los niños jueguen con
el aparato. La limpieza y mantenimiento no
deben ser realizados por niños sin supervisión.
Esta lámpara está diseñada para
usarse únicamente en espacios
interiores.
¡RIESGO DE INCENDIO! Monte
0,5 m
la lámpara a una distancia de al
menos 0,5 m de otros objetos iluminados. Si se genera demasiado calor, podría
provocarse un incendio.
Peligro de muerte por
descarga eléctrica
Antes de conectar la lámpara a la red, com-
pruebe que no presenta ningún daño. Nunca
utilice la lámpara si detecta algún tipo de daño.
Asegúrese antes de cada montaje de que la
corriente nominal disponible coincida con la
tensión de funcionamiento necesaria de la
lámpara (230 V ∼).
No monte la lámpara si no se cumple lo ante-
rior. Monte la lámpara de forma que quede
protegida de salpicaduras de agua y suciedad.
¡CUIDADO! ¡RIESGO DE QUE-
MADURAS! Antes de tocar la
lámpara, asegúrese de que esté
apagada y fría desde hace por lo menos
3 ES
90546_liv_LED-Deckenleuchten_Content_ES_IT.indd 3 19.09.13 10:26
Page 4
5 minutos. Las bombillas pueden generan
mucho calor.
Antes del montaje
Importante: encargue la instalación eléctrica a
un electricista o a una persona especialmente cualificada para ello. Esta persona deberá conocer
las características de la lámpara y la normas de
conexión.
Asegúrese antes de la instalación de que el
cable al que se vaya a conectar la lámpara no
tenga tensión. Para ello, retire el fusible o desconecte el interruptor automático en la caja de
fusibles (posición 0).
Compruebe que no hay tensión con un com-
probador de tensión.
El material de montaje adjunto es apropiado
para paredes fijas normales. Compruebe si el
material de montaje es apto para la superficie
de montaje escogida. Compruebe también si
la superficie de montaje escogida es adecuada
para soportar la lámpara. En caso necesario,
consulte a un técnico especializado sobre este
punto.
Montaje
Nota: Los pasos de montaje son idénticos para
todos los modelos de lámparas mencionados en
este manual de instrucciones.
Mantenga la carcasa de la lámpara 4 fijada
en el techo y marque los agujeros que va a
taladrar (véase fig. A).
Haga ahora los agujeros con el taladro (ø 6 mm).
Asegúrese de no dañar la línea de alimentación.
Introduzca los tacos 1 en los orificios taladra-
dos.
Encaje a continuación la manguera de tejido 3
en los hilos del cable de alimentación de red
externo
2
(véase fig. B).
Conecte la regleta 5 de la lámpara con los
hilos del cable de alimentación de red externo
(véase fig. C). Preste atención a las marcas en
la regleta (L para conductores bajo tensión,
N para conductores neutros).
A continuación, fije la carcasa de la lámpara 4
con el tornillo
6
(véase fig. D).
Ponga la tapa protectora 7 en la abertura en
la carcasa de la lámpara (véase fig. E).
Una vez haya vuelto a colocar el fusible o a conectar el interruptor automático en la caja de fusibles,
su lámpara está lista para su funcionamiento.
Ajustar los focos
Los focos 8 se pueden ajustar aprox. 90º verticalmente y aprox. 330º horizontalmente para conseguir acentos de luz precisos (véase fig. E).
CUIDADO: Los focos se calientan durante su
funcionamiento. Cuando esto ocurra, apáguelos y
déjelos enfriar 5 minutos antes de tocarlos.
Limpieza y cuidado
Antes de comenzar con la limpieza y cuidado de
su lámpara, quítela de la red (retire el fusible o
desconecte el interruptor automático en la caja de
fusibles - posición 0) y déjela enfriar por lo menos
durante 5 minutos.
Por razones de seguridad eléctrica, no limpie
nunca la lámpara con agua u otros líquidos ni la
sumerja en agua.
No utilice disolventes, gasolina ni similares. La
lámpara resultaría dañada.
Para limpiar la lámpara utilice únicamente un
paño seco y sin pelusas.
Desecho del producto
El embalaje se compone de materiales
reciclables que puede desechar en los
puntos locales de recogida selectiva.
4 ES
90546_liv_LED-Deckenleuchten_Content_ES_IT.indd 4 19.09.13 10:26
Page 5
Para deshacerse del producto una vez terminada
su vida útil, pregunte a las autoridades locales o
municipales.
No deseche el aparato / artículo junto con la
basura doméstica bajo ningún concepto.
Deshágase del aparato/artículo a
través de un servicio de recogida de
basuras autorizado o en el centro de
reciclaje de su municipio.
Cumpla con la normativa vigente. Si tiene dudas,
póngase en contacto con el centro de reciclaje de
su localidad.
EMC
5 ES
90546_liv_LED-Deckenleuchten_Content_ES_IT.indd 5 19.09.13 10:26
Page 6

Base con faretti LED da soffitto
Indicazioni per la sicurezza
Utilizzo secondo la
destinazione d’uso
Questa lampada è adatta esclusivamente per l‘utilizzo in ambienti interni e asciutti. La lampada non
è destinata a un utilizzo commerciale.
Descrizione dei componenti
1
Tassello
2
Cavo di alimentazione (esterno)
3
Tubo flessibile in tessuto
4
Alloggiamento della lampada
5
Morsetto
6
Vite
7
Cappuccio di protezione
8
Faretto
Dati tecnici
Tensione di esercizio: 230 V ~ 50 Hz
Lampadina: 20 SMD-LED per ogni
faretto (le lampadine non
sono sostituibili)
Potenza nominale: max. 11,5 W
Classe di protezione:
Numero del modello:
Contenuto della confezione
1 Lampada da soffitto a LED
2 Viti
2 Tasselli ø 6 mm
2 Cappucci protettivi
2 Tubi flessibili in tessuto
1 Manuale d‘istruzione di montaggio
Z31708A (triangolo, cromato),
Z31708B (triangolo,
color titano),
Z31708C (barra, cromato),
Z31708D (barra, color titano)
PRIMA DELL’USO SI PREGA DI LEGGERE LE
ISTRUZIONI DI MONTAGGIO! CONSERVARE
CON CURA LE ISTRUZIONI DI MONTAGGIO!
Quest‘apparecchio può essere uti-
lizzato da bambini di età superiore
agli 8 anni, da persone con capacità fisiche, sensoriali o mentali ridotte o da
persone inesperte solo se supervisionate o
preventivamente istruite sull’utilizzo in sicurezza
del prodotto e solo se informate dei pericoli
legati al prodotto stesso. Non lasciare che i
bambini giochino con l‘apparecchio. La pulizia
e la manutenzione non devono essere eseguite
da bambini senza supervisione.
La lampada è idonea esclusiva-
mente all‘uso in ambienti interni.
PERICOLO DI INCENDIO!
0,5 m
Montare la lampada a una distanza
di almeno 0,5 m dai materiali illuminati. Un eccessivo riscaldamento della lampada
può provocare un incendio.
Pericolo di morte per
scossa elettrica
Prima del collegamento alla rete elettrica, con-
trollare la lampada per verificare l‘eventuale
presenza di danni. Non utilizzare mai il faretto,
qualora si constatassero dei danni.
Prima del montaggio, assicurarsi che la tensione
di rete esistente corrisponda alla tensione
d‘esercizio della lampada (230 V ~).
In caso contrario, non montare la lampada.
Montare la lampada in modo tale che sia
protetta da spruzzi d‘acqua e sporcizia.
ATTENZIONE! PERICOLO DI
USTIONI! Prima di toccare la lam-
pada, assicurarsi che sia spenta e
raffreddata da almeno 5 minuti. Le lampadine
si surriscaldano facilmente.
6 IT/MT
90546_liv_LED-Deckenleuchten_Content_ES_IT.indd 6 19.09.13 10:26
Page 7

Prima del montaggio
Importante: il collegamento elettrico deve essere
effettuato da un elettricista competente o da una
persona esperta in materia. Quest‘ultimo deve
conoscere le caratteristiche della lampada e le
modalità di collegamento.
Prima dell‘installazione, assicurarsi che non
sussista la tensione nel cavo di alimentazione
di rete al quale deve essere collegata la lampada. A tal fine, rimuovere il fusibile oppure disattivare l‘interruttore di sicurezza nella scatola
dei fusibili (posizione 0).
Verificare l‘assenza di tensione con un rileva-
tore di tensione.
Il materiale di montaggio fornito in dotazione
è idoneo al fissaggio sulle comuni pareti di tipo
solido. Informarsi in merito al tipo di materiale
adeguato per il montaggio sulla superficie desiderata. Controllare che la parete sia idonea
a reggere la lampada. Se necessario, informarsi presso un tecnico specializzato.
Dopo aver reinserito il fusibile o aver riattivato
l‘interruttore di sicurezza nella scatola dei fusibili,
la lampada è pronta per l‘uso.
Orientamento dei faretti
Orientare i faretti 8 di ca. 90° in verticale e di
ca. 330° in senso orizzontale, per stabilire una
garantire un‘illuminazione mirata (vedi fig. E).
ATTENZIONE: i faretti si surriscaldano durante il
funzionamento. Spegnerli e lasciarli raffreddare
per 5 minuti prima di toccarli.
Pulizia e manutenzione
Prima di iniziare la pulizia e la cura della lampada,
separarla dalla rete elettrica (rimuovere il fusibile o
disattivare l‘interruttore di sicurezza - posizione 0)
e lasciare raffreddare per almeno 5 minuti!
Per motivi di sicurezza, la lampada non deve mai
essere pulita con acqua o altri liquidi e tanto meno
immersa in acqua.
Montaggio
Nota: le fasi di montaggio sono identiche per tutti
i modelli di lampada indicati.
Tenere l‘alloggiamento della lampada 4 con-
tro il soffitto e marcare i fori (vedere fig. A).
Realizzare i fori di fissaggio (ø 6 mm). Assicu-
rarsi di non danneggiare il cavo di alimentazione
di rete.
Inserire i tasselli 1 nei fori.
Infine, tirare i tubi flessibili in tessuto 3 sui fili
del cavo di collegamento alla rete
2
(vedi
fig. B).
Collegare il morsetto 5 della lampada con i
fili del cavo di collegamento esterno (vedi fig. C).
Fare attenzione alle marcature sui morsetti (L per
il cavo in tensione, N per il conduttore neutro).
Fissare poi l‘alloggiamento della lampada 4
con le viti
6
(vedi fig. D).
Inserire le calotte di protezione 7 sui fori
dell‘alloggiamento delle lampade (vedi figura E).
Non utilizzare solventi, benzina o similari. La
lampada verrebbe danneggiata.
Per la pulizia, usare solo un panno asciutto che
non lascia peli.
Smaltimento
L’imballaggio è composto da materiali
ecologici che possono essere smaltiti
presso i siti di riciclaggio locali.
Informarsi presso l’amministrazione cittadina o comunale sulle possibilità di smaltimento del prodotto
usato.
Non smaltire mai l’apparecchio / l’articolo
gettandolo tra i normali rifiuti domestici.
7 IT/MT
90546_liv_LED-Deckenleuchten_Content_ES_IT.indd 7 19.09.13 10:26
Page 8

Smaltire l‘apparecchio/l‘articolo presso
un punto di smaltimento autorizzato oppure in un centro di smaltimento comunale.
Attenersi al regolamento vigente. In caso di dubbi
mettersi in contatto con il punto di raccolta e
smaltimento rifiuti più vicino.
EMC
8 IT/MT
90546_liv_LED-Deckenleuchten_Content_ES_IT.indd 8 19.09.13 10:26
Page 9

LED Ceiling Light
Safety information
Intended use
This light is suitable only for use in dry rooms. The
light is not intended to be used for commercial purposes.
Parts description
1
Dowel
2
Mains power lead (external)
3
Fabric tube
4
Lamp housing
5
Terminal block
6
Screw
7
Protective cap
8
Spotlight
Technical Data
Operating voltage: 230 V ~ 50 Hz
Light bulb: 20 SMD-LED‘s per spotlight
(LEDs not replaceable)
Rated output: max. 11.5 W
Protection category:
PLEASE READ THE ASSEMBLY INSTRUCTIONS
BEFORE USE! PLEASE KEEP THE ASSEMBLY
INSTRUCTIONS IN A SAFE PLACE!
This appliance may be used by chil-
dren age 8 years and up, as well as
by persons with reduced physical,
sensory or mental capacities, or lacking experience and/or knowledge, so long as they are
supervised or instructed in the safe use of the
appliance and understand the associated risks.
Children should not be allowed to play with
the appliance. Cleaning and user maintenance
should not be performed by children without
supervision.
This lamp is suitable only for use
indoors.
FIRE HAZARD! Fit the light so that
0.5 m
it is at least 0.5 m away from the
material illuminated. Fire can result
from the development of too much heat.
Danger to life by
electric shock
Model number: Z31708A (triangle, chrome-
plated), Z31708B
(triangle, titanium-coloured),
Z31708C (rail, chromeplated), Z31708D (rail,
titanium-coloured)
Always check lamp for damage before con-
necting it to power. Never use the light if it
shows any signs of damage.
Before assembly, ensure that the available
mains voltage corresponds to the operating
voltage necessary for the light (230V ∼).
Do not connect the lamp if this is not the case.
Mount the light so that it is protected from
Scope of delivery
spray water and moisture.
CAUTION! DANGER OF BURN
1 LED Ceiling Light
2 Screws
2 Dowels ø 6 mm
2 Protective caps
cooled down for at least 5 min before touching
it. Lamps can become very hot.
INJURIES! To prevent burns, verify
the light is switched off and has
2 Fabric tubes
1 Installation instructions
9 GB/MT
90546_liv_LED-Deckenleuchten_Content_ES_IT.indd 9 19.09.13 10:26
Page 10

Before installation
Directing the spotlights
Important: The electrical connection must be
performed by a qualified electrician or a person
trained in electrical installations. This person must
be familiar with the properties of the light and the
connection regulations.
Before installation ensure that the circuit, to
which the light will be connected, is not energised. To do so, remove the fuse or switch off
the circuit breaker in the fuse box (
0 position) .
Use the voltage tester to verify the de-ener-
gised status.
The included mounting material is suitable for
ordinary solid concrete or masonry construction.
Check whether the mounting material is suitable for your chosen mounting surface. Also
check whether the chosen mounting surface is
suitable for supporting the lamp. If necessary,
seek expert advice.
Installation
Note: the installation steps are identical for all the
lamp models mentioned in these instructions.
Hold the housing of the light 4 against ceiling
and mark the drill holes (see fig. A).
Now drill the mounting holes (ø 6 mm). Ensure
that you do not damage the supply line.
Insert the dowels 1 into the holes.
Then pull the fabric tube 3 over the strands of
the external main power lead
2
(see fig. B).
Connect the terminal block 5 of the lamp with
the strands of the external main power lead
(see fig. C). Pay attention to the markings on
the terminal block (L for live, N for Neutral).
Then secure the lamp housing 4 to the ceiling
using the screws
6
(see fig. D).
Attach the protective caps 7 to the openings
in the lamp casing (see Fig. E).
After the fuse has been inserted or the circuit
breaker is engaged in the fuse panel, your lamp is
ready for use.
The spotlights 8 can be adjusted to approx. 90°
vertically and approx. 330° horizontally in order
to place targeted light accents (see fig. E).
WARNING: The spotlights become hot during
operation. Switch them off and allow to cool down
for at least 5 minutes before touching them.
Cleaning and Care
Before cleaning and caring for your lamp, disconnect the lamp from the mains (remove the fuse or
disable the circuit breaker in the fuse panel -
0-position) and let it cool for at least 5 minutes!
For electrical safety, never clean the light with
water or other fluids, or immerse it in water.
Do not use solvents, petrol etc. Otherwise the
light will be damaged.
Use a dry fluff-free cloth when cleaning.
Disposal
The packaging is made of environmentally friendly materials, which may be
disposed through your local recycling
facilities.
Contact your local authorities for information on
how to dispose of the product at the end of the
product‘s life.
Never dispose of the product in your regular
household rubbish.
The device / article should be disposed
of at an officially approved disposal
centre or at your local communal disposal facility.
Observe the applicable regulations. In case of
doubt, please contact your waste disposal centre.
EMC
10 GB/MT
90546_liv_LED-Deckenleuchten_Content_ES_IT.indd 10 19.09.13 10:26
Page 11

LED-Deckenleuchte
Sicherheitshinweise
Bestimmungsgemäße
Verwendung
Diese Leuchte ist ausschließlich für den Betrieb in
trockenen Innenräumen geeignet. Die Leuchte ist
nicht für den gewerblichen Einsatz bestimmt.
Teilebeschreibung
1
Dübel
2
Netzanschlussleitung (extern)
3
Gewebeschlauch
4
Leuchtengehäuse
5
Lüsterklemme
6
Schraube
7
Schutzkappe
8
Spot
Technische Daten
Betriebsspannung: 230 V ~ 50 Hz
Leuchtmittel: 20 SMD-LED je Spot
(Die Leuchtmittel sind nicht
austauschbar)
Nennleistung: max. 11,5 W
Schutzklasse:
VOR GEBRAUCH BITTE DIE MONTAGEANLEITUNG LESEN! MONTAGEANLEITUNG BITTE
SORGFÄLTIG AUFBEWAHREN!
Dieses Gerät kann von Kindern ab
8 Jahren und darüber sowie von
Personen mit verringerten physischen,
sensorischen oder mentalen Fähigkeiten oder
Mangel an Erfahrung und Wissen benutzt werden, wenn sie beaufsichtigt oder bezüglich des
sicheren Gebrauchs des Gerätes unterwiesen
wurden und die daraus resultierenden Gefahren verstehen. Kinder dürfen nicht mit dem
Gerät spielen. Reinigung und Benutzerwartung
dürfen nicht von Kindern ohne Beaufsichtigung
durchgeführt werden.
Die Leuchte ist ausschließlich für den
Betrieb im Innenbereich geeignet.
BRANDGEFAHR! Montieren Sie
0,5 m
die Leuchte mit einer Entfernung von
mindestens 0,5 m zu angestrahlten
Materialien. Eine übermäßige Wärmeentwicklung kann zu Brandentwicklung führen.
Lebensgefahr durch
elektrischen Schlag
Modellnummer: Z31708A (Dreieck, verchromt),
Z31708B (Dreieck, titanfarbig),
Z31708C (Schiene, verchromt),
Z31708D (Schiene, titanfarbig)
Überprüfen Sie vor jedem Netzanschluss die
Leuchte auf etwaige Beschädigungen. Benutzen Sie Ihre Leuchte niemals, wenn Sie irgendwelche Beschädigungen feststellen.
Vergewissern Sie sich vor der Montage, dass
die vorhandene Netzspannung mit der benö-
Lieferumfang
tigten Betriebsspannung der Leuchte übereinstimmt (230 V ~).
1 LED-Deckenleuchte
2 Schrauben
2 Dübel ø 6 mm
2 Schutzkappen
2 Gewebeschläuche
1 Montageanleitung
Montieren Sie die Leuchte nicht, wenn dies
nicht der Fall ist. Montieren Sie die Leuchte so,
dass sie vor Spritzwasser und Verschmutzung
geschützt ist.
VORSICHT! VERBRENNUNGS-
GEFAHR! Stellen Sie sicher, dass
die Leuchte ausgeschaltet und
11 DE/AT/CH
90546_liv_LED-Deckenleuchten_Content_ES_IT.indd 11 19.09.13 10:26
Page 12

mindestens 5 min abgekühlt ist, bevor Sie diese
berühren. Leuchtmittel können eine große Hitze
entwickeln.
Vor der Montage
Wichtig: Der elektrische Anschluss muss durch einen ausgebildeten Elektriker oder eine für Elektroinstallationen eingewiesene Person erfolgen. Diese
muss Kenntnis über die Eigenschaften der Leuchte
und Anschlussbestimmungen haben.
Stellen Sie vor der Installation sicher, dass an
der Leitung, an der die Leuchte angeschlossen
werden soll, keine Spannung vorliegt. Entfernen Sie hierfür die Sicherung oder schalten Sie
den Leitungsschutzschalter im Sicherungskasten
aus (0-Stellung).
Überprüfen Sie die Spannungsfreiheit mittels
Spannungsprüfer.
Das beigelegte Montagematerial ist für übli-
ches festes Mauerwerk geeignet. Prüfen Sie,
ob das Montagematerial für den von Ihnen
gewählten Montageuntergrund geeignet ist.
Überprüfen Sie auch, ob der gewählte Montageuntergrund zum Tragen der Leuchte geeignet
ist. Informieren Sie sich hierüber gegebenenfalls bei einer Fachkraft.
Verbinden Sie die Lüsterklemme 5 der Leuchte
mit den Adern der externen Netzanschlussleitung (siehe Abb. C). Achten Sie hierbei auf die
Kennzeichnungen an der Lüsterklemme
(L für den spannungsführenden Leiter, N für
den Nullleiter).
Befestigen Sie das Leuchtengehäuse 4
anschließend mittels der Schrauben
6
(siehe Abb. D).
Stecken Sie die Schutzkappen 7 auf die
Öffnungen im Leuchtengehäuse (siehe Abb. E).
Nachdem Sie die Sicherung wieder eingesetzt
bzw. den Leitungsschutzschalter im Sicherungskasten wieder eingeschaltet haben, ist Ihre Leuchte
betriebsbereit.
Spots ausrichten
Die Spots 8 lassen sich um ca. 90° vertikal und
um ca. 330° horizontal ausrichten, um gezielt
Lichtakzente zu setzen (siehe Abb. E).
ACHTUNG: Die Spots werden während des Betriebs heiß. Schalten Sie diese aus und lassen Sie
sie 5 Minuten abkühlen, bevor Sie sie berühren.
Reinigung und Pflege
Bevor Sie mit der Reinigung und Pflege Ihrer Leuchte
Montage
beginnen, trennen Sie die Leuchte zuerst vom Netz
(Sicherung entfernen oder Leitungsschutzschalter
Hinweis: Die Montageschritte sind für alle in dieser Montageanleitung erwähnten Leuchtenmodelle
identisch.
im Sicherungskasten ausschalten – 0-Stellung) und
lassen Sie sie mindestens 5 Minuten lang abkühlen!
Aus Gründen der elektrischen Sicherheit darf die
Leuchte niemals mit Wasser oder anderen Flüssig-
Halten Sie das Leuchtengehäuse 4 gegen die
Decke und markieren Sie die Bohrlöcher
keiten gereinigt oder gar in Wasser getaucht
werden.
(siehe Abb. A).
Bohren Sie nun die Befestigungslöcher
(ø 6 mm). Stellen Sie sicher, dass Sie die
Zuleitung nicht beschädigen.
Führen Sie die Dübel 1 in die Bohrlöcher ein.
Benutzen Sie keine Lösungsmittel, Benzin o. Ä.
Die Leuchte würde hierbei Schaden nehmen.
Verwenden Sie zur Reinigung nur ein trockenes
fusselfreies Tuch.
Ziehen Sie anschließend die Gewebeschläu-
3
che
über die Adern der externen Netzan-
schlussleitung
12 DE/AT/CH
90546_liv_LED-Deckenleuchten_Content_ES_IT.indd 12 19.09.13 10:26
2
(siehe Abb. B).
Page 13

Entsorgung
Die Verpackung besteht aus umweltfreundlichen Materialien, die Sie über
die örtlichen Recyclingstellen entsorgen
können.
Möglichkeiten zur Entsorgung des ausgedienten
Produktes erfahren Sie bei Ihrer Gemeinde- oder
Stadtverwaltung.
Entsorgen Sie das Gerät / den Artikel keinesfalls in
den normalen Hausmüll.
Das Gerät / den Artikel über einen zugelassenen Entsorgungsbetrieb oder über
Ihre kommunale Entsorgungseinrichtung
entsorgen.
Beachten Sie die gültigen Vorschriften. Setzen Sie
sich im Zweifelsfall mit Ihrer Entsorgungseinrichtung
in Verbindung.
EMC
13 DE/AT/CH
90546_liv_LED-Deckenleuchten_Content_ES_IT.indd 13 19.09.13 10:26
Page 14

ON
A
1
B
C D
Z31708A / Z31708B
2
3
2
4
5
6
E F
7
8
8
14
90546_liv_LED-Deckenleuchten_Content_ES_IT.indd 14 19.09.13 10:26
Page 15

A
ON
B
Z31708C / Z31708D
1
2
3
C D
2
4
5
6
E F
7 8
15
90546_liv_LED-Deckenleuchten_Content_ES_IT.indd 15 19.09.13 10:26
Page 16

IAN 90546
OWIM GmbH & Co. KG
Stiftsbergstraße 1
D-74167 Neckarsulm
Model-No.: Z31708A / Z31708B /
Z31708C / Z31708D
Version: 09 / 2013
Estado de las informaciones · Versione delle
informazioni · Last Information Update
Stand der Informationen: 09 / 2013
Ident.-No.: Z31708A/B/C/D092013-ES/IT
90546_liv_LED-Deckenleuchten_Cover_ES_IT.indd 1 19.09.13 10:27
 Loading...