


DRV-410
GPS Integrated Dashboard Camera
INSTRUCTION MANUAL
Camera de tableau de bord avec GPS integre
MODE D’EMPLOI
Camara de salpicadero con GPS integrado
MANUAL DE INSTRUCCIONES
For your records
Record the serial number, found on the back of the unit, in the spaces designated on the warranty card, and in the space provided below. Refer to the model and serial numbers whenever you call upon your Kenwood dealer for information or service on the product. Model DRV-410
Serial number
US Residents Only
Register Online
Register your Kenwood product at www.Kenwoodusa.com
© 2016 JVC KENWOOD Corporation |
B5A-0959-02 b (K) |

CONTENTS |
|
Precautions for Use.................................................................................................................... |
7 |
How to Install.............................................................................................................................. |
8 |
How to Wire............................................................................................................................... |
10 |
Names and Functions of Parts................................................................................................. |
11 |
Before Using the Driving Support Function.......................................................................... |
12 |
Basic Operations...................................................................................................................... |
13 |
Recording.................................................................................................................................. |
16 |
Playback.................................................................................................................................... |
17 |
Protecting or Deleting Files..................................................................................................... |
18 |
Various Settings....................................................................................................................... |
19 |
Using the PC Application......................................................................................................... |
24 |
Troubleshooting....................................................................................................................... |
28 |
Appendix.................................................................................................................................. |
31 |
Specifications........................................................................................................................... |
34 |
•The screen images and operation examples in this document were created for explaining the operating procedures. There may be screen images that differ from the actual screens or examples of operations not actually performed.
•Unless otherwise specified, microSDHC cards are referred to as SD cards in this document.
•The latest instruction manual, firmware update information, etc. are available at the JVC KENWOOD website. Please visit the following website. http://www.kenwood.com/cs/ce/
Disclaimer
•Please note that JVC KENWOOD shall not be responsible for any damages suffered by the customer or a third party as a result of incorrectly using this product, a failure during use of this product, or other trouble, or due to the use of this product, unless such liability is acknowledged by law.
Copyrights
•Recorded video, image, and audio content cannot be used for other than personal enjoyment without the consent of the copyright holder as specified in the Copyright Act.
•Please note that the recording of an event such as a show, performance, or exhibition may be restricted even when doing so for personal enjoyment.
English 3

Precautions and notices
Warning! Do not operate the device while driving. Using this product does not change the requirement for a driver to take full responsibility for his or her behavior. This responsibility includes observing all traffic rules and regulations in order to avoid accidents, personal injury or property damage.
•For your own safety, do not operate the controls of the product while driving.
•A window mount is needed when using the recorder in a car. Make sure that you place the recorder in an appropriate place, so as not to obstruct the driver’s view or deployment of airbags.
•Make sure that no object is blocking the camera lens and no reflective material is placed near the lens. Please keep the lens clean.
•If the car’s windscreen is tinted with a coating, it may impact the recording quality.
•Connect the charger to a proper power source. The voltage requirements are found on the product case and/or packaging.
•Do not use the charger if the cord becomes damaged.
•Do not attempt to service the unit. There are no serviceable parts inside. Replace the unit if it is damaged or exposed to excess moisture.
4

Caring for your device
Taking good care of your device will ensure trouble-free operation and reduce the risk of damage.
•Keep your device away from excessive moisture and extreme temperatures.
•Avoid exposing your device to direct sunlight or strong ultraviolet light for extended periods of time.
•Do not place anything on top of your device or drop objects on your device.
•Do not drop your device or subject it to severe shock.
•Do not subject your device to sudden and severe temperature changes. This could cause moisture condensation inside the unit, which could damage your device. In the event of moisture condensation, allow the device to dry out completely before use.
•The screen surface can easily be scratched. Avoid touching it with sharp objects. Nonadhesive generic screen protectors designed specifically for use on portable devices with LCD panels may be used to help protect the screen from minor scratches.
•Never clean your device with it powered on. Use a soft, lint-free cloth to wipe the screen and the exterior of your device.
•Do not use paper towels to clean the screen.
•Never attempt to disassemble, repair or make any modifications to your device.
Disassembly, modification or any attempt at repair could cause damage to your device and even bodily injury or property damage and will void any warranty.
•Do not store or carry flammable liquids, gases or explosive materials in the same compartment as your device, its parts or accessories.
•To discourage theft, do not leave the device and accessories in plain view in an unattended vehicle.
•Overheating may damage the device.
5

FCC WARNING
This equipment may generate or use radio frequency energy. Changes or modifications to this equipment may cause harmful interference unless the modifications are expressly approved in the instruction manual. The user could lose the authority to operate this equipment if an unauthorized change or modification is made.
FCC NOTE
This equipment has been tested and found to comply with the limits for a Class B digital device, pursuant to Part 15 of the FCC Rules. These limits are designed to provide reasonable protection against harmful interference in a residential installation.
This equipment may cause harmful interference to radio communications, if it is not installed and used in accordance with the instructions. However, there is no guarantee that interference will not occur in a particular installation. If this equipment does cause harmful interference to radio or television reception, which can be determined by turning the equipment off and on, the user is encouraged to try to correct the interference by one or more of the following measures:
•Reorient or relocate the receiving antenna.
•Increase the separation between the equipment and receiver.
•Connect the equipment into an outlet on a circuit different from that to which the receiver is connected.
•Consult the dealer or an experienced radio/TV technician for help.
6

Precautions for Use
Precautions for Installation
•Install the device in a position where it will not block the front view of the driver (position where hidden by the rear-view mirror).
•Install the device so that it is within the wiping range of the wiper.
•Install the device in a position where it will not interfere with the movement of the rear-view mirror.
•Take care not to install the device over the vehicle inspection sticker or other sticker.
•Take care not to install the device where it will interfere with driving or airbag operation.
•When installing the device in a vehicle equipped with a driving support system, check the instruction manual of the vehicle and then select an installation location that will not interfere with the driving support system.
•If the device is installed incorrectly, event recording or parking recording may not work correctly. Refer to "How to Install" for the loosening of fixing knob, installation orientation,
installation angle, and other information and then install the device correctly. (ÁP.8)
•Do not install the device near a digital terrestrial television antenna or an electrical component. Doing so may reduce television receiver sensitivity or cause flickering and noise.
•Use a commercially available cleaning cloth or the like to wipe off all dirt and grease on the mounting surface and then fix the mount base in place. If the device is re-affixed or mounted using, for example, general-purpose double-sided tape, the adhesion strength may weaken and cause the device to fall.
•After mounting the device, leave it for 24 hours before use to enable the mounting strength of the mount bracket to improve. Failing to do so may result in the adhesion of the mount bracket becoming weak and the device falling.
•Fix the cord in place with tape or the like so that it does not interfere with driving.
Precautions for Use
•Do not block the camera lens, get dirt on it, or place a reflective object near it.
•When LED traffic lights are recorded, video in which they appear to be flickering or flashing may be recorded. JVC KENWOOD assumes no responsibility with regard to the distinguishing or recording of traffic lights.
•If coating is used on the windshield of the vehicle, recording quality may be affected.
•There is no guarantee that the device can record video in all conditions.
Cleaning the Device
•When the device is dirty, wipe it with a dry silicone cloth or other soft cloth. If the device is very dirty, remove the dirt with a cloth with neutral cleaner on it and then wipe off the cleaner. Wiping the device with a hard cloth or using using a volatile substance such as thinner or alcohol may cause scratches, deformation, deterioration, or other damage.
•When the lens is dirty, gently wipe it with a soft cloth dampened with water. Rubbing the lens strongly with a dry cloth may cause scratches.
If You Notice a Problem with the Device
If you notice a problem with the device, first refer to "Troubleshooting" (ÁP.28) and check whether there is a way to resolve the problem.
If you are unable to find a way to resolve the problem, press the [MENU/OK] button on the device for at least 25 seconds to reset the device. When the power turns off after resetting the device, press the [MENU/OK] button for at least 1 second to turn on the power. (ÁP.11)
If the device does not return to normal after the reset, turn off the power of the device and then contact your dealer or nearest JVC KENWOOD service center.
7

How to Install
Installation Procedure
Check that the vehicle is parked on a level surface.
1. Attach the device to the mount bracket. (accessory)
Insert the mount bracket into the bracket attachment part of the device and attach it to the device.
Mount bracket
Camera lens side 


2. Determine where to mount the device.
Determine the mounting position in reference to "Recommended installation position."
3. Clean the mounting surface and then affix the device to the windshield.
Use a commercially available cleaning cloth or the like to wipe off all dirt and grease on the mounting surface. Peel off the release paper of the double-sided tape on the mount bracket and push the bracket against the windscreen to affix it in place. Leave the device for 24 hours before use to enable the mounting strength of the mount bracket to improve.
4. Perform the cord wiring work.
Refer to "How to Wire" and then perform the wiring work. (ÁP.10)
5. Adjust the installation angle of the device and then fix the device in place.
Turn the angle adjustment knob clockwise before adjustment. When adjusting the installation angle, check that the camera field of view is parallel to a level ground surface and that the ratio of the sky and ground are the same. After adjusting the installation angle, turn the angle adjustment knob of the adjustment bracket counterclockwise to fix the device in place.
Adjustment example
Windshield |
Angle |
adjustment knob |


 Rear-view mirror
• |
If you will use the driving support |
|
function, you need to make the |
|
adjustments described in "Adjusting the |
Release paper |
Settings to Match the Vehicle." (ÁP.12) |
• |
Make the adjustments described in |
|
"Adjusting the Settings to Match the Vehicle" |
|
in a location with a level surface and a sight |
|
distance of about 200 m. (ÁP.12) |
8

Recommended installation position
•Install the device in a position where it will not block the front view of the driver (position where hidden by the rear-view mirror).
•Install the device so that it is within the wiping range of the wiper.
•Mounting the device to the center of the windshield behind the rear-view mirror will facilitate optimal video recording.
Outside |
Windshield |
|
vehicle |
|
|
Double- |
|
|
sided tape |
|
|
Inside |
Rear-view |
|
mirror |
||
vehicle |
||
|
Ceramic part
Clip
Power cord
*Fix the power cord in place with commercially available soft tape or the like.
Front pillar cover
Soft tape*
Power cord
Airbag
Front pillar
 CAUTION
When passing the power cord through the front pillar or another part, observe the following points when performing the wiring work.
• Wire the power cord farther forward or farther rearward than the airbag so that it does not interfere with the airbag.
• In the case of a vehicle in which the front pillar cover is fixed in place with special clips or the like, the clips may need to be replaced after you remove the front pillar cover. For how to remove the front pillar cover, the availability of replacement parts, and other information, contact the vehicle dealer.
• Fix the power cord in place with commercially available soft tape or the like so that it does not interfere with driving.
9
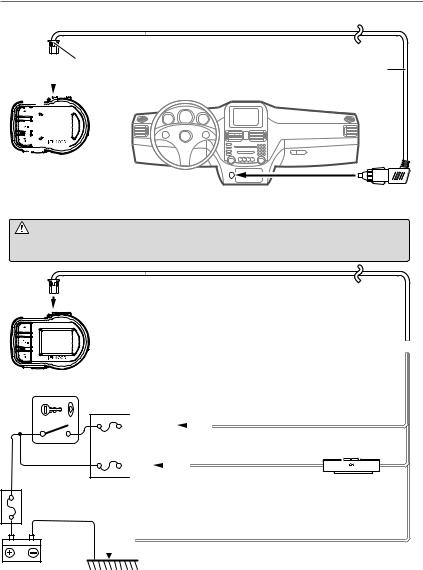
How to Wire
Connecting the cigarette lighter plug cord (accessory)
Connect the drive recorder and power cord of the cigarette lighter plug cord.
|
|
|
|
|
|
|
|
|
|
When disconnecting the power cord, disconnect |
|
Cord length (4 m) |
|||||||||
|
|
|
|
|
|
|
|
|
|
it while pressing the hook of the connector. |
|
|
|
|
|||||||
|
|
|
|
|
|
|
|
|
|
|
|
|
|
|
|
|
|
|
|
|
|
|
|
|
|
|
|
|
|
|
|
|
|
|
|
|
|
|
|
|
|
|
|
|
|
|
|
|
|
|
|
|
|
|
|
|
|
|
|
|
|
|
|
|
|
|
|
|
|
|
|
|
|
|
|
|
|
|
|
|
|
|
|
|
|
|
|
|
|
|
|
|
|
|
|
|
|
|
|
|
|
|
|
|
|
|
|
|
|
|
|
|
|
|
|
|
|
|
|
|
|
|
|
|
|
|
|
|
|
|
|
|
|
|
|
|
|
|
|
|
|
|
|
|
|
|
|
|
|
|
|
|
|
|
|
|
|
|
|
|
|
|
|
|
|
|
|
|
|
|
|
|
|
|
|
|
|
|
|
|
|
|
|
|
|
|
|
|
|
|
|
|
|
|
|
|
|
Drive recorder
Connect the cigarette lighter plug to the cigarette lighter socket.
Power cord for Dashboard Camera (accessory)
CAUTION Before performing the connection work, first check that the engine key is removed and then be sure to disconnect the negative terminal of the
battery to prevent a short accident.
Connect the Dashboard Camera and power cord.
Dashboard Camera
Cord length (3.5 m) 
Ignition key switch
Main fuse
Battery
|
|
|
|
|
|
|
|
|
|
|
|
Accessory cord (Red) |
||||||
Fuse |
|
|
|
|
|
|
|
|
|
Connect to a power supply that can |
||||||||
Accessory power supply be turned on and off with the switch. |
||||||||||||||||||
|
|
|
||||||||||||||||
|
|
|
|
|
|
|
|
|
|
|
|
|
|
|
|
|
|
|
|
|
|
ACC |
|
|
|
|
|
|
|
|
|
|
|
||||
|
|
|
|
|
|
|
|
|
|
|
|
Fuse (2 A) |
|
|
||||
|
|
|
|
|
|
|
|
|
|
|
|
|
|
|
|
|
|
|
|
|
|
BATT |
|
Battery cord (Yellow) |
|||||||||||||
|
|
|
|
|||||||||||||||
|
|
|
|
|
|
|
|
|||||||||||
|
|
|
|
|
|
|
|
Connect to a power supply with a voltage always applied |
||||||||||
|
|
|
|
|
|
|
|
regardless of whether or not the engine key is on or off at |
||||||||||
|
|
|
|
|
|
|
|
a point after the power has passed through the main fuse. |
||||||||||
|
|
|
|
Ground cord (Black) |
|
|
|||
|
|
|
|
Connect to a metal part of the vehicle (part of the chassis with an electrical |
GND |
|
|
connection to the negative side of the power supply). |
|
10
Names and Functions of Parts
1 |
|
|
4 |
|
|
5 |
|
|
|
6 |
|
|
|
7 |
0 |
|
|
|
|
|
|
8 |
9 |
2 |
3 |
|
|
|
|
@ |
!
1Bracket attachment part
Attach the supplied mount bracket.
2Camera lens
3Speaker
Outputs voice guidance, warning sounds, and file playback audio.
4Power cord connector terminal
Connect the supplied cigarette lighter plug cord or the Dashboard Camera power cable.
5J button
•Press this button during playback to play the previous file.
•Hold down this button during playback to rewind, and hold it down while playback is paused to play slowly in the reverse direction. Release this button during rewinding to play, and release it during reverse slow playback to pause.
•Press this button during menu display to return to the previous item.
6MENU/OK button
•Hold down this button to turn on or off the power of the device.
•Press this button to display the MENU screen.
•This button functions as the OK button during menu display.
•Hold down this button for at least 25 seconds to reset the device.
7Microphone
Records audio.
8K button
•Press this button during continuous recording to take a photo.
•Press this button during playback to play the next file.
•Hold down this button during playback to fast-forward, and hold it down while playback is paused to play slowly in the forward direction. Release this button during fast-forwarding to play, and release it during forward slow playback to pause.
•Press this button during menu display to go to the next item.
9Monitor screen
0SD card slot
Insert an SD card for recording.
!Indicator
Lights when the power of the device turns on.
@

 button
•Press this button during continuous recording to start manual recording.
•Each press of this button during playback switches between the paused and playback states.
•Press and hold this button during playback or menu setting to return to continuous recording.
•This button functions as the cancel, back, or exit button during menu display.
11

Before Using the Driving Support Function
Adjusting the Settings to Match theVehicle
Before using the driving support function, set the mounting height of the device from the road surface and adjust the horizon and bonnet front edge position settings to match the vehicle.
1. Press the [MENU/OK] button.
MENU appears.
2. Use the [J]/[K] buttons to select
<Driving support settings> and then press the [MENU/OK] button.
1 |

 2
2


1
3. Use the [J]/[K] buttons to select
<Mounting height settings> and then press the [MENU/OK] button.
1 |

 2
2


1
4. Use the [J]/[K] buttons to select the mounting height from the road surface and then press the [MENU/OK] button.
1 |

 2
2


1
5. Use the [J]/[K] buttons to select
<Detection range settings> and then press the [MENU/OK] button.
1 |

 2
2


1
6. Press the [MENU/OK] button, use the [J]/[K] buttons to align the guide line with the horizon, and then press the [MENU/OK] button.
Adjust as shown in the figure.
2 |

 1
1

 3
3
2
7. Press the [MENU/OK] button, use the [J]/[K] buttons to align the guide line with the bonnet front edge, and then press the [MENU/OK] button.
Adjust as shown in the figure.
2 |

 1
1

 3
3
2
8. Hold down the [


 ] button to end the procedure.
• For the mounting height setting, set the nearest height among the setting options.
•In the case of a vehicle for which the bonnet front edge cannot be seen, lower the guide line to the lowest position at which the center of the road surface is not hidden by the body or a part of the vehicle and then set the setting.
•The driving support function is set to "OFF" by default (ÁP.21).
12

Basic Operations
Inserting and Removing an SD Card Formatting an SD Card
Turn off the power of the device and then insert an SD card into the SD card slot until you hear a clicking sound. Be careful with regard to the orientation of the card.
Before using an SD card, first format (initialize) it with the device.
1. Insert the SD card into the SD card slot.
2. Press the [MENU/OK] button.
MENU appears.
To remove the SD card, turn off the power of the device and then press the SD card so that it pops up and remove the SD card by pulling it out.
•Be sure to format an SD card with the device.
•When an SD card is formatted, all files including protected files are deleted.
Turing the Power On/Off
Turning on the accessories power (ACC) switch or starting the engine of the vehicle turns on the power of the device and starts continuous recording. When the device is connected using the power code (ÁP.10), turning off the accessories power (ACC) turns off the power of the device and switches to parking recording mode.
3. Use the [J]/[K] buttons to select
<Format SD card> and then press the
[MENU/OK] button.
1 |

 2
2


1
4. Use the [J]/[K] buttons to select
<OK> and then press the [MENU/OK] button.
To Turn the Power On/Off Manually
When the accessories power (ACC) is on, the power of the device can be turned on or off manually.
•Hold down the [MENU/OK] button for at least 3 seconds while the device is on to turn off the power.
•Hold down the [MENU/OK] button for at least 1 second while the device is off to turn on the power.
•When the power has been turned off manually, power is consumed because the device is in standby.
•There are vehicle models such as some imported vehicles for which the power to the cigarette lighter is not cut off even when the engine is turned off. To protect the battery, remove the cigarette lighter plug when you get out of the vehicle.
1 |

 2
2


1
5. Press the [MENU/OK] button to end the procedure.
13
Basic Operations
Recording Modes
The device has four recording modes. Turning on the power of the device starts continuous recording. The recorded video is recorded as files to the SD card. The recording files are sorted into a separate folder for each recording mode.
Continuous recordings
Turning on the power of the device starts continuous recording. In continuous recording mode, files are deleted in order from the oldest to record when there is no recording area remaining.
Continuous Elapsed time → recording 


•The recording data is saved to the continuous recordings folder.
•The recording time of one file can be set in "Continuous recording file length" (ÁP.20).
Manual recording
Pressing the [

 ] button on the device during continuous recording starts manual recording. The recording time of manual recording is the 10 seconds before manual recording plus the time set in "Manual recording time" (ÁP.20). If you wish to extend the recording time, press the [

 ] button again. When manual recording ends, the mode returns to continuous recording.
Manual recording
(If the button is pressed during manual recording, the recording time is extended
from that point by the amount of recording time set for manual recording.)
Continuousrecording Elapsed time →


Manual recording |
|
|
|
|
|
|
|
|
|
|
|
|
|
|
|
|
|
|
|
|
|
|
|
Manual recording (set time) |
|||||
Records 10 seconds before |
|
|
|||||||
|
|
||||||||
|
|
|
|
|
|
||||
manual recording |
|
|
|
|
|
|
|||
•The recording data is saved to the manual recordings folder.
•The recording time of one file is a maximum of one minute. If the recording time exceeds one minute, the file is split to record.
•When 10 files will be exceeded, manual recording cannot be performed (when 8 GB SD card). When "Overwrite (manual)" is set to "ON," files are deleted in order from the oldest to record (ÁP.20). Back up the recording data you wish to keep to a PC or other device if necessary.
14

Event recording
The detection of a sudden collision, unexpected collision, or other event during continuous recording starts event recording. The recording time of event recording is the 10 seconds before collision detection plus the time set in "Event recording time" (ÁP.20). When event recording ends, the mode returns to continuous recording.
Collision detected
Continuous Elapsed time →
recording 


 Event recording

Records 10 seconds before Event recording (set time) collision detection
•The recording data is saved to the event recordings folder.
•The recording time of one file is a maximum of one minute. If the recording time exceeds one minute, the file is split to record.
•If a collision is detected during event recording, event recording is extended.
•When five files will be exceeded, event recording cannot be performed (when 8 GB SD card). When "Overwrite (event)" is set to "ON," files are deleted in order from the oldest to record (ÁP.20). Back up the recording data you wish to keep to a PC or other device if necessary.
Parking recording
Turning off the accessories power (ACC) turns off the power of the device and switches to parking recording mode to perform vehicle collision monitoring. If the vehicle is subjected to a collision, the power of the device turns on and parking recording starts. When parking recording ends, vehicle collision monitoring resumes.
|
|
Collision detected |
||||||||
Collision Elapsed time → |
|
|
||||||||
|
||||||||||
|
||||||||||
monitoring |
|
|
|
|
|
|
|
|
|
|
Parking recording |
|
|
|
|
|
|
|
|
Parking recording (set time) |
|
|
|
|
|
|
|
|
|
|||
|
|
|
|
|
|
|
|
|||
•Parking recording mode is available only when the device is connected using the power code (ÁP.10)
•The recording data is saved to the parking recordings folder.
•Parking recording starts a few seconds after the vehicle is subjected to a collision.
•The monitor screen is not displayed during parking recording.
•When 20 files will be exceeded, parking recording cannot be performed (when 8 GB SD card). Delete any unnecessary data or back up the recording data you wish to keep to a PC or other device
if necessary. You can confirm whether there is an excess number of files with the "8 Number of files exceeded" indicator on the recording screen (ÁP.16).
•If parking recording is performed, a notification on the screen informs you that parking recording has been performed when the power turns on.
•Parking recording cannot be performed when "Recording time" is set to "OFF" (ÁP.20).
•Parking recording may sometimes be performed as result of detecting vibration when a door is closed.
15

Recording
Recording at Any Location (Manual Recording)
Pressing the [

 ] button on the device during continuous recording allows you to record manually whenever you wish.
1. Press the [

 ] button.
Manual recording starts and then the mode returns to continuous recording after the time set for the recording time of manual recording elapses.
•If you wish to extend the recording time, press the [


 ] button again.
•The recording time of manual recording is the 10 seconds before manual
recording plus the time set in "Manual recording time." (ÁP.20)
•Recording cannot be performed during folder or file selection, playback, deletion, and setting.
Recording at Any Location (Forcibly Recording)
Forcibly start recording even during playback or menu display.
1. Hold down the [


 ] button.
Playback or menu display stops and continuous recording resumes.
Taking a Photo
Pressing the [K] button on the device during continuous recording allows you to take a photo whenever you wish.
1. Press the [K] button.
•If you wish to take another photo, press the [K] button again.
•A photo cannot be taken when the device is not recording such as during playback or when configuring menu settings.
Recording screen indicators
1 2 3
4 5 6 7 8 9
1Recording mode
2Time
3GPS reception state
4Resolution (3M: 2304x1296, FHD: 1920x1080, or HD: 1280x720)
5Audio recording
6HDR recording
7Remaining manual recording or event recording time
8Number of files exceeded (manual recording, event recording, parking recording, or photos)
9Photo taking
16

Playback
Playing Files
Select a file such as a recording file or photo and start playback.
1. Press the [MENU/OK] button.
MENU appears.
2. Use the [J]/[K] buttons to select
<Playback> and then press the
[MENU/OK] button.
1 |

 2
2


1
3. Use the [J]/[K] buttons to select the folder you wish to play and then press the [MENU/OK] button.
The video for the most recent file in the selected folder is displayed.
1 |

 2
2


1
Continuous |
There are continuous recording |
recordings |
files. |
|
|
Manual recordings |
There are manual recording files. |
|
|
Event recordings |
There are event recording files. |
|
|
Parking recordings |
There are parking recording files. |
|
|
Still images |
There are still image files. |
|
|
4. Use the [J]/[K] buttons to select the file you wish to play and then press the [MENU/OK] button and press the [


 ] button.
Playback of the selected file begins.
1 |

 2
2


1
Pressing the [J] or [K] button during playback plays the previous or next file or photo.
To return to continuous recording
Hold down the [


 ] button.
•Files are listed in their recording or capture order.
•Recording is stopped while selecting a folder or file and during playback. Also,
manual recording using the [


 ] button does not work.
Playback screen indicators
1 2 3
456
1Recording file playback state or photo file indication
2Play time
3Play position
4Recording file name, date, and time
5File protection
6Number of file playing/total number of files
17

Protecting or Deleting Files
Operation with the Playback Menu
Protect or delete files such as event recording files or photos. You can also delete all of the files in a folder.
1. Select a file or photo to play.
2. Press the [MENU/OK] button, use the [J]/[K] buttons to select an item, and press the [MENU/OK] button.
1 |

 2
2


1 |
|
|
|
|
|
|
|||
Return |
Returns to folder selection. |
|||
|
|
|||
Delete file |
Deletes a file that is not protected. |
|||
|
|
|||
Delete folder |
Deletes all files in the folder that are |
|||
not protected. |
||||
|
||||
Protects the file so that it will remain Protect file even if an attempt to overwrite or
delete it is made.
Remove file |
Removes file protection. |
|
protection |
||
|
3. Use the [J]/[K] buttons to select
<OK> and then press the [MENU/OK] button.
1 |

 2
2


1
4. Press the [MENU/OK] button to end the procedure.
•Continuous recording files cannot be protected.
•To delete a protected file, remove file protection.
•When an SD card is formatted, all files including protected files are deleted.
18

Various Settings
Operation with MENU
Perform operations such as playback and configuring video recording settings on the MENU screen.
1. Press the [MENU/OK] button.
MENU appears.
The MENU screen of step 2 changes in the following order.
Playback
Parking recording settings
2. Use the [J]/[K] buttons to select an item and then press the [MENU/OK] button.
1 |

 2
2


1
Repeat the same operation according to the selected item.
3. Hold down the [


 ] button to end the procedure.
•Except for the recording described in "Recording at Any Location (Forcibly
Recording)," recording is not possible while the menu is displayed. (ÁP.16)
Video recording settings
Driving support settings
System settings
Format SD card
Update system
19

Various Settings
MENU |
* Factory default settings |
Playback
Continuous recordings
Manual recordings
Event recordings
Parking recordings
Still images
Select the desired folder from the list screen and play a file. (ÁP.17) Files can also be protected or deleted during playback. (ÁP.18)
 Parking recording settings
|
Recording time |
OFF/10 sec*/20 sec/30 sec |
|
|
Set the recording time for parking recording after collision detection. |
|
Overwrite |
ON*/OFF |
|
|
Set whether or not to overwrite old files when the maximum number of |
|
|
recording files will be exceeded. |
|
Sensitivity settings |
1(Low)/2/3(Mid)*/4/5(High) |
|
|
Set the sensitivity for detecting a vehicle collision while parked. |
|
|
1: Detects large collisions, 3: Standard, 5: Detects small collisions |
 Video recording settings
|
Audio recording |
ON*/OFF |
|
|
Set whether or not to record audio with the microphone during recording. |
|
Continuous recording file |
1 min*/2 min/3 min |
|
length |
Set the recording time for continuous recording. The recording is divided each |
|
|
time the recording time elapses. |
|
Manual recording time |
15 sec*/30 sec/1 min |
|
|
Set the recording time for manual recording. The recording time for before |
|
|
manual recording is set to 10 seconds. |
|
Event recording time |
15 sec*/30 sec/1 min |
|
|
Set the recording time for after collision detection. The recording time for |
|
|
before vehicle collision detection is set to 10 seconds. |
|
Overwrite (manual) |
ON/OFF* |
|
|
Set whether or not to overwrite old files when the maximum number of |
|
|
recording files will be exceeded. |
|
Overwrite (event) |
ON/OFF* |
|
|
Set whether or not to overwrite old files when the maximum number of |
|
|
recording files will be exceeded. |
|
Resolution |
3M (2304x1296)/1920x1080*/1280x720 |
|
|
Set the resolution for recording. |
|
HDR recording |
ON*/OFF |
|
|
Setting this to ON records subjects by reducing overexposure and loss of dark detail even when |
|
|
capturing scenes with high light-dark contrast. HDR cannot be set to ON when the resolution is 3M. |
|
Sensitivity settings |
1(Low)/2/3(Mid)*/4/5(High) |
|
|
Set the sensitivity for detecting a vehicle collision. |
|
|
1: Detects large collisions, 3: Standard, 5: Detects small collisions |
20
 Driving support settings
|
Forward collision warning |
ON/OFF* |
|
|
Detects the distance between your vehicle and the vehicle in front and notifies |
|
|
with a warning sound to prevent a collision with the vehicle in front if a safe |
|
|
distance is not maintained. This operates at 30 km/h and faster. |
|
Lane departure warning |
ON/OFF* |
|
|
Detects the lane your vehicle is driving in and notifies with a warning sound |
|
|
when your vehicle is departing from the current lane. This operates at 60 km/h |
|
|
and faster. |
|
Departure delay warning |
ON/OFF* |
|
|
When your vehicle is stopped behind the vehicle in front and then the vehicle |
|
|
in front begins moving, a warning sign notifies if your vehicle is late to begin |
|
|
moving. A warning sound is also output when, for example, your vehicle moves |
|
|
backward. |
|
Detection range settings |
Before using the driving support function, adjust the horizon and bonnet front |
|
|
edge position settings to match the vehicle. (ÁP.12) |
|
Mounting height settings |
1.2 m*/1.35 m/2 m |
|
|
Set the mounting height of the device from the road surface. (Á P.12) |
 System settings
|
|
Date/time |
Automatic*/Manual |
|
|
|
|
|
Set the date and time automatically or manually. (ÁP.22) |
|
|
Daylight saving time |
OFF*/+1 hr./+30 min |
|
|
|
|
|
Set daylight saving time. |
|
|
Notification volume |
Set the notification volume to any of six levels (mute to maximum). |
|
|
|
|
|
|
|
|
Playback volume |
Set the recording video playback volume to any of six levels (mute to |
|
|
|
|
|
maximum). |
|
|
|
|
|
|
|
Monitor display timer |
Always on*/10 sec/1 min/3 min |
|
|
|
|
|
Set the screen display time. |
|
|
|
|
|
|
|
Language |
English*/Français/Español |
|
|
|
|
|
Change the display language for the MENU screen, etc. |
|
|
|
|
|
|
|
Select units |
km/h/MPH* |
|
|
|
|
|
Switch to kilometer or mile display. |
|
|
Factory reset |
Reset the device settings to the factory default state. |
|
|
|
|
|
|
|
|
System version |
Display the version of the device firmware. |
|
|
|
|
|
|
|
|
|
Format SD card |
Delete all files and format the SD card. (ÁP.13) |
|
|
|
||
|
|
|
|
|
|
|
|
|
|
|
|
|
Update system |
Update the device firmware. (ÁP.23) |
|
|
|
||
|
|
|
|
|
|
|
|
|
|
21

Various Settings
Setting the Date and Time |
|
|
|
Set the date and time |
|
Set the date and time of the device. |
Automatic |
automatically using the time |
|
received from a GPS satellite. |
|
1. Press the [MENU/OK] button. |
|
|
|
|
|
Manual |
Set the date and time manually. |
|
MENU appears. |
|
|
2. Use the [J]/[K] buttons to select
<System settings> and then press the [MENU/OK] button.
1 |

 2
2


1
3. Use the [J]/[K] buttons to select
<Date/time> and then press the
[MENU/OK] button.
1 |

 2
2


1
4. Use the [J]/[K] buttons to select an item and then press the [MENU/OK] button.
5. Set the timezone setting or date/time setting.
Use the [J]/[K] buttons to select the time zone or date and time and then press the [MENU/OK] button.
When automatic was selected, the timezone settings is displayed.
1 |

 2
2


1
When manual was selected, the date/setting is displayed. Repeat the same operation to set the date and time.
1 |

 2
2


1
6. Press the [


 ] button to end the procedure.
|
• The device sets the date and time |
||
|
1 |
automatically using the coordinated |
|
|
universal time (UTC) received from a GPS |
||
|
|
||
2 |
|
satellite. |
|
• |
If the date and time are set automatically, |
||
|
|||
|
1 |
setting the correct time may not be |
|
|
possible until a GPS satellite signal can |
||
|
|
be received normally. |
|
22
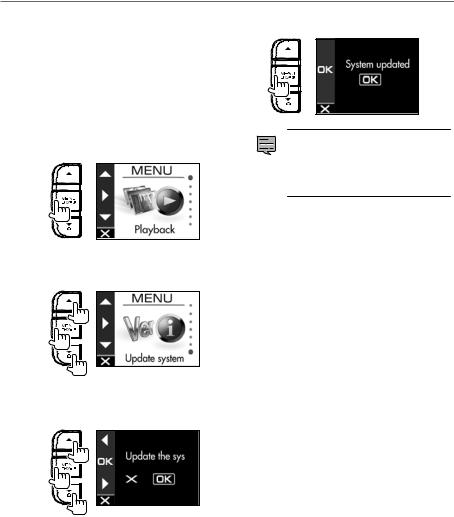
Updating the System
Update the system firmware of the device. For information regarding updates, visit the JVC KENWOOD website at http://www.kenwood.com/cs/ce/.
1. Copy the system update file to the SD card and then insert the SD card into the SD card slot.
2. Press the [MENU/OK] button.
MENU appears.
5. Press the [MENU/OK] button to end the procedure.
•Do not turn off the power of the device, start the engine of the vehicle, or remove the SD card during the update.
•When the firmware update is finished, the device restarts.
3. Use the [J]/[K] buttons to select
<Update system> and then press the
[MENU/OK] button.
1 |

 2
2


1
4. Use the [J]/[K] buttons to select
<OK> and then press the [MENU/OK] button.
1 |

 2
2


1
The firmware is updated.
23
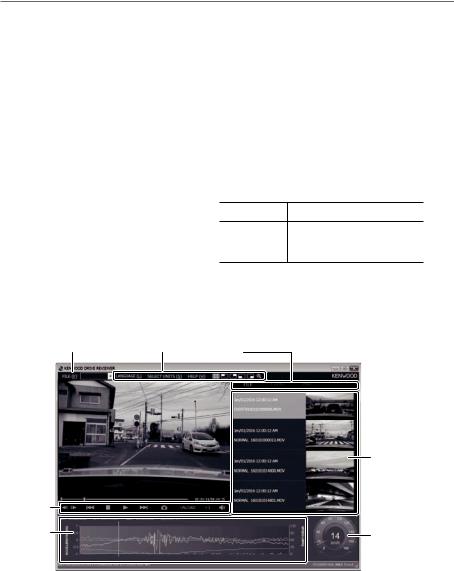
Using the PC Application
KENWOOD DRIVE REVIEWER is a PC application for displaying video recorded with the device. The application can be downloaded from the JVC KENWOOD website at http://www.kenwood.com/cs/ce/.
Installing the Software
1. Double-click <Setup.msi> of the application software downloaded to the PC and following the on-screen instructions to install KENWOOD DRIVE REVIEWER.
Playing Files
1. Remove the SD card from the device, insert it in the supplied SD card adapter, and then connect it to the PC using a card reader (commercially available).
2. Start KENWOOD DRIVE REVIEWER.
3. Select the <JVCKENWOOD> drive for the SD card with <SELECT FOLDER (S)> from the File (F) menu.
4. Select and play the file you wish to play from the [FILE] or [EVENT] tab.
FILE |
Displays all files. |
Displays the event recording, EVENT manual recording, and parking
recording files.
5. To exit the application, select the [X] button or <EXIT (X)> from the File (F) menu.
KENWOOD DRIVE REVIEWER screen
1 2
2 3
3
4
|
6 |
5 |
|
7 |
8 |
|
24

1File operations
Perform file operations such as selecting files and backing up the SD card files to your PC.
SELECT |
Select the <JVCKENWOOD> |
|
FOLDER (S) |
drive for the SD card. |
|
|
|
|
|
Output a driving information file |
|
EXPORT kmz/ |
(kml/kmz) that can be used with |
|
kml (E) |
the GoogleMapsTM map service |
|
|
or GoogleEarthTM map service. |
|
BACKUP (B) |
Back up the SD card data to the |
|
hard disk of a PC, etc. |
||
|
||
|
|
|
EXIT (X) |
Exit the PC application. |
|
|
|
2Video playback screen selection
Display the top right, top left, bottom right, or bottom left of the screen enlarged or display an arbitrary location enlarged.
|
When the top right, top left, |
|
|
bottom right, or bottom left of |
|
|
the screen is displayed enlarged, |
|
|
press this to return to the |
|
|
normal screen. |
|
|
|
|
|
Display the top right, top left, |
|
|
bottom right, or bottom left of |
|
|
the screen enlarged. |
|
|
|
|
|
Move the displayed frame to |
|
|
display an arbitrary location |
|
|
enlarged to a maximum of five |
|
|
times the size. Press [RESET] to |
|
|
display at actual size (1x). |
|
|
|
|
LANGUAGE |
Selects the display language for |
|
the MENU screen, etc. |
||
|
||
|
|
|
SELECT UNITS |
Selects kilometer or mile display. |
|
|
|
3Selection tabs
Display a list of all files or display a list of the event recording, manual recording, and parking recording files. Select MAP to display a map for the video currently playing.
4Video screen
Displays the video of the selected file. Operate the playback bar to move to any location. Also, double-click the video screen during playback to switch to full screen display. Each click of the screen during full screen display switches between the paused and playback states. Double-click the screen to return to the normal screen.
5Operation buttons
These buttons are for operations such as playing and stopping video.
Displays the previous or next frame of the video.
Displays the previous or next file.
Stops playback.
Pressing this during playback pauses playback. Pressing it again resumes playback.
Captures an image at the point pressed.
Indicates operating states such as the playback state.
Changes the playback speed.
Adjusts the volume.
6File list
Displays a list of the files and thumbnails selected with a selection tab.
7G-sensor chart
Displays waveforms of acceleration for movement in the forward/backward (X), left/ right (Y), and up/down (Z) directions of the vehicle.
8Speed meter
Displays the speed of the vehicle.
25

Using the PC Application
Outputting a Still Image from Video
Capture video at any location from the video currently playing as a still image.
1. Start KENWOOD DRIVE REVIEWER.
2. Select the <JVCKENWOOD> drive for the SD card with <SELECT FOLDER (S)> from the FILE (F) menu.
3. Select and play the file you wish to play.
4. Press the [ ] button.
5. Select the backup destination folder and enter a file name.
6. Press the [Save] button.
Using MAP
Display a map for the location of a recorded video. An Internet connection is required to use MAP.
1. Start KENWOOD DRIVE REVIEWER.
2. Select the <JVCKENWOOD> drive for the SD card with <SELECT FOLDER (S)> from the FILE (F) menu.
3. Select and play the file you wish to play.
4. Press the [MAP] tab.
26

Outputting Driving Information
Output a driving information file (kml/kmz) that can be used with the GoogleMapsTM map service or GoogleEarthTM map service.
1. Start KENWOOD DRIVE REVIEWER.
2. Select the <JVCKENWOOD> drive for the SD card with <SELECT FOLDER (S)> from the FILE (F) menu.
3. Select <EXPORT kmz/kml (E)> from FILE (F).
4. Select the backup destination folder, select the file type (kml/kmz), and enter a file name.
5. Press the [Save] button.
•For how to use the file, see the help of the GoogleMapsTM map service or GoogleEarthTM map service.
Backing Up Files
Back up the SD card data to the hard disk of a PC, etc.
1. Start KENWOOD DRIVE REVIEWER.
2. Select the <JVCKENWOOD> drive for the SD card with <SELECT FOLDER (S)> from the FILE (F) menu.
3. Select <BACKUP (B)> from FILE (F).
4. Select the backup destination folder.
5. Select the files to back up by selecting check boxes for the files you wish to save.
6. Press the [EXECUTE] button.
27

Troubleshooting
Find the corresponding symptom in the following table and then resolve the problem. If you are unable to find a solution, contact your dealer or a JVC KENWOOD service center.
Common
Symptom |
|
Cause/Solution |
|
|
|
Power does not turn on. |
• |
The power of the vehicle cigarette lighter socket is not on. |
|
|
ååTurn on the accessories power (ACC) switch of the vehicle or |
|
|
start the engine of the vehicle. |
|
• |
ååCheck the insertion state of the cigarette lighter plug. |
|
The fuse has blown. |
|
|
|
ååCheck the cords are not shorted and then replace the fuse with |
|
|
one of the same capacity. |
|
• |
The connections of the power cord are incorrect. |
|
|
ååConfirm the connections with the dealer. |
|
• The power does not turn on even though there is no problem |
|
|
|
with the fuse and wiring. |
|
|
ååRefer to "If You Notice a Problem with the Device" and then |
|
|
reset the device. (ÁP.7) |
• Cannot record. |
• |
An SD card is not inserted. |
|
• |
An SD card of a size other than 8 GB to 32 GB is inserted. |
|
• |
An SD card that does not comply with the SDHC standards is inserted. |
|
• |
The SD card is not formatted. |
|
|
ååInsert an SD card that can be used with the device into the SD |
|
|
card slot. |
|
• |
ååIf necessary, format the SD card with the device. |
|
The internal temperature of the device is high. |
|
|
|
åå Reduce the temperature inside the vehicle. The protection circuit |
|
|
operation will be canceled and recording will become possible. |
|
|
|
Displayed Messages and Voice Guidance
If any of the following messages appears, resolve the problem as described in the table below. Voice guidance is also played for messages with the * mark.
Message |
|
Cause/Solution |
|
|
|
No SD card inserted* |
• |
The power was turned on while no SD card was inserted. |
|
• |
The SD card was removed during recording. |
|
|
ååRefer to "Cards supported by this device" and then insert an |
|
|
SD card that can be used with the device into the SD card slot. |
|
|
(ÁP.32) |
SD card error* |
• |
An SD card that cannot be recognized is inserted. |
|
|
ååRefer to "Cards supported by this device" and then insert an |
|
|
SD card that can be used with the device into the SD card slot. |
|
|
(ÁP.32) |
28

Message |
|
Cause/Solution |
|
|
|
SD card requires formatting* |
• |
The SD card is not formatted in a format that can be recognized. |
|
|
ååIf necessary, refer to "Formatting an SD Card" and then format |
|
|
the SD card with the device. (ÁP.13) |
Formatting failed |
• |
The SD card has malfunctioned. |
|
|
åå Replace the SD card with a new one. SD cards have a product |
|
|
lifespan, such as the number of times that writing can be performed. |
Uncompatible SD card |
• |
An SD card with a capacity less than 8 GB or more than 32 GB is |
|
|
inserted. |
|
|
ååRefer to "Cards supported by this device" and then insert an |
|
|
SD card that can be used with the device into the SD card slot. |
|
|
(ÁP.32) |
Recording has stopped* |
• |
The SD card was removed during recording. |
|
• |
Recording became no longer possible due to a failure of the SD card. |
|
• |
Recording stopped due to some problem occurring. |
|
• |
Recording may stop if an SD card of an incompatible speed class |
|
|
is used. |
|
|
ååReinsert the SD card. |
|
|
ååReplace the SD card with a new one. |
|
|
ååChange the overwrite setting of the "Video recording settings". |
|
|
(ÁP.20) |
|
|
ååReplace the SD card with a compatible one. |
No space on the SD card |
• |
The free space required to start continuous recording is not |
|
|
available on the SD card. |
|
• The free space required to record up to the file limit for manual |
|
|
|
recording or event recording is not available. |
|
|
ååRefer to "Protecting or Deleting Files" and then delete |
|
|
unnecessary files. (ÁP.18) |
|
|
ååBack up any necessary data to a PC or other device, refer to |
|
|
"Formatting an SD Card," and then format the SD card with the |
|
|
device. (ÁP.13) |
Event recording failed (file limit • "Overwrite (event)" is "OFF" and the file limit of the folder for event exceeded) recordings has been reached.
ååWhen "Overwrite (event)" is set to "ON," old files are deleted to record. (ÁP.20)
Manual recording failed (file limit |
• |
"Overwrite (manual)" is "OFF" and the file limit of the folder for |
exceeded) |
|
manual recordings has been reached. |
|
|
ååWhen "Overwrite (manual)" is set to "ON," old files are deleted to |
|
|
record. (ÁP.20) |
|
|
|
Still image recording failed (file limit |
• |
The file limit for still images has been reached. |
exceeded) |
|
ååRefer to "Protecting or Deleting Files" and then delete |
|
|
unnecessary files. (ÁP.18) |
29

Troubleshooting
Message |
|
Cause/Solution |
|
|
|
File cannot be played |
• |
A file that cannot be played was recorded for some reason. |
|
• |
Data can no longer be read due to a failure of the SD card. |
|
|
ååBack up any necessary data to a PC or other device, refer to |
|
|
"Formatting an SD Card," and then format the SD card with the |
|
|
device. (ÁP.13) |
Recording stopped due to high |
• |
Recording was not possible due the temperature of the device |
temperature |
|
rising. |
|
|
ååReduce the temperature inside the vehicle. The protection |
|
|
circuit operation will be canceled and recording will become |
|
|
possible. |
|
|
|
System will turn off due to high |
• |
The power was turned off for safety reasons due to the |
temperature |
|
temperature of the device rising. |
|
|
ååReduce the temperature inside the vehicle. The protection |
|
|
circuit operation will be canceled and recording will become |
|
|
possible. |
|
|
|
No update file available |
• |
There is no firmware data in the SD card. |
|
|
ååInsert firmware data for the device in the SD card. |
|
• The update file in the SD card is the same as or older than the |
|
|
|
current firmware version. |
|
|
ååInsert the latest firmware data. |
|
|
ååIf the SD card contains the latest firmware data, an update is not |
|
|
necessary because the firmware of the device is up to date. |
System update failed |
• |
The update file could not be read properly from the SD card. |
|
• |
The update file is damaged. |
|
|
ååFormat the SD card in the device, copy the update data to the |
|
|
SD card again, and then perform the update operation again. |
30
 Loading...