


ELECTRIC OIL FILLED RADIATOR
INSTRUCTIONS FOR USE
SAVE THESE INSTRUCTIONS
RADIADORES ELÉCTRICOS DE ACEITE
INSTRUCCIONES PARA EL USO
REPASE Y GUARDE ESTAS INSTRUCCIONES
TYPE/MODELO: EW 7507 EK
Register this product on-line and receive a free trial issue of Cook's Illustrated. Visit www.delonghiregistration.com
Visit www.delonghi.com for a list of service centers near you. (U.S. Only).
Registre este producto en línea y reciba un ejemplar gratis de Cook's Illustrated. Visite www.delonghiregistration.com.
Visite www.delonghi.com para ver la lista de centros de servicios cercanos a usted. (Solamente en los Estados Unidos)
ELECTRONIC CHARACTERISTICS/ CARACTERISTICAS ELECTRICAS
120V˜60Hz 1500W
IMPORTANT SAFEGUARDS
When using electrical appliances, basic precautions should always be taken to avoid the risk of fire, electric shock and personal injury, including the following:
1.Read these instructions thoroughly before using this heater.
2.If your radiator is equipped with a polythene tape, which serves as carry handle, remove it prior to connecting the appliance to an outlet.
3.This heater becomes very hot when operating. To avoid burns, do not touch its hot surfaces with your bare skin. Use the heater’s handle when moving it. Keep combustible materials, such as furniture, pillows, bedding, papers, clothes and curtains at least 3 feet (90 cm) away from the heater’s front and top, and also well away from its sides and rear.
4.Extreme caution should be taken when leaving and operating heater unattended near children.
5.Always unplug the heater when it is not in use.
6.Do not operate your heater when its cord or plug has been damaged or after it has malfunctioned, has been dropped or damaged in any manner. If you notice any leakage of oil, switch it off immediately and contact a service center as indicated in these instructions. Return the heater to an authorized service facility for inspection, electrical or mechanical adjustment, or repair.
7.Your heater should not be operated outdoors.
8.Your heater is not intended for use in bathrooms, laundry areas and similar indoor locations. Never locate the heater where it might fall into a bathtub or other water containers.
9.Do not run the electric cord under carpeting. Do not cover cord with throw rugs, runners, or the like. Run the cord away from traffic areas and where it will not be tripped over.
10.To disconnect the heater, switch it OFF, then unplug its cord from the outlet.
11.Connect to properly polarized outlets only.
12.Do not insert or allow foreign objects to enter any ventilation or exhaust opening, as this might cause an electric shock, fire, or damage the heater.
13.To prevent fire, do not block air intakes or exhaust in any manner. Do not place the heater on soft surfaces, like a bed, where openings may be blocked.
14.Your heater’s internal parts may become hot or issue sparks during normal operation. Therefore, you should not use it in areas where gasoline, paint, or flammable liquids are used or stored.
15.Use this heater only as described in this manual. Any other use not recommended by the manufacturer might cause fire, electric shock, or personal injury.
16.To prevent overload and blown fuses, be sure that no other appliances are plugged into the same shared outlet, or a separate outlet on the same shared circuit.
17.The heater’s electric cord and plug may grow warmer during normal operation. However, exceedingly hot or deformed plug or cord are not normal, and are often the result of a defective power outlet. You should replace such outlets prior to further use of the heater. Continuous use of defective outlets might cause cord overheating and fire.
18.The use of extension cords is not recommended, as they are likely to overheat and increase the risk of fire. However, where necessary, you may use a No. 1 4 AWG or larger cord rated for 1875 watts or more; the extension cord should not be shared by any other appliance.
19.Make sure the heater is firmly plugged into the wall outlet. Please note that the quality of wall outlets may deteriorate over time: Check the electric plug periodically for signs of overheating or deformation, and in such cases, stop using that outlet and have it fixed.
20.Check that neither the heater nor the power cable has been damaged in any way during transportation.
21.Make sure that no pieces of polystyrene or other packaging material have been left between heating elements. If necessary, remove such pieces using a vacuum cleaner.
22.When switching the heater on for the first time, allow it to run at full power for about two hours to get rid of a possibly unpleasant smell. Make sure that the room where the heater is placed is well ventilated during this first operation. Soft crackling sounds are normal during the heater’s first operation.
CAUTION: To prevent electric shock match wide blade of plug to wide slot, fully insert.
SAVE THESE INSTRUCTIONS
2
HOW TO USE YOUR HEATER
ASSEBMLY - "EASY WHEEL" SYSTEM
Turn the radiator upside-down on a rug or a soft surface in order to prevent damaging the paint finish. Fully unfold the castors by turning them outwards (Fig. 1).
Turn the radiator back to its upright position.
fig. 1
1. LOCATION
Place heater on floor beneath coldest window in the room or any desired location. Your heater will minimize the effect of cold drafts.
The heater must not be placed immediately below a power-outlet.
Do not use this radiator in rooms having a surface area of less than 43 square feet (4 sq.m.).
2. POWER CONNECTION
The radiator must be connected to a properly polarized A/C 110/120 V household outlet in perfect working condition.
Keep loose clothing or bedding, furniture and flammable material away from away from the power outlet where the heater is plugged into.
Your product is equipped with a polarized alternating current line plug (a plug having one blade wider than the other). This plug will fit into the power outlet only one way. This is a safety feature. If you are unable to insert the plug fully into the outlet, try reversing the plug. If the plug should still fail to fit, contact your electrician to replace your obsolete outlet.
Do not attempt to modify the plug to bypass this safety feature.
OPERATION AND USE
1) SETTING THE CLOCK
For the first time, set the clock to the correct time, proceeding as follows:
•Press the button “hour” until the display shows the correct hour setting.
•Press the button “min” until the display shows the correct minute setting. When setting the clock time, the numbers will flash on the display.
The flashing numbers will continue for a few seconds until the adjustment has finished. Once the numbers stop flashing the clock will start working.
To change the time, press and hold the hour or min button for at least 5 seconds or until the numbers are flashing. Then proceed as above to modify both hours and minutes.
AM MAN
correct time |
|
|
|
Set temperature |
|
|
|
||
|
||||
|
|
°F |
||
|
0 |
|
|
|
3
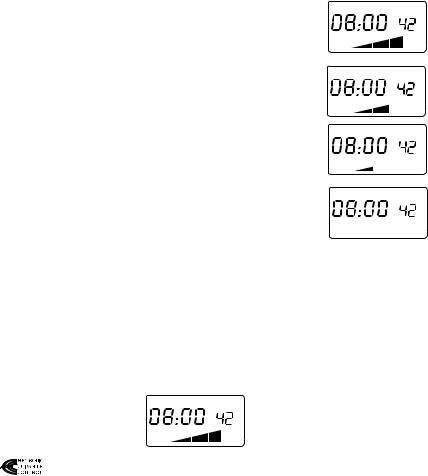
2) MANUAL OPERATION
To operate the appliance in “manual” mode, press the “ON MODE” button.
To set the required power level: press the “ON MODE" button, and then press again one or more times within 5 seconds to select the power level, as per the following sequence:
AM |
MAN |
Maximum power |
|
|
°F |
AM |
MAN |
Medium power |
|
|
°F |
AM |
MAN |
Minimum power |
|
|
°F |
AM |
MAN |
Off |
°F |
|
|
0 |
|
At any time during “Manual” operation, pressing the “ON MODE” button once will display the previously set power level for 5 seconds; after this 5 second period, the display will return to show the current operating power.
If Maximum power has been selected, adjust the “ +” or ”
 -” button to the desired comfort temperature, from 42 to 95°F (5 to 35°C). By pushing once the “
  +” or “
 -” button the desired temperature (shown on the right side of the display) will increase or decrease by1°F. Press and hold the button to move through the temperature mode quickly.
|
|
AM |
MAN |
||
correct time |
|
|
set temperature |
||
|
|
|
|
|
|
|
|
|
°F |
||
ELECTRONIC CLIMATE CONTROL
This heater has Electronic Climate Control which automatically monitors and selects the ideal power setting to maintain your chosen temperature.
If the selected temperature is higher than the actual room temperature, the appliance will start automatically and rapidly heat the room until it reaches the selected temperature. The unit will automatically maintain the temperature at a constant level, by switching between maximum, medium, minimum power and OFF.
If medium power level has been selected using the “ON MODE” button, the appliance will cycle between medium, minimum power and OFF to maintain a selected temperature.
ANTI-FREEZE SETTING
Press the “ON MODE” button and select the maximum power level. Set the temperature to 42°F with the “  -” button. When set in this way, the appliance will turn on
4
automatically only if the room temperature falls below 42°F, to prevent freezing conditions.
Note: This function is not guaranteed in the event of power failures, lasting more than 2 minutes.
TIMER OPERATION
The timer allows you to set two programs in a 24-hour period. To program the timer:
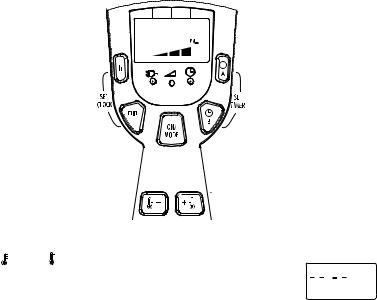
Press the Timer button A (see Figure 2), the following is displayed:
-The flashing message “--:--“;
-The message “ON” at the bottom left (ON time setting);
-The symbol “A” at the right indicating that the first program controlling is being set;
To set the “START” time press the “hour button” to set the hour and “min button” to set the minutes, then confirm the “START” time by pressing the “Timer button A” again. The words “OFF” and “00:00” appear on the display.
Set the time you want the appliance to go OFF using the “hour button” and “min button”, then confirm the OFF time by pressing the “Timer Function A” button again.
At this point, the word “AUTO” appears at the top of the display and the “TIMER ON” indicator light comes on to indicate that the appliance is ready to operate at the programmed time maintaining the preset comfort temperature (fig.2).
AUTO


 :
:


¡F
EW 7507 EK
fig. 2
-To set the program B press “Timer button B” and follow the same procedure as described for the program A.
-Use the “ +” or “ -” buttons to set the desired comfort temperature,
as described above. |
: AUTO |
- When set in this way the heater will automatically switch on at the set |
|
time for the designated time period and automatically maintain the pre-
set comfort temperature. fig. 3 To cancel a preset program, press the timer button A or B once and then press the hour button until the display shows “--:--“ (fig. 3).
TIMER OVERRIDE
To operate the appliance without using the programs (timer), press the “ON MODE” button (Fig.5). The yellow lamp will go off.
IMPORTANT:
If the heater looses its electricity supply for more than 2 minutes the appliance does not switch on. The display shows the blinking numbers.
5
 Loading...