


TYPE FGP20
instructions and recipe ideas

English |
2 - 10 |
´¸∂w |
11-91 |
1
2
 1
1
3
4
7
5
6
8
9
safety
λRead these instructions carefully and retain for future reference.
λRemove all packaging and any labels including the protective film from the cutting blades.
λIf the cord is damaged it must, for safety reasons, be replaced by KENWOOD or an authorised KENWOOD repairer.
λTake care the cone blades and end of the pusher blade are very sharp, handle with care.
λSwitch off and wait until the blades have completely stopped before removing the lid.
λSwitch off and unplug:
 before fitting or removing parts;
 when not in use;
 before cleaning.
λNever use your fingers to push food down the feed tube.
Always use the pusher supplied.
λNever use a damaged appliance. Get it checked or repaired: see ‘service and customer care’.
λNever let the power unit, cord or plug get wet.
λDo not let excess cord hang over the edge of a table or worktop or touch hot surfaces.
λNever leave the appliance on unattended.
λMisuse of your appliance can result in injury.
λNever use an unauthorised attachment.
λAppliances can be used by persons with reduced physical, sensory or mental capabilities or lack of experience and knowledge if they have been given supervision or instruction concerning use of the appliance in a safe way and if they understand the hazards involved.
λChildren should be supervised to ensure that they do not play with the appliance.
2

λThis appliance shall not be used by children. Keep the appliance and its cord out of reach of children.
λOnly use the appliance for its intended domestic use. Kenwood will not accept any liability if the appliance is subject
to improper use, or failure to comply with these instructions.
before plugging in
•Make sure your electricity supply is the same as the one shown on the underside of the appliance.
Important - UK only
•The wires in the cord are coloured as follows:
Blue = Neutral Brown = Live.
•The appliance must be protected by a 3A approved (BS1362) fuse.
Note:
•For non-rewireable plugs the fuse cover MUST be refitted when replacing the fuse. If the fuse cover is lost then the plug must not be used until a replacement can be obtained. The correct fuse cover is identified by colour and a replacement may be obtained
from your Kenwood Authorised Repairer (see Service).
•If a non-rewireable plug is cut off it must be DESTROYED IMMEDIATELY. An electric shock hazard may arise if an unwanted non-rewireable plug is inadvertently inserted into a 13A socket outlet.
•This appliance conforms to EC Regulation 1935/2004 on materials and articles intended to come into contact with food.
before using for the first time
Wash the parts: see ‘care and cleaning’.
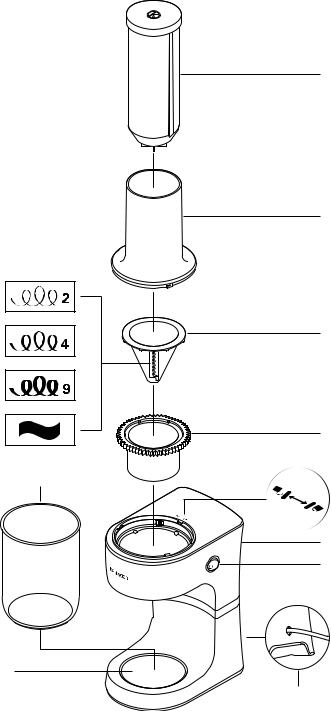
key
1 pusher with support blade
2 lid with feed tube
3 cutting cone
Actual cones in pack may vary. Optional cones available include:
Spaghetti (2 X 2mm)
Linguine (2 X 4mm)
Tagliatelle (2 X 9mm)
Flat blade (Pappardelle) - width of ribbon determined by width of food
4 cone holder
5 power unit
6 On/Off switch
7 container
8 container platform
9cord storage
•Refer to the “service and customer care” section to obtain additional cutting cones.
to assemble your spiralizer
1Insert the cone holder 4.
2Fit the desired cutting cone 3. The lid cannot be fitted if the cone holder or cone are not located correctly. Ensure that the cone sits flush with the holder.
3Fit the lid and align the  on the lid with the
  on the body. Turn clockwise
until the |
aligns with the |
1. |
4Place the container under the cutting cone.
3
5Cut the foods to fit the feed tube and attach to the blade on the end of the pusher.
6Place the pusher in the food tube ensuring the groove on the pusher aligns with the rib in the feed tube.
7Switch on and hold the pusher in position to guide the food down the feed tube.
hints & tips
•Use spiralized vegetables to replace pasta and noodles.
•Use firm fruits and vegetables without stones, seeds or hollow centres.
•Do not use soft, juicy or overripe foods as they will fall apart when spiralized.
•Many important vitamins and nutrients are found in the skin of fruit and vegetables, so only remove if inedible.
•Select vegetables that are as straight as possible.
•Cut the end of the food to create a flat surface to ensure it can be attached to the end of the pusher. Uneven ends will make it difficult to secure to the end of the pusher causing poor results.
•Ensure that the diameter of the food is more than 5 cm so that it can be attached securely to the end of the pusher.
•You will be left with a cone shaped end pieces at the end of spiralizing. These pieces can be sliced and used.
•Lightly steam, blanch, boil or stir fry the spiralized food.
Food item |
Preparation |
Comments |
|
|
|
Apples |
• Use small apples (diameter to fit |
• Spiralized apple will turn brown |
|
feed tube). |
quickly so use immediately or |
|
• Trim end so flat. |
add lemon juice. |
|
• No need to core or remove |
• Use in salads and dessert |
|
seeds as core will be retained on |
recipes. |
|
end of pusher. |
|
Beetroot |
• Remove leaves. |
• Cooked beetroot is too soft and |
|
• No need to peel fresh beetroot, |
will not spiralize well. |
|
just wash the skin before |
• Eat raw in salads. |
|
spiralizing. |
|
Broccoli Stems |
• Trim the stems. |
• When cooking broccoli save the |
|
|
stems and spiralize them. |
Carrots |
• Choose large straight carrot and |
• Lightly steam, blanched, boil or |
|
trim ends flat. |
stir fry. |
Celeriac |
• Peel and cut to fit the feed tube. |
|
|
|
|
Courgettes |
• Choose large straight courgettes |
|
|
and cut off the top and bottom |
|
|
ends. |
|
Parsnip |
• Choose large straight parsnips |
|
|
and cut off the top and bottom |
|
|
ends. |
|
4
Food item |
Preparation |
Comments |
|
|
|
|
|
Swede/Turnip |
• Peel and cut to fit the feed tube. |
• Lightly steam, blanched, boil or |
|
|
|
stir fry. |
|
Butternut Squash |
• Use the non bulbous end |
||
|
|||
|
without the hollow centre and |
|
|
|
seeds. |
|
|
|
• Peel and cut to fit the feed tube. |
|
|
Kohlrabi |
• Peel and trim to fit the feed tube. |
|
|
|
|
|
|
Daikon Radish or |
• Peel and trim to fit the feed tube. |
• Good alternative to rice. |
|
Mooli |
|
|
|
Jerusalem |
• Wash and trim to fit the feed |
• Place in water with a small |
|
Artichokes |
tube. |
amount of lemon juice straight |
|
|
|
after processing to prevent |
|
|
|
discolouration. |
|
Pears |
• Choose firm small pears. |
• Spiralized pear will turn brown |
|
|
• Cut to fit the feed tube. |
quickly so use immediately or |
|
|
|
add lemon juice. |
|
|
|
• Use in salads and dessert |
|
|
|
recipes. |
|
Sweet Potato/ |
• Wash the skins. |
• Place in water straight after |
|
Potato |
• Cut to fit the feed tube |
processing to stop the strands |
|
|
|
discolouring. |
care and cleaning
•Always switch off and unplug before cleaning.
•Handle the cone blades and pusher blade with care - they are extremely sharp. Use a brush to clean the blades.
•Some foods may discolour the plastic. This is perfectly normal and will not harm the plastic or affect the flavour of your food. Rubbing with a cloth dipped in vegetable oil may help remove the discolouration.
•Store the cones in the container after use.
power unit
•Wipe with a damp cloth, then dry.
•Do not immerse the power unit in water.
•Push excess cord into the back 9 of the power unit.
•Wash the removable parts by hand, then dry.
•Alternatively they can be washed in your dishwasher.
service and customer care
•If you experience any problems with the operation of the appliance, before calling
for assistance refer to the troubleshooting guide or visit www.kenwoodworld.com.
UK
If you need help with:
•using your appliance
•servicing or repairs
5
 Loading...