


TYPE FDM78
TYPE FDM79
instructions istruzioni instrucciones
Bedienungsanleitungen gebruiksaanwijzing
Type FDM78
Type FDM79

English |
3 |
- 14 |
Português |
15 |
- 28 |
Español |
29 |
- 41 |
Türkçe |
42 |
- 53 |
Česky |
54 |
- 66 |
Magyar |
67 |
- 79 |
Polski |
80 |
- 93 |
E%%!'#$ |
94 |
- 107 |
Slovenčina |
108 |
- 120 |
Українська |
121 |
- 134 |
´¸∂w |
1-64 |
531 |
|
6
5
4
 3
3
3

 2
2
2
|
1 |
|
bk |
1 |
|
9 |
7 |
|
|
8 |
|
TYPE FDM79
bo
bn


bm

 bl
bl 
cl
1.5 L max
bp |
A - standard attachments |
|
bq |
cm |
|
|
|
|
5 |
|
cp |
|
cn |
|
|
|
cq |
br |
|
|
|
co |
|
|
|
cr |
bs |
|
|
bt |
B - optional attachments |
|
|
|
|
ck |
cs |
|
|
dn |
|
|
|
|
4 |
ct |
|
|
|
|
|
dk |
do |
|
|
|
|
dl |
|
|
|
dp |
6 |
|
|
|
dm |
|
|
|
dq |

cm + cn |
cp |
|
dm |
|
do |
|
|
|
|
|
bt |
|
|
bk |
|
|
bs |
|
|
|
|
bp |
|
|
|
|
bo |
|
|
co + dl |
|
|
|
|
dp |
9 |
|
|
|
|
|
|
|
|
|
|
|
|
7 8 |
|
|
|
|
|
|
|
dn |
|
|
|
cq |
dk |
|
bq |
cn |
|
|
|
|
|
|
|
bl |
|
|
|
|
|
|
|
|
br |
cl |
|
|
|
|
|
|
|
|
|
|
|
cm |
|
|
|
dq |
|
|
|
bm |
|
co |
|
ck |
|
cq |
|
cp |
|
|
|
|
|
|
|
|
|
|
bn |
|
|
|
safety
●Read these instructions carefully and retain for future reference.
●Remove all packaging and any labels.
●The blades and discs are very sharp, handle with care. Always hold by the finger grip at the top, away from the cutting edge, both when handling and cleaning.
●Do not lift or carry the processor by the handle - or the handle may break resulting in injury.
●Always remove the knife blade before pouring contents from the bowl.
●Keep hands and utensils out of the processor bowl and blender goblet whilst connected to the power supply.
●Switch off and unplug:-
●before fitting or removing parts;
●when not in use;
●before cleaning.
●Never use your fingers to push food down the feed tube. Always use the pusher/s supplied.
●Never fit the blade unit to the power unit without the blender goblet or compact chopper/grinder fitted.
●Before removing the lid from the bowl or blender or compact chopper/grinder from the power unit:-
●switch off;
●wait until the attachment/blades have completely stopped;
●be careful not to unscrew the blender goblet or compact chopper/grinder from the blade assembly.
●SCALD RISK: Hot ingredients should be allowed to cool to r oom temperature before blending.
●Do not use the lid to operate the processor, always use the on/off speed control.
●This appliance will be damaged and may cause injury if the interlock mechanism is subjected to excessive force.
●Always unplug your food processor when not in use.
●Never use an unauthorised attachment.
●Never leave the appliance unattended when it is operating.
●Never use a damaged appliance. Get it checked or repaired: see ‘service & customer care’.
●Never let the power unit, cord or plug get wet.
●Don’t let excess cord hang over the edge of a table or worktop or touch hot surfaces.
●Do not exceed the maximum capacities stated in the recommended speed chart.
3
●Children should be supervised to ensure that they do not play with t he appliance.
●This appliance shall not be used by children. Keep the appliance and its cord out of reach of children.
●Appliances can be used by persons with reduced physical, sensory or mental capabilities or lack of experience and knowledge if they hav e been given supervision or instruction concerning use of the appliance in a s afe way and if they understand the hazards involved.
●Only use the appliance for its intended domestic use. Kenwood will not accept any liability if the appliance is subject to improper use, or failure to comply with these instructions.
●Misuse of your processor/blender can result in injury.
●The maximum rating is based on the attachment that draws the greatest load. Other attachments may draw less power.
Refer to the relevant section under “using the attachments” for additional safety warnings for each individual attachment.
blender safety
●SCALD RISK: Hot ingredients should be allowed to cool to r oom temperature before blending.
●Always take care when handling the blade assembly and avoid touching the cutting edge of the blades when cleaning.
●Only operate the blender with the lid in place.
●Only use the goblet with the blade assembly supplied.
●Never run the blender empty.
●To ensure the long life of your blender, do not run it for longer than 60 seconds.
●Smoothie recipes - never blend frozen ingredients that have formed a solid mass during freezing, break it up before adding to the goblet.
●Never blend more than the max level - 1.5 litres (53 fl oz).
4

 IMPORTANT: HOT BLENDING INSTRUCTIONS
To minimise the possibility of scalding when blending hot ingredients keep hands and other exposed skin away from the lid to prevent possible burns. The following precautions must be observed:
●CAUTION: Blending very hot ingredients may result in hot
liquid and steam being forced suddenly past the lid or filler cap bp.
●We recommend that hot ingredients are allowed to cool before blending.
●NEVER exceed 1200mls/5 cups capacity if processing hot liquids, such as soups (refer to the markings on the goblet).
●ALWAYS commence blending at a low speed and gradually increase the speed. NEVER blend hot liquids by using the Pulse setting.
●Liquids which tend to foam such as milk, should be limited to a maximum capacity of 1000mls/4 cups.
●Take care when handling the blender as the goblet and its contents will be very hot.
●Take particular care when removing the lid. The lid is designed to be a tight fit to prevent leakage. If necessary protect your hands with a cloth or oven gloves when handling.
●Ensure the goblet is securely attached to the base and when removing from the appliance, guide the base and ensure it is removed together with the goblet.
●Ensure that the lid and filler cap are securely in place before every blending operation.
●Always ensure that the vents in the filler cap are clear before every blending operation cl.
●When fitting the lid to the goblet always ensure that the lid and goblet rim are clean and dry to ensure a good seal and prevent spillage.
5
slicing/grating disc safety
●Never remove the lid until the cutting disc has completely stopped.
●Handle the cutting discs with care - they are extremely sharp.
●Do not overfill the bowl – do not exceed the maximum capacity level marked on the bowl.
mini bowl and knife safety
●Never remove the lid until the knife blade has completely stopped.
●The knife blade is very sharp - always handle with care. compact chopper/grinder safety
●Never fit the blade unit to your food processor without the jar fitted.
●Never unscrew the jar while the compact chopper/grinder is fitted to your appliance.
●Do not touch the sharp blades – Keep the blade unit away from children.
●Never remove the compact chopper/grinder until the blades have completely stopped.
●To ensure the long life of your compact chopper/grinder, do not run it continuously for longer than 60 seconds. Switch off as soon as you have got the right consistency.
●The appliance will not work if the compact chopper/grinder is incorrectly fitted.
●Do not process turmeric root in the compact chopper/grinder as it is too hard and may damage the blades.
juice extractor safety
●Do not use the juice extractor if the filter is damaged.
●Only use the pusher supplied. Never put your fingers in the feed tube. Unplug before unblocking the feed tube.
●Before removing the lid, switch off and wait for the filter to stop.
●Never use a damaged attachment.
6
before plugging in
●Make sure your electricity supply is the same as the one shown on the underside of your appliance.
WARNING: THIS APPLIANCE MUST BE EARTHED.
●This appliance conforms to EC directive 2004/108/EC on Electromagnetic Compatibility and EC regulation no. 1935/2004 of 27/10/2004 on materials intended for contact with food.
before using for the first time
1Remove the plastic blade covers from the knife blade. Take care the blades are very sharp. These covers should be discarded as they are to protect the blade during manufacture and transit only.
2Wash the parts see ‘care & cleaning’
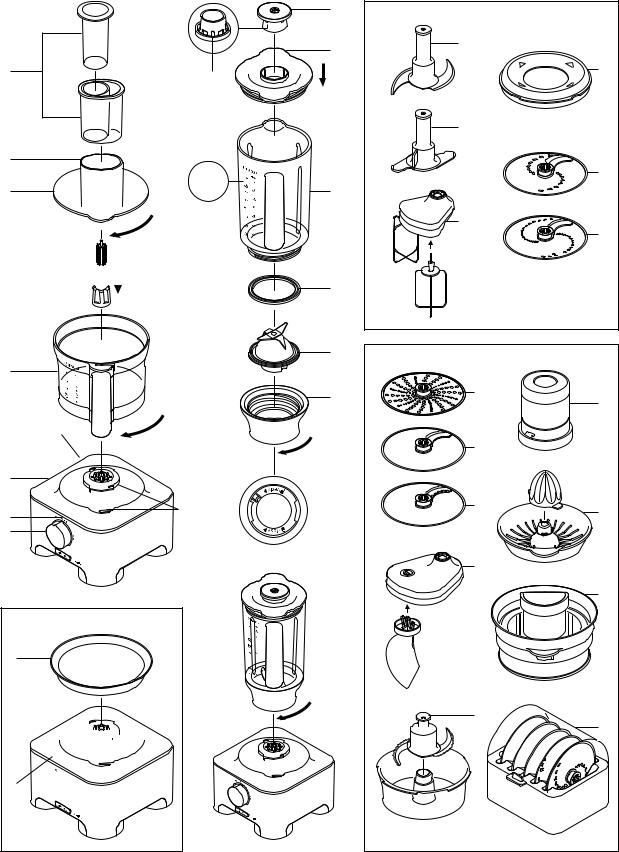
key processor
1 power unit
2 bowl with drive shaft
3 detachable drive shaft
4 lid
5 feed tube
6 pushers
7 safety interlocks
8 speed/pulse control
9 power on light
bk cord storage (at back)
weighing function (TYPE FDM79) bl kg/lb button
bm on/zero button bn display screen bo weighing tray
thermoresist blender
bp filler cap bq lid
br goblet
bs sealing ring
bt blade unit ck base
cl filler cap vents
A - standard attachments
cm knife blade cn dough tool co dual whisk
cp max capacity disc cq 4mm slicing disc cr 2mm slicing disc
B - optional attachments
Not all the attachments listed below will be included with your food processor model. Attachments are dependent upon the model variant. For more information or to order additional attachments refer to the “service and customer care” section.
cs extra fine grater disc (if supplied) ct fine Julienne disc (if supplied) dk French fry disc (if supplied)
dl folding tool (if supplied)
dm mini bowl and blade (if supplied) dn grinding mill (if supplied)
do citrus juicer (if supplied)
dp metal juicer extractor (if supplied) dq attachment storage box (if supplied)
to use your food processor
1Fit the bowl to the power unit. Place the handle towards the right hand side and turn forward 1 until it locks.
2Fit an attachment over the bowl drive shaft.
Note: Detachable drive shaft 2 should be fitted when using the discs, mini bowl, whisk, folding tool and citrus juicer.
●Always fit the bowl and attachment onto the processor before adding ingredients.
3Fit the lid ensuring the top of the drive shaft/tool locates into the centre of the lid 3.
●The processor will not operate if the bowl or lid are not fitted correctly into the interlock. Check that the feed tube and bowl handle are situated to the right hand side.
4Plug in. The Power On light will come on. Select one of the following options: -
Speed Control – manually select the required speed (refer to the recommended speed chart).
Pulse – use the pulse (P) for short bursts. The pulse will operate for as long as the control is held in position.
5At the end of processing turn the speed control to the ‘OFF’ position (Align the speed control with the power on light 9).
●Always switch off and unplug before removing the lid.
important
●Your processor is not suitable for crushing or grinding coffee beans, or converting granulated sugar to caster sugar.
7
weighing function (TYPE FDM79 only)
Your food processor is fitted with a built in weighing function to allow ingredients to be weighed straight into the bowl or blender goblet.
●The Maximum weighing capacity is 3Kg. This is the total weight of all the ingredients including the weight of the bowl or goblet.
to use the weighing function
1Always fit the bowl, detachable drive shaft and attachment or blender goblet onto the power unit before adding ingredients.
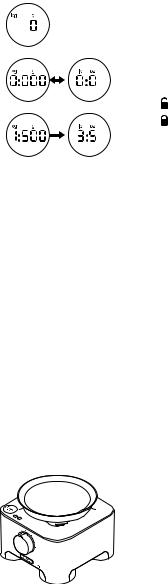
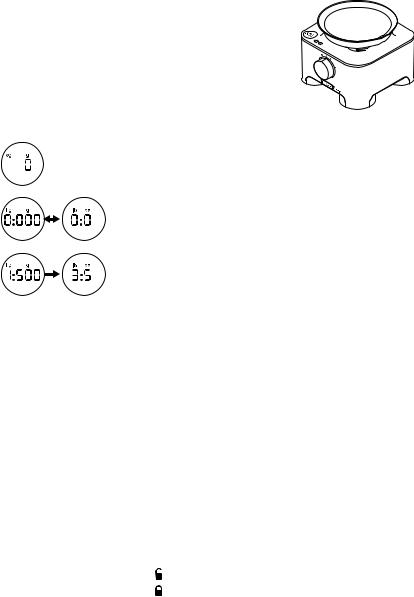
2Plug in – the display screen will
remain blank.
3 Press the ON/ZERO button once and the display screen will light up.
4 Press the (kg/lb) button to select either grams or ounces. The display will default to kg/g when first switched on.
● The unit weighs in 1g increments and teaspoon/tablespoon measures are recommended for weighing small quantities.
5Check the display shows ‘0’, if not, zero by pressing the ON/ZERO button. Then weigh the required ingredients straight into the bowl or goblet. After the weight is displayed, press the ON/ZERO button and the display will return to ‘0’. Add the next ingredients and that weight will be displayed. Repeat until all ingredients are weighed.
●If the display is not zeroed and either the ingredients or the bowl/attachment/lid are removed the display will show
[ - - - -] to represent a minus reading.
To zero press the ON/ZERO button once.
6 Add the lid and select a speed to operate the processor.
●During operation the display screen will freeze [- - - -] until the speed control returned to the ‘OFF’ position.
●After processing the last weight will be displayed on the screen when the speed control is returned to the ‘OFF’ position. Note: The weight of the lid will be included if the display is not zeroed before switching on.
●The weight of any additional ingredients added down the feed tube whilst the processor is running will not be shown on the display screen.
bo weighing tray
A removable weighing tray is supplied for weighing ingredients without the bowl or blender.
To use, place the tray on top of the power unit. Then follow steps 2 to 5 under ‘to use the weighing function’.
To remove, just lift the tray off.
auto switch off
●The display screen will turn off automatically if the same weight reading is shown after 5 minutes.
●The display screen can be turned off manually by pressing and holding down the ON/ZERO button for a few seconds.
important
●Do not overload by exceeding the maximum weighing capacity of 3Kg. The display will show [0 – Ld] if the weighing function is overloaded.
●Do not subject the power unit to excessive force as this may damage the weighing sensor.
●Always place the processor on a dry flat surface prior to weighing.
●Do not move the power unit during operation of the weighing function.
to use your thermoresist blender
1Fit the sealing ring bs into the blade unit bt - ensuring the seal is located correctly in the grooved area.
● Leaking will occur if the seal is damaged or incorrectly fitted.
2 Clip the blade unit bt into the base ck.
3 Screw the blade assembly onto the goblet - ensuring the blade assembly is fully tightened 4. Refer to the graphics on the underside of the blade unit as follows:
- unlocked position
- locked position
The blender will not work if incorrectly assembled.
4Put your ingredients into the goblet.
5Fit the lid to the goblet and push down to secure 5. Fit the filler cap.
6Place the blender onto the power unit, and turn clockwise 6 to lock.
●The appliance will not operate if the blender is incorrectly fitted to the interlock.
7Select a speed (refer to the recommended speed chart) or use the pulse control.
hints
●When making mayonnaise, put all the ingredients, except the oil, into the blender. Remove the filler cap. Then, with the appliance running, add the oil slowly through the hole in the lid.
●Thick mixtures, e.g. pâtés and dips, may need scraping down. If the mixture is difficult to process, add more liquid.
●Ice crushing - operate the pulse in short bursts until crushed to the desired consistency.
●The processing of spices is not recommended as they may damage the plastic parts.
●The appliance will not work if the blender is incorrectly fitted.
●To blend dry ingredients - cut into pieces, remove the filler cap, then with the appliance running, drop the pieces down one by one. Keep your hand over the opening. For best results empty regularly.
●Don’t use the blender as a storage container. Keep it empty before and after use.
●Never blend more than 1.5 litres (53 fl oz) - less for frothy liquids like milkshakes.
8
recommended speed chart
tool/attachment |
function |
recommended |
processing |
maximum |
|
|
speed |
time |
capacities |
Knife blade |
All in one cake mixes |
8 |
15-20 secs |
1.5Kg/3lb 5oz |
|
|
|
|
flour weight |
|
|
|
|
|
|
Pastry - rubbing fat into flour |
5 – 8 |
10 secs |
340g/12oz |
|
|
|
|
flour weight |
|
Adding water to combine pastry ingredients |
|
10-20 secs |
|
|
|
|
|
|
|
Chopping fish and lean meat |
Pulse – 8 |
10-30 secs |
600g/1lb 6oz |
|
Pâtés and terrines |
|
|
max lean beef |
|
Chopping vegetables |
Pulse |
5-10 secs |
500g/1lb 2oz |
|
Chopping nuts |
8 |
30-60 secs |
200g/8oz |
|
Pureeing soft fruit, cooked fruit and vegetables |
8 |
10-30 secs |
1Kg/2lb 4oz |
|
Sauces, dressing and dips |
8 |
2 mins max |
800g/1lb 8oz |
Knife blade with |
Cold soups |
Start at low |
30-60 secs |
1.5 litres/53 fl oz |
max capacity disc |
|
speed and |
|
|
|
Milkshakes/batters |
increase to |
15-30 secs |
1 litres/2pts |
|
|
maximum |
|
|
Dual whisk |
Egg whites |
8 |
60-90 secs |
6 (200g) |
|
Egg & sugar for fatless sponges |
8 |
4-5 min |
3 (150g) |
|
Cream |
8 |
30 secs |
500 ml/1pt |
|
Creaming fat and sugar |
8 |
2 mins max |
200g/8oz fat |
|
|
|
|
200g/8oz sugar |
Dough tool |
Yeasted mixes |
8 |
60 secs |
1Kg/ 2lb 4oz total wt |
|
White Bread Flour |
8 |
60 secs |
600g/1lb 6oz flour wt |
|
Wholemeal Bread Flour |
8 |
60 secs |
500g/1lb 2oz flour wt |
Folding tool |
Whipping cream and fruit purees |
1 – 2 |
60 secs |
300g/12oz cream, |
|
|
|
|
300g/12oz puree |
|
|
|
|
|
|
Egg whites into heavy mixtures |
1 – 2 |
60 secs |
600g/1lb 6oz total wt |
|
Macaroons |
1 – 2 |
60 secs |
500g/1lb 2oz total wt |
Discs - slicing/grating |
Firm food items such as carrots, hard cheeses |
5 – 8 |
– |
|
|
Softer items such as cucumbers, tomatoes |
1 – 5 |
– |
|
Extra fine grater |
Parmesan cheese, potatoes for German |
8 |
– |
Do not fill above |
|
potato dumplings |
|
|
|
|
|
|
|
the maximum capacity |
Fine Julienne disc |
Potato straws and rosti |
8 |
– |
|
|
Stir fries and vegetable garnishes |
|
|
marked on the bowl |
French fry disc |
Cuts potatoes for thin French Fries and |
8 |
– |
|
|
ingredients for casseroles and dips |
|
|
|
|
(eg cucumber, apple and pear.) |
|
|
|
|
|
|
|
|
Thermoresist blender |
Cold liquids and drinks |
8 |
15-30 secs |
1.5 litres/53 fl oz |
|
Stock based soups |
8 |
30 secs |
1.2 litres/42 fl oz |
|
Soups using milk |
8 |
30 secs |
1 litres/2pt |
|
We recommend that hot ingredients are allowed to cool before blending. However should you w ish to process |
|||
|
hot ingredients please read the Hot Blending Safety instructions. |
|
|
|
Mini bowl and knife |
Meat |
8 |
20 secs + Pulse |
200g/8oz Lean beef |
|
Chopping herbs |
8 |
30 secs |
15g/1⁄2oz |
|
Chopping nuts |
8 |
30 secs |
50g/2oz |
|
Mayonnaise |
8 |
30 secs |
2 Eggs |
|
|
|
|
300g/12oz Oil |
|
|
|
|
|
|
Purees |
8 |
30 secs |
200g/8oz |
Citrus Juicer |
Smaller items i.e. limes and lemons |
1 – 2 |
– |
1Kg/2lb 4oz |
|
Larger fruits i.e. oranges and grapefruits |
|
|
|
|
|
|
|
|
Metal juice extractor |
Juicing fruit and vegetables ie apples and |
8 |
– |
800g/1lb 14oz apples |
|
carrots |
|
|
600g/1lb 6oz carrots |
|
|
|
|
|
|
Juicing soft fruits ie grapes and tomatoes |
8 |
– |
500g/1lb 2oz |
Grinding mill |
Processing a range of spices |
8 |
30-60 secs |
50g/2oz |
|
Grinding coffee beans |
8 |
30 secs |
|
|
|
|
|
|
|
Chopping nuts |
Pulse |
10 secs |
50g/2oz |
|
Processing garlic cloves, fresh chillies and root |
Pulse |
10 secs |
30g/1oz |
|
ginger |
|
|
|
|
|
|
|
|
This is for guidance only and will vary depending on the exact recipe and ingredients being processed.
9
using the attachments
Refer to recommended speed chart for each attachment.
cm knife blade
The knife blade is the most versatile of all the attachments. The length of the processing time will determine the texture achieved. For coarser textures use the pulse control.
Use the knife blade for cake and pastry making, chopping raw and cooked meat, vegetables, nuts, pâté, dips, pureeing soups and to also make crumbs from biscuits and bread.
hints
●Cut food such as meat, bread, vegetables into cubes approximately 2cm/3/4in before processing.
●Biscuits should be broken into pieces and added down the feed tube whilst the appliance is running.
●When making pastry use fat straight from the fridge cut into 2cm/3/4in.cubes.
●Take care not to over-process.
cn dough tool
Use for yeasted dough mixes.
●Place the dry ingredients in the bowl and add the liquid down the feed tube whilst the appliance is running. Process until a smooth elastic ball of dough is formed this will take approx. 60 secs.
●Re-knead by hand only. Re-kneading in the bowl is not recommended as it may cause the processor to become unstable.
co dual whisk
Use for light mixtures such as egg whites, cream, evaporated milk and for whisking eggs and sugar for fatless sponges.
using the whisk
1Fit the bowl onto the power unit, add the detachable drive shaft.
2Push each beater 7 securely into the drive head.
3Fit the whisk by carefully turning until it drops over the drive shaft.
4Add the ingredients.
5Fit the lid - ensuring the end of the shaft locates into the centre of the lid.
6Switch on.
important
●The whisk is not suitable for making all in one cake mixes as these mixes are too heavy and will damage it. Always use the knife blade.
hints
●Best results are obtained when the eggs are at room temperature.
●Ensure the bowl and whisks are clean and free from grease before whisking.
creaming fat and sugar
●For best results fat should be allowed to soften at room temperature (20°C) before creaming. DO NOT use fat straight from the fridge as this will damage the whisk.
●Heavier ingredients such as flour and dried fruit should be folded in by hand.
●Do not exceed the maximum capacity or processing time stated in the recommended speed chart.
cp max capacity disc
When blending liquids in the bowl, the max capacity disc must be used with the knife blade. It prevents leaking and improves the chopping performance of the blade.
1Fit the bowl onto the power unit.
2Fit the knife blade.
3Add ingredients to be processed.
4Fit the capacity disc over the top of the blade ensuring it sits on the ledge inside the bowl bk. Do not push down on the capacity disc.
5Fit the lid and switch on.
slicing/grating discs
reversible slicing/grating discs - 4mm cq, 2mm cr
Use the grating side for cheese, carrots, potatoes and foods of a similar texture.
Use the slicing side for cheese, carrots, potatoes, cabbage, cucumber, courgette, beetroot and onions.
extra fine grater disc cs
Grates Parmesan cheese and potatoes for German potato dumplings.
fine julienne ct
Use to cut potatoes into straws and coarse grate for rosti, stir fries and vegetable garnishes.
French fry disc dk
Cuts potatoes for thin French Fries and ingredients for casseroles and dips (eg cucumber, apple and pear.)
safety
●Never remove the lid until the cutting disc has completely stopped.
●Handle the cutting discs with care - they are extremely sharp.
●Do not overfill the bowl – do not exceed the maximum capacity level marked on the bowl.
to use the cutting discs
1Fit the bowl onto the power unit, add the detachable drive shaft.
2Holding by the centre grip, place the disc onto the drive shaft with the appropriate side uppermost bl.
3Fit the lid.
4Put the food in the feed tube.
Choose which size feed tube you want to use. The pusher contains a smaller feed tube for processing individual items or thin ingredients.
To use the small feed tube - first put the large pusher inside the feed tube.
To use the large feed tube - use both pushers together.
10

5Switch on and push down evenly with the pusher - never put your fingers in the feed tube.
hints
●Use fresh ingredients
●Don’t cut food too small. Fill the width of the feed tube fairly full. This prevents the food from slipping sideways during processing. Alternatively use the small feed tube.
●When using the Julienne or French fry disc, place ingredients horizontally.
●When slicing or grating: food placed upright bm comes out shorter than food placed horizontally bn.
●There will always be a small amount of waste on the disc or in the bowl after processing.
dl folding tool
Use the folding tool to fold light ingredients into heavier mixtures for example meringues, mousses and fruit fools.
1Fit the bowl onto the power unit, add the detachable drive shaft.
2Push the paddle 8 securely into the drive head.
3Fit the folding tool by carefully turning until it drops over the drive shaft.
4Add the ingredients.
5Fit the lid – ensuring the end of the shaft locates into the centre of the lid .
6Select low speed (speed 1 -2).
to remove the beater
Detach the beater from the drive head by pressing the release button 9.
hints
●Do not use high speed as a low speed is required to optimise the folding performance.
●For best results do not over whisk egg whites or cream – the folding tool will not be able to fold the mixture correctly if the whisked mix is too firm.
●Do not fold the mixture for longer than stated in the recommended speed chart as the air will be knocked out and the mix will be too loose.
●Any unmixed ingredients left on the paddle or sides of the bowl should be carefully folded in using the spatula.
dm mini bowl and knife
Use the mini processor bowl to chop herbs and process small quantities of ingredients e.g. meat, onion, nuts, mayonnaise, vegetables, purées, sauces and baby food.
mini blade mini bowl
to use the mini bowl and knife
1Fit the bowl onto the power unit, add the detachable drive shaft.
2Fit the mini bowl over the detachable drive shaft - ensure the cut out sections align with the locating tabs bo on the main bowl.
Note: The main bowl lid cannot be fitted if the mini bowl is not located correctly.
3Place the knife blade over the drive shaft bp.
4Add the ingredients to be processed.
5Fit the lid and switch on.
safety
●Never remove the lid until the knife blade has completely stopped.
●The knife blade is very sharp - always handle with care. important
●Do not process spices – they may damage the plastic.
●Do not process hard food such as coffee beans, ice cubes or chocolate – they may damage the blade.
hints
●Herbs are best chopped when clean and dry.
●Always add a little liquid when blending cooked ingredients to make baby food.
●Cut foods such as meat, bread, vegetables into cubes approximately 1-2 cm (1⁄2 – 3⁄4 in) before processing.
●When making mayonnaise add the oil down the feed tube.
dn grinding mill (If supplied)
Use the grinding mill for processing dry ingredients such as nuts or coffee beans and for grinding spices such as:- Black peppercorns, cardamom seeds, cumin seeds, coriander seeds, fennel seeds, fresh ginger root, garlic cloves and fresh chillies.
mill jar
grinding mill blade assembly
to use your grinding mill
1Place your ingredients into the blade assembly  .
.
2Fit the jar  and turn clockwise to lock bq.
3Place the mill onto the power unit and turn clockwise to lock br.
4Select a speed or use the pulse (P).
safety
●Never fit the blade unit to your food processor without the jar fitted.
●Never unscrew the jar while the mill is fitted to your appliance.
●Do not touch the sharp blades – Keep the blade unit away from children.
●Never remove the mill until the blades have completely stopped.
●To ensure the long life of your mill, do not run it continuously for longer than 60 seconds. Switch off as soon as you have got the right consistency.
●The appliance will not work if the mill is incorrectly fitted.
●Do not process turmeric root in the mill as it is too hard and may damage the blades.
hints
●For optimum performance when processing spices we recommend that you do not process more than 50g at a time in the mill.
●Whole spices retain their flavour for a much longer time than ground spices so it is best to grind a small quantity fresh at a time to retain the flavour.
●To release the maximum flavour and essential oils whole spices are best roasted prior to milling.
●Cut ginger up into small pieces before processing.
●For best results the mini bowl attachment is recommended when chopping herbs.
11

do citrus juicer
Use the citrus juicer to squeeze the juice from citrus fruits (eg oranges, lemons, limes and grapefruits).
cone sieve
to use the citrus juicer
1Fit the bowl onto the power unit, add the detachable drive shaft.
2Fit the sieve into the bowl - ensuring the sieve handle is locked into position directly over the bowl handle bs.
3Place the cone over the drive shaft turning until it drops all the way down bt.
4Cut the fruit in half. Then switch on and press the fruit onto the cone.
●The citrus juicer will not operate if the sieve is not locked correctly.
●For best results store and juice the fruit at room temperature and hand roll on a worktop before juicing.
●To help with juice extraction move the fruit from side to side when juicing.
●When juicing large quantities, empty the strainer regularly to prevent the build up of pulp and seeds.
dp metal juice extractor
Use the centrifugal juicer for making juice from firm fruit and vegetables.
safety
●Do not use the juice extractor if the filter is damaged.
●Only use the pusher supplied. Never put your fingers in the feed tube. Unplug before unblocking the feed tube.
●Before removing the lid, switch off and wait for the filter to stop.
●Never use a damaged attachment.
pusher lid
pulp remover filter drum
to use the juice extractor
1Fit the bowl to the power unit ck.
2Place the pulp remover into the filter drum - ensuring the tabs locate with the slots in the bottom of the drum cl.
3Fit the filter drum cm.
4Place the attachment lid onto the bowl, turn until it locks and the feed tube sits over the handle cn. Your juice extractor will not operate if the bowl or lid are
not fitted correctly into the interlock.
5Cut the food to fit the feed tube.
6Switch on and push down evenly with the pusher - never put your fingers in the feed tube. Process fully before adding more.
●After adding the last piece, let the juice extractor run for a further 30 seconds to extract all the juice from the filter drum.
important
●If the juice extractor starts to vibrate, switch off and empty the pulp from the drum. (The juice extractor vibrates if the pulp becomes unevenly distributed).
●Maximum capacity that can be processed at one time is 800g of fruit or vegetables (refer to speed chart).
●Some very hard foods may make your juice extractor slow down or stop. If this happens switch off and unblock the filter.
●Switch off and clear the pulp collector regularly during use. hints
●Before processing remove stones and pips (eg pepper, melon, plum) and tough skins (eg melon, pineapple). You don’t need to peel or core apples and pears.
●Use firm, fresh fruit and vegetables.
●To maximise juice extraction place small quantities at a time in the feed tube and push down slowly.
●Citrus fruit - peel and remove the white pith, otherwise the juice may taste bitter. For best results use the citrus juicer.
dq attachment storage box
Your food processor is supplied with a storage box for your discs.
1Fit the discs into the storage box when not in use co.
2The storage box is fitted with a safety lock - close the lid to lock. To open lift up the lid cp.
care & cleaning
●Always switch off and unplug before cleaning.
●Handle the blades and cutting discs with care - they are extremely sharp.
●Some foods may discolour the plastic. This is perfectly normal and won’t harm the plastic or affect the flavour of your food. Rub with a cloth dipped in vegetable oil to remove the discolouration.
power unit
●Wipe with a damp cloth, then dry. Ensure that the interlock area is clear of food debris.
●Don’t immerse the power unit in water.
●Store excess cord in the storage area at the back of the power unit cq.
blender
1Empty the goblet, unscrew the blade unit by turning to the
unlock position  to release. Then remove the blade unit by pushing up from underneath.
● Care should be taken when removing the blade unit from the base.
2Wash the goblet by hand.
3Remove and wash the seal.
4Don’t touch the sharp blades – brush them clean using hot soapy water, then rinse thoroughly under the tap. Don’t immerse the blade unit in water.
5Leave to dry upside down.
dual whisk
●Detach the beaters from the drive head by gently pulling them free. Wash in warm soapy water.
●Wipe the drive head with a damp cloth, then dry. Do not immerse the drive head in water.
12

grinding mill
●Remove the blade assembly from the jar by turning in an anti-clockwise direction.
●Wash the jar by hand.
●Don’t touch the sharp blades – brush them clean using hot soapy water, then rinse thoroughly under the tap. Don’t immerse the blade unit in water.
●Leave to dry upside down. folding tool
●Detach the beater from the drive head by pressing the release button 9. Wash in warm soapy water.
●Wipe the drive head with a damp cloth, then dry. Do not immerse the drive head in water.
filter drum
●The cutting blades on the base of the filter drum are very sharp, take care when handling and cleaning the drum.
all other parts
●Wash by hand, then dry.
●Alternatively they are dishwasher safe and can be washed on the top rack of your dishwasher. Avoid placing items on the bottom rack directly over the heating element. A short low temperature (Maximum 50°C) programme is recommended.
item |
suitable for |
|
dishwashing |
|
|
main bowl, mini bowl, lid, pusher |
|
|
|
knife blades, dough tool |
|
|
|
detachable drive shaft |
|
|
|
discs |
|
|
|
max capacity disc |
|
|
|
whisk beaters/folding tool paddle |
|
Do not immerse the drive head in water |
|
|
|
blender goblet, lid, filler cap |
|
|
|
blade unit and seal for blender |
|
|
|
metal juice extractor |
|
|
|
grinding mill blade assembly |
|
|
|
grinding mill jar |
|
|
|
spatula |
|
|
|
service & customer care
●If the cord is damaged it must, for safety reasons, be replaced by KENWOOD or an authorised KENWOOD repairer.
●If you experience any problems with the operation of the processor, before calling for assistance refer to the troubleshooting guide.
If you need help with:
●using your appliance or
●servicing or repairs
●Contact the shop where you purchased your appliance.
●Designed and engineered by Kenwood in the UK.
●Made in China.
IMPORTANT INFORMATION FOR CORRECT DISPOSAL OF THE PRODUCT IN ACCORDANCE WITH EC DIRECTIVE 2002/96/EC.
At the end of its working life, the product must not be disposed of as urban waste.
It must be taken to a special local authority differentiated waste collection centre or to a dealer providing this service.
Disposing of a household appliance separately avoids possible negative consequences for the environment and health deriving from inappropriate disposal and enables the constituent materials to be recovered to obtain significant savings in energy and resources. As a reminder of the need to dispose of household appliances separately, the product is marked with a crossed-out wheeled dustbin.
13

troubleshooting guide
Problem |
Cause |
Solution |
The processor will not operate. |
No Power. |
Check processor is plugged in. |
|
No power/indicator light not lit. |
|
|
Bowl not fitted to power unit correctly. |
Check bowl is located correctly |
|
|
and the handle is situated |
|
|
towards the right hand side. |
|
Bowl lid not locked on correctly. |
Check that the lid interlock is |
|
|
located correctly into the |
|
|
handle area. |
|
|
The processor will not |
|
|
work if the bowl and lid |
|
|
are fitted incorrectly. |
|
|
|
Compact chopper/grinder will not operate. |
Compact chopper/grinder not locked on correctly. |
The compact chopper/grinder will |
|
|
not operate if fitted incorrectly to |
|
|
the interlock. |
|
Compact chopper/grinder not assembled correctly. |
Check blade unit is fully tightened |
|
|
onto the compact chopper/grinder |
|
|
jar. |
|
|
|
Blender will not operate. |
Blender not locked on correctly. |
The blender will not operate if |
|
|
fitted incorrectly to the |
|
|
interlock. |
|
Blender not assembled correctly. |
Check blade unit is fully |
|
|
tightened into the goblet. |
|
|
|
Processor stops or slows |
Overload protection operated. |
Switch off, unplug and allow |
during processing. |
Processor overloaded or overheated during |
the appliance to cool down for |
|
operation. |
approximately 15 minutes. |
|
Maximum capacity exceeded. |
Refer to the speed chart for |
|
|
maximum capacities to |
|
|
process. |
|
|
|
Weighing function |
|
|
Display screen freezes on [- - - -]. |
Quantity weighed too small. |
Use teaspoon and tablespoon |
|
|
measures for very small |
|
|
quantities. |
Weight changed on display screen. |
Power unit moved during operation. |
Do not move unit during use. |
|
|
Zero the display before |
|
|
weighing next ingredients. |
|
|
|
Blender leaking from blade assembly base. |
Seal missing. |
Check seal is fitted correctly |
|
Seal incorrectly fitted. |
and not damaged. To obtain a |
|
Seal damaged. |
replacement seal see “service & |
|
|
customer care”. |
|
|
|
Blender seal missing from blade unit when |
The seal is packed pre-fitted to the blade unit. |
Unscrew goblet and check that |
removed from packaging. |
|
seal is fitted to blade unit. |
|
|
To obtain a replacement seal |
|
|
see “service & customer care”. |
|
|
|
Poor performance of tools/attachments. |
Refer to hints in relevant “using the attachment” section. Check att achments are |
|
|
assembled correctly. |
|
|
|
|
14
Português
Por favor desdobre as ilustrações da primeira página.
segurança
●Leia atentamente estas instruções e guarde-as para consulta futura.
●Retire todas as embalagens e eventuais etiquetas.
●As lâminas e os discos estão muito afiados, manipule com cuidado.
Segure sempre aperto de dedo na parte de cima, afastandose das partes cortantes, quer quando manusear quer quando limpar.
●Não levante ou transporte o processador pela pega – esta pode quebrar e provocar ferimentos.
●Retire sempre a lâmina antes de retirar os alimentos da taça.
●Mantenha as mãos e utensílios longe da taça e do copo mistur ador do processador enquanto estiver ligado à corrente eléctrica.
●Desligue no interruptor e da tomada:-
●Antes de colocar ou retirar peças;
●Quando não estiver a ser utilizado;
●Antes de limpar.
●Não utilize os dedos para empurrar os alimentos no tubo de alimentação. Utilize sempre o(s) calcador(es) fornecido(s).
●Nunca coloque a unidade de lâminas na unidade motriz sem o copo misturador colocado ou o picador/moinho compacto.
●Antes de remover a tampa da taça ou do misturador ou do picador/moinho compacto da unidade motriz:-
●desligue o aparelho;
●aguarde até o acessório/as lâminas pararem totalmente;
●tenha cuidado para não desapertar o copo misturador ou o picador/moinho compacto da unidade de lâmina.
●RISCO DE QUEIMADURAS: Deve deixar os ingredientes quentes arrefecerem até à temperatura ambiente antes de os misturar.
●Não utilize a tampa para accionar o robô de cozinha, utilize sempre o botão de velocidade on/off.
●Este aparelho ficará danificado e poderá provocar ferimentos se o mecanismo de engate for submetido a uma força excessiva.
●Desligue sempre o seu robot de cozinha da corrente eléctrica quando não estiver em utilização.
●Não utilize acessórios não autorizados.
●Nunca deixe o aparelho sem vigilância quando estiver em funcionamento.
●Nunca utilize um acessório danificado. Mande-a examinar ou reparar: ver “serviço e cuidados do cliente”.
●Não deixe que a unidade motriz, o cabo ou a ficha fiquem molhados.
15
●Não deixe que o cabo fique pendurado ao longo da extremidade de uma mesa ou bancada ou entre em contacto com superfícies quentes.
●Não exceda as capacidades máximas mencionadas no quadro de velocidades recomendadas.
●As crianças devem ser vigiadas para garantir que não brincam com o electrodoméstico.
●Este electrodoméstico não pode ser usado por crianças. Mantenha o electrodoméstico e o respectivo fio eléctrico fora do alcance de crianças.
●Os electrodomésticos podem ser utilizados por pessoas com capacidades mentais, sensoriais ou físicas reduzidas, ou com falta de experiência ou conhecimento, se forem supervisionadas ou instruídas sobre o uso do electrodoméstico de forma segura e se compreenderem os riscos envolvidos.
●Use o aparelho apenas para o fim doméstico a que se destina. A Kenwood não se responsabiliza caso o aparelho seja utilizado de forma inadequada, ou caso estas instruções não sejam respeitadas.
●O uso inapropriado do seu processador/misturadora pode resultar em ferimentos.
●A capacidade máxima está baseada no acessório que leva a maior quantidade. Outros acessórios podem levar menos quantidade. Consulte a respectiva secção “utilização dos acessórios” para mais informação sobre segurança para cada acessório.
segurança da misturadora
●RISCO DE QUEIMADURAS: Deve deixar os ingredientes quentes arrefecerem até à temperatura ambiente antes de os misturar.
●Tenha sempre cuidado quando manusear o conjunto da lâmina e evite tocar nas extremidades cortantes das lâminas quando as estiver a limpar.
●Não utilize o copo misturador sem a tampa colocada.
●Use apenas o copo com a unidade de lâmina fornecida.
●Nunca ponha em funcionamento se o misturador estiver vazio.
●Para assegurar uma longa vida da sua misturadora, não o faça funcionar mais de 60 segundos.
●Receitas de batidos – nunca misture ingredientes congelados que tenham solidificado durante a congelação; esmague-os antes de os adicionar no copo.
●Nunca misture mais do que o nível máximo – 1,5 litros.
16

IMPORTANTE: INSTRUÇÕES PARA MISTURAS QUENTES
Para minimizar a possibilidade de se queimar quando mistura ingredientes quentes, mantenha longe da tampa as mãos e outras da pele expostas para evitar possíveis queimaduras.
Deve seguir as seguintes precauções:
●ATENÇÃO: Misturar ingredientes muito quentes pode fazer com que o líquido quente e o vapor sejam lançados
subitamente para fora da tampa ou da tampa de enchimento bp.
●Recomendamos que deixe arrefecer os ingredientes quentes antes de misturar.
●NUNCA exceda 1.200mls / 5 chávenas de capacidade se processar líquidos quentes, tais como sopas (consulte as marcações existentes no copo).
●Comece SEMPRE a misturar numa velocidade baixa e vá aumentando gradualmente. NUNCA misture líquidos quentes usando a regulação Impulso.
●Os líquidos que têm tendência a formar espuma como o leite, não devem exceder 1.000mls / 4 chávenas de capacidade.
●Tenha cuidado quando manusear a misturadora uma vez que o copo misturador e respectivas peças estarão muito quentes.
●Tenha especial cuidado quando retirar a tampa. A tampa foi concebida para ter um ajuste apertado para prevenir o vazamento. Se necessário, quando manusear proteja as mãos com um pano ou luvas de forno.
●Assegure-se que o copo misturador está firmemente preso à base e quando o retirar do aparelho, guie a base e assegure-se que remove o copo e a base em conjunto.
●Assegure-se sempre que a tampa e a tampa de enchimento estão bem presas no lugar antes de todas as operações de mistura.
●Assegure-se sempre que os respiradores existentes na tampa de enchimento estão bem limpas antes de todas as operações de mistura cl.
●Quando colocar a tampa no copo misturador assegure-se sempre que a tampa e o rebordo do copo estão limpos e secos para que fique bem fechado e evitar o vazamento.
17
segurança dos discos de fatiar/ralar
●Nunca retire a tampa enquanto o disco de corte não estiver completamente parado.
●Manipule com muito cuidado o disco de corte porque está extremamente afiado.
●Não encha demasiado a taça – não exceda o nível máximo marcado na taça.
segurança da taça mini e lâminas
●Nunca retire a tampa enquanto a unidade de lâminas não estiver completamente parada.
●A unidade de lâminas está muito afiada, manipule SEMPRE com cuidado. segurança do picador/moinho compacto
●Nunca instale a unidade das lâminas na sua máquina sem o copo instalado.
●Nunca desenrosque o jarro enquanto o picador/moinho compacto estiver colocado no seu aparelho.
●Não toque nas lâminas afiadas. Mantenha a unidade das lâminas afastada das crianças.
●Nunca retire o picador/moinho compacto enquanto as lâminas não estiverem completamente paradas.
●Para assegurar uma longa vida ao seu picador/moinho compacto, não o faça funcionar mais de 60 segundos. Desligue-o assim que obter a consistência desejada.
●O aparelho não funcionará se o picador/moinho não estiver correctamente colocado.
●Não processe açafrão da Índia fresco no picador/moinho compacto, uma vez que é muito duro e pode danificar as lâminas.
segurança do extractor de sumo
●Não utilize o extractor de sumo se o filtro estiver danificado.
●Utilize apenas o empurrador fornecido. Nunca introduza os dedos no tubo de alimentação. Desligue sempre da corrente eléctrica antes de retirar o tubo de alimentação.
●Antes de remover a tampa, desligue e espere até que o filtro pare.
●Nunca utilize um acessório danificado.
18
antes de ligar à corrente
●Certifique-se que a fonte de alimentação eléctrica é a mesma que a indicada na parte inferior do equipamento.
AVISO: ESTE APARELHO DEVE SER LIGADO A UMA TOMADA COM LIGAÇÃO À TERRA.
●Este aparelho está em conformidade com a directiva 2004/108/EC da CEE sobre Compatibilidade Electromagnética e o regulamento da CEE nº. 1935/2004 de 27/10/2004 sobre materiais concebidos para estarem em contacto com alimentos.
antes de utilizar o aparelho pela primeira vez
1Remova as tampas plásticas da lâmina de corte. Tenha cuidado porque as lâminas estão muito afiadas.
Estas tampas de protecção devem ser deitadas fora uma vez que servem apenas para protecção durante a fabricação e transporte.
2Para limpar os componentes ver “cuidados e limpeza”
chave
robô de cozinha
1 unidade motriz
2 taça com eixo accionador
3 veio accionador destacável
4 tampa
5 tubo de alimentação
6 calcadores
7 mecanismo de engate de segurança
8 comandos de velocidade/impulsos
9 luz de aviso de ligação
bk arrumação do cabo (nas costas do aparelho) função de pesagem (TIPO FDM79)
bl botão kg
bm botão on/zero
bn ecrã de visualização bo prato de pesagem
misturadora resistente a altas temperaturas
bp tampa de enchimento
bq tampa br copo
bs anel vedante
bt lâminas ck base
cl respiradores da tampa de enchimento
A – acessórios padrão
cm unidade de lâminas cn utensílio para massas
co batedor de varetas duplo
cp disco para grandes quantidades cq disco de fatiar/ralar de 4 mm cr disco de fatiar/ralar de 2mm
B - acessórios opcionais
Nem todos os acessórios da lista abaixo estarão incluídos no seu robot de cozinha. Os acessórios dependem do modelo. Para obter mais informações ou encomendar acessórios opcionais consulte a secção “serviços e cuidados ao cliente”.
cs disco de ralar extra fino (se fornecido)
ct disco de cortar em juliana fino (se fornecido)
dk disco para cortar batatas em palitos (se fornecido) dl acessório para envolver
dm taça mini e lâmina (se fornecido) dn moinho moedor (se fornecido)
do espremedor de citrinos (se fornecido)
dp extractor de sumo em metal (se fornecido) dq acessório de armazenamento
utilizar o robô de cozinha
1Introduza a taça na unidade motriz. Com a pega
posicionada do seu lado direito assente a taça e rode-a na direcção dos ponteiros do relógio 1 até prender.
2Encaixe um acessório por cima do eixo accionador da taça.
Nota: O eixo accionador amovível 2 deve ser colocado quando utilizar os discos, a taça mini, o batedor de varetas, o acessório para envolver e o espremedor de citrinos.
●Coloque sempre a taça e acessório no processador antes de colocar os ingredientes.
3Coloque a tampa assegurando-se que o cimo do eixo
accionador/ferramenta está localizado no centro da tampa
3.
●O robot não funcionará se a taça ou a tampa não estiverem colocadas correctamente no mecanismo de engate. Confirme que o tubo de alimentação e a pega da taça estão situados no lado direito.
4Ligue à corrente eléctrica e a Luz Indicadora de Ligação acende-se. Seleccione uma das seguintes opções: - Controlo de Velocidade – seleccione manualmente a velocidade requerida (Consulte o quadro de velocidades recomendadas).
Botão de Impulso – utilize este botão (P) para pequenos accionamentos. O motor trabalhará enquanto o botão de impulso estiver nessa posição.
5No fim do processamento, rode o botão de controlo de
velocidade para a posição “OFF” (Alinhe o botão de controlo de velocidade com a luz indicadora de ligação 9).
●Desligue sempre e retire o cabo eléctrico da tomada antes de retirar a tampa.
importante
●O robô não foi concebido para esmagar ou moer grãos de café nem transformar açúcar granulado em açúcar mais fino.
19
função de pesagem (apenas TIPO FDM79)
O seu robot de cozinha tem incorporado uma função de balança que permite pesar os alimentos directamente na taça ou no copo misturador.
●A capacidade máxima de pesagem é de 3Kg. Este é o total do peso de todos os ingredientes mais o peso da taça ou do copo.
para utilizar a função de pesagem
1Coloque sempre o eixo de accionamento, a taça e acessório ou copo misturador na unidade motriz antes de
colocar os ingredientes.
2 Ligue à corrente – o ecrã de visualização irá permanecer em branco.
3 Pressione o botão ON/ZERO uma vez para acender o ecrã de visualização.
4Pressione o botão (kg/lb) para seleccionar entre gramas ou onças. Ao ligar o visualizador
encontra-se definido para kg/g.
●A unidade pesa em incrementos de 1g e recomenda-se a
utilização de colheres de chá/colheres de sopa para medição de pequenas quantidades.
5Confirme que o visor marca “0”. Se não for o caso, pressione o botão ON/ZERO. Pese depois os ingredientes necessários, directamente na taça ou copo. Depois do peso estar afixado, pressione o botão ON/ZERO e o visor voltará ao “0”. Adicionado mais ingredientes e o peso será mostrado. Repita esta operação até todos os ingredientes estarem pesados.
●Caso o visualizador não se encontre a zeros e quer os ingredientes ou quer a taça/acessório/tampa sejam removidos, o visualizador irá apresentar [ - - - -] indicando uma leitura negativa.
Para colocar a zeros, pressione uma vez o botão
ON/ZERO.
6Coloque a tampa e seleccione uma velocidade para colocar o processador em funcionamento.
●Durante a operação o ecrã de visualização pára [- - - -] até o botão de controlo de velocidade voltar à posição “OFF”.
●Depois de processar, o último peso será mostrado no ecrã quando o botão do controlo de velocidade volta à posição “OFF”. Nota: O peso da tampa será incluído se o ecrã não for zerado antes de o ligar.
●O peso de quaisquer ingredientes adicionais acrescentados ao tubo de alimentação quando o processador se encontra em funcionamento não será indicado no ecrã de visualização.
bo tabuleiro de pesagem
É também fornecido um tabuleiro de pesagem amovível para pesar ingredientes sem a taça ou o copo.
Para o utilizar, coloque o tabuleiro no cimo da unidade motriz.
Siga depois os passos 2 a 5 “para usar a função de pesagem”.
Para o retirar, basta levantá-lo.
Desligar automático
●O ecrã de visualização irá desligar automaticamente caso a mesma leitura de pesagem seja apresentada após 5 minutos.
●O visor pode ser desligado manualmente pressionando e mantendo pressionado o botão ON/ZERO (LIGADO/ZERO) durante alguns segundos.
Importante
●Não coloque peso a mais excedendo a capacidade máxima de pesagem de 3Kg. O visor mostrará “O” [0 – Ld] se a função de pesagem for sobrecarregada.
●Não sujeite a unidade de alimentação a força excessiva pois tal poderá danificar o sensor de pesagem.
●Coloque sempre o processador numa superfície plana seca antes de iniciar a pesagem.
●Não mexa a unidade durante a operação da função de pesagem.
para usar a sua misturadora resistente a altas temperaturas
1Coloque o anel vedante bs na unidade de lâminas bt - assegurando-se que o anel vedante está correctamente colocado.
● Irá ocorrer vazamento caso o selo se encontre danificado ou esteja mal ajustado.
2 Prenda a unidade de lâmina bt na base ck.
3 Aparafuse o dispositivo da lâmina no copo misturador – assegurando-se de que está totalmente preso 4. Consulte as imagens que se encontram por baixo da unidade de lâminas, da seguinte forma:
- posição aberta
- posição fechada
A misturadora não funcionará se não estiver correctamente montada.
4 Introduza os ingredientes no copo.
5 Coloque a tampa no copo e puxe para baixo para prender 5. Coloque a tampa de enchimento.
6 Coloque a misturadora na unidade motriz e gire na direcção dos ponteiros do relógio 6 para prender.
●O aparelho não funcionará se a misturadora não estiver correctamente colocado e preso no
mecanismo de engate.
7Seleccione uma velocidade (consulte o quadro de velocidades recomendadas) ou utilize o botão de controlo.
20
sugestões
●Quando confeccionar maionese, coloque todos os ingredientes, excepto o azeite no misturador. Remova a tampa de enchimento. Em seguida, com o aparelho em funcionamento, deite muito devagar o azeite através da tampa.
●As misturas grossas como sejam os pâtés e molhos podem necessitar de ser raspados. Caso seja difícil de processar a mistura, adicione mais liquido.
●Triturador de gelo – opere o botão em pequenos arranques até que a trituração tenha a consistência desejada.
●Não se recomenda o processamento de especiarias pois estas podem danificar as partes plásticas.
●O aparelho não funcionará se a misturadora não estiver correctamente colocado.
●Para misturar ingredientes secos – corte-os em pedaços, remova a tampa de enchimento, e com o aparelho em funcionamento junte os pedaços um a um. Mantenha as mãos longe da abertura. Para obter melhores resultados esvazie com regularidade.
●Não utilize a misturadora como recipiente de armazenamento. Mantenha-a vazia ante e depois de a utilizar.
●Não misture mais de 1,5 litros - quantidade inferior para líquidos cremosos como batidos.
21

quadro de velocidades recomendadas
utensílio/acessório |
função |
velocidade |
tempo de |
capacidades |
|
|
|
recomendada |
proces- |
máximas |
|
|
|
|
samento |
|
|
Unidade de lâminas |
Preparados completos para bolos |
8 |
15 a 20 seg. |
1,5Kg peso da farinha |
|
|
Massa – misturar a gordura com a farinha |
5 – 8 |
10 seg. |
340g peso da farinha |
|
|
Adicionar água aos ingredientes da massa |
|
10 a 20 seg. |
|
|
|
Cortar peixe e carne magra |
Pulse – 8 |
10 a 30 seg. |
600g |
|
|
Patês e terrinas |
|
|
máx. de carne de |
|
|
|
|
|
vaca magra |
|
|
Cortar vegetais |
Pulse |
5 a 10 seg. |
500g |
|
|
Picar nozes |
8 |
30 a 60 seg. |
200g |
|
|
Fazer puré com frutos macios, frutos e vegetais |
8 |
10 a 30 seg. |
1Kg |
|
|
cozinhados. |
|
|
|
|
|
|
|
|
|
|
|
Molhos e pastas |
8 |
2 min. Máx. |
800g |
|
Unidade de lâmina com |
Sopas frias |
Comece a uma |
30 a 60 seg. |
1,5 litros |
|
disco para grandes |
|
velocidade baixa e |
|
|
|
quantidades |
|
|
|
|
|
Milk-shakes/batidos |
vá aumentando até |
15 a 30 seg. |
1 litros |
||
|
|
ao máximo. |
|
|
|
Batedor de varetas |
Claras de ovo |
8 |
60 a 90 seg. |
6 (200g) |
|
duplo |
Ovo e açúcar para pão-de-ló magro |
8 |
4 a 5 min. |
3 (150g) |
|
|
Natas |
8 |
30 seg. |
500 ml |
|
|
Bater gordura com açúcar |
8 |
2 min. Máx. |
200g gordura |
|
|
|
|
|
200g açúcar |
|
Utensílio para massa |
Misturas levedadas |
8 |
60 seg. |
1Kg peso total |
|
|
Farinha Branca para Pão |
8 |
60 seg. |
600g peso da farinha |
|
|
Farinha Integral |
8 |
60 seg. |
500g peso da farinha |
|
Acessório para envolver |
Creme de chantili e puré de frutos |
1 – 2 |
60 seg. |
300g natas, |
|
|
|
|
|
300g puré |
|
|
|
|
|
|
|
|
Envolver claras em castelo em misturas pesadas |
1 – 2 |
60 seg. |
600g peso total |
|
|
Biscoitos secos à base de amêndoa |
1 – 2 |
60 seg. |
500g peso total |
|
Discos - fatiar/ralar |
Alimentos consistentes como cenouras, queijo duro |
5 – 8 |
– |
|
|
|
Alimentos moles como pepinos, tomates |
1 – 5 |
– |
|
|
Ralador extra fino |
Queijo parmesão, Batatas para bolinhos |
8 |
– |
Nunca ultrapasse a |
|
|
de massa alemães |
|
|
||
|
|
|
capacidade |
||
|
|
|
|
||
Disco de cortar em |
Batatas em palha e rösti |
8 |
– |
||
máxima marcada |
|||||
juliana fino |
Frituras tipo chinês e vegetais recheados |
|
|
||
|
|
na taça. |
|||
Disco para cortar |
Corta batatas para batatas fritas e ingredientes |
8 |
– |
||
|
|||||
batatas em palitos |
para ensopados e salteados (p. ex. pepinos, |
|
|
|
|
|
maçãs e peras.) |
|
|
|
|
|
|
|
|
|
|
Misturadora resistente a |
Líquidos e bebidas frios |
8 |
15 a 30 seg. |
1,5 litros |
|
altas temperaturas |
Sopa à base de carne |
8 |
30 seg. |
1,2 litros |
|
|
Sopa com leite |
8 |
30 seg. |
1 litros |
|
|
Recomendamos que deixe arrefecer os ingredientes quentes antes de misturar. Contudo se desejar |
||||
|
processá-los quentes, consulte por favor as Instruções de Segurança para Misturas Quentes. |
||||
|
|
|
|
|
|
Mini taça e lâmina |
Carne |
8 |
20 seg. + |
200g carne de vaca |
|
|
|
|
impulso |
magra |
|
|
Picar ervas |
8 |
30 seg. |
15g |
|
|
Picar nozes |
8 |
30 seg. |
50g |
|
|
Maionese |
8 |
30 seg. |
2 ovos |
|
|
|
|
|
300g de azeite |
|
|
|
|
|
|
|
|
Purés |
8 |
30 seg. |
200g |
|
Espremedor de citrinos |
Alimentos mais pequenos, ex.: limas e limões |
1 – 2 |
– |
1Kg |
|
|
Frutos maiores, ex.: laranjas e toranjas |
|
|
|
|
|
|
|
|
|
|
Extractor de sumo |
Espremer frutos e vegetais frescos ex. ma çãs e |
8 |
– |
800g maçãs |
|
|
cenouras |
|
|
600g cenouras |
|
|
|
|
|
|
|
|
Espremer frutos macios ex. tomates e uvas |
8 |
– |
500g |
|
Moinho moedor |
Processar várias especiarias |
8 |
30 a 60 seg. |
50g |
|
|
Moer grãos de café |
|
30 seg. |
|
|
|
|
|
|
|
|
|
Picar nozes |
Pulse |
10 seg. |
50g |
|
|
Processar dentes de alho, piri-piri fresco e raiz de |
Pulse |
10 seg. |
30g |
|
|
gengibre fresca. |
|
|
|
|
|
|
|
|
|
|
Os seguintes tempos de processamento são apenas indicativos e variarão de acordo com a receita e os ingredientes utilizados.
22
utilizar os acessórios
Consulte o quadro de velocidades recomendadas para cada acessório.
cm unidade de lâminas
A unidade de lâminas é a mais versátil de todos os acessórios.
O tempo de processamento determinará a textura desejada. Para texturas grossas utilize o controlo de impulso.
Utilize a unidade de lâminas para confeccionar bolos e massa para bolos, picar carne crua e cozida, vegetais, nozes, massas, patês, passar sopa e também para ralar pão ou biscoitos.
sugestões
●Corte os alimentos como a carne, pão, vegetais em cubos de 2cm antes de processar.
●Os biscoitos devem ser partidos em pedaços e adicionados através do tubo de alimentação enquanto a máquina estiver a funcionar.
●Quando confeccionar massa para bolos utilize a gordura (margarina, manteiga ou outra) directamente do frigorífico e cortada em cubos de 2cm.
●Tenha cuidado para não misturar demasiado.
cn utensílio para massas
Utilize para misturas com fermento.
●Coloque na taça os ingredientes secos e adicione o líquido através do tubo de alimentação enquanto a máquina estiver a funcionar. Processe até obter uma bola de massa macia e elástica que demorará cerca de 60 segundos a obter.
●Continue a amassar apenas à mão. Não se aconselha que misture novamente na máquina uma vez que esta p ode ficar instável.
co batedor de varetas duplo
Utiliza-se para misturas leves como claras de ovo, bater natas, misturar água com leite em pó e para bater ovos com açúcar para pão-de-ló.
utilizar o batedor
1Coloque a taça na unidade motriz e introduza o eixo accionador amovível.
2Encaixe cada vareta 7 na cabeça accionadora.
3Introduza o batedor, rodando-a cuidadosamente até ficar bem encaixada no eixo accionador.
4Adicione os alimentos.
5Coloque a tampa - assegurando-se que o eixo está ali nhado com o centro da tampa.
6Ligue o aparelho.
importante
●O batedor de varetas não é adequado para bater bolos uma vez que estas misturas são muito pesadas e vão danificá-lo. Utilize sempre a unidade de lâmina.
sugestões
●Obtém melhores resultados se os ovos estiverem à temperatura ambiente.
●Certifique-se que a taça e as varetas estão limpas e sem gordura antes de misturar.
bater gordura com açúcar
●Para obter melhores resultados deixe as natas atingirem a temperatura ambiente (20°C) antes de as bater. NÃO utilize a gordura (margarina, manteiga, natas ou outra) directamente do frigorífico porque vai danificar o batedor de varetas.
●Ingredientes mais pesados como a farinha e frutos secos devem ser misturados e envolvidos à mão.
●Não exceda as capacidades máximas ou o tempo de processamento mencionados no quadro de velocidades recomendadas.
cp disco para grandes quantidades
Quando misturar líquidos na taça, o disco para grandes quantidades deve ser usado com a unidade de lâmina. Isso impede o vazamento e melhora o desempenho de corte da lâmina.
1Introduza a taça na unidade motriz.
2Coloque a lâmina de corte.
3Adicione os ingredientes que deseja processar.
4Coloque o disco para grandes quantidades por cima da
lâmina assegurando-se que assenta no encaixe dentro da taça bk. Não carregue para baixo o disco para grandes quantidades.
5Coloque a tampa e ligue à corrente eléctrica.
discos de fatiar/ralar
discos de fatiar/ralar reversíveis - 4mm cq, 2mm cr
Utilize o lado para ralar com queijo, cenouras, batatas e alimentos com texturas similares.
Utilize o lado para fatiar com queijo, cenouras, batatas couves, pepinos, curgetes, beterraba e cebolas.
disco de ralar extra fino cs
Raspa queijo parmesão e batatas para pratos alemães de batatas (tipo gnocci).
disco de cortar em juliana fino ct
Utiliza-se para cortar batatas em palha e ralar grosseiramente para rösti, para fritura tipo chinês e vegetais recheados.
disco para cortar batatas em palitos dk
Corta batatas para batatas fritas e ingredientes para ensopados e salteados (p. ex. pepinos, maçãs e peras.)
segurança
●Nunca retire a tampa enquanto o disco de corte não estiver completamente parado.
●Manipule com muito cuidado o disco de corte porque está extremamente afiado.
●Não encha demasiado a taça – não exceda o nível máximo marcado na taça.
23

para usar os discos
1 Coloque a taça na unidade motriz e introduza o eixo accionador amovível.
2 Segurando pelo suporte central, coloque o disco de corte
no eixo accionador com o lado apropriado virado para cima bl.
3Coloque a tampa.
4Coloque os alimentos no tubo de alimentação.
Escolha que lado do tubo de alimentação deseja utilizar. O empurrador contém um pequeno tubo de alimentação para utilizar com componentes individuais ou ingredientes mais finos.
Para utilizar o tubo de alimentação mais pequeno – introduza primeiro o empurrador maior no tubo de alimentação.
Para utilizar o tubo de alimentação mais largo – utilize ambos os empurradores em conjunto.
5Seleccione auto, ligue e, empurre com o empurrador - nunca introduza os seus dedos no tubo de alimentação.
sugestões
●Utilize ingredientes frescos.
●Não corte os alimentos muito pequenos. Encha o tubo de alimentação largo de forma razoável. Isto impede que os alimentos deslizem para os lados durante o processo. Em alternativa utilize o tubo de alimentação mais pequeno.
●Quando utilizar o disco para juliana ou o de cortar em palitos, coloque os alimentos na horizontal.
●Quando fatiar ou ralar: os alimentos colocados verticalmente bm saem mais pequenos que os alimentos colocados na horizontal bn.
●Existirá sempre uma pequena perda de alimentos que ficarão no disco ou na taça depois de processados.
dl acessório para envolver
Use o acessório para envolver quando envolve ingredientes leves em misturas pesadas como por exemplo, suspiros, mousses e doces de frutos com natas batidas.
1Coloque a taça na unidade motriz e introduza o eixo accionador amovível.
2Encaixe a espátula 8 na cabeça accionadora.
3Introduza o acessório para envolver rodando-o cuidadosamente até cair encaixando no eixo accionador.
4Adicione os ingredientes.
5Coloque a tampa - assegurando-se que o eixo está alinhado com o centro da tampa.
6Seleccione a velocidade lenta (velocidade 1 – 2).
para remover a espátula
Desencaixe o batedor da cabeça accionadora pressionando o botão de libertação de acessórios 9.
sugestões
●Não utilize uma velocidade alta uma vez que é indispensável utilizar uma velocidade baixa para obter um resultado óptimo quando envolver os ingredientes.
●Para obter melhores resultados não bata previamente demasiado as claras em castelo ou natas – o acessório para envolver não será capaz de as misturar correctamente se estiverem demasiado firmes.
●Não envolva a mistura por mais tempo do que o recomendado no quadro de velocidades recomendadas uma vez que o ar será expelido e a mistura ficará demasiado solta.
●Os ingredientes não envolvidos porque ficaram agarrados ao acessório ou aos lados da taça devem ser cuidadosamente envolvidos com uma espátula.
dm mini taça e lâmina
Use a taça mini para picar ervas e processar pequenas quantidades de ingredientes: carne, cebolas, nozes, maionese, vegetais, purés, molhos e comida de bebés.
mini lâmina mini taça
para usar a mini taça e lâmina
1Coloque a taça na unidade motriz e introduza o eixo accionador amovível.
2Insira a mini taça por cima do eixo accionador,
assegurando-se que os encaixes estão alinhados com as saliências bo da taça principal.
Nota: A taça principal não pode ser colocada se a mini taça não estiver correctamente inserida.
3Coloque a Lâmina de corte no eixo accionador bp.
4Adicione os ingredientes que deseja processar.
5Coloque a tampa e ligue à corrente eléctrica.
segurança
●Nunca retire a tampa enquanto a lâmina de corte não estiver completamente parada.
●A lâmina de corte está muito afiada, manipule com cuidado. importante
●Não processe especiarias, podem danificar o plástico.
●Não utilize em alimentos duros como os grãos de café, cubos de gelo ou chocolate pois podem danificar a lâmina.
sugestões
●As ervas ficam melhor moídas se estiverem lavadas e secas.
●Adicione sempre um pouco de líquido quando mistura ingredientes cozinhados para fazer comida de bebé.
●Corte os alimentos como a carne, pão, vegetais em cubos de 1-2 cm antes de processar.
●Quando confeccionar maionese, adicione o azeite pelo tubo de alimentação.
24

dn moinho moedor (se fornecido)
Utilize o moinho moedor para processar ingredientes secos, tais como nozes, grãos de café e moer especiarias como: Pimenta preta em grão, sementes de cardamomo, sementes de cominho, sementes de coentros, sementes de funcho, raiz de gengibre, dentes de alho e piri-piri frescos.
jarro do moinho
dispositivo da lâmina do moinho moedor
para usar o seu moinho moedor
1Coloque os ingredientes no dispositivo da lâmina  .
.
2Coloque o jarro  e gire na direcção dos ponteiros do relógio para o prender bq.
3Coloque o moinho na unidade motriz e gire na direcção dos ponteiros do relógio para prender br.
4Seleccione uma velocidade ou utilize o controlo de impulso
(P).
segurança
●Nunca coloque o dispositivo de lâminas no robot de cozinha sem que o jarro esteja colocado.
●Nunca desenrosque o jarro enquanto o moinho estiver colocado no aparelho.
●Não toque nas lâminas porque estão afiadas – Mantenha a unidade de lâminas afastado das crianças.
●Nunca retire o moinho enquanto as lâminas não estiverem completamente paradas.
●Para assegurar uma longa vida ao seu moinho, não o faça funcionar mais de 60 segundos seguidos. Desligue-o assim que obter a consistência desejada.
●O aparelho não funcionará se o moinho não estiver correctamente colocado.
●Não processe no moinho, açafrão da Índia fresco, uma vez que é muito duro e pode danificar as lâminas.
sugestões
●Para obter um desempenho mais optimizado quando processar especiarias, recomendamos que não processe no moinho mais de 50g de cada vez.
●Especiarias inteiras retêm o sabor por mais tempo do que as especiarias em grão, sendo portanto melhor processar pequenas quantidades de cada vez.
●Para obter o máximo de sabor e libertar os óleos essenciais, as especiarias inteiras deverão ser levemente torradas antes de serem moídas.
●Corte o gengibre em pequenos pedaços antes de o processar.
●Para obter melhores resultados, recomenda-se que utilize como acessório a pequena taça para picar as ervas.
do espremedor de citrinos
Utilize o espremedor de citrinos para retirar o sumo de citrinos (laranjas, limões, limas e toranjas).
cone espremedor coador
para utilizar o espremedor de citrinos
1Coloque a taça na unidade motriz e introduza o eixo accionador amovível.
2Instale o coador na taça, assegurando-se que a pega está encaixada na pega da taça bs.
3Coloque o cone espremedor por cima do eixo accionador girando até que caia totalmente em baixo bt.
4Corte a fruta ao meio. Ligue e pressione a metade do fruto no cone espremedor.
●O espremedor de citrinos não funcionará se o coador não estiver correctamente colocado.
●Para obter melhores resultados esprema e guarde o sumo à temperatura ambiente e faça rodar o fruto com a mão numa superfície plana antes de o cortar e espremer.
●Para ajudar a extrair o sumo, mova o fruto para os lados.
●Quando espremer grandes quantidades, esvazie regularmente o coador para evitar demasiada acumulação de polpa e sementes.
dp extractor de sumo em metal
Utilize o espremedor centrifugador para retirar o sumo de frutos e vegetais.
segurança
●Não utilize o extractor de sumo se o filtro estiver danificado.
●Utilize apenas o empurrador fornecido. Nunca introduza os dedos no tubo de alimentação. Desligue sempre da corrente eléctrica antes de retirar o tubo de alimentação.
●Antes de remover a tampa, desligue e espere até que o filtro pare.
●Nunca utilize um acessório danificado.
empurrador tampa
removedor da polpa tambor do filtro
para utilizar o extractor de sumo
1Introduza a taça na unidade motriz ck.
2Coloque o removedor de polpa no tambor do filtro,
certificando-se que as patilhas encaixam nas ranhuras existentes na parte inferior do tambor cl.
3Coloque o tambor do filtro cm.
4Coloque a tampa na taça, gire até prender e o tubo de alimentação fica assente sobre a pega cn. O seu extractor de sumo não funcionará se a taça ou a
tampa não estiverem colocadas correctamente no mecanismo de engate.
5Corte a fruta para poder caber no tubo de alimentação.
6Ligue e empurre com o empurrador - nunca introduza os seus dedos no tubo de alimentação. Processe completamente antes de adicionar mais.
25
●Após adicionar o último pedaço, deixe o extractor trabalhar mais 30 segundos para extrair todo o sumo do tambor do filtro.
importante
●Se o extractor começar a vibrar, desligue-o e esvazie o conteúdo do tambor do filtro. (O extractor vibra se a polpa dentro do tambor do filtro estiver mal distribuída).
●A capacidade máxima que pode ser processada de cada vez é de 800g de fruta ou vegetais (consulte o quadro de velocidades).
●Alguns alimentos muito duros podem tornar o funcionamento do extractor de sumo muito lento ou fazê-lo parar. Se isso acontecer, desligue e desentupa o filtro.
●Desligue e limpe o colector de polpa regularmente durante a utilização.
sugestões
●Antes de processar remova os caroços, sementes e a casca duras dos alimentos (melão, ananás, etc.). Não precisa de descascar ou descaroçar maçãs ou pêras.
●Utilize sempre frutos ou vegetais frescos.
●Para maximizar a extracção de sumo, coloque pequenas quantidades de cada vez no tubo de alimentação e empurre devagar.
●Citrinos – descasque e remova o caroço, caso contrário o sumo pode saber a amargo. Para obter melhores resultados utilize o espremedor de citrinos.
dq acessório de armazenamento
É fornecido com o seu robot de cozinha uma caixa de armazenamento para guardar os discos.
1Encaixe os discos na caixa de armazenamento quando não estão a ser usados co.
2A caixa de armazenamento tem uma fechadura – feche a tampa para prender. Para abrir levante a tampa cp.
cuidados e limpeza
●Desligue sempre o aparelho e retire a ficha do cabo de alimentação da tomada de parede.
●Manuseie as lâminas e dos discos de cortar com cuidado - são extremamente afiados.
●Alguns alimentos podem retirar a cor do plástico. Isto é perfeitamente normal e não danifica o plástico nem altera o sabor dos alimentos. Limpe com o pano humedecido com óleo vegetal para recuperar a cor original.
unidade motriz
●Limpe com um pano humedecido e, em seguida, seque. Certifique-se de que a área de entrebloqeio não tem restos de alimentos agarrados.
●Não submersa a unidade motriz na água.
●Arrume o cabo em excesso na área de armazenagem na parte posterior da unidade motriz cq.
misturadora
1Esvazie o copo, desatarraxe o dispositivo de lâminas
girando-o para a posição de abrir  para o libertar. Depois remova a unidade de lâminas empurrando para cima pela
parte de baixo.
●Deve ter muito cuidado quando retira o dispositivo de lâmina da base.
2Lave o copo à mão.
3Remova e lave o anel vedante.
4Não toque nas lâminas afiadas – lave-as usando uma escova e água quente com detergente, depois passe bem por água corrente. Não insira a unidade de lâminas dentro de água.
5Deixe secar voltado para baixo.
batedor de varetas duplo
●Retire os batedores da cabeça accionadora puxando-os suavemente para os libertar. Lave em água morna com sabão e seque.
●Limpe a cabeça accionadora com um pano humedecido e, em seguida, seque-a. Não coloque a cabeça accionadora dentro de água.
moinho moedor
●Remova o dispositivo da lâmina do jarro rodando-o na direcção contrária aos ponteiros do relógio.
●Lave o jarro à mão.
●Não toque nas lâminas afiadas – utilize uma escova com água com sabão e passe por água debaixo da torneira.
Não submersa em água a unidade de lâminas.
●Deixe secar virado para baixo. acessório para envolver
●Desencaixe o acessório da cabeça accionadora pressionando o botão de libertação de acessórios 9. Lave em água morna com sabão e seque.
●Limpe a cabeça accionadora com um pano humedecido e, em seguida, seque-a. Não coloque a cabeça accionadora dentro de água.
tambor do filtro
●As lâminas de corte na base do filtro estão muito afiadas, tenha cuidado quando manipular ou limpar o filtro.
as restantes peças
●Lave-as à mão e, em seguida, seque-as.
●Em alternativa, eles podem ser lavados na máquina de lavar loiça e podem ser lavados na prateleira de cima da sua máquina de lavar loiça. Evite colocar os acessórios directamente por cima dos elementos de aquecimento da prateleira superior. É recomendado que utilize um programa de temperatura baixa (máximo 50°C).
acessório |
acessório |
|
adequado |
|
para ser |
|
lavado em |
|
máquina de |
|
lavar loiça |
taça principal, mini taça, tampa, empurrador |
|
|
|
unidade de lâminas, utensílio para massas |
|
|
|
eixo amovível |
|
discos |
|
|
|
disco para grandes quantidades |
|
|
|
batedor de varetas/acessório para envolver |
|
Não mergulhe a cabeça accionadora |
|
em água. |
|
copo misturador, tampa, tampa de |
|
enchimento |
|
|
|
unidade de lâmina e anel vedante para a |
|
misturadora |
|
|
|
extractor de sumo em metal |
|
dispositivo da lâmina do moinho moedor |
|
|
|
jarro do moinho moedor |
|
|
|
espátula |
|
26

assistência e cuidados do cliente
●Caso o fio se encontre danificado, deverá, por motivos de segurança, ser substituído pela KENWOOD ou por um reparador KENWOOD autorizado.
●Se tiver alguns problemas com o funcionamento do seu robot de cozinha, antes de chamar um técnico, consulte o guia de resolução de problemas.
Caso necessite de assistência para:
●utilizar o seu electrodoméstico ou
●assistência ou reparações
●Contacte o estabelecimento onde adquiriu o seu aparelho.
●Concebido e projectado no Reino Unido pela Kenwood.
●Fabricado na China.
ADVERTÊNCIAS PARA A ELIMINAÇÃO CORRECTA DO PRODUTO NOS TERMOS DA DIRECTIVA EUROPEIA 2002/96/EC.
No final da sua vida útil, o produto não deve ser eliminado conjuntamente com os resíduos urbanos.
Pode ser depositado nos centros especializados de recolha diferenciada das autoridades locais, ou junto dos revendedores que prestem esse serviço. Eliminar separadamente um electrodomésticos permite evitar as possíveis consequências negativas para o ambiente e para a saúde pública resultantes da sua eliminação inadequada, além de permitir reciclar os materiais componentes, para, assim se obter uma importante economia de energia e de recursos.
Para assinalar a obrigação de eliminar os electrodomésticos separadamente, o produto apresenta a marca de um contentor de lixo com uma cruz por cima.
27

Guia de resolução de problemas
Problema |
Causa |
Solução |
O robot não funciona. |
Falta de energia. |
Verifique se o robot está ligado à |
|
Não se acende a luz indicadora de energia. |
corrente. |
|
A taça não está correctamente |
Confirme que a taça está |
|
colocada na unidade motriz. |
correctamente localizada e a pega |
|
|
está situada no lado direito. |
|
A taça não está correctamente presa. |
Confirme que o mecanismo de |
|
|
engate da tampa está |
|
|
correctamente na zona da pega. |
|
|
O processador não funcionará |
|
|
se a taça e tampa não |
|
|
estiverem bem colocadas. |
O picador/moinho compacto não |
O picador/moinho compacto não está |
O picador/moinho compacto não |
funcionará. |
correctamente preso. |
funcionará se não estiver |
|
|
correctamente preso. |
|
O picador/moinho compacto não estão |
Verifique se a unidade de lâminas |
|
correctamente montado. |
está totalmente apertada no jarro do |
|
|
picador/moinho compacto. |
|
|
|
A misturadora não funcionará. |
A misturadora não está correctamente preso. |
A misturadora não funcionará se |
|
|
não estiver correctamente presa nos |
|
|
engates de segurança. |
|
A misturadora não está montado correctamente. |
Verifique se o dispositivo de lâminas |
|
|
está totalmente apertado dentro do |
|
|
copo. |
O processador para ou abranda |
Funcionou a protecção de sobrecarga. |
Desligue e retire o cabo eléctrico da |
durante o processamento. |
O processador está sobrecarregado ou |
tomada e deixe arrefecer durante 15 |
|
sobreaqueceu durante a operação. |
minutos. |
|
Excedida a capacidade máxima. |
Consulte o quadro de velocidades |
|
|
recomendadas para processar em |
|
|
capacidade máxima. |
|
|
|
função de pesagem |
|
|
O ecrã de visualização |
A quantidade pesada é muito pequena. |
Utilize colheres de chá e colheres de |
bloqueia em [- - - -]. |
|
sopa para medir quantidades muito |
|
|
pequenas. |
O peso é alterado no ecrã |
A unidade de alimentação foi mexida durante |
Não mexa na unidade durante a |
de visualização. |
a operação. |
utilização. Coloque o visualizador a |
|
|
zeros antes de pesar os |
|
|
ingredientes seguintes. |
A misturadora verte pela base |
Falta o anel vedante. |
Verifique se o anel vedante está |
da unidade de lâminas. |
Anel vedante incorrectamente instalado. |
correctamente instalado e não |
|
Anel vedante danificado. |
danificado. |
|
|
Para obter um selo de substituição, |
|
|
ver “serviço e cuidados do cliente” |
|
|
base da lâmina. |
|
|
|
O selo vedante da misturadora falta na |
O anel vedante é embalado já previamente colocado |
Desaperte o copo e confirme que o |
unidade de lâmina quando foi retirado |
na unidade de lâminas. |
anel vedante está colocado na |
da embalagem. |
|
unidade de lâminas. |
|
|
Para obter um selo de substituição, |
|
|
ver “serviço e cuidados do cliente” |
|
|
base da lâmina. |
|
|
|
Mau desempenho dos |
Consulte as sugestões na secção respectiva em “Utilização dos Acessórios”. Verifique |
|
utensílios/acessórios. |
se os acessórios estão correctamente montados. |
|
|
|
|
28
 Loading...