


 Loading...
LT-32DG20J
ENGLISH
WIDE LCD PANEL TV |
|
|
|
|
INSTRUCTIONS |
|||||||||
|
|
|
|
|
|
|
|
|
|
|
|
|
|
|
|
|
|
|
|
|
|
|
|
|
|
|
|
|
|
|
|
|
|
|
|
|
|
|
|
|
|
|
|
|
|
|
|
|
|
|
|
|
|
|
|
|
|
|
|
|
|
|
|
|
|
|
|
|
|
|
|
|
|
|
|
|
|
|
|
|
|
|
|
|
|
|
|
|
|
|
|
|
|
|
|
|
|
|
|
|
|
|
|
|
|
|
|
|
|
|
|
|
|
|
|
|
|
|
|
|
|
|
|
|
|
|
|
|
|
|
|
|
|
|
|
|
|
|
|
|
|
|
|
|
|
|
|
|
|
|
|
|
|
|
|
|
|
|
|
|
|
|
|
|
|
|
|
|
|
|
|
|
|
|
|
|
|
|
|
0410TMH-VT-VT
Dear Customer,
This apparatus is in conformance with the valid European directives and standards regarding electromagnetic compatibility and electrical safety.
European representative of Victor Company of Japan, Limited is: JVC Technical Services Europe GmbH
Postfach 10 05 04
61145 Friedberg Germany
Information for Users on Disposal of Old Equipment and Batteries [European Union]
Products
Battery
Notice:
The sign Pb below the symbol for batteries indicates that this battery contains lead.
These symbols indicate that the electrical and electronic equipment and the battery with this symbol should not be disposed of as general household waste at its end-of-life. Instead, the products should be handed over to the applicable collection points for the recycling of electrical and electronic equipment as well as batteries for proper treatment, recovery and recycling in accordance with your national legislation and the Directive 2002/96/EC and 2006/66/EC.
By disposing of these products correctly, you will help to conserve natural resources and will help to prevent potential negative effects on the environment and human health which could otherwise be caused by inappropriate waste handling of these products.
For more information about collection points and recycling of these products, please contact your local municipal office, your household waste disposal service or the shop where you purchased the product.
Penalties may be applicable for incorrect disposal of this waste, in accordance with national legislation.
[Business users]
If you wish to dispose of this product, please confirm attached “KESA ELECTRICALS SAFETY INSTRUCTIONS” to obtain information about the take-back of the product.
[Other Countries outside the European Union]
These symbols are only valid in the European Union.
If you wish to dispose of these items, please do so in accordance with applicable national legislation or other rules in your country for the treatment of old electrical and electronic equipment and batteries.
Logo & License
HDMI, the HDMI Logo, and High-Definition Multimedia Interface are trademarks or registered trademarks of
HDMI Licensing LLC in the United States and other countries.
DVB is a registered trademark of the DVB Project
TRADEMARK ACKNOWLEDGMENT
“Dolby” and the double-D symbol are trademarks of Dolby Laboratories.
English - 1 -

Contents |
|
Logo & License....................................................... |
1 |
Accessories ............................................................ |
3 |
Features ................................................................. |
3 |
Introduction............................................................. |
3 |
Preparation............................................................. |
3 |
Safety Precautions ................................................. |
4 |
Power Source ..................................................... |
4 |
Power Cord......................................................... |
4 |
Moisture and Water ............................................ |
4 |
Cleaning.............................................................. |
4 |
Heat and Flames ................................................ |
4 |
Lightning ............................................................. |
4 |
Replacement Parts ............................................. |
4 |
Servicing............................................................. |
4 |
Waste Disposal................................................... |
4 |
Disconnecting the Device ................................... |
4 |
Headphone Volume ............................................ |
4 |
Installation........................................................... |
4 |
LCD Screen ........................................................ |
4 |
Warning .............................................................. |
5 |
Inserting Batteries into the Remote Control Handset |
..5 |
Operating Range for the Remote Control............... |
5 |
Overview of the Remote Control ............................ |
6 |
LCD TV and Operating Buttons.............................. |
7 |
Viewing the ConnectionsBack Connectors .......... |
7 |
Viewing the Connections - Side Connectors .......... |
8 |
Using the Cable Holder .......................................... |
8 |
Power Connection .................................................. |
8 |
Aerial Connection ................................................... |
8 |
Connecting the LCD TV to a PC............................. |
9 |
Connecting to a DVD Player................................... |
9 |
Using Side AV Connectors ................................... |
10 |
Connecting Other Equipment via SCART ............ |
10 |
Switching the TV On/Off ....................................... |
10 |
To Switch the TV On ......................................... |
10 |
To Switch the TV Off ......................................... |
10 |
Input Selection...................................................... |
10 |
Basic Operations ................................................... |
11 |
Operation with the Buttons on the TV................ |
11 |
Initial Settings ........................................................ |
11 |
General Operation................................................ |
12 |
Electronic Programme Guide (EPG) .................... |
12 |
Displaying Subtitles .......................................... |
12 |
Digital Teletext (** for UK only) ......................... |
12 |
Analogue Teletext ............................................. |
13 |
Widescreen....................................................... |
13 |
IDTV Menu System .............................................. |
13 |
Channel List...................................................... |
13 |
Timers............................................................... |
15 |
Conditional Access ........................................... |
15 |
TV Setup........................................................... |
15 |
Setup ................................................................ |
16 |
Analogue TV Menu System.................................. |
19 |
Picture Menu..................................................... |
19 |
Sound Menu ..................................................... |
20 |
Feature Menu ................................................... |
21 |
Install Menu ...................................................... |
22 |
Source Menu .................................................... |
23 |
PC Mode Menu System........................................ |
23 |
PC Position Menu............................................. |
23 |
Displaying TV Information .................................... |
24 |
Muting Function.................................................... |
24 |
Freezing Picture ................................................... |
24 |
Zoom Modes......................................................... |
24 |
Auto .................................................................. |
24 |
16:9................................................................... |
24 |
4:3..................................................................... |
25 |
Panoramic......................................................... |
25 |
14:9................................................................... |
25 |
Cinema ............................................................. |
25 |
Subtitle.............................................................. |
25 |
Zoom................................................................. |
25 |
Teletext ................................................................. |
25 |
Tips....................................................................... |
26 |
Image Persistence............................................ |
26 |
No Power.......................................................... |
26 |
Poor Picture...................................................... |
26 |
No Picture......................................................... |
26 |
Sound ............................................................... |
26 |
Remote Control................................................. |
26 |
Input Sources.................................................... |
26 |
Appendix A: PC Input Typical Display Modes....... |
27 |
Appendix B: AV and HDMI Signal Compatibility |
|
(Input Signal Types).............................................. |
28 |
Specifications ....................................................... |
29 |
Important Instruction............................................. |
30 |
English - 2 -

Accessories |
Batteries: 2 X AAA |
Instruction Book |
Quick Guide |
Remote Controller |
Cable Holder |
Features
•Remote controlled colour LCD TV.
•Fully integrated digital TV (DVB-T).
•HDMI connectors for digital video and audio. This connection is also designed to accept high definition signals.
•200 programmes from VHF, UHF(analogue).
•500 programmes for digital mode (IDTV).
•OSD menu system.
•SCART socket for external devices (such as video, video games, audio set, etc.).
•Stereo sound system.
•Teletext, fastext, TOP text.
•Headphone connection.
•Automatic programming system.
•Forward or backward manual tuning.
•Sleep timer.
•Child lock.
•Automatic sound muting when no transmission.
•NTSC playback.
•AVL (Automatic Volume Limiting).
•When no valid signal is detected, after 5 minutes the TV switches automatically to standby mode.
•PLL (Frequency Search).
•PC input.
•Plug&Play for Windows 98,ME,2000,XP, Vista, Windows7.
•Game Mode
Introduction
Thank you for choosing this product. This manual will guide you for the proper operation of your
TV. Before operating the TV, please read
this manual thoroughly.
Please do keep this manual in a safe place for future references.
Preparation
For ventilation, leave a free space of at least 10 cm all around the set. To prevent any fault and unsafe situations, please do not place any objects on top of the set.
Use this device in moderate climates.
10 cm
10 cm |
|
|
|
|
|
|
cm 10 |
|
|
|
|
|
|
||
|
|
|
|
|
|
|
|
|
|
|
|
|
|
|
|
|
|
|
|
|
|
|
|
|
|
|
|
|
|
|
|
|
|
|
|
|
|
|
|
|
|
|
|
|
|
|
|
English - 3 -

Safety Precautions
Please read the following recommended safety precautions carefully for your safety.
Power Source
The main power supply for this TV is controlled by inserting or removing the power plug.
The TV set should be operated only from a 220-240
V AC, 50 Hz outlet. Ensure that you select the correct voltage setting for your convenience.
Power Cord
Do not place the set, a piece of furniture, etc. on the power cord (mains lead) or pinch the cord. Handle the power cord by the plug. Do not unplug the appliance by pulling from the power cord and never touch the power cord with wet hands as this could cause a short circuit or electric shock. Never make a knot in the cord or tie it with other cords. The power cords should be placed in such a way that they are not likely to be stepped on. A damaged power cord can cause fire or give you an electric shock. When it is damaged and needs to be replaced, it should be done by qualified personnel.
Make enough room for inserting and removing the power plug.
Place the TV as close to the outlet as possible.
Moisture and Water
Do not use this device in a humid and damp place (avoid the bathroom, the sink in the kitchen, and near the washing machine). Do not expose this device to rain or water, as this may be dangerous
and do not place objects filled with liquids, such as flower vases, on top. Avoid from
dripping or splashing.
If any solid object or liquid falls into the cabinet, unplug the TV and have it checked by qualified personnel before operating it any further.
Cleaning
Before cleaning, unplug the TV set from the wall outlet. Do not use liquid or
aerosol cleaners. Use soft and dry cloth.
Ventilation
The slots and openings on the TV set are intended for ventilation and to ensure reliable operation. To prevent overheating, these openings must not be blocked or covered in anyway.
Heat and Flames
The set should not be placed near to open
flames and sources of intense heat such as an electric heater. Ensure that no open
English
flame sources, such as lighted candles, are placed on top of the TV.
Warning
To prevent the spread of fire, keep candles or other open flames away from this product at all times.
Lightning
In case of storm and lightning or when going on holiday, disconnect the power
cord from the wall outlet.
Replacement Parts
When replacement parts are required, make sure that the service technician has used replacement parts, which are specified by the manufacturer or have the same specifications as the original one. Unauthorized substitutions may result in fire, electrical shock or other hazards.
Servicing
Please refer all servicing to qualified personnel. Do not remove the cover
yourself as this may result in an electric shock.
Waste Disposal
Instructions for waste disposal:
•Packaging and packaging aids are recyclable and should principally be recycled. Packaging materials, such as foil bag, must be kept away from children.
•Batteries, including those which are heavy metalfree, should not be disposed of with household waste. Please dispose of used battery in an environment friendly manner. Find out about the legal regulations which apply in your area.
•Cold cathode fluorescent lamp in LCD PANEL contains a small amount of mercury; please follow the local laws or regulations for disposal.
Disconnecting the Device
The mains plug is used to disconnect TV set from the mains and therefore it must remain readily operable.
Headphone Volume
Excessive sound pressure from earphones and headphones can cause hearing loss.
Installation
To prevent injury, this device must be securely attached to the wall in accordance with the installation instructions when mounted to the wall (if the option is available).
LCD Screen
The LCD panel is a very high technology product with about a million thin film transistors, giving you fine picture details. Occasionally, a few non-active pixels
- 4 -
may appear on the screen as a fixed blue, green or red point. Please note that this does not affect the performance of your product.
Warning
Do not leave your TV in standby or operating mode when you leave your house.
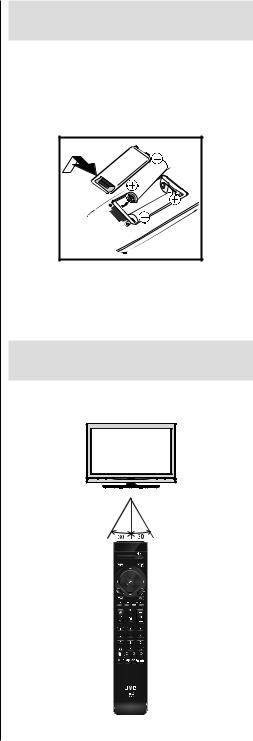
Inserting Batteries into the
Remote Control Handset
•Remove the battery cover located on the back of the handset by gently pulling backwards from the indicated part.
•Insert two AAA/R3 or equivalent type batteries inside. Place the batteries in the right directions and replace the battery cover.
Note: Remove the battery from remote control handset when it is not to be used for a long period. Otherwise it can be damaged due to any leakage of batteries.
Batteries should not be exposed to excessive heat such as sunshine, fire or the like.
Operating Range for the
Remote Control
•Point the top of the remote control toward the LCD TV’s remote sensor LED while pressing a button.
Remote range is approximately 7m/23ft.
English - 5 -

Overview of the Remote Control
1.TV/DTV: TV – Digital TV
2.OK: OK / Confirm / Freezing Picture(in analogue mode) / Channel list (in DTV mode)
3. : Cursor left
4.MENU: Menu on-off
5.ZOOM: Image size
6.RED: Sound menu / Page Up (**) (in DTV mode)
7.GREEN: Picture Menu / Page Down (**) (in
DTV mode)
8.AV: Source selection
9. /
/  : Programme up / down
10. : Info
11. : Index Page (in TXT mode)
12. : Expand (in TXT mode)
13. : Hold (in TXT mode)
14.TV/RADIO: Switches between TV and radio broadcasts.(in DTV mode)
15.
 : Standby
16.GUIDE: Programme guide
17. : Cursor up
18. : Cursor right
19.BACK: Return
20. : Cursor down
21. : Jump to now (in EPG mode)
22.BLUE: Install Menu / Favourite Mode (in DTV mode) (*)
23.YELLOW: Feature Menu / Current Language (in DTV mode) (*)
24.
 /
/ 
 : Volume up / down
25. : Muting
26.0,1...8,9 :Numeric buttons.
27. : Teletext on / PAT (Picture-and-text) /
Teletext off
28. : Reveal
29. : Time (in analogue mode)
30. : Subtitle on-off
31.

 : Mono-stereo / Dual I-II
(*) for EU countries only
(**) Scrolls page up or down in DTV Channel list.
English - 6 -
LCD TV and Operating Buttons
FRONT and REAR VIEW |
Control Buttons |
|
|
|
|
1. Standby button
2. TV/AV button
3. Programme Up/Down buttons
4. Volume Up/Down buttons
Note: Press “ 
 ” /“
” /“
 ” buttons at the same time to view main menu.
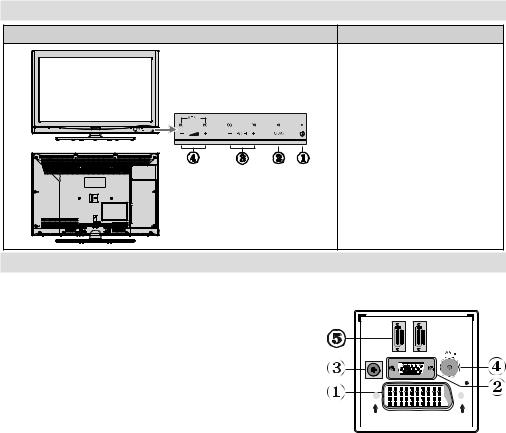
Viewing the ConnectionsBack Connectors
1. SCART socket inputs or outputs for external devices.
Connect the SCART cable between SCART socket on TV and SCART socket on your |
|
(such as a decoder, a VCR or a DVD player). |
|
Note: If an external device is connected via the SCART socket, |
2 |
the TV will automatically switch to AV mode. |
|
Note: S-VHS VCR should be connected to EXT-1 and can be |
HDMI |
|
|
watched from EXT-1S source. |
SPDIF |
|
VGA |
external device
HDMI 1

2. PC Input is for connecting a personal computer to the TV set. |
Coax.OUT |
|
Connect the PC cable between the PC INPUT on the TV and |
||
|
||
the PC output on your PC. Please do not connect a device to |
|
|
YPbPr socket while using PC input.. |
SCART |
3.SPDIF Coaxial Out outputs digital audio signals of the 
 currently watched source.
4.RF Input connects to an antenna or a cable.
Note that if you use a decoder or a media recorder, you should connect the aerial cable through the device to the television with an appropriate antenna cable, as shown in the illustration in the following pages.
5.HDMI 2: HDMI input
6.HDMI 1: HDMI input
HDMI Input is for connecting a device that has an HDMITM connector.
Your LCD Television is capable of displaying High Definition pictures from devices such as a High Definition Satellite Receiver or DVD Player. These devices must be connected via the HDMITM connector or Component Socket. These sockets can accept either 480i, 480p, 576p, 576i, 720p, 1080i,
1080p signals. No sound connection is needed for an HDMI to HDMI connection.
When you use the wall mount kit (optional) with the LCD TV, we would definitely recommend to plug all your cables into the back of the LCD before mounting to the wall.
English - 7 -

Viewing the Connections -
Side Connectors
1. CI Slot is used for
inserting a CI card. A
CI card allows you to
view all the channels that you subscribe to.
For more information, see “Conditional
Access” section.
2. Component Video Inputs (YPbPr) are used for connecting component video.
You can connect the component video and audio sockets with a device that has component output. Connect the component video cables between the
COMPONENT VIDEO
INPUTS on on the
INPUT AV
TV and the component video outputs of your device. While connecting, be sure that the letters on your TV, “Y”, “Pb”, “Pr” correspond with your device’s connectors. IMPORTANT:Please do not connect a device to
PC socket while using YPbPr input.
3.Video Input (INPUT FAV) is used for connecting video signals of external devices.Connect the video cable between the VIDEO IN socket
on the TV and the VIDEO OUT jack on your device.
4.Audio Inputs (INPUT FAV) are used for connecting audio signals of external devices. Connect the audio cable between the AUDIO INPUTS on the TV and the AUDIO OUTPUT jacks on your device.
Also to enable PC/YPbPr sound connection in such a case, use an appropriate audio cable between the connected device’s audio outputs and the TV’s audio inputs
Note: If you connect a device to the TV via the
VIDEO or PC/YPbPr cable you should also connect your device with an audio cable to the AUDIO INPUTS of the TV to enable audio.
5.Headphone jack is used for connecting an external headphone to the system. Connect to the HEADPHONE jack to listen to the TV from headphones.
6.Standby switch is used for turning the TV on or off.
Using the Cable Holder
You can use the supplied cable holder as the following:
•Place the cable holder into the cable holder hole located on the rear side of the TV as illustrated above.
•Place cables into the cable holder after all necessary connections are made.
Power Connection
IMPORTANT: The TV set is designed to operate on 220-240V AC, 50 Hz.
•After unpacking, allow the TV set to reach the ambient room temperature before you connect the set to the mains.
•Plug the power cable to the mains socket outlet.
Aerial Connection
•Connect the aerial or cable TV plug to the AERIAL INPUT socket located at the rear of the TV.
2 |
1 |
HDMI |
HDMI |
VGA |
|
SPDIF |
|
Coax.OUT |
|
SCART |
|
English - 8 -
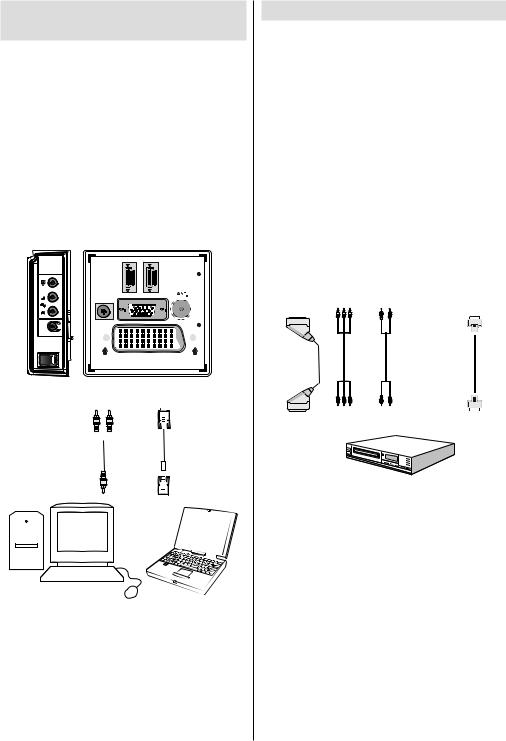
Connecting the LCD TV to a
PC
For displaying your computer’s screen image on your LCD TV, you can connect your computer to the
TV set.
•Power off both computer and display before making any connections.
•Use 15-pin D-sub display cable to connect a PC to the LCD TV.Use an audio cable between audio inputs of the TV (side) and audio output of your PC to enable sound connection.
•When the connection is made, switch to PC source.
See “Input selection” section.
•Set the resolution that suits your viewing requirements.
Resolution information can be found in the appendix
parts.
2 |
1 |
|
HDMI |
HDMI |
|
VGA |
||
SPDIF |
|
|
Coax.OUT |
|
|
|
SCART |
|
Audio |
PC Input |
|
Inputs |
||
|
||
|
|
|
|
|
|
PC audio cable |
|
|
|
|
|
|
PC RGB cable |
|||
|
|
|
|
|
|
|
|
|
||||||||
|
|
|
|
|
|
(not supplied) |
|
(not supplied) |
||||||||
|
|
|
|
|
to AUDIOINPUTS |
|
to PC input |
|||||||||
|
|
|
|
|
|
|
on the TV |
|
|
|||||||
|
|
|
|
|
|
|
|
|
|
|
|
|
|
|
|
|
|
|
|
|
|
|
|
|
|
|
|
|
|
|
|
|
|
|
|
|
|
|
|
|
|
|
|
|
|
|
|
|
|
|
|
|
|
|
|
|
|
|
|
|
|
|
|
|
|
|
|
|
|
|
|
|
|
|
|
|
|
|
|
|
|
|
|
|
|
|
|
|
|
|
|
|
|
|
|
|
|
|
|
|
|
|
|
|
|
|
|
|
|
|
|
|
|
|
|
|
|
|
|
|
|
|
|
|
|
|
|
|
|
|
|
|
|
|
|
|
|
|
|
|
|
|
|
|
|
|
|
|
|
|
|
|
|
|
|
|
|
|
|
|
|
|
|
|
|
|
|
|
|
|
|
|
|
|
|
|
|
|
|
|
|
|
|
|
|
|
|
|
|
|
|
|
|
|
|
|
|
|
|
|
|
|
|
|
|
|
|
|
|
|
|
|
|
|
|
|
|
|
|
|
Connecting to a DVD Player
If you want to connect a DVD player to your LCD
TV, you can use connectors of the TV set. DVD players may have different connectors. Please refer to your DVD player’s instruction book for additional information. Power off both the TV and the device before making any connections.
Note: Cables shown in the illustration are not supplied.
•If your DVD player has an HDMI socket, you can connect via HDMI. When you connect to DVD player as illustrated below, switch to HDMI source. See,
“Input Selection” section.
•Most DVD players are connected through COMPONENT SOCKETS. Use a component video cable to connect video input. To enable sound connection, use AUDIO IN located side of the TV (YPbPr cable is not supplied).
•When the connection is made, switch to YPbPr source. See, “Input selection” section.
•You may also connect through the SCART socket.
Use a SCART cable as shown below.
|
Component |
Component |
|
|
Scart socket |
video |
audio |
HDMI |
|
inputs |
inputs |
|||
|
input |
DVD Player
Note: These methods of connection perform the same function but in different levels of quality. It is not necessary
to connect by all three methods.
English - 9 -
Loading...