


 Loading...
WIDE LCD PANEL TV INSTRUCTIONS
This illustration shows LT-32EX19.
The illustrations of LT-32EX19 is used in this instruction manual for explanation purpose. Your TV may not look exactly the same as illustrated.
LT - 32EX19 LT - 32BX19
ENGLISH 
Contents |
|
PREPARATION |
|
Safety precautions............................... |
2 |
Remote control buttons and functions... |
3 |
Set up and connections....................... |
4 |
Initial settings....................................... |
6 |
Registering / Editing channels............. |
6 |
FUNCTIONS |
|
Picture setting...................................... |
7 |
Sound setting ...................................... |
9 |
Useful functions................................. |
10 |
Viewing Teletext................................. |
12 |
Watching Video or DVDs................... |
12 |
REFERENCE |
|
Troubleshooting................................. |
13 |
Technical information......................... |
14 |
CH/CC List......................................... |
15 |
Specification ...................................... |
16 |
GGT0303-001A-H |
|

Thank you for buying this JVC LCD panel television.
To make sure you understand how to use your new TV, please read this manual thoroughly before you begin.
•Follow this manual regarding setup!
-Connect only to a 110-240 V, 50/60Hz AC outlet.
•Make enough room for inserting and removing the power plug!
•Place the TV as close to the outlet as possible!
-The main power supply for this TV is controlled by inserting or removing the power plug.
•Never cut or damage the power cord!
-If the AC plug is not the right shape, or the power cord is not long enough, use an appropriate plug adapter or extension cable. (Consult your retailer.)
•Unplug the power cord when going out!
•Do not allow the TV to fall!
-Do not rest your elbows on, or allow children to hang from the TV.
-There is a risk that the TV will fall and cause injuries.
-Make use of the hole on the back of the stand to prevent the TV from falling easily. (P. 4)
If the TV is damaged or behaving strangely, stop using it at once!
Unplug the power cord and contact your retailer.
JVC
• Never place anything on the TV!
- Placing liquid, naked flames, cloths, paper, etc. on the TV may cause a fire.
• Never expose to rain or moisture!
- To prevent fire or electric shock, never allow liquids to enter the unit.
• Never insert objects into the cabinet openings!
- It may cause a fatal electric shock. - Take care when children are near.
•Hold the TV so as not to scratch the screen!
-Do not touch the screen when carrying the TV.
•Do not carry the TV on your own!
-In order to prevent accidents, ensure that the TV is carried by two or more people.
•When attaching the TV to the wall, use the optional JVC wall mounting unit!
-Consult a qualified technician.
-See the included manual on mounting procedures.
- JVC assumes no responsibility for damage due to improper mounting.
•Never listen to headphones at high volume!
- It may damage your hearing.
- The power buttons on the |
If a television is not positioned in a sufficiently stable location, it can be potentially |
remote control and the |
hazardous due to falling. Many injuries, particularly to children, can be avoided by |
TV unit cannot completely |
taking simple precautions such as: |
turn off the TV. (Make |
• Using cabinets or stands recommended by the manufacturer of the television. |
appropriate arrangements |
• Only using furniture that can safely support the television. |
for bedridden people.) |
• Ensuring the television is not overhanging the edge of the supporting furniture. |
|
• Not placing the television on tall furniture (for example, cupboards or bookcases) |
|
without anchoring both the furniture and the television to a suitable support. |
|
• Not standing the televisions on cloth or other materials placed between the television |
|
and supporting furniture. |
|
• Educating children about the dangers of climbing on furniture to reach the television or |
|
its controls. |
• For more details on installation, usage and safety Consult your retailer.
•Never dismantle the rear panel!
-It may cause an electric shock.
•Never obstruct the ventilation holes!
-It may cause overheating or a fire.
•Handle LCD panel with care!
-Use a soft, dry cloth when cleaning.
Never try repair the TV yourself!
If the problem cannot be solved in “Troubleshooting” (P. 13), unplug the power cord and contact your retailer.
2
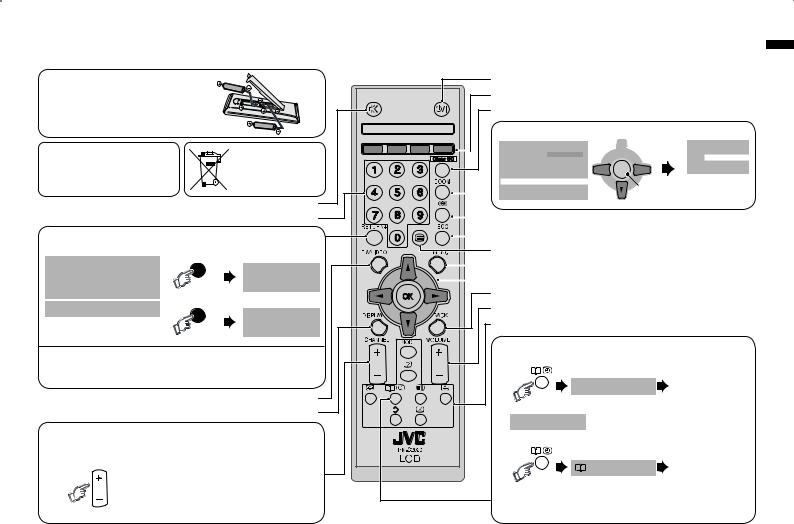
Remote control buttons and functions
• Insert the batteries |
“AAA/R03” |
Use two “AAA/R03” dry cell |
Batteries |
batteries. Insert the batteries from |
|
the · end, making sure the · and |
|
ª polarities are correct. |
|
WARNING:
Batteries shall not be exposed to excessive heat such as direct sunshine, fire or the like.
If this symbol is shown, it is only valid in the
European Union.
Turn the volume off/on Change channel/page
RETURN PLUS function
Return to the frequently viewed channel.
Choose the channel |
RETURN + |
|
Return Plus |
||
you want to |
||
Programmed! |
||
programme |
||
Press and hold |
||
|
||
To cancel |
RETURN + |
|
Return Plus |
||
|
||
|
Canceled! |
|
|
Press and hold |
RETURN function
If you have not set or have cancelled the RETURN PLUS channel, this will return to the previously viewed channel.
Select TV or Video input
Channel information
Channel selection
Select the desired channel number.
For Hyper Scan
CHANNEL
Press and hold
PR changes without changing the picture. Once you stop pressing CHANNEL+ or CHANNEL - button, picture will change to the desired PR.
Turn the TV on from standby |
Colour button |
Turn on “Clear SD” |
Change the aspect ratio (P. 8)
:OOM
!UTO |
0ANORAMIC |
2EGULAR |
|
0ANORAMIC |
|
:OOM:OOM
:OOM 3UBTITLE &ULL
 1. Select
OK |
2. Set
V-Scroll
 16:9 Zoom
Move the picture with 5 or ∞ while this bar is displayed.
Turn on “Sound Meister” |
Turn on “Eco Mode” |
To Teletext (P. 12) |
Display on-screen menu |
Operate the menu |
To previous screen |
Adjust the volume, Turn off muting |
View the Teletext (P. 12) |
Favourite channel setting. (P. 11)
1. Register the favourite channel
 Set 1-4 ?
Press and hold
Press number button (1-4 only)
Programmed! will be displayed.
2. Recall the favourite channel
Favourite 1-4 ?
Press number button (1-4 only)
Press
•If the favourite channel has not been registed then “No Memory” will be displayed.
3
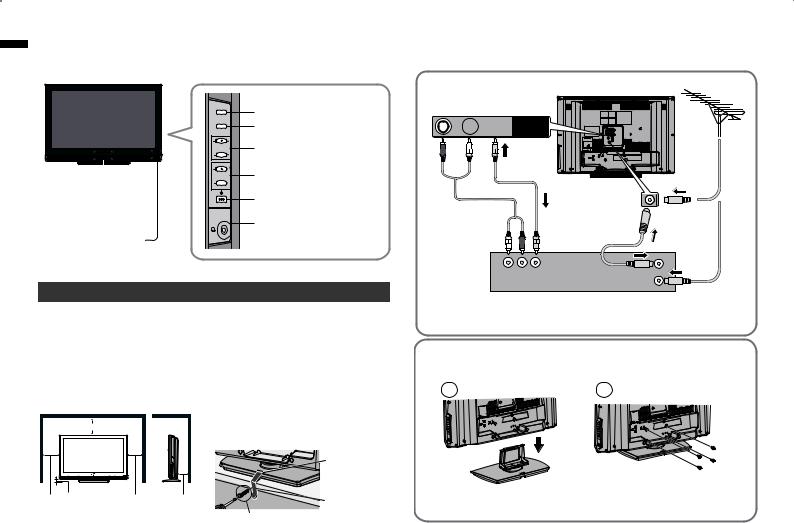
Set up and connections
LT-32EX19
TV/VIDEO
MENU/OK
CHANNEL
Power lamp 
VOLUME
ON : Lit (Blue) OFF : Unlit
Power lamp lights while the TV is on.
• “Power Lamp” (P. 11)
Remote control sensor 
Switch between TV / VIDEO devices
Display on-screen menu / set
Change channel / Page / Hyper Scan Function (P. 3)
Volume / Adjust
Power On / Off
To Headphone (P. 5)
Care when setting
■ Power requirements
•Connect the power cord only to a 110-240V, 50/60Hz AC outlet.
■ When attaching the TV to the wall, use the optional JVC wall mounting unit
•Consult a qualified technician.
•JVC assumes no responsibility for damage due to improper mounting.
•200 mm x 200 mm mount which conforms to VESA standards.
■ Installation requirements
• To avoid overheating, ensure the unit has ample room.
|
|
|
• To prevent the TV from falling thread |
MM |
|
|
the belt through the hole on the back of |
|
|
|
the stand and secure it to the TV rack. |
|
|
|
Hole for belt |
MM MM |
MM |
MM |
Belt |
LT-32EX19 |
|
|
(not provided) |
|
|
Screw (not provided) |
Connect an aerial and VCR / DVD Player
AERIAL
LT-32EX19
 R
R  L
L  V VIDEO-2
OR
VCR (DVD Player)
•After all the connections have been made, insert the plug into an AC outlet.
Stand Assembly
-Insert the stand into the panel at the position where the screw holes are, and fasten the screws.
1 |
2 |
LT-32EX19
-If you have any problem with assembly, please contact a retailer or a dealership.
Note: 4 screws included.
4

Set up and connections (continued)
You can connect many different devices to the rear panel of the TV. Please read the user manuals of each device before setup.
(Connecting cables are not supplied with this TV.)
HDMITM Connector.
LT-32EX19
Headphones
HDMI-1 HDMI-2 HDMI-3
DIGITAL VIDEO/AUDIO
To “HDMI-1” |
To “HDMI-3” |
Component input |
Composite input |
DVD player |
|
(HDMI compatible) |
|||
|
|
R |
L |
V |
R |
L |
V |
|
|
VIDEO-1 |
|
|
VIDEO-1 |
Pr |
Pb |
Y |
Pr |
Pb |
Y |
Game Video
C
JV
DVD Player |
VCR |
To Video-2
Game consoles Video camera
JVC
PC input line in
PC
•Check for PC compatibility.
“PC signals that can be displayed” (P. 14)
|
R |
L |
V |
OUTPUT |
L |
R |
L |
V |
|
|
|
|
|
VIDEO-1 |
R |
Pr |
Pb |
Y |
|
HDMI-1 |
R |
L |
V |
VIDEO-2 |
( DVI ANALOG AUDIO ) |
||||
|
PC AUDIO |
|
|
PC |
|
|
|
PC IN |
|
|
|
|
(D-SUB) |
|
HD Video camera
To “HDMI-2” 
 DVD player
(HDMI compatible)
VCR / DVD recoder
Amplifier
(L)(R)
VIDEO-1 Watching videos
Output Input
•Composite signal / Component signal (P. 16)
•Sound L / R
•Use Component signal
“Video - 1 Setting” (P. 12)
VIDEO-2 Watching videos
Output Input
•Composite signal
•Sound L / R
HDMI-1
HDMI-2 Connecting HDMI devices
HDMI-3
Output Input
 • HDMI signal (P. 16)
•“HDMI Setting” (P. 12)
•HDMI-2 and HDMI-3 inputs do not support analogue sound.
•Connect a “DVI” device to “HDMI-1” (P.14)
•Please use a High Speed HDMITM Cable. High Speed HDMITM Cables are tested to carry an HD signal up to 1080p and higher.
OUT
Video and sound signal of a TV channel you are viewing outputs from this terminal
Output
•Composite signal
•Sound L / R
5
Loading...