


|
Downloaded |
|
|
from |
|
|
www |
|
|
. |
|
|
vandenborre |
|
|
. |
|
|
be |
|
LT-24HA72U |
|
|
Operating Instructions |
English |
|
Mode d'emploi |
||
Handleiding |
||
|
||
|
French |
|
|
Dutch |

Downloaded from
www .  vandenborre
 .
. 

 be
be
EN
You get the smartcard from your cable supplier (CAMs are customary). Insert the smartcard into the CAM, and then insert the CAM into the CI slot of your TV set.


 modules
KESA Electricals SAS 37 Rue dela Victoire, 75009 Paris, France
EN 2

Features............................................................................................... |
2 |
Contents............................................................................................... |
3 |
Downloaded from
www . vandenborre . be
Important Safety Information |
...................................................................4-8 |
Installation............................................................................................ |
9-12 |
Remote Control..................................................................................... |
13-14 |
Operation............................................................................................. |
15-24 |
Troubleshooting table............................................................................ |
25-29 |
Specification......................................................................................... |
30 |
License Information............................................................................... |
31 |
EN
3 EN

Downloaded from
www . vandenborre . be
 100-240V~50/60Hz
EN

 it is damaged.
 broken glass. You could be hurt or the unit could become damaged.


 to allow for air circulation.
EN 4
Downloaded from
www . vandenborre . be
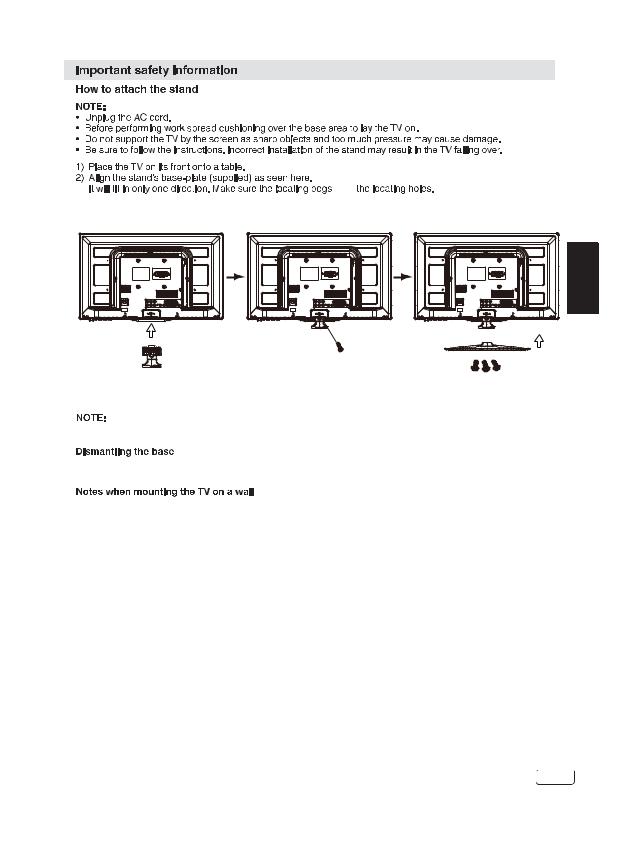
fit in  Carefully hold the base plate in position and secure it with screws.
Stand Neck
Screw (4x 20PWB)
EN |
Screw (4 x 10PWB)
 To detach the base plate,perform these steps in reverse order.
For wall mounting,the base must be dismantled.To do this,remove screws from the back. (100x100mm,).
Remove the stand as one piece by reversing the fixing procedure described above. You can refit the screws to the stand for safe keeping, but tighten them only slightly. FIXING SCREWS
4xM4x5mm
Protect the screen and lay the TV flat on its face, on a stable table, with the stand foot clear of the table edge.
To ensure a safe installation, please observe the following when hanging the television on a wall: Warning: This operation requires two people.
Check that the wall can support the weight of the television set and a VESA-standard wall mount assembly (not supplied).
Be sure to use only screws suitable for the material of the wall. In case of any doubt please contact a qualified installer. Beware of electrical cables, gas and water pipes in the wall. Follow the instructions provided with the wall mount.
The set must be installed on a vertical wall.
Make sure that cables are placed so that there is no danger of tripping over them or damaging them.
5 EN
Downloaded from
www .  vandenborre .


 be
be
EN
 it on the edge.
 While cleaning, do not wear jewelry that could cause surface scratching (such as rings, wrist-watch, etc.).
  the
the 
EN 6
Safety Information
Safe use and care of your television
We have designed and made this television to meet European Safety Standards, but as with any electronic equipment you must take care, to stay safe and get the best results. Here is some good advice to help you do this.
Read these instructions carefully before you try to use the television.
Protect the mains lead. You must ensure the mains lead cannot be walked on, crushed, chafed, cut or trapped.
Switch off the mains power or pull out the mains plug when you leave the television unattended, unless the function of the television requires a continuous power supply.
Do not continue to use your television if you have spilt liquids in it, if it is damaged in any way or if it does not work normally. Immediately unplug the television and get expert advice.
Avoid harsh conditions such as wet or damp places, high humidity, strong vibration, extremely high or low temperatures, strong sunlight and places that are very dusty.
Never fit makeshift stands or legs to the television. Never push objects into holes and ventilation slots. To prevent electric shock do not remove any cover.
Do not touch the LED display as it gets warm when in use, this is normal and is not a fault.
If anything goes wrong do not try to fix it yourself, get a qualified service agent to look at it.
Pull out the mains plug and disconnect the aerial lead during thunder storms.
Cleaning
Disconnect the mains supply and use only a lightly dampened soft cloth. Do not use chemical solvents or strong detergents as these may damage the cabinet or screen.
Downloaded |
|
|
from |
|
|
www |
||
|
. |
|
Never allow water droplets to remain on the |
vandenborre |
|
screen as moisture can cause permanent |
. |
|
be |
||
discolouration. |
||
|
||
Greasy marks must only be removed with a |
|
|
commercial cleaner specifically recommended for |
|
|
LED screens. |
|
|
Mains Supply |
|
|
This television is designed to operate from a 100- |
|
|
240 Volts 50/60Hz AC mains supply. Other power |
|
|
sources |
|
|
may damage it. Check that the rating plate (on the |
|
|
back cover of the television) states 100-240V AC |
EN |
|
before you plug it in for the first time. |
||
|
||
The manufacturer accepts NO liability for damage or injury caused by using the product with the wrong mains voltage.
Dangerous voltage constituting a risk of electric shock is present inside this equipment.
This equipment is double insulated and an earth connection is not required.
This mark is applied to show the equipment conforms to European safety and electro-magnetic compatibility standards.
7 EN

|
Downloaded |
|
|
|
from |
||
|
|
www |
|
|
|
. |
|
|
|
|
vandenborre |
|
|
|
|
Eye Fatigue |
|
|
|
Safety Information (cont) |
|
|
|
|
|
. |
|
When using this product as a computer monitor, health and safety experts recommend short |
|
be |
|
|
|
||
frequent breaks rather than occasional longer breaks. For example a 5-10 minute break after an hour of continuous screen work is considered to be better than a 15 min break every 2 hours. Do not use the monitor against a bright background or where sunlight or other bright light sources will shine directly onto the screen.
EN
WARNINGS:
This appliance is intended for domestic household use only and should not be used for any other purpose or on any other application, such as for non-domestic use or use in a commercial environment.
If the supply cord is damaged it must be replaced by the manufacturer, its service agent or similarly qualified persons in order to avoid a hazard.
This apparatus shall not be exposed to dripping or splashing and that no objects filled with liquids, such as vases shall be placed on the apparatus.
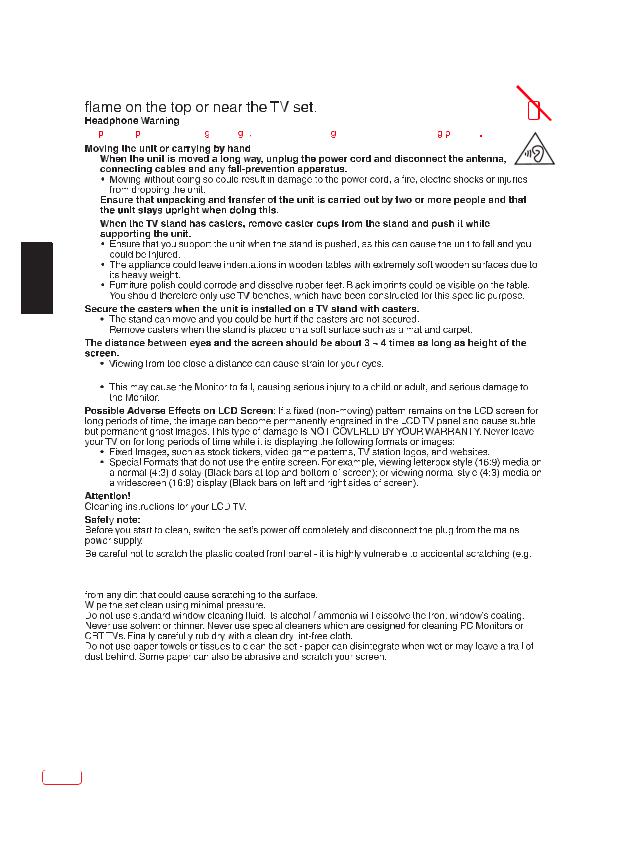
No naked flame sources, such as lighted candles should be placed on the apparatus.
The ventilation should not be impeded by covering the ventilation openings, with items such as newspapers, tablecloths, curtains etc.
WARNING: To prevent injury, this apparatus must be securely attached to the floor/wall in accordance with the installation instructions.
EN 8

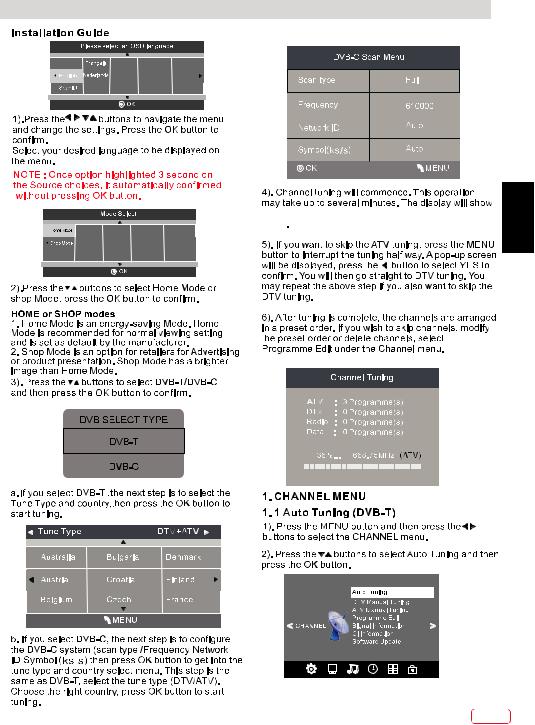
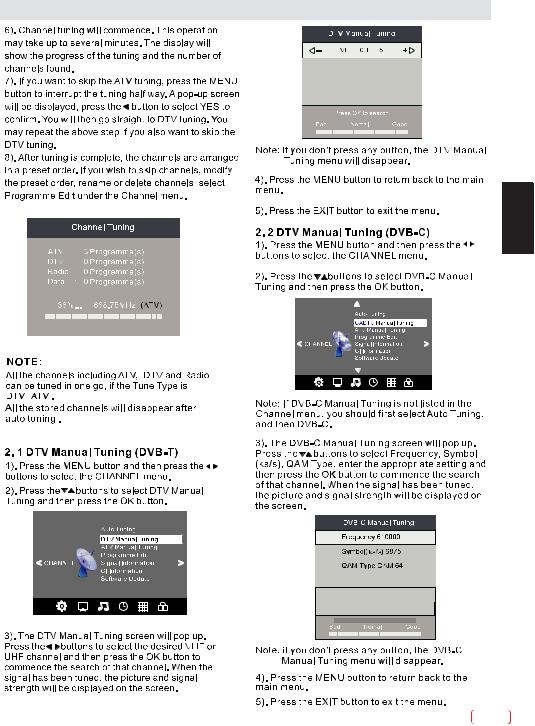
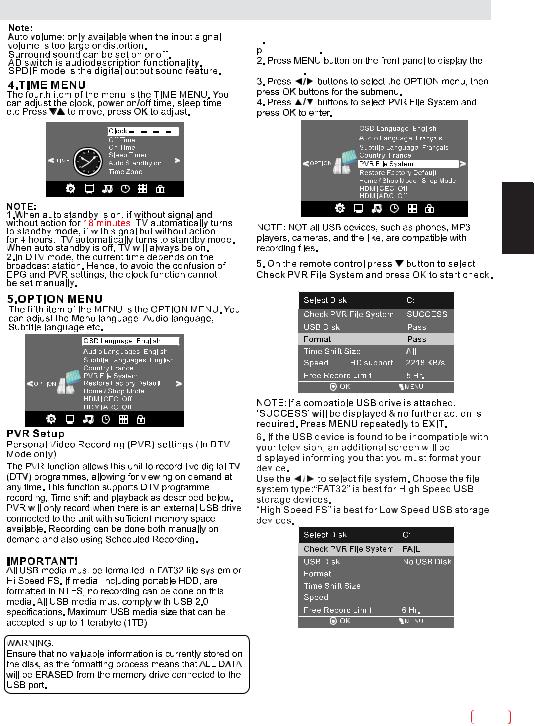
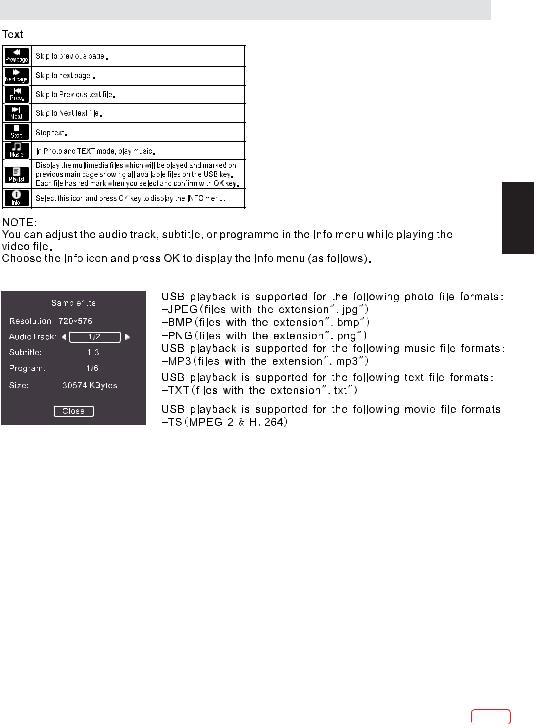
Installation
Front panel |
KEYBOARD |
1 |
2 |
3 |
Downloaded |
|
|
|
from |
|
|
|
www |
|
|
. |
|
|
vandenborre |
|
|
. |
4 |
5 |
be |
|
||
SOURCE MENU V- V+ CHCH+ Standby
|
|
3 |
1 |
|
|
2 |
|
1: |
Remote Control Sensor. |
|
|
2: |
Power Indicator LED: |
|
|
3: |
RED |
STANDBY. |
30 30 |
Buttons |
|
|
|
REAR AV Connections
COAXIAL OUTPUT
1.SOURCE: Displays the input source menu; press repeatedly to move down the menu and press "VOL-" or "VOL+" to select the required source.
2.MENU: Display main MENU.
3.VOL+/VOL-: Adjust sound level. In MENU mode,
press "VOL+ " or "VOL- " to adjust the item that you selected.
4.CH+/CH-: In TV mode, press "CH+" or "CH-" to change the channel up and down. In MENU mode, press "CH+" or "CH-" to select items.In standby mode, press "CH+" or "CH-" to turn on the TV.
5.STANDBY: Press this button to turn the unit ON
from STANDBY mode. Press it again to turn the set back to STANDBY.
All the terminals are(from left to right):YPbPr INPUT,VIDEO,AUDIO INPUT,COAXIAL OUTPUT,SCART. Note: VIDEO and YPbPr share one audio channel.
EN
REAR AV Connections(SIDE)
All the terminals are(from left to right):
USB, HDMI2, HDMI1(ARC), HEADPHONE, CI, PC AUDIO, VGA, RF.
Note: 1.When HDMI port gets DVI signal ,the audio signal is received from the PC Audio channel. 2.Insert the plug of the earphone into the headphone jack on the unit.
The speakers are then muted.
9 EN
Installation
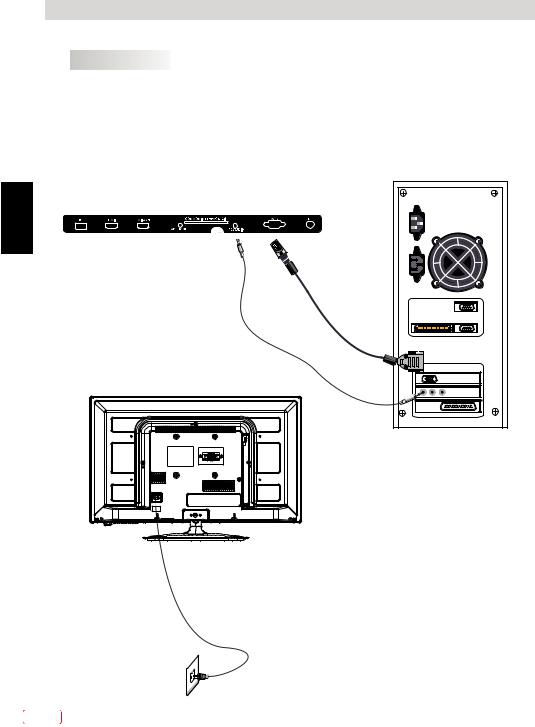
PC
STEPS:
Be sure both the TV and computer are set to Power off.
1.Connect VGA and audio cable. 2.Connect the power cord.
3.Power on the TV, switch to PC mode. 4.Power on the PC.
This sequence is very important.
EN
Downloaded from
www . vandenborre . be
EN 10
Installation
PC
PRESET MODE
Downloaded from
www . vandenborre . be
|
RESOLUTION |
V.Freq.(Hz) |
H.Freq.(KHz) |
|
|
|
|
1 |
800*600 |
60 |
37.88 |
|
|
|
|
2 |
640*480 |
60 |
31.47 |
|
|
|
|
3 |
1024*768 |
60 |
48.36 |
|
|
|
|
5 |
1366*768 |
60 |
47.7 |
|
|||
|
|
|
|
6 |
1280*960 |
60 |
60 |
|
|
|
|
7 |
1280*720 |
60 |
45 |
|
|
|
|
8 |
1360*768 |
60 |
47.7 |
|
|
|
|
EN
ANTENNA
Note:
Aerial connections: IEC(female). Input impendance: 75 unbalanced.
11 EN

|
Downloaded |
||
|
|
from |
|
|
|
www |
|
|
|
. |
|
|
|
|
vandenborre |
AV EQUIPMENT |
|
|
|
Installation |
|
|
|
|
|
. |
|
This TV provides one group of AV, one group of YPbPr and one SCART for convenient |
|
be |
|
connection to VCR, DVD or other video equipment. Please refer to the owners manual of the equipment to be connected.
REAR AND SIDE CONNECTIONS
EN
HDMI |
VIDEO EQUIPMENT with YPbPr
G B R |
W R |
|
Y Yellow (video)
W White(audio L)
R Red(audio R or Pr)
B Blue(Pb)
G Green(Y)
W |
R |
G 
 B
B  R
R
COAXIAL OUTPUT
Y |
W |
R |
VIDEO EQUIPMENT
R
W

Y
TO VIDEO
OUTPUTS
TO AUDIO OUTPUTS
It can be connected to the following appliances: VCR, multi disc player, DVD, camcorder, video game or stereo system, etc.....
YPbPr can support these video formats: 480i,576i,480p,576p,720p,1080i,1080p.
EN 12

REMOTE CONTROL
Downloaded from
www . vandenborre . be
EN
13 EN

EN
|
|
Downloaded |
|
|
|
|
from |
||
|
|
|
www |
|
|
|
|
. |
|
|
|
|
|
vandenborre |
REMOTE CONTROL |
|
|||
|
|
|||
|
TELETEXT |
|
. |
|
|
|
|
||
|
Teletext is an information system broadcast by certain channels which can be read like a |
|
be |
|
|
newspaper. It also offers access to subtitles for viewers with hearing problems or who are not |
|
|
|
|
familiar with the transmission language (cable networks, satellite channels, etc.) |
|
|
|
|
|
|
|
|
|
Press : |
E |
|
|
|
You will obtain : |
|
|
|
|
|
This is used to enter or exit teletext mode. The summary appears with a |
|
|
|
T EXT |
list of items that can be accessed. Each item has a corresponding 3 digit |
|
|
|
(BUTTON 6) |
page number. |
|
|
|
|
|
|
|
|
|
Enter the number of the page required using the 0 to 9 up/down. Example: |
|
|
|
SELECTING A PAGE |
page 120, enter 120. The number is displayed top left, the counter turns |
|
|
|
|
and then the page is displayed. Repeat this operation to view another |
|
|
|
|
page. If the counter continues to search, this means that the page is not |
|
|
|
|
transmitted. Select another number. |
|
|
|
|
|
|
|
|
DIRECT ACCESS |
Coloured areas are displayed at the bottom of the screen. The 4 coloured |
|
|
|
keys are used to access the items or corresponding pages. The coloured |
|
|
|
|
TO THE ITEMS |
|
|
|
|
areas flash when the item or the page is not yet available. |
|
|
|
|
|
|
|
|
|
|
|
|
|
|
INDEX |
This returns to the contents page (usually page 100). |
|
|
|
(BUTTON 19) |
|
|
|
|
|
|
|
|
|
SUB PAGE |
Certain pages contain sub-pages which are automatically displayed |
|
|
|
successively. This key is used to stop or resume sub-page |
|
|
|
|
(BUTTON 2) |
|
|
|
|
acquisition. The number appears top left. |
|
|
|
|
|
|
|
|
|
|
|
|
|
|
HOLD |
To freeze the page. |
|
|
|
(BUTTON 18) |
|
|
|
|
|
|
|
|
|
|
|
|
|
|
REVEAL |
To display or hide the concealed information (games solutions). |
|
|
|
(BUTTON 3) |
|
|
|
|
|
|
|
|
|
|
The user can set four favorite pages to be directly linked to the four colour |
|
|
|
LIST |
keys. The favorite page numbers should be stored and restored to/from |
|
|
|
(BUTTON 17) |
nonvolatile memory for each channel by the system software. |
|
|
|
|
|
|
|
EN 14
OPERATION
Downloaded from
www . vandenborre . be


 EN
EN
15 EN

OPERATION
EN
Downloaded from
www . vandenborre 


 .
. 


 be
be
EN 16
OPERATION
Downloaded from
www . vandenborre . be
EN
17 EN

OPERATION
EN
Downloaded from
www . vandenborre . be
EN 18
OPERATION
Downloaded from
www . 


 vandenborre .


 be
be
EN
19 EN

OPERATION
EN
Downloaded from
www . vandenborre . be
EN 20
OPERATION
Downloaded from
www . vandenborre . be
EN
21 EN

OPERATION
Downloaded from
www . vandenborre 
 .
.  be
be
EN |
EN 22
OPERATION
Downloaded from
www . vandenborre . be
EN
23 EN

OPERATION
EN
Downloaded from
www . vandenborre . be
EN 24
|
|
Downloaded |
|
|
|
|
|
|
from |
|
|
|
|
|
|
www |
||||
|
|
|
. |
|
||
|
|
|
|
|
vandenborre |
|
Troubleshooting table |
|
|
|
|||
|
|
|
|
|
|
|
TV Troubleshooter |
|
|
|
|
|
|
A check through the guide below could save you the trouble of returning your purchase or waiting for a |
. |
|||||
service engineer. If you require assistance with operating this product you can phone our help line during |
||||||
normal office hours. |
|
|
|
|
|
be |
|
|
|
|
|
|
|
Analogue TV & general |
Sound |
|
|
|
|
|
|
|
|
|
|
|
|
Symptoms |
Possible causes |
What to do |
|
|
|
|
|
|
|
|
|
|
|
No sound |
The volume is set to minimum. The mute is |
Turn the volume up. Press the mute |
|
|
|
|
switched on. |
|
|
|
|
||
|
button to release 'mute'. |
|
|
|
|
|
|
|
|
|
|
|
|
|
|
|
|
|
|
|
Crackling noises or distorted sound. |
nterference from cars, fluorescent lights, |
Turn off one piece of equipment at a |
|
|
|
|
|
video recorder, a radio broadcast, personal |
time to see if the interference clears. |
|
|
|
|
|
computer or other equipment. |
See also what to do for picture |
|
|
|
|
|
|
interference. |
|
|
|
|
|
|
|
|
|
EN |
|
Stereo switching to mono. |
Aweak signal or a mono broadcast. |
Check the signal and your aerial |
|
|
|
|
|
|
system. |
|
|
|
|
|
|
|
|
|
|
|
No stereo sound from equipment |
A mono scart lead is being used to connect |
Check that the scart lead is stereo. |
|
|
|
|
connected to the scart (AV) socket. |
the television. The signal being viewed is |
Check the video recorder is |
|
|
|
|
|
connected through the aerial socket. |
connected to the television through |
|
|
|
|
|
|
an AV (scart) lead, then switch the |
|
|
|
|
|
|
television to AV mode. |
|
|
|
|
|
|
|
|
|
|
|
|
|
|
|
|
|
|
Analogue TV & general |
Picture |
|
|
|
|
|
|
|
|
|
|
|
|
Symptoms |
Possible causes |
What to do |
|
|
|
|
|
|
|
|
|
|
|
Grainy (snowy) picture |
Cl disconnected. |
If you have a video recorder try |
|
|
|
|
|
|
|
|
|
||
|
Your video recorder could be faulty. |
plugging the aerial directly into the |
|
|
|
|
|
Transmitter trouble. |
television. If the fault clears, the |
|
|
|
|
|
The outside aerial has moved, or is |
video recorder is probably faulty. |
|
|
|
|
|
damaged. |
Have your aerial system checked. |
|
|
|
|
|
|
|
|
|
|
|
Extra outlines on objects in the picture |
The aerial is receiving reflected signals |
Try to tune in a better signal from |
|
|
|
|
(ghosts). |
|
|
|
|
||
the same television station. |
|
|
|
|
||
from hills or buildings. Faulty aerial |
|
|
|
|
||
|
|
|
|
|
||
|
Get your aerial system checked. |
|
|
|
|
|
|
system. |
|
|
|
|
|
|
|
|
|
|
|
|
|
|
|
|
|
|
|
Picture interference like spots or |
Weak aerial signal. Interference from |
Try to tune in a better signal from |
|
|
|
|
streaks. |
electrical equipment such as power |
the same television station. Get |
|
|
|
|
|
tools and motors. |
your aerial system checked. Move |
|
|
|
|
|
Settings for the digital video equipment |
the interfering equipment further |
|
|
|
|
|
output do not match the monitors VGA |
away or if possible, turn it off. |
|
|
|
|
|
or DVI input specifications. |
Change the refresh rate or |
|
|
|
|
|
|
resolution settings on the digital |
|
|
|
|
|
|
equipment, if possible. |
|
|
|
|
|
|
|
|
|
|
|
Picture is the wrong size or the source |
Source device has not read the set-up |
Avoid old cables and adapter |
|
|
|
|
devices. Use only modern cables. |
|
|
|
|
||
device (computer, DVD player, set top |
data from the display. Connecting cable |
|
|
|
|
|
Re-start the source device after |
|
|
|
|
||
box and so on) will not let you set up the |
does not have all the necessary |
|
|
|
|
|
connecting and powering up the |
|
|
|
|
||
pixel resolution the display can |
connections. |
|
|
|
|
|
display. Change the graphics |
|
|
|
|
||
reproduce. |
|
|
|
|
|
|
|
adapter in your computer. Check |
|
|
|
|
|
|
|
|
|
|
|
|
|
|
compatible video resolutions given |
|
|
|
|
|
|
in these instructions. |
|
|
|
|
|
|
|
|
|
|
|
25 EN

|
|
|
|
|
Downloaded |
|
|
|
|
|
|
from |
|
|
|
|
|
|
www |
|
|
|
|
|
|
|
. |
|
|
|
|
|
|
vandenborre |
|
|
Troubleshooting table |
|
|
||
|
|
|
|
|
||
|
|
|
|
|
|
. |
|
|
Picture looks squashed or |
Equipment feeding the |
On the equipment feeding the TV choose the correct |
||
|
|
be |
||||
|
|
stretched even though the |
display is set to the wrong |
output aspect ratio such as 4:3 or 16:9 to match the |
||
|
|
aspect ratio controls are |
aspect ratio. |
TV. On digital equipment you might choose 1280 x |
|
|
|
|
set correctly (for example |
|
|||
|
|
|
960 pixels to match 4:3 screens or |
|
||
|
|
4:3 or 16:9). |
|
|
||
|
|
|
1280 x 768 pixels to match 16:9 screens. |
|
||
|
|
|
|
|
||
|
|
|
|
|
|
|
|
|
Picture interference like |
Some other equipment is |
Put other equipment on stand-by to see if the |
|
|
|
|
wavy lines or patterns. |
using the same frequency. |
interference stops: change the output frequency of |
|
|
|
|
Sound or colour |
Poor quality cable in the path |
the equipment that is causing interference(see its |
|
|
|
|
interference may also be |
between the TV and the TV |
instructions). Get higher quality cable. |
|
|
|
|
aerial.Your aerial system is |
|
|||
|
|
present. |
Get your aerial system checked. |
|
||
|
|
|
receiving an unwanted signal |
|
||
|
|
|
|
|
|
|
|
|
|
on the same frequency. |
|
|
|
|
|
|
|
|
|
|
EN |
|
No picture. |
Brightness and contrast |
Increase the brightness and contrast settings. |
|
|
|
|
levels are set to minimum. |
|
|
|
|
|
|
|
|
|
|
|
|
|
Jumbled teletext |
Poor quality signal |
As for 'Snowy picture' and 'Ghosts' |
|
|
|
|
characters |
|
|
|
|
|
|
|
|
|
|
|
|
|
|
|
|
|
|
|
|
When RGB input is |
Synchronisation signal is |
Press the AV button to select the AV input which |
|
|
|
|
used there is a |
|
|||
|
|
missing. |
receives the synchronisation signal. |
|
||
|
|
distorted picture or no |
|
|||
|
|
|
|
|
|
|
|
|
picture. |
|
|
|
|
|
|
|
|
|
|
|
|
|
Analogue TV & general |
Sound |
|
|
|
|
|
|
|
|
|
|
|
|
Symptoms |
Possible causes |
|
What to do |
|
|
|
|
|
|
|
|
|
|
Television seems 'dead' - |
Mains supply missing. Main |
|
Make sure it is not a general power cut. |
|
|
|
no lights come on and |
power switch is off. |
|
|
|
|
|
nothing works. |
|
|
|
|
|
|
|
|
|
|
|
|
|
The stand-by light is on |
Blown fuse or circuit breaker. |
|
Check the power switches on the television and at the |
|
|
|
but the buttons don't seem |
|
|
||
|
|
Try the front panel |
|
power outlet. Check the fuse or circuit breaker at your main |
|
|
|
|
to work. |
STANDBY/ON button: if TV |
|
fuse box. Look for a possible cause of failure before you |
|
|
|
|
|
|
||
|
|
|
comes on then check "The |
|
replace or re-set it. Disconnect power supply, wait five |
|
|
|
|
remote does not function". |
|
minutes and try front panel STANDBY/ON. If still no good, |
|
|
|
|
|
|
disconnect power supply and assume the unit is faulty. |
|
|
|
|
|
|
|
|
|
|
Local function buttons do |
Micro-controller confused by |
|
Switch off mains power and wait 10 minutes before trying |
|
|
|
not work. Stuck on stand- |
electrical disturbance. |
|
again. (Leave the TV unplugged and call a service |
|
|
|
by. |
|
|
engineer if this does not work.) |
|
|
|
|
|
|
|
|
|
|
|
|
|
|
|
|
|
Analogue TV & general |
Remote |
|
|
|
|
|
|
|
|
|
|
|
|
Wrong functions or short |
Batteries run down. |
|
Insert new batteries |
|
|
|
range. |
Obstacle in the way. |
|
Remove any objects and aim from straight in front of the |
|
|
|
|
|
|
remote sensor with a clear line of sight. |
|
|
|
|
|
|
|
|
EN 26

Troubleshooting table
Digital Terrestrial TV Troubleshooter
Downloaded from
www . vandenborre . be
Symptoms |
Possible causes |
What to do |
|
|
|
|
|
|
|
Picture blocking or |
Weak signal or wrong type of |
Try re-tuning. |
|
|
freezing. Sound breaking |
aerial. |
Aerial may not be suitable for digital TV broadcasts. |
|
|
up. |
|
You may be in a place which does not get a good digital TV |
|
|
|
|
signal. |
|
|
Some channels are |
Not receiving one or more |
Get an aerial rigger to check the aerial system. |
|
|
missing. |
|
|
|
|
digital multiplex frequencies. |
|
|
|
|
|
|
|
|
|
|
|
|
|
EN |
|
|
|
|
|
Any or all of the above |
Interference or other problem |
Try connecting the aerial directly to the digital TV receiver |
|
|
faults. |
caused by passing aerial signal |
and then re-tuning. |
|
|
through other equipment. |
|
|
||
|
If some equipment has a radio frequency modulator, switch |
|
|
|
|
|
|
|
|
|
|
it off or change the frequency of it and re-tune the analogue |
|
|
|
|
TV. (Please see other equipments instructions for how to |
|
|
|
|
do this.) |
|
|
|
|
|
|
|
Multiplex
DVB-T (Digital Video Broadcasting - Terrestrial) is broadcast in groups of channels on one common frequency. This arrangement is known as a Multiplex.
There are several multiplexes in the DVB-T system, each carrying a group of channels.
If the signal level on a particular multiplex frequency is poor you may lose the whole group of channels on that multiplex.
27 EN

|
|
|
|
|
Downloaded |
|
|
|
|
|
|
|
from |
|
|
|
|
|
|
|
www |
||
|
|
|
|
|
|
. |
|
|
|
|
|
|
|
|
vandenborre |
|
|
Troubleshooting table |
|
|
|
||
|
|
|
|
|
|
||
|
|
|
|
|
|
. |
|
|
|
|
Computer Monitor TV and HDMI Troubleshooter |
|
be |
||
|
|
|
|
|
|||
|
|
|
|
|
|
|
|
|
|
Sound |
|
|
|
|
|
|
|
|
|
|
|
|
|
|
|
Symptoms |
Possible causes |
|
Possible solutions |
|
|
|
|
|
|
|
|
|
|
|
|
No sound |
HDMI input is being fed through |
|
Connect sound output from the DVI equipment to an |
|
|
|
|
|
a conversion connector from |
|
external amplifier. |
|
|
|
|
|
equipment with a DVI output. |
|
|
|
|
|
|
|
|
|
|
|
|
|
|
|
|
|
|
|
|
|
|
|
|
Picture |
|
|
|
|
|
|
|
|
|
|
|
|
|
Symptoms |
Possible causes |
|
Possible solutions |
|
|
EN |
|
|
|
|
|
|
|
|
No picture. |
Settings for the digital video |
|
Change the refresh rate or resolution settings of the |
|
|
|
|
|
|
|
|
|||
|
|
On-screen message |
equipment feeding the TV do |
|
computer graphics adaptor or other digital equipment. |
|
|
|
|
indicates video input is not |
not match the TV input |
|
|
|
|
|
|
compatible. |
requirements. |
|
|
|
|
|
|
|
|
|
|
|
|
|
|
Computer feeding the TV |
Computer has not exchanged |
|
Re-start the computer while the television is still connected |
|
|
|
|
does not offer you suitable |
information with the television. |
|
to the power supply, then try again. |
|
|
|
|
settings to match the TV |
In older computers, the |
|
In exceptional cases, you may need to go into the |
|
|
|
|
requirements. |
graphics adaptor might be |
|
computer graphics adaptor settings and clear the check |
|
|
|
|
|
obsolete. |
|
box for Show only settings this monitor can support. For |
|
|
|
|
|
|
|
|
|
|
|
|
|
|
|
Microsoft Windows this can be found by right-clicking on |
|
|
|
|
|
|
|
the Desktop and following Properties - Display |
|
|
|
|
|
|
|
Properties - Settings - advanced tab Monitor tab. The |
|
|
|
|
|
|
|
availability of this function and the method of adjustment |
|
|
|
|
|
|
|
varies with computer operating system. |
|
|
|
|
|
|
|
Upgrade your graphics adaptor. |
|
|
|
|
|
|
|
|
|
|
|
|
Picture is not clear. |
Television needs to be set up for |
|
For computer analogue RGB input (also known as VGA-or |
|
|
|
|
Picture is in the wrong |
the computer analogue RGB |
|
D-sub-, activate the automatic set-up function. The phase, |
|
|
|
|
position. |
input (also known as VGA - or - |
|
frequency, vertical and horizontal position controls might |
|
|
|
|
|
sub). |
|
also need slight adjustment. |
|
|
|
|
|
Some input resolutions produce |
|
Check information in the computer monitor section of these |
|
|
|
|
|
a clearer picture than others. |
|
instructions and try a different resolution setting. |
|
|
|
|
|
|
|
|
|
|
|
|
Picture looks squashed |
the wrong aspect ratio. |
|
For a TV with a computer monitor function fed from the |
|
|
|
|
or stretched. |
Equipment feeding the TV is |
|
computer analogue RGB connector (also known as VGA or |
|
|
|
|
|
set to |
|
D-sub, set up the computer graphics adaptor resolution to |
|
|
|
|
|
|
|
have the same aspect ratio as the TV screen. (Aspect ratio |
|
|
|
|
|
|
|
means the ratio of width to height, which in this case is |
|
|
|
|
|
|
|
measured in pixels.) |
|
|
|
|
|
|
|
|
|
|
We have made every effort to ensure these instructions are as accurate as possible, however we apologize for any inconvenience caused by minor inconsistencies which may occur as a result of product improvement and development.
EN 28
 Loading...