


Dear Customer
This apparatus is in conformance with the valid European directives and standards regarding electromagnetic compatibility and electrical safety.
European representative of the manufacturer is: Vestel Germany GmbH
Parkring 6
85748 Garching b.München Germany
Contents |
|
Dear Customer......................................................... |
1 |
Contents................................................................... |
1 |
Safety Information.................................................... |
2 |
Markings on the Product.......................................... |
2 |
Environmental Information....................................... |
3 |
Accessories Included............................................... |
3 |
Wall mounting instructions....................................... |
4 |
TV Control Switch & Operation................................ |
5 |
Inserting the Batteries into the Remote.................... |
5 |
Power Connection.................................................... |
5 |
Antenna Connection................................................. |
5 |
License Notification.................................................. |
6 |
Disposal Information................................................ |
7 |
Remote Control........................................................ |
8 |
Switching On/Off...................................................... |
9 |
First Time Installation............................................... |
9 |
Using Satellite Channel Table Feature................... |
10 |
E-Manual................................................................ |
11 |
Connectivity............................................................ |
11 |
Wired Connectivity................................................. |
11 |
Wireless Connectivity............................................. |
12 |
Wake ON................................................................ |
12 |
Wireless Display..................................................... |
13 |
Connecting Bluetooth Devices............................... |
13 |
Using Audio Video Sharing Network Service......... |
13 |
DVB functionality information................................. |
13 |
English - 1 -

Safety Information
CAUTION
RISK OF ELECTRIC SHOCK
DO NOT OPEN
CAUTION: TO REDUCE THE RISK OF ELECTRIC SHOCK DO NOT REMOVE COVER (OR BACK).
NO USER-SERVICEABLE PARTS INSIDE. REFER SERVICING TO QUALIFIED SERVICE PERSONNEL.
In extreme weather (storms, lightning) and long inactivity periods (going on holiday) disconnect the TV set from the mains.
The mains plug is used to disconnect TV set from the mains and therefore it must remain readily operable. If the TV set is not disconnected electrically from the mains, the device will still draw power for all situations even if the TV is in standby mode or switched off.
Note: Follow the on screen instructions for operating the related features.
IMPORTANT - Please read these instructions fully before installing or operating
WARNING: This device is intended to be used by persons (including children) who are capable / experienced of operating such a device unsupervised, unless they have been given supervision or instruction concerning the use of the device by a person responsible for their safety.
•\ Use this TV set at an altitude of less than 2000 meters above the sea level, in dry locations and in regions with moderate or tropical climates.
•\ The TV set is intended for household and similar general use but may also be used in public places.
•\ For ventilation purposes, leave at least 5cm of free space around the TV.
•\ The ventilation should not be impeded by covering or blocking the ventilation openings with items, such as newspapers, table-cloths, curtains, etc.
•\ The power cord plug should be easily accessible. Do not place the TV, furniture, etc. on the power cord.
A damaged power cord/plug can cause fire or give you an electric shock. Handle the power cord by the plug, do not unplug the TV by pulling the power cord. Never touch the power cord/plug with wet hands as this could cause a short circuit or electric shock. Never make a knot in the power cord or tie it with other cords. When damaged it must be replaced, this should only be done by qualified personnel.
•\ Do not expose the TV to dripping or splashing of liquids and do not place objects filled with liquids, such as vases, cups, etc. on or over the TV (e.g., on shelves above the unit).
•\ Do not expose the TV to direct sunlight or do not place open flames such as lit candles on the top of or near the TV.
•\ Do not place any heat sources such as electric heaters, radiators, etc. near the TV set.
•\ Do not place the TV on the floor and inclined surfaces.
•\ To avoid danger of suffocation, keep plastic bags out of the reach of the babies, children and domestic animals.
•\ Carefully attach the stand to the TV. If the stand is provided with screws, tighten the screws firmly to prevent the TV from tilting. Do not over-tighten the screws and mount the stand rubbers properly.
•\ Do not dispose of the batteries in fire or with hazardous or flammable materials.
WARNING - Batteries must not be exposed to excessive heat such as sunshine, fire or the like.
- Excessive sound pressure from earphones or headphones can cause hearing loss.
ABOVE ALL - NEVER let anyone, especially children, push or hit the screen, push anything into holes, slots or any other openings in the case.
Caution |
Serious injury or death risk |
|
|
|
|
Risk of electric shock |
Dangerous voltage risk |
|
|
|
|
Maintenance |
Important maintenance |
component |
|
|
|
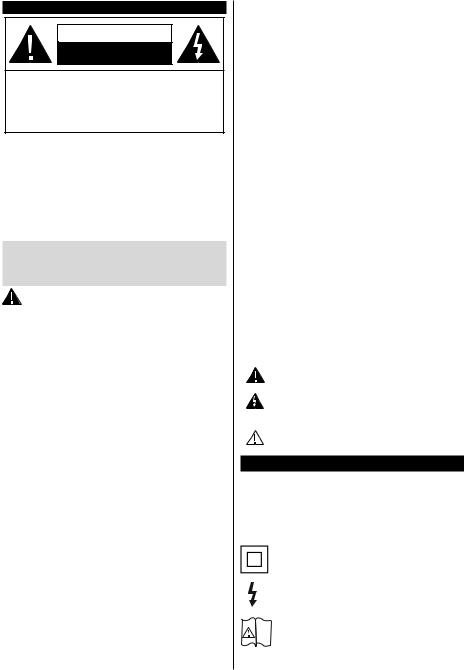
Markings on the Product
The following symbols are used on the product as a marker for restrictions and precautions and safety instructions. Each explanation shall be considered where the product bears related marking only. Note such information for security reasons.
Class II Equipment: This appliance is designed in such a way that it does not require a safety connection to electrical earth.
Hazardous Live Terminal: The marked terminal(s) is/are hazardous live under normal operating conditions.
Caution, See Operating Instructions: The
i marked area(s) contain(s) user replaceable coin or button cell batteries.
Class 1 Laser Product: This
product contains Class 1 CLASS 1 laser source that is safe under
LASER PRODUCT
reasonably foreseeable conditions of operation.
English - 2 -

WARNING
Do not ingest the battery, Chemical Burn Hazard This product or the accessories supplied with the product may contain a coin/button cell battery. If the coin/button cell battery is swallowed, it can cause severe internal burns in just 2 hours and can lead to death.
Keep new and used batteries away from children. If the battery compartment does not close securely, stop using the product and keep it away from children.
If you think batteries might have been swallowed or placed inside any part of the body, seek immediate medical attention.
– – – – – – – – – – – –
Never place a television set in unstable or inclined locations. A television set may fall, causing serious personal injury or death. Many injuries, particularly to children, can be avoided by taking simple precautions such as;
•\ Using cabinets or stands recommended by the manufacturer of the television set.
•\ Only using furniture that can safely support the television set.
•\ Ensuring the television set is not overhanging the edge of the supporting furniture.
•\ Not placing the television set on tall furniture (for example, cupboards or bookcases) without anchoring both the furniture and the television set to a suitable support.
•\ Not standing the television set on cloth or other materials placed between the television and supporting furniture.
•\ Educating children about the dangers of climbing on furniture to reach the television set or its controls. If your existing television set is being retained and relocated, the same considerations as above should be applied.
– – – – – – – – – – – –
Apparatus connected to the protective earthing of the building installation through the MAINS connection or through other apparatus with a connection to protective earthing – and to a television distribution system using coaxial cable, may in some circumstances create a fire hazard. Connection to a television distribution system has therefore to be provided through a device providing electrical isolation below a certain frequency range (galvanic isolator)
WALL MOUNTING WARNINGS
•\ Read the instructions before mounting your TV on the wall.
•\ The wall mount kit is optional. You can obtain from your local dealer, if not supplied with your TV.
•\ Do not install the TV on a ceiling or on an inclined wall.
•\ Use the specified wall mounting screws and other accessories.
•\ Tighten the wall mounting screws firmly to prevent the TV from fall. Do not over-tighten the screws.
Environmental Information
This television is designed to be environment friendly. To reduce energy consumption, you can follow these steps:
If you set the Energy Saving to Minimum, Medium, Maximum or Auto the TV will reduce the energy consumption accordingly. If you like to set the Backlight toafixedvaluesetasCustom and adjust the Backlight
(located under the Energy Saving setting) manually using Left or Right buttons on the remote. Set as Off to turn this setting off.
Note: Available Energy Saving options may differ depending on the selected Mode in the Settings>Picture menu.
The Energy Saving settings can be found in the Settings>Picture menu. Note that some picture settings will be unavailable to be changed.
If pressed Right button or Left button consecutively, “Screen will be off in 15 seconds.” message will be displayed on the screen. Select Proceed and press OK to turn the screen off immediately. If you don’t press any button, the screen will be off in 15 seconds. Press any button on the remote or on the TV to turn the screen on again.
Note: Screen Off option is not available if the Mode is set to Game.
When the TV is not in use, please switch off or disconnect the TV from the mains plug. This will also reduce energy consumption.
WARNING
To prevent fire, never place any type of candle or open flame on the top or near the
TV set.
Accessories Included
•\ Remote Control
•\ Batteries: 2 x AAA* •\ Instruction Book
(*) Limited Models Only
English - 3 -
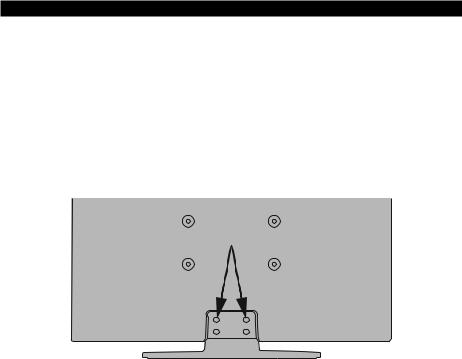
Wall mounting instructions
Wall Mounting the TV
The TV can be mounted on a wall using a MX X*X mm (*) VESA mounting kit supplied separately. Remove the base stand as shown. Mount the TV according to the instructions supplied with the kit. Beware of electrical cables, gas and water pipes in the wall. In case of any doubt please contact a qualified installer. The screw thread length must not exceed X mm (*) into the TV. Contact the store where you purchased the product for information on where to purchase the VESA kit.
(*) Refer to the related additional page for the accurate VESA measurements and screw specifications.
Removing the base stand
•\ To remove the base stand, protect the screen and lay the TV flat on its face on a stable table with the base over the edge. Remove the screws fixing the stand to the TV.
English - 4 -
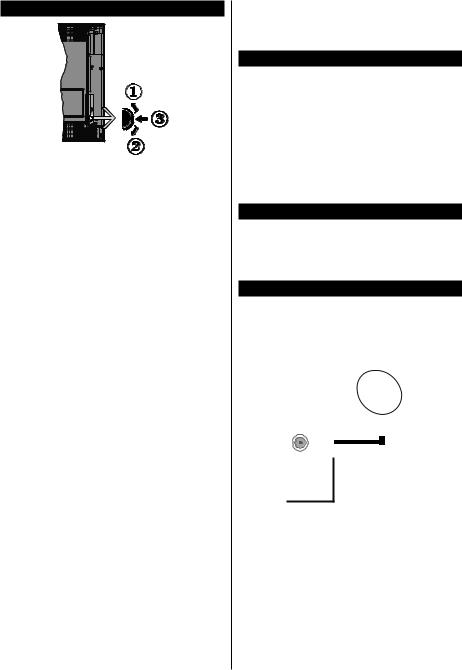
TV Control Switch & Operation
1.\ Up direction 2.\ Down direction
3.\ Volume / Info / Sources List selection and Standby-On switch
The Control button allows you to control the Volume / Programme / Source and Standby-On functions of the TV.
To change volume: Increase the volume by pushing the button up. Decrease the volume by pushing the button down.
To change channel: Press the middle of the button in, the information banner will appear on the screen. Scroll through the stored channels by pushing the button up or down.
To change source: Press the middle of the button in twice(for the second time in total), the source list will appear on the screen. Scroll through the available sources by pushing the button up or down.
To turn the TV off: Press the middle of the button in and hold it down for a few seconds, the TV will turn into standby mode.
To turn on the TV: Press the middle of the button in, the TV will turn on.
Notes:
If you turn the TV off, this cycle starts again beginning with the volume setting.
Main menu OSD cannot be displayed via control button.
Operation with the Remote Control
Press the Menu button on your remote control to display main menu. Use the directional buttons and OK button to navigate and set. Press Return/Back or Menu button to quit a menu screen.
Input Selection
Once you have connected external systems to your
TV,youcanswitchtodifferentinputsources.Pressthe
Source button on your remote control consecutively to select the different sources.
Changing Channels and Volume
You can change the channel and adjust the volume by using the Programme +/- and Volume +/- buttons on the remote.
Inserting the Batteries into the Remote
Remove the back cover to reveal the battery compartment. Insert two size AAA batteries. Make sure the (+) and (-) signs match (observe correct polarity). Do not mix old and new batteries. Replace only with same or equivalent type. Place the cover back on.
A message will be displayed on the screen when the batteries are low and must be replaced. Note that when the batteries are low, the performance of the remote control may be impaired.
Batteries should not be exposed to excessive heat such as sunshine, fire or the like.
Power Connection
IMPORTANT: The TV set is designed to operate on a 220-240VAC,50Hzsupply. After unpacking, allow the TV set to reach the ambient room temperature before you connect the set to the mains. Plug the power cable to the mains socket outlet.
Antenna Connection
Connect the aerial or cable TV plug to the AERIAL INPUT (ANT-TV) socket or satellite plug to the SATELLITE INPUT (ANT SAT) socket located on the rear side of the TV.
Rear side of the TV
1
ANT SAT
ANT-TV
2
1. Satellite
2. Aerial or cable
If you want to connect a device to the TV, make sure that both theTV and the device are turned off before making any connection. After the connection is done, you can turn on the units and use them.
English - 5 -

License Notification
ThetermsHDMIandHDMIHigh-DefinitionMultimedia
Interface, and the HDMI Logo are trademarks or registered trademarks of HDMI LicensingAdministrator, Inc. in the United States and other countries.
Manufactured under license from Dolby Laboratories. Dolby, Dolby Audio, and the double-D symbol are trademarks of Dolby Laboratories.
YouTube and the YouTube logo are trademarks of Google Inc.
For DTS patents, see http://patents.dts.com. Manufactured under license from DTS Licensing Limited. DTS, the Symbol, & DTS and the Symbol together are registered trademarks, and DTS TruSurround is a trademark of DTS, Inc.© DTS, Inc. All Rights Reserved.
For DTS patents, see http://patents.dts.com. Manufactured under license from DTS Licensing Limited. DTS, DTS-HD, the Symbol, & DTS or DTS-HD and the Symbol together are registered trademarks of DTS, Inc.© DTS, Inc. All Rights Reserved.
The Bluetooth® word mark and logos are registered trademarks owned by the Bluetooth SIG, Inc. and any use of such marks by Vestel Elektronik Sanayi ve Ticaret A.S. is under license. Other trademarks and trade names are those of their respective owners.
This product contains technology subject to certain intellectual property rights of Microsoft. Use or distribution of this technology outside of this product is prohibited without the appropriate license(s) from Microsoft.
Content owners use Microsoft PlayReady™ content access technology to protect their intellectual property, including copyrighted content. This device uses PlayReady technology to access PlayReady-protected content and/or WMDRM-protected content. If the device fails to properly enforce restrictions on content usage, content owners may require Microsoft to revoke the device’s ability to consume PlayReady-protected content. Revocation should not affect unprotected content or content protected by other content access
technologies. Content owners may require you to upgrade PlayReady to access their content. If you decline an upgrade, you will not be able to access content that requires the upgrade.
The “CI Plus” Logo is a trademark of CI Plus LLP.
This product is protected by certain intellectual property rights of Microsoft Corporation. Use or distribution of such technology outside of this product is prohibited without a license from Microsoft or an authorized Microsoft subsidiary.
DVB is a registered trademark of the DVB Project.
This product is manufactured, distributed and warranted exclusively by VESTELTicaretA.Ş and serviced by its designated service providers. “JVC” is the trademark of JVC KENWOOD Corporation, used by such companies under licence.
English - 6 -

Disposal Information
[European Union]
These symbols indicate that the electrical and electronic equipment and the battery with this symbol should not be disposed of as general household waste at its end-of-life. Instead, the products should be handed over to the applicable collection points for the recycling of electrical and electronic equipment as well as batteries for proper treatment, recovery and recycling in accordance with your national legislation and the Directive 2012/19/EU and 2013/56/EU.
By disposing of these products correctly, you will help to conserve natural resources and will help to prevent potential negative effects on the environment and human health which could otherwise be caused by inappropriate waste handling of these products.
For more information about collection points and recycling of these products, please contact your local municipal office, your household waste disposal service or the shop where you purchased the product.
Penalties may be applicable for incorrect disposal of this waste, in accordance with national legislation.
[Business users]
If you wish to dispose of this product, please contact your supplier and check the terms and conditions of the purchase contract.
[Other Countries outside the European Union]
These symbols are only valid in the European Union.
Contact your local authority to learn about disposal and recycling.
The product and packaging should be taken to your local collection point for recycling.
Some collection points accept products free of charge.
Note: The sign Pb below the symbol for batteries indicates that this battery contains lead.
12
Pb
1. Products
2. Battery
English - 7 -

Remote Control
1 |
26 |
|
2 |
|
|
3 |
25 |
|
4 |
|
|
5 |
24 |
|
6 |
23 |
|
22 |
||
|
||
7 |
|
|
8 |
|
|
9 |
21 |
|
10 |
20 |
|
11 |
19 |
|
12 |
18 |
|
13 |
||
17 |
||
14 |
||
16 |
||
15 |
||
|
(*) MY BUTTON 1 & MY BUTTON 2:
These buttons may have default functions depending on the model. However you can set a special function to thesebuttonsbypressingonthemforfivesecondswhen onadesiredsourceorchannel.Aconfirmationmessage will be displayed on the screen. Now the selected My Button is associated with the selected function.
Note that if you perform First Time Installation, My Button 1&2 will return to their default function.
Teletext Services
Press the Text button to enter. Press again to activate mix mode, which allows you to see the teletext page and the TV broadcast at the same time. Press once more to exit. If available, sections in the teletext pages will become colour-coded and can be selected by pressing the coloured buttons. Follow the instructions displayed on the screen.
Digital Teletext
Press the Text button to view digital teletext information. Operate it with the coloured buttons, cursor buttons and the OK button. The operation method may differ depending on the contents of the digital teletext. Follow the instructions displayed on the digital teletext screen. When the Text button is pressed again, the TV returns to television broadcast.
1.\ Standby: Switches On / Off the TV
2.\ Numeric buttons: Switches the channel, enters a number or a letter in the text box on the screen.
3.\ Language: Switches among sound modes (analogue TV), displays and changes audio/subtitle language and turns subtitles on or off (digital TV, where available)
4.\ Mute: Completely turns off the volume of the TV
5.\ Volume +/-
6.\ Guide: Displays the electronic programme guide
7.\ Directional buttons: Helps navigate menus, content etc. and displays the subpages in TXT mode when pressed Right or Left
8.\ OK: Confirms user selections, holds the page (in
TXT mode), views Channels menu (DTV mode)
9.\ Back/Return: Returns to previous screen, previous menu, opens index page (in TXT mode)
10.\ My Button 1 (*)
11.\ Netflix: Launches the Netflix application
12.\ Rewind: Moves frames backwards in media such as movies
13.\ Record: Records programmes**
14.\ Coloured Buttons: Follow the on-screen instructions for coloured button functions
15.\ Play: Starts to play selected media
16.\ Pause: Pauses the media being played, starts timeshift recording**
17.\ Stop: Stops the media being played
18.\ Fast Forward: Moves frames forward in media such as movies
19.\ YouTube: Launches the YouTube application
20.\ My Button 2 (*)
21.\ Exit: Closes and exits from displayed menus or returns to previous screen
22.\ Info: Displays information about on-screen content, shows hidden information (reveal - in TXT mode)
23.\ Menu: Displays TV menu
24.\ Programme +/-
25.\ Text: Displays teletext (where available), press again to superimpose the teletext over a normal broadcast picture (mix)
26.\ Source: Shows available broadcast and content sources
Footnote:
Red, green, blue and yellow buttons are multifunction; please follow on-screen prompts and section instructions.
(**) If this feature is supported by your TV.
English - 8 -
Switching On/Off
To Switch the TV On
Connect the power cord to a power source such as a wall socket (220-240V AC, 50 Hz).
To switch on the TV from standby mode either:
•\ Press the Standby button, Programme +/- or a numeric button on the remote control.
•\ Press the middle of the side function switch on the TV in.
To Switch the TV Off
Press the Standby button on the remote control or press the middle of the side function switch on the TV in and hold it down for a few seconds, the TV will switch into standby mode.
To power down the TV completely, unplug the power cord from the mains socket.
Note: WhentheTVisswitchedintostandbymode,thestandby
LED can blink to indicate that features such as Standby
Search, Over Air Download or Timer is active. The LED can also blink when you switch on the TV from standby mode.
First Time Installation
Note: IfyouaregoingtoperformFRANSATinstallation,insert the FRANSAT card (optional) into the Conditional Access terminal of your TV before switching on your TV.
When turned on for the first time, the language selection screen is displayed. Select the desired language and press OK. In the following steps of the installation guide, set your preferences using the directional buttons and OK button.
On the second screen set your country preference. Depending on the Country selection you may be asked to set and confirm a PIN at this point.The selected PIN cannot be 0000. You have to enter it if you are asked to enter a PIN for any menu operation later.
Note: M7(*) operator type will be defined according to the
Language and Country selections that you made in the First Time Installation.
(*) M7 is a digital satellite service provider.
You can activate Store Mode option in the next step.
This option will configure your TV’s settings for store environment and depending on the TV model being used, the supported features of it may be displayed on the side of the screen as an info banner. This option is intended only for store use. It is recommended to select Home Mode for home use. This option will be available in Settings>System>More menu and can be turned off/on later. Make your selection and press
OK to continue.
Depending on the model of your TV and the country selection Privacy Settings menu may appear at this point. Using this menu you can set your privacy privileges. Highlight a feature and use Left and Right directional buttons to enable or disable. Read
English
the related explanations displayed on the screen for each highlighted feature before making any changes. You can use Programme +/- buttons to scroll up and down to read the entire text. You will be able to change your preferences at any time later from the Settings>System>Privacy Settings menu. If the Internet Connection option is disabled
Network/Internet Settings screen will be skipped and not displayed. If you have any questions, complaints or comments regarding this privacy policy or its enforcement, please contact by email at smarttvsecurity@vosshub.com.
Highlight Next and press OK button on the remote control to continue and the Network/Internet Settings menu will be displayed. Please refer to Connectivity section to configure a wired or a wireless connection. IfyouwantyourTVtoconsumelesspowerinstandby mode,youcandisabletheWake On optionbysettingit as Off.Afterthesettingsarecompletedhighlight Next and press OK button to continue.
On next screen you can set broadcast types to be searched, set your encrypted channel searching and time zone (depending on the country selection) preferences. Additionally you can set a broadcast type as your favourite one. Priority will be given to the selected broadcast type during the search process and the channels of it will be listed on the top of the channel list. When finished, highlight Next and press
OK to continue.
About Selecting Broadcast Type
To turn a search option for a broadcast type highlight it and press OK. The checkbox next to the selected option will be checked. To turn the search option off clear the checkbox by pressing OK after moving the focus on the desired broadcast type option.
Digital Aerial: If D. Aerial broadcast search option is turned on, the TV will search for digital terrestrial broadcasts after other initial settings are completed.
Digital Cable: If D. Cable broadcast search option is turned on, the TV will search for digital cable broadcasts after other initial settings are completed. A message will be displayed before starting to search asking if you want to perform cable network search. If you select Yes and press OK you can select Network or set values such as Frequency, Network ID and Search Step on the next screen. If you select No and press OK you can set Start Frequency, Stop Frequency and Search Step on the next screen.
When finished, highlight Next and press OK button to continue.
Note: Searching duration will change depending on the selected Search Step.
Satellite: If Satellite broadcast search option is turned on, the TV will search for digital satellite broadcasts after other initial settings are completed. Before satellite search is performed some settings should
- 9 -

be made. A menu will be displayed where you can select to start M7 or Fransat operator installation or a standard installation.
To start an M7 operator installation set the Install Type as Operator and the Satellite Operator as the related M7 operator. Then highlight Preferred Scan option and set as Automatic channel scan and press OK to start the automatic search. These options can be preselected depending on the Language and Country selectionsthatyoumadeintheearlierstepsofthefirst time installation process. You may be asked to select
HD/SD or country specific channel list according to your M7 operator type. Select one and press OK to proceed.
Wait till the scan is finished. Now the list has been installed.
While performing an M7 operator installation, if you want to use the satellite installation parameters that differ from the default settings select the Preferred Scan option as Manual channel scan and press the
OK button to proceed. Antenna Type menu will be displayed next. After selecting the antenna type and the desired satellite in the following steps press OK in order to change the satellite installation parameters in the sub-menu.
To start a Fransat installation set the Install Type as
Operator and then set the Satellite Operator as the related Fransat operator. Then press the OK button to start Fransat installation. You can select to start an automatic or manual installation.
Press OK to proceed. Fransat Installation will be performed and broadcasts will be stored (if available).
If you set the Install Type as Standard, you can continue with regular satellite installation and watch satellite channels.
You can start a Fransat installation at any time later from the Settings>Installation>Automatic channel scan> Satellite menu.
In order to search for satellite channels other than M7 or Fransat channels you should start a standard installation. Select the Install Type as Standard and press the OK button to proceed. Antenna Type menu will be displayed next.
There are three options for antenna selection. You can select Antenna Type as Direct, Single Satellite Cable or DiSEqC switch by using Left or Right buttons. After selecting your antenna type press OK to see the options to proceed. Continue, Transponder list and ConfigureLNBoptions will be available. You can change the transponder and LNB settings using the related menu options.
•\ Direct: If you have a single receiver and a direct satellite dish, select this antenna type. Press OK to continue. Select an available satellite on the next screen and press OK to scan for services.
•\ Single Satellite Cable: If you have multiple receivers and a single satellite cable system, select this antenna type. Press OK to continue. Configure settings by following instructions on the next screen. Press OK to scan for services.
•\ DiSEqC switch: If you have multiple satellite dishes and a DiSEqC switch, select this antenna type. Press OK to continue. You can set four DiSEqC options (if available) on the next screen. Press OK button to scan the first satellite in the list.
Analogue: If Analogue broadcast search option is turned on, the TV will search for analogue broadcasts after other initial settings are completed.
A dialogue screen asking to activate parental control will be displayed. If you select Yes, parental restriction options will be displayed. Configure as desired and press OK when finished. Select No and press OK to advance, if you don’t want to activate parental restrictions.
After the initial settings are completed TV will start to search for available broadcasts of the selected broadcast types.
While the search continues current scan results will be displayed at the bottom of the screen. After all the available stations are stored, Channels menu will be displayed. You can edit the channel list according to your preferences using the Edit tab options or press the Menu button to quit and watch TV.
While the search continues a message may appear, asking whether you want to sort channels according to the LCN(*). Select Yes and press OK to confirm.
(*) LCN is the Logical Channel Number system that organizes available broadcasts in accordance with a recognizable channel number sequence (if available).
Notes:
To search for M7 channels after the First Time Installation, youshouldperformthefirsttimeinstallationagain.Orpressthe
Menu button and enter the Settings>Installation>Automatic channel scan>Satellite menu. Then follow the same steps mentioned above in the satellite section.
Do not turn off the TV while initializing first time installation. Note that, some options may not be available depending on the country selection.
Using Satellite Channel Table Feature
You can perform these operations using the Settings>Installation>Satellite Settings>Satellite Channel Table menu. There are two options regarding to this feature.
You can download or upload satellite channel table data. In order to perform these functions a USB device must be connected to the TV.
You can upload current services and related satellites & transponders in TV, to a USB device.
Additionally you can download one of the satellite channel table files stored in USB device, to the TV.
English - 10 -

When you select one of these files, all services and related satellites and transponders in the selected file will be stored in the TV. If there are any installed terrestrial, cable and/or analogue services, they will be kept and only satellite services will be removed.
Afterwards, check your antenna settings and make changes if necessary. An error message stating “No Signal” may be displayed if the antenna settings are not configured properly.
E-Manual
You can find instructions for your TV’s features in the
E-Manual.
To access the E-Manual, enter Settings menu, select Manuals and press OK. For quick access press Menu button and then Info button.
By using the directional buttons select a desired category. Every category includes different topics.
Select a topic and press OK to read instructions.
To close the E-Manual screen press the Exit or Menu button.
Note: Depending on model, your TV may not support this function. The contents of the E-Manual may vary according
to the model.
Connectivity
Wired Connectivity
To Connect to a Wired Network
•\ You must have a modem/router connected to an active broadband connection.
•\ Connect your TV to your modem/router via an Ethernet cable. There is a LAN port at the rear
(back) of your TV.
1
2
3
1.\ Broadband ISP connection 2.\ LAN (Ethernet) cable
3.\ LAN input on the rear side of the TV
To configure wired settings refer to the Network section in the Settings menu.
•\ You might be able to connect your TV to your LAN depending on your network’s configuration. In such
a case, use an Ethernet cable to connect your TV directly to the network wall outlet.
1
2
1.\ Network wall socket
2.\ LAN input on the rear side of the TV
Configuring Wired Device Settings
Network Type
The Network Type can be selected as Wired Device, Wireless Device or Disabled, in accordance with the active connection to the TV set. Select this as Wired Device if you are connecting via an Ethernet cable.
Internet Speed Test
Highlight Internet Speed Test and press the OK button. TV will check the internet connection bandwidth and display the result when complete.
Advanced Settings
Highlight Advanced Settings and press the OK button. On the next screen you can change the IP and DNS settings of the TV. Highlight the desired one and press Left or Right button to change the setting from
Automatic to Manual. Now you can enter the Manual IP and / or Manual DNS values. Select the related item in the drop down menu and enter the new values using the numeric buttons of the remote. Highlight Save and press the OK button to save settings when complete.
English - 11 -

Wireless Connectivity
To Connect to a Wireless Network
The TV cannot connect to the networks with a hidden SSID. To make your modem’s SSID visible, you should change your SSID settings via the modem’s software.
1
1.\ Broadband ISP connection
Configuring Wireless Device Settings
Open the Network menu and select Network Type as
Wireless Device to start connection process.
Highlight Scan Wireless Networks option and press OK to start a search for available wireless networks. Allfoundnetworkswillbelisted.Highlightyourdesired network from the list and press OK to connect.
Note: If the modem supports N mode, you should set N mode settings.
If the selected network is password-protected, enter the correct key by using the virtual keyboard. You can use this keyboard via the directional buttons and the
OK button on the remote control.
Wait until the IP address is shown on the screen.
This means that the connection is now established. To disconnect from a wireless network, highlight Network Type and press Left or Right buttons to set as Disabled.
If your router has WPS, you can directly connect to the modem/router without entering a password or adding the network first. Highlight Press WPS on your wifi router option and press OK. Go to your modem/router device and press the WPS button on it to make the connection.You will see a connection confirmation on your TV once the devices have paired. Select OK to proceed. No further configuration is required.
HighlightInternet Speed Test and press the OK button to check your internet connection speed. Highlight
Advanced Settings and press the OK button to open the advanced setting menu. Use directional and numeric buttons to set. Highlight Save and press the OK button to save settings when complete.
Other Information
The status of the connection will be displayed as
Connected or Not Connected and the current IP address, if a connection is established.
Connecting to your mobile device via
WLAN
•\ If your mobile device has WLAN feature, you can connect it to your TV via a router, in order to access the content in your device. For this, your mobile device must have an appropriate sharing software.
\Connect your TV to your router following the steps mentioned in the sections above.
\Afterwards,connectyourmobiledevicetotherouter andthenactivatethesharingsoftwareonyourmobile device.Then,selectfilesthatyouwanttosharewith your TV.
\If the connection is established correctly, you will be able to access the shared files installed on your mobile device via the AVS(audio video sharing) feature of your TV.
\Highlight the AVS option in the Sources menu and press OK, available media server devices in the networkwillbedisplayed.Selectyourmobiledevice and press the OK button to continue.
•\ If available, you can download a virtual remote controller application from the server of your mobile device application provider.
Note: This feature may not be supported on all mobile devices.
Wake ON
Wake-on-LAN (WoL) and Wake-on-Wireless LAN (WoWLAN) are standards that allow a device to be turned on or woken up by a network message. The message is sent to the device by a program executed on a remote device connected to the same local area network, such as a smartphone.
Your TV is WoL and WoWLAN compatible. This feature might be disabled during the First Time Installation process. To enable this feature set the Wake On option in the Network menu as On. It is necessary that both the device, from which the network message will be sent to the TV, and the TV are connected to the same network. Wake On feature is only supported for Android OS devices and can only be used via YouTube and
Netflix applications.
In order to use this feature the TV and the remote device should be connected at least once while the
TV is on. If the TV is powered off, the connection should be re-established, the next time it is switched on. Otherwise this feature will be unavailable. This does not apply, when the TV is switched into the standby mode.
The performance of some devices in the market, may vary due to the software architecture. In order to use
English - 12 -

Wake On feature with a better performance, please makesurethatyourdevicehaslatestfirmwareversion.
If you want your TV to consume less power in standby mode, you can disable this feature by setting the Wake On option as Off.
Wireless Display
Wireless Display is a standard for streaming video and sound content. This feature provides the ability to use your TV as wireless display device.
Using with mobile devices
There are different standards which enable sharing of screens including graphical, video and audio content between your mobile device and TV.
Plug the wireless USB dongle to TV first, if the TV doesn’t have internal WLAN feature.
Then press the Source button on the remote and switch to Wireless Display source.
A screen appears stating that the TV is ready for connection.
Open the sharing application on your mobile device.
These applications are named differently for each brand, refer to the instruction manual of your mobile device for detailed information.
Scan for devices. After you select your TV and connect, the screen of your device will be displayed on your TV.
Note: This feature can be used only if the mobile device supports this feature. If you experience problems with the connection check if the operating system version you use supports this feature. There may be incompatibility problems with the operating system versions which are released after the production of this TV. Scanning and connecting processes differ according to the programme you use.
Connecting Bluetooth Devices
Your TV supports Bluetooth wireless connection technology too. A pairing is required before using Bluetooth devices with the TV set. You should do the following to pair your device with the TV:
•\ Set the device to pairing mode •\ Start device discovery on the TV
Note: Refer to the user manual of the Bluetooth device to learn how to set the device to pairing mode.
For audio devices you should use the Bluetooth option in the Settings>Sound menu, for remote controllers the
Smart Remote option in the Settings>System>More menu. Select the menu option and press the OK button to open the related menu. Using this menu you can discover and connect the devices that use the Bluetooth wireless technology and start to use them. Follow the on-screen instructions.
Using Audio Video Sharing Network Service
Audio Video Sharing feature uses a standard that eases the viewing process of digital electronics and makes them more convenient to use on a home network.
This standard allows you to view and play photos, musicandvideosstoredinthemediaserverconnected to your home network.
1. Server Software Installation
The AudioVideoSharingfeature cannot be used if the server programme is not installed onto your PC or if therequiredmediaserversoftwareisnotinstalledonto the companion device. Prepare your PC with a proper server programme.
2.Connect to a Wired or Wireless Network
See the Wired/Wireless Connectivity chapters for detailed configuration information.
3.Enable Audio Video Sharing
Enter the Settings>System>More menu and enable the AVS option.
4. Play Shared Files via Media Browser
HighlighttheAVS optionintheSources menu by using the directional buttons and press OK. Availablemedia serverdevicesinthenetworkwillbelisted.Selectone and press OK to continue. The media browser will then be displayed.
DVB functionality information
This DVB receiver is only suitable for use in the country which it was designed to be used in.
Although this DVB receiver conforms to the latest DVB specifications at the time of manufacture, we cannot guarantee compatibility with future DVB transmissions due to changes that may be implemented in broadcast signals and technologies.
Some digital television functions may not be available in all countries.
We continually strive to improve our products; therefore, specifications may change without prior notice.
For advice on where to purchase accessories, please contact the store where you purchased your equipment.
English - 13 -

Estimado(a) Cliente:
Este aparato cumple con las directivas y las normas europeas relativas a la compatibilidad electromagnética y a la seguridad eléctrica.
El representante del fabricante en Europa es: Vestel Germany GmbH
Parkring 6
85748 Garching b.München Germany
İndice |
|
Estimado(a) Cliente:................................................. |
1 |
Información De Seguridad....................................... |
2 |
Marcas en el producto.............................................. |
2 |
Información medioambiental.................................... |
3 |
Accesorios Incluidos................................................ |
4 |
Instrucciones para el montaje en la pared............... |
5 |
Interruptor de Control y Funcionamiento del |
|
Televisor................................................................... |
6 |
Colocación de las pilas en el mando a distancia..... |
6 |
Conexión Eléctrica................................................... |
6 |
Conexión de la Antena............................................. |
6 |
viso sobre la licencia................................................ |
7 |
Información sobre su desecho................................. |
8 |
Mando a Distancia................................................... |
9 |
Encendido/Apagado............................................... |
10 |
Instalación inicial.................................................... |
10 |
Uso de la función de tabla de canales satelitales.. 12 |
|
E-Manual................................................................ |
12 |
Conectividad.......................................................... |
12 |
Conectividad alámbrica.......................................... |
12 |
Conexión Inalámbrica............................................ |
13 |
Wake On (Despertar)............................................. |
14 |
Pantalla Inalámbrica............................................... |
14 |
Conexión de dispositivos Bluetooth....................... |
15 |
Uso del servicio de red Compartir Audio y Vídeo... |
15 |
Información sobre la función de DVB..................... |
15 |
Español - 1 -
Información De Seguridad
PRECAUCIÓN
RIESGO DE DESCARGA
ELÉCTRICA
NO ABRIR
PRECAUCIÓN: PARA REDUCIR EL RIESGO DE DESCARGA ELÉCTRICA NO RETIRE LA TAPA (O EL PANEL TRASERO).
NO CONTIENE PIEZAS QUE PUEDAN SER
CAMBIADAS POR EL USUARIO. PÓNGASE
EN CONTACTO CON PERSONAL TÉCNICO CUALIFICADO.
En climas extremos (tormentas, relámpagos) y largos periodos de inactividad (irse de vacaciones) desconecte el televisor de la red eléctrica.
El enchufe de corriente sirve para desconectar el televisor de la electricidad y, por lo tanto, siempre debe estar accesible. Si el televisor no se desconecta de la red eléctrica, el dispositivo aún consumirá energía para todas las situaciones, incluso si el televisor está en modo de espera o apagado.
Nota: Siga las instrucciones en pantalla para la operación de las funciones relacionadas.
IMPORTANTE - Por favor, lea estas instrucciones detenidamente antes de instalar o encender el televisor.
ADVERTENCIA: Este dispositivo está diseñado para ser utilizado por personas (incluidos los niños) con capacidad / experiencia enelfuncionamientodeundispositivodeestetipo sin supervisión, a menos que hayan recibido supervisión o instrucciones relativas al uso del aparato por una persona responsable de su
seguridad.
•\ Utilice este aparato de TV a una altura de menos de 2000 metros sobre el nivel del mar, en lugares secos y en regiones con climas templados o tropicales.
•\ El televisor está diseñado para uso doméstico y uso general similar, pero también puede ser utilizado en lugares públicos.
•\ Para facilitar la ventilación, deje al menos 5 cm de espacio libre alrededor de la TV.
•\ La ventilación no debe impedirse al cubrir o bloquear las aberturas de ventilación con objetos como periódicos, manteles, cortinas, etc.
•\ Se debe poder acceder fácilmente al cable de corriente. No coloque el televisor, ni ningún mueble, etc., sobre el cable de corriente, ni lo pise. Un cable deteriorado puede causar un incendio o provocarle una descarga eléctrica. Agarre el cable de corriente por la clavija de enchufe; no desenchufe el televisor tirando del cable de corriente. No toque nunca el cable con las manos mojadas, pues podría causar un cortocircuito o sufrir una descarga eléctrica. No haga nunca un nudo en el cable ni lo empalme con otros cables. Deberá sustituirlo cuando esté dañado, siendo únicamente un profesional quien puede hacerlo.
Español
•\ No exponga el televisor a goteos y salpicaduras de líquidos y no coloque objetos que contengan líquidos, como floreros, tazas, etc., o más sobre el televisor (por ej., en los estantes por encima de la unidad).
•\ No exponga el televisor a la luz solar directa ni llamas abiertas, tales como velas encendidas en la parte superior o cerca del televisor.
•\ No coloque ninguna fuente de calor como calentadores eléctricos, radiadores, etc. cerca del televisor.
•\ Nocoloqueeltelevisorenelpisonienlassuperficies inclinadas.
•\ Paraevitarelpeligrodeasfixia,mantengalasbolsas de plástico fuera del alcance de los bebés, los niños y los animales domésticos.
•\ Ponga cuidadosamente el soporte al televisor. Si el soporte está provisto de tornillos, apriete los tornillos firmementeparaevitarqueeltelevisorseincline.No apriete demasiado los tornillos y monte los cauchos del soporte adecuadamente.
•\ No deseche las pilas en el fuego o con materiales peligrosos o inflamables.
ADVERTENCIA - Las pilas no deben exponerse a un calor excesivo como la luz del sol, fuego o similares. - La presión de sonido excesiva de auriculares o auriculares puede causar pérdida de audición.
MUY IMPORTANTE: NO DEBE dejar que nadie, especialmente los niños, introduzcan ningún objetoporlosagujeros,lasranurasoporcualquier apertura de la carcasa.
Precaución |
Riesgo de lesiones graves |
o muerte |
|
|
|
Riesgo de descarga |
Riesgo de tensión peligrosa |
eléctrica |
|
Mantenimiento |
Importante componente de |
mantenimiento |
Marcas en el producto
Los siguientes símbolos se utilizan como marcadores sobre las restricciones, precauciones e instrucciones de seguridad del producto. Cada explicación se deberá tomar en cuenta dependiendo de la ubicación de tales marcas. Tenga en cuenta dicha información por motivos de seguridad.
Equipo de Clase II: Este aparato está diseñado de una manera tal que no requiere una conexión de seguridad a tierra eléctrica.
Terminal viva peligrosa: La(s) terminal(es) marcada(s) live (viva) es/son peligrosa(s) bajo condiciones normales de operación.
Precaución,consultelasinstruccionesde
i funcionamiento: El área marcada contiene baterías de celda de moneda o de botón
reemplazable por el usuario.
- 2 -

Producto Láser Clase 1
Este producto contiene una CLASS 1 fuente láser Clase 1 que es
LASER PRODUCT
segura en condiciones razonablemente previsibles
de funcionamiento.
ADVERTENCIA
No ingiera pilas, hay riesgo de quemaduras químicas. Este producto o los accesorios suministrados con el producto pueden contener una pila tipo moneda / botón. Si la pila de botón es ingerida, puede causar quemaduras internas graves en solo 2 horas y puede llevar a la muerte.
Mantenga las pilas nuevas y usadas lejos de los niños. Si el compartimiento de las pilas no se cierra de forma segura, deje de usar el producto y manténgalo alejado de los niños.
Si usted piensa que las pilas podrían haber sido ingeridas o estar dentro de cualquier parte del cuerpo, busque atención médica inmediata.
– – – – – – – – – – – –
Nunca coloque un aparato de televisión en un lugar inestable o inclinado. Un televisor puede caerse y causar lesiones personales graves o la muerte. Podrá evitar lesiones o heridas, especialmente a los niños, tomando precauciones tan sencillas como:
•\ Utilizar soportes recomendados por el fabricante del televisor.
•\ Utilizar únicamente mobiliario que pueda soportar segura y suficientemente el peso del televisor.
•\ Asegurarse de que el televisor no sobresalga del borde del mueble.
•\ No coloque el televisor en un mueble alto (por ej., armariosyestanterías)sinfijartantoelmueblecomo el televisor a un soporte adecuado.
•\ No coloque el aparato de televisión sobre tela u otros materiales colocados entre la televisión y muebles de apoyo.
•\ Enseñe a los niños los peligros de subirse al mueble para tocar el televisor y sus controles. Si su televisor existente está siendo retenido y trasladado, se deben aplicar las mismas consideraciones que arriba.
– – – – – – – – – – – –
El aparato conectado a la tierra de protección de la instalación del edificio a través de la conexión a la red o a través de otros aparatos con una conexión a tierra de protección, y a un sistema de distribución de televisión mediante un cable coaxial, en algunas circunstancias puede crear un peligro de incendio. La conexión a un sistema de distribución de televisión por lo tanto, ha de ser proporcionado a través de un dispositivo que proporciona aislamiento eléctrico por debajo de un determinado rango de frecuencias (aislador galvanizado)
ADVERTENCIAS DE MONTAJE EN
PARED
•\ Lea las instrucciones antes de montar el televisor en la pared.
•\ El kit de montaje de pared es opcional. Usted lo puede obtener de su distribuidor local, si no se suministra con el televisor.
•\ No instale el televisor en un techo o en una pared inclinada.
•\ Utilice los tornillos de montaje en la pared especificada y otros accesorios.
•\ Apriete los tornillos de montaje de pared con firmeza para evitar que el televisor caiga. No apriete demasiado los tornillos.
Información medioambiental
Este televisor está diseñado para consumir menos energía. Para reducir el consumo de energía, puede seguir estos pasos:
Si configura el Ahorro de energía a Mínimo, Medio,
Máximo o Automático del televisor se reducirá el consumo de energía en consecuencia. Si te gusta para configurar la Luz de fondo a un valor fijo establecido como Personalizado y ajustar la Luz de fondo (que se encuentra debajo de la configuración de Ahorro de energía) de forma manual mediante los botones Izquierda o Derecha en el mando a distancia. Establezca como Apagado para desactivar esta opción.
Nota: Las opciones disponibles de Ahorro de energía pueden variar según el modo seleccionado en el menú
Configuración> Imagen.
La configuración de Ahorro de energía se puede encontrar en el menú Configuración>Imagen. Tenga encuentaquenosepodrán modificaralgunosajustes de imagen.
Si pulsa los botines derecho e izquierdo de forma consecutiva, aparecerá el mensaje “La pantalla de apagará en 15 segundos.” Seleccione la opción
Continuar y pulse OK para apagar la pantalla de inmediato. Si no pulsa ningún botón, la pantalla se apagará en 15 segundos. Para encender la pantalla otra vez, pulse cualquier tecla del mando a distancia o del televisor.
Nota: La opción de Apagar pantalla no estará disponible si el modo está ajustado en Juego.
Es recomendable que apague o desenchufe el televisor cuando no lo esté utilizando. De este modo se reducirá también el consumo eléctrico.
Español - 3 -

Advertencia
Para evitar la propagación de fuego, no deben colocarse objetos o fuentes de llama abierta
como velas incandescentes o lamparillas encendidas sobre o cerca del aparato.
Accesorios Incluidos
•\ Mando a Distancia •\ Pilas: 2 X AAA*
•\ Manual de Instrucciones
(*) si la opción está disponible
Español - 4 -
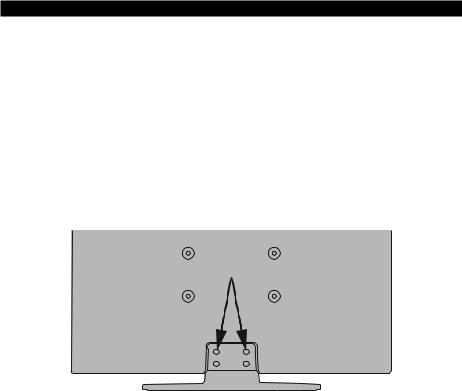
Instrucciones para el montaje en la pared
Instalación del televisor en la pared
El televisor puede ser montado en la pared utilizando un kit de montaje VESA MX X*X mm (*) que se suministra por separado. Extraiga la base tal y como se muestra. Instale el televisor de acuerdo con las instrucciones suministradas con el kit. Esté al tanto de los cables eléctricos, las tuberías de gas y agua que estén en la pared.
Si tiene dudas por favor contacte a un instalador calificado. La longitud de la cuerda del tornillo no deberá exceder X mm (*) dentro del televisor. Póngase en contacto con el establecimiento donde adquirió el aparato para saber dónde comprar el kit VESA.
(*) Consulte la página adicional relacionada con VESA para las medidas precisas y especificaciones de los tornillos.
Para quitar la base
•\ Para quitar la base, proteja la pantalla y coloque el televisor sobre la superficie plana de una mesa estable con la base saliente por la orilla. Saque los tornillos de fijación del soporte al televisor.
Español - 5 -
Interruptor de Control y Funcionamiento del Televisor
1.\ Botón de dirección (Arriba) 2.\ Dirección abajo
3.\ Volumen /Información/ Selección de la lista de fuentes e interruptor de encendido del Modo en espera
El botón de Control le permite manejar el Volumen, los Canales, las Fuentes y el Modo de Espera del televisor.
Para cambiar el volumen: Aumente el volumen pulsando el botón arriba. Baje el volumen pulsando el botón abajo.
Para cambiar el canal: Pulse el centro del botón, la barra de información aparecerá en la pantalla. Desplácese a través de los canales almacenados pulsando el botón hacia arriba o hacia abajo.
Paracambiarlafuente:Pulse dos veces el centro del botón (por segunda vez en total), y aparecerá la lista de fuentes en la pantalla. Desplásese por las fuentes disponibles pulsando el botón arriba o abajo.
Apagado del televisor: Si aprieta en el centro del botón abajo y lo mantiene pulsado unos segundos, el televisor pasará al modo de espera.
Para encender la TV: Pulse el centro del botón y se encenderá la TV.
Notas:
Si apaga el televisor, el ciclo se iniciará de nuevo con el ajuste de volumen.
No es posible mostrar el menú principal en pantalla mediante el botón de control.
Manejo con el Mando a Distancia
Pulse el botón del Menu en su mando a distancia para mostrar el menú principal. Use los botones direccionales y el botón OK para navegar y ajustar. Pulse Return /Back o Menu para salir del menú de pantalla.
Selección de entrada
Cuando haya terminado de conectar los aparatos externos al televisor, puede alternar entre las distintas fuentes de entrada. Pulse el botón Fuente en su
mando a distancia consecutivamente para seleccionar fuentes diferentes.
Cambio de canales y volumen
Usted puede cambiar el canal y ajustar el volumen con las teclas Volumen +/-, Canal +/- en el mando a distancia.
Colocación de las pilas en el mando a distancia
Abra la tapa de las pilas. Coloque dos pilas AAA. Asegúrese de que (+) y (-) coincidan con los signos (observe la polaridad correcta). No utilice pilas de distinto tipo (nuevas y viejas, alcalinas y salinas, etc.) a la vez. Cámbielas por pilas del mismo tipo o de un tipo equivalente. Coloque la tapa otra vez en su sitio.
Cuando las baterías estén bajas y cuando se debe reemplazar las baterías, en la pantalla se visualizará un mensaje. Tenga en cuenta que cuando las baterías están bajas, el rendimiento del control remoto puede verse afectado.
No exponga las pilas a una fuente de calor excesiva: por ejemplo luz solar, fuego o similares.
Conexión Eléctrica
¡IMPORTANTE! Este conjunto de televisor está diseñado para funcionar con corriente alterna 220240V CA, 50 Hz. Tras desembalar el televisor, deje que éste alcance la temperatura ambiente antes de conectarlo a la corriente. Enchufe el cable de corriente a la electricidad.
Conexión de la Antena
Conecte la toma de antena o de TV por cable a la ENTRADA DE ANTENA (ANT) o enchufe el satélite a la ENTRADA DE SATÉLITE (ANT SAT) de la parte trasera inferior del televisor.
Parte trasera inferior del televisor
ANT SAT ANT-TV
1
2
1. Satélite
2. Antena o Cable
Si desea conectar un dispositivo al televisor, asegúrese de que el televisor y el dispositivo están apagados antes de realizar cualquier conexión. Después de realizar la conexión, puede activar las
unidades y utilizarlas.
Español - 6 -

viso sobre la licencia
Los términos HDMI y High-Definition Multimedia Interface y el logotipo de HDMI son marcas comerciales o registradas de HDMI Licensing Administrator, Inc. en los Estados Unidos y en otros países.
Fabricado con la autorización de Dolby Laboratories. Dolby y el logotipo de la doble D son marcas registradas de Dolby Laboratories.
YouTube y el logotipo de YouTube son marcas registradas de Google Inc.
Para patentes DTS, consulte http://patents.dts. com. Fabricado bajo la licencia de DTS Licensing Limited. DTS, el símbolo, & DTS y el símbolo junto son marcas registradas, y DTS TruSurround es una marca registrada de DTS, Inc. © DTS, Inc. Todos los derechos reservados.
Para patentes DTS, consulte http://patents.dts.com. Fabricado bajo la licencia de DTS Licensing Limited. El símbolo DTS, DTS-HD, y el texto DTS o DTS-HD y el símbolo juntos son marcas comerciales registradas de DTS, Inc.© DTS, Inc. Todos los derechos reservados.
La palabra y los logotipos de Bluetooth® son marcas registradas propiedad de Bluetooth SIG, Inc. y cualquier uso de tales marcas por parte de Vestel Elektronik Sanayi ve Ticaret A.S. está bajo licencia. Otras marcas y nombres comerciales pertenecen a sus respectivos propietarios.
Este producto contiene tecnología sujeta a ciertos derechos de propiedad intelectual de Microsoft. El uso o distribución de esta tecnología fuera de este producto está prohibido sin la(s) licencia(s) apropiada(s) de Microsoft.
Los propietarios de contenido utilizan la tecnología de acceso de contenido Microsoft PlayReady ™ para proteger su propiedad intelectual, incluyendo el contenido protegido por derechos de autor. Este dispositivo utiliza la tecnología PlayReady para acceder a contenido protegido por PlayReady y / o contenido protegido por WMDRM. Si el dispositivo no cumple correctamente las restricciones sobre el uso del contenido, los propietarios de contenido
pueden requerir que Microsoft revogue la capacidad del dispositivo para consumir contenido protegido por PlayReady. La revocación no debe afectar a contenido desprotegido o contenido protegido por otras tecnologías de acceso a contenido. Los propietarios de contenido pueden requerir que actualice PlayReady para acceder a su contenido. Si rechaza una actualización, no podrá acceder al contenido que requiera la actualización.
El logotipo “CI Plus” es una marca registrada de CI Plus LLP.
Este producto está protegido por ciertos derechos de propiedad intelectual de Microsoft Corporation. El uso o la distribución de dicha tecnología fuera de este producto está prohibido sin una licencia de Microsoft o una subsidiaria autorizada de Microsoft.
DVB es una marca registrada del proyecto DVB.
“Este producto es fabricado, distribuido y ga-
rantizado |
exclusivamente |
por |
VESTEL |
Ti- |
caret A.Ş |
“JVC” es la |
marca |
comercial |
de |
JVC KENWOOD Corporation, utilizada por dichas empresas bajo licencia.”
Español - 7 -

Información sobre su desecho
[Unión Europea]
Estos símbolos indican que aquellos equipos eléctricos y electrónicos, así como las pilas que lo tengan grabado, no se deben desechar como basura doméstica al final de su vida útil. Por ello, tales aparatos deberán llevarse a puntos de recogida destinados al reciclaje tanto de equipos eléctricos y electrónicos, como de pilas o baterías para su tratamiento, recuperación y reciclaje adecuados, de acuerdo con la normativa nacional y la directiva 2012/19/EU y 2013/56/EU.
Al desechar este producto de forma correcta ayudará a conservar los recursos naturales y evitará las posibles consecuencias nocivas para el medio ambiente y la salud de las personas que podrían derivarse del mal manejo del producto como residuo.
Para obtener más información sobre puntos de recogida y reciclaje de estos aparatos, póngase en contacto con su ayuntamiento, servicio de recogida de desechos, o bien con el establecimiento donde lo adquirió.
En caso de no incumplir la normativa vigente en materia de desecho de materiales, se le podría sancionar.
[Empresas Usuarias]
Si desea desechar este aparato, contacte con el distribuidor y compruebe los términos y condiciones del contrato de adquisición.
[Otros países fuera de la Unión Europea]
Estos símbolos son válidos solo en la Unión Europea.
Contacte con la autoridad local para obtener la información relativa al desecho y reciclado.
El aparato y las pilas deben llevarse al punto local de recogida para su reciclado.
Algunos de estos puntos recogen aparatos de forma gratuita.
Nota: El símbolo Pb de abajo para la pilas indica que dicha batería contiene plomo.
12
Pb
1. Productos
2. Pila
Español - 8 -

Mando a Distancia
1 |
26 |
|
2 |
|
|
3 |
25 |
|
4 |
|
|
5 |
24 |
|
6 |
23 |
|
22 |
||
|
||
7 |
|
|
8 |
|
|
9 |
21 |
|
10 |
20 |
|
11 |
19 |
|
12 |
18 |
|
13 |
||
17 |
||
14 |
||
16 |
||
15 |
||
|
(*) MI BOTÓN 1 & MI BOTÓN 2:
En función del modelo, estos botones tendrán funciones predefinidas. Sin embargo, podría fijar una función especial para los mismos, pulsándolos durante 5 segundos cuando esté en una fuente o canal determinados. Se mostrará la siguiente información en pantalla. Esto confirma que el botón seleccionado como MI BOTÓN estaría asociado a la función elegida.
Tenga en cuenta que MI BOTÓN 1y2 volverá a su función predeterminada si realiza de nuevo la
Instalación Inicial.
Servicios de Teletexto
Pulse el botón Text para entrar. Púlselo de nuevo para activar el modo de mezcla, que le permite ver a la vez el teletexto y la emisión del programa. Púlsela de nuevo para salir. Si la opción estuviera disponible, las distintas partes de la página de teletexto aparecen codificadas por color, pudiendo seleccionarse con las teclas de colores. Siga las instrucciones mostradas en la pantalla.
Teletexto digital
Pulse el botón Textpara ver la información del teletexto digital. Puede manejarlo con las teclas de colores, las teclas de cursor y la tecla OK. La forma de manejo puede variar en función de los contenidos del teletexto digital. Siga las instrucciones que aparecen en la pantalla del teletexto digital. Cuando el botón Texto se pulsa nuevamente, la TV regresa a emisión de TV.
1.\ Modo en espera: Prender / Apagar TV
2.\ Teclas numéricas: Cambia el canal, entra en un número o una letra en el cuadro de texto en la pantalla.
3.\ Idioma: Alterna entre las opciones de audio en televisión analógica, o muestra y cambia el idioma del audio / subtítulos (Televisión digital, cuando la opción esté disponible)
4.\ Silencio: Silencia totalmente el volumen del televisor
5.\ Volumen +/-
6.\ Guía:Muestra la guía electrónica de programación
7.\ Botonesdenavegación:Sirven para desplazarse por los menús, contenidos, etc.también muestra las páginas secundarias del teletexto cuando se pulsen las teclas derecha o izquierda
8.\ OK: Sirve para confirmar la selección del usuario, detener el avance de la página (en modo TXT), ver la lista de canales (modo DTV)
9.\ Volver/Atrás: Regresa a la pantalla anterior, abre la página índice (del modo Teletexto)
10.\ Mi Botón 1 (*)
11.\ Netflix: Inicia la aplicación de Netflix.
12.\ Retroceder: Retrocede fotogramas en ficheros multimedia tales como películas
13.\ Grabar: Graba canales**
14.\ Teclas de Colores: Siga las instrucciones en pantalla para las funciones de las teclas de colores
15.\ Reproducir: Inicia la reproducción de los ficheros seleccionados
16.\ Pausa:Pausa la reproducción del archivo en curso, inicia la grabación diferida**
17.\ Alto: Detiene la reproducción de ficheros multimedia
18.\ Avance rápido: Avanza fotogramas en ficheros multimedia tales como películas
19.\ YouTube: Inicia la aplicación de YouTube
20.\ Mi Botón 2 (*)
21.\ Salir: Cierra y sale de los menús que aparecen o regresa a la pantalla anterior
22.\ Info: Muestra información sobre el contenido de la pantalla, muestra información oculta (revelar - en modo teletexto)
23.\ Menú: Muestra el menú del Televisor
24.\ Programa +/-
25.\ Texto:Muestra el teletexto (si estuviera disponible); púlselo de nuevo para superponer el teletexto sobre la imagen (mezcla)
26.\ Fuente: Muestra todas las fuentes de señales y contenidos
Nota al pie:
Los botones de color rojo, verde, azul y amarillo son multi-función, siga las instrucciones en pantalla y de sección.
(**) Si esta función es compatible con el televisor
Español - 9 -

Encendido/Apagado
Encendido del televisor
Conecte el cable a una fuente de corriente, como por ejemplo un enchufe de pared (220-240V CA, 50 Hz).
Para encender el televisor desde el modo de espera puede realizarlo de dos modos:
•\ Pulse el botón Modo en espera, Canal +/- o un botón numérico del mando a distancia.
•\ Pulse el centro del selector de funciones lateral del televiso.
Apagado del Televisor
Pulse el botón Modo en Espera en el mando a distancia o pulse el botón central de la palanca de función en el televisor por unos segundos hasta que el televisor cambie al modo en espera.
Paraapagareltelevisorporcompleto,desenchufe el cable de alimentación de la toma de corriente.
Nota: Cuando el televisor está encendido en modo de espera, el LED de espera puede parpadear para indicar que elementos como Espera, Buscar, Descargar por are o el Temporizador está activo. El indicador LED también puede parpadear cuando encienda el televisor en modo en espera.
Instalación inicial
Nota: Si usted va a realizar la instalación FRANSAT, inserte la tarjeta FRANSAT (opcional) en el terminal de acceso condicional de su televisor antes de encender su TV.
Cuando lo encienda por primera vez, aparecerá el menú de selección de idioma. Seleccione el idioma deseado y pulse OK. En los siguientes pasos de la guíadeinstalación,configuresuspreferenciasconlos botones direccionales y el botón OK.
Enlasegundapantalla,configurelapreferenciadesu país. En función del País seleccionado, se le pedirá unPINquedeberáconfirmarenestepunto.DichoPIN no podrá ser 0000. Lo deberá introducir más tarde, en caso de que se le solicite para realizar cualquier operación en los menús.
Nota: El tipo de operador M7(*) se definirá de acuerdo al Idioma y el País que haya seleccionado en el menú de
Primera Instalación.
(*) M7 es un proveedor de servicios de satélite digital.
Puede activar la opción de Modo de Tienda en el siguiente paso. Esta opción configurará los ajustes de su TV para la mejor calidad de pantalla y las características compatibles de la TV se mostrarán en la parte superior de la pantalla como una barra de información. Esta opción es solo para uso en establecimientos. Se recomienda seleccionar el Modo Hogar para el uso doméstico. Esta opción estará disponible en el menú Configuración>Sistema>Más y puede ser apagado / encendido más adelante. Haga su selección y presione OK para continuar.
Dependiendo del modelo de su televisor y de la selección de país, el menú Configuración de privacidad puede aparecer en este punto. Usando este menú puede configurar sus privilegios de privacidad. Resalte una función y utilice los botones direccionales izquierdo y derecho para activar o desactivar. Lea las explicaciones relacionadas mostradas en la pantalla para cada característica resaltada antes de realizar cualquier cambio. Puede utilizar los botones de programa +/- para desplazarse hacia arriba y hacia abajo para leer todo el texto. Podrá cambiar sus preferencias en cualquier momento más tarde desde el menú Configuración> Sistema> Configuraciones de privacidad. Si la opción Conexión a Internet está deshabilitada, la pantalla Configuración de red / Internet se omitirá y no se mostrará. Si tiene alguna pregunta, queja o comentario con respecto a esta Política de Privacidad o su aplicación, comuníquese por correo electrónico a smarttvsecurity@vosshub.com.
Seleccione Next (Siguiente) pulse el botón OK en el mando a distancia para continuar y se mostrará el menú Network/InternetSettings(Configuraciónde red/Internet). ConsultelasecciónConectividadpara configurar una conexión alámbrica o inalámbrica. Si desea que su televisor consuma menos energía en el modoenespera,puededesactivarlaopciónWakeOn (Despertar) al configurarlo como Off (Desactivado).
Después de completar la configuración, resalte Next (Siguiente) y presione el botón OK para continuar.
En la pantalla siguiente, puede establecer los tipos de difusión para buscar, establecer sus preferencias de búsqueda de canales cifrados y zona horaria (según la selección del país). Además, puede definir un tipo de emisión como su favorita. Se dará prioridad al tipo de emisión seleccionado durante el proceso de búsqueda y los canales de la misma se incluirán en la parte superior de la Lista de Canales. Cuando termine, resalte Next(Siguiente) y presione OKpara continuar.
Acerca de Seleccionar el Tipo de Emisión
Para activar una opción de búsqueda para un tipo de transmisión, resáltela y presione OK. Se marcará la casilla de verificación junto a la opción seleccionada.
Para desactivar la opción de búsqueda, borre la casilla deverificaciónpresionandoOKluego de mover el foco a la opción de tipo de transmisión deseada.
Antenadigital:Si la opción de búsqueda de emisiones Antena Digital está encendida, el televisor buscará emisiones terrestres digitales después de que otros ajustes iniciales se hayan completado.
CableDigital:Si la opción de búsqueda de emisiones de Cable Digital está activada, el televisor buscará emisiones digitales por cable después de que otros ajustes iniciales hayan sido completados. Se mostrará un mensaje antes de comenzar a buscar y se le preguntará si desea realizar una búsqueda
Español - 10 -

en la red de cable. Si selecciona Yes (Sí) y pulse
OK puede seleccionar Network (Red) o establecer valores como Frequency, Network ID (Frecuencia, ID de red) y Search Step (Paso de búsqueda) en la pantallasiguiente.Siselecciona No y pulsa OKpuede configurarStart Frequency (Iniciar frecuencia), Stop Frequency (Detener frecuencia)y Search Step (Paso de búsqueda) en la siguiente pantalla.
Cuando termine, resalte Next (Siguiente) y presione OK para continuar.
Nota: La duración de la búsqueda cambiará en función del
Paso de Búsqueda seleccionado.
Satélite: Si la opción de búsqueda de emisiones por Satélite está encendida, el televisor buscará emisiones digitales por satélite después de que otros ajustes iniciales se hayan completado. Antes de realizar la búsqueda de satélite se deben hacer algunos ajustes. Aparecerá un menú donde puede seleccionar iniciar la instalación del operador M7 o Fransat o una instalación estándar.
Para iniciar una instalación del operador M7 establezca el Tipo de instalación como Operador y Operador de satélite como el operador M7 relacionado. A continuación, resalte la opción de Escaneopreferido y como Búsqueda Automática de Canales y pulse
OK para iniciar la búsqueda automática. Estas opciones pueden ser pre seleccionadas en función de las selecciones de Idioma y País que haya realizado en los pasos anteriores del proceso de Primera Instalación. Se le puede pedir seleccionar HD o SD lista de canales del país acuerdo a su tipo de operador M7. Seleccione una y pulse OK para continuar.
Espere hasta que finalice la búsqueda.Ahora, la lista se ha instalado.
Durante la realización de una instalación del operador M7, si desea utilizar los parámetros de la instalaciónporsatélitequedifierendelaconfiguración predeterminada, seleccione la opción de Escaneo preferido como Búsqueda manual de canales y pulse el botón OK para continuar. Ahora aparecerá el menú Tipo de Antena. Después de seleccionar el tipo de antena y el satélite deseado en los siguientes pasos, presione OK para cambiar los parámetros de instalación del satélite en el submenú.
Para iniciar una instalación de Fransat, configure el
Tipo de instalación (Install Type) como Operador (Operator) y luego el Operadordesatélite(Satellite Operator) como el operador de Fransat relacionado. Luego, pulse el botón OK para iniciar el proceso de instalación de Fransat. Usted puede seleccionar iniciar una instalación automática o manual.
Pulse OK para seguir. La instalación de Fransat se llevará a cabo y las emisiones se almacenará (si está disponible).
Español
Si establece el Tipo de instalación como Estándar, puede continuar con la instalación normal de satélite y ver canales vía satélite.
Puede iniciar una instalación Fransat en c u a l q u i e r m o m e n t o p o s t e r i o r d e l m e n ú
Settings>Installation>Automatic channel scan> Satellite(Configuración>Instalación>Exploración automática de canales> Satélite).
Conelfindebuscarloscanalessatelitalesdistintosde los canales M7 o Fransat debería iniciar una instalación estándar. Seleccione el Tipo de instalación como Estándar y pulse el botón OK para continuar. Ahora aparecerá el menú Tipo de Antena.
Hay tres opciones para la selección de la antena. Puede seleccionar Antenna Type (Tipo de antena) como Direct, SingleSatelliteCableo DiSEqCswitch usando los botones Izquierda o Derecha. Después de seleccionar su tipo de antena, presione OK para ver las opciones para continuar. Continuar, Lista de transpondedores y las opciones de ConfigurarLNB estarán disponibles. Puede cambiar los ajustes de transpondedor y LNB usando las opciones de menú relacionadas.
•\ Directa: Seleccione este tipo de antena si tiene un sólo receptor y una antena parabólica directa. Pulse OKparacontinuar.Seleccione un satélite disponible y pulse OK para buscar los servicios.
•\ Cable de un solo satélite Si usted tiene múltiples receptores y un solo sistema de cable de satélite, seleccione este tipo de antena. Pulse OK para continuar. Configure las opciones siguiendo las instrucciones que aparecen en pantalla. Pulse OK para buscar los servicios.
•\ Interruptor DiSEqC: Si dispone de varias antenas satelitales y un Conmutador DiSEqC, seleccione este tipo de antena. Luego configure la versión DiSEqC y pulse OKparacontinuar.Puedeconfigurar hasta cuatro satélites (si están disponibles) para la versión v1.0 y dieciséis satélites para la versión v1.1 en la siguiente pantalla. Pulse el botón OK para buscar el primer satélite en la lista.
Analógica: Si la opción de búsqueda de difusión Analógica está activada, el televisor buscará emisiones analógicas después de que se hayan completado otros ajustes iniciales.
Aparecerá un cuadro de diálogo solicitándole activar el control parental. Si selecciona Sí, se mostrarán las opciones de restricción de los padres. Realice la configuración como desee y pulse OK cuando haya terminado. Seleccione No y pulse OKpara avanzar, si no desea activar las restricciones parentales.
Después de que los ajustes iniciales se completen el televisor comenzará a buscar transmisiones disponibles de los tipos de difusión seleccionados.
- 11 -

Mientras la búsqueda continúa, los resultados del escaneo se mostrarán en la parte inferior de la pantalla. Después de almacenar todas las estaciones disponibles, se mostrará el menú Channels(Canales). Puede editar la lista de canales de acuerdo con sus preferencias usando las opciones de la pestaña Edit (Editar) o presionar el botón Menupara salir y ver TV.
Mientras continúa la búsqueda puede aparecer un mensaje preguntándole si desea ordenar los canales según LCN(*). Seleccione la opción Sí y pulse OK para confirmar.
(*) LCN responde a las siglas de Logical Channel Number (Número Lógico de Canal); es un sistema que organiza las señales de emisión disponibles según una secuencia de canales reconocibles (si estuviera disponible la opción).
Notas:
Para buscar canales M7 después de la Instalación inicial, debe realizar la Primera instalación de nuevo. O pulse el botón de Menu y entre en el menú de
Settings>Installation>Automatic channel scan>Satellite (Configuración>Instalación> Búsqueda Automática de Canales> Satélite). Luego siga los mismos pasos mencionados anteriormente en la sección del satélite.
No apague el televisor mientras realice la Primera Instalación. Tenga en cuenta que, algunas opciones pueden no estar disponibles en función de la selección del país.
Uso de la función de tabla de canales satelitales
Puede realizar estas operaciones usando el menú
Settings>Installation>Satellite Settings>Satellite ChannelTable(Configuración>Instalación>Configuracióndesatélite>Tabladecanalessatelitales). Hay dos opciones con respecto a esta característica.
Puede descargar o cargar datos de tablas de canales satelitales. Para poder realizar estas funciones que, en primer lugar deberá conectar un dispositivo USB al televisor.
Podrá subir los servicios actuales, así como los correspondientes satélites y transponedores del televisor, al dispositivo USB.
Además, puede descargar uno de los archivos de tabla de canales satelitales almacenados en un dispositivo USB al televisor.
Cuandoseleccionecualquieradeestosficheros,todos los servicios, satélites y transponedores del archivo seleccionado quedarán almacenados en el televisor. Si hay servicios terrestres, de cable y/o analógicos instalados, se conservarán y solo se eliminarán los servicios de satélite.
Después, compruebe los ajustes de la antena y realice cambios si fuera necesario. Si no configura correctamente la antena, podrá mostrarse el mensaje de error "Sin señal".
E-Manual
Puede encontrar instrucciones sobre las funciones de su televisor en el E-Manual.
Para acceder al E-Manual o manual electrónico, ingrese al menú de Settings Configuración, seleccione Manuals(Manuales)y presione OK. Para un acceso rápido, presione el botón Menu y luego el botón Info (Información).
Mediante el uso de los botones de navegación, seleccione la categoría que desee. Cada categoría incluye una serie de temas diferentes. Seleccione un tema y pulse OK para leer las instrucciones.
Para cerrar la pantalla de E-Manual pulse el botón
Salir o el botón Menu.
Nota: Según el modelo, es posible que su televisor no admita esta función. El contenido del E-Manual puede variar de acuerdo al modelo.
Para más información e instrucciones más detalladas, consulte el manual del usuario completo en nuestro sitio web www.jvctv.eu.
Conectividad
Conectividad alámbrica
Conexión a Redes Alámbricas
•\ Usted debe tener un módem/router conectado a una conexión de banda ancha activa.
•\ Conecte el televisor a su módem/router mediante un cable Ethernet. Hay un puerto LAN en la parte trasera (atrás) de su TV.
1
2
3
1.\ Conexión ISP de banda ancha 2.\ Cable de LAN (Ethernet)
3.\ Entrada LAN en la trasera del televisor
Para configurar los ajustes de Red, consulte la sección Red en el menú Configuración.
•\ Usted puede ser capaz de conectar el televisor a la redLANdependiendodelaconfiguracióndesured. Entalcaso,utiliceuncableethernetparaconectarel televisor directamente a la toma de red de la pared.
Español - 12 -

1
2
1.\ Enchufe de pared de red
2.\ Entrada de LAN en el lado posterior de la TV
Configuración del Dispositivo Alámbrico Tipo de Red
El Tipo de Red puede seleccionarse como
Dispositivo Alámbrico, Dispositivo Inalámbrico o Deshabilitado, de conformidad con la conexión activa del televisor. Selecciónelo como Dispositivo Alámbrico si va a conectar vía Ethernet.
Prueba de Velocidad de Internet
Resalte la Prueba de velocidad de Internet y presione el botón OK. El televisor revisará el ancho de banda de conexión a Internet y mostrará el resultado cuando termine.
Configuración Avanzada
Seleccione Configuración Avanzada y presione el botón OK. En la siguiente pantalla puede cambiar la configuración IP y DNS del televisor. Seleccione el que desee y pulse el botón Izquierda o Derecha para cambiar el ajuste de Automático a Manual. Ahora puede introducir los valores de IP Manual y/o DNS Manual. Seleccione el elemento relacionado en el menú desplegable e introduzca los nuevos valores utilizando los botones numéricos del mando a distancia. Pulse el botón OK para guardar la configuración cuando haya terminado.
Conexión Inalámbrica
Conexión a Redes inalámbricas
El televisor no se puede conectar a las redes con SSID ocultas. Si desea hacer visible la SSID del módem, deberácambiarlosajustesSSIDatravésdelsoftware del mismo.
1
1.\ Conexión ISP de banda ancha
Configuración de los ajustes del dispositivo inalámbrico
Abra el menú ConfiguraciónderedyseleccioneTipo de red como Dispositivo Inalámbricopara iniciar el proceso de conexión.
Resalte la opción Escanear redes inalámbricas y presione OK para iniciar una búsqueda de redes inalámbricas disponibles. Se enumerarán todas las redes encontradas. Seleccione la red que desee de la lista y pulse OK para conectarse.
Nota: Si el módem es compatible con el modo N, debe establecer la configuración de modo N.
Si la red seleccionada está protegida por contraseña, ingrese la clave correcta usando el teclado virtual. Puede utilizar este teclado a través de los botones de navegación y el botón OK del mando a distancia.
Espere hasta que vea la dirección IP en la pantalla.
Estosignificaráquesehaestablecidolaconexión.Para desconectarse de una red inalámbrica, seleccione Tipo de red y pulse los botones Izquierda o Derecha para establecer como Deshabilitado.
Si su enrutador tiene WPS, puede conectarse directamente al enrutador sin introducir una contraseña o agregar la red primero. Seleccione la opción “Press
WPS on your wifi router ” ("Pulse WPS en su enrutador wifi") y pulse OK. Vaya a su dispositivo de enrutador y presione el botón WPS en él para hacer la conexión. Verá una confirmación de conexión en su televisor una vez que los dispositivos estén emparejados. Seleccione OK para continuar. No se requiere ninguna otra configuración.
Español - 13 -

Seleccione Prueba de Velocidad de Internet y pulse el botón OK para comprobar la velocidad de conexión a Internet. Seleccione Configuración Avanzada y pulse el botón OK para abrir el menú de configuración avanzada. Utilice los botones de navegación y numéricos para establecer. Resalte Guardar y presione el botón OK para guardar la configuración cuando finalice.
Otra Información
ElestadodelaconexiónaparecerácomoConectado o No Conectado y la dirección IP, si se establece una conexión.
Conexión al teléfono móvil mediante WLAN
•\ En caso de que su teléfono o dispositivo móvil tenga WLAN, podrá conectarlo al televisor con un enrutador para acceder al contenido de su dispositivo.Paraello,eldispositivomóvildebetener un software de intercambio apropiada.
\Conecte su televisor a su enrutador siguiendo los pasos mencionados en las secciones anteriores.
\Luego, conecte su dispositivo móvil al enrutador y luego active el software para compartir en su dispositivo móvil. A continuación, seleccione los ficheros que desea compartir con su televisor.
\Si la conexión se establece correctamente, podrá acceder a los archivos compartidos instalados en su dispositivo móvil a través de la función AVS (compartir video en audio) de su televisor.
\Resalte la opción AVS en el menú de Fuentes y presione OK, se mostrarán los dispositivos de servidordemediosdisponiblesenlared.Seleccione su dispositivo móvil y pulse el botón OK para continuar.
•\ Si es posible, podrá descargar una app para usar como mando a distancia virtual desde el servidor de aplicaciones de su teléfono o dispositivo móvil.
Nota: Esta característica no es compatible con todos los dispositivos móviles.
Wake On (Despertar)
Wake-on-Wireless LAN (WoWLAN) es un estándar que permite que un dispositivo sea encendido o despertado por un mensaje de red. El mensaje se envía al dispositivo mediante un programa ejecutado en un dispositivo remoto conectado a la misma red de área local, tal como un teléfono inteligente.
Su TV es compatible con WoWLAN. Esta característica podría estar deshabilitada durante el proceso de instalación por primera vez. Para habilitar esta función, configurelaopciónWakeOn(Despertarencendido) en el menú Red como Activado. Es necesario que tanto el dispositivo, desde el cual se envíe el mensaje de red al televisor, como el televisor, estén conectados a la misma red. La característica de Wake On (Despertar encendido) solo se admite para dispositivos
con sistema operativo Android y solo se puede utilizar a través de aplicaciones de YouTube y Netflix.
Para utilizar esta función, el televisor y el dispositivo remoto deben estar conectados al menos una vez mientras el televisor esté encendido. Si el televisor está apagado, la conexión debe restablecerse, la próxima vez que se encienda. De lo contrario, esta función no estará disponible.. Esto no se aplica cuando el televisor se cambia al modo de espera
El rendimiento de algunos dispositivos en el mercado, puedevariardebidoalaarquitecturadelsoftware.Para utilizar la función Wake On (Despertar encendido) con un mejor rendimiento, asegúrese de que su dispositivo tenga la versión de firmware más reciente.
Si desea que su televisor consuma menos energía en el modo de espera, puede desactivar esta función configurando la opción Activar como Desactivado.
Pantalla Inalámbrica
La pantalla inalámbrica es un estándar para el servicio de streaming de vídeo y contenido de sonido. Esta característica proporciona la capacidad de utilizar el televisor como dispositivo de visualización inalámbrico.
Uso con dispositivos móviles
Hay diferentes normas que permiten compartir pantallasincluyendodegráficos,vídeoycontenidode audio entre su dispositivo móvil y el televisor.
En primer lugar, conecte el dongle USB inalámbrico al televisor, si el televisor no tiene la función de WLAN interna.
Luego pulse el botón Fuente en el mando a distancia y cambie a la fuente Pantalla inalámbrica.
Aparece una pantalla que indica que el televisor está listo para la conexión.
Abra la aplicación para compartir en su dispositivo móvil. Estas aplicaciones se denominan de forma diferente para cada marca, por favor consulte el manual de instrucciones de su dispositivo móvil para obtener información detallada.
Realice una búsqueda de dispositivos. Después de seleccionar su televisor y conectarse, la pantalla de su dispositivo se mostrará en su televisor.
Nota: Solo podrá utilizar esta opción en caso de que el dispositivo o teléfono móvil sea compatible con esta función. Si tiene problemas con la conexión, compruebe si la versión del sistema operativo que utiliza admite esta característica. Puede haber problemas de incompatibilidad con las versiones del sistema operativo que se lanzan después de la producción de este TV. Los procesos de búsqueda y conexión variarán en función del programa que use.
Español - 14 -

Conexión de dispositivos Bluetooth
Su televisor también es compatible con la tecnología de conexión inalámbrica Bluetooth. Se requiere un emparejamiento antes de usar dispositivos Bluetooth con el televisor. Usted debe hacer lo siguiente para emparejar el dispositivo con el televisor:
•\ Configureeldispositivoenmododeemparejamiento
•\ Iniciar la detección de dispositivos en el televisor
Nota: Consulte el manual de usuario del dispositivo Bluetooth para saber cómo configurar el dispositivo en modo de emparejamiento.
Para dispositivos de audio, debe usar la opción
Bluetooth en el menú Settings>Sound
(Configuración> Sonido), para los controladores remotos la opción Smart Remote en el menú
Settings>System>More(Configuración>Sistema> Más). Seleccione la opción de menú y pulse el botón OK para abrir el menú relacionado. Con este menú, puede descubrir y conectar los dispositivos que usan la tecnología inalámbrica Bluetooth y comenzar a usarlos. Siga las instrucciones en línea.
Uso del servicio de red Compartir Audio y Vídeo
La característica de Compartir Audio y Vídeo utiliza un estándar que facilita el proceso de visión de la electrónica digital y los hace más cómodo de usar en una red doméstica.
Esta norma le permite ver y reproducir fotos, música y vídeos almacenados en el servidor multimedia conectados a la red doméstica.
1. Instalación del software del servidor
LacaracterísticaCompartirAudioyVídeonosepuede utilizarsi el programa servidor no está instalado en su PC osielsoftwaredeservidordemultimedianecesario no está instalado en el dispositivo compañero. Por favor, prepare su PC con el programa de servidor apropiado.
2. Conexión a Redes Alámbricas o Inalámbricas
Consulte los capítulos Conectividad Cableada/ Inalámbricapara obtener información detallada sobre la configuración.
3. Compartir Audio y Vídeo
Ingrese al menú Settings>System>More (Configuración> Sistema> Más) y habilite la opción AVS.
4. Reproducción de Ficheros Compartidos mediante el Explorador Multimedia
Resalte la opción AVS en el menú de Sources
(Fuentes) usando los botones direccionales y presione
OK. Se enumerarán los dispositivos de servidor multimedia disponibles en la red. Seleccione uno y presioneOKparacontinuar.Se mostrará el explorador multimedia.
Español
Información sobre la función de DVB
Este receptor de DVB sólo es compatible para su uso en el país para el cual se haya concebido el mismo.
Aunque este receptor de DVB cumple con las últimas especificaciones sobre DVB en el momento de su fabricación, no podemos garantizar la compatibilidad con las transmisiones de DVB en el futuro debido a los cambios que se aplicarán en las señales de radiodifusión y en las tecnologías.
Algunas funciones de televisión digital podrían no estar disponibles en todos los países.
Nos esforzamos continuamente para mejorar nuestros productos. Por tanto, las especificaciones pueden cambiar previo aviso.
Para tener información sobre dónde comprar los accesorios, le rogamos contacte con el establecimiento donde compró el aparato.
- 15 -
 Loading...