


OMNIBOOK XT1000
KS
SDYLOLRQQRWHERRN
]W[]
VHULHV
RPQLERRNQRWHERRN
WURXEOHVKRRWLQJ
DQGVHOIUHSDLU
JXLGH

Thank you for purchasing this Factory Service
Manual CD/DVD from servicemanuals4u.com.
Please check out our eBay auctions for more great
deals on Factory Service Manuals:
servicemanuals4u

Notice
This manual and any examples contained herein are provided “as is” and are subject to change without
notice. Hewlett-Packard Company makes no warranty of any kind with regard to this manual,
including, but not limited to, the implied warranties of merchantability and fitness for a particular
purpose. Hewlett-Packard Co. shall not be liable for any errors or for incidental or consequential
damages in connection with the furnishing, performance, or use of this manual or the examples herein.
Consumer transactions in Australia and the United Kingdom: The above disclaimers and limitations
shall not apply to Consumer transactions in Australia and the United Kingdom and shall not affect the
statutory rights of Consumers.
© Copyright Hewlett-Packard Company 2000–2002. All rights reserved. Reproduction, adaptation, or
translation of this manual is prohibited without prior written permission of Hewlett-Packard Company,
except as allowed under the copyright laws.
The programs that control this product are copyrighted and all rights are reserved. Reproduction,
adaptation, or translation of those programs without prior written permission of Hewlett-Packard Co.
is also prohibited.
Portions of the programs that control this product may also be copyrighted by Microsoft Corporation,
SystemSoft Corp., Insyde Software Corporation, S3 Graphics Incorporated, and Adobe Systems
Incorporated. See the individual programs for additional copyright notices.
This product incorporates copyright protection technology that is protected by method claims of
certain U.S. patents and other intellectual property rights owned by Macrovision Corporation and
other rights owners. Use of this copyright protection technology must be authorized by Macrovision
Corporation and is intended for home and other limited viewing uses only unless otherwise authorized
by Macrovision Corporation. Reverse engineering or disassembly is prohibited.
Microsoft®, MS-DOS®, and Windows® are U.S. registered trademarks of Microsoft Corporation.
Pentium® and the Intel Inside logo are U.S. registered trademarks and Celeron™ and SpeedStep™
are U.S. trademarks of Intel Corporation. Adobe® and Acrobat® are trademarks of Adobe Systems
Incorporated.
All certifications may not be completed at product introduction.
This equipment is subject to FCC rules. It will comply with the appropriate FCC rules before final
delivery to the buyer.
Hewlett-Packard Company
HP Notebook Customer Care
1000 NE Circle Blvd., MS 425E
Corvallis, OR 97330, U.S.A.
Edition History
Edition 1.........................January 2002
ii zt1100/xz100 and xt1000 Series
Troubleshooting and Self-Repair Guide

Contents
Product Information.........................................................................................................5
Notebook Features............................................................................................................................5
Operating the Notebook.................................................................................................................10
Turning the Notebook On and Off...........................................................................................10
Resetting the Notebook...........................................................................................................11
Changing the Boot Device.......................................................................................................11
Hardware Specifications.................................................................................................................12
Troubleshooting and Diagnostics...................................................................................15
Audio Problems.......................................................................................................................15
CD and DVD Problems...........................................................................................................16
Display Problems.....................................................................................................................17
Floppy Disk Drive Problems...................................................................................................19
Hard Disk Drive Problems ......................................................................................................19
Heat Problems .........................................................................................................................20
Infrared Problems.................................................................................................................... 20
Keyboard and Pointing Device Problems................................................................................20
LAN Problems.........................................................................................................................21
Memory Problems...................................................................................................................22
Modem Problems.....................................................................................................................22
One-Touch Button Problems................................................................................................... 24
Parallel and USB Problems.....................................................................................................25
PC Card (PCMCIA) Problems ................................................................................................ 26
Performance Problems.............................................................................................................26
Power and Battery Problems ...................................................................................................27
Printing Problems.................................................................................................................... 29
Startup Problems .....................................................................................................................29
Standby and Resume Problems ...............................................................................................30
Wireless Problems...................................................................................................................30
Using the e-Diagtools Diagnostic Tests.........................................................................................32
Using the BIOS Configuration Utility............................................................................................33
Reinstalling and Updating Software..............................................................................37
Recovering the Factory Software Installation................................................................................37
Updating the Notebook BIOS ........................................................................................................38
Updating the Windows Drivers...................................................................................................... 38
Removing and Replacing Parts......................................................................................39
Removing the Battery.....................................................................................................................40
Removing the Optical Drive Module.............................................................................................41
Removing the Hard Disk Drive......................................................................................................42
Removing the Mini-PCI Card ........................................................................................................44
Removing the Keyboard Cover......................................................................................................46
Removing the Keyboard.................................................................................................................48
Removing an SDRAM Module......................................................................................................50
Removing an Expansion SDRAM Module.............................................................................50
Removing the System SDRAM Module ................................................................................. 51
Removing the Speakers..................................................................................................................52
Removing the Fan..........................................................................................................................53
Replacing Small Parts and Accessories.......................................................................................... 55
zt1100/xz100 and xt1000 Series iii
Troubleshooting and Self-Repair Guide

Reference Information....................................................................................................57
Password Removal Policy.............................................................................................................. 57
Hewlett-Packard Display Quality Statement.................................................................................. 57
Figures
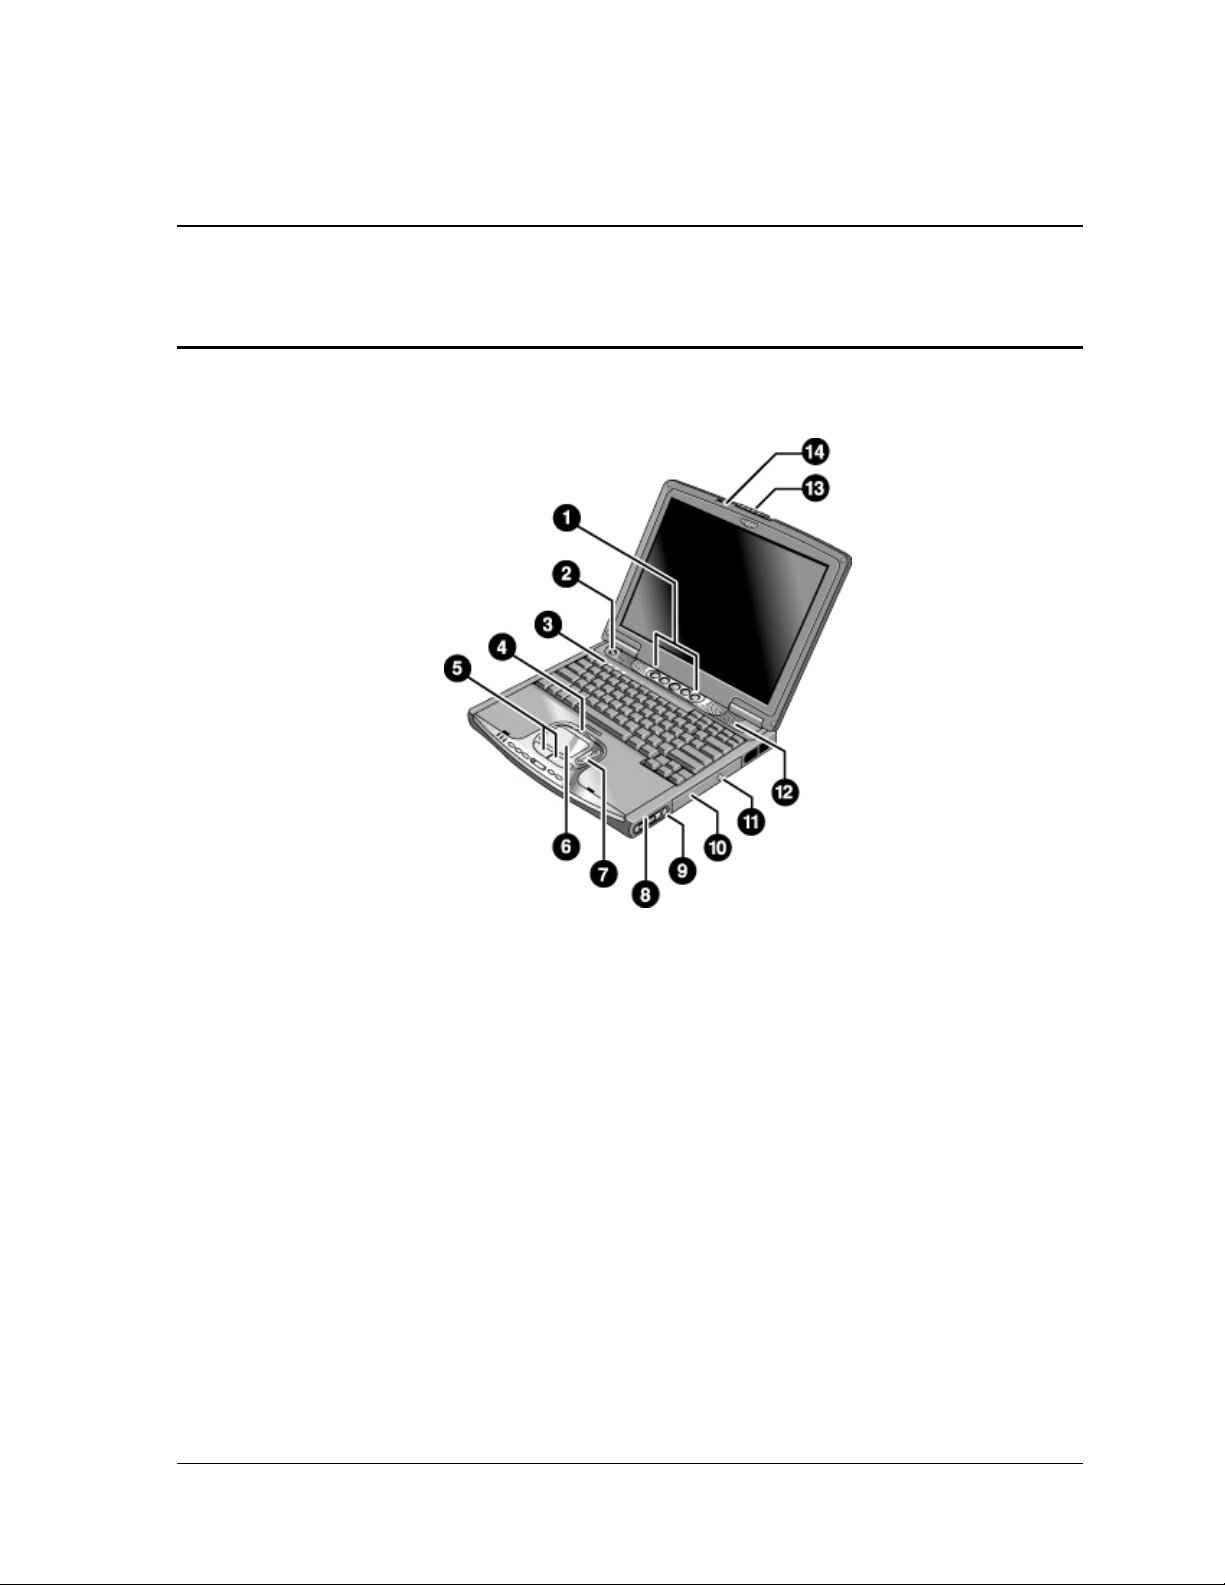
Figure 1. Front View............................................................................................................................... 5
Figure 2. Back View............................................................................................................................... 6
Figure 3. Bottom View............................................................................................................................7
Figure 4. Main Status Lights................................................................................................................... 8
Figure 5. Keyboard Status Lights............................................................................................................ 9
Figure 6. Multimedia Buttons and Status Panel (selected models)......................................................... 9
Figure 7. Pressing the Reset Switch...................................................................................................... 11
Figure 8. Removing the Battery............................................................................................................ 40
Figure 9. Releasing the Plug-in Module ............................................................................................... 41
Figure 10. Removing the Hard Disk Drive........................................................................................... 42
Figure 11. Removing the Hard Disk Tray............................................................................................. 43
Figure 12. Removing the Mini-PCI Card.............................................................................................. 45
Figure 13. Removing the Keyboard Cover Retaining Screws.............................................................. 46
Figure 14. Removing the Keyboard Cover........................................................................................... 47
Figure 15. Loosening the Keyboard Retaining Screws......................................................................... 48
Figure 16. Disconnecting the Keyboard................................................................................................ 49
Figure 17. Removing an Expansion SDRAM Module ......................................................................... 50
Figure 18. Installing an Expansion SDRAM Module........................................................................... 51
Figure 19. Removing the System SDRAM Module ............................................................................. 51
Figure 20. Removing the Speakers ....................................................................................................... 52
Figure 21. Removing the Fan................................................................................................................ 54
Tables
Table 1. Battery Replacement Part Numbers........................................................................................ 40
Table 2. Optical Drive Module Replacement Part Numbers................................................................. 41
Table 3. Hard Disk Drive Replacement Part Numbers......................................................................... 42
Table 4. Mini-PCI Card Replacement Part Numbers............................................................................ 44
Table 5. Keyboard Cover Replacement Part Numbers......................................................................... 46
Table 6. Keyboard Replacement Part Numbers.................................................................................... 48
Table 7. SDRAM Module Replacement Part Numbers........................................................................ 50
Table 8. Speaker Replacement Part Numbers....................................................................................... 52
Table 9. Fan Replacement Part Numbers..............................................................................................53
Table 10. Replacing Small Parts........................................................................................................... 55
Table 11. Accessories ........................................................................................................................... 55
iv zt1100/xz100 and xt1000 Series
Troubleshooting and Self-Repair Guide
Product Information
This section introduces the notebook and its components, and briefly describes basic operation.
Notebook Features
Figure 1. Front View
1. One-Touch buttons (programmable).
2. Power button.
3. Keyboard status lights: Caps Lock, Num Lock,
CD/DVD drive activity.
4. Touch pad/scroll pad on-off button (with on-off
indicators on either side).
5. Left and right click buttons.
6. Touch pad.
7. Scroll pad.
zt1100/xz100 and xt1000 Series Product Information 5
Troubleshooting and Self-Repair Guide
8. Volume controls (selected models).
9. Mute button and indicator light (selected models).
10. Removable DVD or DVD/CD-RW drive.
11. CD/DVD eject button.
12. Speaker (one on each side).
13. Latch.
14. Built-in microphone.

Figure 2. Back Vie w
15. AC adapter jack.
16. Parallel port (LPT1) (colored burgundy).
17. External monitor (VGA) port (colored blue).
18. S-video (TV out) port (colored yellow)
(selected models).
19. Universal serial bus (USB) ports (2).
20. Audio line-out jack (colored lime green) and
external microphone jack (colored pink).
21. Reset switch.
22. Kensington lock slot (security connector).
23. LAN port and indicators.
24. Modem port (selected models).
25. IEEE 1394 connector (selected models).
26. PC Card slot (Type II or Type III, lower slot only).
27. PC Card eject button.
28. Hard disk drive.
29. Wireless on-off button and indicator light
(selected models).
30. Universal serial bus (USB) port.
31. Headphones jack (colored lime green).
6 Product Information zt1100/xz100 and xt1000 Series
Troubleshooting and Self-Repair Guide

Figure 3. Bottom Vi ew
32. Infrared port (selected models).
33. Battery.
34. CD/DVD drive latch.
35. RAM cover.
36. Battery latch.
37. Docking port.
38. Mini-PCI cover (no user-
replaceable parts inside).
39. Hard disk drive retaining screws.
zt1100/xz100 and xt1000 Series Product Information 7
Troubleshooting and Self-Repair Guide
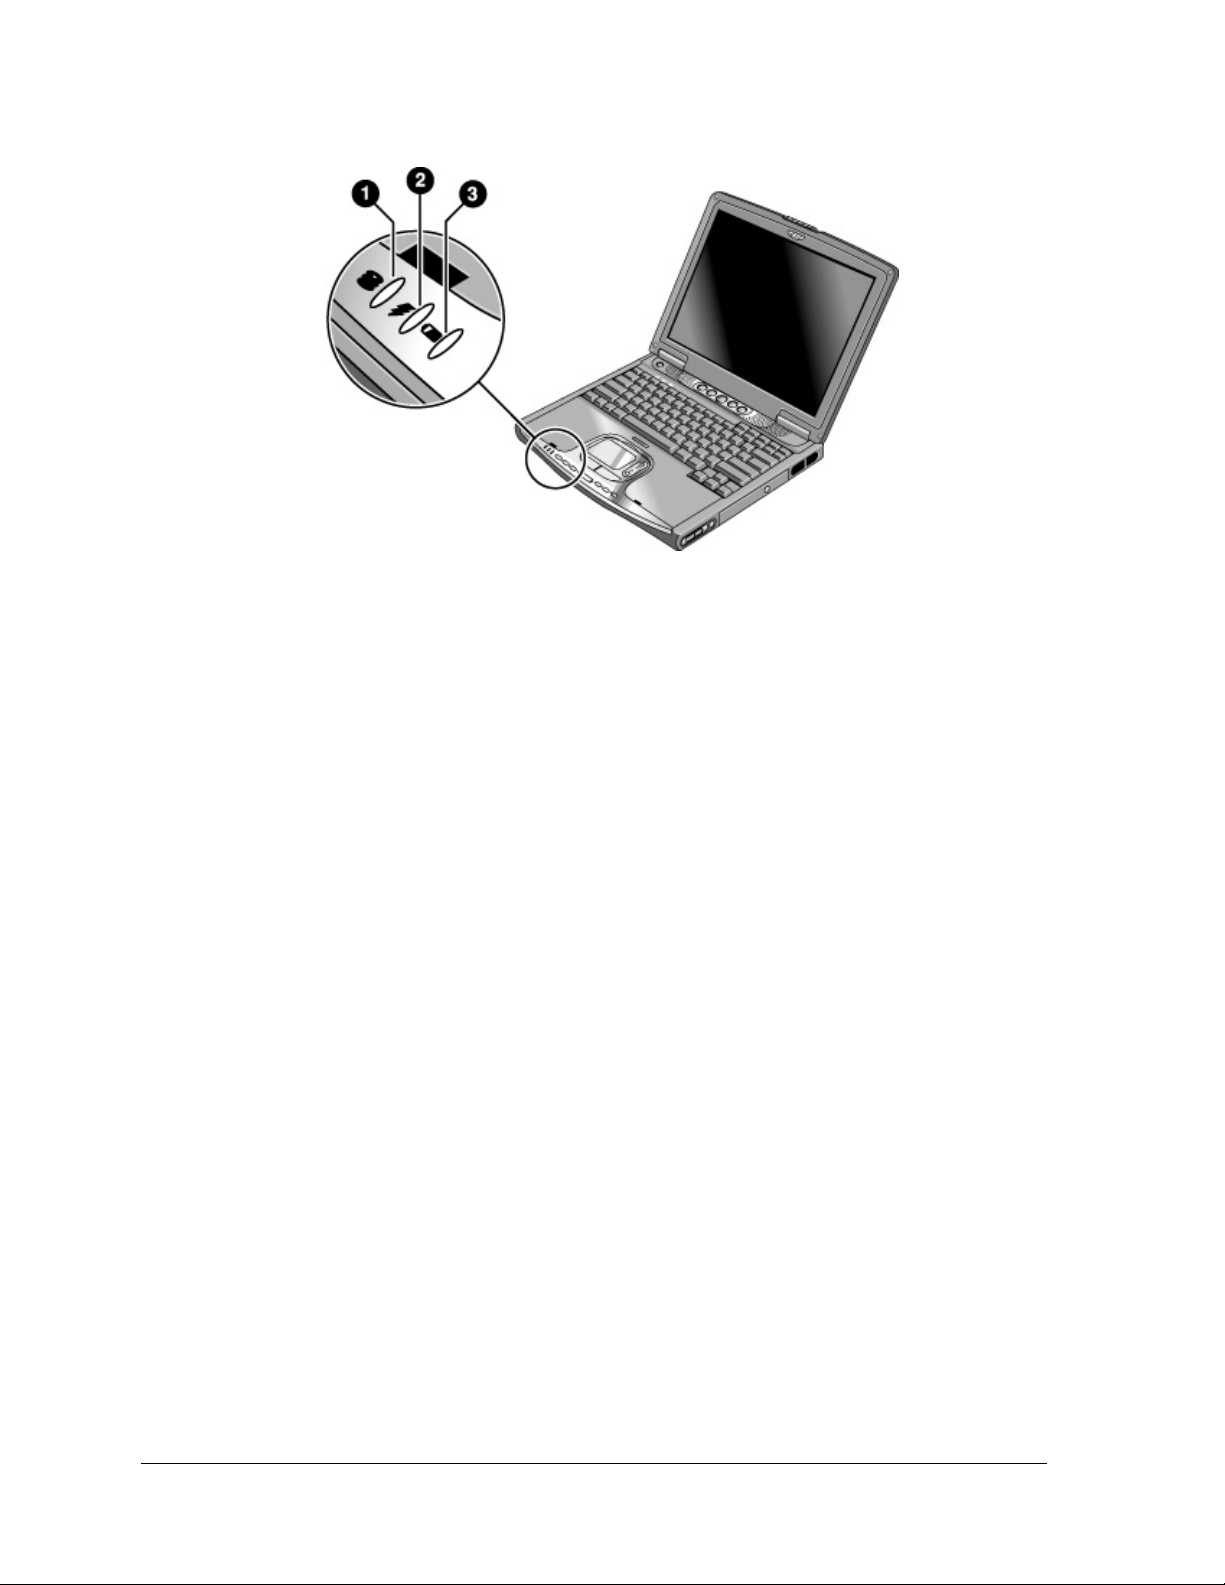
Figure 4. Main Stat us Lights
1. Hard disk drive activity.
• On: the notebook is accessing the hard disk drive.
2. Power mode.
• Green: the notebook is on (even if the display is off).
• Amber: the notebook is on standby.
• Off: the notebook is off or in hibernation.
3. Battery charge status.
• Green: the AC adapter is connected and the battery is fully charged.
• Amber: the AC adapter is connected and the battery is charging.
• Red: the AC adapter is connected and the battery has a fault.
• Off: the AC adapter is not connected or the battery is missing.
8 Product Information zt1100/xz100 and xt1000 Series
Troubleshooting and Self-Repair Guide
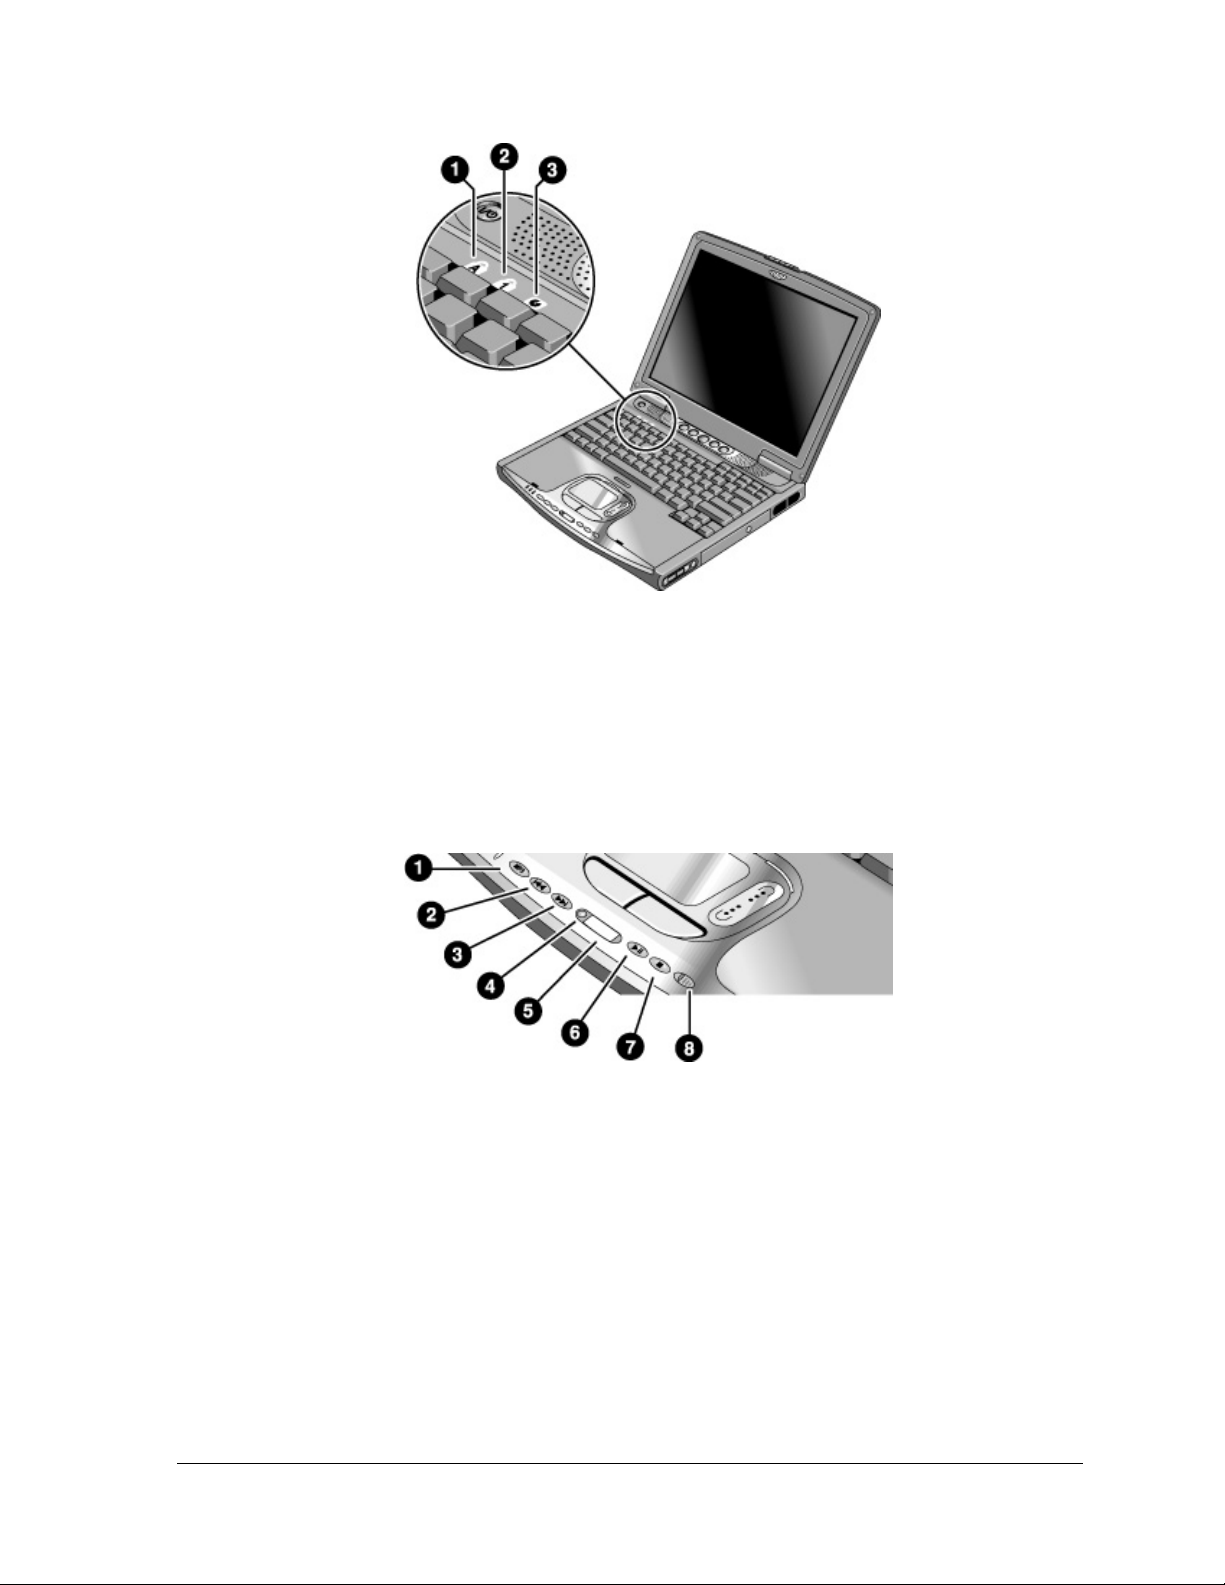
Figure 5. Keyboard Status Lights
1. Caps Lock. Caps Lock is active.
2. Num Lock. Num Lock is active. (The Keypad Lock must also be on to use the
embedded keypad.)
3. CD/DVD drive activity. The drive is active.
Figure 6. Multimedia Buttons and Status Panel (selected models)
1. MP3 player launch button.
2. Previous track button.
3. Next track button.
4. Status panel button.
5. Status panel.
6. Play/Pause button.
7. Stop button.
8. Multimedia power switch and
indicator light.
zt1100/xz100 and xt1000 Series Product Information 9
Troubleshooting and Self-Repair Guide

Operating the Notebook
Note
This manual describes the notebook in its original factory configuration, with all settings at their
default values.
Turning the Notebook On and Off
Power mode To enter this mode To turn on again
On
Power mode status light is green.
Standby
Maintains current session in RAM.
Turns off the display and other components.
Saves significant power.
Restarts quickly.
Restores network connections.
Power mode status light is amber.
Hibernation
Saves current session to disk, then turns off.
Saves maximum power.
Restores network connections.
Power mode status light is off.
Turn off
Turns off without saving current session.
Saves maximum power.
At startup, resets everything, and starts a new
session.
Power mode status light is off.
Press the power button.
Click Start, Turn Off Computer,
Stand By.
–or–
Press the power button.
–or–
Allow timeout.
Click Start, Turn Off Computer,
then press and hold Shift and
click Hibernate.
–or–
Allow timeout.
Click Start, Turn Off Computer,
Turn Off.
–or–
Press and hold the power
button for four seconds (only
if the Start menu procedure
doesn’t work).
Press the power button to
quickly resume your
session.
Press the power button to
resume your session.
Press the power button to
start with a new session.
10 Product Information zt1100/xz100 and xt1000 Series
Troubleshooting and Self-Repair Guide
Resetting the Notebook
If Windows or the notebook stops responding and you cannot turn the notebook off, try the following
in the order listed. Press the power button to restart.
• If possible, restart or turn off the notebook from within Windows: click Start, Turn Off Computer,
Restart (or Turn Off).
• Press Ctrl+Alt+Del, then click Shut Down, Restart (or Turn Off).
• Press and hold the power button for about four seconds.
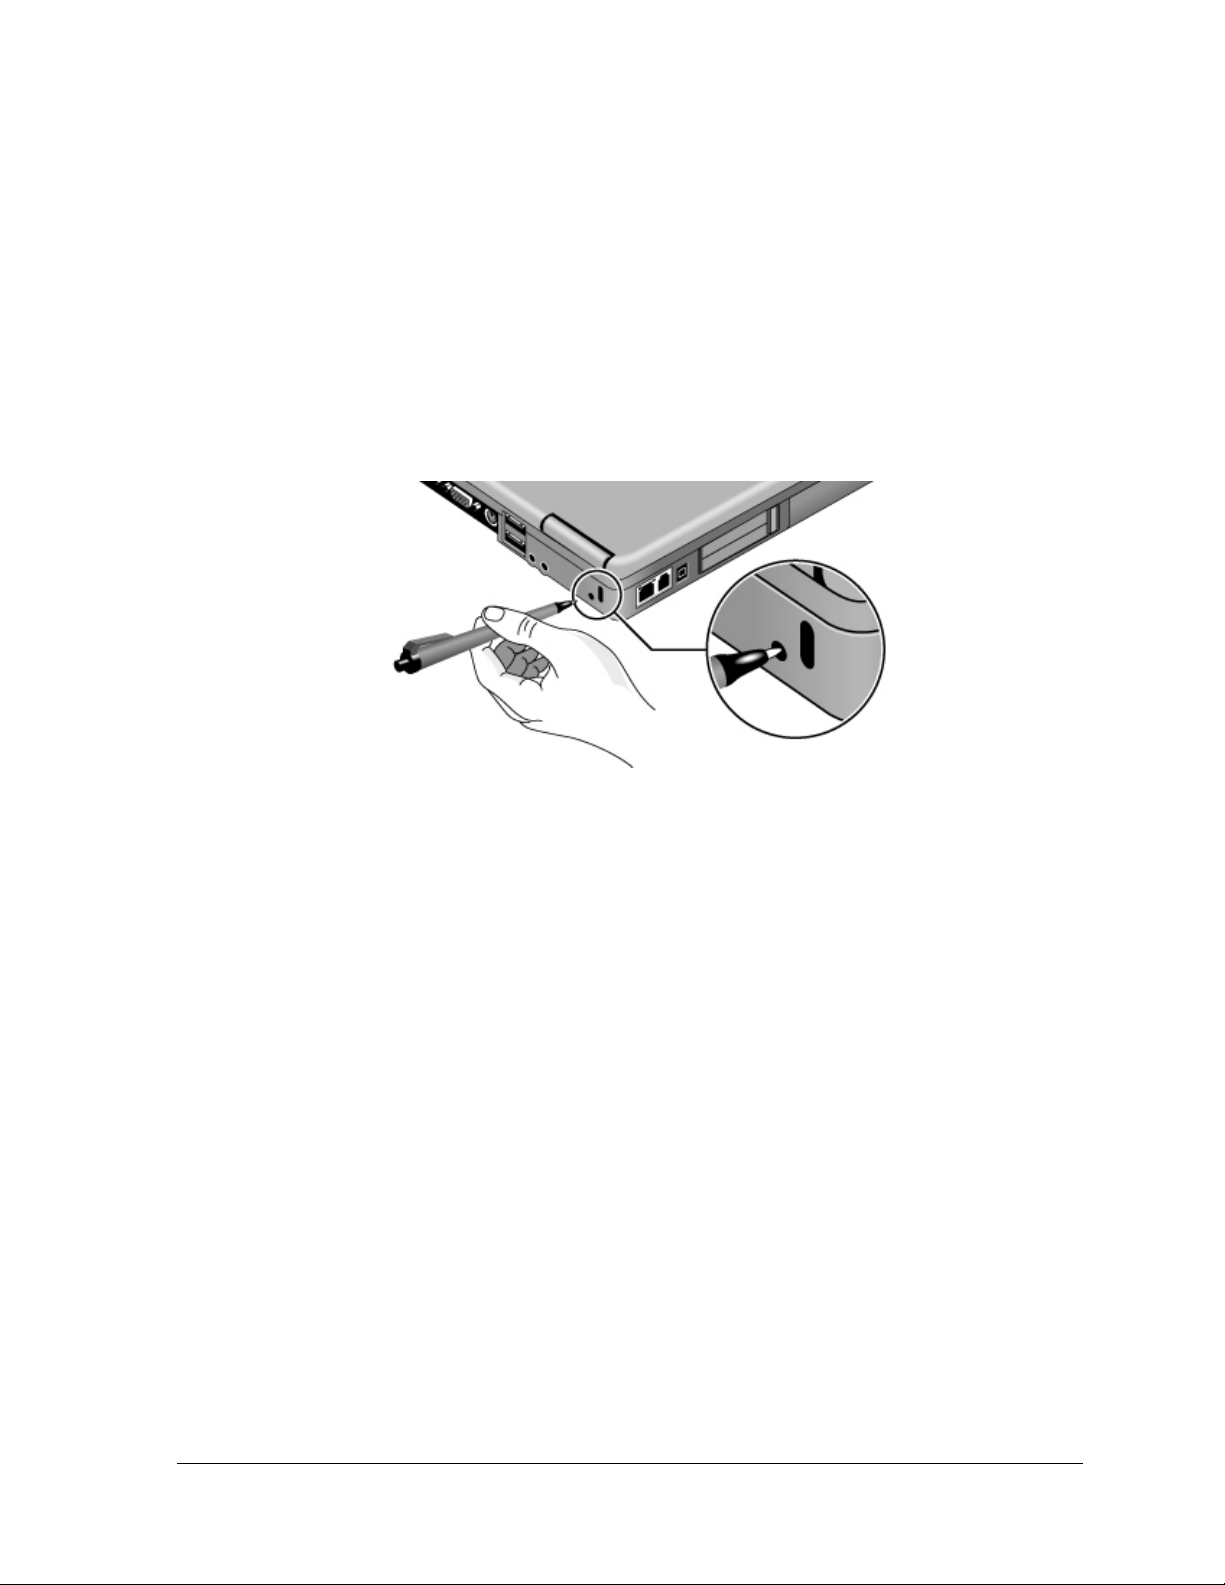
• Use a pen or straightened paper clip to press the reset switch on the back of the notebook.
Figure 7. Pressing the Reset Switch
Changing the Boot Device
The notebook normally boots from its internal hard disk. You can also boot the notebook from an
external USB floppy disk drive (optional accessory), the CD/DVD drive, or a local area network
(LAN).
1. Restart the notebook: click Start, Turn Off Computer, Restart.
2. When the HP logo appears, press Esc to display the Boot menu.
3. Use the arrow keys to select the boot device, and press Enter.
If you want to boot from a specific device whenever it is present, change the boot order using the
BIOS configuration utility—see “Using the BIOS Configuration Utility” on page 33.
zt1100/xz100 and xt1000 Series Product Information 11
Troubleshooting and Self-Repair Guide

Hardware Specifications
The specifications shown below are subject to change. For the latest specifications, see the HP
Notebook web site (www.hp.com/notebooks).
Physical Attributes Dimensions:
13.3/14.1-in models: 318 × 273 × 35.8 mm (12.5 × 10.75 × 1.4 in).
15-in models: 330 × 278 × 37.5 mm (12.99 × 10.94 × 1.47 in).
Thickness varies across unit.
Starting travel weight: 2.3 kg (5.0 lbs) minimum, depending on model.
Processor and
Bus Architecture
Graphics
Power
Mass Storage
CD/DVD drive
RAM
Audio System
Keyboard and
Pointing Devices
Intel Mobile Pentium III-M processor (starting at 933 MHz) with SpeedStep technology.
–or–
Intel Celeron processor (starting at 866 MHz).
1.6-V core, 2.5-V external, low-power processor.
32-bit PCI bus.
13.3/14.1/15-in XGA (1024x768) or 15-in SXGA+ (1400x1050) TFT LCD display.
Supports 16 million colors, 3D and OpenGL graphics.
Supports hardware acceleration for MPEG. Display driver supports MPEG2 overlay.
Supports simultaneous LCD+CRT operation (same image on both displays).
Integrated VGA.
Up to 32-MB video memory (shared with system memory).
Supports NTSC and PAL TV.
Dual display for LCD and external monitor or TV.
Rechargeable lithium-ion or NiMH battery.
Battery life depends on notebook type and usage, and battery type and calibration.
Low-battery warning.
Standby/hibernate and resume capability.
Universal AC adapter: 100–240 Vac (50/60 Hz) input, 19 Vdc output, 60 W.
10- to 40-GB removable IDE hard disk drive.
Supports optional 1.44-MB floppy disk drive module.
8X DVD or 8X8X24X8 DVD/CD-RW (or higher) removable drive.
Two slots for SDRAM expansion (SODIMM, PC133) up to 1024 MB (2x512MB).
133-MHz RAM bus.
Built-in microphone.
Stereo sound through two built-in speakers. 1.5 W per channel.
Polk Audio certified on 15-in models.
Dedicated mute and volume controls (selected models).
CD player (can play while notebook is on standby, in hibernation, or off).
3D-enhanced PCI bus audio.
87/88/91-key touch-type QWERTY keyboard with 101/102 key emulation.
Embedded numeric keypad.
12 function (Fn) keys.
5 user-programmable One-Touch buttons.
Touch pad with lock button and on-off indicator.
Left and right click buttons, vertical scroll pad.
12 Product Information zt1100/xz100 and xt1000 Series
Troubleshooting and Self-Repair Guide

Input/Output
Expandability
Security Features
Environmental Limits
Major ICs
3 universal serial bus (USB) ports.
15-pin VGA video-out (blue) with DDC support. (Resolution up to 1600×1200×64K or
16M colors. Refresh rate of 60 to 100 Hz, depending on resolution and color depth.)
RJ-45 LAN jack.
25-pin bi-directional high-speed ECP/EPP parallel (burgundy).
S-video TV out (yellow) (selected models).
4-Mbps IrDA-compliant infrared port (selected models).
IEEE 1394 port (selected models).
Docking port: supports optional simple port replicator.
One Type II or Type III 16/32-bit PC Card slot (3.3- and 5-V support).
CardBus enabled.
Optional simple port replicator (selected models).
User and administrator passwords.
DMI-accessible electronic serial number.
Kensington MicroSaver lock slot.
Operating temperature: 0 to 40 °C (32 to 104 °F).
Operating humidity: 10 to 90 percent RH (0 to 45 °C).
Operating altitude: up to 10,000 ft (3000 m) at 25 °C (77 °F).
Storage (non-operating) temperature: –20 to 65 °C (–4 to 149 °F).
CPU: Intel Mobile Pentium III or Celeron processor.
North Bridge: VIA Pro Savage Pn 133T.
South Bridge: VIA VT8231.
Display controller: S3 Savage 4 in North Bridge.
Audio controller: VIA/Realtek ALC201 AC97 Codec.
CD player controller: O2 OZ-163.
LAN: Realtek RTL8100L.
CardBus controller: ENE 1410.
Keyboard/embedded controller: National NS87591.
Super I/O: in South Bridge.
zt1100/xz100 and xt1000 Series Product Information 13
Troubleshooting and Self-Repair Guide


Troubleshooting and Diagnostics
This section contains solutions to several types of problems you may encounter when using the
notebook. Try the solutions one at a time, in the order in which they are presented.
You can also find technical tips and software updates for the notebook at the HP Business Support
web site (www.hp.com/go/bizsupport).
Audio Problems
If no sound is audibl e
• Press Fn+Page Up several times.
• If available, press the rear volume control several times.
• Click the speaker icon on the taskbar (if present), and make sure Mute is not checked and the
Volume slider is not set to the bottom.
• If available, press the mute button on the right side of the notebook once or twice until the
indicator light goes off.
• The notebook’s sound may not operate properly in MS-DOS mode.
If sound does not rec ord
• Check the software controls for recording sound: click Start, All Programs, Accessories,
Entertainment, Sound Recorder.
• In Volume Control, click Options, Properties, and make sure the microphone is enabled in the
recording controls.
• Test the audio with the e-Diagtools diagnostics— see “Using the e-Diagtools Diagnostic Tests”
on page 32.
If you hear a loud high-pitched whine (feedback) from the speakers
• In Volume Control, try reducing the master volume.
• In Volume Control, click Options, Properties, and select the microphone option for the playback
settings. Make sure the microphone is muted.
• Avoid using the built-in microphone and built-in speakers at the same time.
zt1100/xz100 and xt1000 Series Troubleshooting and Diagnostics 15
Troubleshooting and Self-Repair Guide

CD and DVD Problems
If you can’t boot fro m a CD in the CD/DVD driv e
• Make sure the CD is bootable, such as a Re covery C D.
• Make sure the CD-ROM/DVD drive is selected as the boot device—see “Changing the Boot
Device” on page 11.
• Restart the notebook.
• Test the CD/DVD drive with the e-Diagtools diagnostics— see “Using the e-Diagtools Diagnostic
Tests” on page 32.
If a CD or DVD plays erratically
• Dirt or smudges can cause a disk to skip. Clean the disk with a soft cloth. If the disk is badly
scratched, it may have to be replaced.
• Some DVDs include software called “PC Friendly.” You generally should not install this
software, as it can cause errors or erratic play. If needed, uninstall it and restart the notebook.
If a DVD movie stops playing in the middle
• You may have accidentally paused the DVD movie. Press the Play button to resume.
• The DVD may be double-sided. Open the DVD tray, and read the text near the center of the disk.
If it says Side A, flip the disk over, close the tray, and press the Play button to continue playing
the movie.
If you get a Region Code error when pl aying a DVD movie
• DVDs have regional codes embedded in their disk data. These codes prevent DVD movies from
being played outside the region of the world in which they are sold. If you get a Region Code
error, you are trying to play a DVD intended for a different region.
Important: Most DVD drives let you change the region code only a limited number of times
(usually no more than four) to allow you to set the proper region code for your area. Please note
that when you reach this limit, your last change to the region code will be hard-coded on the DVD
drive, and will be permanent. The HP warranty does not cover the expense of correcting this
situation.
Refer to the help for the DVD player software for details about setting region codes.
If the notebook cannot read a C D or D V D
• For a single-sided CD or DVD, make sure the disk is placed in the drive with the label facing up.
• Clean the disk with a soft cloth.
• Wait 5 to 10 seconds after closing the tray for the notebook to recognize the disk.
• Remove the disk from the drive, then restart the notebook.
• If you created the CD on a CD-RW drive, try using a different media brand. For best results use
HP certified media. While other media may work, HP cannot guarantee compatibility.
16 Troubleshooting and Diagnostics zt1100/xz100 and xt1000 Series
Troubleshooting and Self-Repair Guide

If a DVD movie doesn’t fill the screen
• Each side of a double-sided DVD has a different format (standard or widescreen). In widescreen
format, black bands appear at the top and bottom of the screen. To view the standard format, flip
the disk over and play the other side.
If you have problems with display r esolution or color depth while playing a DVD
• Set the display resolution and color depth before starting the DVD player. You cannot change
these once the DVD player is started.
• Some combinations of color depth and resolution are not supported in DVD playback. If needed,
reduce color depth or display resolution.
If a DVD doesn’t play with two displays
• Before starting the DVD player, press Fn+F5 to switch to one display. You cannot switch displays
once the DVD player is started.
• If you’re using both displays, the DVD image will not appear on any display set up as
“secondary”. Click Start, Control Panel, Appearance and Themes, Display. Click Advanced on
the Settings tab, then click the S3Display tab and change settings.
Display Problems
If the notebook is on, but the screen is blank
• Move the mouse or tap the touch pad or scroll pad. This will wake the display if it is off.
• Try pressing Fn+F2 to increase the display brightness.
• Press Fn+F5 in case the internal display was disabled. (Do this three times to return to the state
you started from.)
• If the notebook is cold, allow it to warm up.
If the screen is difficult to read
• Try setting the display resolution to its default setting of 1024×768: click Start, Control Panel,
Appearance and Themes, Display, Settings.
If part of the Windows desktop is not vi sible and you have to scroll down to see the
taskbar, or does not fill the entire display and has a black border
• The display resolution may be set incorrectly. Adjust as needed.
If an external display does not work
• Check the connections.
• Press Fn+F5 in case the external monitor was disabled. (Do this three times to return to the state
you started from.)
• Test the display with the e-DiagTools diagnostics— see “Using the e-Diagtools Diagnostic Tests”
on page 32.
zt1100/xz100 and xt1000 Series Troubleshooting and Diagnostics 17
Troubleshooting and Self-Repair Guide
 Loading...