


HP OmniBook 800
Getting Started

Notice
This manual and any examples contained herein are provided “as is” and are subject to change without notice. Hewlett-Packard Company makes no warranty of any kind with regard to this manual, including, but not limited to, the implied warranties of merchantability and fitness for a particular purpose. Hewlett-Packard Co. shall not be liable for any errors or for incidental or
consequential damages in connection with the furnishing, performance, or use of this manual or the examples herein.
Consumer transactions in Australia and the United Kingdom: The above disclaimers and limitations shall not apply to Consumer transactions in Australia and the United Kingdom and shall not affect the statutory rights of Consumers.
© Copyright Hewlett-Packard Company 1993–1996. All rights reserved. Reproduction, adaptation, or translation of this manual is prohibited without prior written permission of Hewlett-Packard Company, except as allowed under the copyright laws.
The programs that control this product are copyrighted and all rights are reserved. Reproduction, adaptation, or translation of those programs without prior written permission of Hewlett-Packard Co. is also prohibited.
Portions of the programs that control this product may also be copyrighted by Microsoft Corporation, Microcom Systems, Inc., SystemSoft Corp., and NeoMagic, Inc. See the individual programs for additional copyright notices.
Microsoft, MS, MS-DOS, and Windows are registered trademarks of Microsoft Corporation in the United States and/or other countries.
For warranty information, see the Support and Service booklet.
Hewlett-Packard Company
Mobile Computing Division
1000 N.E. Circle Blvd.
Corvallis, OR 97330, U.S.A.
ii

HP Software Product License Agreement
The HP Software Product License Agreement and Product Limited Warranty shall govern all Software which is provided to you, the Customer, as part of the HP computer product. This HP Software Product Agreement and Product Limited Warranty shall supersede any non-HP software license or warranty terms which may be found in any documentation or other materials contained in the computer product packaging.
Carefully read this License Agreement before proceeding to operate this equipment. Rights in the software are offered only on the condition that the Customer agrees to all terms and conditions of the License Agreement. Proceeding to operate the equipment indicates your acceptance of these terms and conditions. If you do not agree to the License Agreement, you must now either remove the software from your hard disk drive and destroy the master diskettes, or return the complete computer and software for a full refund.
Software License Agreement
In return for payment of the applicable fee, Hewlett-Packard grants the Customer a license in the software, subject to the following:
1.Use. Customer may use the software on any one computer. Customer may not network the software or otherwise use it on more than one computer. Customer may not reverse assemble or decompile the software unless authorized by law.
2.Copies and Adaptations. Customer may make copies or adaptations of the software (a) for archival purposes or (b) when copying or adaptation is an essential step in the use of the software with a computer so long as the copies and adaptations are used in no other manner.
3.Ownership. Customer agrees that he/she does not have any title or ownership of the software, other than ownership of the physical media. Customer acknowledges and agrees that the software is copyrighted and protected under the copyright laws. Customer acknowledges and agrees that the software may have been developed by a third party software supplier named in the copyright notices included with the software, who shall be authorized to hold the Customer responsible for any copyright infringement or violation of this Agreement.
iii

4.Transfer of Rights in Software. Customer may transfer rights in the software to a third party only as part of the transfer of all rights and only if Customer obtains the prior agreement of the third party to be bound by the terms of this License Agreement. Upon such a transfer, Customer agrees that his/her rights in the software are terminated and that he/she will either destroy his/her copies and adaptations or deliver them to the third party.
5.Sublicensing and Distribution. Customer may not lease, sublicense the software or distribute copies or adaptations of the software to the public in physical media or by telecommunication without the prior written consent of Hewlett-Packard.
6.Termination. Hewlett-Packard may terminate this software license for failure to comply with any of these terms provided Hewlett-Packard has requested Customer to cure the failure and Customer has failed to do so within thirty (30) days of such notice.
7.Updates and Upgrades. Customer agrees that the software does not include updates and upgrades which may be available from Hewlett-Packard under a separate support agreement.
8.Export Clause. Customer agrees not to export or re-export the software or any copy or adaptation in violation of the U.S. Export Administration regulations or other applicable regulation.
9.U.S. Government Restricted Rights. Use, duplication, or disclosure by the U.S. Government is subject to restrictions as set forth in subparagraph (c)(1)(ii) of the Rights in Technical Data and Computer Software clause in DFARS 252.227-7013. Hewlett-Packard Company, 3000 Hanover Street, Palo Alto, CA 94304 U.S.A. Rights for non-DOD U.S. Government Departments and Agencies are as set forth in FAR 52.227-19(c)(1,2).
Edition History
Edition 1 ............................................. |
May 1996 |
 This manual is printed on recycled paper.
iv

Contents
1. Starting Out with Your OmniBook ......................... |
1-1 |
Setting Up ........................................... |
1-3 |
1. Install the battery pack. .............................. |
1-3 |
2. Connect the ac adapter and start charging ................. |
1-4 |
3. Open the OmniBook ................................ |
1-5 |
4. Reset the OmniBook ................................ |
1-5 |
5. Adjust the display .................................. |
1-7 |
6. Pop out the mouse ................................. |
1-8 |
7. Plug in the floppy drive .............................. |
1-9 |
8. Set up and install the operating system ................... |
1-10 |
Where to Go from Here.................................. |
1-14 |
Special Features....................................... |
1-15 |
Instant On and Power Shut-Down......................... |
1-15 |
Using the Back Panel ................................. |
1-16 |
Using Hot Keys as Shortcuts ............................. |
1-16 |
Using the System Configuration Utility...................... |
1-17 |
Using the Recovery CD ................................ |
1-20 |
Using a Docking System ............................... |
1-21 |
System Resources .................................... |
1-22 |
Replacing the Hard-Disk Drive ........................... |
1-24 |
2. Troubleshooting ...................................... |
2-1 |
Solving Basic Problems.................................. |
2-3 |
3. Specifications, Regulatory, and Safety Information ............ |
3-1 |
Hardware Specifications ................................. |
3-3 |
Safety Information ..................................... |
3-4 |
Regulatory Information.................................. |
3-7 |
U.S.A. ............................................ |
3-7 |
Canada ........................................... |
3-8 |
Japan ............................................ |
3-8 |
Europe ........................................... |
3-9 |
Contents-1

1
Starting Out with Your
OmniBook

Starting Out with Your OmniBook
Congratulations! Your OmniBook sets a new standard in personal computing. Although it’s compact and easy to carry, the OmniBook is equipped with a full-size keyboard, its own built-in mouse, and Microsoftâ Windowsâ95. In addition, your OmniBook has been specifically designed for ease of use on the road. It features “instant-on” power that immediately restores your last screen. And the OmniBook is infused with the quality and attention to detail that are the hallmark of HewlettPackard.
This OmniBook Getting Started manual shows how to start using your OmniBook. It also shows what to do if you run into trouble getting started. You also have an
Introducing Windows 95 manual to help you start using Windows 95.
Your OmniBook provides these additional manuals:
·The online OmniBook User’s Guide : This introduces the OmniBook and shows you how to operate and maintain your OmniBook. It also contains troubleshooting information. Hold down FN and press F5 (FN+F5)—or look in the OmniBook Library.
· The Introducing Microsoft Windows 95 manual: This is shipped with your OmniBook and contains information about using the standard features of Windows 95.
·The online Windows Quick Start and MS-DOS Quick Start manuals: These are in the OmniBook Library group for Windows 3.1 and 3.11.
1-2
Starting Out with Your OmniBook
Setting Up
Setting Up
To start working with your OmniBook the first time, you have to make the following
preparations—they’re described in detail on the following pages:
1.Install the battery.
2.Connect the ac adapter and start charging the battery.
3.Open the OmniBook.
4.Press the reset button on the side.
5.Adjust the display.
6.Pop out the mouse. (The mouse is PS/2-compatible and is replaceable.)
7.Plug in the floppy drive.
8.Go through the setup screens and install the operating system.
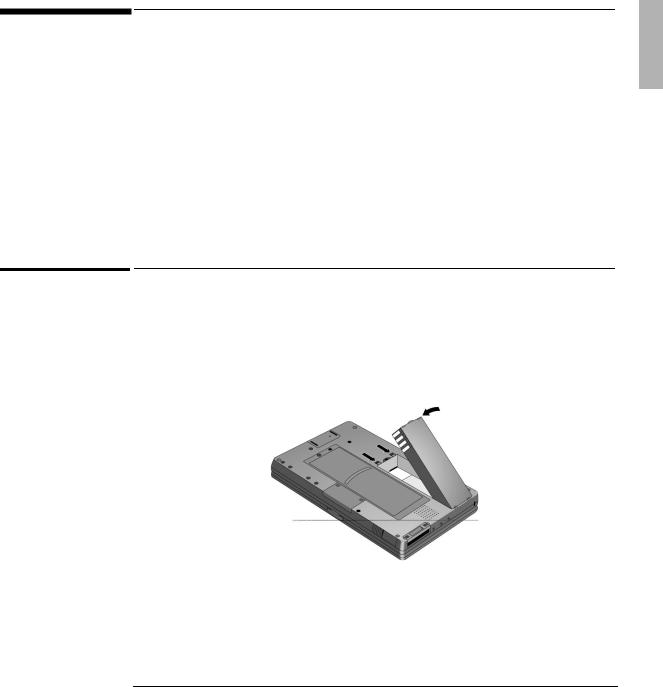
1.Install the battery pack.
See “Battery Safety” in chapter 3 for the proper handling of batteries.
1.Lay the battery pack into the battery compartment. The metal battery contacts on the pack mate with contacts in the compartment.
2.Close the two latches.
The battery pack contains rechargeable batteries. The first time you use your OmniBook, you should charge the battery for 1 or 2 hours before operating solely on battery power. However, you can operate immediately with the ac adapter plugged in—see the next section.
1-3

Starting Out with Your OmniBook
Setting Up
2.Connect the ac adapter and start charging
∙Plug the power cord into the ac adapter, then into a grounded ac outlet.
∙Plug the connector from the ac adapter into the socket at the right-rear corner of the OmniBook.
|
|
The Charging Light |
|
|
|
|
|
|
|
|
|
Color |
Meaning for Battery |
|
|
|
|
|
|
|
|
Off |
Not charging (no power connection). |
|
|
|
Green |
Charged 90% - 100%. |
|
|
|
Orange |
Charging. |
|
|
|
Red |
Bad battery or missing battery. |
|
|
|
|
|
|
|
|
|
||
C A U T I O N |
Use the ac adapter shipped with the OmniBook (HP part number F1044B or |
|||
|
|
other Hewlett-Packard adapter intended for use with the OmniBook 800). |
||
|
|
Using any other adapter could damage the OmniBook and void your warranty. |
||
|
|
Always plug the ac adapter into a grounded outlet. Also, the adapter plug has |
||
|
|
negative polarity —the inner contact is negative, and the outer is positive. This |
||
|
|
is different from many other adapters. |
||
|
|
|
|
|
1-4

Starting Out with Your OmniBook
Setting Up
3.Open the OmniBook
∙Press the center latch and lift the lid to open the OmniBook.
4.Reset the OmniBook
∙Press the reset button: Insert a pen tip or bent paper clip into the small opening marked “RESET” on the right side of the computer. Press the red button for 1 to 2 seconds. The OmniBook may take half a minute or more to restart (reboot).
1-5

Starting Out with Your OmniBook
Setting Up
Pressing the reset button is similar to turning off a PC’s power, then turning it back on again. After this first time, you should not need to press the reset button often.
If you have an OmniBook floppy drive attached when you reset the OmniBook, make sure there’s no disk in the drive (unless you set the option in the System Configuration Utility to boot only from the hard drive). As on a PC, if there’s a disk in the floppy drive, the OmniBook looks there first for its startup files.
1-6
Starting Out with Your OmniBook
Setting Up
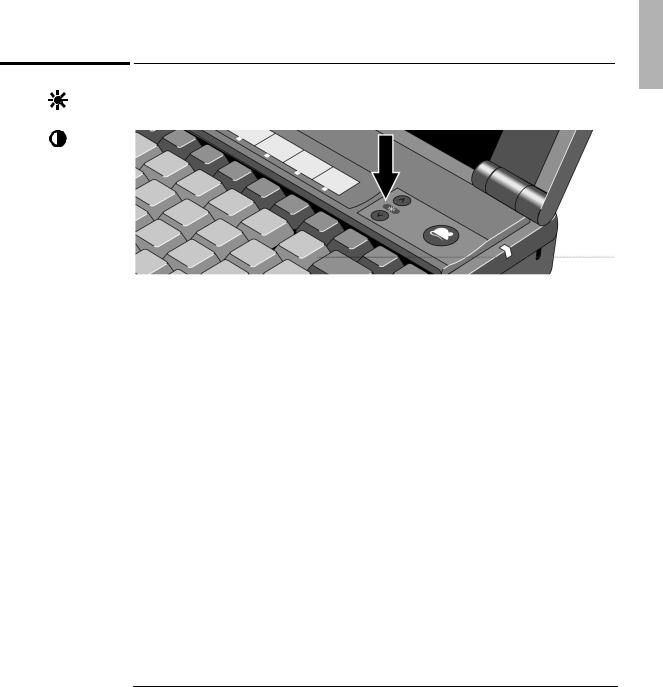
5. Adjust the display
Brightness
Contrast
|
Some OmniBook models have just a brightness control, while others have both |
||
|
brightness and contrast controls. |
|
|
|
∙ |
If there is only a brightness symbol: Press the and buttons above the |
|
|
∙ |
keyboard to adjust the brightness. |
|
|
If there is a gray contrast symbol and an orange brightness symbol: |
Press |
|
|
|
the and buttons above the keyboard to adjust the contrast. Hold down the |
|
|
|
(orange) FN key and press the same two buttons to adjust the brightness. |
|
|
|
||
Note |
Keep in mind that a higher brightness setting gives a shorter battery operating |
||
|
time—because the internal light is using more power. This may affect the operating |
||
|
time by as much as 1 hour or so. (The contrast setting doesn’t affect the operating |
||
|
time.) |
|
|
|
|
|
|
When you turn on your OmniBook, the display usually takes 1 minute or more to reach its normal brightness. The cooler the environment, the longer it takes.
1-7
Starting Out with Your OmniBook
Setting Up
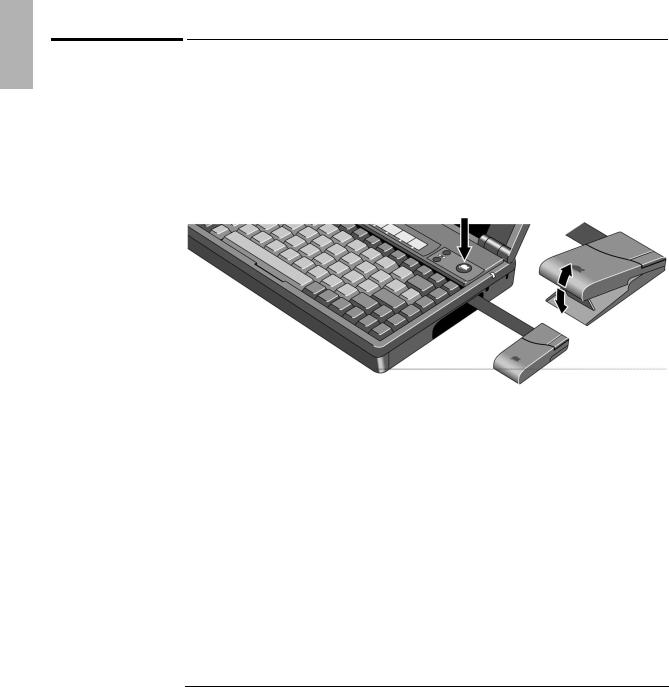
6.Pop out the mouse 
1.Press the round mouse-eject button in the upper-right corner of the keyboard.
2.Firmly pull the mouse out past the first resistance to its full extended position— about 3 inches (8 centimeters).
3.Lift the near end of the mouse—it pops up for a more comfortable shape.
4.Although the arm limits the physical extension of the mouse, it does not limit the travel of the pointer, as you will see. Just by pushing or pulling on the pointer, the pointer will continue to travel.
The mouse is extremely sturdy. Its flexibility allows it to withstand bending and
accidental bumps without breaking.
To store the mouse
1.If the mouse is popped up, press inward on the support arm and press the raised end of the mouse downward to collapse it.
2.Gently push the mouse into the case opening until it latches.
To replace the mouse
1.Tug sharply on the mouse to remove it and its arm from the computer.
2.Slip the arm of the new mouse into the slot inside the mousehole on the computer. Push the arm in and force it past the first resistance.
1-8
Starting Out with Your OmniBook
Setting Up
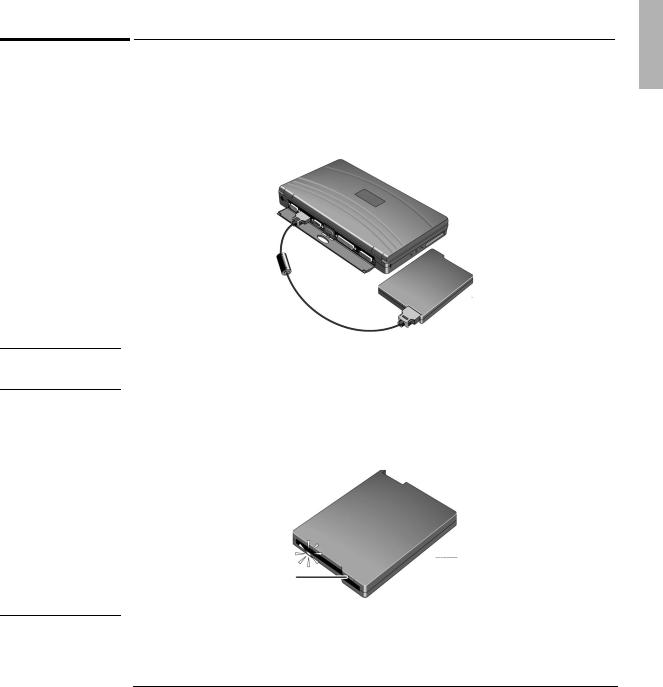
7.Plug in the floppy drive
1.Find the floppy-drive cable included with the OmniBook.
2.Plug the larger plug (pinching its tabs) into the back of the floppy drive.
3.Plug the smaller plug into the floppy-drive port at the back of the OmniBook.
Hint |
When possible, plug in the OmniBook ac adapter while you’re using the floppy |
|
drive. This prevents the battery from running down. |
∙When unplugging the cable, pinch the two tabs on the plug.
∙The plug-in floppy drive accepts 3.5-inch disks (1.44 MB and 720 KB).
∙There are two models of this drive: the one not pictured has the disk-eject button on top of the drive.
Disk-eject button
C A U T I O N |
Always wait until all disk activity stops (the Busy light is off) before ejecting a |
|
disk or unplugging a cable. |
1-9

N O T E
Starting Out with Your OmniBook
Setting Up
8. Set up and install the operating system
When your OmniBook starts up the first time, it takes you through a series of setup screens, including installation of the operating system. (If you have a docking system, you should not have it docked during the installation of the operating system.)
This product offers a choice between two Microsoft operating systems:
Windows 95, or
Windows for Workgroups. (See the steps below.)
As part of the setup procedure, you must make a one-time, final selection of the operating system you want to use. Once made, this selection can be changed only by purchasing new copies of DOS 6.22 and Windows 3.1 or 3.11. (Windows95 is included on the Recovery CD ROM.)
1-10
Starting Out with Your OmniBook
Setting Up
|
|
|
To install Windows for Workgroups (Windows 3.11) |
|
||
|
|
|
|
|
|
|
C A U T I O N |
|
|
When prompted to do so, it is important that you make back-up installation |
|
||
|
|
|
disks for MS-DOS and Windows for Workgroups. This will require 12 floppy |
|
||
|
|
|||||
|
|
|
disks for English. (The back-up program will format the disks.) |
|
||
|
|
|
You will need these installation disks to install certain drivers (such as printers |
|
||
|
|
|
and networks), as well as to recover your operating system in case of a failure. |
|
||
|
|
|
If you do not make these disks, you will need to purchase your own copies of |
|
||
|
|
|
MS-DOS 6.22 and Windows 3.11. (You can make these back-up disks at any |
|
||
|
|
|
time from the icon in the Windows OmniBook group.) |
|
||
|
|
|
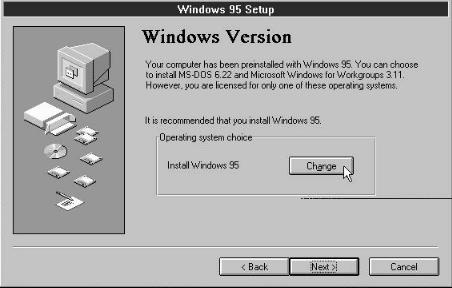
1. The Setup screens are labeled Windows 95, but they are for Windows for |
|
||
|
|
|
Workgroups, too. After you accept the License Agreement and enter the |
|
||
|
|
|
Product ID (printed on the Certificate of Authenticity on the Microsoft |
|
||
|
|
|
Introducing Windows95 book), you will see the Windows Version screen. |
|
||
|
|
|
2. In the Windows Version screen, click the Change button. |
|
||
|
|
|
|
|
|
|
|
|
|
|
|
|
|
|
|
|
|
|
|
|
1-11
 Loading...