


OMNIBOOK XE-DE

HP OmniBook XE Series
Setup Guide

Notice
This manual and any examples contained herein are provided “as is” and are subject to
change without notice. Hewlett-Packard Company makes no warranty of any kind with
regard to this manual, including, but not limited to, the implied warranties of
merchantability and fitness for a particular purpose. Hewlett-Packard Co. shall not be
liable for any errors or for incidental or consequential damages in connection with the
furnishing, performance, or use of this manual or the examples herein.
Consumer transactions in Australia and the United Kingdom: The above disclaimers and
limitations shall not apply to Consumer transactions in Australia and the United
Kingdom and shall not affect the statutory rights of Consumers.
© Copyright Hewlett-Packard Company 2000. All rights reserved. Reproduction,
adaptation, or translation of this manual is prohibited without prior written permission of
Hewlett-Packard Company, except as allowed under the copyright laws.
The programs that control this product are copyrighted and all rights are reserved.
Reproduction, adaptation, or translation of those programs without prior written
permission of Hewlett-Packard Co. is also prohibited.
Portions of the programs that control this product may also be copyrighted by Microsoft
Corporation, SystemSoft Corp., Crystal Semiconductor Corporation, Phoenix
Technologies, Ltd., Silicon Motion Corporation, ESS, and Adobe Systems Incorporated.
See the individual programs for additional copyright notices.
Microsoft, MS, MS-DOS, Windows, and Windows NT are registered trademarks of
Microsoft Corporation. Pentium and the Intel Inside logo are U.S. registered trademarks
and MMX is a U.S. trademark of Intel Corporation. TrackPoint is a U.S. registered
trademark of International Business Machines. Adobe and Acrobat are trademarks of
Adobe Systems Incorporated.
Hewlett-Packard Company
Mobile Computing Division
19310 Pruneridge Ave.
Cupertino, CA 95014
2 Setup Guide

HP Software Product License Agreement
Your HP OmniBook PC contains factory-installed software programs. Please read the
Software License Agreement before proceeding.
Carefully read this License Agreement before proceeding to operate this equipment.
Rights in the software are offered only on the condition that the customer agrees to
all terms and conditions of the License Agreement. Proceeding to operate the
equipment indicates your acceptance of these terms and conditions. If you do not
agree with the terms of the License Agreement, you must now either remove the
software from your hard disk drive and destroy the Recovery CD, or return the
complete computer and software for a full refund.
Proceeding with configuration signifies your acceptance of the License Terms.
Unless otherwise stated below, this HP Software Product License Agreement shall
govern the use of all software that is provided to you, the customer, as part of the
HP computer product. It shall supersede any non-HP software license terms that
may be found online, or in any documentation or other materials contained in the
computer product packaging.
Operating System Software by Microsoft is licensed to you under the Microsoft
Note:
End User License Agreement (EULA).
The following License Terms govern the use of the software:
Customer may use the software on any one computer. Customer may not network
Use.
the software or otherwise use it on more than one computer. Customer may not reverse
assemble or decompile the software unless authorized by law.
Customer may make copies or adaptations of the software (a)
Copies and Adaptations.
for archival purposes or (b) when copying or adaptation is an essential step in the use of
the software with a computer so long as the copies and adaptations are used in no other
manner.
Customer agrees that he/she does not have any title or ownership of the
Ownership.
software, other than ownership of the physical media. Customer acknowledges and
agrees that the software is copyrighted and protected under the copyright laws. Customer
acknowledges and agrees that the software may have been developed by a third party
software supplier named in the copyright notices included with the software, who shall be
authorized to hold the Customer responsible for any copyright infringement or violation
of this Agreement.
Product Recovery CD-ROM.
CD-ROM: (i) The product recovery CD-ROM and/or support utility software may only
be used for restoring the hard disk of the HP computer with which the product recovery
CD-ROM was originally provided. (ii) The use of any operating system software by
Microsoft contained in any such product recovery CD-ROM shall be governed by the
Microsoft End User License Agreement (EULA).
If your computer was shipped with a product Recovery
Setup Guide 3

Transfer of Rights in Software. Customer may transfer rights in the software to a third
party only as part of the transfer of all rights and only if Customer obtains the prior
agreement of the third party to be bound by the terms of this License Agreement. Upon
such a transfer, Customer agrees that his/her rights in the software are terminated and that
he/she will either destroy his/her copies and adaptations or deliver them to the third party.
Sublicensing and Distribution. Customer may not lease, sublicense the software or
distribute copies or adaptations of the software to the public in physical media or by
telecommunication without the prior written consent of Hewlett-Packard.
Termination. Hewlett-Packard may terminate this software license for failure to comply
with any of these terms provided Hewlett-Packard has requested Customer to cure the
failure and Customer has failed to do so within thirty (30) days of such notice.
Updates And Upgrades. Customer agrees that the software does not include updates
and upgrades which may be available from Hewlett-Packard under a separate support
agreement.
Export Clause. Customer agrees not to export or re-export the software or any copy or
adaptation in violation of the U.S. Export Administration regulations or other applicable
regulation.
U.S. Government Restricted Rights. Use, duplication, or disclosure by the U.S.
Government is subject to restrictions as set forth in subparagraph (c)(1)(ii) of the Rights
in Technical Data and Computer Software clause in DFARS 252.227-7013. HewlettPackard Company, 3000 Hanover Street, Palo Alto, CA 94304 U.S.A. Rights for nonDOD U.S. Government Departments and Agencies are as set forth in FAR 52.22719(c)(1,2).
Edition History
Edition 1
4 Setup Guide
...........................................
January 2000
This manual is printed on recycled paper.

Contents
Introducing the OmniBook.............................................................................................. 7
Taking Inventory .......................................................................................................... 8
Software provided on your OmniBook................................................................... 8
To find more information........................................................................................ 9
Identifying the Parts of the OmniBook....................................................................... 10
Front view............................................................................................................. 10
Side view............................................................................................................... 11
Rear view .............................................................................................................. 12
Bottom view.......................................................................................................... 13
Status lights........................................................................................................... 14
Setting Up the Computer ............................................................................................ 15
To install the battery ............................................................................................. 15
To connect AC power........................................................................................... 16
To connect a phone line........................................................................................ 16
To turn on the computer........................................................................................ 17
To set up Windows ............................................................................................... 17
To register your computer..................................................................................... 19
To connect to an Internet Service Provider........................................................... 20
Using the OmniBook ...................................................................................................... 21
Operating the Computer ............................................................................................. 22
To use the Fn hot keys .......................................................................................... 22
To use the touch pad ............................................................................................. 23
Working in Comfort ................................................................................................... 24
About Repetitive Strain Injury.............................................................................. 24
Preparing Your Work Environment...................................................................... 25
Setting Up Your HP Computing Equipment......................................................... 28
Comfort and Safety Checklist............................................................................... 33
Your HP OmniBook Computer............................................................................. 34
Traveling with Your Computer .................................................................................... 37
Managing Power Consumption .................................................................................. 38
To manage power in Windows 95 ........................................................................ 38
To manage power in Windows NT 4.0................................................................. 38
To use manual power management with Windows 98 ......................................... 39
Using Battery Power................................................................................................... 41
To check the battery status.................................................................................... 41
To respond to a low-battery warning.................................................................... 42
Setup Guide 5

Configuring and Expanding the OmniBook................................................................ 43
Installing RAM Modules............................................................................................ 44
Removing RAM Modules........................................................................................... 45
Replacing a Hard Disk Drive...................................................................................... 46
Expanding the Hibernate Partition.............................................................................. 47
Service and Support....................................................................................................... 49
Hewlett-Packard Limited Warranty Statement........................................................... 50
Getting Support for Your OmniBook......................................................................... 52
To use the OmniBook User’s Guide..................................................................... 52
To get help from the OmniBook Web site............................................................ 52
To get support from the HP Customer Care Web site .......................................... 53
To call the HP Customer Care Center................................................................... 54
Obtaining Repair Service............................................................................................ 56
To receive warranty repair service........................................................................ 56
To prepare your OmniBook for shipment............................................................. 56
Solving Problems with your Computer........................................................................57
Troubleshooting Techniques ...................................................................................... 58
Testing Hardware Operation....................................................................................... 59
To run the diagnostic test...................................................................................... 59
To create a diagnostic floppy disk ........................................................................ 60
Recovering and Reinstalling Software ....................................................................... 61
To recover the factory installation of your hard disk............................................ 61
Specifications and Regulatory Information................................................................. 63
Hardware and Software Specifications....................................................................... 64
Safety Information...................................................................................................... 65
Power Cords.......................................................................................................... 65
Battery Safety........................................................................................................ 66
Laser Safety........................................................................................................... 66
LED Safety............................................................................................................ 67
Regulatory Information .............................................................................................. 68
U.S.A..................................................................................................................... 68
Canada................................................................................................................... 69
European Union .................................................................................................... 69
Japan ..................................................................................................................... 70
International.......................................................................................................... 71
Index................................................................................................................................ 73
6 Setup Guide

Introducing the OmniBook
Setup Guide 7

Introducing the OmniBook
Taking Inventory
Taking Inventory
•
HP OmniBook XE2.
•
Main battery.
•
AC adapter and power cord.
•
Telephone cord—if your OmniBook includes a modem.
•
Quick Start sheet.
•
The OmniBook
•
OmniBook Recovery CD, which includes Windows recovery and Windows drivers
•
Microsoft Windows manual (Windows 95, Windows 98, or Windows NT).
Setup Guide
.
Software provided on your OmniBook
Software Function
VirusScan Protects your OmniBook from files that can be harmful.
See “To use the VirusScan utility” in the electronic
User's Guide
Electronic Registration Permits quick and easy registration of your OmniBook.
See “To register your computer” on page 19 for details.
Adobe Acrobat Reader Allows you to read documents in Acrobat format, which
is used frequently on the Web.
QuickLink III Permits fax transfer to fax machines and fax
software—and permits data transfer.
eFax Allows you to receive faxes at your existing email
address.
HP DiagTools Provides basic and advanced hardware diagnostic
tests.
DVD Player For computers with a DVD drive, controls DVD play
under Windows 98 and Windows NT 4.0 only.
Phoenix Advanced
Power Management
Phoenix Card Executive For Windows NT 4.0 only, allows you to use PC Cards.
For Windows NT 4.0 only, helps you to optimize your
system and battery life.
.
.
8 Setup Guide

Introducing the OmniBook
Taking Inventory
To find more information
Congratulations! Your OmniBook sets a new standard in personal computing. It is
compact and easy to carry, and is infused with the quality and attention to detail that are
the hallmark of Hewlett-Packard.
The OmniBook
quickly. This
Setup Guide
Quick Start
sheet shows how to get your OmniBook up and running
shows how to set up and operate the OmniBook and where to
go for help if you run into trouble.
This table lists other sources of supplementary information about OmniBook products.
Source Description
OmniBook
User’s Guide
OmniBook
Notes
Introductory
Microsoft
manual for
Windows.
OmniBook
Web site (USA)
OmniBook
Web site
(Europe)
HP Customer
Care Web site
The User’s Guide is a help file located on your hard drive.
It provides detailed information about your OmniBook
(Start, Programs, OmniBook Library—or double-click the
desktop icon).
This document contains late-breaking information
available after the manuals were completed (Start,
Programs, OmniBook Library—or double-click the
desktop icon).
This printed manual contains information about using the
standard features of Microsoft Windows (Windows 95,
Windows 98, or Windows NT, depending on which
operating system your computer is shipped with).
www.hp.com/omnibook
www.europe.hp.com/omnibook
www.hp.com/cposupport
Setup Guide 9

Introducing the OmniBook
Identifying the Parts of the OmniBook
Identifying the Parts of the OmniBook
Front view
1 Latch to open the OmniBook
2 Built-in microphone
3 Blue power button
4 Status lights
5 Built-in speakers
6 Touch pad (pointing device)
7 Click buttons
8 CD player power (on selected CD-ROM and
DVD models)
10 Setup Guide

Introducing the OmniBook
Identifying the Parts of the OmniBook
9 CD player buttons (on selected CD-ROM and
DVD models)
10 CD-ROM drive or DVD drive
11 Kensington lock slot (security connector)
12 Modem phone jack (on selected models)
Side view
13 PC Card eject buttons
14 PC Card and CardBus slots (upper and lower)
15 Floppy disk drive
Setup Guide 11
Introducing the OmniBook
Identifying the Parts of the OmniBook
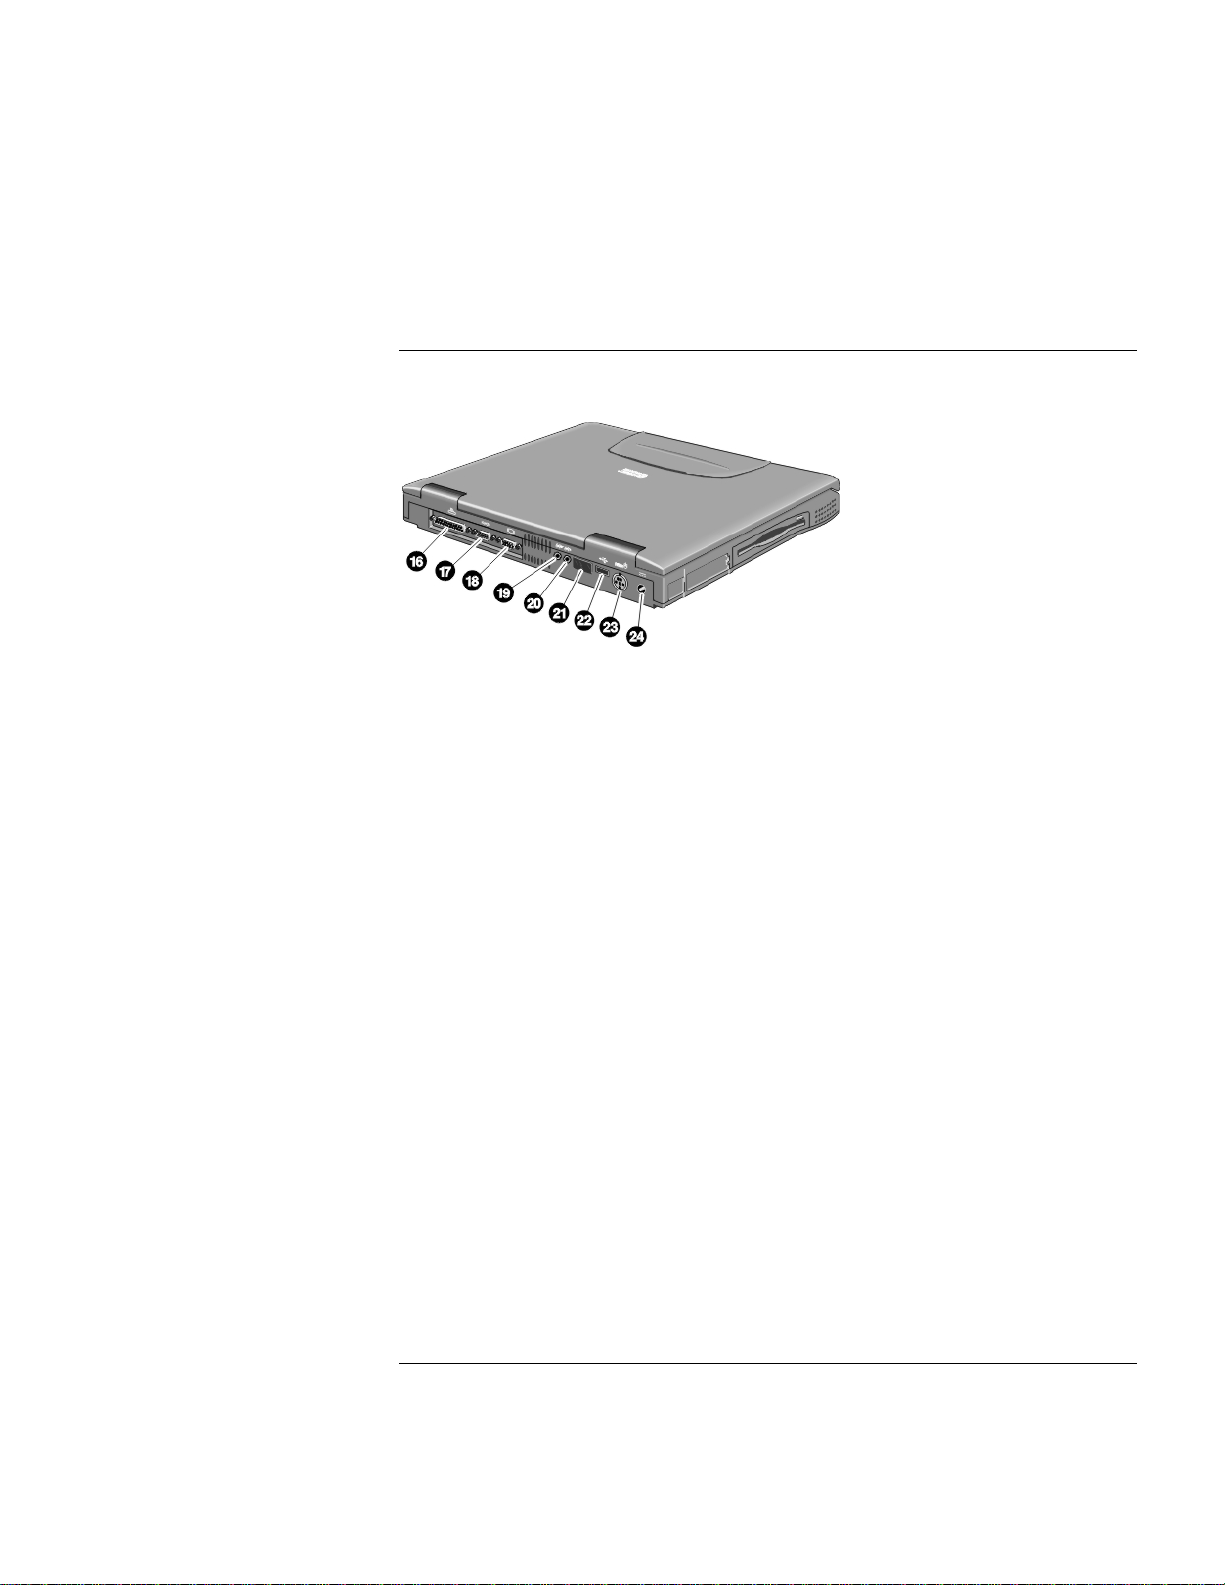
Rear view
16 Parallel port
17 Serial port
18 VGA port (external monitor)
19 Audio out (external speaker)
20 Microphone jack
21 Infrared port
22 USB port
23 PS/2 port
24 AC adapter jack
12 Setup Guide
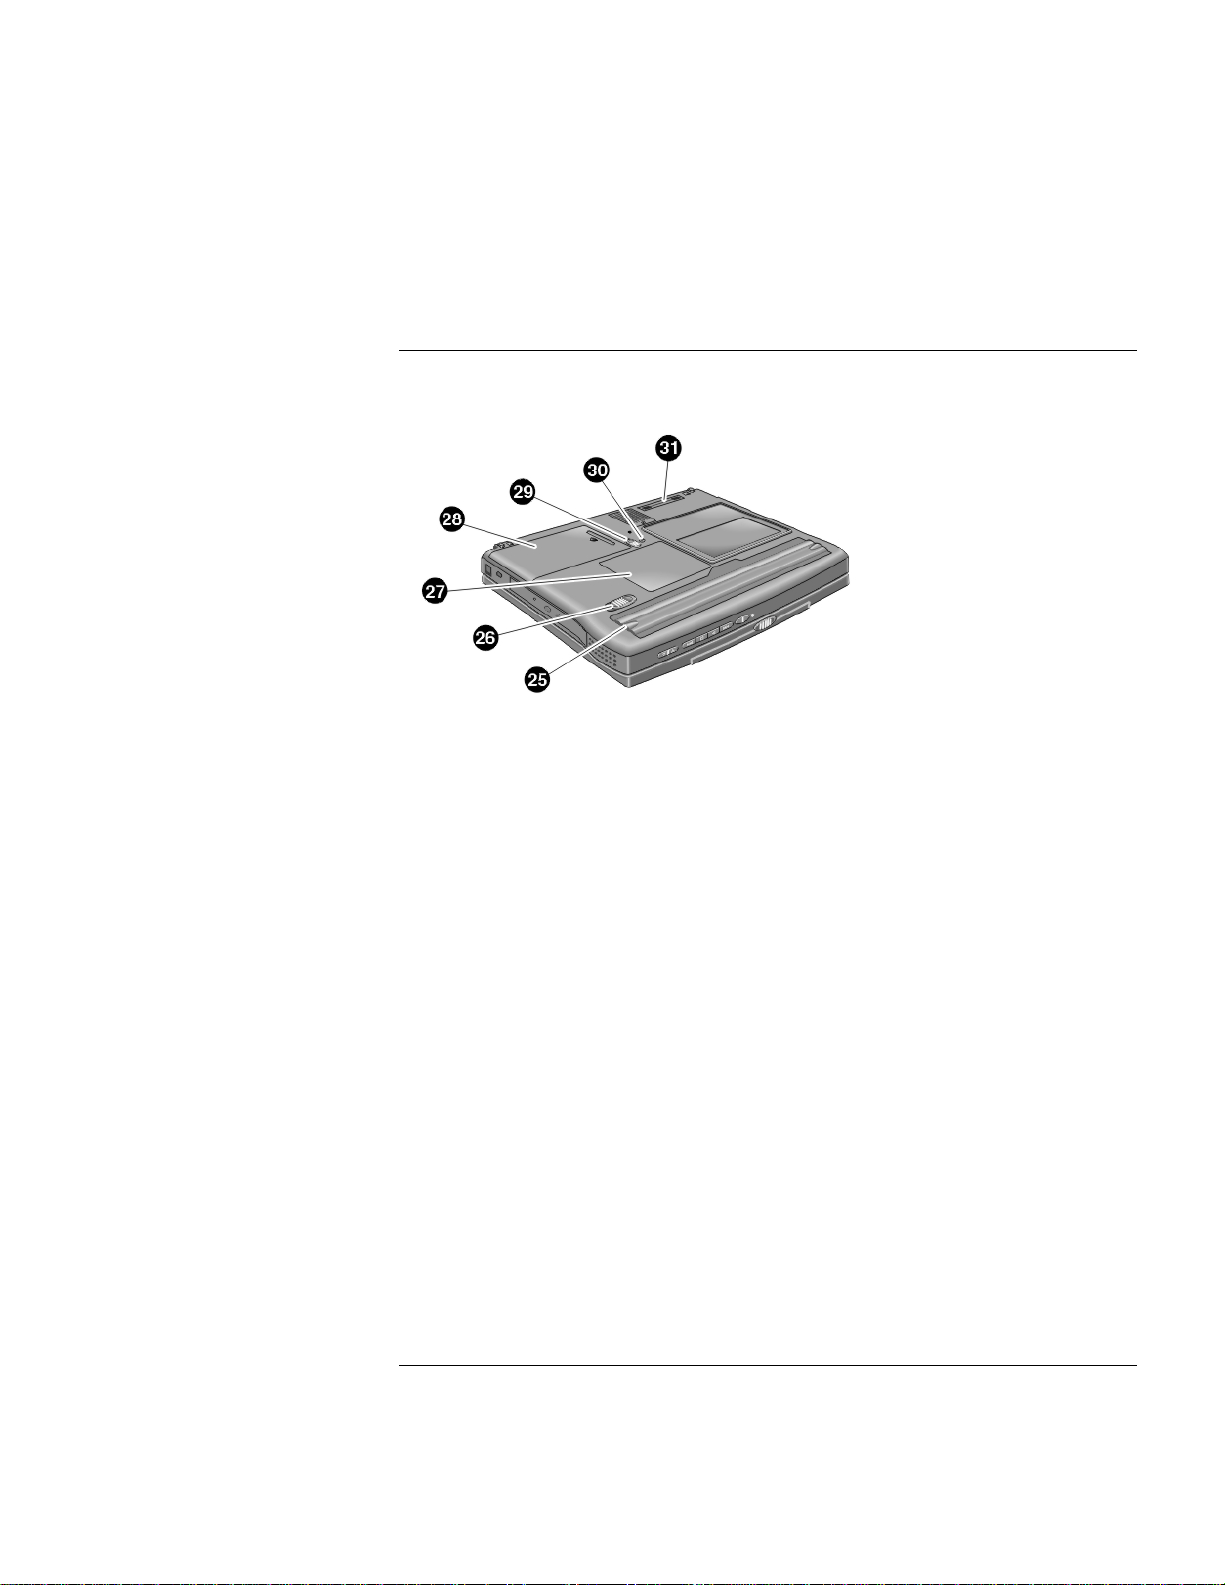
Bottom view
25 Battery
Introducing the OmniBook
Identifying the Parts of the OmniBook
26 Battery latch
27 RAM expansion cover
28 Hard disk drive
29 Hard disk drive latch and locking screw
30 System-off button (for resetting computer)
31 Port replicator connector
Setup Guide 13

Introducing the OmniBook
Identifying the Parts of the OmniBook
Status lights
1 Power
2 AC connected
3 Battery
4 Caps Lock
5Num Lock
6 Scroll Lock
7 Floppy disk drive access
8 Hard disk drive access
9 CD-ROM or DVD access
14 Setup Guide
Setting Up the Computer
To install the battery
Introducing the OmniBook
Setting Up the Computer
WARNING
Do not mutilate, puncture, or dispose of batteries in fire. A battery can burst or
explode, releasing hazardous chemicals. A rechargeable battery must be recycled
or disposed of properly.
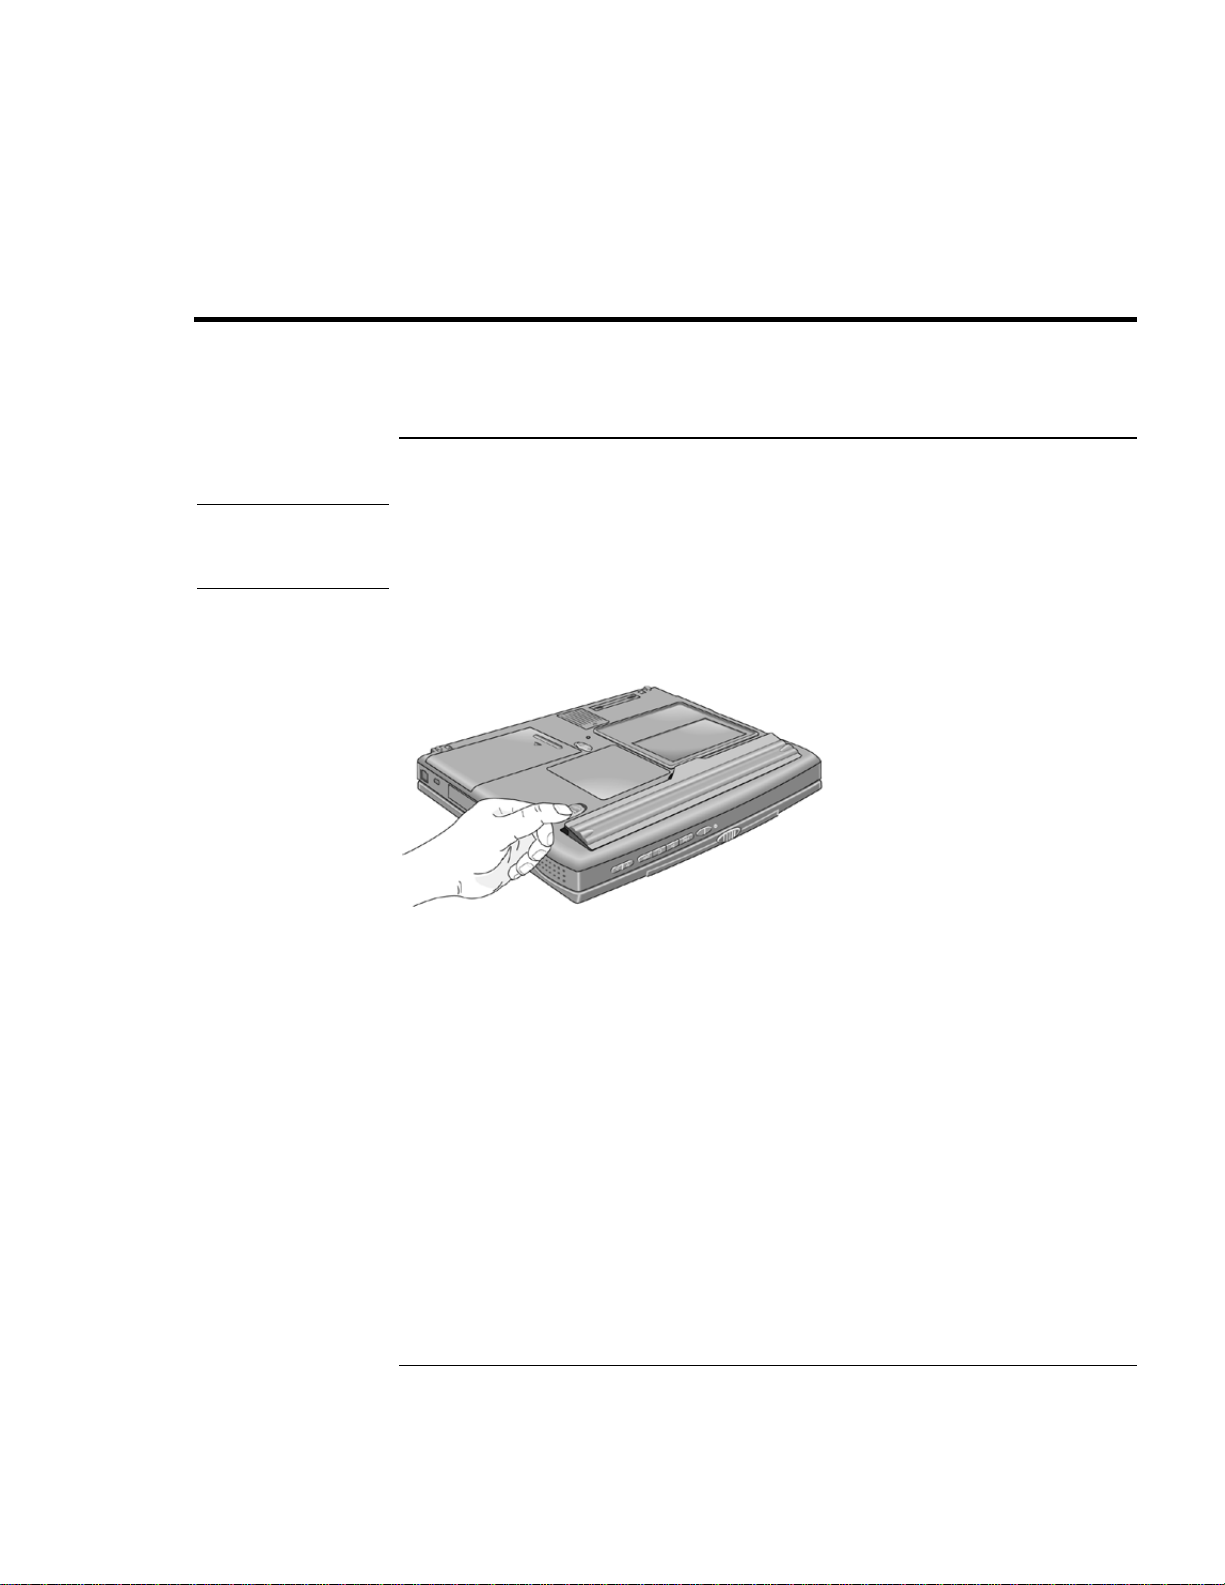
Your OmniBook is shipped with the battery installed. If the battery has been removed,
you can install it by inserting it into the battery bay on the bottom of your computer by
sliding the battery latch, as shown.
Once you have installed the battery, connect the AC adapter to the OmniBook and
recharge the battery while you work. You can also replace a low battery with another that
is more fully charged.
Setup Guide 15

Introducing the OmniBook
Setting Up the Computer
To connect AC power
CAUTION
Use only the HP AC adapter intended for this product, model HP F1454A. Using
any other AC adapter can damage the OmniBook and may void your warranty.
Refer to the warranty statement for your product.
Plug in the AC adapter, then connect the AC adapter to the rear of the OmniBook, as
shown. The OmniBook battery starts charging.
To connect a phone line
Selected OmniBook models have a built-in modem. If your computer does not have one,
you can instead use a PC Card modem or an external modem to connect to a phone line.
1. Plug one end of the phone cable into the (modem) phone jack on the OmniBook. Be
sure the cable clicks into place.
2. Plug the other end of the phone cable into a telephone jack. (If the phone cable does
not fit your telephone jack, you may need to use an adapter.)
16 Setup Guide

Introducing the OmniBook
Setting Up the Computer
CAUTION
CAUTION
Hint
If you have a modem built into your OmniBook, it may not work with multiple
phone lines or a private branch exchange (PBX), cannot be connected to a coinoperated telephone, and does not work with party lines. Some of these connections
may result in excess electrical voltage and could cause a malfunction in the internal
modem. Check your telephone line type prior to connecting your phone line.
When using a modem in the Republic of South Africa, an external surge protector
may be necessary in order to prevent computer damage by lightening or other
electrical surge. If so desired, connect any approved surge protector to the modem
cable whenever you are using the modem.
To turn on the computer
Press the blue power button above the keyboard. Windows starts automatically. If you
are turning on the OmniBook for the first time, go to “To set up Windows” on page 17.
The power status light (see “Status lights” on page 14) reports the following:
• Steady green light: OmniBook is on.
•
Slow blinking: OmniBook is in System Standby or Suspend mode.
• No light: OmniBook is off or in Hibernate mode.
See “Managing Power Consumption” on page 38 for information about turning off your
OmniBook.
If your OmniBook does not turn on when operating on battery power, the battery may
be out of power. Plug in the AC adapter and press the blue power button again.
To set up Windows
The OmniBook has Microsoft Windows—Windows 95, Windows 98, or Windows NT—
preinstalled on the hard disk drive. The first time you turn on your computer, the
Windows Setup program automatically runs so that you can customize your setup,
register your computer, and sign up with an Internet Service Provider (ISP).
Setup Guide 17

Introducing the OmniBook
Setting Up the Computer
Year 2000
Notes
Hewlett-Packard makes no representation or warranty about the Year 2000 readiness of
non-HP products including preinstalled operating systems or application software. You
should contact the software manufacturer directly to determine if you need to do
anything else to ensure compliance.
Microsoft has indicated that many of its operating system software products and
applications require customer installation of software patches for Year 2000 compliance
and may require additional patches in the future. The need for such patches most likely
applies to the operating system software and any Microsoft applications shipped with
this product. You are urged to contact Microsoft at http://www.microsoft.com/y2k, at
1-888-MSFTY2K (U.S. and Canada only), or at your local Microsoft office.
Before you begin, connect the AC adapter to your notebook, since your battery may not
be sufficiently charged to complete the Windows setup. Also, be sure to connect the
notebook to the phone line. For information on connecting your modem, see “To connect
a phone line” on page 16.
1. Press the blue power button.
2. The Windows Setup program starts automatically.
3. Follow the instructions as they appear on the screen. For additional information about
registering your computer, see “To register your computer” on page 19.
In Windows 95 and Windows NT 4.0, you are required to enter your Product ID
number. To locate this number, look on the Certificate of Authenticity packaged with
the Microsoft Windows manual or look for a sticker on the bottom of your notebook.
If you experience any connection problems with your modem, you can try redialing, or
if that doesn’t work, you can skip the product registration and ISP selection.
18 Setup Guide

Introducing the OmniBook
Setting Up the Computer
To register your computer
After you have set up Windows, be sure to register your OmniBook. Registering is free
and fast, and it insures you will be promptly informed about new product information,
product support, enhancements, and add-ons. The information that you provide during
registration will be used by Hewlett-Packard and Microsoft to provide you better
products and services.
There are three ways to register:
by modem
•
by phone
•
by fax
•
By modem
If you have Windows 98, you are prompted automatically to register. To register by
modem, make sure that you have connected the phone line, then follow the onscreen
instructions.
Hint
If you have Windows 95 or Windows NT 4.0, you are not prompted to register, but you
can register by modem if you double click the HP OmniBook Registration icon on the
desktop. See that the phone line is connected, and follow the onscreen instructions.
If you choose not to register right away, you can register by modem later by doubleclicking the HP OmniBook Registration icon on the desktop. (This icon disappears after
you register.)
By phone
You can call your HP Customer Care Center and register by phone. See “To call the HP
Customer Care Center” on page 54 for phone numbers.
By fax
If a printer is connected to your computer, you can print a copy of your registration and
register by fax. You will find the fax number on the registration form.
Be sure to provide a Personal Identifier during registration, such as your mother’s
maiden name or any other short set of characters that you always remember. Whenever
you call for service, this information allows us to authenticate you as the owner of this
notebook.
Setup Guide 19

Introducing the OmniBook
Setting Up the Computer
By completing registration, you will:
•
Record your ownership of the OmniBook XE with Hewlett-Packard and gain access
to service, support, and information.
• Record your ownership of the Windows 98 operating system with Microsoft. If you
have Windows 95 or Windows NT 4.0, please contact Microsoft separately for
registration of the operating system.
To connect to an Internet Service Provider
If you don’t have access to the Internet via a local area network (LAN), you may want to
sign up for an ISP or configure your computer to use your existing ISP. (Not available on
International English models.) You had an option to select an ISP the first time you
turned on your computer. If you didn’t sign up at that time, just connect a phone line to
your computer and follow the instructions below:
• Click Start, Programs, Online Services and select one of the service providers listed.
This begins the registration process for the online provider you have chosen.
−or−
•
Click the Connect to the Internet icon on the desktop. This will launch an internet
setup wizard, which will help you locate an ISP in your area.
20 Setup Guide

Using the OmniBook
Setup Guide 21

Using the OmniBook
Operating the Computer
Operating the Computer
To use the Fn hot keys
The combination of the Fn key plus another key creates a
sequence—for various system controls. Press
and hold
hot key
—a shortcut key
Fn while pressing the appropriate
key. (Press and hold Ctrl+Alt with the appropriate key when using an external keyboard.)
Hot key Does this
Fn + F1 Increases the display’s contrast (HPA displays only).
Fn + F2 Decreases the display’s contrast (HPA displays only).
Fn + F3 Enters Standby mode.
Fn + F4 Enters Suspend mode.
Fn + F5 Enters Hibernate mode.
Fn + F6 Toggles the sound on and off (mutes sound).
Fn + UP ARROW Increases sound volume.
Fn + DOWN ARROW Decreases sound volume.
Fn + F12 Switches among the built-in display, an external display, and
simultaneous displays.
Fn + NumLock Toggles Scroll Lock on and off
22 Setup Guide

Using the OmniBook
Operating the Computer
To use the touch pad
The touch pad, a touch-sensitive pointing device that controls the motion and speed of
the pointer on the screen, is built into your OmniBook.
1. Move a thumb or finger across the touch pad in the direction you want the pointer to
move.
2. Use the click buttons, which function like the left and right buttons on a mouse, to
make your selection. You can also tap on the touch pad instead of clicking a button.
To open an application, move the pointer over the icon, then press the
•
rapidly.
twice
To make menu selections, move the pointer to the item and press the
•
To open the shortcut menu for an item, move the pointer over the item and click the
•
button.
right
To drag an item, move the pointer over the item. Press and hold the left button while
•
you move the pointer to the new location. Release the button.
left button
button once.
left
Setup Guide 23
 Loading...