


HP OfficeJet K Series
Your Basic Guide

©Copyright Hewlett-Packard Company 2001
All rights are reserved. No part of the document may be photocopied, reproduced, or translated to another language without the prior written consent of Hewlett-Packard Company.
Publication number: C6747-90278 First edition: March 2001
Printed in U.S.A., Germany, or Singapore
Windows® and Windows NT® are U.S.-registered trademarks of Microsoft Corporation.
Intel® and Pentium® are registered trademarks of Intel Corporation.
Notice
The information contained in this document is subject to change without notice and should not be construed as a commitment by the Hewlett-Packard Company.
Hewlett-Packard assumes no responsibility for any errors that may appear in this document, nor does it make expressed or implied warranty of any kind with regard to this material, including, but not limited to, the implied warranties of merchantability and fitness for a particular purpose. The Hewlett-Packard Company shall not be liable for incidental or consequential damages in connection with, or arising out of the furnishing, performance, or use of this document and the program material which it describes.
Note: Regulatory information can be found in the “Technical information” section.
It is not lawful in many places to make copies of the following items. When in doubt, check with a legal representative first.
•Governmental paper or documents:
-Passports
-Immigration papers
-Selective service papers
-Identification badges, cards, or insignias
•Governmental stamps:
-Postage stamps
-Food stamps
•Checks or drafts drawn on Governmental agencies
•Paper currency, traveler’s checks, or money orders
•Certificates of deposit
•Copyrighted works
Safety Information
WARNING
!To prevent fire or shock hazard, do not expose this product to rain or any type of moisture.
Always follow basic safety precautions when using this product to reduce risk of injury from fire or electric shock.
WARNING: Potential Shock Hazard
1Read and understand all instructions in the Setup Poster.
2Use only a grounded electrical outlet when connecting the unit to a power source. If you do not know whether the outlet is grounded, check with a qualified electrician.
3Telephone lines can develop hazardous voltages. To avoid electrical shock, do not touch the contacts on the end of the cord, or any of the sockets on the HP OfficeJet. Replace damaged cords immediately.
4Never install telephone wiring during a lightning storm.
5Observe all warnings and instructions marked on the product.
6Unplug this product from wall outlets and telephone jacks before cleaning.
7Do not install or use this product near water or when you are wet.
8Install the product securely on a stable surface.
9Install the product in a protected location where no one can step on or trip over the line cord, and where the line cord will not be damaged.
10If the product does not operate normally, see the online Troubleshooting Help.
11No operator-serviceable parts inside. Refer servicing to qualified service personnel.
12Use in a well-ventilated area.

Contents
1 Review your unit’s front panel. . . . . . . . . . . . . . . . . . . . . . . . . . . . . 1
2 Use your HP OfficeJet with a PC. . . . . . . . . . . . . . . . . . . . . . . . . . . 3
Review the Director . . . . . . . . . . . . . . . . . . . . . . . . . . . . . . . . . . . . . . . . . . . . . . . . . . . 3 Review the status window . . . . . . . . . . . . . . . . . . . . . . . . . . . . . . . . . . . . . . . . . . . . . . 4
3 Get help . . . . . . . . . . . . . . . . . . . . . . . . . . . . . . . . . . . . . . . . . . . . . . . 5
Where can I find help? . . . . . . . . . . . . . . . . . . . . . . . . . . . . . . . . . . . . . . . . . . . . . . . . 5
4 Load paper or transparency film, or load originals. . . . . . . . . . . . 7
Load the input tray with letter-, legal-, or A4-size paper . . . . . . . . . . . . . . . . . . . . . . . 7 Review tips for loading specific types of paper . . . . . . . . . . . . . . . . . . . . . . . . . . 9 Load the input tray with envelopes (only works with printing) . . . . . . . . . . . . . . . . . . 10 Set the paper type . . . . . . . . . . . . . . . . . . . . . . . . . . . . . . . . . . . . . . . . . . . . . . . . . . . 12 Load originals . . . . . . . . . . . . . . . . . . . . . . . . . . . . . . . . . . . . . . . . . . . . . . . . . . . . . . 13 Avoid paper jams . . . . . . . . . . . . . . . . . . . . . . . . . . . . . . . . . . . . . . . . . . . . . . . . . . . 13
5 Use the print features. . . . . . . . . . . . . . . . . . . . . . . . . . . . . . . . . . . 15
Start a print job . . . . . . . . . . . . . . . . . . . . . . . . . . . . . . . . . . . . . . . . . . . . . . . . . . . . . 16
6 Use the scan features. . . . . . . . . . . . . . . . . . . . . . . . . . . . . . . . . . . 17
Begin a scan . . . . . . . . . . . . . . . . . . . . . . . . . . . . . . . . . . . . . . . . . . . . . . . . . . . . . . . 18
7 Use the copy features . . . . . . . . . . . . . . . . . . . . . . . . . . . . . . . . . . 21
Make copies . . . . . . . . . . . . . . . . . . . . . . . . . . . . . . . . . . . . . . . . . . . . . . . . . . . . . . . 22 Initiate the copy process from your HP OfficeJet . . . . . . . . . . . . . . . . . . . . . . . . 22 Initiate the copy process from your PC . . . . . . . . . . . . . . . . . . . . . . . . . . . . . . . 22 Stop copying . . . . . . . . . . . . . . . . . . . . . . . . . . . . . . . . . . . . . . . . . . . . . . . . . . . . . . . 23
8 Use the fax features . . . . . . . . . . . . . . . . . . . . . . . . . . . . . . . . . . . . 25
Enable fax confirmation . . . . . . . . . . . . . . . . . . . . . . . . . . . . . . . . . . . . . . . . . . . . . . . 26 Send a fax . . . . . . . . . . . . . . . . . . . . . . . . . . . . . . . . . . . . . . . . . . . . . . . . . . . . . . . . . 27 Initiate the fax process from your HP OfficeJet . . . . . . . . . . . . . . . . . . . . . . . . . 27 Initiate the fax process from your PC . . . . . . . . . . . . . . . . . . . . . . . . . . . . . . . . . 28 Initiate the process from within a program . . . . . . . . . . . . . . . . . . . . . . . . . . . . . 30 Receive a fax . . . . . . . . . . . . . . . . . . . . . . . . . . . . . . . . . . . . . . . . . . . . . . . . . . . . . . 31 Receive a fax manually . . . . . . . . . . . . . . . . . . . . . . . . . . . . . . . . . . . . . . . . . . . 31 Save frequently used fax numbers . . . . . . . . . . . . . . . . . . . . . . . . . . . . . . . . . . . . . . 32
9 Additional setup information. . . . . . . . . . . . . . . . . . . . . . . . . . . . . 33
Microsoft’s plug-and-play messages do not appear . . . . . . . . . . . . . . . . . . . . . . . . . 33 New Hardware message appears (Windows 95, 98, 2000, or XP) . . . . . . . . . . . . . . 34 Your PC is unable to communicate with your HP OfficeJet . . . . . . . . . . . . . . . . . . . 35 Windows Add Printer feature . . . . . . . . . . . . . . . . . . . . . . . . . . . . . . . . . . . . . . . . . . . 35 Install an HP JetDirect Print Server later (models K80 and K80xi only) . . . . . . . . . . 35
Contents |
i |

Set up for network printing using Windows sharing . . . . . . . . . . . . . . . . . . . . . . . . . |
35 |
Use your HP OfficeJet with Windows 2000 . . . . . . . . . . . . . . . . . . . . . . . . . . . . . . . . |
36 |
Set basic fax settings using the front panel . . . . . . . . . . . . . . . . . . . . . . . . . . . . . . . . |
36 |
Set the date and time . . . . . . . . . . . . . . . . . . . . . . . . . . . . . . . . . . . . . . . . . . . . . |
36 |
Set the fax header . . . . . . . . . . . . . . . . . . . . . . . . . . . . . . . . . . . . . . . . . . . . . . . |
36 |
Enter text . . . . . . . . . . . . . . . . . . . . . . . . . . . . . . . . . . . . . . . . . . . . . . . . . . . . . . |
37 |
Set the answer mode . . . . . . . . . . . . . . . . . . . . . . . . . . . . . . . . . . . . . . . . . . . . . |
37 |
Set the Rings to Answer setting . . . . . . . . . . . . . . . . . . . . . . . . . . . . . . . . . . . . . |
37 |
Check for dial tone . . . . . . . . . . . . . . . . . . . . . . . . . . . . . . . . . . . . . . . . . . . . . . . |
38 |
Remove and reinstall your HP OfficeJet software . . . . . . . . . . . . . . . . . . . . . . . . . . . |
38 |
10 Use Hewlett-Packard’s support services . . . . . . . . . . . . . . . . . . . 39
Internet . . . . . . . . . . . . . . . . . . . . . . . . . . . . . . . . . . . . . . . . . . . . . . . . . . . . . . . . . . . 39 HP Customer Support . . . . . . . . . . . . . . . . . . . . . . . . . . . . . . . . . . . . . . . . . . . . . . . . 39 HP Distribution Center . . . . . . . . . . . . . . . . . . . . . . . . . . . . . . . . . . . . . . . . . . . . . . . . 41
11 Technical information . . . . . . . . . . . . . . . . . . . . . . . . . . . . . . . . . . 43
Power specifications . . . . . . . . . . . . . . . . . . . . . . . . . . . . . . . . . . . . . . . . . . . . . . . . . 43 Order print cartridges . . . . . . . . . . . . . . . . . . . . . . . . . . . . . . . . . . . . . . . . . . . . . . . . 43 Regulatory information . . . . . . . . . . . . . . . . . . . . . . . . . . . . . . . . . . . . . . . . . . . . . . . 43 Regulatory notices . . . . . . . . . . . . . . . . . . . . . . . . . . . . . . . . . . . . . . . . . . . . . . . . . . 44 Declaration of Conformity . . . . . . . . . . . . . . . . . . . . . . . . . . . . . . . . . . . . . . . . . . . . . 47
ii |
Contents |

1
Review your unit’s front panel
You can perform many functions using either the front panel or the HP OfficeJet
K Series software. The method you choose may depend on the function you need to perform, or it may depend on which is the most convenient.
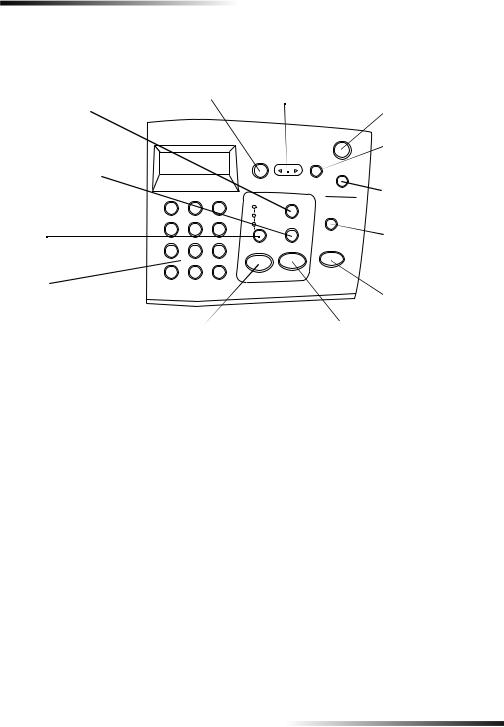
Even if you do not connect your HP OfficeJet to a PC (also called stand-alone use), you can use the front panel to process fax and copy jobs. You can change a wide variety of settings using the front-panel buttons and menu system. Depending on your model, your front panel may look slightly different from the following diagrams.
The following shows the left side of the front panel.
One-touch speed-dial buttons:
Perform one-touch speed dialing for fax (models K80 and K80xi only).
Resolution:
Change fax resolution.
Speed Dial: 
Access speed-dial numbers.
Cancel:
Stop job, or exit menu.
 Auto Answer:
Turn automatic answering for fax on or off.
 Redial/Pause:
|
Dial the last number |
|
again, or insert a |
|
pause. |
|
Keypad: |
|
Use keypad to dial fax |
|
numbers or enter text. |
Black: |
Color: |
Send black-and-white fax. |
Send color fax. |
Chapter 1—Review your unit’s front panel |
1 |
HP OfficeJet K Series
The following shows the right side of the front panel.
Menu: |
Arrows: |
|
Access various scan, copy, |
Scroll through scan-copy-fax-setting options. |
|
fax, and unit settings. |
Move forward and backward in a text entry. |
|
Reduce/Enlarge: |
|
On: |
Make copied image |
|
Turn unit on/off. |
smaller or larger. |
|
Enter: |
|
|
|
|
|
Select or save displayed |
Number of Copies: |
|
setting. |
Set the number of copies. |
|
Lighter/Darker: |
|
|
Make copy lighter or |
|
|
darker. |
Quality: |
|
Scan To: |
Select the highest quality or |
|
Select a specific program |
quickest copy. |
|
or networked PC to scan |
Keypad: |
|
to. |
|
START SCAN: |
|
Use keypad to dial fax |
|
|
numbers or enter text. |
|
Start a scan. |
Black: |
|
Color: |
Make black-and-white copy. |
Make color copy. |
|
2 |
Chapter 1—Review your unit’s front panel |
2
Use your HP OfficeJet with a PC
If you connect your HP OfficeJet to a PC, you can work from the front panel or from the HP OfficeJet K Series software on your Windows desktop. The software offers more features and ease of use.
For comprehensive information, see the fully searchable Onscreen Guide. To access the guide, go to the Director, click Help, and choose Onscreen Guide.
Review the Director
The Director automatically appears on your PC after you load originals into the automatic document feeder (ADF). The Director is always available through the desktop shortcut or Windows Start menu. To start the Director:
•Double-click the HP OfficeJet K Series shortcut on the Windows desktop, or
•In the Windows taskbar, click Start, point to Programs, choose HP OfficeJet K Series, and then choose HP Director.
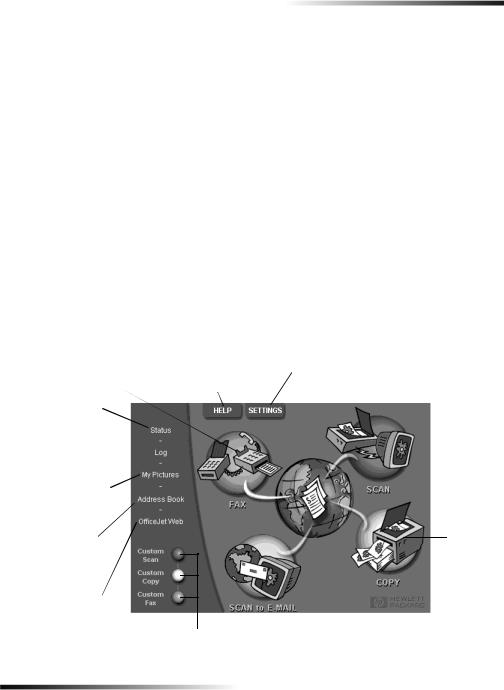
The following shows some of the features available through the Director.
Fax in black and |
Access onscreen |
View or change various settings, |
||
white or color. |
assistance. |
including speed dial and print. |
||
Open status window. |
|
|
|
|
View list of faxes recently |
|
|
|
|
|
|
|
||
sent and received. |
|
|
|
|
|
|
|
|
|
Open default folder for |
|
|
|
|
scanned images. |
|
|
|
|
Scan image or text.
Access the address  book, if you use Outlook or Outlook Express.
Launch your browser and access our site.
Copy in black and white or color.
Right-click to create buttons for frequently |
Scan directly to your e-mail |
used scan, copy, or fax settings. |
on your PC. |
Chapter 2—Use your HP OfficeJet with a PC |
3 |
HP OfficeJet K Series
Review the status window
The status window is similar to the display included on the front panel of your HP OfficeJet. It describes the current state of your HP OfficeJet, and it is always
available via right-clicking the status icon in the Windows status area (lower-right corner of the Windows taskbar). One of the default settings for your HP OfficeJet instructs the PC to display the status window automatically if there is an issue that needs to be addressed, such as your HP OfficeJet being out of paper.
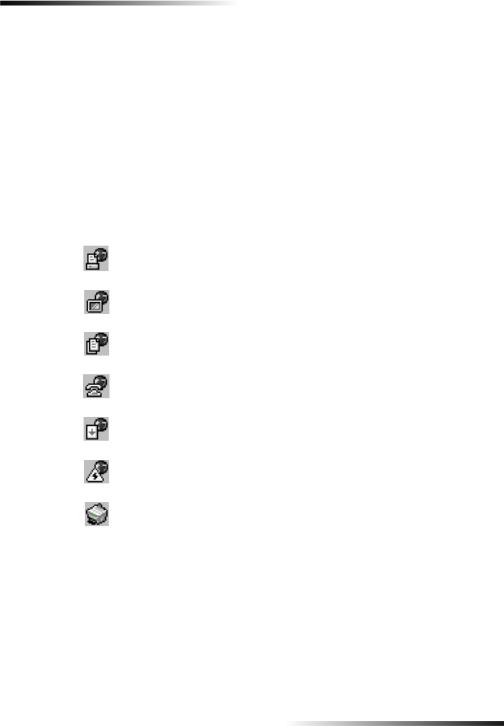
Depending on the current state of your HP OfficeJet, a different icon appears in the Windows status area. Right-clicking an icon displays a shortcut menu that lets you display the status window or close the HP OfficeJet software.
Icon |
Indicates |
|
|
|
|
|
Print job in process |
|
|
|
Scan job in process |
|
|
|
Copy job in process |
|
|
|
Fax job in process |
|
|
|
Paper loaded in ADF |
|
|
|
Error condition |
|
|
|
Ready (idle) |
|
|
4 |
Chapter 2—Use your HP OfficeJet with a PC |

3
Get help
This section explains where you can find information about your unit.
For comprehensive information, see the fully searchable Onscreen Guide. To access the guide, go to the Director, click Help, and choose Onscreen Guide.
Where can I find help?
For hardware and setup information:
•See the HP OfficeJet K Series Setup Poster. The printed Setup Poster comes in the box with your unit.
•See “Additional setup information” in the HP OfficeJet K Series: Your Basic Guide and the HP OfficeJet K Series: Onscreen Guide. The Basic Guide is available in printed format in the box your unit came in.
For software information:
•If available, click the Help button that appears on a specific dialog box. Most of the windows (also known as dialog boxes) available in the HP OfficeJet software have Help topics that provide assistance for the visible window.
•See the HP OfficeJet K Series: Onscreen Guide.
•See Troubleshooting. To access Troubleshooting, go to the Director, click Help, and then choose Troubleshooting. Troubleshooting is also available via the Help button that appears on some error messages.
For feature information:
•Run the HP OfficeJet K Series Product Tour. To access the tour, go to the Director, click Help, and then choose Product Tour. After the Product Tour dialog box appears, insert the HP OfficeJet K Series CD into your PC’s CD-ROM drive, and click Search.
•See the HP OfficeJet K Series: Onscreen Guide.
Chapter 3—Get help |
5 |

HP OfficeJet K Series
6 |
Chapter 3—Get help |
4
Load paper or transparency film, or load originals
Your unit is designed to print and copy onto a variety of transparency films and paper types, weights, and sizes. It is important, however, that you choose the right paper and make sure that it is not damaged.
For comprehensive information, see the fully searchable Onscreen Guide. To access the guide, go to the Director, click Help, and choose Onscreen Guide.
Load the input tray with letter-, legal-, or A4-size paper
For best results, adjust the paper settings each time you change paper types. For more information, see “Set the paper type.”
1Pull out the bottom (input) tray, and slide the paper-width and -length adjusters to their outermost positions.
2Tap the stack on a flat surface to even the edges of the paper, and then check the paper for the following:
•Make sure it is free of rips, dust, wrinkles, and curled or bent edges.
•Make sure all the paper in the stack is the same size and type, unless you are working with photo paper.
3Insert paper into the input tray, print-side down and letterhead or top of page first, until it stops.
Chapter 4—Load paper or transparency film, or load originals |
7 |

HP OfficeJet K Series
4Slide the paper-width and -length adjusters in until they stop at the edges of the paper, and be sure that the paper stack lies flat in the input tray and fits under the tab of the paper-length adjuster.
5 Push the input tray back in until it stops.
8 |
Chapter 4—Load paper or transparency film, or load originals |

HP OfficeJet K Series
6To prevent legalor A4-size paper from possibly falling off the tray, pull out the output-tray extender.
Review tips for loading specific types of paper
The following table provides guidelines for loading certain types of paper and film. For best results, adjust the paper settings each time you change paper types. For more information, see “Set the paper type.”
Paper Tips
HP papers • HP Premium Inkjet Paper: Locate the gray arrow on the nonprinting side of the paper, and insert paper with the arrow side facing up.
•HP Premium or Premium Plus Photo Paper: Load the glossy (print) side down. Always load at least five sheets of regular paper in the input tray first, and place the photo paper on top of the regular paper.
•HP Premium or Premium Rapid-Dry Inkjet Transparency Film: Insert the film so that the white transparency strip, with arrows and the HP logo, is on top and is going into the tray first.
•HP Iron-On T-Shirt Transfers: Flatten the transfer sheet completely before using it; do not load curled sheets. (To prevent curling, keep transfer sheets sealed in the original package until just before using.) Manually feed one sheet at a time, with the unprinted side facing down (the blue stripe faces up).
•HP Greeting Card, Glossy Greeting Card, or Textured Greeting Card Paper: Insert a small stack of HP Greeting Card Paper with the print-side down into the input tray until it stops.
•HP Restickable Inkjet Stickers: Place the sheets in the input tray, print-side (sticker-side) down.
Chapter 4—Load paper or transparency film, or load originals |
9 |
HP OfficeJet K Series
Paper |
Tips |
|
|
|
|
Legal-size paper |
Even though the paper-length adjuster is fully extended, make sure |
|
that the input tray itself is pushed all the way in. |
|
|
Labels |
• Always use letteror A4-size label sheets designed for use with |
(only works with |
HP inkjet products (like Avery Inkjet Labels), and make sure that |
printing) |
the labels are not over two years old. |
|
• Fan the stack of labels to make sure none of the pages are |
|
sticking together. |
|
• Place a stack of label sheets on top of standard paper in the input |
|
tray, print-side down. Do not insert labels one sheet at a time. |
|
|
Postcards |
Insert a stack of postcards with the print-side down into the input |
(only works with |
tray until it stops. Line the postcards up on the right side of the input |
printing) |
tray, slide the width adjuster up against the left side of the cards, and |
|
slide the length adjuster in until it stops. |
|
|
Load the input tray with envelopes (only works with printing)
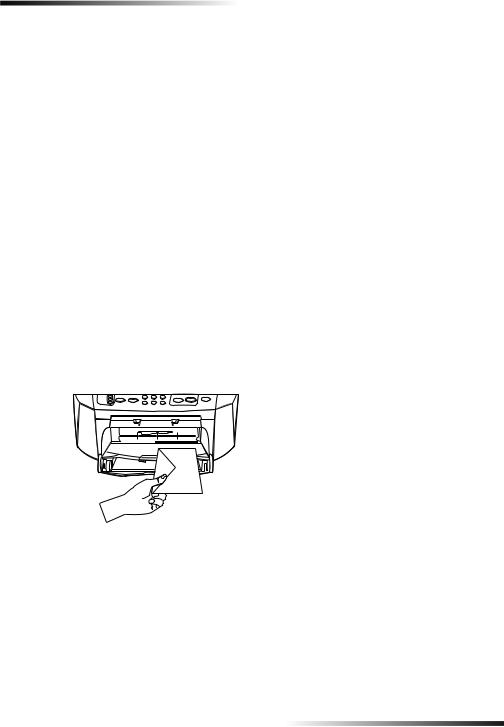
Your HP OfficeJet provides two methods for working with envelopes. Do not use shiny or embossed envelopes or envelopes that have clasps or windows.
•If you are printing one envelope, use the envelope slot. Slide the envelope into the envelope slot located on the right side toward the back of the output tray, with the envelope flap up and on the left, until it stops.
10 |
Chapter 4—Load paper or transparency film, or load originals |

HP OfficeJet K Series
•If you are printing multiple envelopes, remove all paper from the input tray, and then slide a stack of envelopes into the tray, with the envelope flaps up and to the left (print-side down), until they stop.
Adjust the left paper guide against the envelopes (be careful not to bend the envelopes). Make sure the envelopes fit within the tray (do not overload it).
Chapter 4—Load paper or transparency film, or load originals |
11 |

HP OfficeJet K Series
Set the paper type
After you have loaded paper or film in the unit, select the new paper type. Change this setting whenever you change the type of paper or film.
The paper types you specify for copying are independent of the paper types you specify for printing.
For more information, see “Recommended paper-type settings for copying” or “Recommended paper-type settings for printing” in the Onscreen Guide.
To do this for future copy jobs
Choose one of the following:
•On the front panel, press Menu. Press 1, and then press 2. Press  until the appropriate type appears. Press ENTER to choose the displayed paper type.
•In the Director, click SETTINGS, and then choose Copy Settings. The Settings tab appears. In the Paper Type area, choose the appropriate type, and then click
Save Configuration.
To do this for a print job
Choose one of the following:
•To do this for future print jobs, go to the Director, click SETTINGS, and then choose Print Settings. The Setup tab appears. From the Paper Type list, choose the appropriate type, and click OK.
•To do this for the current print job, open the document that you want to print. From the File menu, choose Print, Print Setup, or Page Setup. Make sure that the selected printer is HP OfficeJet K Series, and then click Properties, Options,
Printer Setup, or Printer. The Setup tab appears. From the Paper Type list, choose the appropriate type, and then click OK.
12 |
Chapter 4—Load paper or transparency film, or load originals |
HP OfficeJet K Series
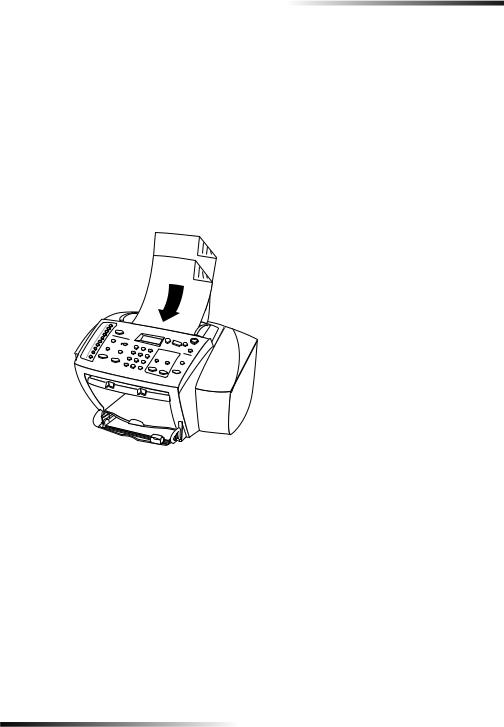
Load originals
If you are working with originals that are printed on 16-24 lb. (60-90 gsm) plain paper or HP Premium Inkjet paper, you can load more than one in the automatic document feeder (ADF). If you are working with photos or originals of an odd size (no smaller than 3-by- 3 inches or 76-by-76 millimeters), load them in the ADF one at a time. When working with fragile, torn, or odd-sized originals, we recommend that you use a document sleeve or sheet protector (available from most office-product stores) for the original. Place a single sleeve into the ADF with the sealed edge first and the transparent side down.
1Place the original(s) in the ADF with the printed side facing toward the back and with the top of the document pointing down.
2Adjust the document guides to fit your document.
Avoid paper jams
To avoid paper jams, remove papers from the output tray frequently. Output tray capacity is affected by the type of paper and the amount of ink you are using. For more information about output-tray capacity, see “Technical information.” For help with clearing a paper jam, see the Troubleshooting Help available through the Director.
Chapter 4—Load paper or transparency film, or load originals |
13 |
 Loading...