


Officejet Pro 8500 - A909a
Table of contents
 Loading...
OFFICEJET/OFFICEJET PRO
Fax Getting Started Guide
Guide de démarrage du télécopieur
Guía de introducción del fax
Guia de Introdução ao Fax

Copyright Information
© 2009 Copyright Hewlett-Packard Development Company, L.P.
Edition , 2/2009
Reproduction, adaptation or translation without prior written permission is
prohibited, except as allowed under the copyright laws.
The information contained herein is subject to change without notice.
The only warranties for HP products and services are set forth in the express
warranty statements accompanying such products and services. Nothing
herein should be construed as constituting an additional warranty. HP shall
not be liable for technical or editorial errors or omissions contained herein.
Trademark credits
Microsoft
®
and Windows
®
are U.S. registered trademarks of Microsoft
Corporation.
Informations sur le copyright
© 2009 Copyright Hewlett-Packard Development Company, L.P.
Édition
Toute reproduction, adaptation ou traduction sans autorisation écrite
préalable est interdite, à l’exception de ce qui est autorisé en vertu des lois
sur le copyright.
Les informations contenues dans ce document sont sujettes à des
modifications sans préavis.
Les seules garanties couvrant les produits et les services HP sont celles
stipulées de façon explicite dans les déclarations de garantie
accompagnant ces produits et services. Rien dans le présent document ne
peut être considéré comme constituant une garantie supplémentaire. HP
n’est en aucun cas responsable des éventuelles omissions ou erreurs d’ordre
technique ou éditorial contenues dans le présent document.
Crédits
Microsoft
®
et Windows
®
sont des marques commerciales de Microsoft
Corporation aux Etats-Unis.
2
,
2/2009
2

Contents 3
English
Set up the fax ............................................................................................................... 4
Step 1: Identify the type of phone system you are using (parallel or serial) ....................... 4
Step 2: Determine the type of phone line (dedicated or shared) ...................................... 5
Step 3: Manage and configure fax settings .................................................................. 6
Step 4: Test fax setup ................................................................................................ 7
Set the answer mode (Auto Answer) (optional).................................................................. 7
Change the answer ring pattern for distinctive ring (optional) ............................................. 8
Set up speed-dial entries (optional).................................................................................. 8
Set up HP Digital Fax (Fax to PC or Fax to Mac) ............................................................... 9
Solve fax problems...................................................................................................... 10
Hewlett-Packard limited warranty statement .................................................................... 13
Contents
Safety Information
Always follow basic safety precautions when using this product
to reduce risk of injury from fire or electric shock.
1. Read and understand all instructions in the documentation that
comes with the device.
2. Use only a grounded electrical outlet when connecting this
product to a power source. If you do not know whether the outlet
is grounded, check with a qualified electrician.
3. Observe all warnings and instructions marked on the product.
4. Unplug this product from wall outlets before cleaning.
5. Do not install or use this product near water, or when you are wet.
6. Install the product securely on a stable surface.
7. Install the product in a protected location where no one can
step on or trip over the line cord, and the line cord cannot be
damaged.
8. If the product does not operate normally, see Maintain and
troubleshoot.
9. There are no user-serviceable parts inside. Refer servicing to
qualified service personnel.
10. Use only the external power adapter/battery provided with the
device.
Note: Ink from the cartridges is used in the printing process in a
number of different ways, including in the initialization process, which
prepares the device and cartridges for printing, and in printhead
servicing, which keeps print nozzles clear and ink flowing smoothly.
In addition, some residual ink is left in the cartridge after it is used.
For more information see www.hp.com/go/inkusage.

Set up the fax4
Set up the fax
This getting started guide provides
instructions for setting up the fax.
For more information about fax features
available with your HP Officejet/
Officejet Pro device, see the electronic
user guide available on your computer
after you install the software
—either from the HP
Solution Center Software (Windows) or the Help Viewer
(Mac OS). (The user guide is also available online at
www.hp.com/support.)
CAUTION: If you do not use the supplied cord or
adapter to connect from the telephone wall jack to your
HP Officejet/Officejet Pro device, you might not be able
to fax successfully.
This special phone cord is different from the phone
cords you might already have in your home or office.
If the supplied phone cord is too short, see the “Solve
fax problems” on page 10.
Step 1: Identify the type of phone system you are using
(parallel or serial)
NOTE: Before setting up the fax, connect the
HP Officejet/Officejet Pro device and install the
software.
To begin setting up the HP Officejet/Officejet Pro device
for faxing, determine whether your country/region’s
phone system uses a parallel or serial system.
NOTE: The instructions for fax setup differ depending
on whether you have a serial- or parallel-type phone
system.
If you do not see your country/region listed in the
following sections, you probably have a serial-type
phone system. If you are unsure which kind of telephone
system you have (serial or parallel), check with your
telephone company.
Parallel-type phone systems
In a parallel-type phone system, you are able to connect
shared telephone equipment to the phone line by using
the “2-EXT” port on the back of the HP Officejet/
Officejet Pro device.
NOTE: If you have a parallel-type phone system,
see “Step 2: Determine the type of phone line
(dedicated or shared)” on page 5.
The following countries use a parallel phone system:
Argentina Australia Brazil
Canada Chile China
Colombia Greece India
Indonesia Ireland Japan
Korea Latin America Malaysia
Mexico Philippines Poland
Portugal Russia Saudi Arabia
Singapore Spain Taiwan
Thailand USA Venezuela
Vietnam

Set up the fax 5
English
Serial-type phone systems
In a serial-type phone system, the connector type on
your shared telephone equipment (modems, phones,
and answering machines) does not allow a physical
connection to the “2-EXT” port on the HP Officejet/
Officejet Pro device. Instead, all equipment must be
connected at the telephone wall jack.
NOTE: In some countries/regions that use serial-type
phone systems, an adapter is provided that enables you
to connect other telecom devices to the wall jack where
you plug in the HP Officejet/Officejet Pro device.
For information on setting up the HP Officejet/Officejet
Pro device for faxing using a serial-type phone system,
see the Fax Configuration Web site for your country/
region.
NOTE: After you set up the HP Officejet/Officejet Pro
device for faxing, see “Step 3: Manage and configure
fax settings” on page 6.
Step 2: Determine the type of phone line (dedicated or
shared)
If you have determined that you use a parallel-type
phone system, determine if the HP Officejet/Officejet
Pro device will have its own phone line (dedicated
phone line) or if it will share the phone line with another
device (shared phone line).
If you are going to connect another device to the
HP Officejet/Officejet Pro device, you will need to
change settings such as how many rings to allow before
picking up, whether you have a distinctive ring service,
and whether to automatically answer the phone line.
NOTE: You cannot receive faxes automatically if you
have a voice mail service at the same phone number
you use for fax calls. You must receive faxes manually;
this means you must be available to respond in person
to incoming fax calls. If you want to receive faxes
automatically instead, contact your telephone company
to subscribe to a distinctive ring service, or to obtain a
separate phone line for faxing.
To change the Auto Answer setting, see the electronic
user guide available on the computer after installing the
software.
Austria www.hp.com/at/faxconfig
Belgium (Dutch) www.hp.be/nl/faxconfig
Belgium (French) www.hp.be/fr/faxconfig
Denmark www.hp.dk/faxconfig
Finland www.hp.fi/faxconfig
France www.hp.com/fr/faxconfig
Germany www.hp.com/de/faxconfig
Ireland www.hp.com/ie/faxconfig
Italy www.hp.com/it/faxconfig
Norway www.hp.no/faxconfig
Netherlands www.hp.nl/faxconfig
Portugal www.hp.pt/faxconfig
Spain www.hp.es/faxconfig
Sweden www.hp.se/faxconfig
Switzerland (French) www.hp.com/ch/fr/faxconfig
Switzerland (German) www.hp.com/ch/de/faxconfig
United Kingdom www.hp.com/uk/faxconfig
Set up the fax6
Dedicated phone line
Use this section if you plan on using the following type
of phone line for the fax:
• Dedicated phone line (no other devices, such as
a phone or answering machine, share the line).
• Dedicated phone line without devices sharing the
line but with a subscription to a distinctive ring
service.
• Private Branch Exchange (PBX) or an Integrated
Services Digital Network (ISDN) line. For more
information about PBX and ISDN lines, see the
electronic user guide available on the computer
after installing the software.
1. Unplug any telephone devices from the phone jack
where you are connecting the HP Officejet/Officejet
Pro device.
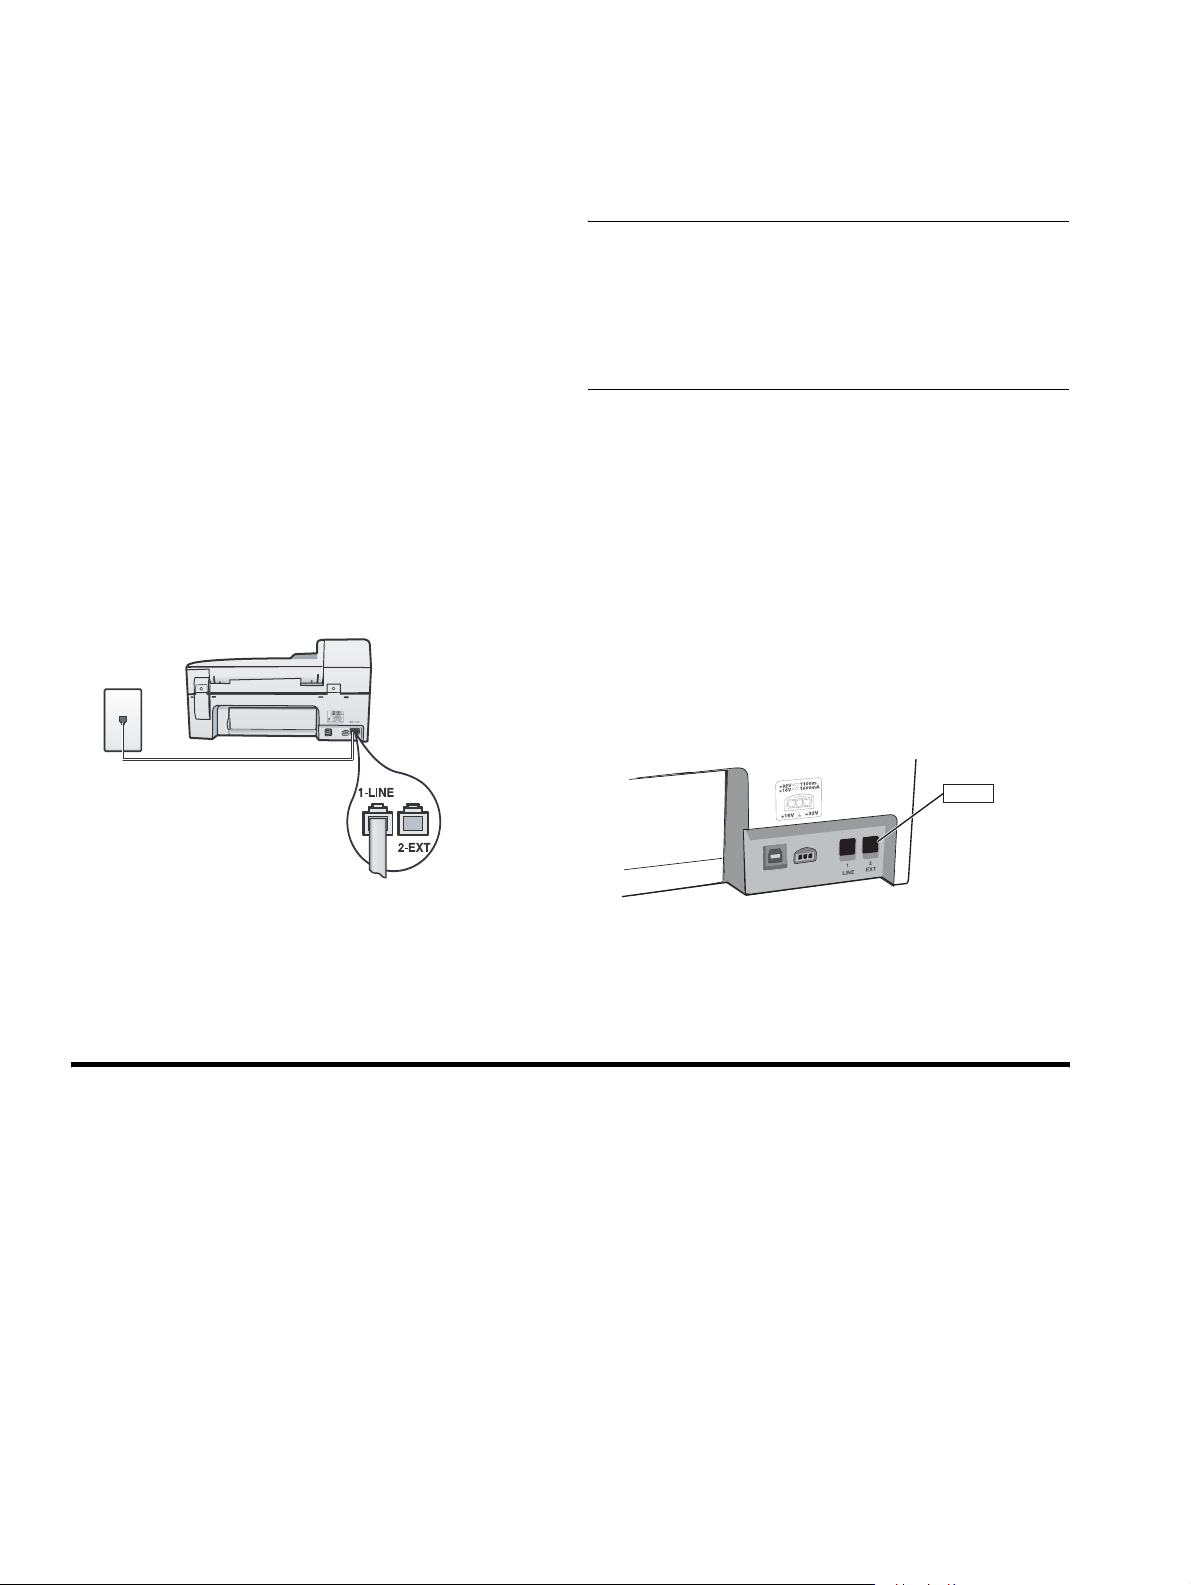
2. Connect the phone cord that came with the
HP Officejet/Officejet Pro device between the
1-LINE port on the HP Officejet/Officejet Pro device
and the phone jack.
3. If you subscribe to a distinctive ring service, change
the Answer Ring Pattern setting to the pattern that
has been assigned to your fax number by the
telephone company, for example, double rings or
triple rings.
For information on changing this setting, see the
electronic user guide available on the computer
after installing the software.
4. Go to “Step 3: Manage and configure fax settings”
on page 6.
NOTE: Your HP Officejet/Officejet Pro device is factory-
set to answer all ring patterns. If you do not set the
correct ring pattern assigned to your fax number by
the telephone company, your HP Officejet/Officejet Pro
device might answer both voice calls and fax calls,
or it might not answer at all.
Shared phone line
If the fax is going to share the phone line with other
devices, such as a phone, answering machine,
computer/computer modem, or caller ID box, or if you
have voicemail service included with your line, you must
follow these instructions to determine how to set up your
fax.
1. Follow steps 1-3 in the “Dedicated phone line” on
page 6.
2. Plug the additional device into the 2-EXT port on the
back of the HP Officejet/Officejet Pro device.
3. Set up the HP Officejet/Officejet Pro device to
work with the device you have attached. For more
information, see the electronic user guide available
on the computer after installing the software.
Step 3: Manage and configure fax settings
After you have connected the HP Officejet/Officejet Pro
device to a phone line, set the fax header, date and
time settings, and country/region settings.
If you are connecting the HP Officejet/Officejet Pro
device directly to a computer, install the HP Officejet/
Officejet Pro device software, and then run the Fax
Setup Wizard (Windows) or HP Fax Setup Utility
(Mac OS X). You can also launch these tools from
Solution Center (Windows) or HP Device Manager
(Mac OS X) at a later time.
You can also configure these settings from the control
panel. For information on the control panel, see the
electronic user guide available on your computer after
installing the software.
If your HP Officejet/Officejet Pro device is connected to
a network, you can also configure the fax settings from
the embedded Web server (EWS). For information on
the EWS, see the electronic user guide available on
your computer after installing the software.
2-EXT

Set the answer mode (Auto Answer) (optional) 7
English
Step 4: Test fax setup
Test your fax setup to check the status of the
HP Officejet/Officejet Pro device and to make sure it is
set up properly for faxing. The test does the following:
• Tests the fax hardware
• Verifies the correct type of phone cord is connected
to the HP Officejet/Officejet Pro device
• Checks that the phone cord is plugged into the
correct port
• Checks for a dial tone
• Checks for an active phone line
• Tests the status of your phone line connection
The HP Officejet/Officejet Pro device prints a report
with the results of the test. If the test fails, review the
report for information on how to fix the problem
and rerun the test. For additional troubleshooting
information, see “Solve fax problems” on page 10.
To test fax setup
1. Set up the HP Officejet/Officejet Pro device for
faxing according to your particular home or office
setup instructions.
2. Make sure the printing supplies are installed, and
that full-size paper is loaded in the input tray before
starting the test.
3. From the control panel, press the (Setup button).
4. Select Tools, and then select Run Fax Test.
The HP Officejet/Officejet Pro device displays the
status of the test on the display and prints a report.
5. Review the report.
• If the test passes and you are still having
problems faxing, check the fax settings listed
in the report to verify the settings are correct.
A blank or incorrect fax setting can cause
problems faxing.
• If the test fails, use the report to fix the problems
and rerun the test.
Set the answer mode (Auto Answer) (optional)
The answer mode determines whether the device
answers incoming calls:
• Turn on the Auto Answer setting if you want the
device to answer faxes automatically. The device
answers all incoming calls and faxes.
• Turn off the Auto Answer setting if you want to
receive faxes manually. You must be available to.
To set the answer mode to manual
or automatic
Press Auto Answer to turn the light on or off,
as appropriate for your setup.
When the Auto Answer light is on, the device answers
calls automatically. When the light is off, the it does not
answer calls.

Change the answer ring pattern for distinctive ring (optional)8
Change the answer ring pattern for distinctive ring
(optional)
NOTE: Check with your local service provider for the
above service before using the feature.
Many phone companies offer a distinctive ring feature
that allows you to have several phone numbers on one
phone line.
When you subscribe to this service, each number is
assigned a different ring pattern. You can set up the
device to answer incoming calls that have a specific ring
pattern.
For more information, see the electronic user guide
available on the computer after installing the software.
To change the answer ring pattern
for distinctive ring
1. Verify that the device is set to answer fax calls
automatically.
2. Press the (Setup button).
3. Select Advanced Fax Setup, and then select
Distinctive Ring.
4. Select an option, and then press OK.
5. When the phone rings with the ring pattern assigned
to your fax line, the device answers the call and
receives the fax.
Set up speed-dial entries (optional)
You can store fax numbers or groups of fax numbers
as speed-dial entries. If the HP Officejet/Officejet Pro
device has one-touch speed-dial buttons on the control
panel, they are associated with the corresponding
speed-dial entries. This lets you dial those numbers
quickly by using the control panel.
NOTE: If your HP Officejet/Officejet Pro device is
connected to a network, you can also set up speed-dial
entries using the embedded Web server.
For information on setting up and using speed-dial
entries, see the electronic user guide available on the
computer after installing the software.
To set up speed-dial entries
1. From the control panel, press the (Setup button).
2. Select Speed Dial Setup and do one of the following:
• To add or change an entry: Select Individual
Speed Dial or Group Speed Dial and press the
arrow keys to move to an unused entry number,
or type a number on the keypad. Type the fax
number, and then press OK. Include any pauses
or other required numbers, such as an area
code, an access code for numbers outside a
PBX system (usually a 9 or 0), or a long-distance
prefix. Type the name using the numeric keypad,
and then press OK.
• To delete one entry or all entries: Select Delete
Speed Dial and press the arrow keys to move
to the speed-dial entry that you want to delete,
and then press OK.
Set up HP Digital Fax (Fax to PC or Fax to Mac) 9
English
Set up HP Digital Fax (Fax to PC or Fax to Mac)
Use Fax to PC and Fax to Mac to automatically receive
faxes and save faxes directly to your computer. With
Fax to PC and Fax to Mac, you can store digital copies
of your faxes easily and also eliminate the hassle of
dealing with bulky paper files.
In addition, you can turn off fax printing altogether
—
saving money on paper and ink, as well as helping
reduce paper consumption and waste.
Received faxes are saved as TIFF (Tagged Image File
Format). Once the fax is received, you get an on-screen
notification with a link to the folder where the fax is
saved.
For more information, see the onscreen User Guide
available after you install the software.
NOTE: You must install the software before setting up
Fax to PC or Fax to Mac.
If you are using an HP Officejet Pro device with a color
display, you can use the device’s Fax to Network Folder
or Fax to E-mail functions
—two of the HP Digital
Solutions provided with the HP device. For more
information, see the HP Digital Solutions Getting Started
Guide.
To set up Fax to PC from the
Solution Center (Windows)
1. After you have installed the HP Officejet Pro device
software, open the HP Solution Center.
• Double-click the HP Solution Center icon on the
desktop.
-Or-
• On the Windows taskbar, click Start, select
Programs or All Programs, select HP, select
the folder for the HP device, and then click
HP Solution Center.
2. Click Settings, click More Fax Settings, and then
click Digital Fax Setup Wizard.
3. Follow the onscreen instructions.
NOTE: You can turn off Fax to PC from the
HP Officejet/Officejet Pro device control panel.
To set up Fax to Mac from the
HP Device Manager (Mac OS X)
1. After you have installed the HP Officejet Pro device
software, open the HP Fax Setup Utility:
a. Click the HP Device Manager icon in the Dock.
(If HP Device Manager is not in the Dock, click
the Spotlight icon on the right side of the menu
bar, type ”HP Device Manager” in the box,
and then click the HP Device Manager entry.)
b. Select Fax Setup Utility from the Information and
Settings menu.
2. Follow the onscreen instructions in the Fax Setup
Utility.
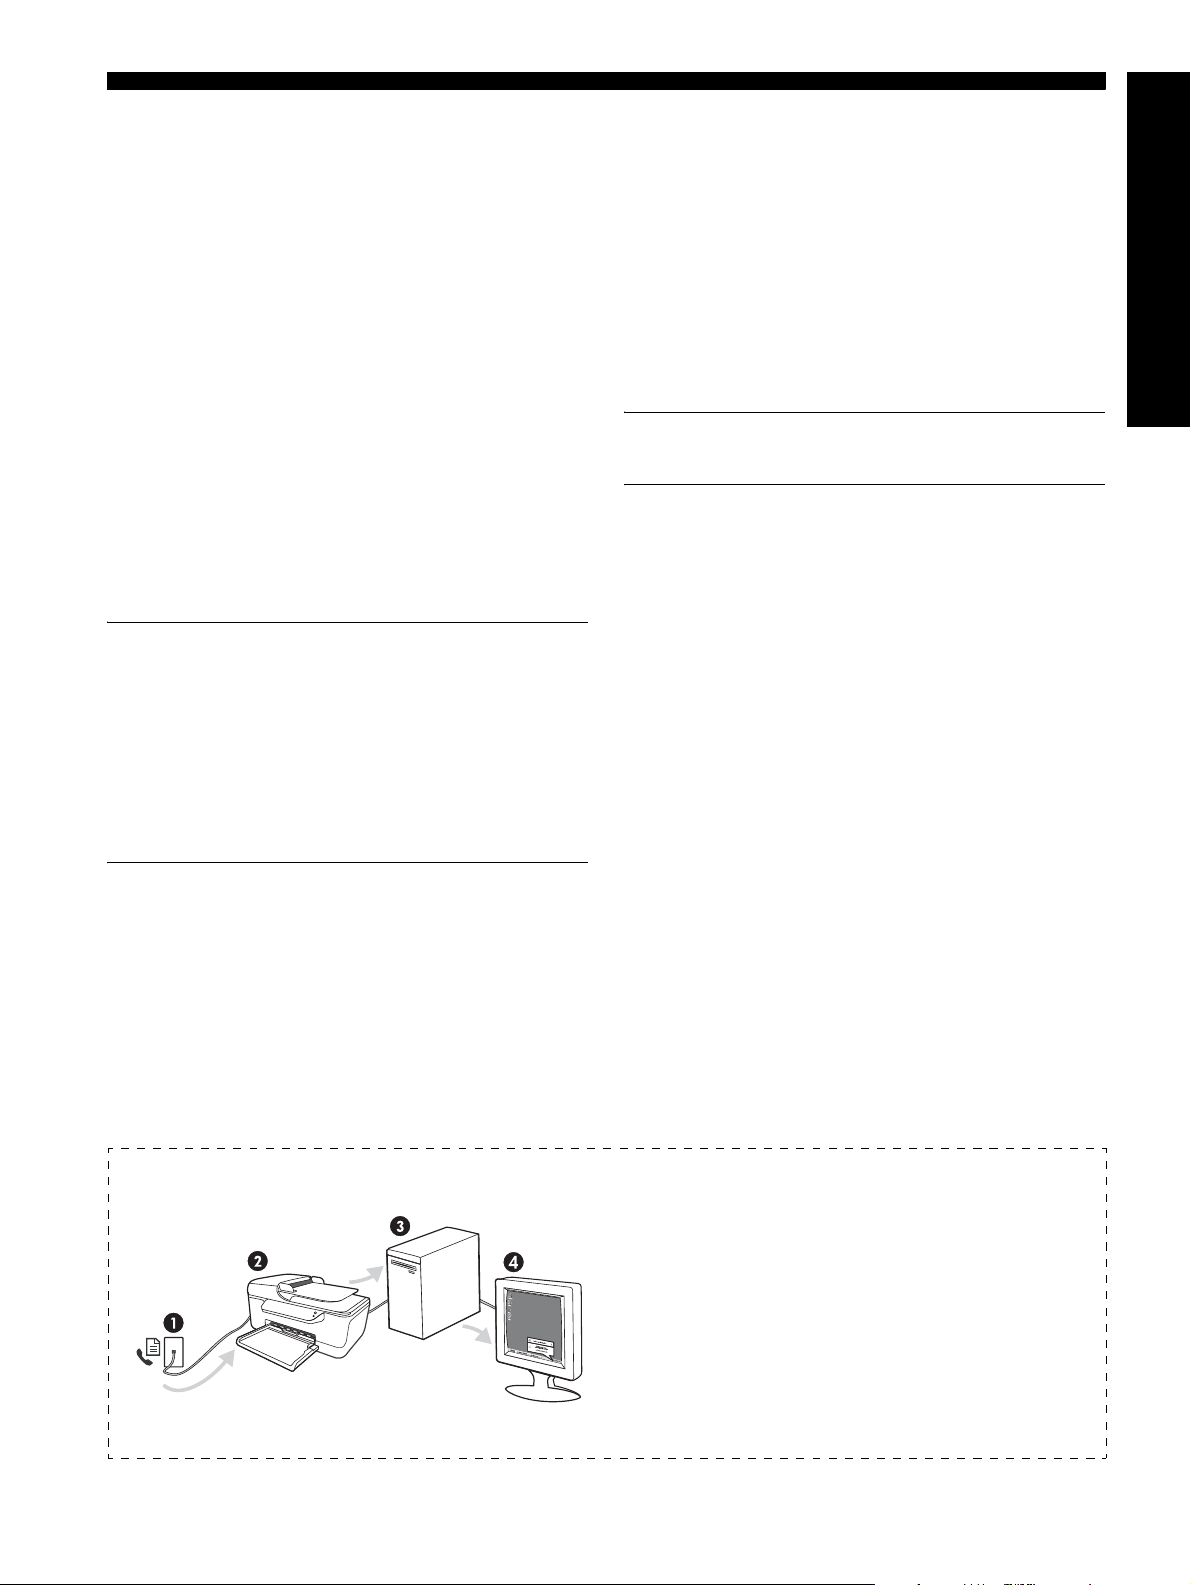
How it works!
1. Incoming black-and-white faxes are sent to the
HP Officejet/Officejet Pro device
2. HP Officejet/Officejet Pro device sends black-and-white
faxes to the computer, it prints color faxes
3. Incoming faxes are saved on the computer
4. Pop-up note appears notifying you that a fax has been
received

Solve fax problems10
Solve fax problems
If you ran a fax test and the test failed, see the test report for possible solutions. For more detailed information,
see the electronic user guide available on the computer after installing the software.
The HP Officejet/Officejet Pro
device is having problems
sending and receiving faxes
Make sure you use the phone cord or adapter that came with the HP Officejet/Officejet Pro
device.
Other equipment that uses the same phone line as the HP Officejet/Officejet Pro device might be
in use. Make sure extension phones (phones on the same phone line, but not connected to the
HP Officejet/Officejet Pro device) or other equipment is not in use or off the hook. For example,
you cannot use the HP Officejet/Officejet Pro device for faxing if an extension phone is off the
hook or if you are using a computer dial-up modem to send e-mail or access the Internet.
If you are using a phone splitter, the splitter could cause faxing problems. Try connecting the
HP Officejet/Officejet Pro device directly to the telephone wall jack.
Make sure that one end of the phone cord is connected to the telephone wall jack, while the
other end to port labeled “1-LINE” on the back of the HP Officejet/Officejet Pro device.
Try connecting a working phone directly to the telephone wall jack and check for a dial tone —
if you do not hear a dial tone, please contact your telephone company to check the line.
Make sure you connect the HP Officejet/Officejet Pro device to an analog phone line, or you
cannot send or receive faxes. To check if your phone line is digital, connect a regular analog
phone to the line and listen for a dial tone. If you do not hear a normal-sounding dial tone,
it might be a phone line set up for digital phones. Connect the HP Officejet/Officejet Pro device
to an analog phone line and try sending or receiving a fax.
The phone line connection might be noisy. Phone lines with poor sound quality (noise) can
cause faxing problems. Check the sound quality of the phone line by plugging a phone into the
telephone wall jack and listening for static or other noise. If you hear noise, turn
Error
Correction Mode
(ECM) off and try faxing again.
If you are using a digital subscriber line (DSL) service, make sure that you have a DSL filter
connected. Without the filter, you cannot fax successfully.
If you are using either a private branch exchange (PBX) or an integrated services digital network
(ISDN) converter/terminal adapter, make sure the HP Officejet/Officejet Pro device is connected
to the correct port and the terminal adapter is set to the correct switch type for your country/
region.
You are using a Fax over IP service. Try to use a slower connection speed. If this does not work,
contact your Fax over IP service’s support department.

Solve fax problems 11
English
The HP Officejet/Officejet Pro
device can send faxes
but cannot receive faxes
If you are not using a distinctive ring service, check to make sure that the Distinctive Ring feature
on the HP Officejet/Officejet Pro device is set to
All Rings.
If Auto Answer is set to Off, or you have a voice mail service at the same phone number you use
for fax calls, you can only receive faxes manually.
If you have a computer dial-up modem on the same phone line with the HP Officejet/Officejet
Pro device, check to make sure that the software that came with your modem is not set to receive
faxes automatically.
If you have an answering machine on the same phone line with the HP Officejet/Officejet Pro
device:
• Check that the answering machine is working properly.
• Make sure the HP Officejet/Officejet Pro device is set to receive faxes automatically.
• Make sure the
Rings to Answer setting is set to a greater number of rings than the
answering machine.
• Disconnect the answering machine and then try receiving a fax.
• Record a message that is approximately 10 seconds in duration. Speak slowly and at a low
volume when recording your message. Leave at least 5 seconds of silence at the end of the
voice message.
Other equipment that uses the same phone line might be causing the test to fail. You can
disconnect all the other devices and run the test again. If the Dial Tone Detection Test passes,
then one or more of the other equipment is causing problems. Try adding them back one at
a time and rerunning the test each time until you identify which piece of equipment is causing the
problem.
The HP Officejet/Officejet Pro
device cannot send faxes but
can receive faxes
The HP Officejet/Officejet Pro device might be dialing too fast or too soon. For example, if you
need to access an outside line by dialing “9,” try inserting pauses as follows: 9-XXX-XXXX (where
XXX-XXXX is the fax number you are sending to). To enter a pause press Redial/Pause, or press
the
Symbols or *@ button repeatedly, until a dash (-) appears on the display.
The display always shows
Phone Off Hook
You are using the wrong phone cord. See the first two issues under “The HP Officejet/Officejet
Pro device is having problems sending and receiving faxes” on page 10.
The HP Officejet/Officejet Pro
device is having problems
sending a manual fax
This possible solution applies only in the countries/regions that receive a 2-wire phone cord
in the box with the HP Officejet/Officejet Pro device, including: Argentina, Australia, Brazil,
Canada, Chile, China, Colombia, Greece, India, Indonesia, Ireland, Japan, Korea, Latin
America, Malaysia, Mexico, Philippines, Poland, Portugal, Russia, Saudi Arabia, Singapore,
Spain, Taiwan, Thailand, USA, Venezuela, and Vietnam.
If you are sending a fax manually from your phone that is connected directly to the HP Officejet/
Officejet Pro device, you must use the keypad on the telephone to send the fax.
Fax tones are recorded on my
answering machine
See the information about answering machine - related problems for the ”The HP Officejet/
Officejet Pro device can send faxes but cannot receive faxes“ topic in this table.

Solve fax problems12
The phone cord that came with
my HP Officejet/Officejet Pro
device is not long enough
If the phone cord that came with the HP Officejet/Officejet Pro device is not long enough, you
can use a coupler to extend the length. You can purchase a coupler at an electronics store that
carries phone accessories. You also need another phone cord, which can be a standard phone
cord that you might already have in your home or office.
TIP: If the device came with a 2-wire phone cord adaptor, you can use it with a 4-wire phone
cord to extend the length. For information on using the 2-wire phone cord adaptor, see the
documentation that came with it.
1. Using the phone cord supplied in the box with the HP Officejet/Officejet Pro device, connect
one end to the coupler, and then connect the other end to the port labeled 1-LINE on the
back of the HP Officejet/Officejet Pro device.
2. Connect a second phone cord to the open port on the coupler and to the telephone wall
jack.
I cannot print color faxes To print color faxes, make sure that the Incoming Fax Printing options in the control panel is
turned on.
I cannot save color copies to
the computer
Fax to PC and Fax to Mac do not support saving color copies to a computer.
I cannot receive faxes on my
computer
If you are using a computer running Windows, check the taskbar and ensure that HP Digital
Imaging monitor is turned on at all times.
Make sure Fax to PC or Fax to Mac is activated and the computer is configured to receive faxes.
If the computer receiving faxes is different from the one used for setup, both computers should be
switched on at all times.

Hewlett-Packard limited warranty statement 13
English
Hewlett-Packard limited warranty statement
A. Extent of limited warranty
1. Hewlett-Packard (HP) warrants to the end-user customer that the HP products specified above will be free from defects
in materials and workmanship for the duration specified above, which duration begins on the date of purchase by the
customer.
2. For software products, HP’s limited warranty applies only to a failure to execute programming instructions. HP does not
warrant that the operation of any product will be interrupted or error free.
3. HP's limited warranty covers only those defects that arise as a result of normal use of the product, and does not cover
any other problems, including those that arise as a result of:
a. Improper maintenance or modification;
b. Software, media, parts, or supplies not provided or supported by HP;
c. Operation outside the product's specifications;
d. Unauthorized modification or misuse.
4. For HP printer products, the use of a non-HP cartridge or a refilled cartridge does not affect either the warranty to the
customer or any HP support contract with the customer. However, if printer failure or damage is attributable to the use of
a non-HP or refilled cartridge or an expired ink cartridge, HP will charge its standard time and materials charges to
service the printer for the particular failure or damage.
5. If HP receives, during the applicable warranty period, notice of a defect in any product which is covered by HP's
warranty, HP shall either repair or replace the product, at HP's option.
6. If HP is unable to repair or replace, as applicable, a defective product which is covered by HP's warranty, HP shall,
within a reasonable time after being notified of the defect, refund the purchase price for the product.
7. HP shall have no obligation to repair, replace, or refund until the customer returns the defective product to HP.
8. Any replacement product may be either new or like-new, provided that it has functionality at least equal to that of the
product being replaced.
9. HP products may contain remanufactured parts, components, or materials equivalent to new in performance.
10. HP's Limited Warranty Statement is valid in any country where the covered HP product is distributed by HP. Contracts
for additional warranty services, such as on-site service, may be available from any authorized HP service facility in
countries where the product is distributed by HP or by an authorized importer.
B. Limitations of warranty
TO THE EXTENT ALLOWED BY LOCAL LAW, NEITHER HP NOR ITS THIRD PARTY SUPPLIERS MAKES ANY
OTHER WARRANTY OR CONDITION OF ANY KIND, WHETHER EXPRESS OR IMPLIED WARRANTIES OR
CONDITIONS OF MERCHANTABILITY, SATISFACTORY QUALITY, AND FITNESS FOR A PARTICULAR PURPOSE.
C. Limitations of liability
1. To the extent allowed by local law, the remedies provided in this Warranty Statement are the customer's sole and
exclusive remedies.
2. TO THE EXTENT ALLOWED BY LOCAL LAW, EXCEPT FOR THE OBLIGATIONS SPECIFICALLY SET FORTH IN
THIS WARRANTY STATEMENT, IN NO EVENT SHALL HP OR ITS THIRD PARTY SUPPLIERS BE LIABLE FOR
DIRECT, INDIRECT, SPECIAL, INCIDENTAL, OR CONSEQUENTIAL DAMAGES, WHETHER BASED ON
CONTRACT, TORT, OR ANY OTHER LEGAL THEORY AND WHETHER ADVISED OF THE POSSIBILITY OF
SUCH DAMAGES.
D. Local law
1. This Warranty Statement gives the customer specific legal rights. The customer may also have other rights which vary
from state to state in the United States, from province to province in Canada, and from country to country elsewhere in
the world.
2. To the extent that this Warranty Statement is inconsistent with local law, this Warranty Statement shall be deemed
modified to be consistent with such local law. Under such local law, certain disclaimers and limitations of this Warranty
Statement may not apply to the customer. For example, some states in the United States, as well as some governments
outside the United States (including provinces in Canada), may:
a. Preclude the disclaimers and limitations in this Warranty Statement from limiting the statutory rights of a consumer
(e.g., the United Kingdom);
b. Otherwise restrict the ability of a manufacturer to enforce such disclaimers or limitations; or
c. Grant the customer additional warranty rights, specify the duration of implied warranties which the manufacturer
cannot disclaim, or allow limitations on the duration of implied warranties.
3. THE TERMS IN THIS WARRANTY STATEMENT, EXCEPT TO THE EXTENT LAWFULLY PERMITTED, DO NOT
EXCLUDE, RESTRICT, OR MODIFY, AND ARE IN ADDITION TO, THE MANDATORY STATUTORY RIGHTS
APPLICABLE TO THE SALE OF THE HP PRODUCTS TO SUCH CUSTOMERS.
HP Limited Warranty
Dear Customer,
You will find below the name and address of the HP entity responsible for the performance of the HP Limited Warranty in your
country.
You may have additional statutory rights against the seller based on your purchase agreement. Those rights are not
in any way affected by this HP Limited Warranty.
Ireland: Hewlett-Packard Ireland Limited, 63-74 Sir John Rogerson's Quay, Dublin 2
United Kingdom: Hewlett-Packard Ltd, Cain Road, Bracknell, GB-Berks RG12 1HN
Malta: Hewlett Packard International Trade BV, Branch 48, Sqaq Nru 2, Triq ix-Xatt, Pieta MSD08, Malta
South Africa: Hewlett-Packard South Africa Ltd, 12 Autumn Street, Rivonia, Sandton, 2128, Re
p
ublic of South Africa
HP product Duration of limited warranty
Software Media 90 days
Printer 1 year
Print or Ink cartridges Until the HP ink is depleted or the “end of warranty” date printed
on the cartridge has been reached, whichever occurs first. This
warranty does not cover HP ink products that have been refilled,
remanufactured, refurbished, misused, or tampered with.
Printheads (only applies to products with customer 1 year
replaceable printheads)
Accessories 1 year unless otherwise stated


Table des matières 15
Français
Configuration du télécopieur ........................................................................................ 16
Étape 1 : Identification du type de système téléphonique utilisé (parallèle ou série).......... 16
Étape 2 : Détermination du type de ligne téléphonique (dédiée ou partagée) ................. 17
Étape 3 : Gestion et configuration des paramètres du télécopieur ................................. 18
Étape 4 : Test de la configuration du télécopieur......................................................... 19
Définition du mode de réponse (réponse automatique) (facultatif)...................................... 19
Modification du type de sonnerie sur Sonnerie distincte (facultatif) .................................... 20
Configuration des entrées de numérotation rapide (facultatif)............................................ 20
Configuration de la télécopie numérique HP (Télécopie vers PC ou Télécopie vers Mac) ...... 21
Résolution des problèmes de télécopie........................................................................... 22
Déclaration de garantie limitée Hewlett-Packard ............................................................. 25
Table des matières
Consignes de sécurité
Respectez toujours les précautions de sécurité élémentaires
quand vous utilisez ce produit afin de réduire les risques de
blessures dues au feu ou à un choc électrique.
1. Lisez attentivement toutes les instructions contenues dans la
documentation livrée avec le périphérique.
2. Utilisez toujours une prise de courant mise à la terre lors du
branchement de ce produit à une source d’alimentation. Si vous
ne savez pas si une prise de courant est mise à la terre, consultez
un électricien qualifié.
3. Respectez toutes les instructions et tous les avertissements
indiqués sur le produit.
4. Débranchez cet appareil des prises murales avant de procéder
à son nettoyage.
5. N’installez jamais cet appareil près d’une source d’eau, ni si
vous êtes mouillé.
6. Installez l’appareil en toute sécurité sur une surface stable.
7. Installez l’appareil en un lieu protégé où personne ne puisse
marcher sur le cordon ou trébucher sur celui-ci, et où le
cordon ne puisse pas être endommagé.
8. Si l’appareil ne fonctionne pas normalement, reportez-vous au
chapitre « Maintenance et dépannage ».
9. L’appareil ne contient aucune pièce dont l’entretien doive être
réalisé par l’utilisateur. Confiez l’entretien à du personnel
qualifié.
10. N’utilisez que l’adaptateur d’alimentation externe ou la batterie
fourni(e) avec l’imprimante.
Remarque : l’encre des cartouches est utilisée dans le processus
d’impression de différentes manières, notamment lors de la phase
d’initialisation, qui prépare l’appareil et les cartouches pour
l’impression, et de l’entretien de la tête d’impression, qui maintient
les buses dégagées et garantit une libre circulation de l’encre.
Notez également qu’il reste de l’encre dans la cartouche après son
utilisation. Pour plus d’informations, reportez-vous à la page Web
www.hp.com/go/inkusage.
Loading...