


 Loading...
HP ffice et 3830 All-in-One series

Table of contents
1 HP ff ce et 3830 series Help ......................................................................................................................... |
1 |
2 Get started .................................................................................................................................................... |
3 |
Printer parts ........................................................................................................................................................... |
4 |
Control panel and status lights ............................................................................................................................. |
5 |
Load media ............................................................................................................................................................. |
7 |
Load original ........................................................................................................................................................ |
11 |
Paper basics ......................................................................................................................................................... |
13 |
Open the HP printer software (Windows) ............................................................................................................ |
15 |
Sleep mode .......................................................................................................................................................... |
16 |
Quiet Mode ........................................................................................................................................................... |
17 |
utoff ............................................................................................................................................................... |
19 |
3 Print ........................................................................................................................................................... |
21 |
Print from your computer .................................................................................................................................... |
22 |
Print Quick Forms ................................................................................................................................................ |
28 |
Print from your mobile device ............................................................................................................................. |
29 |
Print with AirPrint ................................................................................................................................................ |
30 |
Tips for print success ........................................................................................................................................... |
31 |
4 Use Web Services ......................................................................................................................................... |
35 |
What are Web Services? ....................................................................................................................................... |
36 |
Set up Web Services ............................................................................................................................................. |
37 |
Print with HP ePrint ............................................................................................................................................. |
38 |
Use HP Printables ................................................................................................................................................ |
39 |
Use the HP Connected website ............................................................................................................................ |
40 |
Remove Web Services .......................................................................................................................................... |
41 |
5 Copy and scan .............................................................................................................................................. |
43 |
Copy ..................................................................................................................................................................... |
44 |
Scan using the printer control panel ................................................................................................................... |
46 |
ENWW |
iii |
Scan using the HP printer software ..................................................................................................................... |
47 |
Scan using Webscan ............................................................................................................................................ |
51 |
Tips for copy and scan success ............................................................................................................................ |
52 |
6 Fax ............................................................................................................................................................. |
53 |
Send a fax ............................................................................................................................................................ |
54 |
Receive a fax ........................................................................................................................................................ |
57 |
Set up phone book contacts ................................................................................................................................ |
61 |
Change fax settings ............................................................................................................................................. |
64 |
Fax and digital phone services ............................................................................................................................ |
68 |
Fax on Voice over Internet Protocol .................................................................................................................... |
69 |
Use reports .......................................................................................................................................................... |
70 |
7 Manage ink cartridges .................................................................................................................................. |
75 |
Check estimated ink levels .................................................................................................................................. |
76 |
Order ink supplies ................................................................................................................................................ |
77 |
Choose right ink cartridges ................................................................................................................................. |
78 |
Replace ink cartridges ......................................................................................................................................... |
79 |
Use single-cartridge mode .................................................................................................................................. |
82 |
Cartridge warranty information .......................................................................................................................... |
83 |
Tips for working with ink cartridges .................................................................................................................... |
84 |
8 Connect your printer .................................................................................................................................... |
85 |
Connect your printer to a wireless network with a router .................................................................................. |
86 |
Connect wirelessly to the printer without a router ............................................................................................. |
87 |
Wireless settings ................................................................................................................................................. |
90 |
Connect your printer to your computer with a USB cable (non-network connection) ....................................... |
92 |
Change from a USB connection to a wireless network ....................................................................................... |
93 |
Advanced printer management tools (for networked printers) ......................................................................... |
94 |
Tips for setting up and using a networked printer ............................................................................................. |
96 |
9 Solve a problem ........................................................................................................................................... |
97 |
Jams and paper-feed issues ................................................................................................................................ |
98 |
Ink cartridge issues ........................................................................................................................................... |
104 |
Printing issues ................................................................................................................................................... |
107 |
Copy issues ........................................................................................................................................................ |
116 |
Scan issues ........................................................................................................................................................ |
117 |
Fax issues ........................................................................................................................................................... |
118 |
Network and connection issues ........................................................................................................................ |
126 |
Printer hardware issues ..................................................................................................................................... |
128 |
iv |
ENWW |
Maintain the document feeder .......................................................................................................................... |
129 |
HP support ......................................................................................................................................................... |
130 |
Appendix A Technical information ................................................................................................................. |
133 |
Hewlett-Packard Company notices ................................................................................................................... |
134 |
pecifications ..................................................................................................................................................... |
135 |
Environmental product stewardship program .................................................................................................. |
138 |
Regulatory notices ............................................................................................................................................. |
146 |
Appendix B Additional fax setup .................................................................................................................... |
157 |
Set up faxing (parallel phone systems) ............................................................................................................ |
158 |
Test fax setup .................................................................................................................................................... |
178 |
Index ........................................................................................................................................................... |
179 |
ENWW |
v |
vi |
ENWW |

1 HP ff ce et 3830 series Help
Learn how to use your HP ffice et 3830 series.
●Printer parts on page 4
●Control panel and status lights on page 5
●Load media on page 7
●Print on page 21
●Copy on page 44
●Scan to a computer on page 47
●Check estimated ink levels on page 76
●Replace ink cartridges on page 79
●Clear a paper jam on page 98
ENWW |
1 |
2 Chapter 1 HP ffice et 3830 series Help |
ENWW |

2Get started
●Printer parts
●Control panel and status lights
●Load media
●Load original
●Paper basics
●Open the HP printer software (Windows)
●Sleep mode
●Quiet Mode
●utoff
ENWW |
3 |

Printer parts
1 |
Paper-width guide |
|
|
2 |
Input tray |
|
|
3 |
Input tray shield |
|
|
4 |
Document feeder tray |
|
|
5 |
Document feeder tray extender |
|
|
6 |
Scanner lid |
|
|
7 |
Scanner glass |
|
|
8 |
USB port |
|
|
9 |
Fax port (2-EXT) |
|
|
10 |
Document feeder |
|
|
11 |
Output tray extender (also referred to as the tray extender) |
|
|
12 |
Output tray |
|
|
13 |
Front door |
|
|
14 |
Control panel |
|
|
15 |
Cartridge access door |
|
|
16 |
Ink cartridges |
|
|
17 |
Power connection |
|
|
18 |
Fax port (1-LINE) |
|
|
4 Chapter 2 Get started |
ENWW |
Control panel and status lights
●Overview of buttons and lights
●Control panel display icons
Overview of buttons and lights
Label |
Name and Description |
|
|
1 |
Power button: Turns the printer on or off. |
|
|
2 |
Home button: Returns to the Home screen, the screen that is displayed when you first turn on the printer. |
|
|
3 |
Control panel display: Touch the screen to select menu options, or scroll through the menu items. |
4Wireless light: Indicates the status of the printer wireless connection.
●Solid blue light indicates that wireless connection has been established and you can print.
●Slow blinking light indicates that wireless is on, but the printer is not connected to a network. Make sure your printer is within the range of wireless signal.
●Fast blinking light indicates wireless error. Refer to the message on the printer display.
● |
If wireless is turned off, the wireless light is off and the display screen shows Wireless ff. |
5Help button: Opens the Help menu for the current operation.
6Back button: Returns to the previous screen.
Control panel display icons
Icon Purpose
Copy : Opens the Copy menu where you can select a copy type or change copy settings.
Scan : Displays a screen where you can select a destination for your scan.
Fax : Displays a screen where you can send a fax, or change fax settings
ENWW |
Control panel and status lights 5 |

Icon Purpose
HP Printables: Provides a quick and easy way to access and print information from the web, such as coupons, coloring pages, puzzles, and more.
Quick Forms : Opens the Quick Forms menu where you can select a form to print.
Setup : Opens the Setup menu where you can change preferences and use tools to perform maintenance functions.
Help : Opens the Help menu where you can view How to Videos, printer feature information, and tips.
ePrint icon: Opens the Web Services Summary menu, where you can check ePrint status details, change ePrint settings, or print an Info page.
Wi-Fi Direct icon: Opens the Wi-Fi Direct Details menu where you can turn on Wi-Fi Direct, turn off Wi-Fi Direct, and display the Wi-Fi Direct name and password.
Wireless icon: Opens the Wireless menu where you can check wireless status and change wireless settings. You can also print a wireless test report, helping diagnose network connection issues.
Fax Status icon: Displays status information for the Auto Answer function, fax logs, and the fax sound volume.
Ink icon: Shows estimated ink levels by cartridge. Displays a warning symbol if the ink level is less than the minimum expected ink level.
NOTE: Ink level warnings and indicators provide estimates for planning purposes only. When you receive a low-ink warning message, consider having a replacement cartridge available to avoid possible printing delays. You do not need to replace cartridges until the print quality becomes unacceptable.
6 Chapter 2 Get started |
ENWW |
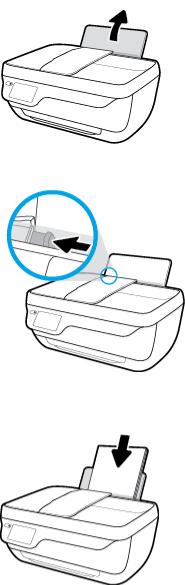
Load media
Select a paper size to continue.
To load full-size paper
1.Pull out the input tray.
2.Slide the paper-width guide to the left.
3.Insert a stack of paper into the input tray with the short edge down and the print side up, and slide the stack of paper down until it stops.
ENWW |
Load media 7 |
4.Slide the paper-width guide to the right until it stops at the edge of the paper.
5.Pull out the output tray and the tray extender.
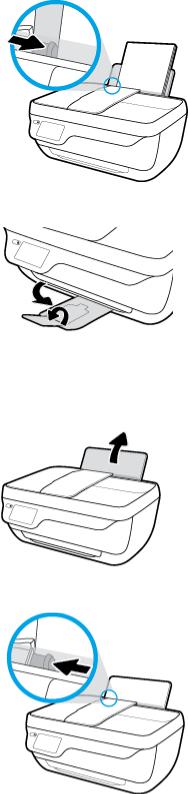
To load small-size paper
1.Pull out the input tray.
2.Slide the paper-width guide to the left.
8 Chapter 2 Get started |
ENWW |

3.Insert a stack of photo paper into the far-right side of the input tray with the short edge down and the print side up, and slide the stack of paper down until it stops.
4.Slide the paper-width guide to the right until it stops at the edge of the paper.
5.Pull out the output tray and the tray extender.
To load envelopes
1.Pull out the input tray.
ENWW |
Load media 9 |
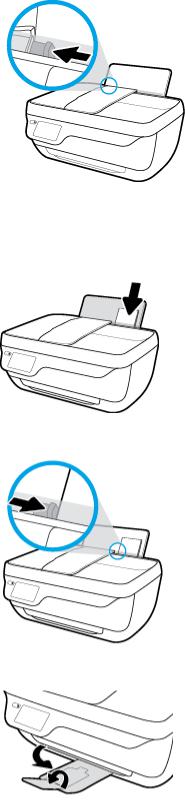
2.Slide the paper-width guide to the left.
3.Insert one or more envelopes into the far-right side of the input tray and slide the stack of envelopes down until it stops.
The side to be printed on should face up. The ap should be on the left side and facing down.
4.Slide the paper-width guide to the right against the stack of envelopes until it stops.
5.Pull out the output tray and the tray extender.
10 Chapter 2 Get started |
ENWW |

Load original
To load an original in the document feeder
 NOTE: Load only plain paper in the document feeder. Do not load photos or other types of thick paper in the document feeder; this might cause a paper jam.
1.Open the document feed tray and tray extender.
2.Slide the paper-width guides of the document feeder tray outwards.
3.Load the original print-side up, head first, in the document feeder.
 NOTE: Load the plain paper original only. Photos or other types of thick paper might cause a paper jam.
4.Slide the paper-width guides inward until they stop at the edge of paper.
To load an original on the scanner glass
1.Lift the scanner lid.
ENWW |
Load original 11 |
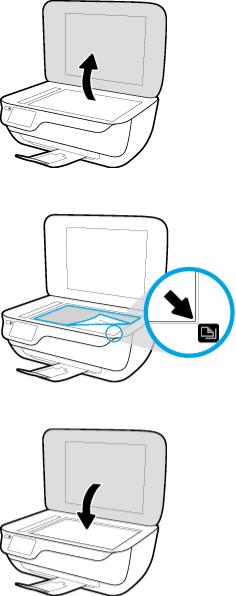
2.Load the original print-side down on the right corner of the scanner glass.
3.Close the scanner lid.
12 Chapter 2 Get started |
ENWW |

Paper basics
The printer is designed to work well with most types of office paper. It is best to test a variety of print paper types before buying large quantities. Use HP paper for optimum print quality. Visit the HP website at www.hp.com for more information about HP paper.
HP recommends plain papers with the ColorLok logo for printing everyday documents. All papers with the ColorLok logo are independently tested to meet high standards of reliability and print quality, and produce documents with crisp, vivid color, bolder blacks, and that dry faster than ordinary plain papers. Look for papers with the ColorLok logo in a variety of weights and sizes from major paper manufacturers.
This section contains the following topics:
●Recommended papers for printing
●Order HP paper supplies
Recommended papers for printing
If you want the best print quality, HP recommends using HP papers that are specifically designed for the type of project you are printing.
Depending on your country/region, some of these papers might not be available.
Photo printing
●HP Premium Plus Photo Paper
HP Premium Plus Photo Paper is HP’s highest-quality photo paper for your best photos. With HP Premium Plus Photo Paper, you can print beautiful photos that are instant-dry so you can share them right off the printer. It is available in several sizes, including A4, 8.5 x 11 inches, 4 x 6 inches (10 x 15 cm), 5 x 7 inches (13 x 18 cm), and in two finishes - glossy or soft gloss (semi-gloss). Ideal for framing, displaying, or gifting your best photos and special photo projects. HP Premium Plus Photo Paper delivers exceptional results with professional quality and durability.
●HP Advanced Photo Paper
This glossy photo paper features an instant-dry finish for easy handling without smudging. It resists water, smears, fingerprints, and humidity. Your prints have a look and feel comparable to a storeprocessed photo. It is available in several sizes, including A4, 8.5 x 11 inches, 10 x 15 cm (4 x 6 inches), 13 x 18 cm (5 x 7 inches). It is acid-free for longer lasting documents.
●HP Everyday Photo Paper
Print colorful, everyday snapshots at a low cost, using paper designed for casual photo printing. This affordable photo paper dries quickly for easy handling. Get sharp, crisp images when you use this paper with any inkjet printer. It is available in glossy finish in several sizes, including A4, 8.5 x 11 inches, 5 x 7 inches, and 4 x 6 inches (10 x 15 cm). It is acid-free for longer lasting documents.
●HP Photo Value Packs
HP Photo Value Packs conveniently package original HP ink cartridges and HP Advanced Photo Paper to save you time and take the guesswork out of printing affordable, lab-quality photos with your HP
ENWW |
Paper basics 13 |
printer. Original HP inks and HP Advanced Photo Paper have been designed to work together so your photos are long lasting and vivid, print after print. Great for printing out an entire vacation's worth of photos or multiple prints to share.
Business documents
●HP Premium Presentation Paper 120g Matte or HP Professional Paper 120 Matt
This paper is a heavy two-sided matte paper perfect for presentation, proposals, reports, and newsletters. It is heavyweight for an impressive look and feel.
●HP Brochure Paper 180g Glossy or HP Professional Paper 180 Glossy
These papers are glossy-coated on both sides for two-sided use. They are the perfect choice for nearphotographic reproductions and business graphics for report covers, special presentations, brochures, mailers, and calendars.
●HP Brochure Paper 180g Matte or HP Professional Paper 180 Matte
These papers are matte-coated on both sides for two-sided use. They are the perfect choice for nearphotographic reproductions and business graphics for report covers, special presentations, brochures, mailers, and calendars.
Everyday printing
All the papers listed for everyday printing feature ColorLok Technology for less smearing, bolder blacks, and vivid colors.
●HP Bright White Inkjet Paper
HP Bright White Inkjet Paper delivers high-contrast colors and sharp text. It is opaque enough for twosided color usage with no show-through, which makes it ideal for newsletters, reports, and yers.
●HP Printing Paper
HP Printing Paper is a high-quality multifunction paper. It produces documents that look and feel more substantial than documents printed on standard multipurpose or copy paper. It is acid-free for longer lasting documents.
● |
HP |
ff ce Paper |
|
HP |
ffice Paper is a high-quality multifunction paper. It is suitable for copies, drafts, memos, and other |
|
everyday documents. It is acid-free for longer lasting documents. |
|
● |
HP |
ff ce Recycled Paper |
|
HP |
ffice Recycled Paper is a high-quality multifunction paper made with 30% recycled fiber. |
Order HP paper supplies
The printer is designed to work well with most types of office paper. Use HP paper for optimum print quality.
To order HP papers and other supplies, go to www.hp.com . At this time, some portions of the HP website are available in English only.
HP recommends plain papers with the ColorLok logo for printing and copying of everyday documents. All papers with the ColorLok logo are independently tested to meet high standards of reliability and print quality, and produce documents with crisp, vivid color, bolder blacks and shorter dry-time than ordinary plain papers. Look for papers with the ColorLok logo in a variety of weights and sizes from major paper manufacturers.
14 Chapter 2 Get started |
ENWW |
Open the HP printer software (Windows)
After installing the HP printer software, double-click the printer icon on the desktop or do one of the following to open the printer software:
●Windows 8.1: Click the down arrow in lower left corner of the Start screen, and then select the printer name.
●Windows 8: Right-click an empty area on the Start screen, click All Apps on the app bar, and then select the printer name.
●Windows 7, Windows Vista, and Windows XP: From the computer desktop, click Start, select All Programs, click HP, click the folder for the printer, and then select the icon with the printer's name.
ENWW |
Open the HP printer software (Windows) 15 |
Sleep mode
Power usage is reduced while in Sleep mode.
After initial setup of printer, the printer will enter Sleep mode after 5 minutes of inactivity. The Power button light is dimmed in Sleep mode.
To change the time to Sleep mode
1.From the Home screen, touch Setup .
2.Touch Power Handling.
3.Touch Sleep Mode, and then touch the desired option.
16 Chapter 2 Get started |
ENWW |

Quiet Mode
Quiet Mode slows down printing to reduce overall noise without affecting print quality. Quiet Mode only works for printing with Normal print quality on plain paper. To reduce printing noise, turn on Quiet Mode. To print at normal speed, turn Quiet Mode off. Quiet mode is off by default.
 NOTE: In Quiet Mode, if you print on plain paper with the Draft or Best print quality, or if you print photos or envelopes, the printer works in the same way as when Quiet Mode is off.
You can create a schedule by selecting the time when the printer prints in Quiet Mode. For example, you can schedule the printer to be in Quiet Mode from 10 p.m. to 8 a.m. everyday. Quiet Mode is off by default.
Turn Quiet Mode on or off
To turn Quiet Mode on or off from the printer control panel
1.From the Home screen, touch Setup .
2.Touch Preferences , and then touch Quiet Mode.
3.Touch On or ff next to Quiet Mode.
To turn Quiet Mode on or off from the printer software (Windows)
1.Open the HP printer software. For more information, see Open the HP printer software (Windows) on page 15.
2.Click the Quiet Mode tab.
3. Click On or ff.
4.Click Save Settings.
To turn Quiet Mode on or off from the Embedded Web Server (EWS)
1.Open the EWS. For more information, see Open the Embedded Web Server on page 94.
2.Click the Settings tab.
3. In the Preferences section, select Quiet Mode, and then select On or ff.
4.Click Apply.
Create a schedule for Quiet Mode
To create a schedule for Quiet Mode from the printer control panel
1.From the Home screen, touch Setup .
2.Touch Preferences , and then touch Quiet Mode.
3.Touch ff next to Quiet Mode to turn it on, and then touch OK to confirm.
4.Touch ff next to Schedule, and then change start time and end time of the schedule.
ENWW |
Quiet Mode 17 |
To turn Quiet Mode on or off from the printer software (Windows)
1.Open the HP printer software. For more information, see Open the HP printer software (Windows) on page 15.
2.Click the Quiet Mode tab.
3.Click On in the Quiet Mode area.
4.Specify the start time and stop time in the Schedule Quiet Mode area.
5.Click Save Settings.
To create a schedule for Quiet Mode from the Embedded Web Server (EWS)
1.Open the EWS. For more information, see Open the Embedded Web Server on page 94.
2.Click the Settings tab.
3.In the Preferences section, select Quiet Mode, and then select On in the Quiet Mode area.
4.Specify the start time and end time in the Schedule Quiet Mode area.
5.Click Apply.
18 Chapter 2 Get started |
ENWW |
uto ff
This feature turns the printer off after 2 hours of inactivity to help reduce energy use. uto ff turns the printer off completely, so you must use the Power button to turn the printer back on. If your printer supports this energy saving feature, utoff is automatically enabled or disabled depending on printer capabilities and connection options. Even when utoff is disabled, the printer enters Sleep mode after 5 minutes of inactivity to help reduce energy use.
● |
uto- |
ff is enabled when the printer is turned on, if the printer does not have network or fax capability, |
|
or is not using these capabilities. |
|
● |
uto- |
ff is disabled when a printer’s wireless or Wi-Fi Direct capability is turned on or when a printer |
|
with fax, USB, or Ethernet network capability establishes a fax, USB, or Ethernet network connection. |
|
ENWW |
utoff 19 |
20 Chapter 2 Get started |
ENWW |

3Print
●Print from your computer
●Print Quick Forms
●Print from your mobile device
●Print with AirPrint
●Tips for print success
ENWW |
21 |

Print from your computer
●Print documents
●Print photos
●Print envelopes
●Print using the maximum dpi
Print documents
Before printing documents, make sure you have paper loaded in the input tray and the output tray is pulled out. For more information about loading paper, see Load media on page 7.
To print a document (Windows)
1.From your software, select Print.
2.Make sure your printer is selected.
3.Click the button that opens the Properties dialog box.
Depending on your software application, this button might be called Properties, Options, Printer Setup,
Printer Properties, Printer, or Preferences.
4.Select the appropriate options.
●On the Layout tab, select Portrait or Landscape orientation.
●On the Paper/Quality tab, select the appropriate paper type from the Media drop-down list in the Tray Selection area, select the appropriate print quality in the Quality Settings area, and then select the appropriate color in the Color area.
●Click Advanced to select the appropriate paper size from the Paper Size drop-down list.
5.Click OK to close the Properties dialog box.
6.Click Print or OK to begin printing.
To print documents (OS X)
1.From the File menu in your software, choose Print.
2.Make sure your printer is selected.
3.Specify the page properties.
If you do not see options on the Print dialog, click Show Details.
 NOTE: The following options are available for a USB connected printer. Locations for the options can vary from one application to another.
●Choose the paper size.
22 Chapter 3 Print |
ENWW |

 NOTE: If you change the Paper Size ensure that you have loaded the correct paper and set the paper size on the printer control panel to match.
●Select the orientation.
●Enter the scaling percentage.
4.Click Print.
To print on both sides of the page (Windows)
1.From your software, select Print.
2.Make sure your printer is selected.
3.Click the button that opens the Properties dialog box.
Depending on your software application, this button might be called Properties, Options, Printer Setup,
Printer Properties, Printer, or Preferences.
4.Select the appropriate options.
●On the Layout tab, select Portrait or Landscape orientation.
●On the Paper/Quality tab, select the appropriate paper type from the Media drop-down list in the Tray Selection area, select the appropriate print quality in the Quality Settings area, and then select the appropriate color in the Color area.
●Click Advanced to select the appropriate paper size from the Paper Size drop-down list.
5.On the Layout tab, select an appropriate option from the Print on Both Sides Manually drop-down list.
6.After you print the first side, follow the on-screen instructions to reload the paper with the blank side up and top of the page down, and then click Continue.
7.Click OK to print.
To print on both sides of the page (OS X)
1.From the File menu in your software, choose Print.
2.In the Print dialog, choose Paper Handling from the pop-up menu and set Page Order to Normal.
3.Set Pages to Print to Odd only.
4.Click Print.
5.After all of the odd numbered pages have printed, remove the document from the output tray.
6.Reload the document so that the end that came out of the printer is now going into the printer and the blank side of the document is facing toward the front of the printer.
7.In the Print dialog, return to the Paper Handling pop-up menu and set the page order to Normal and the pages to print to Even Only.
8.Click Print.
ENWW |
Print from your computer 23 |

Print photos
Before printing photos, make sure you have photo paper loaded in the input tray and the output tray is open. For more information about loading paper, see Load media on page 7.
To print a photo on photo paper (Windows)
1.From your software, select Print.
2.Make sure your printer is selected.
3.Click the button that opens the Properties dialog box.
Depending on your software application, this button might be called Properties, Options, Printer Setup,
Printer Properties, Printer, or Preferences.
4.Select the appropriate options.
●On the Layout tab, select Portrait or Landscape orientation.
●On the Paper/Quality tab, select the appropriate paper type from the Media drop-down list in the Tray Selection area, select the appropriate print quality in the Quality Settings area, and then select the appropriate color in the Color area.
●Click Advanced to select the appropriate photo size from the Paper Size drop-down list.
5.Click OK to return to the Properties dialog box.
6.Click OK, and then click Print or OK in the Print dialog box.
 NOTE: After the printing is finished, remove unused photo paper from the input tray. Store the photo paper so it does not start to curl, which could reduce the quality of your printout.
To print a photo from the computer (OS X)
1.From the File menu in your software, choose Print.
2.Make sure your printer is selected.
3.Set the print options.
If you do not see options on the Print dialog, click Show Details.
 NOTE: The following options are available for a USB connected printer. Locations for the options can vary from one application to another.
a.Choose the appropriate paper size in the Paper Size pop-up menu.
 NOTE: If you change the Paper Size ensure that you have loaded the correct paper and set the paper size on the printer control panel to match.
b.Select an Orientation.
c.From the pop-up menu, choose Paper Type/Quality, and then choose the following settings:
24 Chapter 3 Print |
ENWW |
Loading...