


IPAQ H3641

I
PAQ H3000 P
OCKET
PC
R
EFERENCE
G
UIDE

N
OTICE
The information in this document is subject to change without notice.
COMPAQ COMPUTER CORPORATION SHALL NOT BE LIABLE FOR TECHNICAL OR
EDITORIAL ERRORS OR OMISSIONS CONTAINED HEREIN; NOR FOR INCIDENTAL
OR CONSEQUENTIAL DAMAGES RESULTING FROM THE FURNISHING, PERFOR-
MANCE, OR USE OF THIS MATERIAL.
This document contains information protected by copyright. No part of this document may be
photocopied or reproduced in any form without prior written consent from Compaq Computer
Corporation.
© 2000 Compaq Computer Corporation.
Compaq and the Compaq log are registered in the U.S. Patent and Trademark Office. iPAQ is a
trademark of Compaq Information Technologies Group, L.P. Microsoft, ActiveSync, Outlook,
Pocket Outlook, Expedia, AutoRoute Express, MapPoint, Windows, Windows NT, and the Win-
dows logo are either registered trademarks or trademarks of Microsoft Corporation in the United
States and/or other countries. Microsoft products are licensed to OEMs by Microsoft Licensing,
Inc., a wholly owned subsidiary of Microsoft Corporation.
Product names mentioned herein are may be trademarks and/or registered trademarks of their
respective companies.
iPAQ H3000 Pocket PC Reference Guide
iPAQ H3000 Pocket PC
First Edition. May 2000.
177711-001

Table of Contents I-1
T
ABLE
OF
C
ONTENTS
Chapter 1: Getting Started ____________________________________1
Welcome _____________________________________________________ 1
Where to Find Information ___________________ ______________________ 2
Symbols and Conventions _________________________________________ 3
Customer Registration ____________________________________________ 3
How to Transfer Palm-size PC Data __________________________________ 4
Chapter 2: Basic Skills ______________________________________1
Front Panel Components __________________________________________ 1
Bottom Edge Components _________________________________________ 3
USB Cradle and AC Adapter ________________________________________ 4
Compaq iPAQ Expansion Pack System ________________________________ 6
The Stylus ____________________________________________________ 9
Today Screen __________________________________________________ 10
Programs _____________________________________________________ 11
Navigation Bar and Command Bar _______________________ ____________ 13
Pop-up Menus _________________________________________________ 14
Notifications ___________________________________________________ 14
Enter Information on Your iPAQ _____________________________________ 15
Find Information ________________________________________________ 21
Customize Your iPAQ H3000 _______________________________________ 22
QStart _______________ ___ ___ ___ ____ ___ _______ ___ ___ ____ ___ ___ __ 28
QUtilities and QMenu _____________________________________________ 29
Backup and Restore Data _________________________________________ 32

I-2 Table of Contents
Chapter 3: Microsoft ActiveSync _______________________________1
Chapter 4: Microsoft Pocket Outlook ____________________________1
Calendar: Scheduling Appointments and Meetings _______________________ 2
Contacts: Tracking Friends and Colleagues _____________________________ 4
Tasks: Keeping a To Do List ________________________________________ 7
Notes: Capturing Thoughts and Ideas __________________ _______________ 10
Inbox: Sending and Receiving E-mail Messages _________________________ 12
Chapter 5: Companion Programs _______________________________1
Pocket Word ___________________________________________________ 1
Pocket Excel _________________________________ __________________ 5
Microsoft Money ________________________________________________ 7
Windows Media Player for Pocket PC _________________________________ 11
Microsoft Reader ________________________________________________ 14
Pocket Streets _________________________________________________ 17
Chapter 6: Pocket Internet Explorer _____________________________1
The Mobile Favorites Folder __________________ ______________________ 1
Favorite Links __________________________________________________ 1
Mobile Favorites ________________________________________________ 2
Channels _____________________________________________________ 3
Use Pocket Internet Explorer _______________________________________ 4

Table of Contents I-3
Chapter 7: Getting Connected _________________________________1
Transfer Items Using Infrared _______________________________________ 2
Connect to an ISP _______________________________________________ 3
Connect to Your Network ___________________________ _______________ 4
End a Connection _______________________________________________ 7
Connect Directly to an E-mail Server _ ________________________ ________ 7
Get Help on Connecting _____________________ ______________________ 8
Appendix A: Tips and Troubleshooting ___________________________1
Reset the iPAQ H3000 and Clear Memory ______________________________ 1
Battery Loses Power _____________________________________________ 3
If You Forget Your Password _______________________________________ 4
If You Run Out of iPAQ H3000 Memory ________________________________ 4
Screen Freezes or Responds Slowly __________________________________ 6
Screen is Blank ___________________________ ______________________ 6
Screen is Dark _________________________________________________ 6
Screen is Hard to Read _____ _______________________ _______________ 7
Inaccurate Response to Stylus Taps __________________________________ 7
Slow or No Response ____________________________________________ 7
Infrared (IR) Connection Problems ___________________________________ 7
Modem Connection Problems ______________________________________ 8
Network Connection Problems ______________________________________ 10
USB Cable Connection Problems __________________________________ __ 10
Routine Maintenance _______ _______________________ _______________ 11
Battery Guidelines _______________________________________ ________ 11
Travel Guidelines _______________________________________________ 12

I-4 Table of Contents
Appendix B: Character Recognizer ______________________________1
Appendix C: Regulatory Notices ________________________________1
Regulatory Agency Identification Numbers _____________________________ 1
Federal Communications Commission Notice ___________________________ 2
Canadian Notice ________________________________________________ 3
Avis Canadien ________________________________ __________________ 3
European Union Notice ___________________________________________ 3
Battery Warning ________________________________________________ 3
Airline Travel Notice _______ _______________________ _______________ 3
Power Cords ___________________________________________________ 4
Appendix D: Hardware Specifications ____________________________1
System Specifications ________________________________ ____________ 1
Physical Specifications ___________________________________________ 2
Operating Environment ___________________________________________ 2

Getting Started 1-1
chapter 1
G
ETTING
S
TARTED
Welcome
Congratulations on purchasing a Compaq iPAQ H3000 Windows Powered Pocket PC.
Due to the size and capabilities of your iPAQ H3000 Pocket PC, you can keep your most
important business and personal information up-to-date and close at hand. Microsoft
ActiveSync
increases the power of your iP AQ H3000 Pocket PC by allowing you to syn-
chronize the information on your desktop or laptop computer with your Pocket PC. Picture
yourself in the following situations:
• While walking with a colleague, your cell phone rings and your manager asks if the
two of you are free this afternoon for an emergency meeting. While your colleague
fumbles through his paper organizer, you press a button on your iPAQ H3000 and
instantly see a list of the day’s appointments and meetings. You are quickly able to tell
your manager your available times. For more information on scheduling appointments
and meetings, see Chapter 4.
• You’re meeting your friends tonight for dinner and a movie. You download the latest
movie information from the Internet onto your computer then synchronize it with your
iPAQ H3000. At dinner, you pull out your iPAQ H3000 and review your movie
options with your friends. For more information on downloading Web pages to your
iPAQ H3000, see Chapter 6.
• A Calendar reminder alerts you that it’s time to catch the bus to work. You grab your
iPAQ H3000 and catch the bus just in time. Because ActiveSync k eeps the information
on your iPAQ H3000 up-to-date, you leisurely review your task list, make notes about
the new books and CDs you want to buy, and read and respond to e-mail messages.
When you get back to the office, ActiveSync transfers any task changes you made,
your notes, and your e-mail message responses to your computer. For more informa-
tion on ActiveSync, see Chapter 3.
1-2 Getting Started
Where to Find Information
This reference guide describes your iPAQ H3000 Pocket PC hardware, provides an over-
view of the programs on your iPAQ H3000, and explains how to connect your iPAQ
H3000 to a computer, a network, or the Internet. For instructions on setting up your iPAQ
H3000, see the Quick Start Card. For instructions on installing ActiveSync, see the book-
let accompanying the ActiveSync CD. The following table is a guide to additional infor-
mation to help you use your iPAQ H3000:
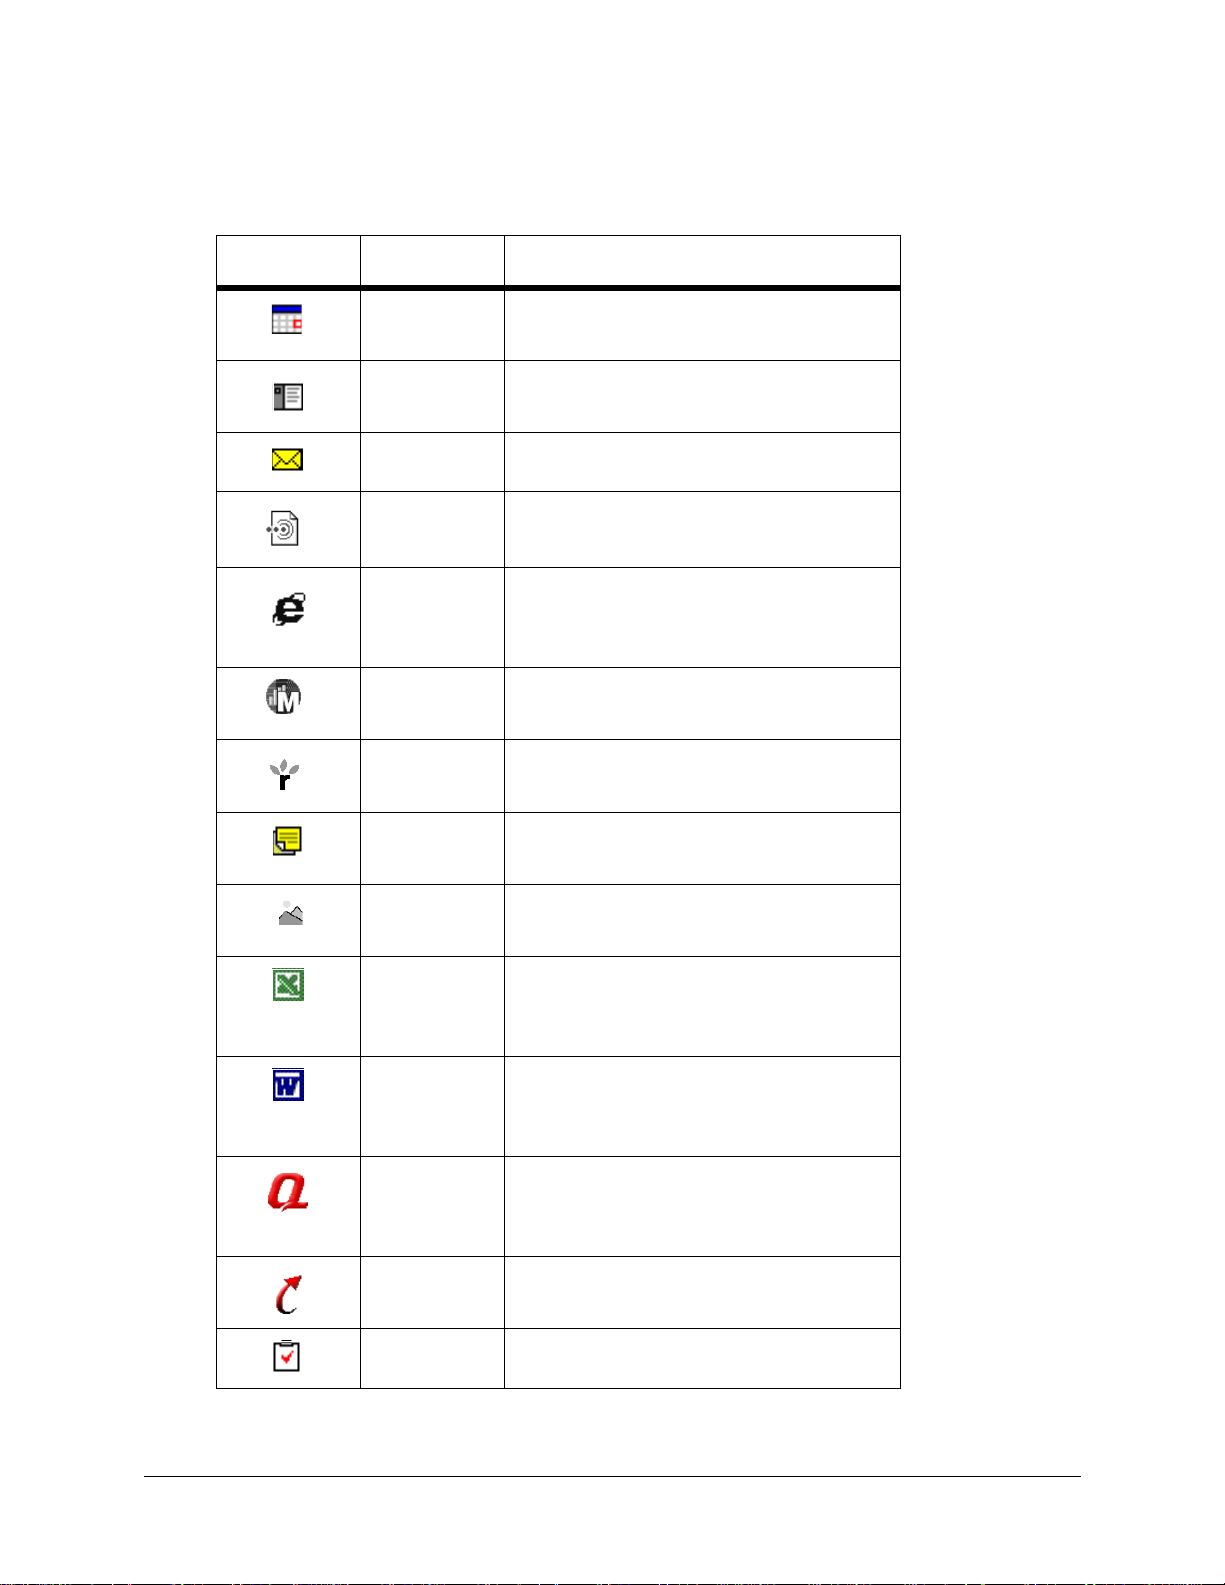
For information on: See this source:
Programs on your iPAQ
H3000
This reference guide and iPAQ H3000 Help. To
view Help, tap then Help.
Additional programs that
can be installed on your
iPAQ H3000
The Extras folder, located on the ActiveSync
CD.
Connecting to and
synchronizing with a
computer
The ActiveSync booklet or online ActiveSync
Help on your computer. To view online Help,
open Microsoft ActiveSync on your computer,
then select Help, Microsoft ActiveSync Help.
Last-minute updates and
detailed technical
information
The Read Me files, located in the Microsoft
ActiveSync folder on the computer and on the
ActiveSync CD.
Up-to-date information
on Windows
-powered
devices including tips and
tricks
Microsoft Windows Powered Home Page
www.microsoft.com/windowsce/ -or-
www.microsoft.com/windowsce/products/tips
The latest information
and offers for your iPAQ
Compaq Handheld Home Page
www.compaq.com/products/handhelds
Information on iPAQ
accessories and ordering
Accessories Information
Tips and troubleshooting
information
Online ActiveSync Help on your computer. To
view the online Help, open Microsoft Active-
Sync on your computer, then select Help,
Microsoft ActiveSync Help. -or-
Appendix A, “Tips and Troubleshooting,” in
this reference guide. -or-
Compaq iPAQ Support Home Page
www.compaq.com/support/handhelds
Technical support and
your warranty
The How Do I Get Service and Support for My
Compaq iPAQ Pocket PC? card.

Getting Started 1-3
Symbols and Conventions
Some or all of the following format conventions may be used in this guide to dis-
tinguish elements of text:
• Names of menus, commands and icons are shown in bold type as they appear on the
display, for example, Settings, Power.
NOTE:
Text set off in this manner presents commentary, sidelights, or interesting points of infor-
mation.
Customer Registration
You can receive the latest information on your iPAQ H3000 Pocket PC, as well as special
offers on iPAQ H3000 accessories and software, by registering with Compaq by complet-
ing and mailing the Register Now* card included in the shipping box or the online regis-
tration.
* Not available in all regions.
Text set off in this manner indicates that failure to follow directions could result in
bodily harm or loss of life.
Text set off in this manner indicates that failure to follow directions could result in
damage to equipment or loss of information.
!

1-4 Getting Started
How to Transfer Palm-size PC Data
If you are currently using a Windows CE-based Palm-size PC and want to transfer your
data to your iPAQ H3000 Pocket PC, follow this upgrade procedure:
1. Install Microsoft ActiveSync 3.1 on your computer. For information on installing
ActiveSync, see the booklet accompanying the ActiveSync CD.
2. Synchronize your Palm-size PC with your computer so that the information on your
computer is current.
NOTE:
If you have files on your Palm-size PC that you want to transfer, such as Note Taker
notes and recordings, turn file conversion off in ActiveSync options so that the files
stay in device format, and use the ActiveSync Explorer to copy the files to your com-
puter. For specific instructions, see ActiveSync Help on the computer.
3. Synchronize your iPAQ H3000 with your computer. This will update your device
using the current data on your computer (step 2).
4. Reinstall programs. Check whether new versions are available.
NOTE:
Some older Palm-size PC programs may not work on your iPAQ H3000 Pocket PC.
NOTE:
Copy the files you transferred to your computer to your iPAQ H3000 using the Active-
Sync Explorer. Turn file conversion on again in ActiveSync.
5. Enter your settings and connection information on the iPAQ H3000.
If you have offline folders in Inbox on your Palm-size PC that contain e-mail messages
you want to transfer to your iPAQ H3000, follow this procedure:
1. Connect your Palm-size PC to your computer then click Windows CE Inbox Trans-
fer on the Microsoft Outlook Tools menu.
2. Select Copy or move selected messages to your computer, then click Browse.
3. Select the offline folder that contains the messages you want to transfer to your com-
puter, then click OK.
4. Click the Transfer button and select the folder you want to transfer the messages to or
click New Folder to create a new folder. Click OK to transfer the messages. Now you
must transfer the messages from your computer to your iPAQ H3000.
5. Tap Tools then New Folder and create a folder for the messages you are going to
transfer in Inbox on your iPAQ H3000.
6. Select the messages you want to transfer in Outlook on your computer.
7. Connect your iPAQ H3000 to your computer, then click Windows CE Inbox Trans-
fer on the Outlook Tools menu.
8. Select Copy selected messages to your mobile device, then click Browse.
9. Select the offline folder on your iPAQ H3000 that you want to transfer the messages
to, then click OK.
10. Click the Transfer button. The selected messages are moved to your iPAQ H3000.
Basic Skills 2-1
chapter 2
B
ASIC
S
KILLS
Learning to use your iPAQ H3000 Pocket PC is easy. This chapter describes the basic con-
cepts of using and customizing your iPAQ H3000 Pocket PC.
Front Panel Components
Item Component Function
1 Stylus Allows you to tap or write on the screen. Push the
stylus release button (w) to release it from the
compartment.
2 Power Button Powers the iPAQ H3000. Press and release the
button to turn on or off your iPAQ H3000. Press
and hold the button for one second to toggle on or
off the backlight.
2-2 Basic Skills
3 Alarm/Charge
Light
Serves as both a battery charge indicator and a
visual alarm indicator.
• Flashing green: Notification alarm signal.
• Flashing amber: Battery is charging.
• Solid amber: Battery is fully charged
4 Light Sensor Detects the ambient light level so that the back-
light level adjusts to suit the environment.
5 Speaker Sounds alarms and plays back sound recordings.
6 iPAQ Navigator/
Action Button
Allows you to scroll through a list (similar to
pressing the arrow keys on a keyboard). In the list
view of a program, you can use your iPAQ Navi-
gator to scroll to the item you want to view. Can
also be used as game buttons within a game appli-
cation. The center of the button can be used as an
Action button to open a selected item.
7 Application
Buttons
Allow quick access to four applications. By
default, the applications are Calendar, Contacts,
QMenu, and QStart. Y ou can change the functions
of the application buttons to open different appli-
cations. For more information, see “Adjusting
Settings” later in this chapter.
8 Record Button Activates the record function in Notes. For more
information, see “Notes” in Chapter 4. You can
change the function of the Record button so that it
opens a different application. For more informa-
tion, see “Adjusting Settings” later in this chapter.
9 Microphone Allows you to record voice messages.
10 Headphone Jack Lets you connect standard headphones.
11 Infrared Port Enables you to exchange data with other Win-
dows-powered devices. The infrared port can
transmit at speeds up to 115.2Kb per second. For
more information, see Chapter 7.
12 Stylus Release
Button
Lets you eject the stylus from its compartment.
Item Component Function
!
To reduce the risk of personal injury, turn
down the volume control before putting on
headphones.
Basic Skills 2-3
Bottom Edge Components
Item Component Function
1 Communications
Port
Connects your iPAQ H3000 to the cradle (or to an
optional USB or serial cable).
2 Reset Button Lets you reset your iPAQ H3000. For more infor-
mation, see “Reset the iPAQ H3000 and Clear
Memory” in Appendix A.
3 On/Off Switch Allows you to clear all data, and reset your system
if you have forgotten your password. Clearing
memory deletes all data and restores your iPAQ
H3000 to its default settings. For more informa-
tion, see “Reset the iPAQ H3000 and Clear Mem-
ory” in Appendix A.
4 DC Jack Allows you to connect to external power with the
supplied AC adapter.
5 iPAQ Expansion
Pack Connector
Connects to the connector of an (optional) iPAQ
Expansion Pack.
2-4 Basic Skills
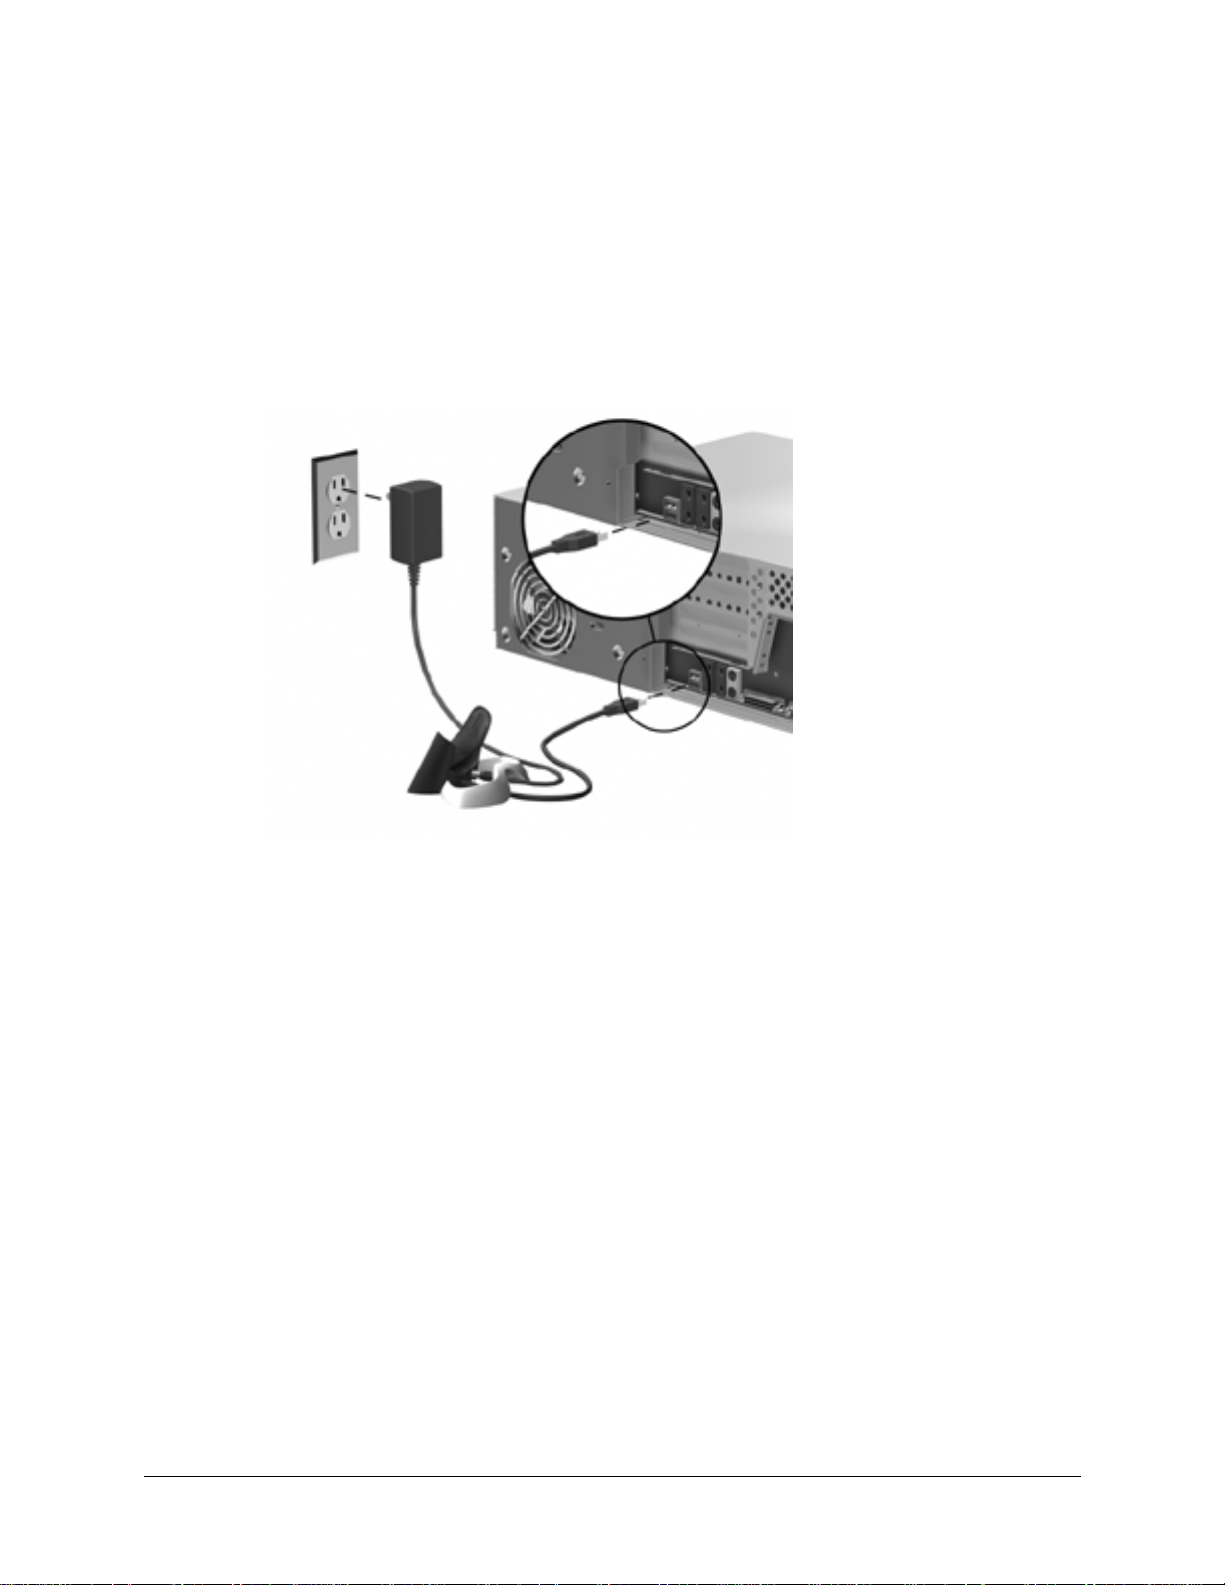
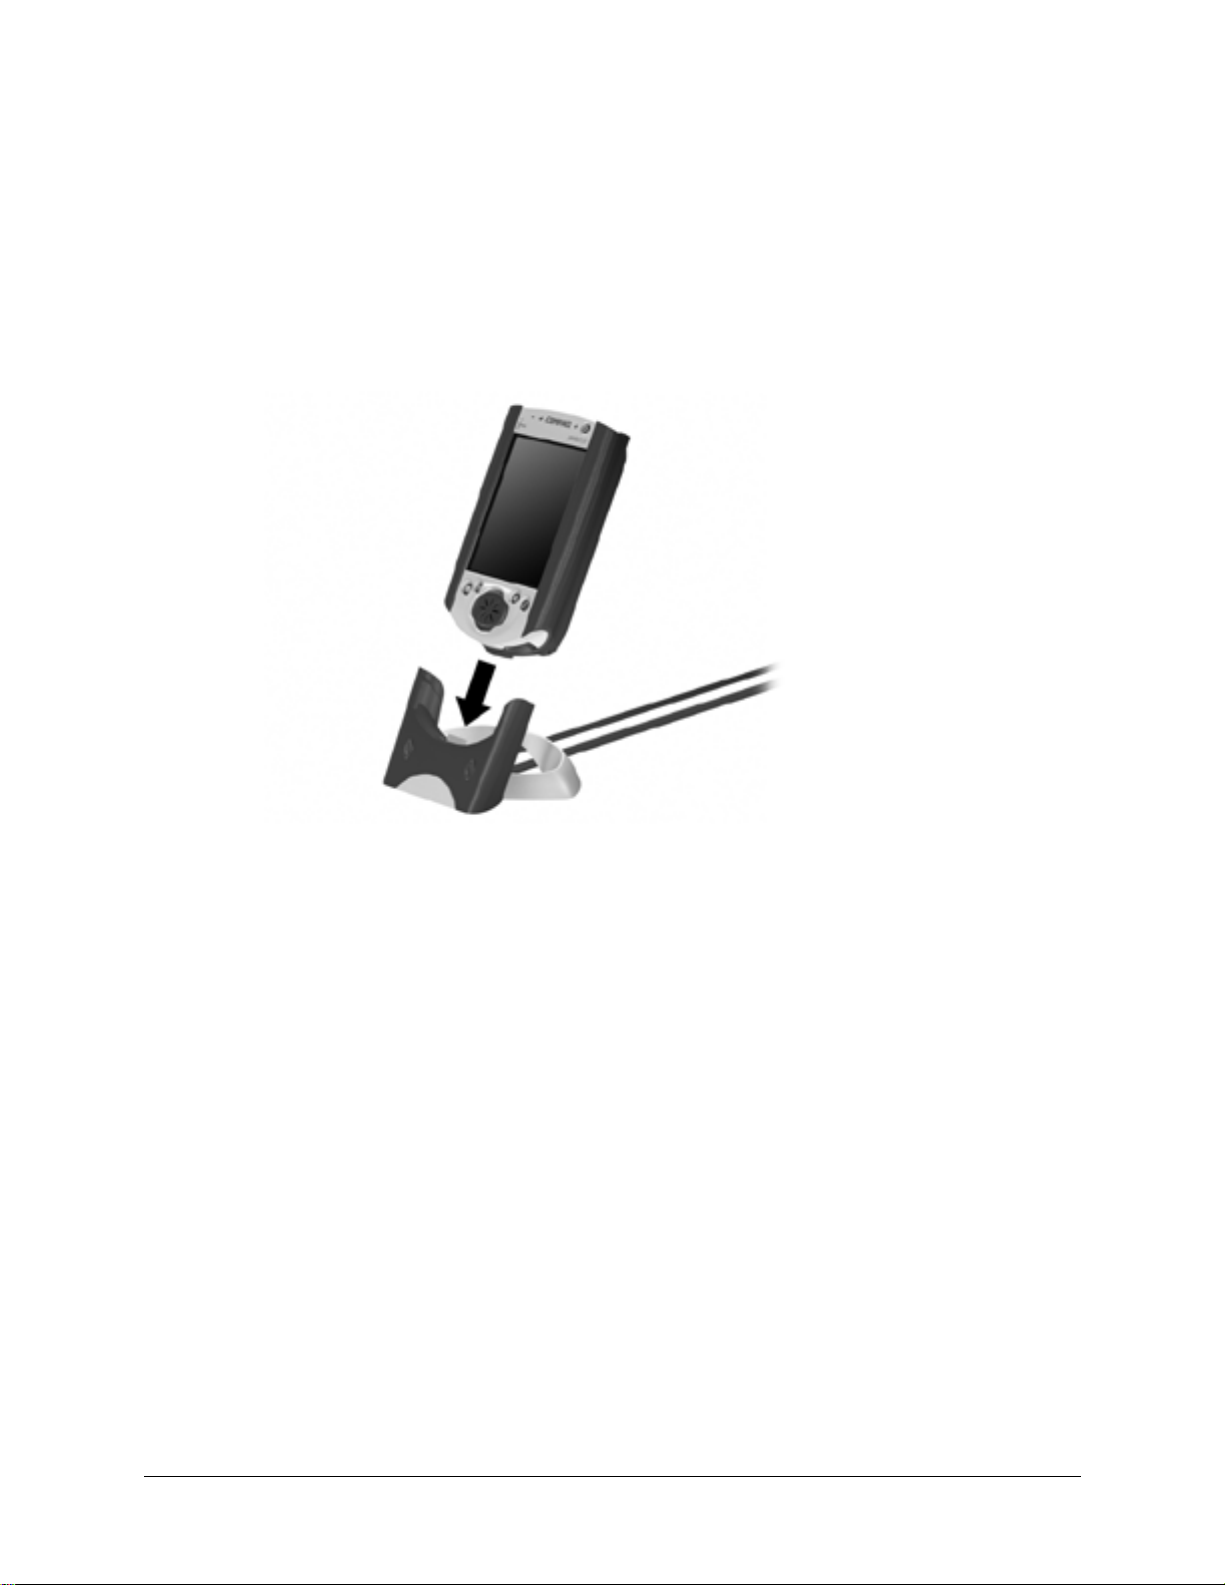
USB Cradle and AC Adapter
Your iPAQ H3000 comes with a USB cradle and AC adapter. This allows you to recharge
your iPAQ H3000, as well as synchronize the information between your iPAQ H3000 and
a computer using ActiveSync. For more information on synchronization, see ActiveSync
Help on your computer.
NOTE:
The USB Cradle must be plugged into an available USB port on the back of your computer.
Basic Skills 2-5
Recharging the Battery
Your iPAQ H3000 contains a rechargeable Lithium Polymer battery that is recharged each
time you place your iP AQ H3000 in the cradle and connect the cradle to an external power
source with the AC adapter. You never need to replace the battery. Just place your iPAQ
H3000 in the cradle for three to four hours for an initial charge before you use it the first
time. Next, place it in the cradle for a short time each day to recha r ge the batte ry to i ts full
capacity.
NOTE: You can also use the AC adapter to connect your iPAQ H3000 directly to the external
power source.
If the battery gets very low, your iPAQ H3000 displays a warning message. If this occurs,
save any unsaved data you are working on, perform a synchronization with your com-
puter, then turn of f your iPAQ H3000. Don’t try to restart your iP AQ H3000 until you have
connected to external power. The battery acts like a rechargeable backup battery by pro-
tecting your data if your iPAQ H3000 shuts down. If your iPAQ H3000 does shut down,
you still have about 24 hours to recharge the battery before you lose the data on your
Pocket PC.
2-6 Basic Skills
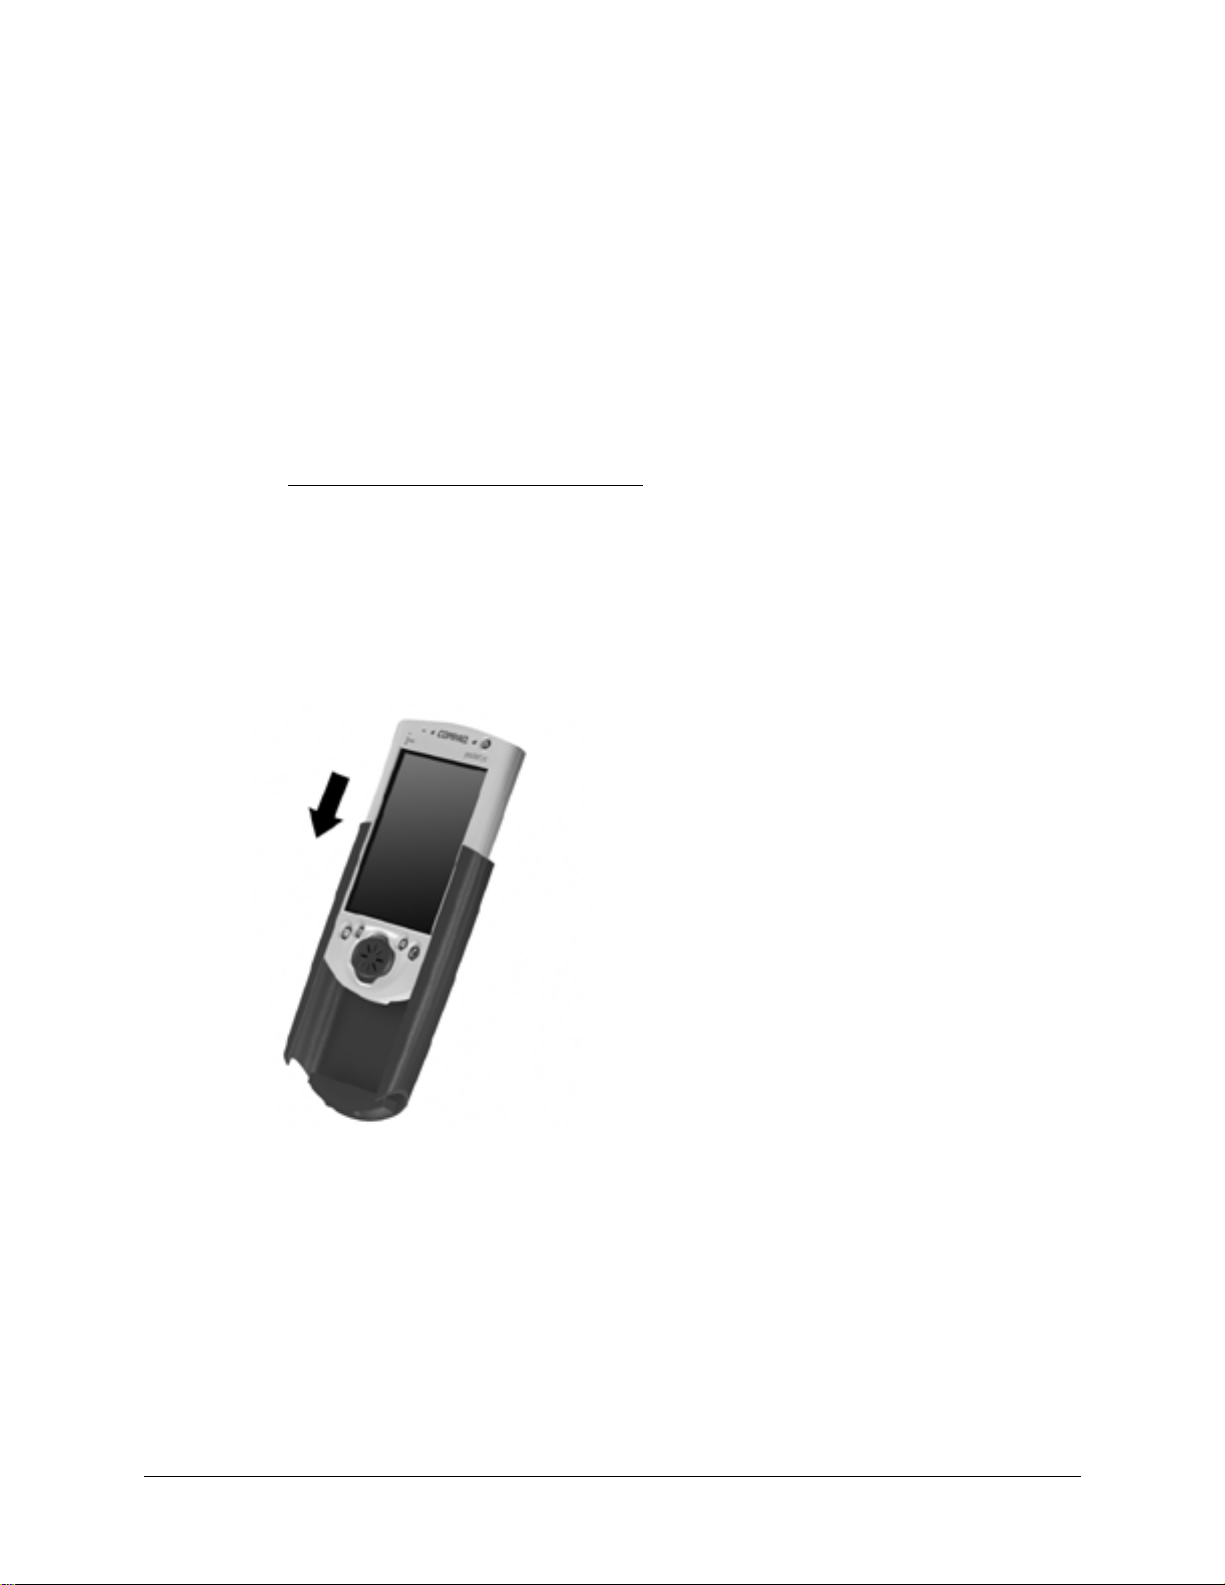
Compaq iPAQ Expansion Pack System
Your iPAQ features the iPAQ Expansion Pack System, which allows you to personalize
the appearance of your iPAQ H3000 or add extra functionality. iPAQ Style Packs offer a
range of styles to customize your iPAQ, while Expansion Packs, such as the CF Card, or
PC Card Expansion Pack, let you add extra features.
Compaq iPAQ Expansion and Style Packs are designed to be easily slid on and off your
Pocket PC without having to power off your Pocket PC first.
NOTE:
For information on ordering Compaq iPAQ Expansion Packs, see the
Accessories Informa-
tion
flier included in the shipping box, or visit the Compaq iPAQ H3000 home page at
www.compaq.com/products/handhelds/
To add a Compaq iPAQ Expansion Pack:
1. Remove the protective plug that covers the iPAQ Expansion connector on the Pocket
PC.
2. Slide the iPAQ H3000 into the Expansion Pack until it clicks into place. The Pocket
PC will alert you when the Expansion Pack is ready to be used.
To view the Expansion Pack properties:
Press the QMenu button, then tap Expansion Pack. If the Expansion Pack is installed
properly, the name of the Expansion Pack will appear in the Expansion Pack Properties
screen.
Basic Skills 2-7
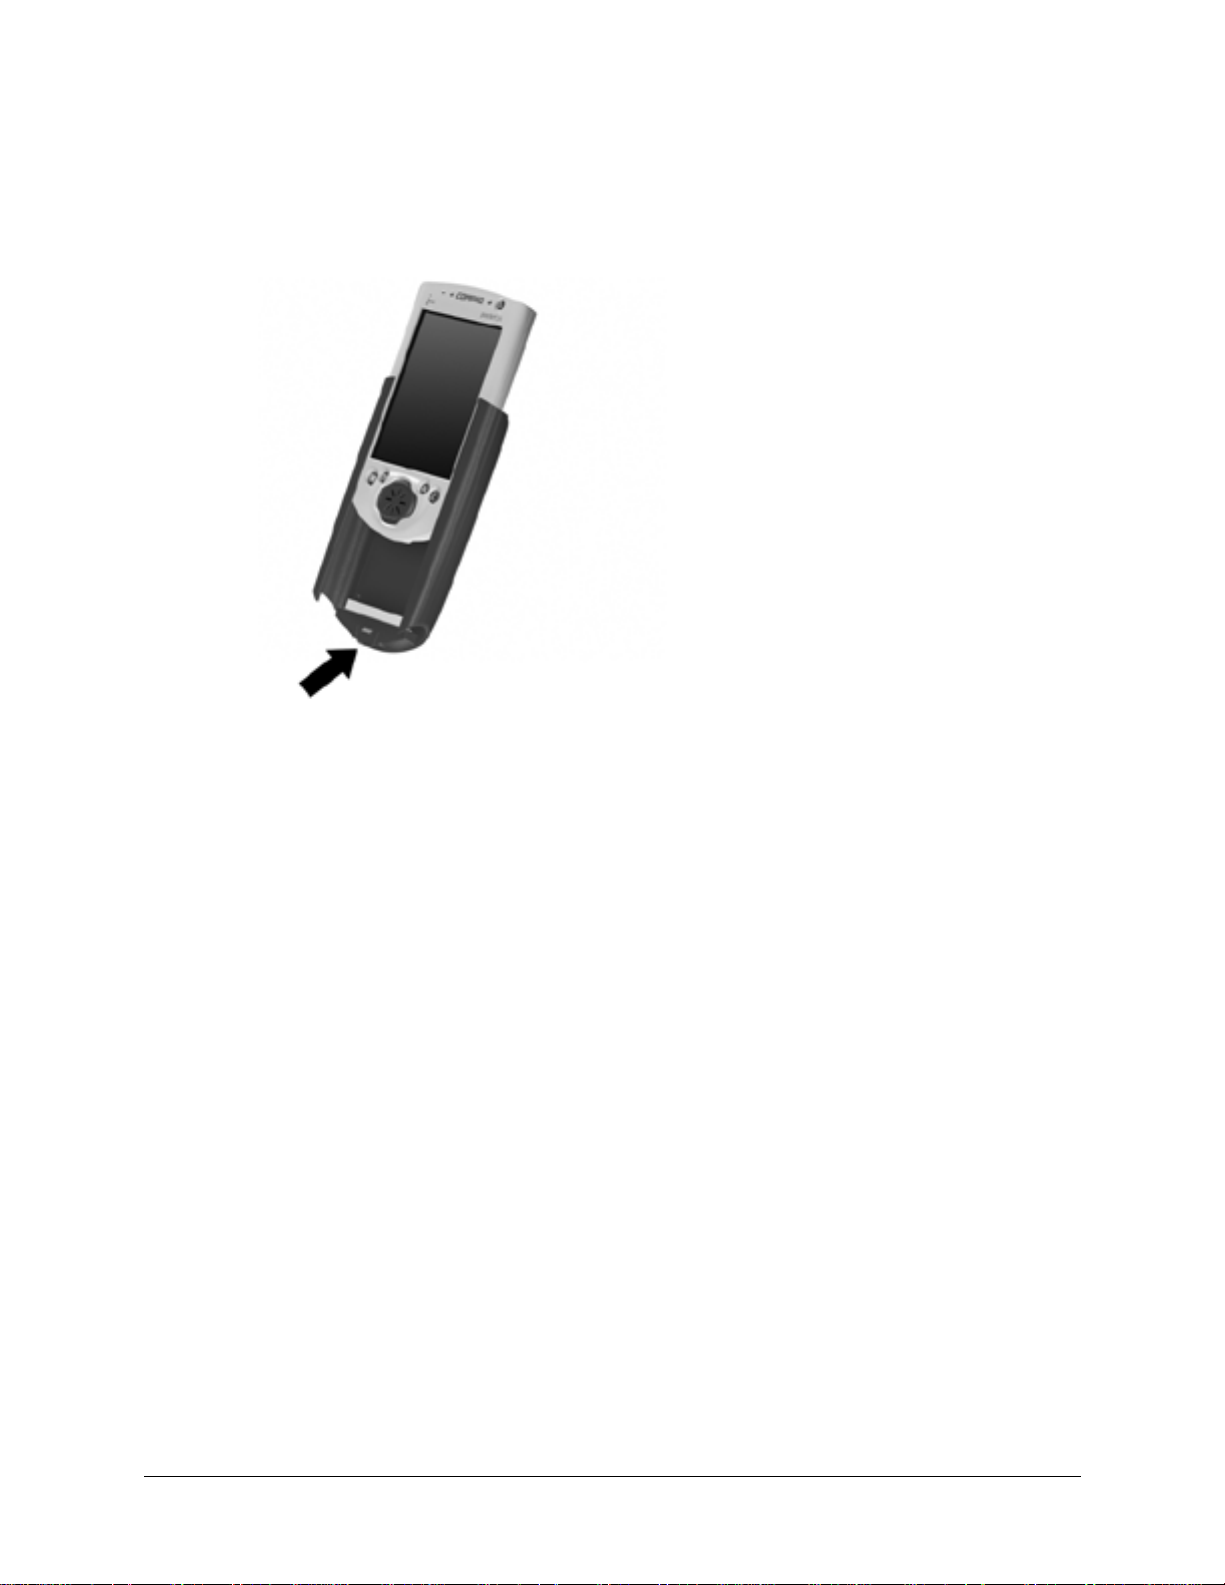
To remove a Compaq iPAQ Expansion Pack:
1. Press the Expansion Pack lock on the base of the Expansion Pack.
2. Slide the Expansion Pack down and off your iPAQ H3000.
2-8 Basic Skills
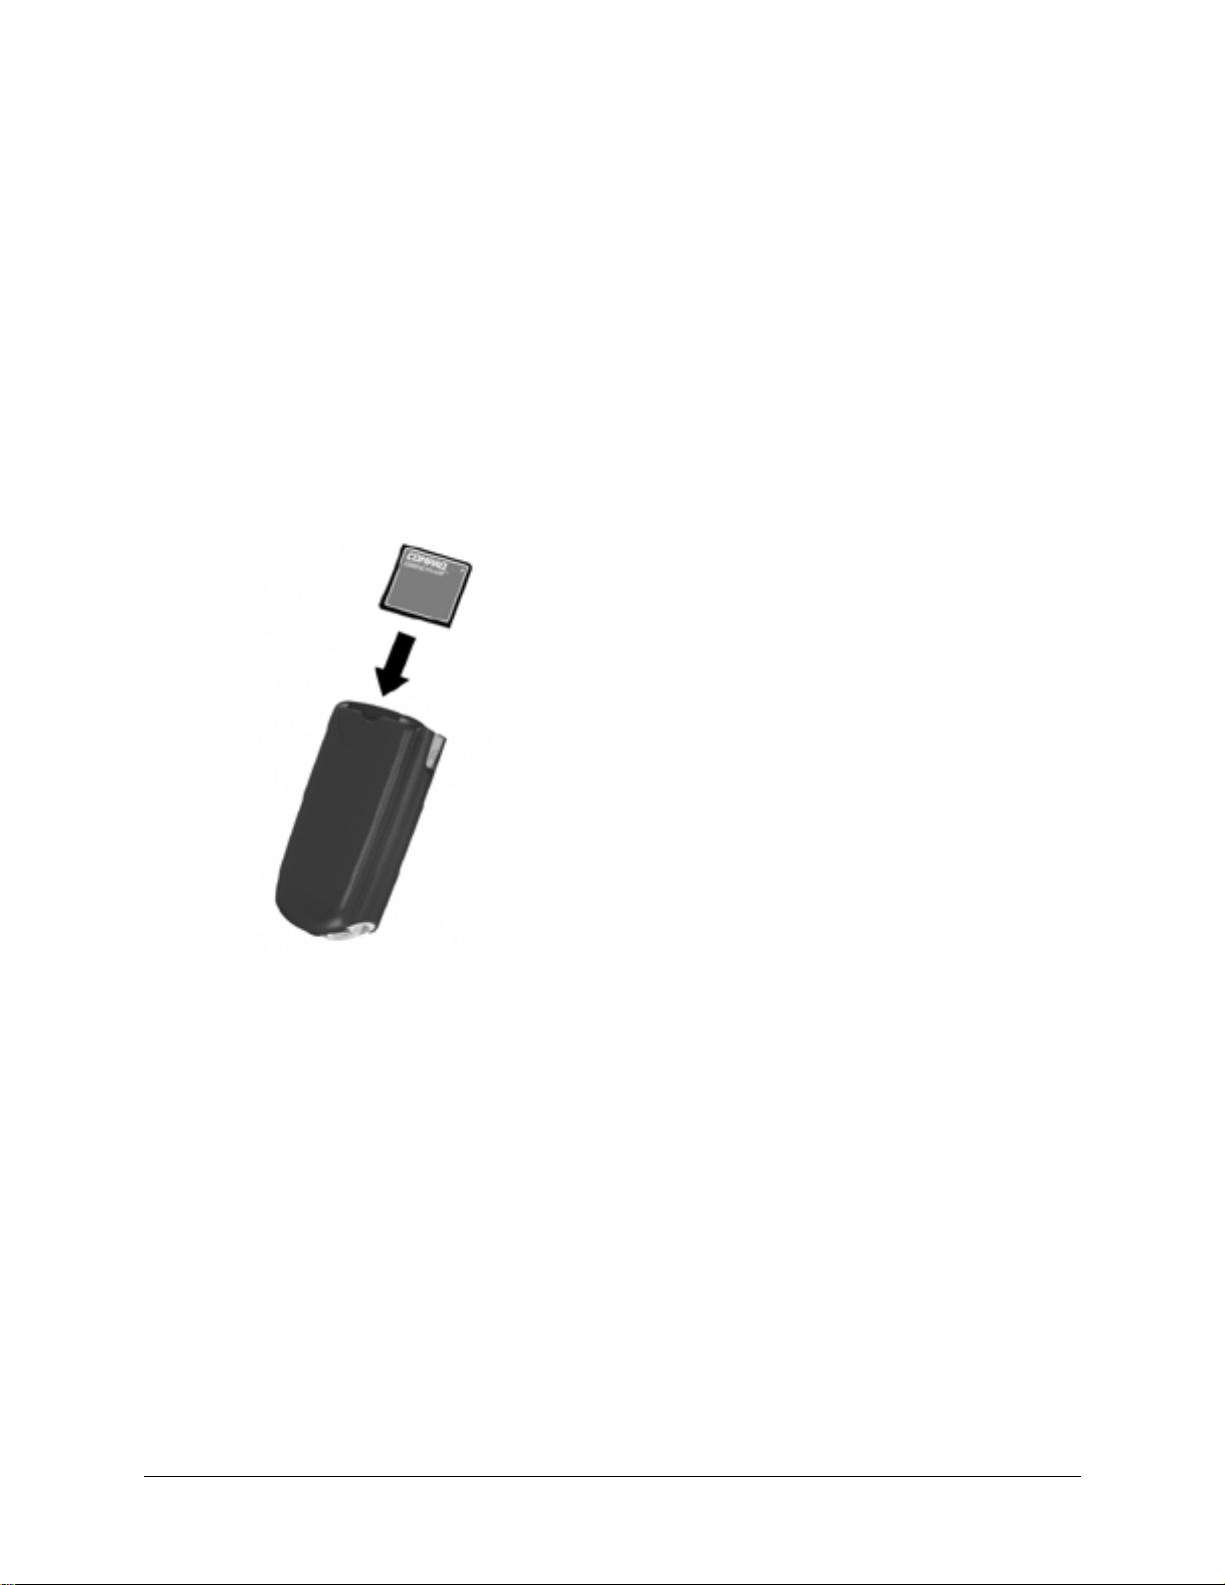
Compaq iPAQ CF Card Expansion Pack
The optional Compaq iPAQ CF Card Expansion Pack supports Type I and Type II Com-
pactFlash cards. The CompactFlash slot allows you to install storage cards for backup and
storage of data and applications. It also allows you to install communication devices such
as a LAN adapter or a fax/modem.
To insert a CompactFlash card:
1. Remove the CompactFlash slot cover.
NOTE: The CompactFlash slot cover can and should be replaced only when the slot is empty.
2. Push the card, connector-side first into the slot until it stops.
NOTE: When you insert a CompactFlash card, your iPAQ H3000 displays a message asking if you
want to enable the card you just inserted. You can choose not to do so in order to save
battery power. After you enable a card, the only way to disable it, and save power, is to
remove the card.
To remove a CompactFlash card:
1. Close all applications on your iPAQ H3000 that have open files on the CompactFlash
card.
2. Lever the CompactFlash card out of the slot using a fingernail.
Basic Skills 2-9
Guidelines for Using CompactFlash Cards
• Your iPAQ H3000 automatically recognizes a wide range of CompactFlash cards
approved for use with ActiveSync. If you are ever instructed to install card-specific
iPAQ H3000 drivers provided by a CompactFlash card manufacturer, be sure to install
only device drivers specifically designed for the operating system on your iPAQ
H3000. If you are unclear about installation instructions, call your CompactFlash card
manufacturer for more information.
• Some CompactFlash cards consume large amounts of power. To avoid battery drain-
age when using a CompactFlash card, connect your iPAQ H3000 to AC power wher-
ever possible.
• If the battery is very low, you should not attempt to save data to a CompactFlash card.
This may result in the loss of data. First replace the batteries or connect to AC power.
• Do not turn off your iPAQ H3000 or remove the CompactFlash card when you are in
the middle of performing an operation, such as saving data to your CompactFlash
card.
• Keep your CompactFlash card in a protective case when not in use to protect it from
dirt and moisture.
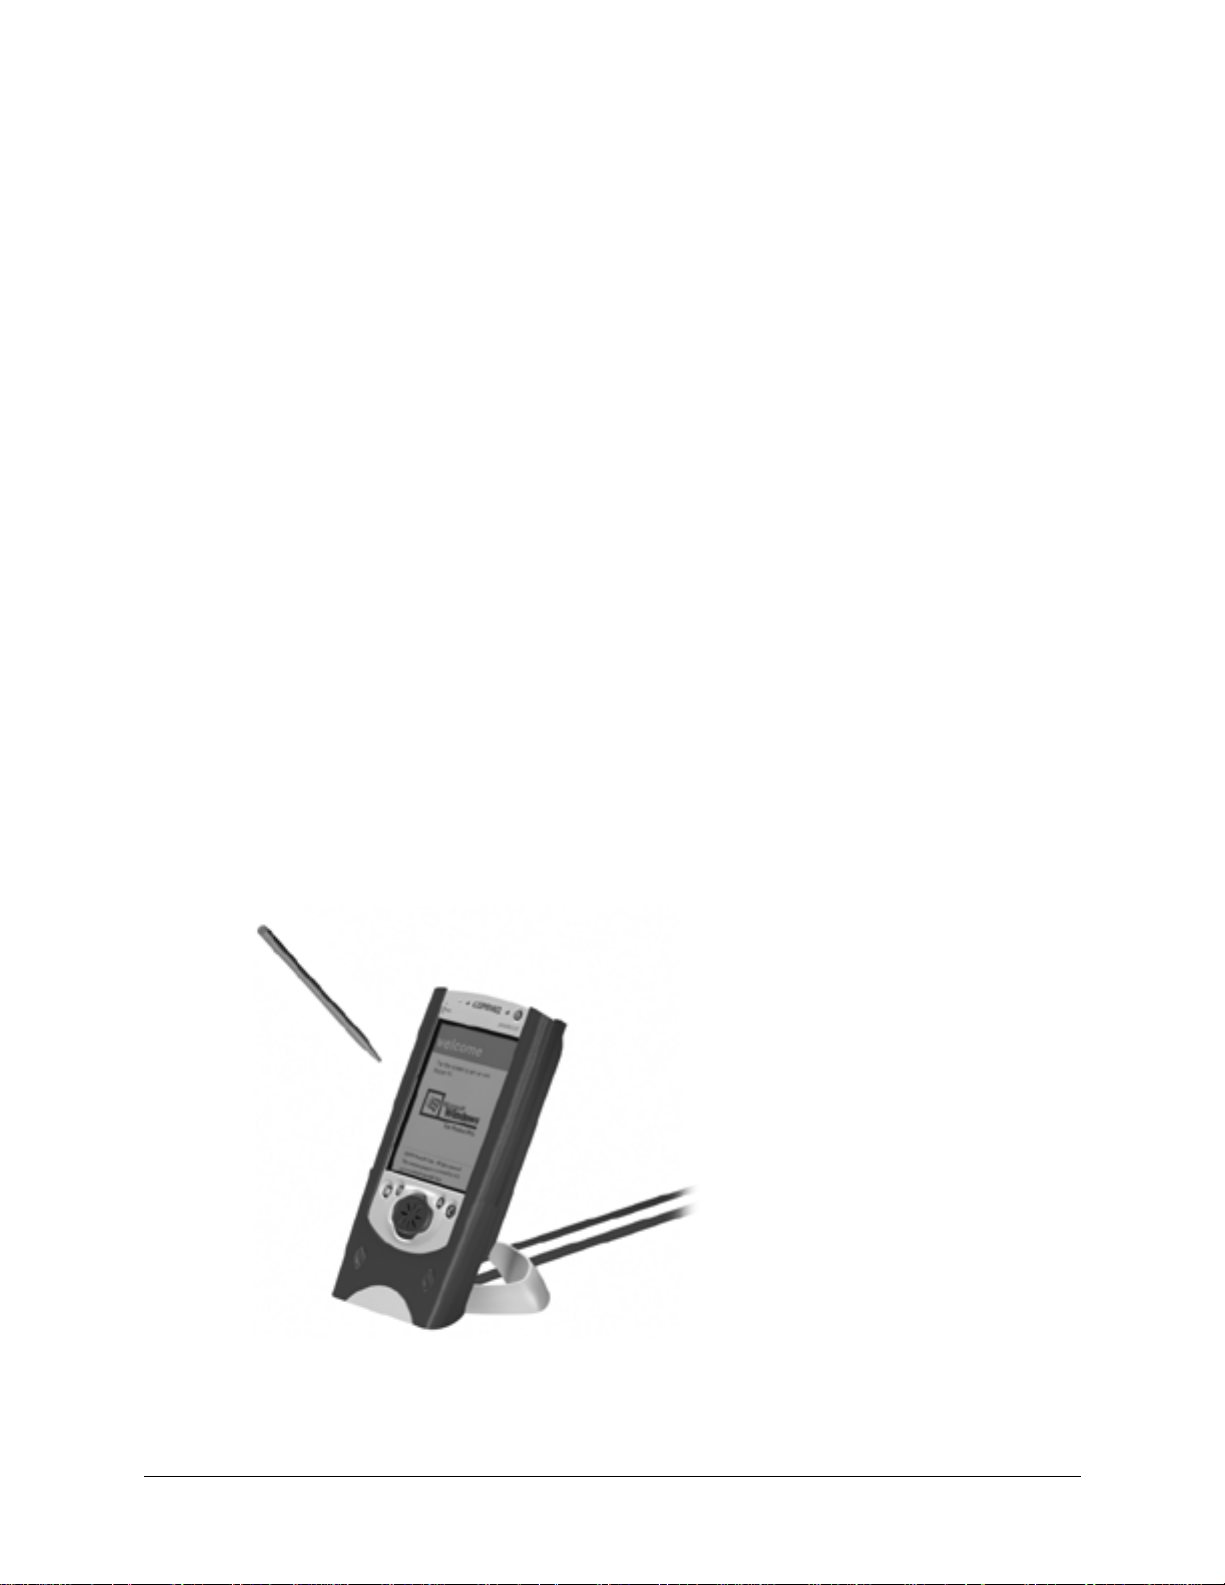
The Stylus
Your iPAQ H3000 has a stylus for selecting items and entering information. To use the
stylus, press and hold the stylus release button while pulling the stylus upward out of its
compartment. To replace the stylus, just insert it back into the compartment, then push it
until it clicks into place.
2-10 Basic Skills
The following actions are available with the stylus:
• Tap. Touch the screen once with the stylus to open items and select options.
• Drag. Hold the stylus on the screen and drag it across the screen to select text and
images. Drag within a list to select multiple items.
• Tap-and-hold. Tap and hold the stylus on an item to see a list of actions available for
that item. Tap the action you want to perform on the pop-up menu that appears.
NOTE: The stylus tip can also be used to press the reset button or set the On/Off switch.
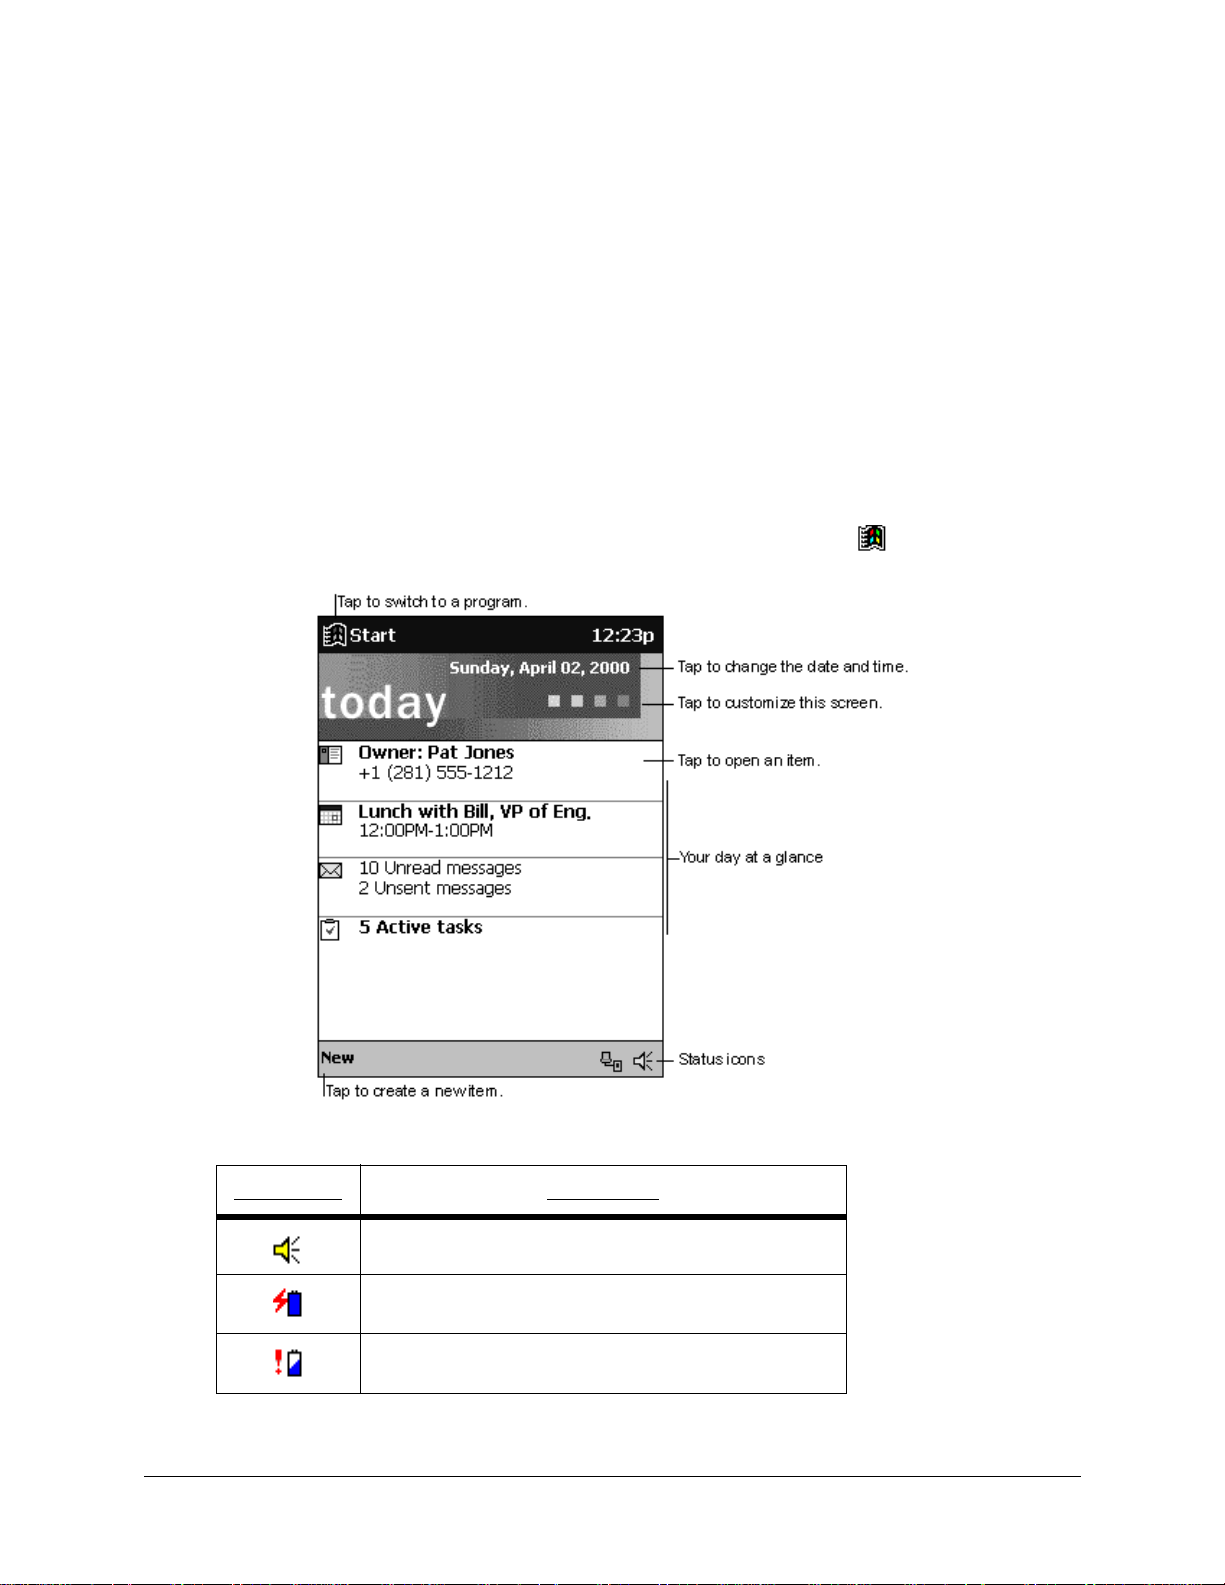
Today Screen
When you turn on your iPAQ H3000 for the first time each day (or after 4 hours of inactiv-
ity), you’ll see the T oday screen. You can also display it by tapping then Today. On the
Today screen, you can see at a glance important information for the day.
You may see the following status icons on the command bar in the Today screen.
Status Icon Description
Turns all sounds on and off
Main battery is charging
Main battery is low
Basic Skills 2-11
Programs
You can switch from one program to another by selecting it from the menu. (You can
customize which programs you see on this menu. For information, see “Adjusting Set-
tings,” later in this chapter.) You can also use QStart to switch between programs. See
“QStart” later in this chapter.
NOTE:
Some programs have abbreviated labels for check boxes and drop-down menus. To see
the full spelling of an abbrev iated label, tap and hold the stylus on the label. Drag the sty-
lus off the label so that the command is not carried out.
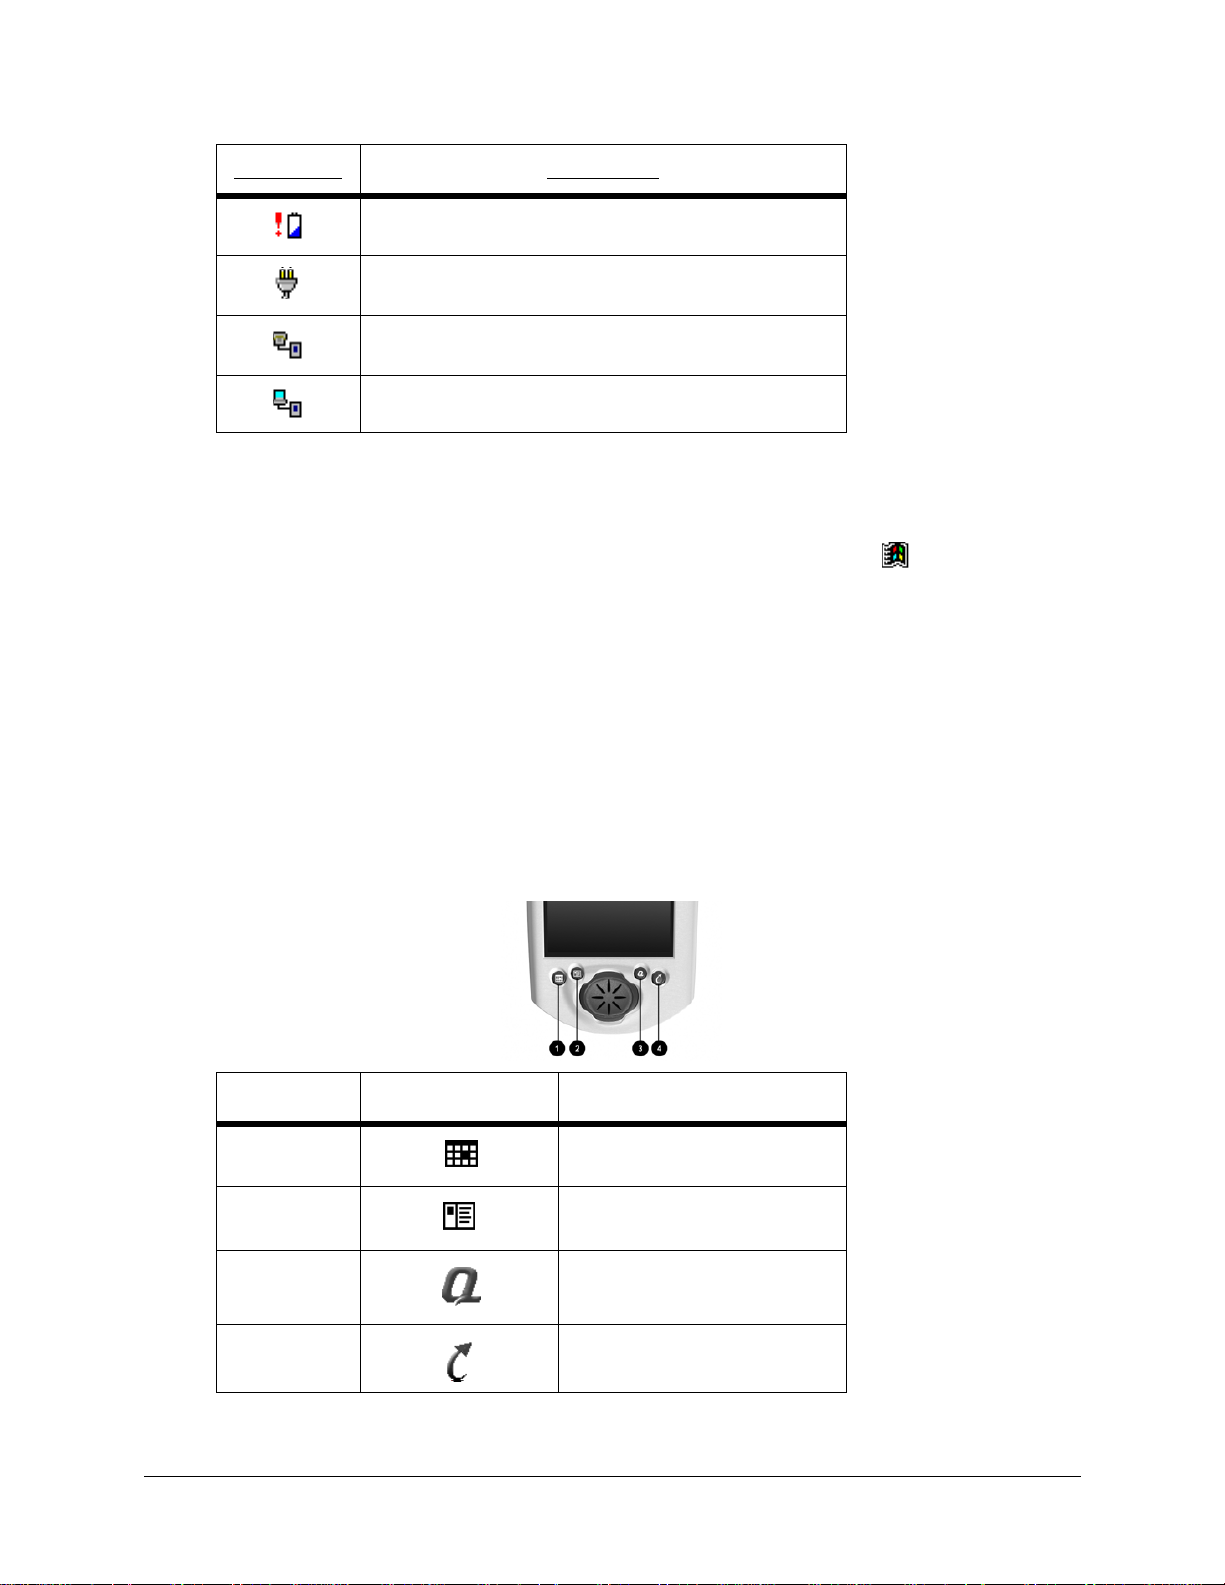
NOTE:
You can also switch to some programs by pressing an application button. Your iPAQ
H3000 has four application buttons located on the front of your iPAQ H3000, and the
Record button located on the side. The following icons on the buttons on the front of the
iPAQ identify the programs they switch to:
Main battery is very low
External (AC) power source is connected
Dial-up connection is active
Direct connection is active
Item Icon Program
1 Calendar
2 Contacts
3 QMenu
4 QStart
Status Icon Description
2-12 Basic Skills
The following table contains a partial list of programs that are on your iPAQ H3000. Look
in the Compaq CD and the Extras folder on the ActiveSync CD for additional programs
that you can install onto your iPAQ H3000..
Icon Program Description
Calendar Keep track of your appointments and
create meeting requests.
Contacts Keep track of your friends and
colleagues.
Inbox Send and receive e-mail messages.
Infrared
Receive
Receive information from another
Windows-powered device.
Internet
Explorer
View Web pages downloaded from
your computer or connect to an ISP
and browse the Web.
Microsoft
Money
Enter and view transactions and check
on your account balances.
Microsoft
Reader
Read or listen to (using Audible)
electronic books on your iPAQ.
Notes Create handwritten or typed notes,
drawings, and recordings.
Picture
Viewer
View bitmap or JPEG images on your
iPAQ.
Pocket
Excel
Create new workbooks or view and
edit Excel workbooks created on your
computer.
Pocket
Word
Create new documents or view and
edit Word documents created on your
computer.
QMenu Activates the QMenu which provides
easy-open programs and quick access
to activities and the QUtilities.
QStart Allows you to quickly access
programs.
Tasks Keep track of your tasks.
Basic Skills 2-13
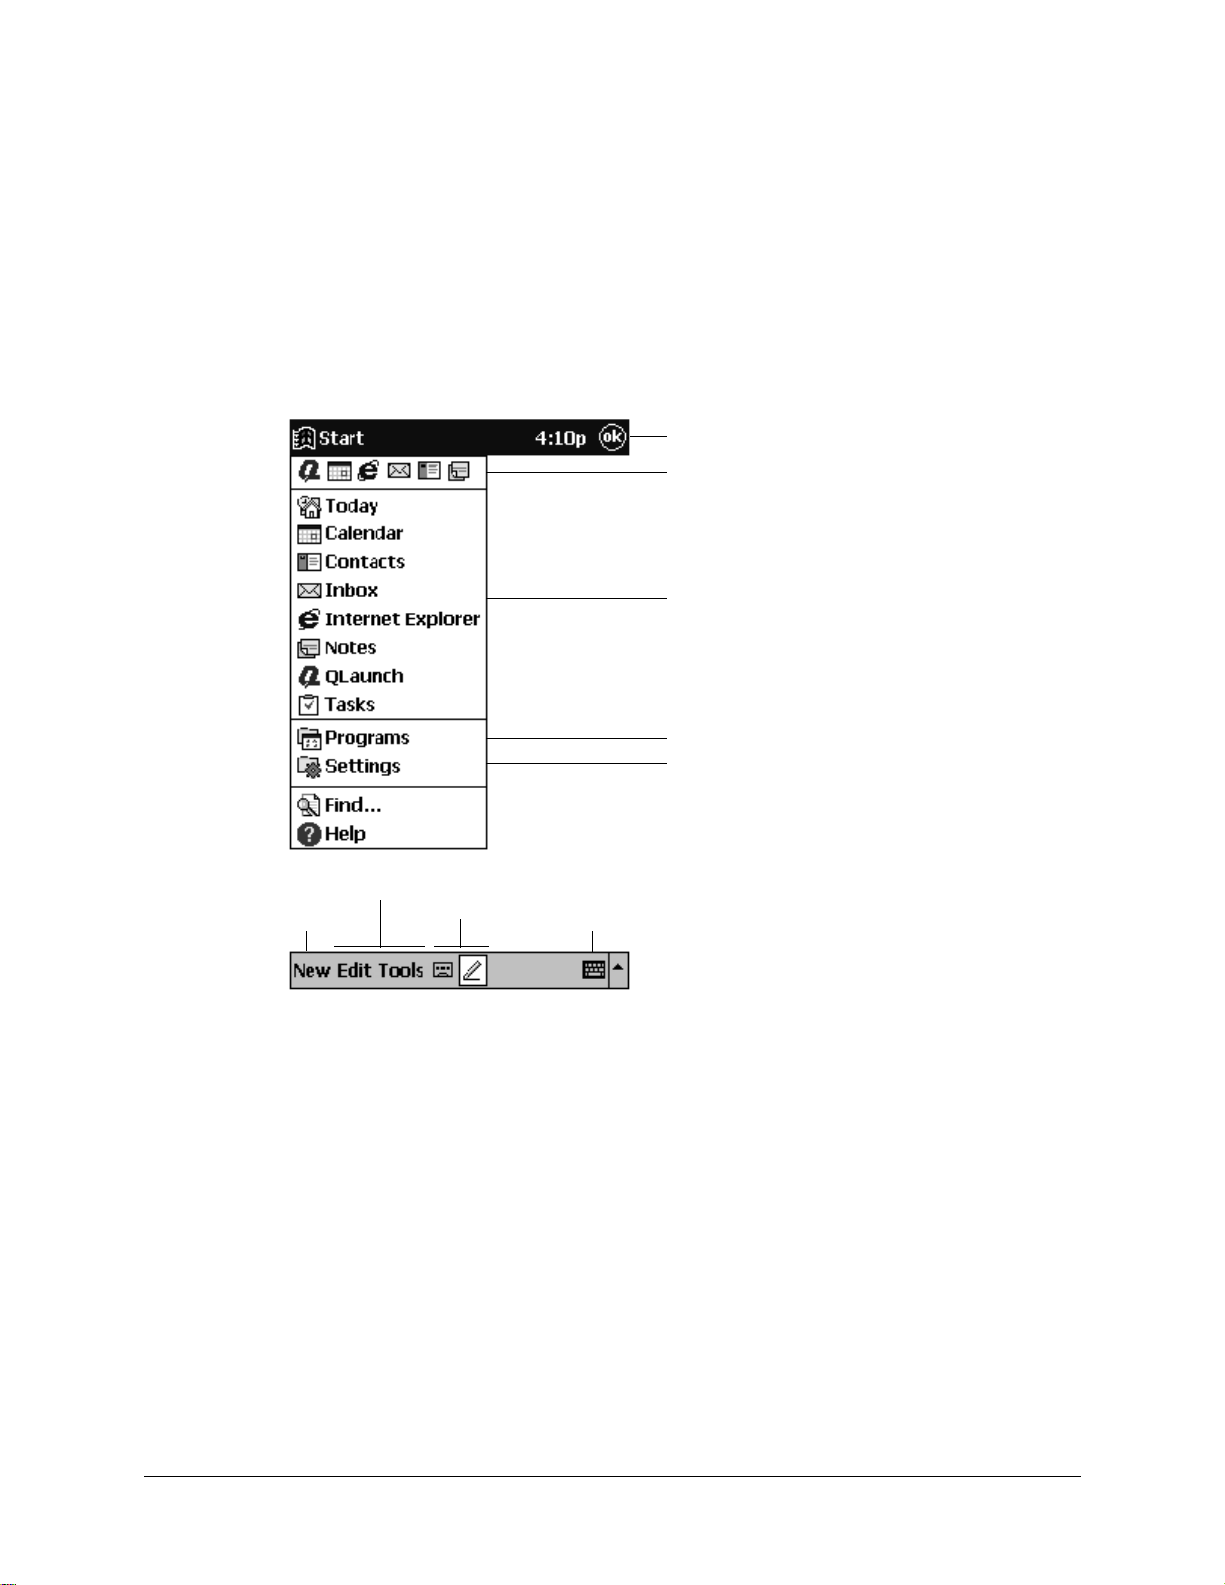
Navigation Bar and Command Bar
The navigation bar is located at the top of the screen and displays the title of the active
program and current time. It also allows you to switch to programs and close screens.
Use the command bar at the bottom of the screen to perform tasks in programs. The com-
mand bar includes menu names, buttons, and the input panel button. To create a new item
in the current program, tap New. To see the name of a button on screen, tap and hold the
stylus on the button. Drag the stylus off the button so that the command is not carried out.
Tap to close the screen.
Tap to select a program.
Tap to select a program.
Tap to see additional programs.
Tap to customize the device.
New button
Menu names
Buttons
Input panel button

2-14 Basic Skills
Pop-up Menus
With pop-up menus, you can quickly choose an action for an item. For example, you can
use the pop-up menu in the contact list to quickly delete a contact, make a copy of a con-
tact, or send an e-mail message to a contact. The actions in the pop-up menus vary from
program to program. To access a pop-up menu, tap and hold the stylus on the item name
that you want to perform the action on. When the menu appears, lift the stylus, and tap the
action you want to perform. Or tap anywhere outside the menu to close the menu without
performing an action.
Notifications
Your iPAQ H3000 reminds you in a variety of ways when you have something to do. For
example, if you’ve set up an appointment in Calendar, a task with a due date in Tasks, or
an alarm in Clock, you’ll be notified in any of the following ways:
• A message box appears on the screen.
• A sound, which you can specify, plays.
• The green alarm light flashes on your iPAQ H3000.
To choose reminder types and sounds for your iPAQ H3000, tap then Settings. In the
Personal tab, tap Sounds & Reminders. The options you choose here apply throughout
your iPAQ H3000.
Tap and hold to display
the pop-up menu.
Lift the stylus and tap
the action you want.
Tap outside the menu to
close it without performing
an action.
Basic Skills 2-15
Enter Information on Your iPAQ
You have several options for entering new information:
• Enter typed text in the input panel by using t he soft keyboard or Character Recognizer.
• Write or draw pictures directly on the screen.
• Speak into your iPAQ H3000 microphone to record a message.
• Synchronize or copy information from your computer to your iPAQ H3000 using
ActiveSync. For more information on ActiveSync, see the booklet accompanying the
ActiveSync CD or ActiveSync Help on your computer.
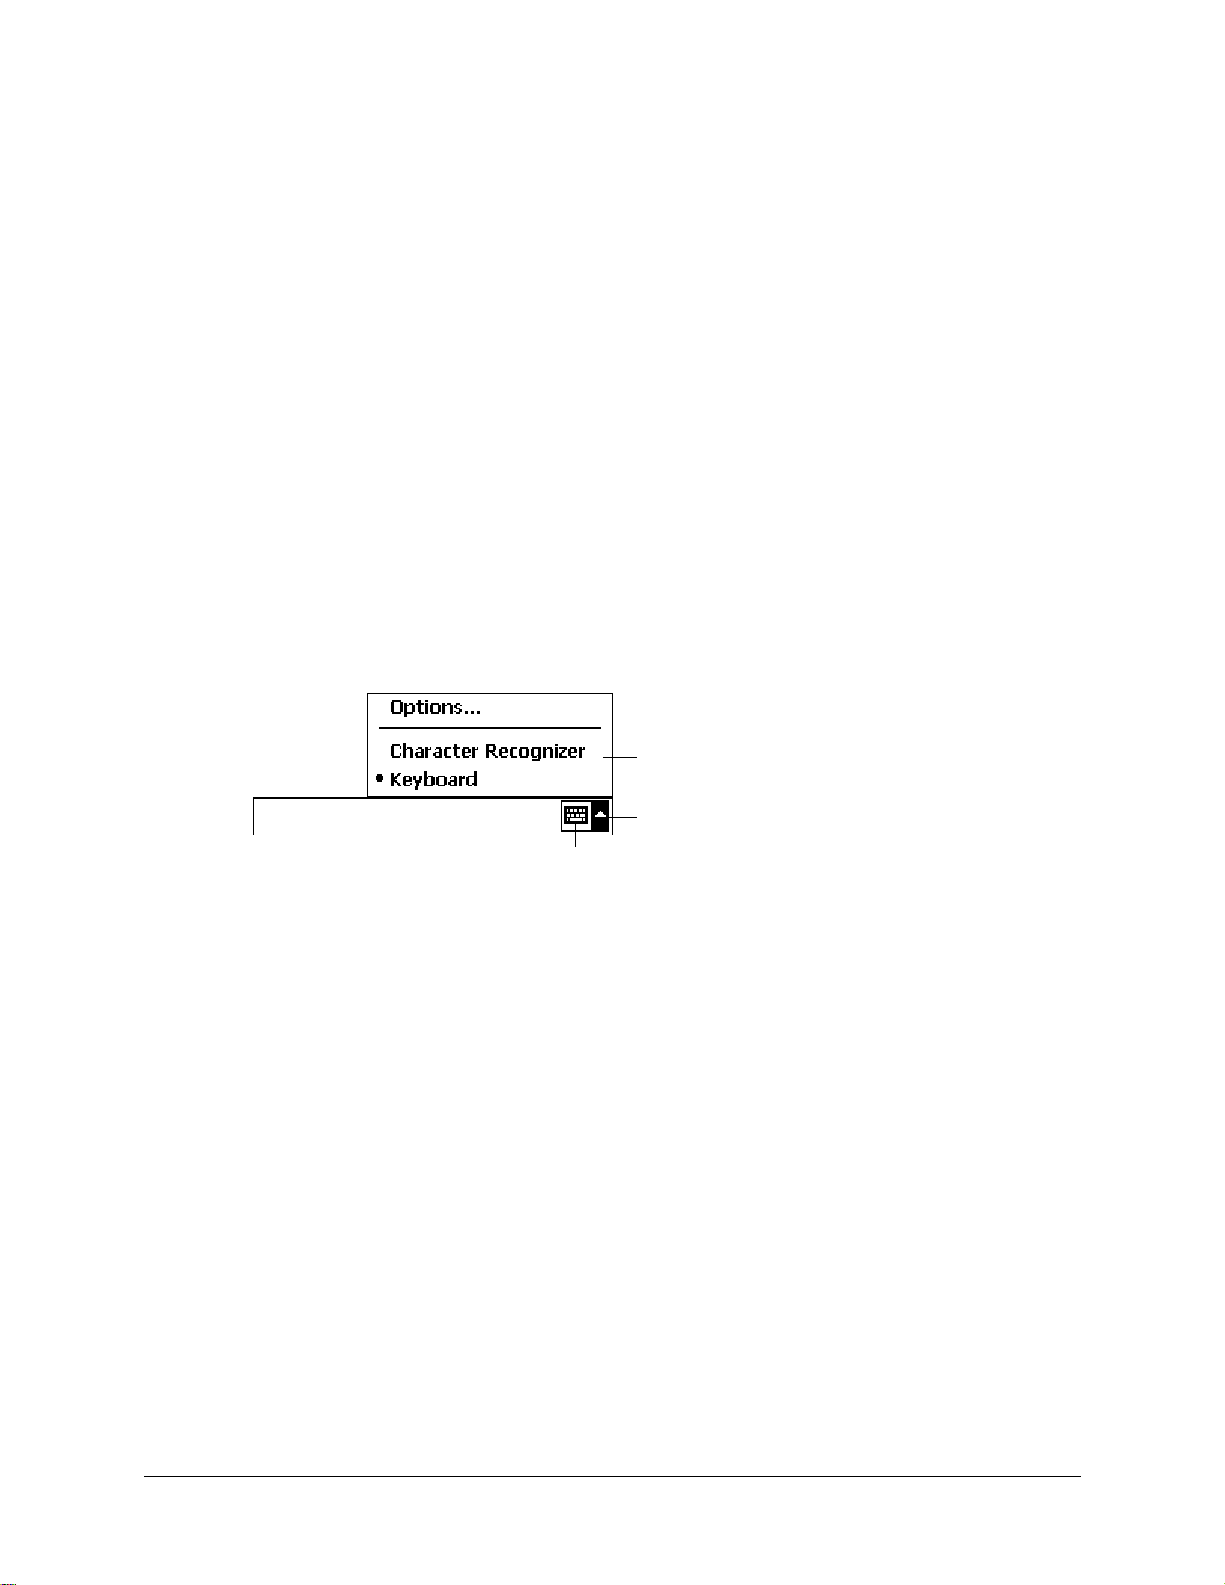
Typing Using the Input Panel
Use the input panel to enter information in any program on your iPAQ H3000. You can
either type using the soft keyboard or write using Character Recognizer . In either case, the
characters appear as typed text on the screen.
Tap the Input Panel button to show or hide the input panel, then tap the arrow next to the
Input Panel button to see your choices.
When you use the input panel, your iPAQ H3000 anticipates the word you are typing or
writing and displays it above the input panel. When you tap the displayed word, it is
inserted into your text at the insertion point. The more you use your iPAQ H3000, the
more words it learns to anticipate.
Select an input method.
Tap to see your choices.
Input panel button
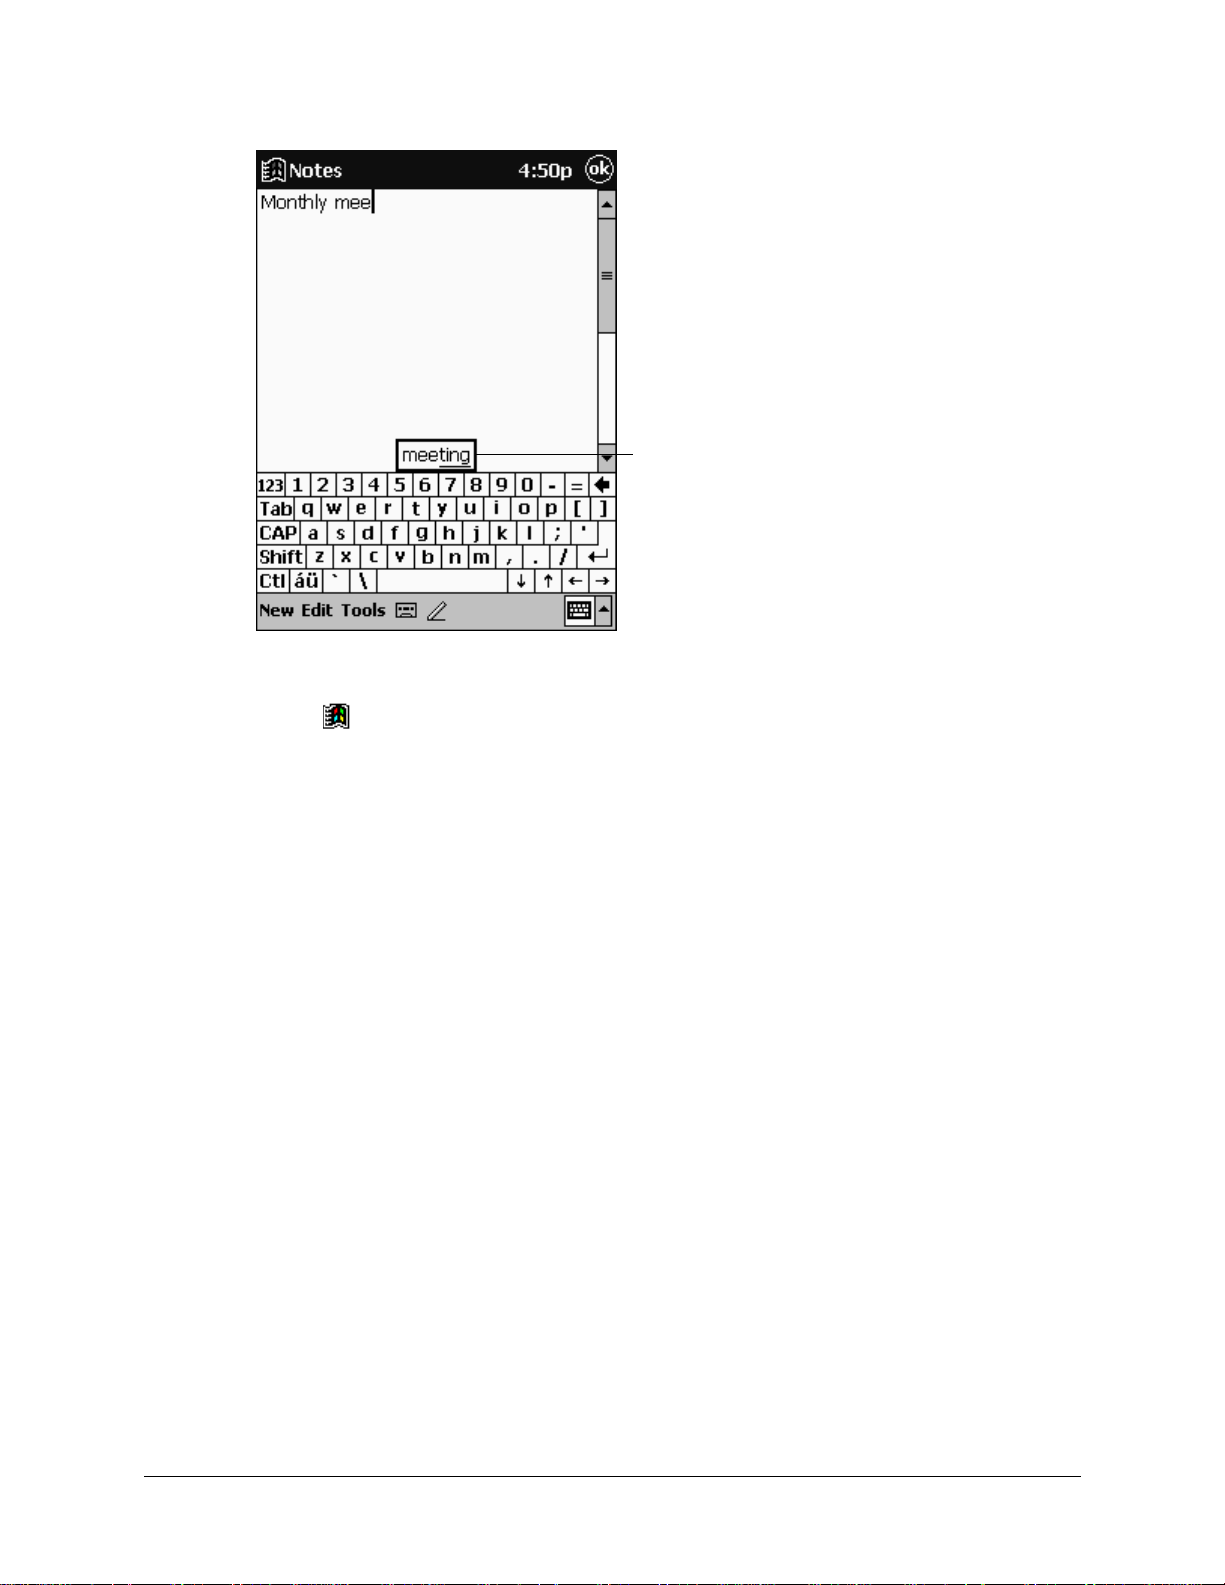
2-16 Basic Skills
NOTE: To change word suggestion options, such as the number of words suggested at one time,
tap , Settings, Personal tab, Input, then the Word Completion tab.
To type with the soft keyboard:
1. Tap the arrow next to the Input Panel button then Keyboard.
2. Tap the keys with your stylus on the soft keyboard that displays.
To use Character Recognizer:
1. Tap the arrow next to the Input Panel button then Character Recognizer.
2. Write a letter in the box.
When you write a letter, it is converted to typed text that appears on the screen. For spe-
cific instructions on using Character Recognizer, see Appendix A.
To select typed text:
If you want to edit or format typed text, you must select it first by dragging the stylus
across the text you want to select.
You can cut, copy, and paste text by tapping and holding the selected words then tapping
an editing command on the pop-up menu, or by tapping the command on the Edit menu.
Tap here if this is
the right word.
Basic Skills 2-17
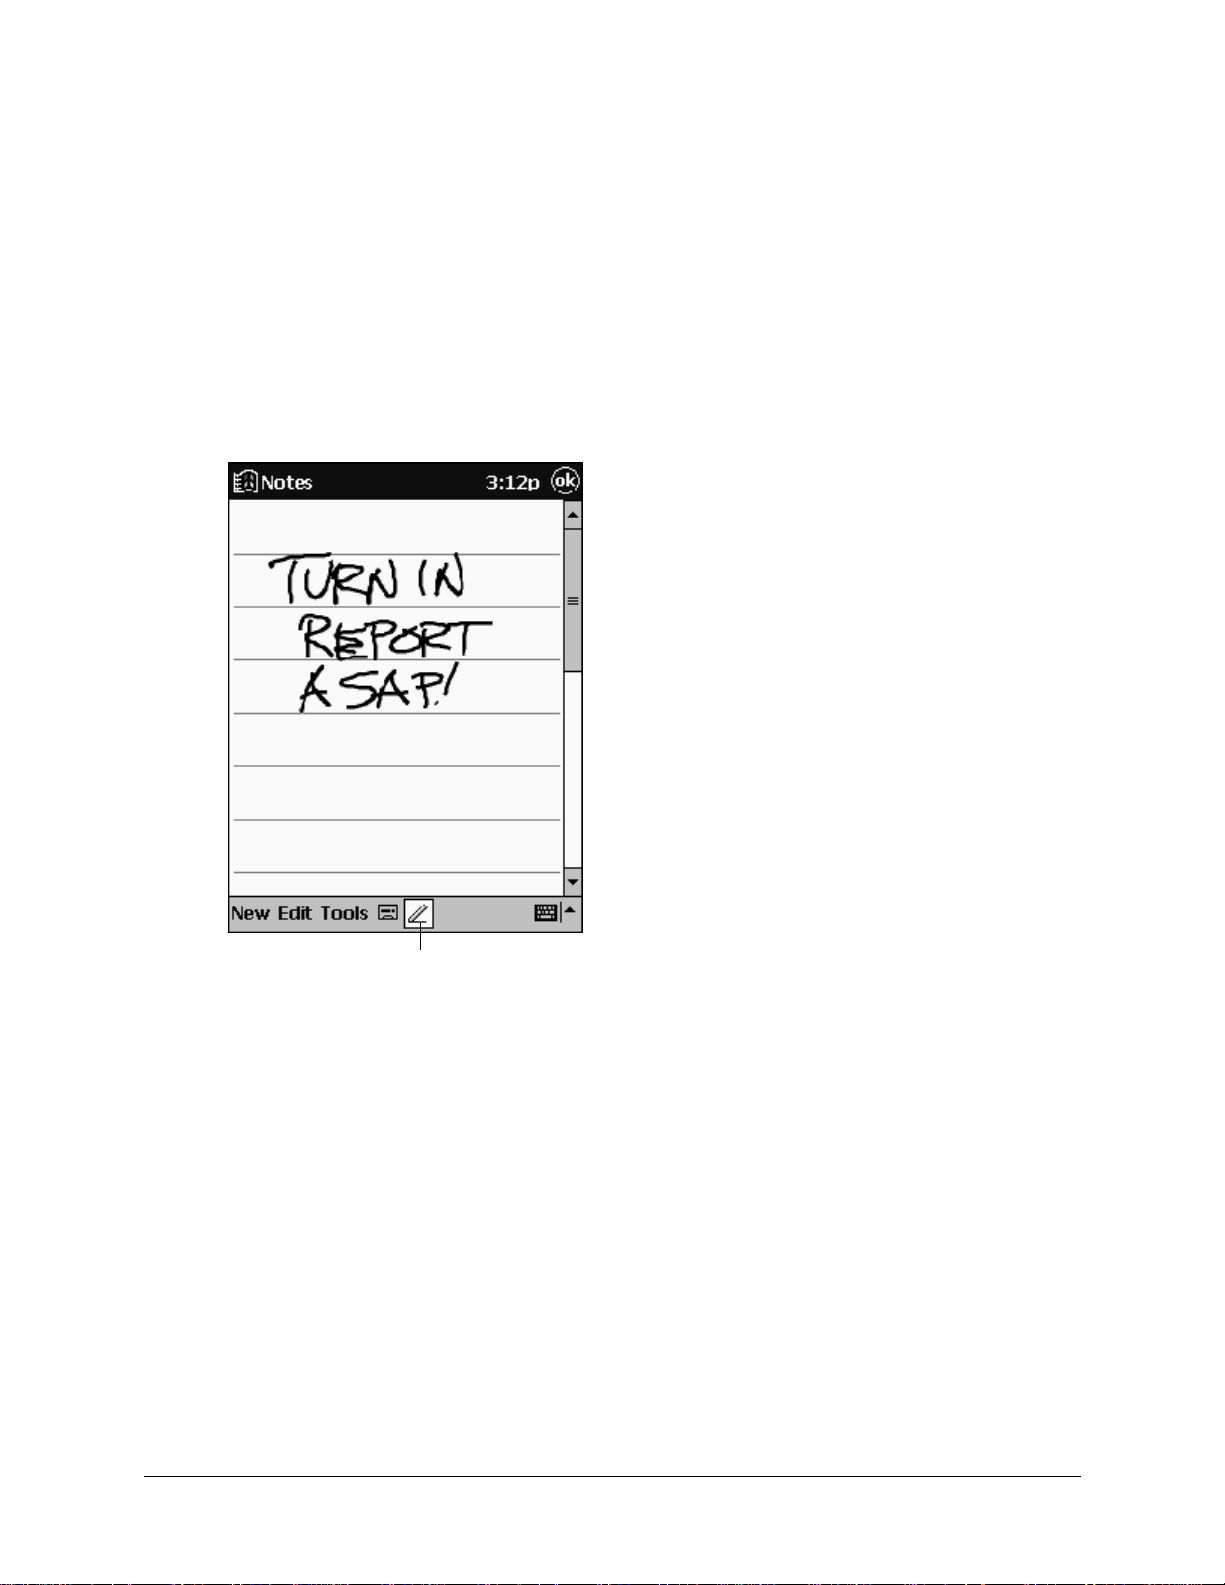
Writing on the Screen
In any program that accepts writing, such as the Notes program and the Notes tab in Cal-
endar, Contacts, and Tasks, you can use your stylus to write directly on the screen. Write
the way you do on paper. You can edit and format what you’ve written and convert the
information to text at a later time.
To write on the screen:
Tap the Pen button to switch to writing mode. This action displays lines on the screen to
help you write.
NOTE: Some programs that accept writing may not have the Pen button. See the documentation
for that program to find out how to switch to writing mode.
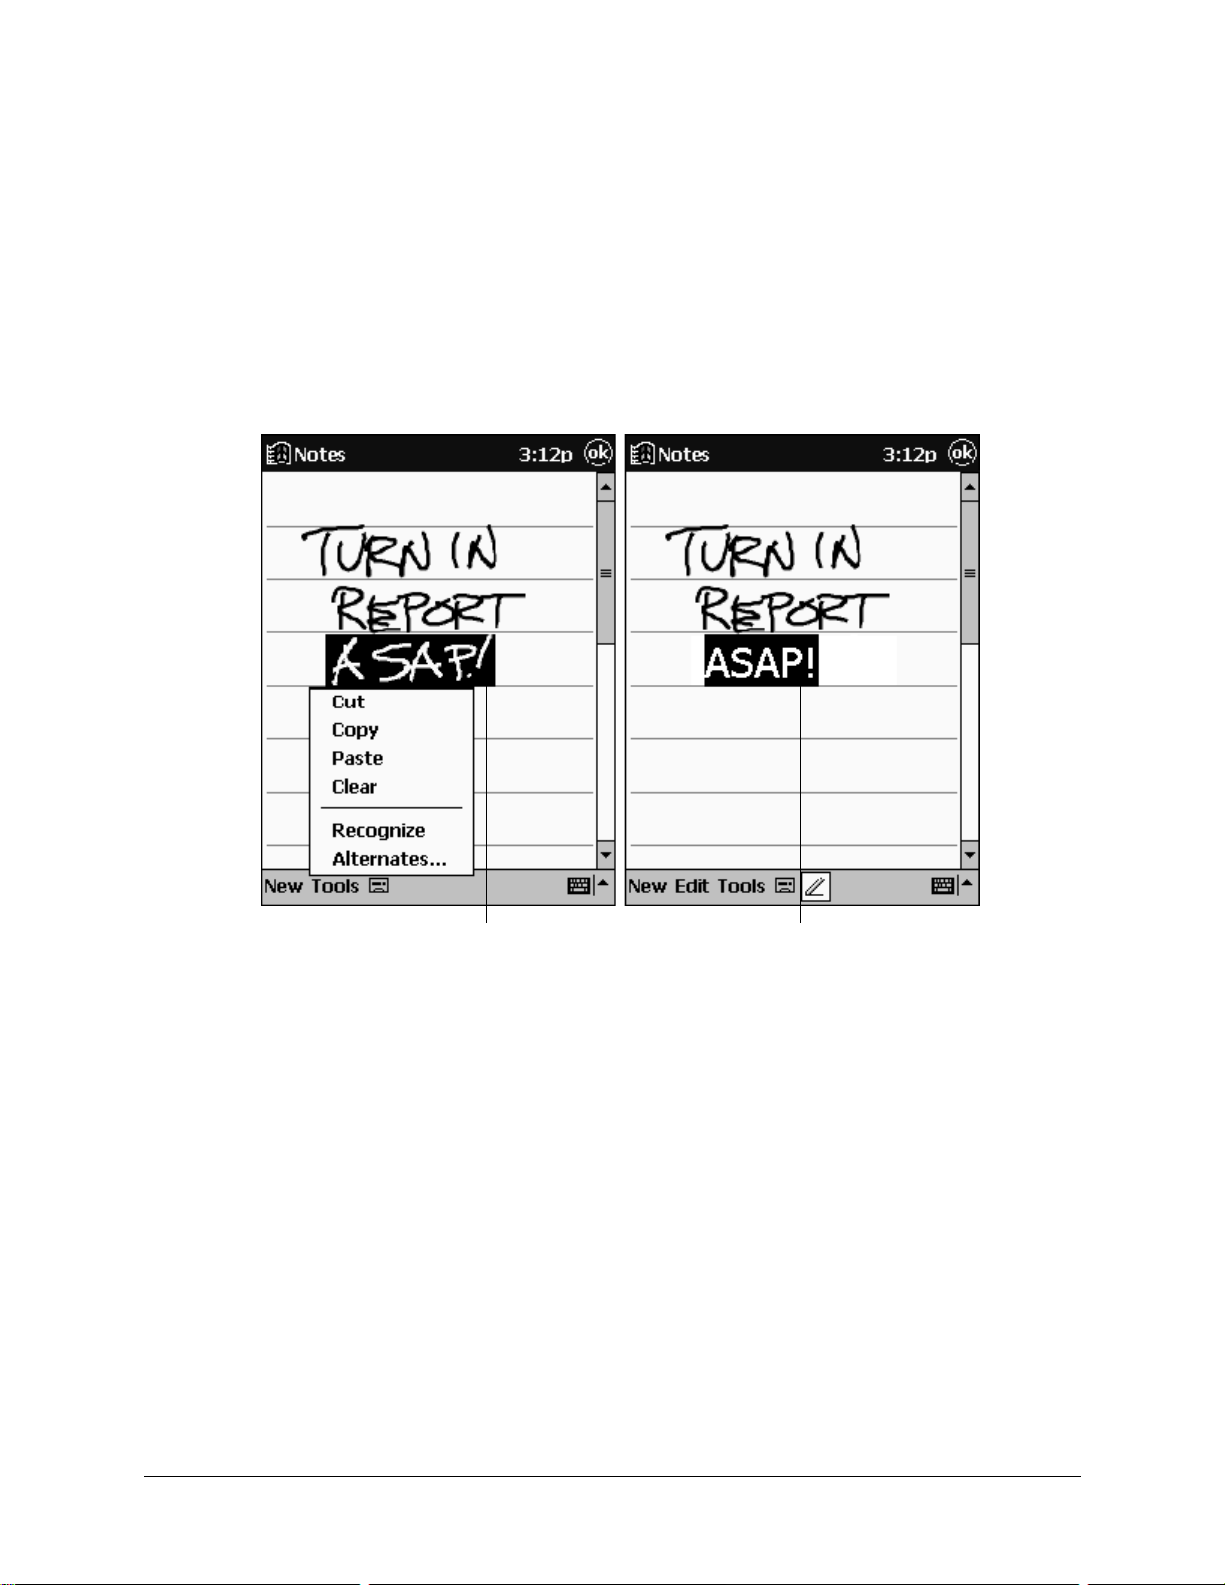
To select writing:
If you want to edit or format writing, you must select it first.
1. Tap and hold the stylus next to the text you want to select until the insertion point
appears.
2. Drag the stylus across the text you want to select without lifting the stylus.
If you accidentally write on the screen, tap Tools then Undo and try again. You can also
select text by tapping the Pen button to deselect it then dragging the stylus across the
screen.
T ap th e P en but ton and us e
your stylus like a pen.
2-18 Basic Skills
You can cut, copy, and paste written text in the same way you work with typed text: tap
and hold the selected words then tap an editing command on the pop-up menu, or tap the
command on the Edit menu.
To convert writing to text:
•Tap Tools then Recognize.
If you want to convert only certain words, select them before tapping Recognize on the
Tools menu (or tap and hold the selected words then tap Recognize on the pop-up menu).
If a word is not recognized, it is left as writing.
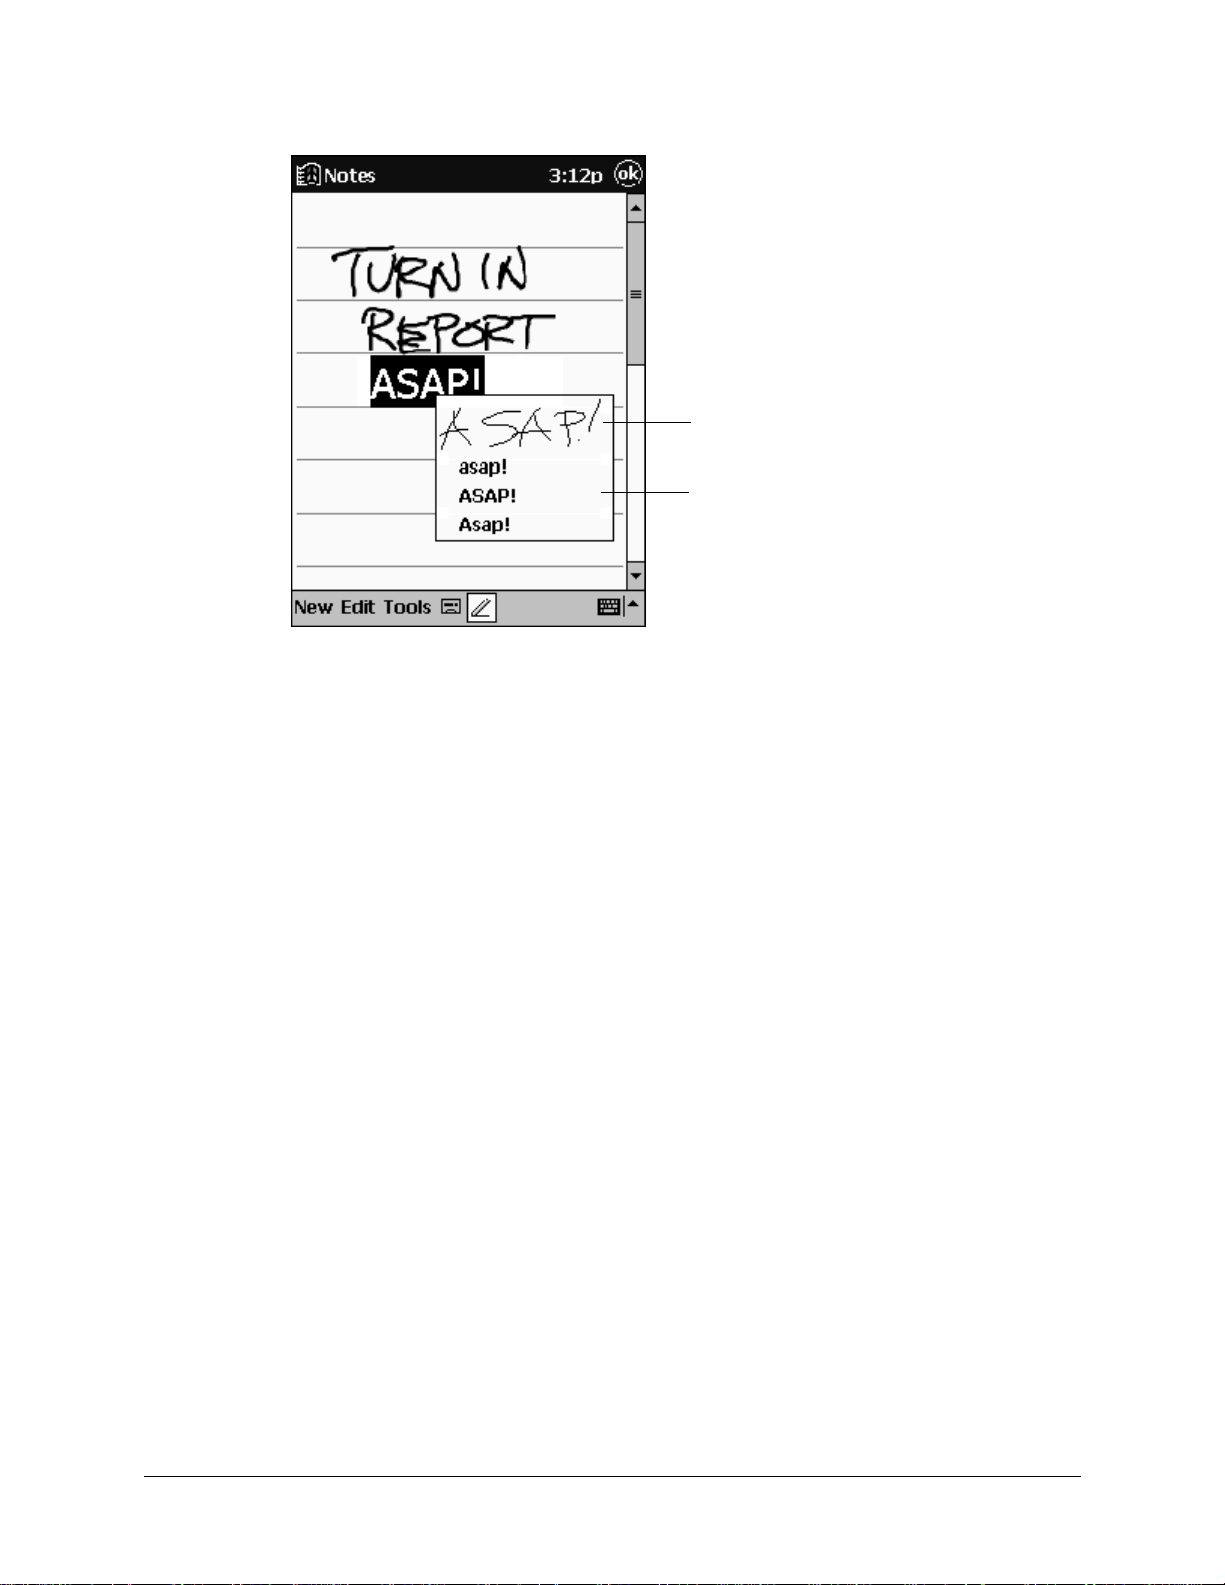
If the conversion is incorrect, you can select different words from a list of alternates or
return to the original writing. To do so, tap and hold the incorrect word (tap one word at a
time). On the pop-up menu, tap Alternates. A menu with a list of alternate words appears.
Tap the word you want to use, or tap the writing at the top of the menu to return to the
original writing.
Select the text you want to
convert and tap Recognize
on the pop-up menu.
The writing is turned into text.
Basic Skills 2-19
Tips for getting good recognition:
• Write neatly.
• Write on the lines and draw descenders below the line. Write the cross of the “t” and
apostrophes below the top line so that they are not confused with the word above.
Write periods and commas above the line.
• For better recognition, try increasing the zoom level to 300% using the Tools menu.
• W rite the letters of a word closely and leave big gaps between words so that your iPAQ
H3000 can easily tell where words begin and end.
• Hyphenated words, foreign words that use special characters such as accents, and
some punctuation cannot be converted.
• If you add writing to a word to change it (such as changing a “3” to an “8”) after you
attempt to recognize the word, the writing you add will not be included if you attempt
to recognize the writing again.
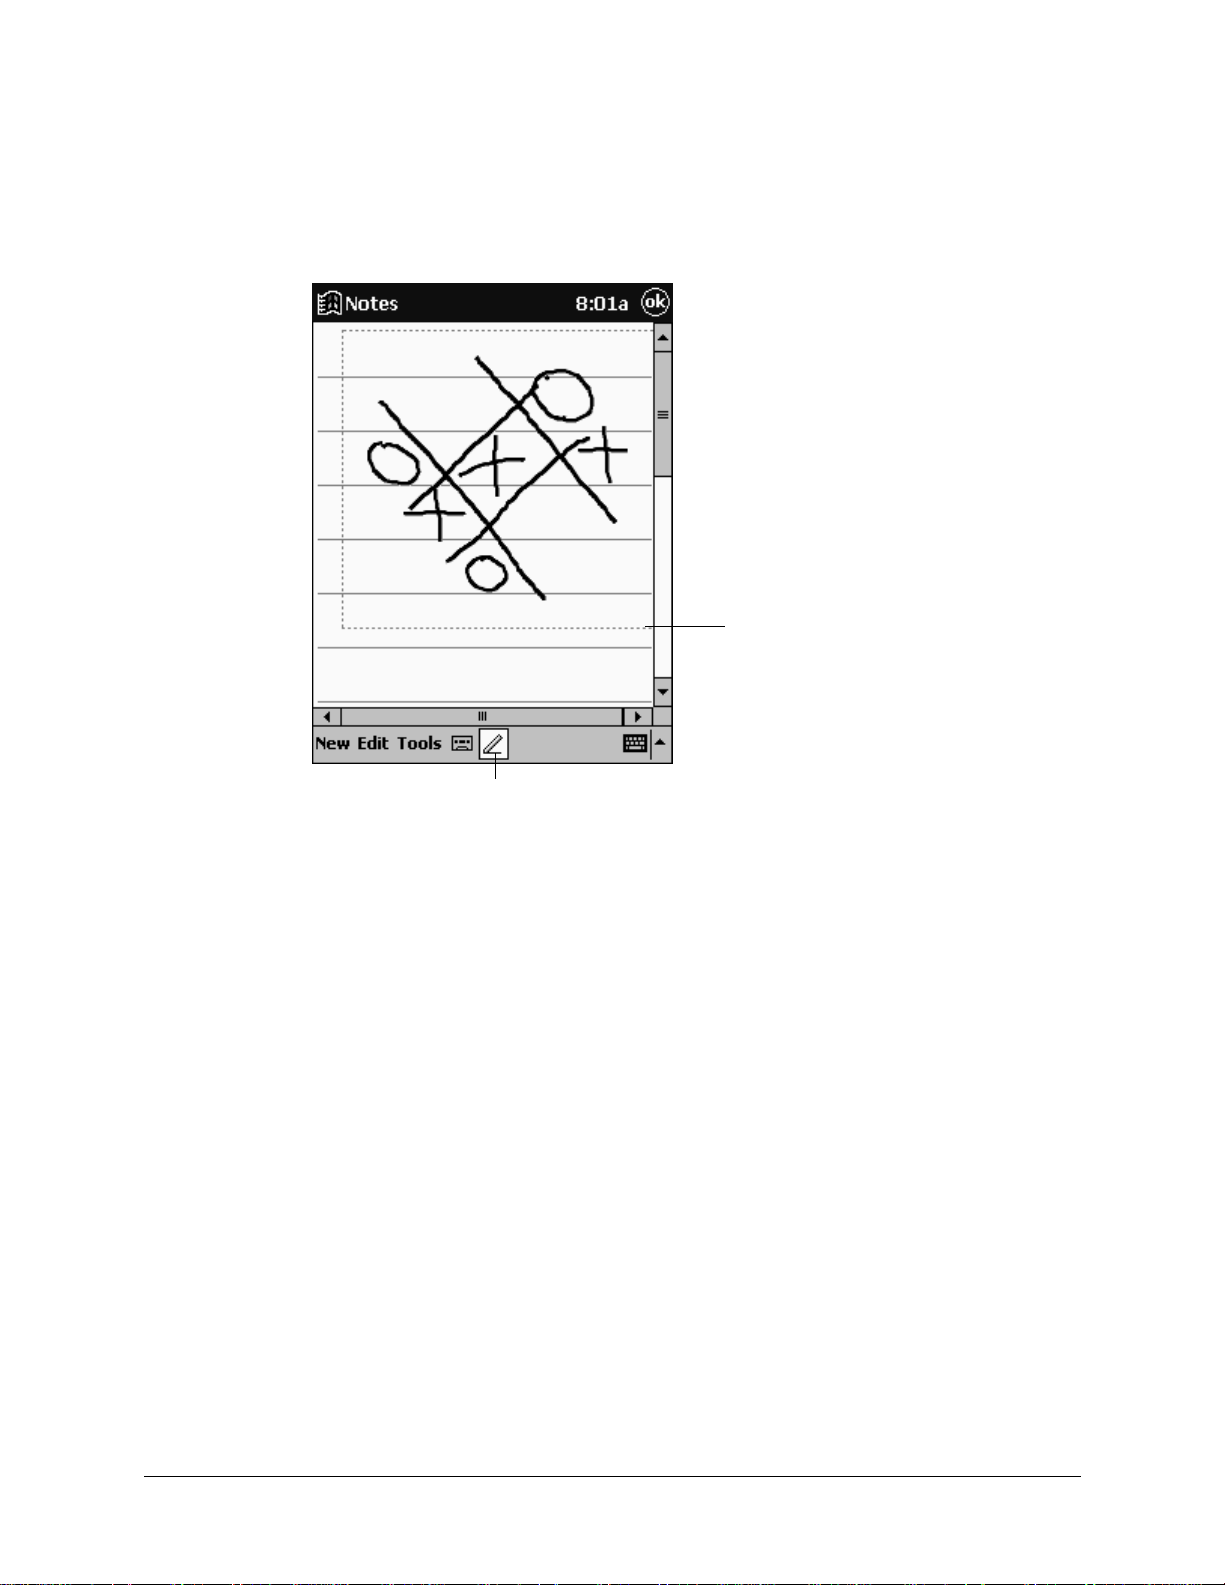
Drawing on the Screen
You can draw on the screen in the same way that you write on the screen. The difference
between writing and drawing on the screen is how you select items and how they can be
edited. For example, selected drawings can be resized, while writing cannot.
Tap to return to your
original writing.
Or, tap the word you
want to use.
2-20 Basic Skills
To create a drawing:
• Cross three ruled lines on your first stroke. A drawing box appears. Subsequent
strokes in or touching the drawing box become part of the drawing. Drawings that do
not cross three ruled lines will be treated as writing.
NOTE: You may want to change the zoom level so that you can more easily work on or view your
drawing. Tap Tools then a zoom level.
To select a drawing:
If you want to edit or format a drawing, you must select it first. Tap and hold the stylus on
the drawing until the selection handle appears. To select multiple drawings, deselect the
Pen button then drag to select the drawings you want.
You can cut, copy, and paste selected drawings by tapping and holding the selected draw-
ing then tapping an editing command on the pop-up menu, or by tapping the command on
the Edit menu. To resize a drawing, make sure the Pen button is not selected and drag a
selection handle.
Recording a Message
In any program where you can write or draw on the screen, you can also quickly capture
thoughts, reminders, and phone numbers by recording a message. In Calendar, Tasks, and
Contacts, you can include a recording in the Notes tab. In the Notes program, you can
either create a stand-alone recording or include a recording in a written note. If you want
to include the recording in a note, open the note first.
The drawing box indicates the
boundaries of the drawing.
Pen button
 Loading...