


© 2008 Hewlett-Packard Development Company, L.P.
Microsoft, Windows, the Windows logo, Outlook, and ActiveSync are trademarks of Microsoft Corporation in the U.S. and other countries.
HP iPAQ Products are Powered by Microsoft® Windows Mobile™ 5.0 software for Pocket PC.
SD Logo is a trademark of its proprietor.
Bluetooth® is a trademark owned by its proprietor and used by Hewlett-Packard Development Company, L.P. under license.
Hewlett-Packard Development Company, L.P. shall not be liable for technical or editorial errors or omissions contained herein. The information is provided “as is” without warranty of any kind and is subject to change without notice. The warranties for Hewlett-Packard products are set forth in the express limited warranty statements accompanying such products. Nothing herein should be construed as an additional warranty.
This document contains proprietary information that is protected by copyright. No part of this document may be photocopied, reproduced, or translated to another language without the prior written consent of Hewlett-Packard Development Company, L.P.
Text set off in this manner indicates that failure to follow directions could result in damage to equipment or loss of information.
HP iPAQ Product Information Guide
Third Edition (January 2008)
NOTE: Use of dial-up and wireless Internet, e-mail, corporate networks, and other wireless communications, such as Bluetooth-enabled devices, might require separately purchased additional hardware and other compatible equipment, in addition to a standard Wi-Fi infrastructure and a separately purchased service contract. Check with your service provider for availability and coverage in your area. Not all Web content may be available. Some Web content might require installation of additional software.
When you see a ¹ in this document, it refers to the above note.

Table of contents |
|
Product Information Guide |
|
Welcome ............................................................................................................. |
1 |
Frequently Asked Questions ............................................................................... |
1 |
Finding More Information .................................................................................... |
2 |
Front Components ............................................................................................... |
4 |
Top, Back, Side Panel Components ................................................................... |
6 |
Bottom Panel Components ................................................................................. |
8 |
HP Desktop Cradle .............................................................................................. |
8 |
Locating What is On The Getting Started Disc .................................................... |
9 |
Entering Owner Information .............................................................................. |
10 |
Customizing the HP iPAQ ................................................................................. |
10 |
Changing the Regional Settings ........................................................................ |
10 |
Finding the Product ID and Serial Number ........................................................ |
11 |
Resetting Your HP iPAQ ................................................................................... |
12 |
Performing a Soft Reset ............................................................................ |
12 |
Performing a Hard Reset .......................................................................... |
12 |
Performing a Clean Reset ......................................................................... |
12 |
Synchronizing with a Computer ......................................................................... |
13 |
Synchronizing with Multiple Computers ............................................................ |
15 |
Changing What Is Synchronized ....................................................................... |
16 |
Copying (or Transferring) Files .......................................................................... |
16 |
Today Screen .................................................................................................... |
17 |
TodayPanel Lite ................................................................................................ |
17 |
Status Icons ....................................................................................................... |
19 |
Changing the Screen from Portrait to Landscape Mode ................................... |
20 |
Entering Text ..................................................................................................... |
21 |
Microsoft Programs ........................................................................................... |
22 |
Windows Media Player 10 Mobile ............................................................. |
22 |
Internet Explorer Mobile ............................................................................ |
23 |
PowerPoint Mobile .................................................................................... |
23 |
Word Mobile .............................................................................................. |
24 |
iii

Excel Mobile .............................................................................................. |
24 |
Accessing Calendar .......................................................................................... |
25 |
Accessing Contacts ........................................................................................... |
25 |
Writing a Note .................................................................................................... |
26 |
Creating a Task ................................................................................................. |
26 |
Different Ways to Access E-mail Messages ...................................................... |
27 |
Composing and Sending Messages .................................................................. |
27 |
Replying to or Forwarding a Message ............................................................... |
28 |
HP Image Zone ................................................................................................. |
28 |
HP ProtectTools ................................................................................................ |
29 |
Turning HP ProtectTools On or Off ................................................................... |
29 |
Changing your Password .................................................................................. |
30 |
Bluetooth ........................................................................................................... |
30 |
Turning Bluetooth On or Off .............................................................................. |
31 |
Wi-Fi .................................................................................................................. |
31 |
Turning Wi-Fi On or Off ..................................................................................... |
32 |
Using Expansion Cards ..................................................................................... |
32 |
Battery Saving Tips ........................................................................................... |
33 |
Protecting the HP iPAQ Screen from Cracking or Damage .............................. |
34 |
Obtaining Services for a Cracked or Damaged Screen .................................... |
35 |
Traveling with Your HP iPAQ ............................................................................ |
35 |
Index ......................................................................................................................... |
36 |
iv

Product Information Guide
Welcome
Congratulations on purchasing your HP iPAQ hx2000 Pocket PC series. Use this guide to help you set up your HP iPAQ and to learn how it works.
Your HP iPAQ includes the new Microsoft® Windows Mobile™ Version 5.0 for Pocket PC software. The features include:
●ActiveSync 4.5 (the most current synchronization software for faster management and transfer of information on your PC)
●Improved productivity
●Faster access to e-mail and information
●New Office Mobile Suite
●Integrated Multimedia (Windows Media Player 10 Mobile)
●Persistent Store (Reduces the risk of data loss)
●MSN (Permits one-click access to MSN Hotmail and MSN Messenger)
●Microsoft Internet Mobile to browse the Web and download pages through synchronization or when connected to the Internet.¹
Enjoy using the new features on this product. Use this guide to set up and begin using your HP iPAQ.
Frequently Asked Questions
How Do I...? |
Find information here... |
|
|
Install Microsoft ActiveSync and create an |
Synchronizing with a Computer, page 13 |
ActiveSync partnership? |
|
|
|
Locate the product ID and serial, number for |
Finding the Product ID and Serial Number, |
my HP iPAQ? |
page 10 |
|
|
Enter text on my HP iPAQ screen? |
Entering Text, page 21 |
|
|
Perform a soft, hard, or clean reset? |
Resetting Your HP iPAQ, page 11 |
|
|
1

How Do I...? |
Find information here... |
|
|
Monitor system resources quickly? |
TodayPanel Lite, page 18 |
|
|
Set up security on my HP iPAQ? |
HP ProtectTools, page 30 |
|
|
Use wireless connections? |
Bluetooth, page 31 |
|
Wi-Fi, page 32 |
|
|
Copy files from my computer to my |
Copying (or Transferring) Files, page 16 |
HP iPAQ? |
|
|
|
Conserve battery power? |
Battery Saving Tips, page 34 |
|
|
Protect my HP iPAQ from screen or damage |
Protecting the HP iPAQ Screen from |
and cracking? |
Cracking or Damage, page 35 |
|
|
Finding More Information
for information on... |
see this source... |
|
|
Using your HP iPAQ |
Additional Product Information on the Getting |
|
Started disc. |
|
|
Connecting to and synchronizing with a |
ActiveSync Help on your computer. To view |
computer |
Help, start ActiveSync, then click Help > |
|
Microsoft ActiveSync Help. |
|
|
Troubleshooting ActiveSync connections |
ActiveSync Troubleshooting on your |
|
computer. From ActiveSync, click Help > |
|
Microsoft ActiveSync Help > |
|
Troubleshooting. |
|
|
Programs that are on your HP iPAQ |
Getting Started disc and Help located on the |
|
HP iPAQ. From the Start menu, tap Help. |
|
|
Additional programs that can be installed on |
Getting Started disc or |
your HP iPAQ |
http://www.microsoft.com/ mobile/pocketpc/ |
|
downloads. |
|
|
Updates on Windows-powered devices |
http://www.microsoft.com/pocketpc |
|
|
2

for information on... |
see this source... |
|
|
Safety precautions |
Important Safety Information on the Getting |
|
Started disc. |
|
|
Warranty information |
http://www.hp.com/go/handheldwarranty |
|
|
Accessory products |
http://www.hp.com/go/ipaqaccessories |
|
|
For customer support |
http://www.hp.com/support |
|
|
Worldwide telephone support phone |
http://www.hp.com/country/us/en/ |
numbers |
|
|
|
3

Front Components
|
Component |
Function |
|
|
|
(1) |
Flip Cover |
Protect the screen. Lift the |
|
|
flip cover before tapping on |
|
|
the screen |
|
|
|
(2) |
Power button |
Turn unit on and off |
|
|
|
(3) |
Speaker |
Listen to notes or music |
|
|
|
(4) |
iTask button |
Open, close, and switch |
|
|
between applications, run |
|
|
utilities, and change settings |
|
|
|
(5) |
Messaging button |
Access your Inbox for |
|
|
sending and receiving e-mail |
|
|
iPAQ Wireless*: Launch |
|
|
iPAQ Wireless application |
|
|
|
4

|
Component |
Function |
|
|
|
|
|
(6) |
5-Way Navigation button |
Scroll through a list and push |
|
|
|
to select (similar to using a |
|
|
|
joystick) |
|
|
|
|
|
(7) |
Contacts |
Display a list of your contacts |
|
|
|
from the category you select |
|
|
|
HP ProtectTools*: Launch |
|
|
|
security application |
|
|
|
|
|
(8) |
Calendar |
Schedule appointments, set |
|
|
|
reminders, or view your |
|
|
|
calendar |
|
|
|
Landscape/Portrait*: Switch |
|
|
|
between landscape and |
|
|
|
portrait display modes |
|
|
|
|
|
(9) |
Microphone |
Speak into the microphone |
|
|
|
to record notes |
|
|
|
|
|
(10) |
Biometric Fingerprint |
Authenticate access to your |
|
|
Reader |
device |
|
|
|
|
|
(11) |
Charge/Notification LED |
Charge/Notification LED |
|
|
indicator |
indicator: |
|
|
|
● |
LED off = not charging |
|
|
|
or no notifications |
|
|
● |
Amber flash = charging |
|
|
● |
Green flash = one or |
|
|
|
more notification |
|
|
|
events have occurred |
|
|
● |
Amber solid = charging |
|
|
|
complete |
|
|
|
|
(12) |
Wireless LED indicator |
Wireless LED indicator: |
|
|
|
● |
LED off = Wi-Fi and |
|
|
|
Bluetooth are both off |
|
|
● |
Blue flash = Wi-Fi and/ |
|
|
|
or Bluetooth are on |
|
|
|
|
5
*To access this function, press and hold for two seconds.
 NOTE: Not all models or features available in all regions.
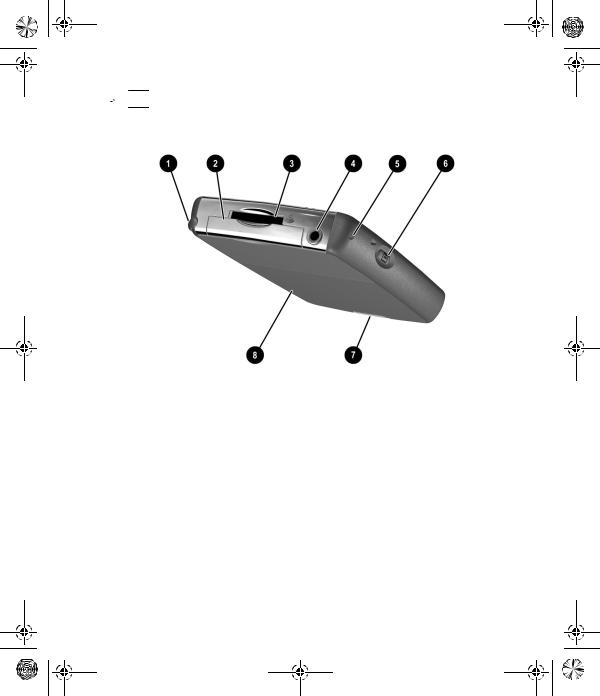
Top, Back, Side Panel Components
|
Component |
Function |
|
|
|
(1) |
Stylus |
Use to input information. |
|
|
Slide up to remove, slide |
|
|
down to replace |
|
|
|
(2) |
Type II Compact Flash (CF) |
Supports CF Type I or Type |
|
slot |
II expansion card |
|
|
|
(3) |
Secure digital expansion slot |
Supports Secure Digital (SD) |
|
|
and MMC memory cards and |
|
|
SDIO expansion card |
|
|
|
(4) |
3.5 mm stereo headphone/ |
Supports standard 3.5 mm |
|
headset jack |
headphones or headsets |
|
|
|
6

|
Component |
Function |
|
|
|
(5) |
Removable flip cover hinge |
Connects the removable flip |
|
|
cover to the HP iPAQ |
|
|
|
(6) |
Record button |
Record voice or sound |
|
|
|
(7) |
Battery door release latch |
Pull down to release battery |
|
|
door |
|
|
|
(8) |
Battery cover |
Remove to install or remove |
|
|
the battery |
|
|
|
 NOTE: Not all models or features available in all regions.
7
Bottom Panel Components
|
Component |
Function |
|
|
|
(1) |
Reset button |
Push the stylus into this hole |
|
|
for a soft reset of your |
|
|
HP iPAQ |
|
|
|
(2) |
Universal sync connector |
Connects to HP desktop |
|
|
cradle, AC adapter, and USB |
|
|
synchronization cable |
|
|
|
HP Desktop Cradle
The HP desktop cradle connects to the HP iPAQ for charging and/or synchronizing. It serves also as a recommended home for your HP iPAQ when it is not in use. (The HP desktop cradle is not included with all models.)
8

Locating What is On The Getting Started Disc
The Getting Started disc includes:
●Windows Mobile™ Version 5.0 for Pocket PC software
●Microsoft ActiveSync 4.5
●Microsoft Outlook 2002
●Additional Product Information
●Important Safety Information
All software and documents are designed to be installed on your personal computer to enhance your ability to use your HP iPAQ to its full potential. The disc also contains HP iPAQ enhancements that you can install directly onto your device for use “on the go.”¹
 NOTE: All current Microsoft operating systems are supported by Microsoft ActiveSync 4.5, except Windows 98SE and Windows ME.
9

Entering Owner Information
Be sure to enter your owner information so your HP iPAQ can be returned to you in case it is lost.
1.Tap Start > Settings > Personal > Owner Information.
2.On the Identification tab, enter your personal information.
TIP: If owner information is displayed on the Today screen, you can open and edit the information directly from the Today screen. Just tap that section of the screen.
Customizing the HP iPAQ
To get detailed information:
Tap Start > Settings > System > About.
The Version tab displays important device information, including the type of processor and the amount of memory installed.
The device name is used to identify the HP iPAQ in the following situations:
●Synchronizing with a computer
●Connecting to a network ¹

 NOTE: If you synchronize multiple devices with the same computer, each device must have a unique name.
To change the device name:
1.Tap Start > Settings > System > About.
2.Tap the Device ID tab.
3.Enter a name. The device name must begin with a letter, consist of letters from A to Z, numbers from 0 to 9, and cannot contain spaces.
Changing the Regional Settings
The style in which numbers, currency, dates, and times are displayed is specified in regional settings.
10

To change the regional settings:
1.Tap Start > Settings > System tab > Regional Settings.
2.Tap the Region tab.
3.Select your region.
The region you select determines which options will be available on the other tabs.
4.To customize additional settings, tap the appropriate tabs and select the options you want.
To change the date and time display, follow steps 1 through 3 above then perform one of the following:
●On the Time tab, select the time display options you want.
●On the Date tab, select the date display options you want.
Finding the Product ID and Serial Number
You can find the Product ID and Serial Number for your HP iPAQ in the Asset Viewer program or on the label underneath the battery. Please have this information available before contacting HP Customer Support, particularly if you are calling for in-warranty support.
To use Asset Viewer to locate the Product ID and Serial Number:
1.Tap Start > Settings > System tab > HP Asset Viewer.
2.To locate the Product ID, tap System.
3.To locate the Serial Number, tap Identity.
To locate only the Serial Number on the HP iPAQ (without removing the battery):
1.Remove the battery cover.
2.Locate the label containing the Serial Number next to the battery. To locate the Product ID and Serial Number on the HP iPAQ:
1.Remove the battery cover.
2.Remove the battery from the unit.
3.Locate the label containing the Product ID and Serial Number underneath the battery.
11
 Loading...