


 Loading...
HP iPAQ
Product Guide

© Copyright 2008 Hewlett-Packard
Development Company, L.P.
HP iPAQ products are powered by Microsoft® Windows Mobile® 6.0 Classic with Messaging and Security Feature Pack.
Microsoft Windows, the Windows logo, Outlook, and ActiveSync/Windows Mobile Device Center are trademarks of Microsoft Corporation in the U.S. and other countries.
TM
SD Logo is a trademark of its
proprietor.
Bluetooth® is a trademark owned by its proprietor and used by Hewlett-Packard Development Company, L.P. under license.
All other product names mentioned herein may be trademarks of their respective companies.
Hewlett-Packard Company shall not be liable for technical or editorial errors or omissions contained herein. The information is provided ”as is” without warranty of any kind and is subject to change without notice. The warranties for Hewlett-Packard products are set forth in the express limited warranty statements accompanying such products. Nothing herein should be construed as an additional warranty.
This document contains proprietary information that is protected by copyright. No part of this document may be photocopied, reproduced, or translated to another language without the prior written consent of Hewlett-Packard Development Company, L.P.
Second Edition January 2008
Document Part Number: 461290-002

Table of contents
1 Register your HP iPAQ |
|
2 Box contents |
|
3 Components |
|
Front panel components ....................................................................................................................... |
3 |
Top and bottom panel components ...................................................................................................... |
4 |
Left and right side components ............................................................................................................ |
5 |
Back panel components ....................................................................................................................... |
5 |
4 Set up your HP iPAQ |
|
Step 1: Remove the battery cover ........................................................................................................ |
7 |
Step 2: Install the battery and replace the battery cover ...................................................................... |
7 |
Step 3: Charge the battery ................................................................................................................... |
8 |
Step 4: Turn on your HP iPAQ ............................................................................................................. |
9 |
Protect your HP iPAQ with a password ................................................................................................ |
9 |
Find the serial and model number ........................................................................................................ |
9 |
View status icons .................................................................................................................................. |
9 |
5 Learn the basics |
|
The Today screen .............................................................................................................................. |
11 |
Use TodayPanel Lite .......................................................................................................................... |
11 |
Battery saving tips .............................................................................................................................. |
12 |
The 5–Way Navigation key ................................................................................................................ |
12 |
Lock and unlock your HP iPAQ .......................................................................................................... |
12 |
Enter text ............................................................................................................................................ |
13 |
Shortcut menus .................................................................................................................................. |
13 |
Enter owner information ..................................................................................................................... |
13 |
Perform a soft reset ............................................................................................................................ |
14 |
Perform a hard reset .......................................................................................................................... |
14 |
View the Operating System (OS) information .................................................................................... |
14 |
Change the device name ................................................................................................................... |
14 |
Change the regional settings .............................................................................................................. |
14 |
Adjust the volume ............................................................................................................................... |
15 |
Change power management settings ................................................................................................. |
15 |
Dim or adjust brightness of the backlight ........................................................................................... |
15 |
Install and remove programs .............................................................................................................. |
16 |
Open and close programs .................................................................................................................. |
16 |
Set alarms and clocks ........................................................................................................................ |
16 |
Display the clock in title bar ................................................................................................................ |
17 |
Adjust the speed for scrolling through items in a list .......................................................................... |
17 |
iii
6 Connections |
|
WLAN ................................................................................................................................................. |
18 |
WLAN terms ...................................................................................................................... |
18 |
Automatically connect to a WLAN network ........................................................................ |
19 |
Manually connect to a WLAN network ............................................................................... |
19 |
Find an IP address ............................................................................................................. |
20 |
Delete a wireless network .................................................................................................. |
20 |
Configure the 802.1x authentication settings ..................................................................... |
20 |
Bluetooth ............................................................................................................................................ |
20 |
Bluetooth terms .................................................................................................................. |
20 |
Bluetooth Manager ............................................................................................................ |
21 |
Bluetooth Phone Manager ................................................................................................. |
21 |
Connect to a computer via Bluetooth ................................................................................. |
22 |
Bluetooth device profiles .................................................................................................... |
22 |
Create, end, and accept a Bluetooth partnership .............................................................. |
23 |
Rename a Bluetooth partnership ....................................................................................... |
23 |
Pair and unpair devices ..................................................................................................... |
24 |
Connect to a Bluetooth Headset ........................................................................................ |
25 |
Make a device discoverable .............................................................................................. |
25 |
Open Bluetooth settings .................................................................................................... |
25 |
Authorization to access services ....................................................................................... |
25 |
Use a passkey or bond ...................................................................................................... |
25 |
Set a Bluetooth shared folder ............................................................................................ |
26 |
Bluetooth Stack 2.0/EDR ................................................................................................... |
26 |
Advanced settings .............................................................................................................................. |
27 |
Connect to intranet URLs .................................................................................................. |
27 |
Change an intranet URL .................................................................................................... |
27 |
Set up proxy server settings .............................................................................................. |
27 |
Set up a Wireless Access Point (WAP) gateway ............................................................... |
27 |
Configure advanced proxy settings ................................................................................... |
28 |
Advanced connection settings ........................................................................................... |
28 |
Set up a VPN server connection ........................................................................................ |
28 |
Change a connection group name ..................................................................................... |
29 |
End a connection ............................................................................................................... |
29 |
7 HP Photosmart Mobile |
|
HP Photosmart Mobile ....................................................................................................................... |
30 |
Attach a voice note to a picture .......................................................................................................... |
30 |
E-mail a picture .................................................................................................................................. |
30 |
View a slideshow ................................................................................................................................ |
31 |
8 Messaging |
|
Understand messages ....................................................................................................................... |
32 |
Types of folders .................................................................................................................................. |
32 |
Synchronize e-mail ............................................................................................................................. |
33 |
Set up messaging accounts ............................................................................................................... |
33 |
Set up e-mail using Exchange server ................................................................................ |
33 |
Internet e-mail .................................................................................................................... |
34 |
Receive attachments ......................................................................................................... |
35 |
Send meeting requests ...................................................................................................... |
36 |
iv
Receive meeting requests ................................................................................................. |
36 |
Create or change a signature ............................................................................................ |
37 |
Use Messaging ................................................................................................................................... |
37 |
Compose and send messages .......................................................................................... |
37 |
Reply to or forward a message .......................................................................................... |
37 |
Add an attachment to a message ...................................................................................... |
38 |
Download messages ......................................................................................................... |
38 |
Download messages from a server ................................................................................... |
38 |
Install an online address book ............................................................................................................ |
38 |
Windows Live Messenger .................................................................................................................. |
39 |
Sign in and out of Messenger ............................................................................................ |
39 |
Send instant messages ..................................................................................................... |
40 |
Change your status ............................................................................................................ |
40 |
9 Calendar |
|
Access calendar ................................................................................................................................. |
41 |
Change the display of the work week ................................................................................................. |
41 |
Set a default reminder for all new appointments ................................................................................ |
41 |
Create an appointment ....................................................................................................................... |
41 |
Update an appointment ...................................................................................................................... |
42 |
Cancel an appointment ...................................................................................................................... |
42 |
10 Contacts |
|
Create a contact ................................................................................................................................. |
43 |
Delete a contact ................................................................................................................................. |
43 |
Change contact information ............................................................................................................... |
43 |
Copy a contact ................................................................................................................................... |
43 |
Find a contact ..................................................................................................................................... |
44 |
Send an e-mail message to a contact ................................................................................................ |
44 |
Add and remove a picture .................................................................................................................. |
44 |
Use the contact list ............................................................................................................................. |
45 |
11 Applications |
|
HP applications .................................................................................................................................. |
46 |
HP Help and Support ......................................................................................................... |
46 |
HP iPAQ Setup Assistant .................................................................................................. |
46 |
HP Asset Viewer ................................................................................................................ |
47 |
Certificate Enroller ............................................................................................................. |
47 |
Manage certificates ............................................................................................................ |
48 |
HP iPAQ Tips ..................................................................................................................... |
48 |
HP iPAQ QuickStart Tour .................................................................................................. |
48 |
HP iPAQ Zip ...................................................................................................................... |
48 |
HP iPAQ File Store ............................................................................................................ |
49 |
HP PrintSmart Mobile ........................................................................................................ |
49 |
HP SecureConnect Mobile ................................................................................................ |
49 |
HP 24-pin connector .......................................................................................................... |
50 |
Additional features of WM6.0 over WM5.0 ......................................................................................... |
50 |
Windows Media Player ....................................................................................................................... |
51 |
Windows Media Player 10 Mobile ...................................................................................... |
51 |
v
Clear the Now Playing list .................................................................................................. |
51 |
Update a Library ................................................................................................................ |
51 |
MS Office applications ........................................................................................................................ |
51 |
Word Mobile ....................................................................................................................... |
51 |
Excel Mobile ...................................................................................................................... |
52 |
PowerPoint Mobile ............................................................................................................. |
52 |
PDF viewer ......................................................................................................................................... |
53 |
Games ................................................................................................................................................ |
53 |
Bubble Breaker .................................................................................................................. |
53 |
Solitaire .............................................................................................................................. |
53 |
Internet Explorer ................................................................................................................................. |
54 |
HP Enterprise Mobility Suite ............................................................................................................... |
54 |
12 Notes |
|
Write a note ........................................................................................................................................ |
55 |
Create a copy of a note ...................................................................................................................... |
55 |
Create a voice note ............................................................................................................................ |
55 |
13 Storage cards |
|
Storage cards ..................................................................................................................................... |
57 |
Insert a storage card .......................................................................................................................... |
57 |
Remove a storage card ...................................................................................................................... |
57 |
View content of a storage card ........................................................................................................... |
57 |
14 Synchronization |
|
Synchronization software ................................................................................................................... |
59 |
Copy files ............................................................................................................................................ |
59 |
Migrate data from Palm Desktop to Microsoft Windows Mobile 6.0 ................................................... |
59 |
Wireless synchronization cost saving tips .......................................................................................... |
60 |
Troubleshoot synchronization issues ................................................................................................. |
60 |
15 Tasks |
|
Set start and due dates for a task ...................................................................................................... |
63 |
Show start and due dates in the task list ............................................................................................ |
63 |
Set options for displaying tasks on the Today screen ........................................................................ |
63 |
Mark a task as completed .................................................................................................................. |
63 |
16 Product specifications |
|
System specifications ......................................................................................................................... |
64 |
Physical specifications ....................................................................................................................... |
64 |
Operation environment ....................................................................................................................... |
65 |
17 Regulatory notices |
|
Federal Communications Commission Notice ................................................................................... |
66 |
Modifications ...................................................................................................................... |
66 |
Cables ................................................................................................................................ |
66 |
Declaration of Conformity for Products Marked with the FCC Logo (United States |
|
Only) .................................................................................................................................. |
66 |
vi
Canadian Notice ................................................................................................................................. |
67 |
Avis Canadien .................................................................................................................................... |
67 |
European Union Notice ...................................................................................................................... |
67 |
Products with 2.4–GHz Wireless LAN Devices ................................................................. |
68 |
Battery Warning .................................................................................................................................. |
68 |
Battery Recycling ............................................................................................................................... |
68 |
Battery Disposal ................................................................................................................................. |
68 |
Disposal of Waste Equipment by Users in Private Household ........................................................... |
69 |
Equipment Warning ............................................................................................................................ |
75 |
Acoustics Warning .............................................................................................................................. |
75 |
Airline Travel Notice ........................................................................................................................... |
76 |
Medical Electronic Equipment ............................................................................................................ |
76 |
Wireless Notices ................................................................................................................................. |
76 |
U.S. Regulatory Wireless Notice ....................................................................................... |
76 |
Canadian Regulatory Wireless Notice ............................................................................... |
76 |
Brazilian Notice .................................................................................................................. |
76 |
Japanese Notice ................................................................................................................................. |
77 |
Wireless LAN 802.11b Devices ......................................................................................... |
77 |
Wireless LAN 802.11g Devices ......................................................................................... |
77 |
Bluetooth Devices .............................................................................................................. |
77 |
Taiwan DGT Notice ............................................................................................................................ |
77 |
Korean Notice ..................................................................................................................................... |
77 |
18 Safety information |
|
General Precautions ........................................................................................................................... |
78 |
Safety Precautions for Power Cords and Accessories ....................................................................... |
79 |
Safety Precautions for Battery Packs ................................................................................................. |
79 |
Safety Precautions for Docking Devices ............................................................................................ |
80 |
Safety Precautions for Products with Wireless Devices ..................................................................... |
80 |
Safety Precautions for Products with Modems, Telecommunications or Local Area Network |
|
Accessories ........................................................................................................................................ |
80 |
Safety Precautions for Products with Laser Devices .......................................................................... |
80 |
CDRH Regulations ............................................................................................................................. |
81 |
19 Frequently asked questions |
|
I am having trouble turning on my HP iPAQ. What should I do? ........................................................ |
82 |
I have trouble connecting to the Internet. What should I do? ............................................................. |
82 |
Why does the HP iPAQ operate slowly at times? .............................................................................. |
82 |
Why do I see the Today screen layout error message on my HP iPAQ display screen? ................... |
82 |
I have trouble charging my battery. What should I do? ...................................................................... |
82 |
I am unable to use the ActiveSync feature. What should I do? .......................................................... |
83 |
My HP iPAQ was not connected during WMDC installation? ............................................................. |
83 |
My HP iPAQ was connected while I was installing but WMDC is not launching after |
|
installation? ........................................................................................................................................ |
83 |
Can I connect for the first time via Bluetooth? .................................................................................... |
83 |
20 Guidelines for care and maintenance |
|
Using your HP iPAQ ........................................................................................................................... |
84 |
Cleaning your HP iPAQ ...................................................................................................................... |
84 |
vii
Carrying or storing your HP iPAQ ...................................................................................................... |
84 |
21 Accessories for HP iPAQ
viii

1 Register your HP iPAQ
You need to register your HP iPAQ with Hewlett-Packard to be able to:
●Access support and services, and get the most out of your HP products.
●Manage your profile.
●Sign up for free support alerts, driver notices, and personalized newsletters.
After registering your HP iPAQ, you will receive an e-mail message regarding special offers and promotions. Visit http://www.register.hp.com to register your HP iPAQ or update your mail or e-mail address after registration. You are required to enter your user ID and registration password to edit your profile online.
1

2 Box contents
This illustration depicts the items that come in the box with your HP iPAQ.
 NOTE: Box contents might vary by model.
(1)HP iPAQ
(2)Stylus
(3)2200 mAh Li-Ion removable/rechargeable battery
(4)Getting Started CD with additional software
(5)HP iPAQ documentation
(6)AC adapter
(7)HP 24-pin connector
(8)Slip case
2 Chapter 2 Box contents
3 Components
 NOTE: Not all models or features are available in all countries/regions.
Front panel components
|
|
|
|
|
|
|
|
|
|
|
|
|
|
|
|
|
|
|
|
|
|
|
|
|
|
|
|
|
|
|
|
|
|
|
|
Component |
|
|
|
|
|
|
|
|
Function |
||
|
|
|
|
|
|
|
|
||||
|
|
|
|
|
|
|
|
||||
|
|
|
|
|
|
|
|
|
|
|
|
(1) |
|
|
|
|
|
Power Key |
Press and hold to switch your HP iPAQ on or off. |
||||
|
|
|
|
|
|
|
|
|
|
|
|
(2) |
|
|
|
|
|
Power/Wireless LEDs |
● Solid amber– Battery charging |
||||
|
|
|
|
|
|
|
|
|
|
|
● Flashing green and Solid green – One or more notifications |
|
|
|
|
|
|
|
|
|
|
|
received |
|
|
|
|
|
|
|
|
|
|
|
● Solid green – Battery charge complete |
|
|
|
|
|
|
|
|
|
|
|
● Solid Blue – WLAN or Bluetooth is on |
|
|
|
|
|
|
|
|
|
|
|
|
(3) |
|
|
|
|
|
Touch Screen |
Use to view the contents on the screen. Use the stylus to select items, |
||||
|
|
|
|
|
|
|
|
|
|
|
navigate menus, change feature settings, or play games. |
|
|
|
|
|
|
|
|
|
|
|
|
(4) |
|
|
|
|
|
Application Key 1 |
Press to launch the Messaging application. Press and hold to launch |
||||
|
|
|
|
|
|
|
|
|
|
|
the Windows Media Player. |
|
|
|
|
|
|
|
|
|
|
|
|
(5) |
|
|
|
|
|
Application Key 2 |
Press to confirm your selection. Press and hold to switch between the |
||||
|
|
|
|
|
|
|
|
|
|
|
landscape and portrait views. |
|
|
|
|
|
|
|
|
|
|
|
|
(6) |
|
|
|
|
|
5–Way Navigation Key |
Use to select items, navigate menus, change feature settings, or play |
||||
|
|
|
|
|
|
|
|
|
|
|
games. Scroll up, down, left, or right by pressing the button in the |
|
|
|
|
|
|
|
|
|
|
|
direction you want to scroll. Release the button to stop the scrolling |
|
|
|
|
|
|
|
|
|
|
|
action. Press the button to select the item highlighted on the screen. |
|
|
|
|
|
|
|
|
|
|
|
|
(7) |
|
|
|
|
|
Application Key 3 |
Press to display the Start menu on the screen. Press and hold to access |
||||
|
|
|
|
|
|
|
|
|
|
|
the Today screen. |
|
|
|
|
|
|
|
|
|
|
|
|
Front panel components |
3 |
Component |
|
Function |
|
|
|
(8) |
Application Key 4 |
Press to launch the Calendar. Press and hold to launch the Contacts |
|
|
list. |
|
|
|
(9) |
Light Sensor |
Use to detect environment light change and adjust backlight setting |
|
|
automatically in a small range by the current backlight setting. |
|
|
|
(10) |
Audio Receiver |
Use to listen during VoIP calls. |
|
|
|
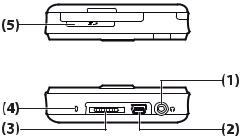
Top and bottom panel components
Component |
|
Function |
|
|
|
(1) |
3.5 mm Headphone Connector |
Plug headset into this connector to listen to audio through a headset. |
|
|
|
(2) |
Charging/Communications |
Use to connect the mini-USB charging/synchronization cable. |
|
Port |
NOTE: Mini-USB charging/synchronization cable is an optional |
|
|
|
|
|
accessory. |
|
|
|
(3) |
Docking Connector |
Use to charge your HP iPAQ using the AC adapter with the HP 24-pin |
|
|
connector. |
|
|
|
(4) |
Microphone |
Use to record voice notes. |
|
|
|
(5) |
SD/SDIO/CF Card Slot |
Insert a Secure Digital (SD) storage card, a Secure Digital Input Output |
|
|
(SDIO) card, or a Compact Flash (CF) card with the label side up for data |
|
|
storage. |
|
|
|
4 Chapter 3 Components

Left and right side components
Component |
|
Function |
|
|
|
(1) |
Stylus |
Use to select elements on the screen and enter information. |
|
|
|
(2) |
Reset Button |
Press to reset your HP iPAQ. |
|
|
|
(3) |
Voice Recorder Button |
Use to launch the Voice Recorder application. |
|
|
|
Back panel components
Component |
|
Function |
|
|
|
(1) |
Back Speaker |
Use the speaker to listen to audio. |
|
|
|
Left and right side components |
5 |
Component |
|
Function |
|
|
|
(2) |
Bluetooth Antenna |
Detects and radiates Bluetooth signals. |
|
|
|
(3) |
WLAN Antenna |
Detects WLAN hotspots. |
|
|
|
6 Chapter 3 Components

4 Set up your HP iPAQ
Step 1: Remove the battery cover
Slide the cover down and away from the HP iPAQ.
Step 2: Install the battery and replace the battery cover
1.Align the battery connectors on the battery with the housing pins in the battery compartment and insert the battery.
Step 1: Remove the battery cover 7
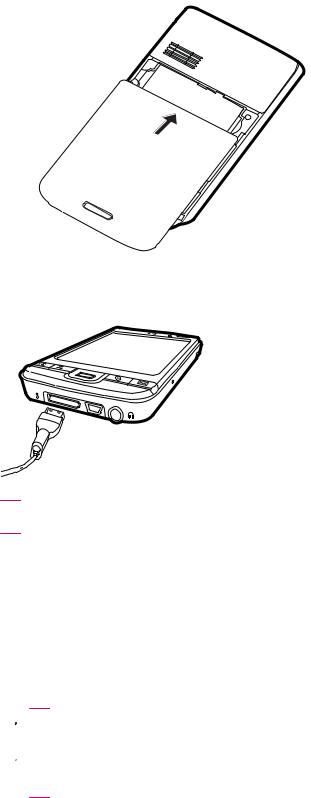
2.Place the battery cover down and slide up until it locks into place.
Step 3: Charge the battery
 CAUTION: To avoid damaging your HP iPAQ or the AC adapter, make sure all connectors are properly aligned before connecting.
The battery provides power for your HP iPAQ to operate. Your HP iPAQ comes with a HP 24-pin connector synchronization cable, which must be used to charge the device.
It takes approximately 2–4 hours to fully charge the battery for the first time. Subsequent charges might take longer.
1.Connect the AC adapter to an electrical outlet.
2.Connect the HP 24-pin connector end of the HP 24-pin connector synchronization cable to the Docking connector on your HP iPAQ. The cable connector fits only one way. If the connector does not insert easily, turn it over.
 TIP: You can also charge the battery by connecting your HP iPAQ to a USB port on your computer using the HP 24-pin connector synchronization cable.
 NOTE: Whenever a replacement battery is inserted into your HP iPAQ, press the Power key for at least two seconds. In case the device does not turn on, attach the AC adapter to turn on your HP iPAQ.
8 Chapter 4 Set up your HP iPAQ
Step 4: Turn on your HP iPAQ
Press the Power key to turn on your HP iPAQ. Next, follow the instructions on the screen to complete the setup. Use the on-screen keyboard to enter information.
Protect your HP iPAQ with a password
You can secure the data on your HP iPAQ by setting a password. Each time you turn on your HP iPAQ, you will be prompted to enter the password.
To set a password:
1.Tap Start > Settings > Lock.
2.Select the Prompt if device unused for check box, and select the time that your HP iPAQ must be unused before you are prompted for a password.
3.In the Password type list, select the type of password you would like to use. Enter the password, and then confirm the password.
4.On the Hint tab, enter a phrase to help you remember your password. Make sure that your hint does not allow others to guess your password. The hint is displayed after the wrong password is entered five times in a row.
5.When prompted, tap ok. The next time your HP iPAQ remains unused for the specified amount of time, you will be prompted to enter your password.
 TIP: Follow the steps above to change or reset your password.
Find the serial and model number
Locate the serial and model numbers before contacting HP Customer Support, particularly if you are calling for in-warranty support.
View the serial number and model ID by tapping Start > Programs > HP Help and Support > Serial and Model Number.
You can also find this information next to the battery of your HP iPAQ. To locate the serial number:
1.Remove the battery cover.
2.Locate the label containing the serial number next to the battery.
View status icons
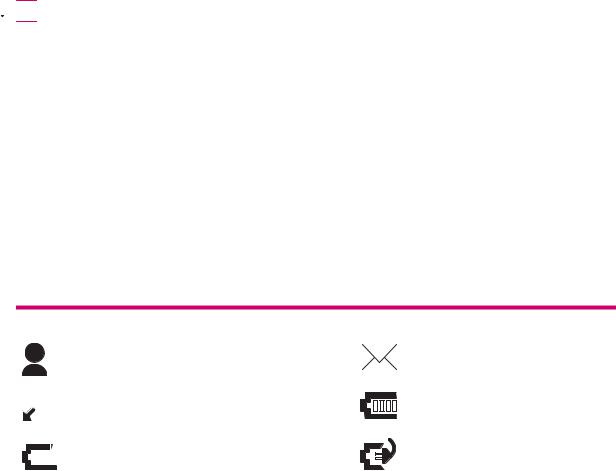
The following table lists the common status indicators and their meanings.
Icon |
|
Status |
Icon |
Status |
||||
|
|
|
|
|
|
|
|
|
|
|
|
Instant message received |
|
|
|
|
New e-mail |
|
|
|
|
|
|
|||
|
|
|
|
|
|
|
|
|
|
|
|
|
|
|
|
|
|
|
|
|
Sync error |
|
|
|
|
Battery level |
|
|
|
|
|
|
|||
|
|
|
|
|
|
|
|
|
|
|
|
|
|
|
|
|
|
|
|
|
|
|
|
|
|
|
|
|
|
Battery level low |
|
|
|
|
Battery charging |
|
|
|
|
|
|
|
||
|
|
|
|
|
|
|
|
|
|
|
|
|
|
|
|
|
|
Step 4: Turn on your HP iPAQ |
9 |

Icon |
Status |
Icon |
Status |
|
No battery or battery fault |
|
Bluetooth |
|
Bluetooth off |
|
WLAN off |
10 Chapter 4 Set up your HP iPAQ

5 Learn the basics
Get started with your HP iPAQ by learning basic functions such as knowing the Today screen, entering text, and synchronizing data.
The Today screen
The Today screen displays the date and time and provides a quick status of the remaining battery capacity and upcoming appointments. At the top of the Today screen, the connectivity icons, volume indicator, and clock are displayed.
From the Today screen, tap the  (iPAQ Wireless) icon to open the iPAQ Wireless application. On the All tab, you can turn all wireless connections on/off.
To customize the Today screen:
1.Tap Start > Settings > Today.
2.On the Appearance tab, select the required theme for the background of the Today screen.
3.On the Items tab, select the items to appear on the Today screen.
 TIP: To move the order in which the items appear, tap Start > Settings > Today. On the Items tab, tap Move Up or Move Down.
Use TodayPanel Lite
Icon |
Name |
Function |
|
TodayPanel Lite |
Use to change the TodayPanel Lite options or the |
|
|
Today screen settings. |
|
Battery power |
Use to view the amount of remaining battery power |
|
|
on your HP iPAQ. Set the standby period, time |
|
|
duration for turning off the HP iPAQ, and USB |
|
|
charging method. |
|
Main memory |
Use to view the amount of available main memory |
|
|
on your HP iPAQ. View, activate, and stop all |
|
|
running programs from this screen. |
|
Storage memory |
Use to view the amount of available storage |
|
|
memory on your HP iPAQ. View, activate, and stop |
|
|
all running programs from this screen. |
|
Backlight |
Use to view and change the backlight options on |
|
|
your HP iPAQ. |
To use TodayPanel Lite, tap the required icon, make the necessary changes, and tap ok.
The Today screen 11

You can change the TodayPanel Lite icons to compact mode, which allows more space on the Today screen. You can also change the memory and storage settings to display as percentages instead of file sizes.
To change the TodayPanel Lite icons to compact mode:
1. |
Tap the |
(TodayPanel Lite) icon > Options to open the TodayPanel Lite application. |
|
2. Tap the Display Mode list and select Compact.
To display memory and storage as percentages:
1. |
Tap the |
(TodayPanel Lite) icon > Options to open the TodayPanel Lite application. |
|
2.Tap the Display Memory as list or the Display Storage as list and select the percentage listed.
3.Tap ok.
To remove the TodayPanel Lite application from the Today screen:
1.Tap Start > Settings > Today > Items.
2.Clear the TodayPanel check box and tap ok.
For more options, visit http://www.rhinocode.com to upgrade to TodayPanel.PRO.
Battery saving tips
You can adjust the settings on your HP iPAQ to fit your individual needs and to help your battery last as long as possible between charges. Here are some recommendations to conserve battery life:
●Sounds – Every time you are notified of an event, battery power is consumed. Tap Start > Settings > Personal >Sounds & Notifications to turn off any unnecessary notifications.
●Auto Turn Off the Backlight – Tap Start > Settings > System > Backlight. Specify a short amount of wait before turning off the backlight. On the Battery Power tab, set Turn off backlight if device is not used for to 10 seconds.
●Turn off Bluetooth and WLAN – Always turn off Bluetooth and WLAN when not in use.
HP also offers a variety of accessories to keep your HP iPAQ charged when you are out of the office for extended time periods. These include the mini-USB synchronization cable and travel adapter. Use original HP batteries and chargers to charge your HP iPAQ.
To check the battery power, tap Start > Settings > System > Power.
The 5–Way Navigation key
The 5–Way Navigation key is used to navigate the menu system, change feature settings, or play games. It is also used to scroll up and down a list and select a required function.
TIP: Up and down are your primary movements while navigating within menus or through the Contacts list. Move left and right to change the feature settings and edit text. Press the button to select the item highlighted on the screen.
Lock and unlock your HP iPAQ
You can lock your HP iPAQ to prevent accidental key presses while you carry your device.
12 Chapter 5 Learn the basics
 NOTE: When your device is locked, you can still receive e-mail notifications and see appointment reminders.
To lock your HP iPAQ:
On the Today screen, tap Device unlocked. To unlock your HP iPAQ:
On the Today screen, tap Unlock. Now, your iPAQ is unlocked and ready for use.
Enter text
Based on your preference, you can use the on-screen keyboard or a handwriting recognition feature such as Block Recognizer, Keyboard Letter Recognizer, or Transcriber to enter text.
1.Tap Start > Settings > Personal > Input.
2.On the Input Method tab, select a text input method and change options as appropriate.
3.Tap ok.
You can now go to a program (such as Notes) and start entering text.
Text-Input Method |
Definition |
|
|
Block Recognizer |
Use a single stroke to write letters, numbers, symbols, and |
|
punctuation marks that get converted into typed text. |
|
|
Keyboard |
Tap keys on the keyboard to enter text. |
|
|
Letter Recognizer |
Write individual letters, numbers, and punctuation marks that |
|
are converted into typed text. |
|
|
Transcriber |
Write in cursive, print, or mixed handwriting (consisting of both |
|
cursive and print), and convert your writing into typed text. |
|
|
|
TIP: Change the text input method from within any program by tapping the |
(Input Selector) |
|
arrow and selecting an input method. |
|
Shortcut menus |
|
|
A shortcut menu is displayed when you tap and hold an item. This menu displays the most common commands for the specific item. For example, you can delete an appointment by using commands on a shortcut menu.
When the shortcut menu displays, tap the action you want to perform.
To close a shortcut menu without performing an action, tap anywhere outside the menu.
Enter owner information
Enter your personal information, such as your name and address, so that the HP iPAQ can be returned to you if it is lost.
1.Tap Start > Settings > Personal > Owner Information.
2.On the Identification tab, enter your personal information.
Enter text 13

TIP: You can edit the owner information directly from the Today screen.
Perform a soft reset
A soft reset stops all running applications, but does not erase any programs or saved data.
 NOTE: Be sure to close all running applications before performing a soft reset.
To perform a soft reset:
1.Locate the recessed Reset button on the HP iPAQ.
2.Use the stylus to lightly press the Reset button.
Perform a hard reset
A hard reset stops all running applications and erases any program which you have installed or saved data.
To perform a hard reset:
1.Press the Application Key 3, Application Key 2, and the Voice Recorder button simultaneously and hit the Reset button once.
2.Press and hold the Application Key 3, Application Key 2, and the Voice Recorder button until
Clean boot is displayed at the bottom of the screen.
View the Operating System (OS) information
Tap Start > Settings > System > About.
The Version tab displays important device information, including the type of processor and the amount of available memory.
Change the device name
The device name is used to identify your HP iPAQ in the following situations:
●Synchronizing with a computer
●Connecting to a network
 NOTE: If you synchronize multiple devices with the same computer, each device must have a unique name.
To change the device name:
1.Tap Start > Settings > System > About > Device ID tab.
2.Enter a name. The device name must begin with a letter, consist of letters from A to Z and numbers from 0 to 9, and should not contain spaces.
Change the regional settings
The style in which numbers, currency, dates, and times are displayed is specified in regional settings.
14 Chapter 5 Learn the basics

To change the regional settings:
1.Tap Start > Settings > System > Regional Settings > Region.
2.Select a region.
The region you select determines the options available on the other tabs.
3.To customize additional settings, tap the tabs given below to display the required options:
●Region
●Number
●Currency
●Time
●Date
Adjust the volume
You can change the volume for various sounds, such as the sound you hear when you tap program names and menu options.
1.Tap the  (Speaker) icon at the top of the screen.
2.Move the system volume slider on the screen to the required volume level.
3.To mute system sounds, tap Off.
You can also set a specific sound for a specific event.
1.Tap Start > Settings > Personal > Sounds & Notifications.
2.On the Sounds tab, choose how you want to be notified by selecting the appropriate check boxes.
3.On the Notifications tab, in the Event list, tap an event name and choose how you want to be notified by selecting the appropriate check boxes. You can choose from several options, such as a special sound, a message, or a flashing light.
 NOTE: Turning off sounds and the LED notification helps conserve battery power.
Change power management settings
1.Tap Start > Settings > System > Power.
2.Tap Advanced and select the length of time the HP iPAQ should remain on when using battery power or external power.
Dim or adjust brightness of the backlight
You can set the backlight to dim after a specified amount of time has elapsed.
1.Tap Start > Settings > System > Backlight.
2.Tap Battery power or External Power.
3.Select the backlight options of your choice.
Adjust the volume 15

You can also increase or decrease the brightness of the backlight.
Move the slider near the 


 (Backlight) icon to increase or decrease the brightness. You can also change the brightness by tapping Start > Settings > System > Backlight > Brightness.
Install and remove programs
To install programs on your HP iPAQ:
1.Use a HP 24-pin connector synchronization cable to connect your HP iPAQ to your computer.
2.Follow the instructions in the Installation Wizard provided with the program you want to install.
3.Check the screen on your HP iPAQ to see if any further steps are necessary to complete the program installation.
To remove programs from your HP iPAQ:
1.Tap Start > Settings > System > Remove Programs.
2.Select the check boxes for programs you want to remove, and then tap Remove.
 NOTE: By removing a program from your HP iPAQ, you can increase available memory on the device.
If programs are lost from your HP iPAQ for any reason, most of them can be re-installed using any synchronization software. See Synchronization software on page 59 for more information.
Open and close programs
You do not need to exit a program to open another or to conserve memory. The system manages memory automatically.
To open a program, tap Start, and then select the required program from the list. If you do not see the program you want to launch, tap Start > Programs.
In most cases, selecting x or ok will close an application but will not stop the application from running in memory. However, you can close it manually.
1.Tap Start > Settings > System > Memory > Running Programs.
2.From the Running Programs list, tap the program you want to close, and then tap Stop.
Set alarms and clocks
To set alarm on your HP iPAQ:
1.Tap Start > Settings > System > Clock & Alarms > Alarms.
2.Tap <Description> to enter a name for the alarm.
3.Tap a week day to set the alarm. You can also set the alarm for multiple days.
4.Tap Time and set the time for the alarm.
5.Tap the 

 (Alarm) icon to specify the type of alarm. You can choose a single sound or a repeating sound.
6.If you choose to play a sound, tap the list next to the Play sound check box, and then tap the sound you want to set.
16 Chapter 5 Learn the basics
To set time on your HP iPAQ:
1.Tap Start > Settings > System > Clock & Alarms > Time.
2.Select Home to set the time zone, local time, and date when you are in your home country. Select Visiting to set these options while traveling.
Display the clock in title bar
When viewing certain programs, the clock might not be displayed in the title bar. To display the clock in the title bar at all times:
1.Tap Start > Settings > System > Clock & Alarms.
2.On the More tab, tap to select the Display the clock on the title bar in all programs check box.
Adjust the speed for scrolling through items in a list
To change the scrolling speed:
1.Tap Start > Settings > Personal > Buttons > Up/Down Control.
2.Under Delay before first repeat, move the slider to reduce or increase the time that elapses before scrolling begins.
3.Under Repeat rate, move the slider to change the time it takes to scroll from one item to the next.
Display the clock in title bar 17

6 Connections
You can use your HP iPAQ to connect to and exchange information with other handheld devices, your computer, various network types, or the Internet. Following are the ways to get connected:
●WLAN
●Bluetooth
You can access all these connection types by tapping Start > Settings > Connections.
WLAN
With wireless access, you do not need to use cables to connect your HP iPAQ to the Internet. Instead, access points transmit data to and from your wireless device. Your HP iPAQ can connect to an IEEE 802.11b/g device or connect directly to other WLAN-enabled devices.
With WLAN, you can:
●Access the Internet
●Send and receive e-mail
●Access corporate network information
●Use Virtual Private Networks (VPNs) for secure remote access
●Use hotspots for wireless connectivity
On the Today screen, tap the  (iPAQ Wireless) icon to access the WLAN features.
 NOTE: Use of dial-up and wireless Internet, e-mail, corporate networks, and other wireless communications, such as Bluetooth devices, might require separately purchased additional hardware and other compatible equipment, in addition to a standard WLAN infrastructure and a separately purchased service contract. Not all Web content might be available. Some Web content might require installation of additional software.
WLAN terms
It is recommended that you become familiar with the following terms as you begin to use WLAN technology.
Term |
Definition |
|
|
802.11 standard |
An approved standard specification of radio technology from the Institute of Electrical and |
|
Electronics Engineers (lEEE) used for wireless local area networks (WLANs). |
|
|
Device-to-computer or ad-hoc |
A mode that does not use access points. It provides independent peer-to-peer connectivity in |
|
a wireless LAN. |
|
|
Domain Name System (DNS) |
The way that Internet domain names are located and translated into IP addresses. It is easy |
|
to remember name for an Internet address. Every Web site has its own specific IP address |
|
on the Internet. |
|
|
Encryption |
An alphanumeric (letters and/or numbers) conversion process of data primarily used for |
|
protection against any unauthorized people. |
|
|
18 Chapter 6 Connections

Term |
Definition |
|
|
Hotspots |
Public or private areas where you can access WLAN service. These wireless connections can |
|
be located, for example, at a library, cyber cafe, hotel, airport lounge, or convention center. |
|
This service can be free or sometimes requires a fee. |
|
|
Infrastructure |
This connection mode uses wireless access points to connect to networks. |
|
|
Automatically connect to a WLAN network
When you turn on the WLAN radio, your HP iPAQ automatically detects WLAN networks that are broadcasting their signals. If your WLAN network is not set to broadcast, then you have to connect to it manually. Before trying to connect to a WLAN network, determine if authentication information is needed by contacting your network administrator.
1.Tap the  (iPAQ Wireless) icon.
2.Tap the  (WLAN) icon to turn on WLAN.
3.Once the HP iPAQ detects a WLAN network, you are asked to choose if you want to connect. Select the network you want to connect to and tap Connect.
Manually connect to a WLAN network
A wireless network can be added manually by entering the settings information to add the network. Before trying to connect to a WLAN network, determine if authentication information is needed by contacting your network administrator.
1.Tap the  (iPAQ Wireless) icon.
2.Tap the  (WLAN) icon to turn on WLAN.
3.Tap Start > Settings > Connections > iPAQ Wireless > WLAN > View WLAN Networks >
Wireless > Add New…
4.Enter the Network name.
5.Choose a connection method. Select The Internet to connect to the Internet through an ISP or select Work to connect to a company network. You should select Work if the network requires a proxy server.
6.Tap Next.
●To use authentication, select the authentication method from the Authentication list.
●To use data encryption, select an encryption method from the Data Encryption list.
●To automatically use a network key, tap The key is automatically provided, else enter the
Network key and Key index.
 NOTE: To delete a connection, tap Start > Settings > Connections > iPAQ Wireless > WLAN > View WLAN Networks > Wireless. Tap and hold the connection you want to remove, and then tap
Remove Settings.
WLAN 19

Find an IP address
1.Tap the  (iPAQ Wireless) icon.
2.Tap the  (WLAN) icon to turn on WLAN.
3.Connect to a network automatically or manually by tapping Start > Settings > Connections > iPAQ Wireless > WLAN > View WLAN Networks > Network Adapters.
4.Select a WLAN network. The WLAN IP address is shown here.
Delete a wireless network
You can delete networks you manually entered. However, if a network was automatically detected, you cannot delete it.
To delete an existing or available wireless network:
1.Tap the  (iPAQ Wireless) icon.
2.Tap the  (WLAN) icon to turn on WLAN.
3.Tap WLAN > View WLAN Networks > Wireless.
4.In the Configure Wireless Networks box, tap and hold the network you want to delete.
5.Tap Remove Settings.
Configure the 802.1x authentication settings
Before performing these steps, determine if authentication information is needed by contacting your network administrator.
1.To manually enter information, tap Start > Settings > Connections > iPAQ Wireless > WLAN > View WLAN Networks > Network Adapters.
2.In Wireless networks list, select the network you want to configure.
3.For increased security, select the Use IEEE 802.1x network access control check box. Then, select the appropriate EAP type.
Bluetooth
Bluetooth wireless technology is a short-range data communication technology. It uses frequency hopping in timeslots and has the ability to simultaneously handle both data and voice transmissions. Bluetooth signals avoid interference from other signals by hopping to a new frequency after transmitting or receiving a data packet. Therefore, this technology is robust, cost-effective, and replaces cables connecting devices assuring high levels of security.
Bluetooth terms
It is recommended that you become familiar with the following terms as you begin to use Bluetooth technology.
Term |
Definition |
|
|
Authentication |
Verification of a numeric passkey before a connection or activity can be completed. |
|
|
20 Chapter 6 Connections
Loading...